


MrSimon
-
Posts
1,732 -
Joined
-
Last visited
-
Days Won
6
Content Type
Profiles
Forums
Blogs
Gallery
Events
Exhibition Layout Details
Store
Posts posted by MrSimon
-
-
My first Blue Peter Badge! Thanks Cameron! (note corrugated aesbestos/iron made from tinfoil pressed against a microsol lid)
Today I managed some pictures in day light of the tram cottage. It needs weathering then I think it’s done.
It’ll be bedded in with some grass/bushes to look like it’s slowly fading into the landscape.
Lots to do!
Simon
-
 5
5
-
-
Hello everybody!
I had a go at finishing off the tree but it looked a little like a weird stick had fallen in the candyfloss machine… so I went to 4D this morning!
The tree isn’t as big as the one I was making, but that’s ok, it’s just a younger tree. I think if I hadn’t swapped the planned ploughed field for a woods (made of 4D trees) the tree I’d made would have been fine.
This afternoon I fitted it and then built the rest of the porch round it:
Here’s the end piece I built ages ago before I originally started to put off finishing the tree
Here’s the front view with the floor built. Once it’s set it will need to be painted then I can finish off the final painting and detailing… I probably spent longer on the Tube today than fitting and building round the tree.
Lots to do!
Simon-
4
-
-
I made a cradle for the smaller motor out of plasticard and small bolts and then araldited the motor to it to shape.
I’m two minds about swapping the motor out for a Nigel Lawton one - but when I’ve finished sulking at it and sorted out the quartering and the fixed the rod I bent I might not need ti stronger motor…-
1
-
-
Hi,
I used a 3-390 14t spur gear after finding the 13t didn’t reach - there wasn’t any calculation there I was just trying what was in my box. It works ok (although the chassis is currently in the sulking tin after a slight rods mis-hap…)
Hope that helps
Simon
-
Hello everybody!
I think I’ve got the base layer of painting done on the cottage now, but I can’t paint it any further without building the porch, and I decided it really needed a tree growing through it…
Ages ago I built this armature and then stopped when I got stuck. Now there’s the added problem of the site for the cottage being next to a load of 4D trees so this one needs to look at least as good

Here’s the roof from above. My plan is to do the best job I can on the tree, and if it doesn’t look good enough I’ll butcher a 4D one to approximately the same shape. Then finish off the veranda and get painting.
Lots to do!
Simon
-
3
-
-
-
Hello everybody!
It’s been a while since I updated this, I thought much more recently than this… obviously Covid has sent work crazy and the modelling time/brain space I’ve had has been mostly spent on the buildings for Gresby…
There have been some bits of progress though:
This is reaching the final sprint! I need to do the detail painting and add transfers to the lower half of the body. The other end wagon is also progressing but I’m not sure if I’ve got the etch right/neat. I’ll weather them as a 5 in approximately 19 years when I’ve built the other three.
A quick job on my first day off for Christmas - I made a CT dummy from two units that need repairing. These have had the Tomix coupling fitted so they can run with a 156/153.
My present to myself was a non-running 142 from Hattons second hand. It needed a new gear (right) as seen here with the new gear (left) for comparison. It runs ok now and I’m just thinking about repainting options…
Talking of repainting 142s, I’ve made a start on the Merseyrail one that came in the autumn. First up I’ve painted out the printed on destination panels and glossed the panels where the new transfers are going. Later jobs will include painting dirt onto the chassis and repainting the roof to correct the shape around the cab front.
Lots to do! Happy New Year everyone!!
Simon
-
6
-
-
Did your order come yet?
-
On 30/12/2021 at 12:04, TomE said:
I hope Health & Safety don't see that!
Tom.Maybe it could form part of the exhibition instead of the usual ‘how many cows are there’ - ‘how many breaches of the health and safety at work act can you see…?’
It’s definitely the second door held open like that on Gresby, maybe the third!
21 hours ago, DavidMcKenzie said:Looks brilliant, all those little life like features like the door held open really bring the models to life. I hope you are enjoying the holiday period.
All the best,
Dave
Thanks Dave, hope you are too! It’s all about the smaller details for me (but without it getting crowded) - enjoying watching your new one develop!!
There has been a bit of painting over the last 24h, green won the toss and now the tram is looking much more like an abandoned holiday cottage:
Quite a bit more painting left to do on this, some glazing, graffiti, dirt, rust, and moss. There’s also a tree in the cupboard that I need to finish so it can grow through the porch…
Lots to do! Happy New Year everyone
Simon
-
4
-
-
Hello everybody, Happy Christmas!
I’ve just sat down for a little Christmas modelling time, and finished a building already so time for a little round-up:
This got painted and fitted sometime in December. I went a bit overboard with the grass, but it’s not too massive when it’s fitted
Doubt this will ever be noticed in any pictures of the layout (although I might investigate photo layering so it appears in a few shots)
The final job was to make and fit the open door on the workshop. I’ve got a figure in mind to stand in the doorway but I can’t find him at the moment…
As per Gresby standard it’s held open with a fire extinguisher. So that’s the building finished, it’s taped into some card now and in the ‘finished stuff to go on the layout’ box.
The next building to finish was already on my desk, it’s lived on the desk in it’s little case for years:
The cottage. The first thing I did after taking this was pull as much of the roofing off as possible. It was far too thick - I think that’s why it stalled
I covered the rest over with rizlas. I think I’ve only got painting and weathering to do on this side, and I need to finish the veranda and make a tree for the other.
Lots to do!
Simon
-
7
-
 1
1
-
-
Hi Robert, I’d recommend some of the vinyl lining tape cut down for load straps - Duncan put me onto it and it looks really effective.
Great work on the cubes! Good luck on the Autoballasters…
Simon
-
 1
1
-
-
I’ve got a picture of my grandad on leaning out the window at Nottingham station on the way to the fa cup final in 1959 and the coach still had LMS on it
-
On the east coast you had to stop smoking and move out of the compartment before the train passed Berwick as Scotland banned smoking first. There was a partition in coach M and coach B on the 225s after the Mallard refurbs to reduce the amount of smoking accommodation from a whole coach to just a little area.
I can’t tell if it went the same time as the smoking ban in England or sooner
-
On 01/12/2021 at 13:29, A. Bastow said:
Progress!
Love it when things work as intended.
I showed off the drawings for some L&Y wagons the other day and I have now made a successful test print of the Dia.62 covered goods. The Dia.3 will be the next one, followed by the Dia.1.
When I have proved that they work and fit on the association etches, I’ll get them listed on the 3d printing section of the 2mmSA website.
These look great, can’t wait! -
Hello everybody!
On the homeward stretch for this building… bit of hidden detail

I can’t remember what my thinking was, but it seems to come from the taller building and out.
I even remembered having the platform thing in a drawer, just needs painting…
Lots to do!
Simon
-
5
-
-
Hi Simon
Love that you’re doing this livery - top of my wish list! Really impressive bit of masking there, can wait to see it completed
Keep up the good work!
Simon
-
1
-
-
Hello everybody!
I put this aside a few days while I got on with some other bits, I’ve just got the door and some weeds to do then that’s a building complete, the bit that goes in the sunken area can follow but doesn’t affect this bit until it’s time to fit it:
Painted the fence green because this doesn’t feel like a grey fence kinda place
The barbed wire makes it feel really inviting for the staff having a cheeky fag
And there we are, only 5 years to finish!
Lots to do
Simon
-
8
-
-
Hi Nigel,
Thanks for the tip - I’m going to go with the muff method to keep the front driver in line (but I’ve made a note for my next chassis about not smoothing the bearings until I know where the valve gear is going…)
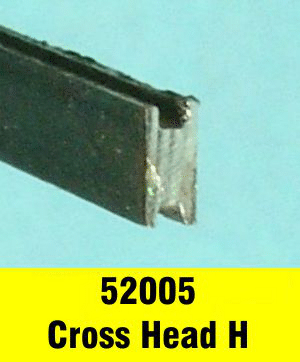
Would the cast cross head Simon’s mentioned work on the Ivatt? Also, I can’t find motion pins in the association shop, so these come from somewhere else these days?
Many thanks
Simon
-
Thanks Simon!
I’ve gone onto the members area and found the article - impressive and simultaneously terrifying modelling there!! I’m looking forward to getting stuck in to it! It’ll be interesting to see if I can swap out the front bearings for ones not filed flush without breaking the chassis apart, as that was the first thing I read in the article where I’ve done different (and having seen the pictures in the article I can see why leaving the front bearing not-flush with the frame is a good idea)
Is this the crosshead?
I need to turn down the bits of rod before I get as far as the cross head…
Thanks again
Simon
-
Hello everybody!
Despite having a week on the scenery I seem to have done a lot of soldering…
First, I fitted the brakes to the Jinty chassis. Once the solder hardened (I don’t know if that’s a thing but I always let it set) I cut the wires joining the halves of the chassis, and it still runs! The chassis is now complete except for the paint, which is next.
This year I decided to start a new 2mm loco every time I finish a chassis, so I started this following the completion of the 4F:
It’s a Nigel Hunt Dapol 262 tank chassis. Here’s the outside of the frames cleaned up
The inside, which always looks messy. The PCBs are strange shapes to clear the bearings and the brake holes
The basic chassis in one piece. Three chassis ago this was a really scary process getting a chassis this far - this time wasn’t daunting, but having read the instructions this is going to be a learning curve!!
While I had the soldering iron out I made a wagon chassis:
This Farish fish van had seen service on an exhibition layout or two, but has now been retired (mostly due to its agricultural couplings…)
So it received an etched chassis, fitted with wooden solebars. I’ve just noticed I need to wrap the arm around the vac cylinder, and the prototype pics I’ve seen show I need to put some sort of backing behind the louvres to give a sort of double layer…
There’s another wagon chassis waiting for all the parts I forgot to order, I’ll show you next time
Lots to do!
Simon
-
3
-
1
-
-
The finish on the coaches is incredible - love the worn wood on the guards door! Do you have a secret recipe for painting the teak?
Thanks for sharing!
Simon
-
2 hours ago, eastwestdivide said:
Yonks ago, near Blackheath/Lewisham, there was a graffiti "Happy New Year" that disappeared with the summer weed growth and reappeared in late autumn, just in time to wish everyone a happy new year again!
I love that! My favourite one always used to be on the train from Wigan to Liverpool and on a massive block wall someone had coloured in the blocks to read PIES. It warmed my heart every time I went past-
1
-
-
Hello everybody,
Bit of work this morning, I built the slope in front of the graffiti:
Then once the glue set I painted it, grassed it, and fitted the first part of the railway fence.
At least Bren will always know it was there hahahaha. I’ve deliberately not fitted the rest of the fence as that will need to join up with the fence on the other baseboard so it can wait until the next blockade… I’ll paint these two panels though.
News just in: I’ve glued down the second building and added some details to the yard. I was going for more bushes but these ones are a little rubbish!! Feels a little cheesy leaving out a penny for scale
Next up is painting the metal fences, matt varnishing all the glue marks, and making a door for the hole… still plenty to do but this is looking more and more finished
Lots to do
Simon
-
9
-
-
Hello everybody!
I was off today so had a field trip to 4D in London, I got the last of the trees for the woods and some plastruct ready made handrail - it felt like cheating!
The new handrail, I had to lay some of the grass yesterday as that’s going to be a tricky bit to get into.
The handrail painted and the concrete fence posts had a second coat. I need to work out how the chain link fence joins the palisade fence along the trackside, but I found pictures a few pages back of the landform on the track side of this building.
Unfortunately: a) I need to peel up a bit of this grass to finish the bank to match the other board, and b) Bren and all her friends were reminded that her Deano couldn’t do Ns every time they took the train to Sheffield…
Lots to do!
Simon
-
8
-


Mr Simon's N and 2mm Workbench - pg29> N V1 2-6-2, 2mm L&Y class 23, assorted wagons and stuff
in Kitbuilding & Scratchbuilding
Posted · Edited by MrSimon
Added the photos back
Hello everybody!
It’s been a while since the L&Y tank was on here, I did a bit of prevaricating (as usual) before getting on with building the bottom end of the firebox/boiler. I glued it on tonight.
I’m not sure if there’s anything I won’t try to bodge with Slaters brick plasticard….
Next up is to clean the spilled glue, stick the rivets and some pipes on then it’ll be time to add the steps and buffer beams.
Lots to do!
Simon