

James Hilton
-
Posts
2,623 -
Joined
-
Last visited
-
Days Won
1
Content Type
Profiles
Forums
Blogs
Gallery
Events
Exhibition Layout Details
Store
Posts posted by James Hilton
-
-
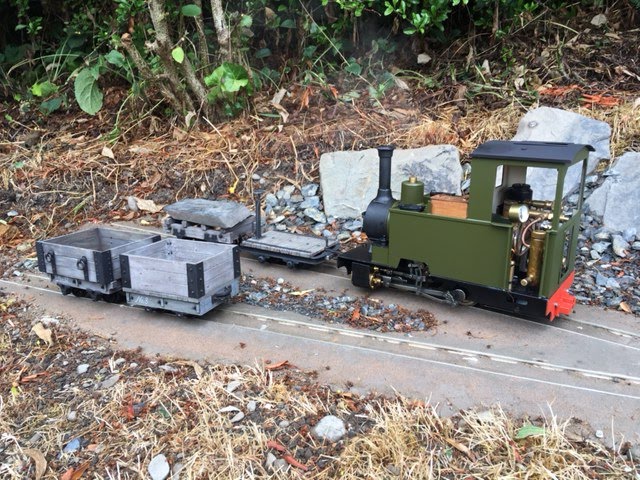
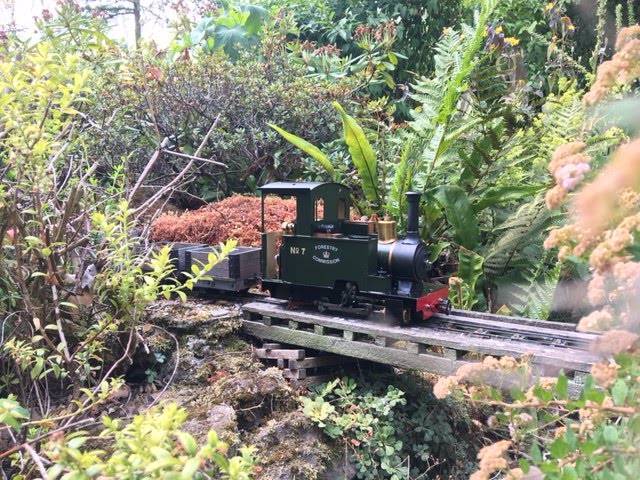
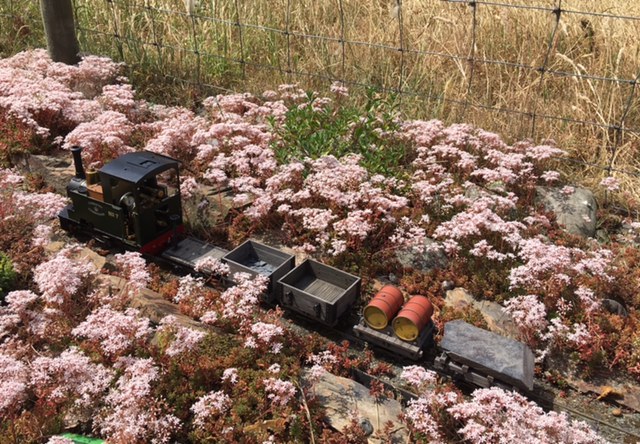
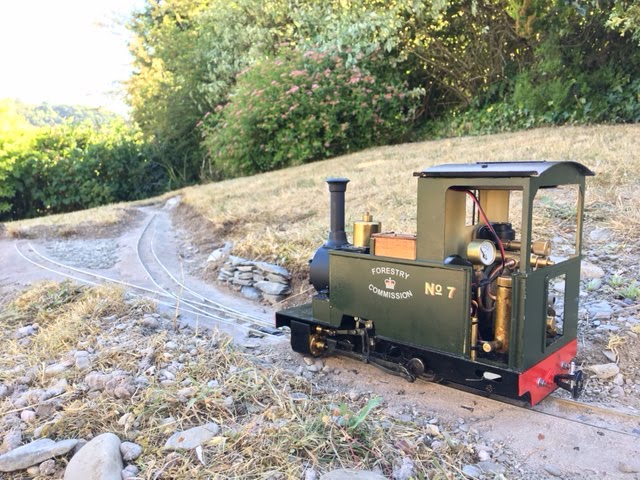
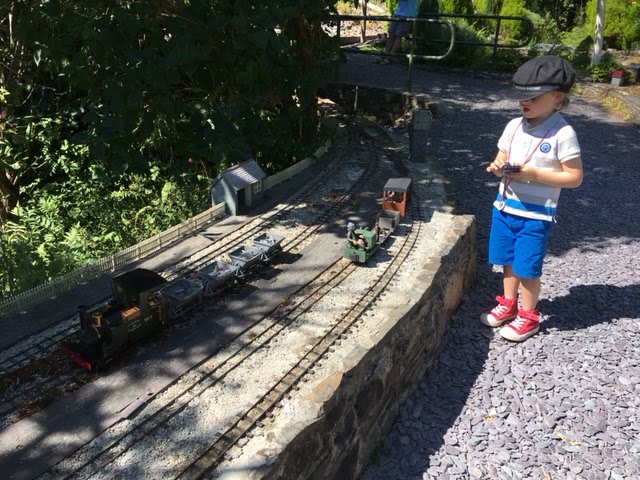
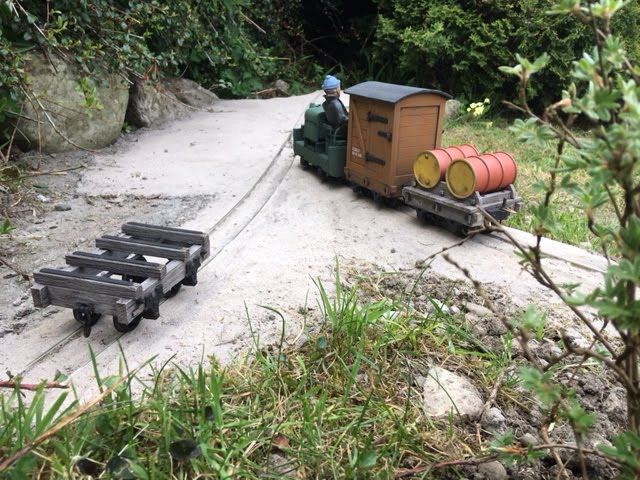
This morning I couldn't resist a bit of a 'coffee break' steam up. These days I work from home so this is easily possible, the only danger is it taking a little longer than a cup of coffee...
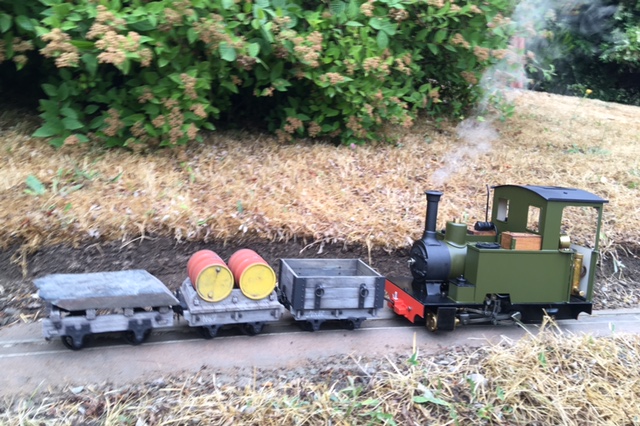
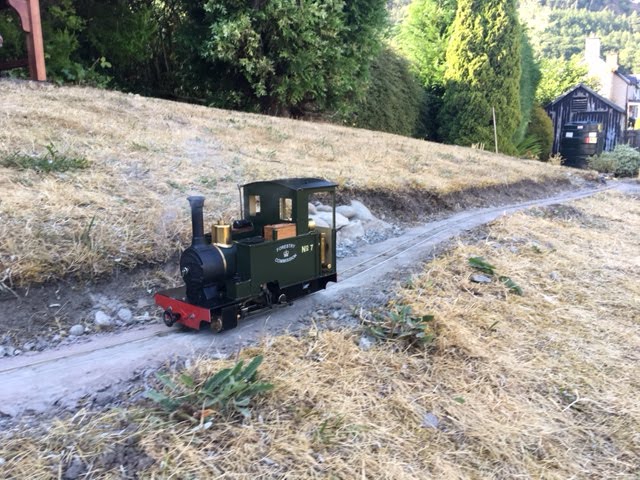
I was excited to see how the locomotive performed after I'd resprayed it, and to see it in the garden again. Suffice to say it works well still, and the paintwork survived intact. It's lighter shade looks great, and the new buffer beams look much more at home, and in fact the lighter shade of red I have used works really well in the garden.

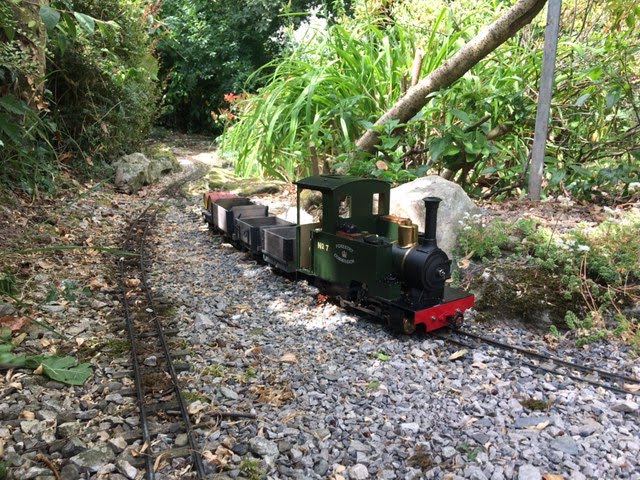
I played as if it was an indoor model railway, shuffling wagons between the wharf, mill and quarry. A few tweaks are required to couplings and I need to remember they work better in certain combinations but no real problems and lots and lots of fun!
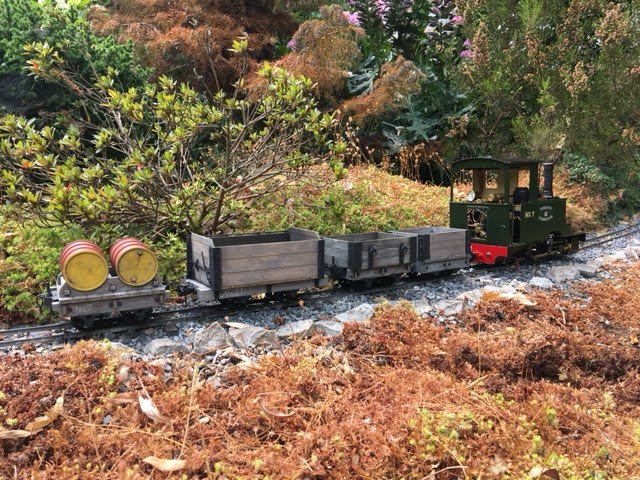
The engine looks great with the toned down finish... these two shots show how realistic the garden can be - can you believe I only built the railway in the spring!
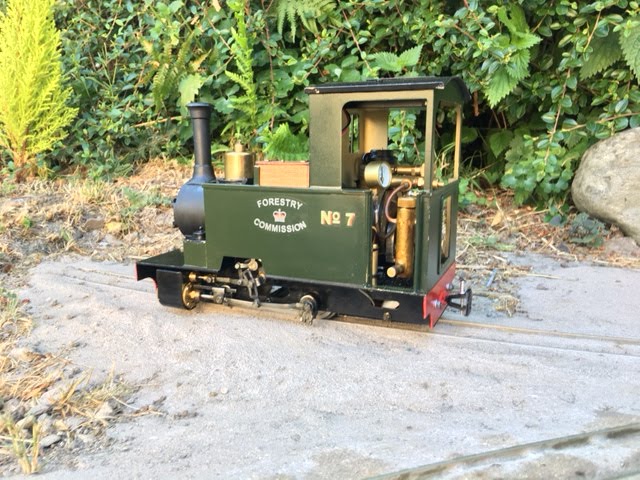
I must get around to cutting some glass for the windows, and I can't wait to add the finishing touches and add a little dry brushing to the model to bring it to life.
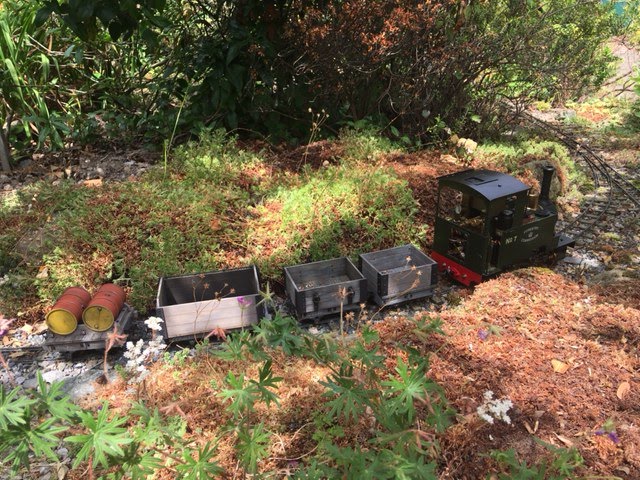
Sorry for yet more photos, but it was fun playing and they're taken really to help me start to plan out more scenic detail in the near future.
More soon...
-
 3
3
-
-
When I bought my new live steam engine I always intended on making a few changes to better suit my own line, back story and preferences...
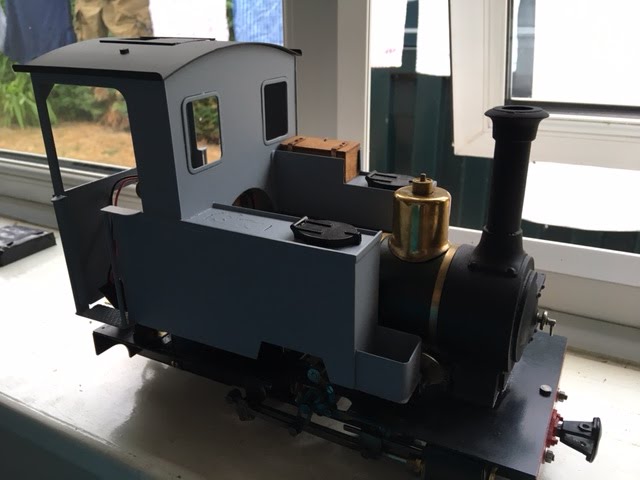
So when I got home from John's I stripped the body off, paint stripped the cab and tanks, removing the decals and then primed in grey. So far so good, and beginning to think about other changes I'd like to make. My intention was to retain the wooden box and turbo generator that Peter had made, but to add my own touches to the finish.
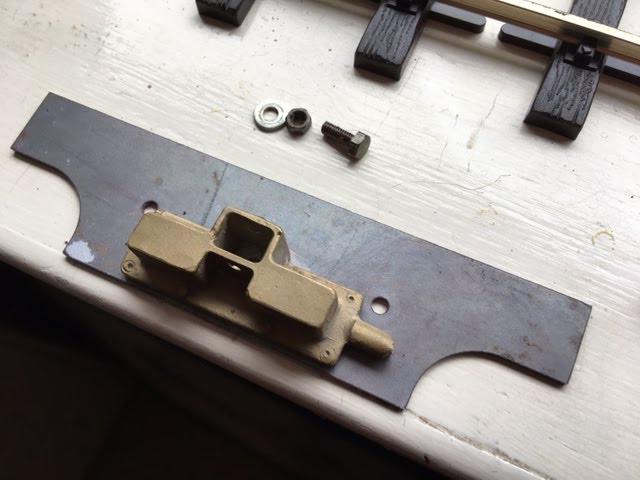
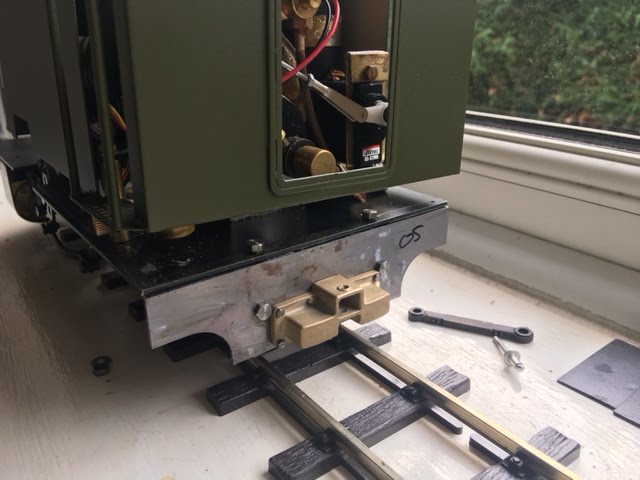
The first was to replace the bell mouth couplers with something more in keeping with a 18" locomotive. These coupler pockets are from Model Earth and were for the Hunslet Jack project. I called in to Steve Milner who helped by drilling and fitting then for me.

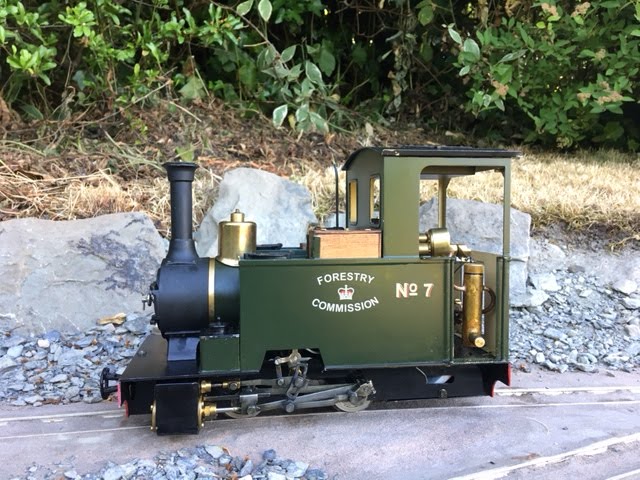
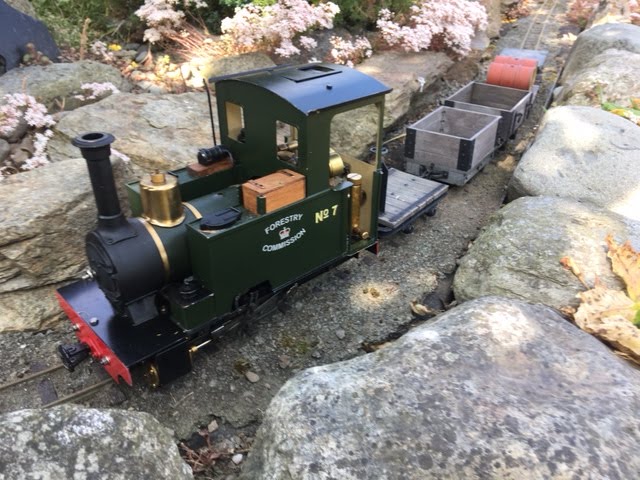
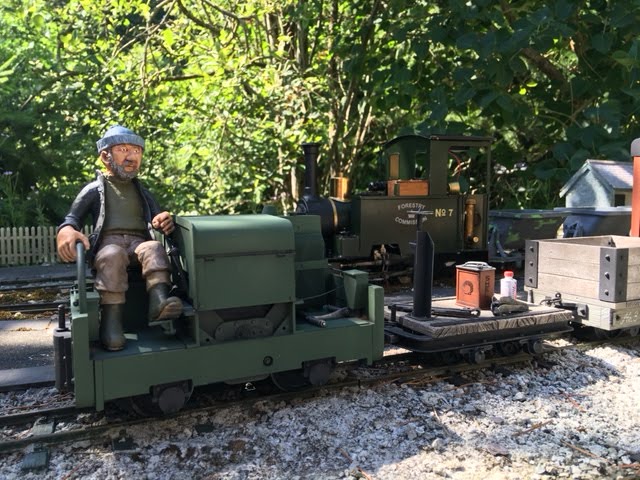
The bodywork was resprayed, unfortunately I realised I'd bought the wrong shade of green, lighter than the original, so the boiler wrapper was also painted to match, which had the advantage of painting the bands and dome too...
The roof was painted in matt black, and the buffer beams will be satin red. I plan to fit a driver, with minor surgery, so here you can see George Batty (from Model-earth) posed next to the locomotive. I am also going to fit a whistle to the cab front, a few tools and a bucket of sand for the footplate. Here I am beginning to like the somber appearance of the transformation. Finishing touches will be the Andrew Barclay works plates sourced from Narrow Planet.

More soon...
-
1
-
-
A few weeks ago I was lucky to be invited to visit John Wenlock's garden railway. John is member number 3 of the 16mm society (I believe) and his line is wonderfully integrated into the garden...
I took along my 7/8ths stock for a run, and enjoyed the lower loop, and despite appearance a fun and challenging drive with a few gradients and a sharp turn to contend with. My engine behaved itself and the stock looked good in and amongst the greenery.
John hand build his track and it looks superb, it's certainly given me ideas if I ever extend the tramway, so I could represent 18" gauge track with scale 7/8ths sleepers.

A very pleasant afternoon and thanks to John for his hospitality! More soon...
-
2
-
-
After the excitement of bringing my first steam engine home, and then running it on a friend's line, I was waiting on some sundries to get running at home...
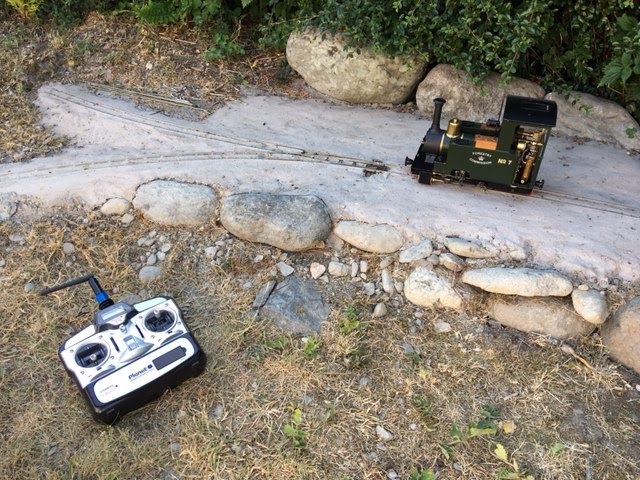
I needed a bottle of gas and filler needle, I needed a water bottle and syringe and I needed steam and lubricating oils... so once these all arrived it was out to the garden for a test run. Here you can see the locomotive warming up on a summer's evening a few weeks ago alongside the Radio Control handset.
For those unfamiliar with live steam there is an order and nice gentle mindful pace to raising steam. I started with draining the condensate from the lubricator, and then refilling with steam oil (this is the long tall cylinder in the cab doorway, drained at the bottom, filled at the top). Once done, I oil the moving parts. The dome is removed, and the safety valve unscrewed to reveal the boiler filling port, fill to the brim and remove circa 25ml from this Roundhouse Billy boiler. Finally the gas, check it's switched off in the cab, remove the roof and press down firmly on the gas tank with the filling needle. Remove when it starts to blow clouds off gas off. The last thing to check before lighting up is the R/C is working.
To light, turn on the gas on, and hold a lighter near the chimney. Once it's lit it may blow itself out so listen until it's a steady roar, back it off a little and go and get your rolling stock ready. In about 15 minutes you'll have 20-30psi on the gauge. I am still very new to this, so I've yet to manage to keep it there from the off, usually topping out at 40psi and blowing steam through the safety valve. Turn the gas down a touch, turn on the R/C hand unit, then the R/C on the loco and ease the reverser, then open the regulator...
And you're off... the first run at home was great fun. The tramway is a challenge despite it's relative short length with gradients up and down, along with sharp corners. I had a massive smile on my face all evening... more soon...
-
1
-
-
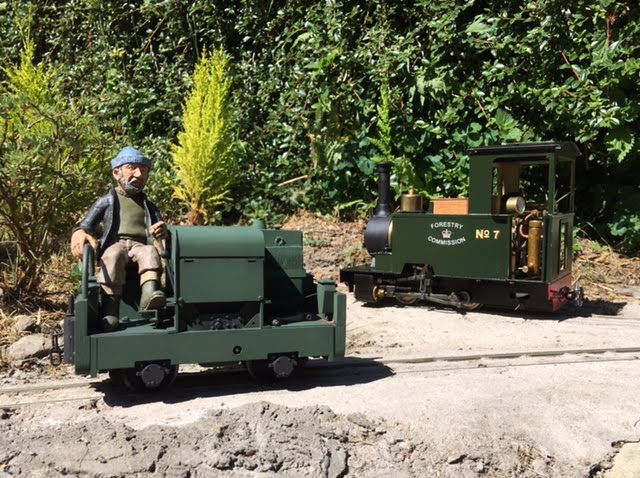
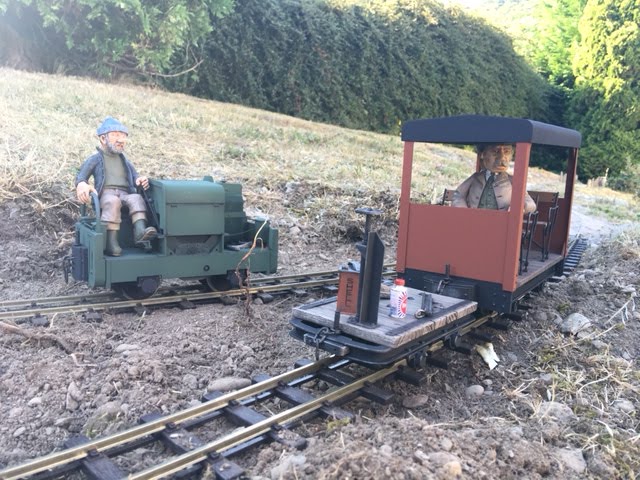
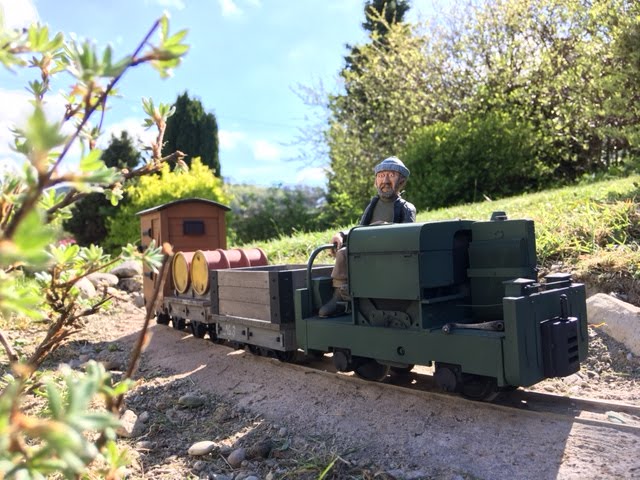
Today I steamed my new locomotive for the first time since I brought her home at the weekend... my neighbour Paul had a small gathering at his place, we had 4 of us there, alas I was the only 7/8ths modeller...
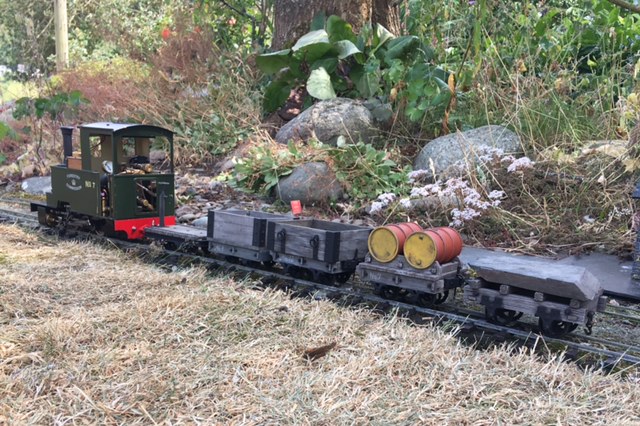
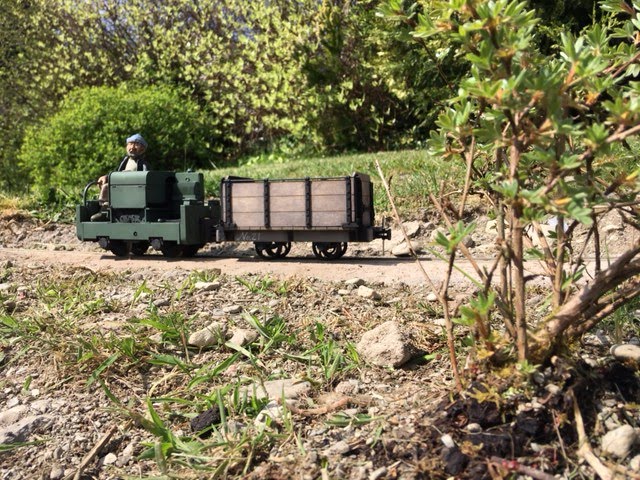
Paul's line is quite a challenge to drive smoothly with lots of gradients, and the foliage is shall we say, well established. Once this had been cleared and a few troublesome bits of track seen to, I had a reasonably uneventful run of about 25 minutes. I reckon I can run with the gas turned down even lower so should manage over 30 minutes steaming easily on my own line. I took a selection of stock, all based on Model-earth budget trucks, which looked at home and behaved themselves, despite some of the damage done to Paul's line by a marauding sheep and the hot weather!
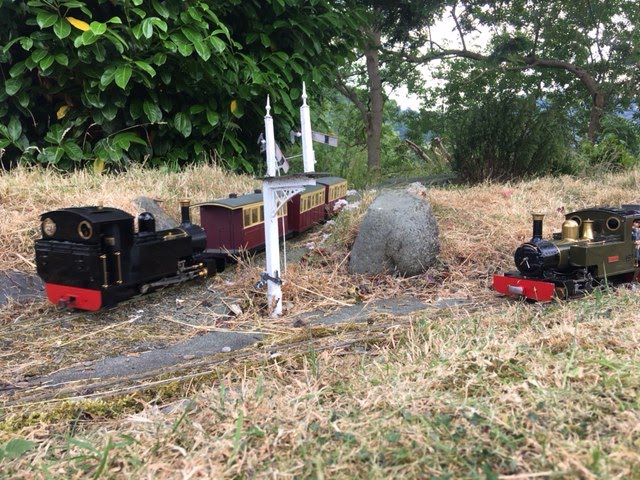
The final shot shows a a pair of Lady Anne's (the black one belonging to John and his lovely hand made coaches coasts down hill into the station, whilst the green one belonging to Paul sits on the old loop line having a rest after running first.
Good to run trains and talk with nice chaps in the sunshine. More soon I hope!-
3
-
-
For as long as I can remember I've always wanted to be a train driver, and own my own steam engine. Day dreaming, model making, garden railways, narrow gauge and now a professional career all centred around the subject, it seemed it may never happen, especially with my chosen scale of 7/8ths, I'd even thought about getting one in 16mm and running only at friends houses...
As the Dyfrdwy Tramway is relatively short, yet uphill, I wasn't certain a steam engine was sensible, but Paul, my neighbour kindly let me drive his locomotive a few weeks ago and I got a feel for what might be possible. Then David Mees invited me to his railway as Peter Bakke (a fellow 7/8ths modeller) was popping along to collect some wagons. Peter offered to bring down his Simply Seven Eights steam engine, as I'd been asking about it as I was wondering about building my own... Anyway one thing led to another and I ended up travelling to Dave's on Saturday with a heavy wallet and returning with my very own steam engine. It's based on a reliable Roundhouse Billy chassis and boiler and is RC. I am in love, although the lettering will be removed soon, and I'll tidy it up a little, I'm keeping the lovely Land Rover green colour. It is a lovely runner, very smooth to drive, quite powerful and well behaved.
Back on the tramway, the ballast was dry on the extension so I got out the stock for a play with my son, and we drove trains and shunted for an hour or so on Sunday morning. It was good fun and the stock behaved itself on the most part, being propelled up the gradient (for safety reasons, the locomotive must always be on the downhill end of the train on the tramway).
The stock looks good together, and the finish is fairly consistent despite me completing them separately over the past 6 months. I can't wait to get the stuff to steam my new engine at home. Most of the stuff should arrive this week, but I still need to get a syringe for the water and some gas.
Finally a shot of the Simplex and the engine, that will be sporting Andrew Barclay plates soon, as it's similar to a quad of locos exported to North Africa in 1909. More soon...
-
1
-
-
At the weekend I took the kids to visit Dave Mee's W&LLR, a lovely mature 16mm scale line near Betws-y-coed. Despite being usually just 16mm I was joined by Peter Bakke from Aberdeen (!) who had brought down his Simply Seven Eights locomotive, Swift Sixteen Simplex (lovingly modified into an open example) and picking up a pair of bolsters from the US...

My son enjoyed driving the Simplex and a few wagons around the yard before being let loose on the mainline. In this photo you can see the bolsters and Simplex belonging to Peter, in the ballast as Peter runs on 45mm gauge.

The Dyfrdwy Tramway train didn't look too out of place in slate quarry, when other items that gave away the scale discrepancy were not in shot.
Here is my son driving the Simplex, whilst Peter's engine sits on the main...
The Simplex with steam engine behind...

Finally the steamer with my flat wagon to show how it looks with a Model-earth budget skip wagon chassis...
We had a lot of fun, and David and friends were very welcoming. It was SOOO hot and the kids did well... Alex and I drove steam engines, and came away with something exciting... more on that shortly...
-
2
-
-
When I started out in 7/8ths I bought a Swift Sixteen flat wagon to gauge the size of the scale. As the Model-earth items began to be built the relative size of the SS flat got me thinking about building some sort of coach...
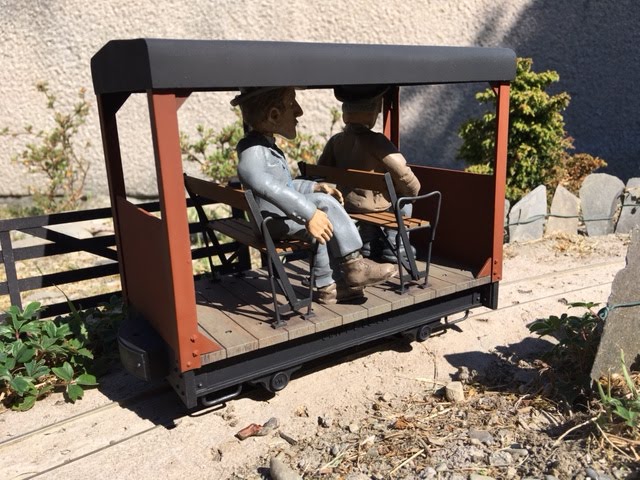
As I've said before, the Dalmunzie estate railway was a real inspiration behind some of the atmosphere I'm trying to recreate in the garden. The Motor Rail coach I built in 006.5 was upscaled and fitted perfectly on the chassis. Since it last appeared it has now been fully painted, chassis is black, wooden deck, black chair metal work, varnished seat slats and a satin brown paintwork to the coach ends.
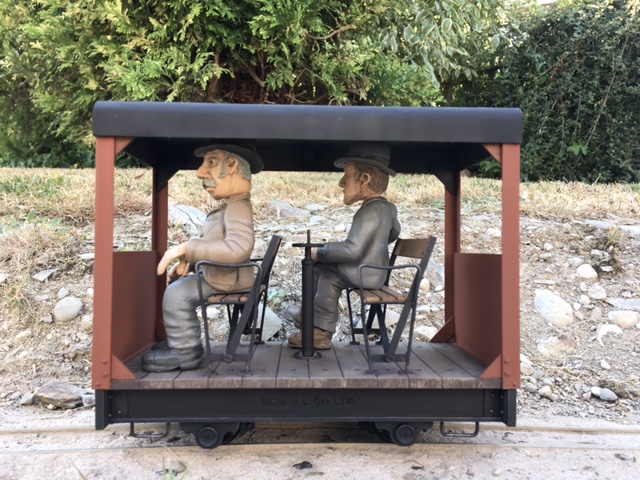
The owner of the tramway sits at the front, his general manager, a thin spindly mean sort of chap sits behind... both figures from Model-earth.

The coach is quite narrow, as seen by this end on shot, this is the compromise by using the SS flat, and of course I'm running on 18" gauge, whereas the Dalmunzie used something nearer 2ft6in if I recall. The under frame and seat arms have been weathered by drybrushing with gun metal paint.
Here the finished coach is seen with the runner wagon and the Simplex in the mill siding, prior to finishing of the extension. More soon...
-
1
-
-
I never intended to extend the railway this year, but the good weather, the plans for the rest of the garden and a renewed enthusiasm for 7/8ths (which saw the coach finished - more on that later) meant that the idea to add a bit of operating interest came to be...
The plan was simple, add two more 'stops' to the line representing the mill (half way) and siding, and the quarry (end). On the real Deeside tramway slab was brought down the line to the mill because there wasn't a water supply at the quarry to power the slab cutting machines. The same premise is followed on the Dyfrdwy Tramway, and eventually I hope to add a small mill building. The quarry should feature a small office, and the slate wharf will have the main office and loading crane.
The ground was broken, turf cut out, a little of the garden dug out and a foundation of cement and sand/ballast compacted and levelled. The Peco SM32 track was laid upon this, and the alignment and level checked. This new section is uphill, so I wanted to ensure it was fairly consistent as well as level from side to side. Once this had been achieve with packing I covered the sleepers and buried the rails with Rowlands mix (cement, sand, peat). This time with less peat, as I was worried about the strength of the trackbed on this section.

Finally, I built a small stone wall at the mill, another example of what I'm hoping to achieve with the scenic finish along the whole tramway. More soon...
-
4
-
-
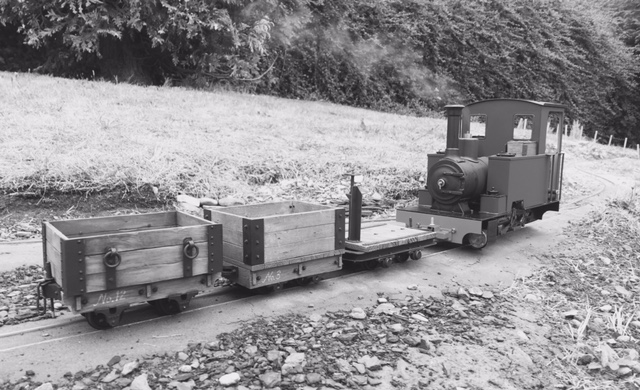
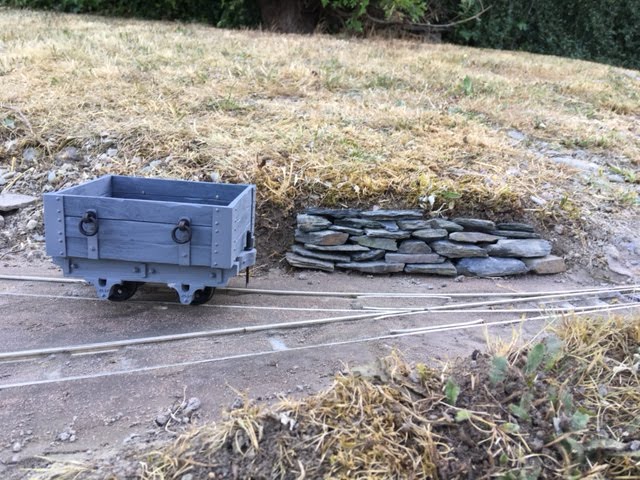
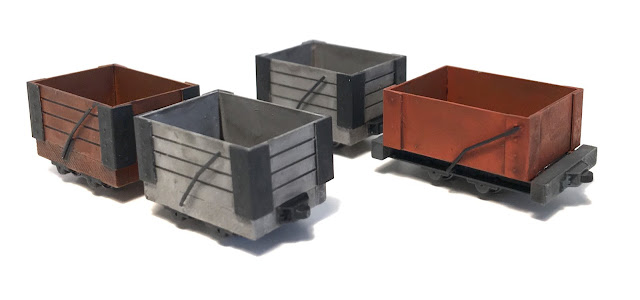
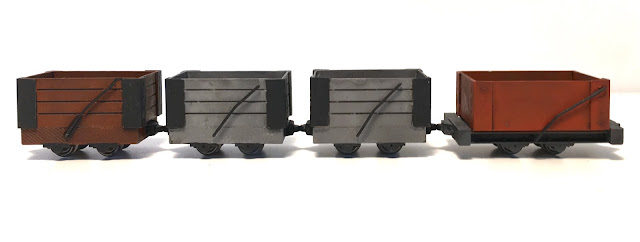
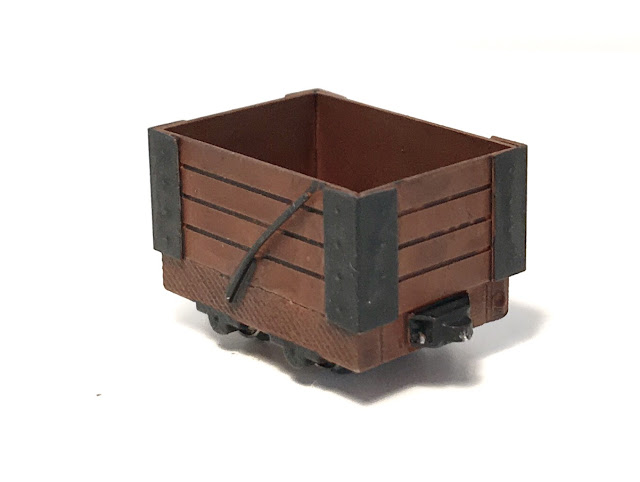
The Dyfrdwy Tramway modified a number of the early slate wagons in the early 20th century but building new 'container' bodies. This made transhipment of slate from the narrow to standard gauge, or even lorry, a lot easier.
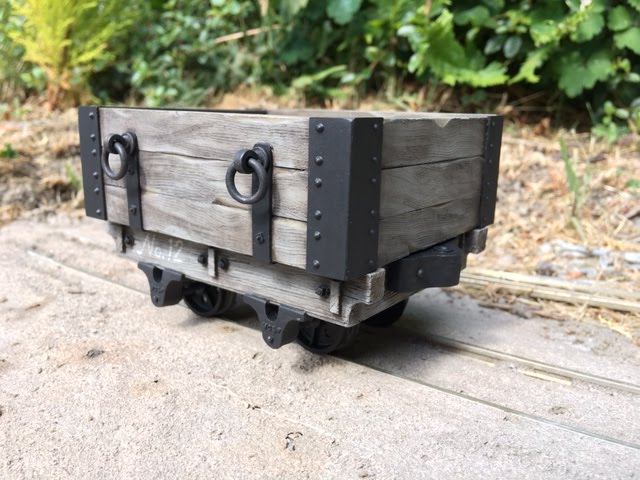
Records are scarce, but it is assumed around twenty bodies were made, and ten of the old wagons stripped down to their chassis and modified to allow these to fit. The bodies were three planks high, and included corner re-enforcement like the earlier wagons (this may well have been re-cycled on some the bodies), as well as straps with eye lift rings that spanned the wagon from side to side.
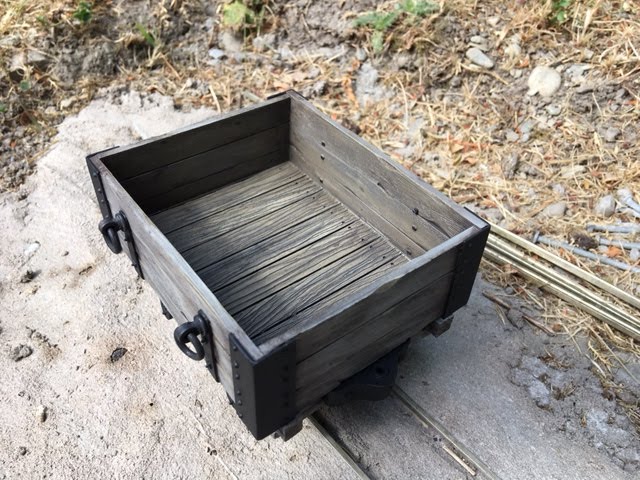
The inside was as flat as possible with nuts slightly countersunk to reduce damage to slates during transit. The wagons chassis and body were painted light grey, ironwork was black. The inside was left unpainted.
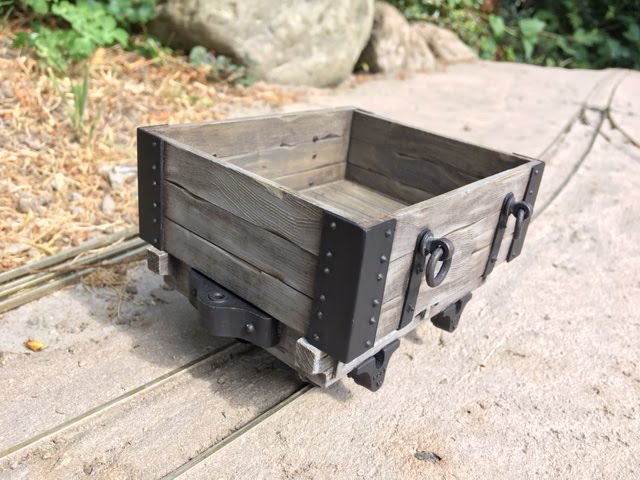
The wagons continued in service until the end of the tramway in the 1960s, this example is modelled on a well used wagon and body, and will shortly be joined by a second, nearly identical wagon to allow me to represent this important early containerisation in miniature on my own garden tramway. More soon...
-
The new '6point5' models catalog will shortly be available, and as part of that I'm really excited to share plans for the next models in the range...
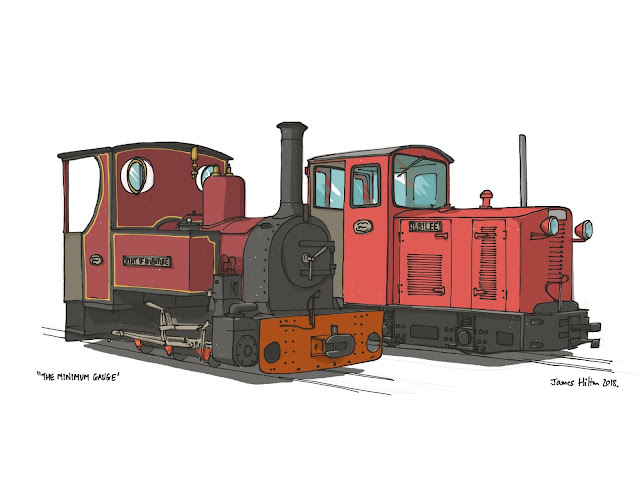
Following the success of 'Jubilee', the 15" gauge Perrygrove Hunslet-Jenbach diesel the next releases will be focused upon Estate and miniature prototypes. The range will include an Exmoor style 0-4-0t, Alan Keef inspired coaches and a small range of estate wagons with typical loads (a stationary engine, a pair of oil drums, a tool box). More soon...
(If anyone would like a print of the illustration I can provide these for £12 each on high quality art board delivered free in the UK - get in touch using the contact form on the website or a messenger system).
-
2
-
-
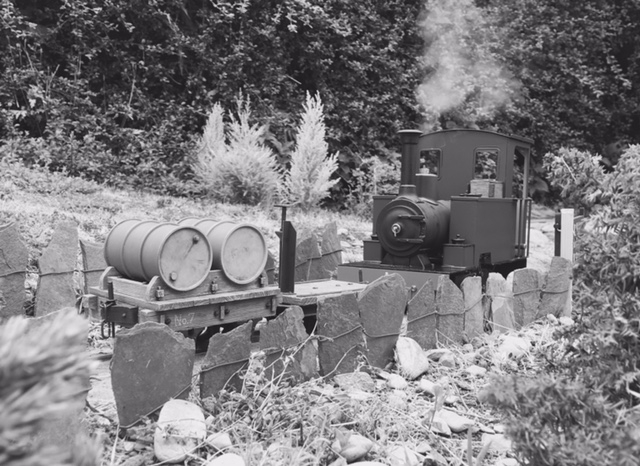
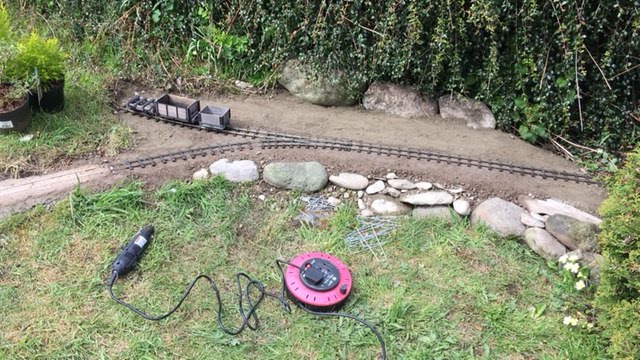
The Dyfrdwy Tramway has, since I finished phase 1, ended in a pile of rocks at the edge of the lawn...

My Model-earth slab wagon seen here posed during the start of phase 2, yes we're good to go for the quarry... First step was to modify the path onto the lawn and build a low rubble/boulder wall, so this was done in fairly quick measure and track ordered for the big push.

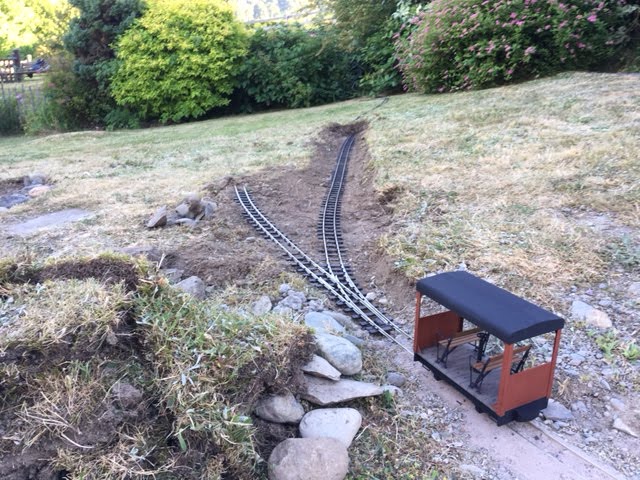
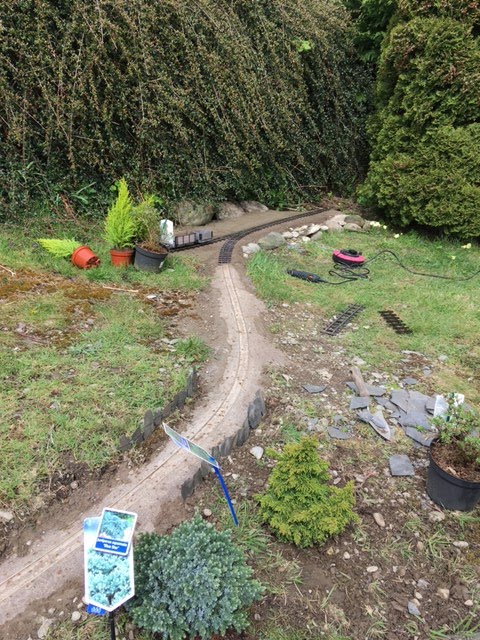
I started mocking up using the last 3 lengths of flex-track I had - the plan was to install a point a the current limit of operation for the mill siding, the slab mill being used to cut up the slate from the quarry, which has no appropriate water supply (readers may see a parallel with the real Deeside tramway here). From here the line will continue uphill across the garden to finish in a quarry. Track ordered from Hattons it was delivered in 24 hours and cutting of turf could commence...

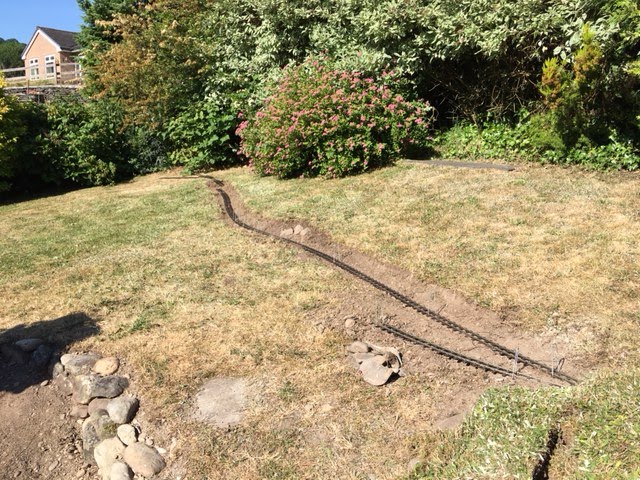
Unfortunately it coincide with a heat wave so I've only been able to work first thing in the morning and in the evening but even so in less than 24 hours we've made it across the lawn. The line here is on a slight uphill gradient, but weaves a little to try and minimise the climb. The bushes in the corner need to be pruned before work on the quarry can commence. Above you can see the coach (itself nearing completion) at the end of the current tramway as track is laid... and below the extent of track as of this morning...

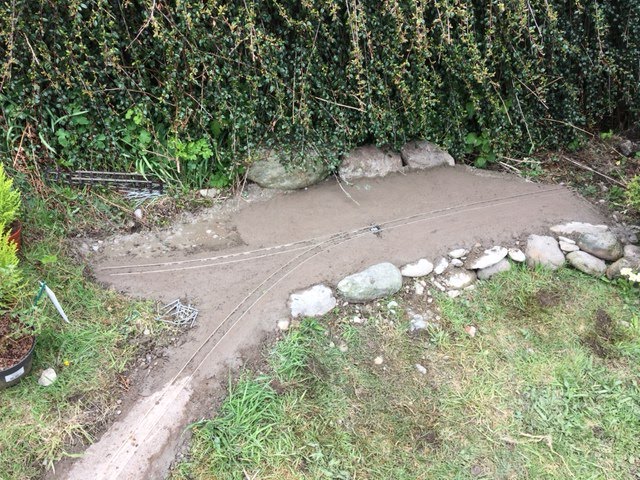
The plan is to cut the quarry in, build up the ground for the Mill, and use some rock to build a few retaining walls in places, before then adding a foundation of sand and cement, laying the track for good, and then using Rowlands Mix again to bury up to the sleeper tops. More soon...
-
4
-
-
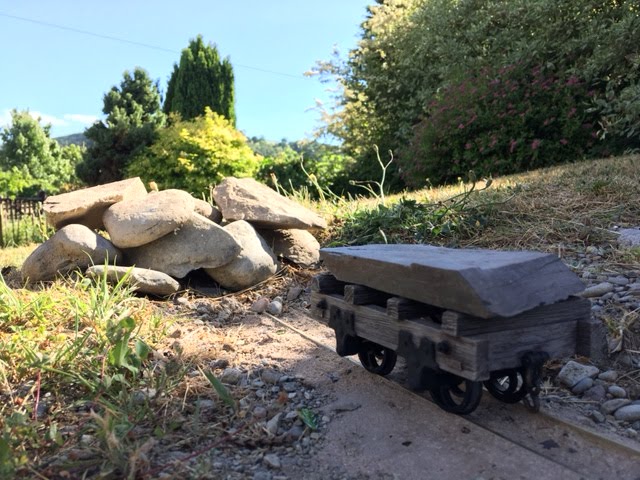
I've been lucky enough to work on this lovely model of a Royal Arsenal workshop tool wagon in 7/8ths scale for a friend and customer of 'James Hilton Custom Model Railways' in the past few weeks...
To see the model before I started check out the last photo... the above shows the finished wagon outside on my Dyfrdwy Tramway before heading back to it's owner. The model is scratchbuilt largely in wood, using various metal fixings and details (some from Talisman castings) and custom turned wheels. The axle boxes and wheel inserts were laser cut in layers and glued together. Truly lovely model making. It came to be pristine, and I wanted to preserve a little of the finish and quality of the build whilst breathing some life into it...
I started by using a craft knife to carve away at the sides and inside ends of the wagon body to give the impression they had been rounded smooth though wear and life. Once this was done I smoothed with very fine wet and dry before painting started. The first step was a wash of Humbrol oil paint, kept quite thin, and rubbed off on the deck and edges. Once dry, I used a dirty black to pick out the metalwork. The wagon was then given a dirty brown wash, rubbed off quickly to leave a build up around bolt heads in in some of the grain.
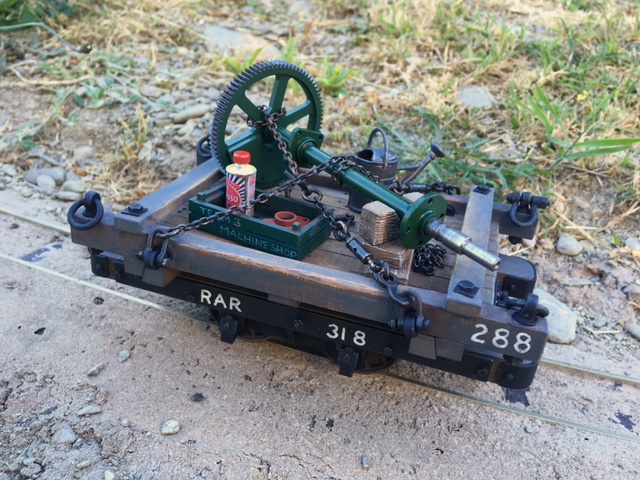
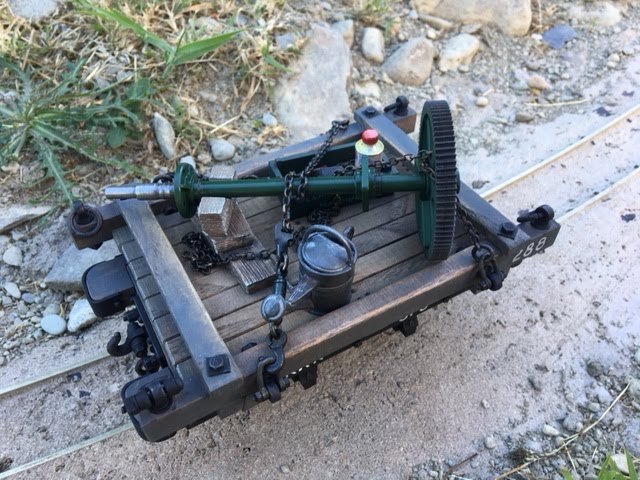
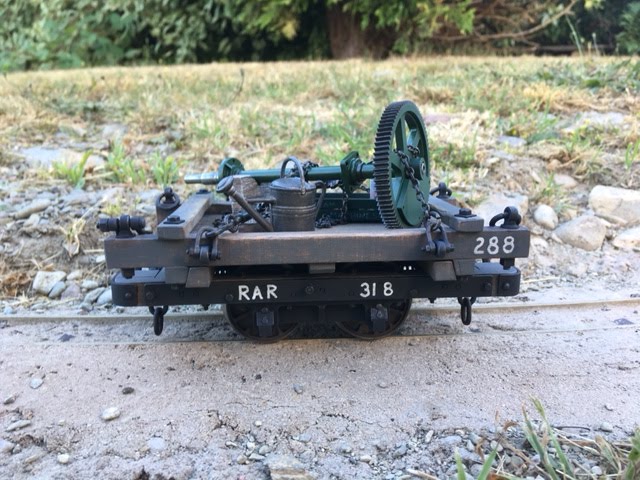
The lettering was added using a Uni-ball POSCA paint pen, and a knife used to 'cut' the rounded ends of the letters back, before being toned down a touch with a light oil based wash. The load was also detailed, the gear has grease within the teeth, a mix of gunmetal, leather and gloss varnish. The shaft end shows signs of wear, picked out with a greasy wash. The Brasso tin has the typical spillage (gone yellow) around the rim and down the side.
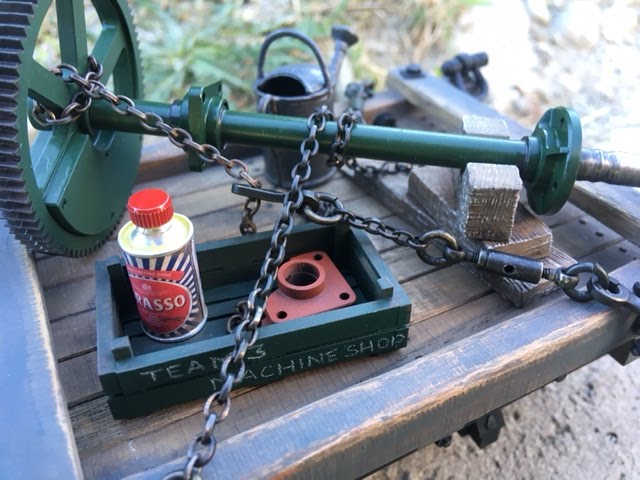
I chained it all back up and sealed with dull-cote. Looking forward now to seeing it re-united with it's sister (more on that later) and hopefully visit my line again in the near future.
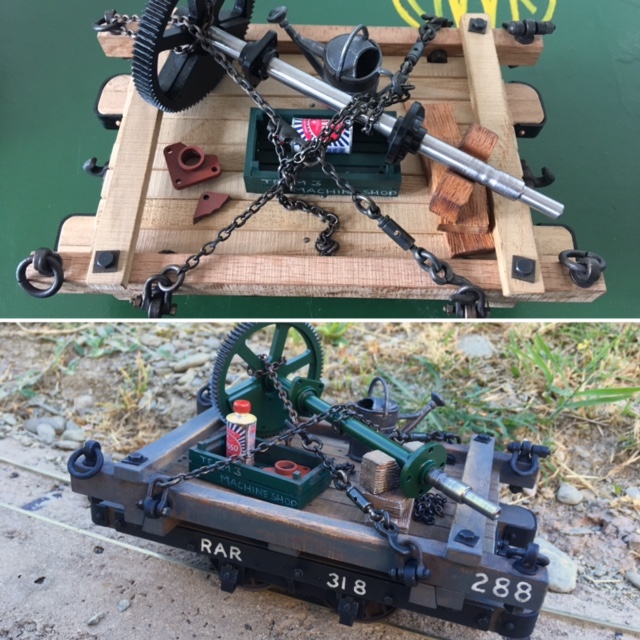
Final shot here shows a before and after... if you're interested in commissioning your own model, please get in touch using the contact form on this website. More soon...
-
5
-
-
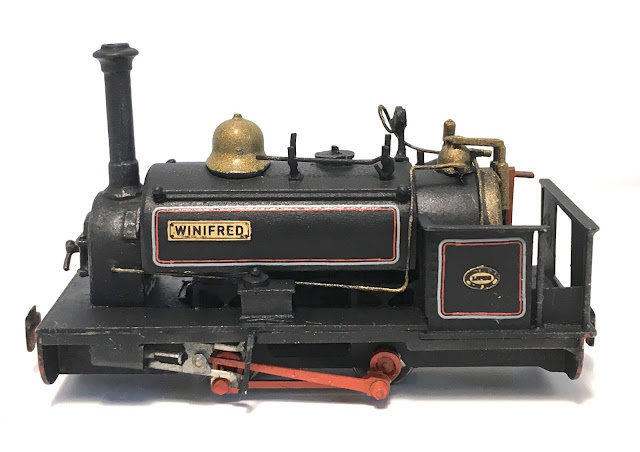
Here is Winifred, built from a Brian Madge 'scratch-aid' kit, a touch more involved than his usual kits, she was a fun and challenging build and I'm happy with the finished result...
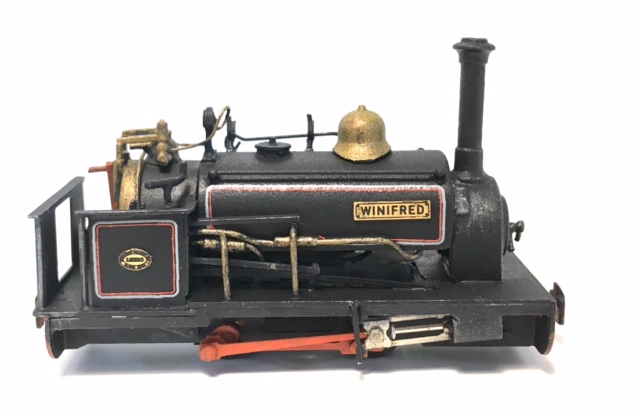
The model is based upon photos of her last days at the quarry, so I have removed the rivets from the smokebox and water tank castings. I have also added as much of the pipework and levers that I could from studying photos - a real labour of love, but well worth it now on the completed model.
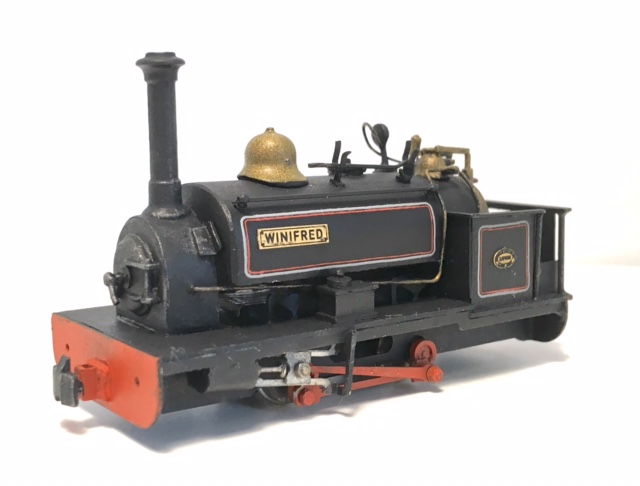
The couplings are from my Narrow Planet 'Barclayfication' kit designed for the Minitrains Bohler. They are closer to the style fitted to Winifred than the usual RT Models Penryhn couplings. The name and works plates are lovely, and are just 'standard issue' Narrow Planet ordered straight from the website.
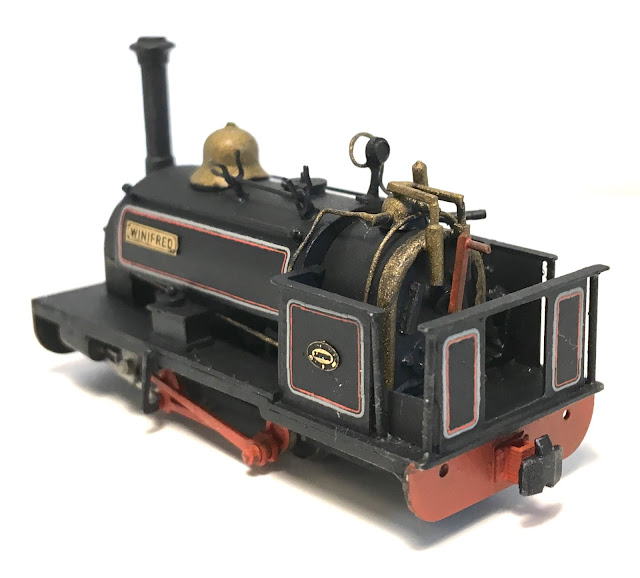
The lining was done using the new Fox N-gauge BR Mixed traffic lining, which although is grey/red rather than blue, is a good match from most distances. The grey and red are now separated so there is fine black line visible, a lovely finesse to these, and they're relatively easy to apply with patience, starting by adding the corners first and then measuring and fitting the straight lines between a few days later once they've dried.
If you'd like to commission your own model from me, get in touch on here or through my website.
-
8
-
-
I've been working on some more kits for 6point5, largely inspired by my own plans for a small slate railway in 006.5...
To go with the 'Taffson Evan and Jenkins' locomotives, I have also lifted the Vowchurch quarry slate wagons from the imagination of Brian Clarke and his wonderful book 'Slate Railway to Churchwater'. These tiny wagons combine etched brass fold up bodies and details with a 3D printed chassis.
As well as that approach, I've also incorporated a slot to mount a larger diameter magnet between the frames. I've used the ones supplied as Greenwich uncoupling magnets, and it improves the road holding as there is no where to add weight in these tiny wagons. The locos and couplings still cope with a train of 3 or 4 wagons with no problems.
These four are the production versions of the GW ones I showed a few months ago and should be onsale soon through Narrow Planet. More soon...
-
5
-
-
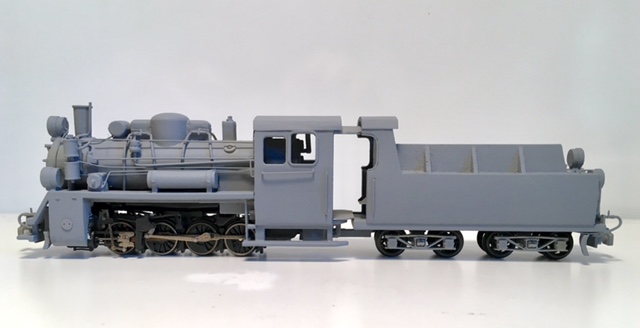
The second of my Polish locomotives, the PX48, is also now at the stage of weathering after pressing on with painting over the last 24 hours...
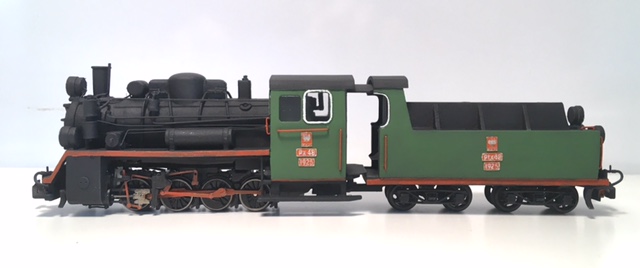
It's a pretty straight forward colour scheme, but the green required careful masking! The model was first sprayed black, a mix of satin and matt black enamel from Humbrol. I then mixed up a green using Humbrol 131 as a base, and adding a darker olive green until I had a shade I was happy with, again airbrushed. Once this was dry I used red to pick out the handrails, buffer beams and sides of the footplate and sole bars as well as the coupling rods.
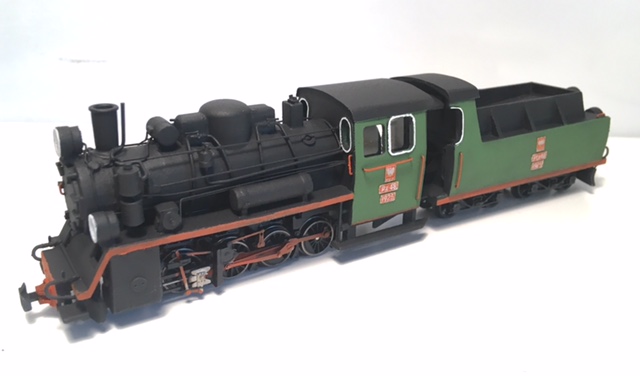
The headlight rims and the spectacle plates and cab side windows were edged in with white by hand, and the headlights touched in with silver. The etched works plates, done by Steve at Narrow Planet a long time ago in brass had a red backing added, but didn't look right in raw metal so I dry brushed white over them. It's not perfect but better than before. The finish was sealed with dull-cote before I added glazing using 10thou clear styrene.
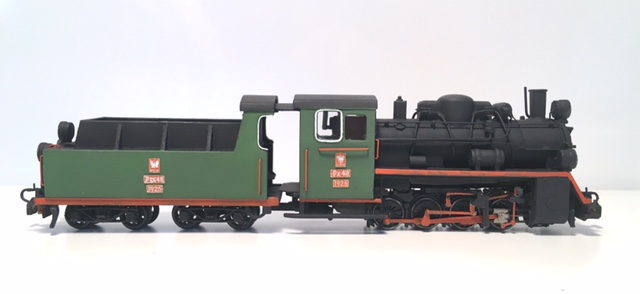
The plan now will be to lightly weather the model, and then add some coal in the tender. More soon...
-
5
-
-
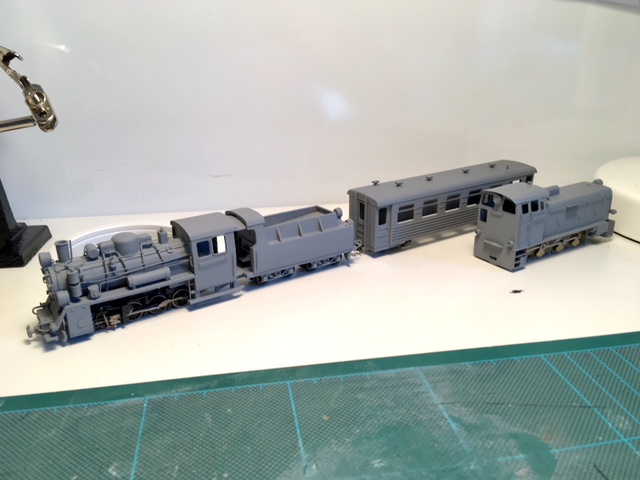
Can you believe it? The PX48 I started in November 2013 nearly 5 years ago is finally ready for paint. Last seen on the workbench before I moved, when I'd added pipework to one side in January 2015 it not has both sides with a complete complement of plumbing as well as handrails, couplings and some work in the cab and tender...

It's a funny looking beast and if you trace the history of my model you'll realise I have taken a little artistic liberty to fit the chassis - rather than have a strange gap under the cab, I shortened the boiler when it was first assembled. I don't think this has negatively impacted it's appearance, but I'll leave that up to you to decide.
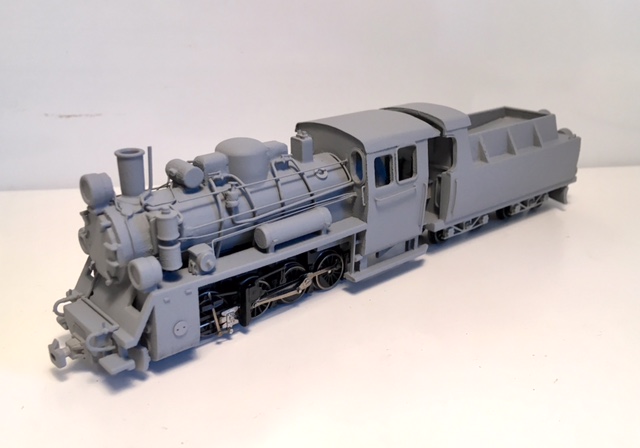
The pipework is a mix of brass wire in 0.3, 0.4, 0.6 and 0.7mm brass wire, a few whitemetal castings and Hornby Class 31 buffer beam valves (of all things). The air pipes are also from the same set. I added circular etched water filler lids from one of my old O&K kits on the cylinders. The cab received a section of Talyllyn coach roof and a larger footplate, as well as a little detailing to the front of the tender inside the cab, where the coal drops through etc. Just something to catch the eye, I'm not certain it's accurate as I couldn't find any photos of the tender front. On the rest of the tender as well as handrails, I added beading to the 'cab' cutout, a false floor inside the tender and a water filler hatch.
I'm planning to spray it all black before picking out the tender and cab sides in green, and then red footplate edges and buffer beams...
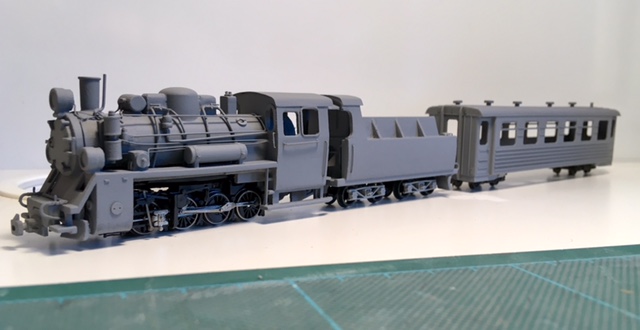
Obviously all this effort on a locomotive, it needed something to pull! I bought this coach from Shapeways some time ago but never got very far with it. Today I modified the Graham Farish BR2 bogies by removing the couplings and added Greenwich ones, and constructed something to use a as a coach floor once it's painted. The roof and sides are one, so once painted I will glaze, and then add a rudimentary interior and finally the floor.
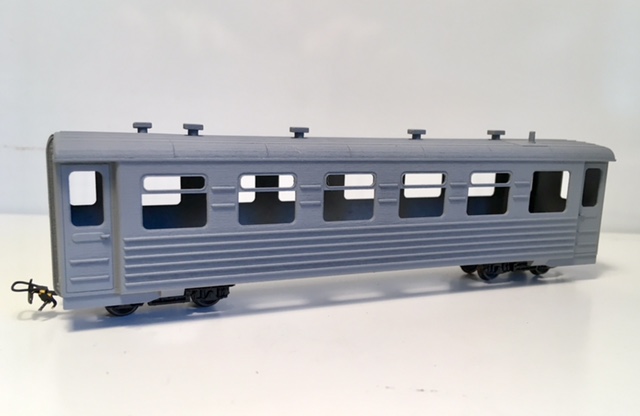
Size wise it's a good match with the locomotive. I'm not certain without going through books again whether it's a Russian or Polish (or even Romanian) design, but it's a short length which suits the potential shunting plank concept layout (more on that shortly).
Finally, a glimpse with the other relevant locomotive, the Romanian Lyd2, which I've had to fabricate a replacement roof for today as I'd lost the original. A can of San Miguel succumbed to the knife and worked a treat. Now to decide what colour to paint it, and the coach. More soon...
-
7
-
-
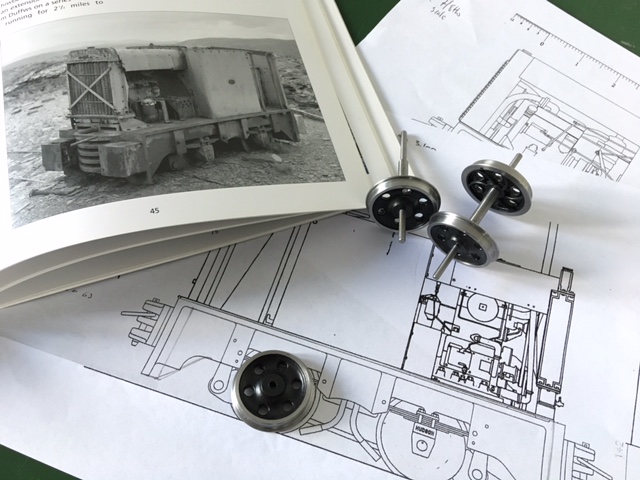
Well although I've been pondering building a Hudson Hunslet diesel, I hadn't considered quite this one... initially thinking the 24hp 2ft gauge variety but I stumbled on this photo on the Imperial War Museum archive...

THE BRITISH ARMY IN THE INTERWAR PERIOD © IWM (Q 72839)
I remembered seeing a photo in the Sand Hutton book by RCL publishing, which shows a transverse mounted engine, the works plate reads built by Hunslet for Robert Hudson, 1933... Looking at it I suspect it's the same basic equipment as used in the 24hp tractors, but arranged at 90 degrees, presumably to allow the engine and gearbox to be in the same axis as the axles. So is it the same locomotive? Well there was only one record of a diesel being at Deptford, although the IWM photo is apparently dated 1926, so I guess we'll never know.

So I started mocking something up in Sketchup using some known and some assumed dimensions, and this begins to look like a do-able project! A real 18" gauge locomotive for my Dyfrdwy Tramway, and in my parallel history perhaps bought when the depot's rail system was wound up by Convoys International.
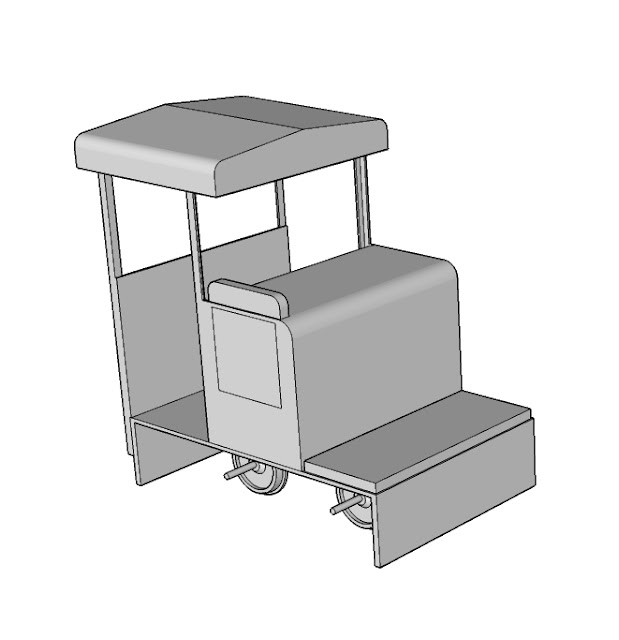
The next step is to get some frames drawn up so I can play around with motorising options... oh and perhaps get a standing driving figure from Model Earth! More soon...
-
3
-
-
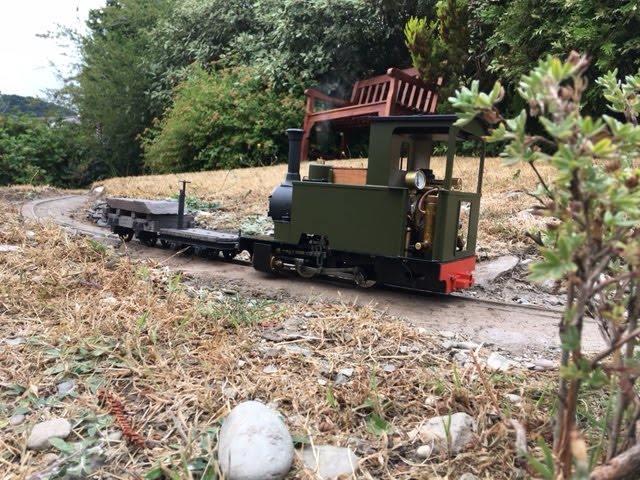
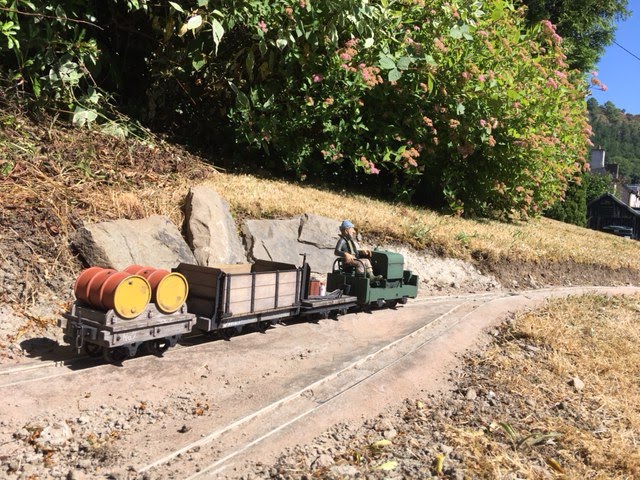
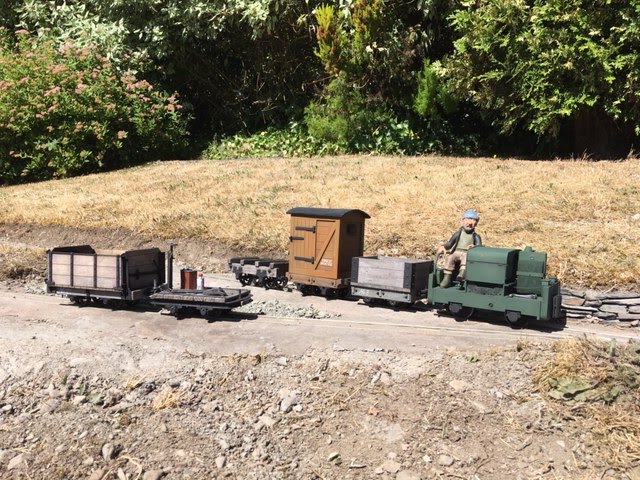
Over the bank holiday weekend I enjoyed the tramway, despite it's unfinished nature I found it relaxing to sit back and drive a train slowly from one end to the other. Anyone who remembers my old garden railway will remember my love of taking photos and so, again, I've been taking lots...
The sunshine and blue sky made for some lovely photos, here the original three items of stock are seen at the current end of the tramway. A point will be added here so I can have two sidings, and potentially then extend across the lawn at a later date.
The new coal wagon also got a run, as I drilled out the couplers to accept the same pins as the Simplex and used a small chain to made the connection.
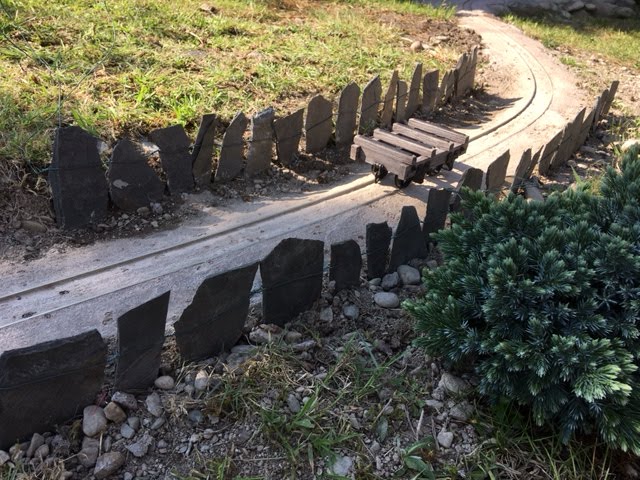
The slate slab fencing has been re-done and extended, and this is looking great, just as I had hoped and imagined. The end furthest from the camera will have a working gate, and then the yard area will have a cattle stop between the rails. I also plan to add some fencing and telegraph poles with time.
The yard in it's raw state, awaiting the office and some detailing. The simple track plan lends to the feel of my tramway, which although not complicated to run or even offering much scope for variety in terms of operation, fulfils my garden needs nicely at the moment. More soon...
-
9
-
-
I've had this half finished slab wagon, built from a Model Earth resin kit on my workbench, and then windowsill for many months now...
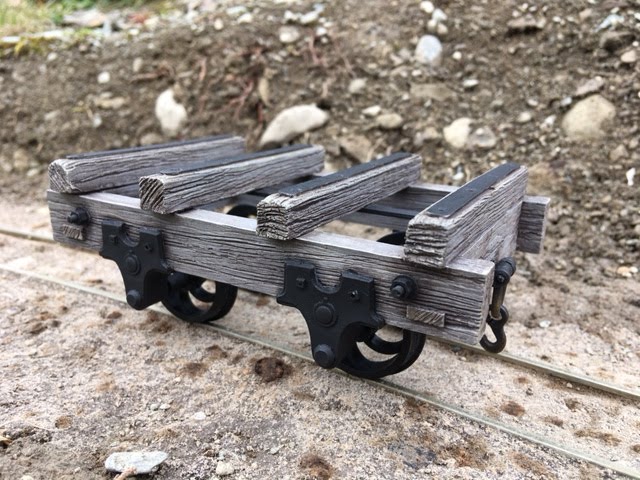
I finally have got around to finishing it. It had been primed with grey Halfords plastic primer as a base, the first stage was painting - I used Humbrol 64, thinned a little all over for the old paintwork. I then used Humbrol 72 on the ends of the wood, and on the edges of the cross members to represent where the paint has worn through to wood. Once dry, I mixed Humbrol 72 with a little white, and then dry brushed the planks. I left the model overnight to dry thoroughly. The next step was a slightly thinned coat of Humbrol 173, which was wiped off to leave a build up in the cracks and around the nuts and protruding details. Finally I painted the metal work in a mix of Humbrol 53, 173 and 27004.
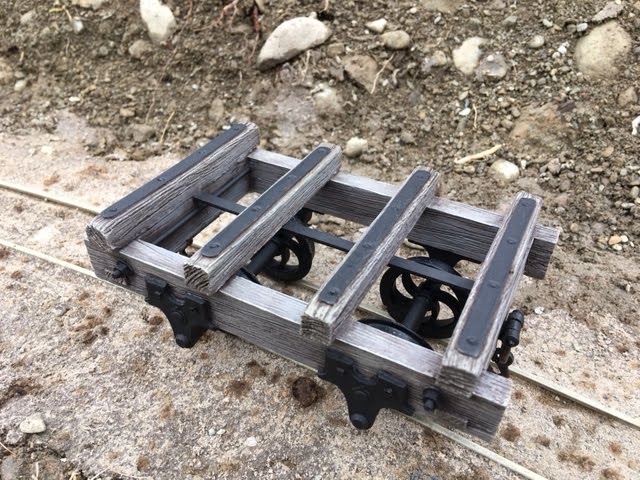
This model uses Binnie wheels and axles, but I added Styrene tube to these to beef up their appearance, which has worked quite effectively. The model won't be in general use, probably appearing in the sidings from time to time, as it doesn't have compatible couplings with my other stock. More soon once I've a suitable load for it!...
Please note, I'm happy to offer this painting and weathering technique as part of my custom model making service. Get in touch for a price and proposal to your own requirements...
-
5
-
-
I shared photos of the Trefor quarry wagon yesterday, but didn't show the coal load...
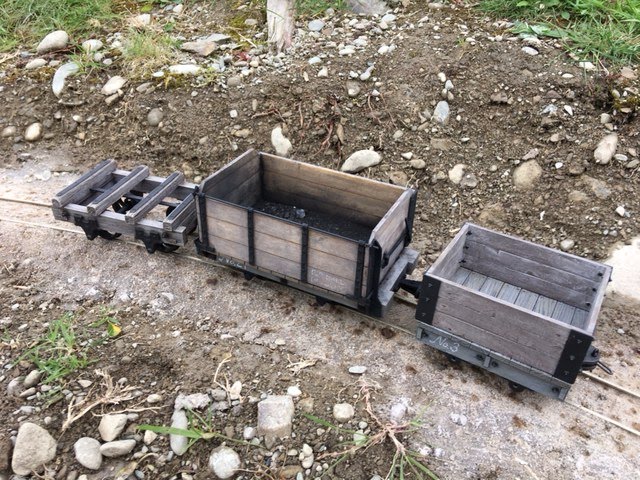
This first shot shows how the finish matches the other items in the roster, resin and plastic models painted to look like wood, although it's different, there is a family resemblance and the colours generally blend. The photo above doesn't really show this, it's difficult to photograph in natural light without sunshine.
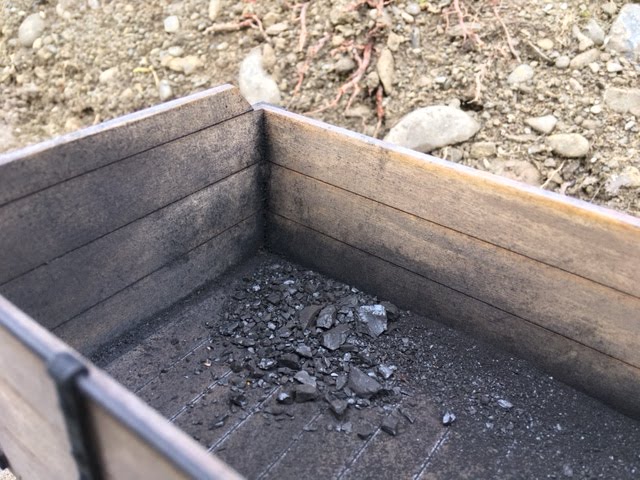
The wagon has some loose coal inside, which isn't secured (yet) and looks very real!
The paintwork has certainly seem better days...

There is coal spilt on the headstocks...
And the load wasn't completely emptied last time!
More soon...
-
4
-
-
We've had some good weather here today and so I took the opportunity to push on with finishing off phase 1 of the tramway. I had pondered a much more elaborate track plan but in the end we've got a basic yard...
The reason is two fold, first of all, there isn't a lot of space for more without it feeling crowded, and I wanted to give the feel of a run down 18" gauge tramway near the end of it's life, so with that in mind, a large yard with sprawling facilities and a run round loop and engine shed were probably unlikely...
Secondly, the track is expensive, especially the points! So I laid a foundation, and then added the track, cutting one section to length. Rowlands mix was then used like on the rest of the tramway, although I was more careful around the point to not gum up the operating mechanism and flange ways in the check rails. I like the gentle curves of the line as it leaves the yard, here you can see I've made a start on the planting.
This overview shows how simple and small the yard is... I have ordered some materials from a dolls house supplier to build an office building that can live outside permanently. More on that soon...
-
2
-
-
Another engine i've wanted to model for a few years is the original 1940s style of Hudson Hunslet diesel, ordered in numbers by the Ministry of Supply and others during the war for various 2ft gauge lines in this country...
It's quite a distinctive looking thing, that has a definite face, and a rather short and squat appearance. It's also very different from the Simplex I've already built for the Dyfrdwy Tramway.
The story will be that this is engine 3. Numbers 1 and 2 were original steam engines, 3 and 4 were replacement HH acquired after the war, but quite worn out - with the Simplex, number 5, ordered later in the 1950s.
I've sourced some drawings, and am planning on something roughly to scale, but adapted a little as I'm using 30mm 6 hole disc wheels from Slaters rather than the 32mm I really need. I'm also planning on building my own drive, so that will be interesting! More on it when the drive components arrive...
-
1
-
-
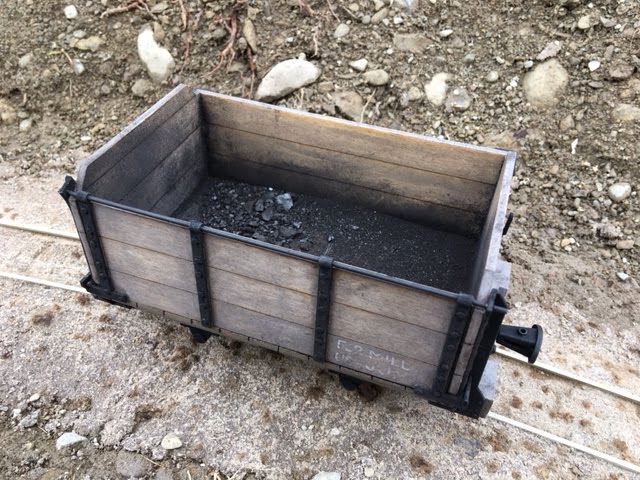
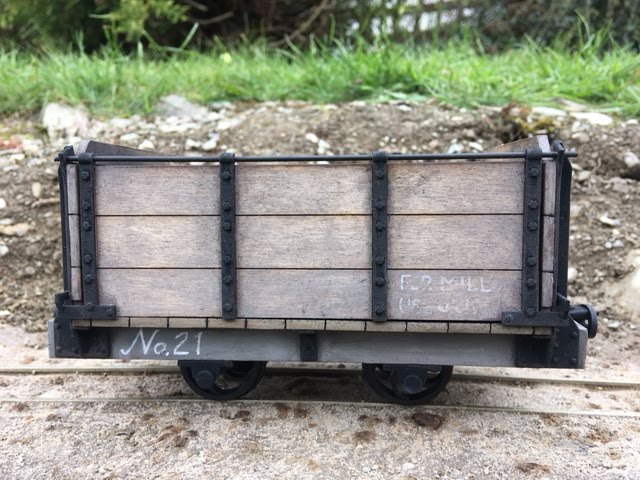
I'm pleased to say that I've achieved to make the wooden wagon look like painted plastic... only kidding... the Bole Laser Craft 'Trefor' granite wagon has been finished for coal service on the Dyfrdwy Tramway...
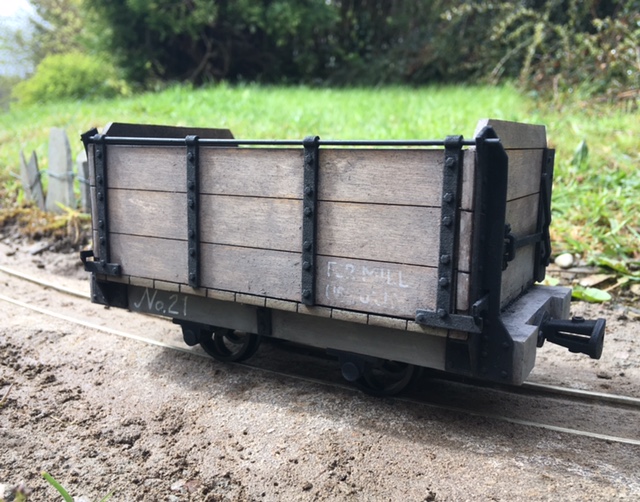
Last seen here in bare wood I was a little apprehensive about painting it because I didn't want it to look out of place with my other stock that is resin and plastic painted to look like weathered wood. To this end I took two approaches. The chassis has been primed, sealed, smoothed and then painted to look fairly recently painted with a few rough edges. This was done with Humbrol 64. The inside of the body was washed with Humbrol 72, and the outside 64. This was put on in thin washes to build up the effect of old flaky paint. Once dry I weathered both inside and out with a dirty brown wash wiped off whilst still wet. The metalwork was painted with a mix of Humbrol 33 and 27004. I then added a real coal weathering to the interior, shaking around some coal dust, and then sealing it with dullcote.
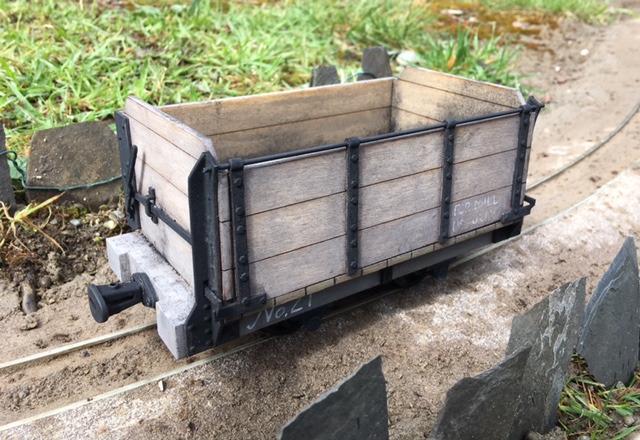
The wagon number and the 'For Mill Use Only' were done with a Uni Posca paint pen. The writing on the body wiped whilst still a little wet to give the impression it was old and had flaked off with the paint. I also added a little coal dust to the buffer beam headstocks. All that waits is to sort out a means to couple with the other stock now. More soon...
-
3
-


James's 7/8ths thread...
in My Garden Railway Topics
Posted
No I don't think it's worth it, most of the uncoupling is between wagons really.