


James Makin
-
Posts
1,507 -
Joined
-
Last visited
Content Type
Profiles
Forums
Blogs
Gallery
Events
Exhibition Layout Details
Store
Posts posted by James Makin
-
-
- Popular Post
- Popular Post
Hi guys,
I've had another little play with Loftus Road and thought I'd share a few pics of what I did when I got bored recently!
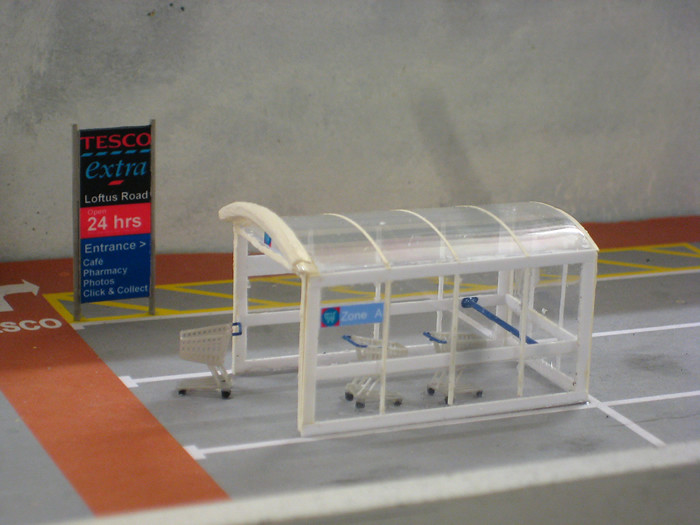
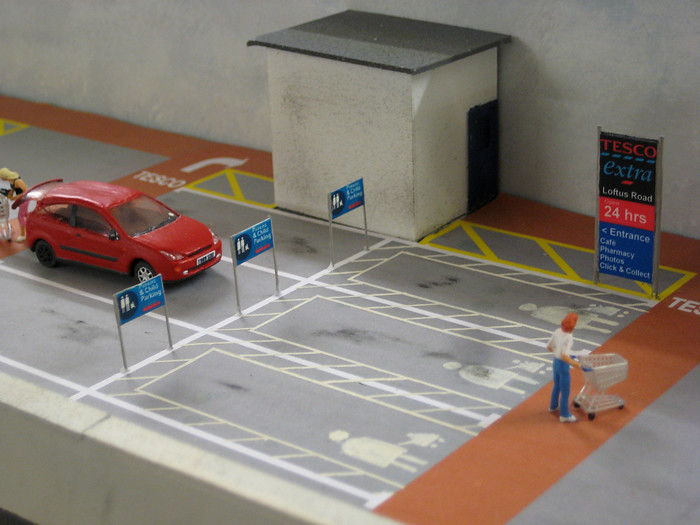
There's a large Tesco superstore & multistorey car park forming a major part of the Loftus Road backscene and I decided to add a few details to break up the sea of concrete...
 Loftus Road by Worthing MRC by jamesmakin2002, on Flickr
First up was the ubiquitous trolley park!
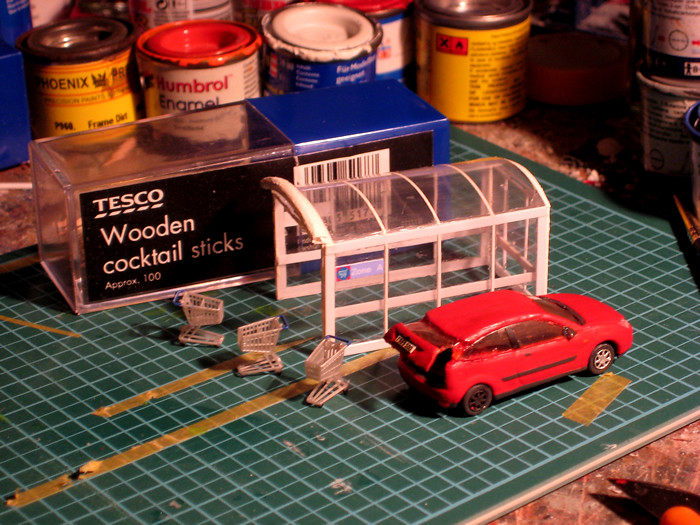
I decided to scratchbuild this out of an old cocktail stick box (Tesco's appropriately!), by chopping off the bottom side and adding thin slivers of plasticard around the translucent plastic shell. The roof is made from curved plastic nabbed from a Tesco disposable drinking cup!
 Loftus Road by Worthing MRC by jamesmakin2002, on Flickr
The trolleys are little plastic ones from German firm Preiser. The half-empty box has been sitting on my workbench for many years since I last used a few as abandoned ones on Wells Green TMD, so it felt rather nice actually using them in their correct setting for once!!
Of course, no supermarket car park scene is complete without a car being loaded up!
I took a plasticky model and detailed it up to represent a base model of an ageing Colorado Red 1999 Mk1 Ford Focus, with RHD conversion and cut the boot open while I was at it! There is a hubcap missing and a boot full of miniature wine being loaded!
 Loftus Road by Worthing MRC by jamesmakin2002, on Flickr
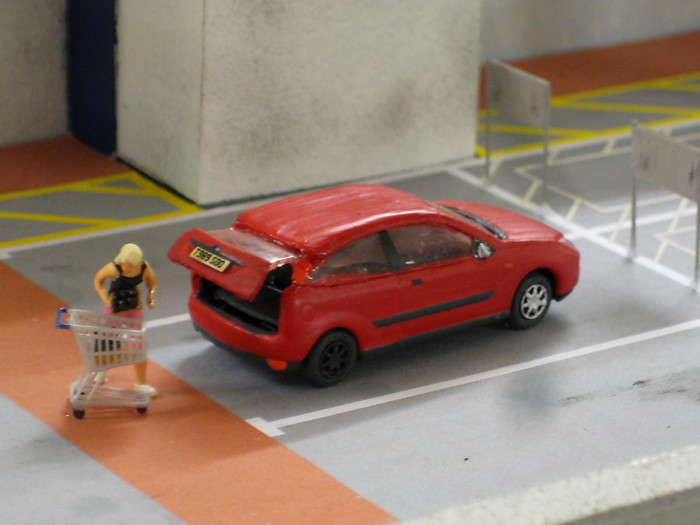
So I'd done the car and the trolley park but I had a hankering for something else... the much-abused Mother & Baby car parking section!
I masked off a few of the existing bays to create some of the white chevron markings and bashed up some custom signage using prototype pictures for guidance.
 Loftus Road by Worthing MRC by jamesmakin2002, on Flickr
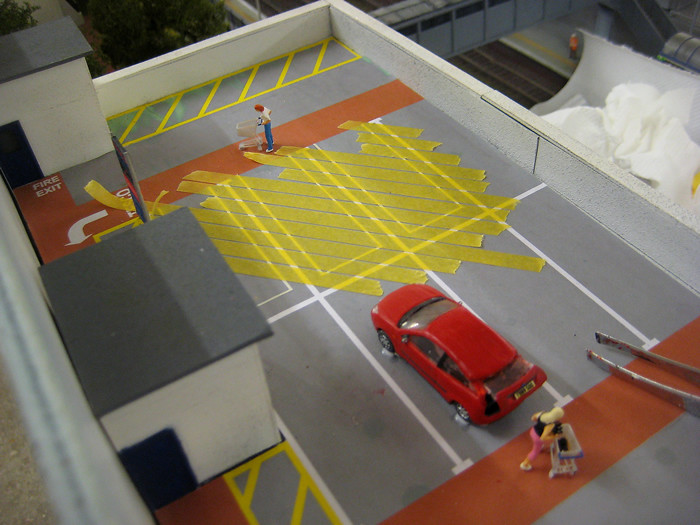
These were all installed and then I started on a spot of weathering for the inevitable oil patches and tyre marks you see in supermarket car parks. The Tesco Extra signage I also custom made based on prototype examples and attached to fine brass wire.
 Loftus Road by Worthing MRC by jamesmakin2002, on Flickr
I wish supermarkets also had extra-wide spaces for people who value the paintwork on their car doors!!
So there we go, an ordinary car and ordinary scene made for an extraordinarily fun little detailing session!
Cheers,
James
-
 22
22
-
The next chapter in electropop band Ladytron's discography - here is frontwoman Marnie with new solo single 'The Hunter'
Some superb production, but being new wave/electropop, hardly anyone will ever hear it!
This will never make it to the mainstream but as long as Helen and the gang never give up, then I am happy

-
Never really been a fan of Daft Punk, but i have to admit i'm quite liking Random Access Memories.
I like the way they move, just a little bit, during the video!
-
Lana Del Rey - Cola
Probably one of her strongest songs and some 'interesting' lyrics! #Pepsi
Seeing her tomorrow at Hammersmith, cannot wait!
-
-
Eclectic mix...
Sisters of Mercy - Temple of Love
Florence + the Machine - Kiss With A Fist
Ladytron - The Way That I Found You
Rik Mayall - Noble England
-
1
-
-
Just to mention, for anyone who is interested in the layout and passing through Worthing this coming Sunday 5th May - Loftus Road is attending a mini-show Toy & Collectors fair held at the Charmandean Centre, Worthing, BN14 9HS, just next to the A27 - 10.30am -2pm.
http://www.srptoyfairs1.co.uk/fairs/2013/05/worthing-toy-fair/
It's a small affair, mainly traders selling secondhand model railways, model cars and other items but Loftus Road can be found in one corner!
I won't be there myself (RS'ing about at a Ford day at Beaulieu) but Pete and the gang will be putting on a very decent Sunday service!
Cheers
James
-
1
-
-
- Popular Post
- Popular Post
Hi folks!
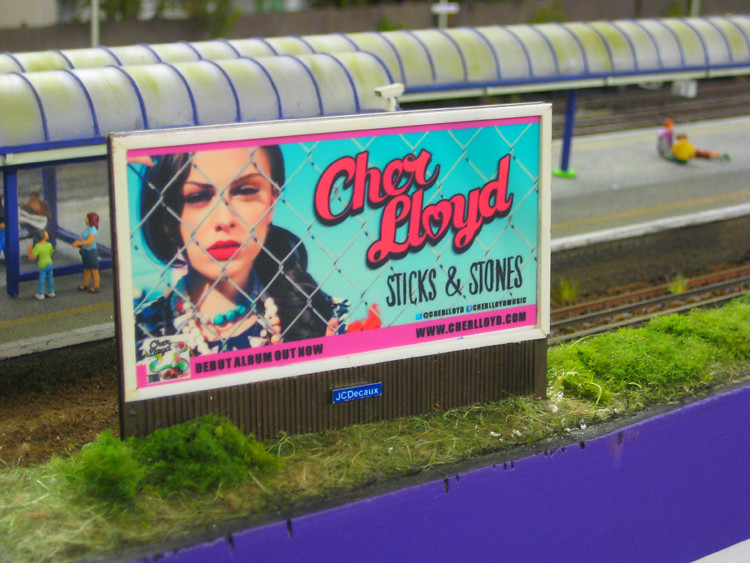
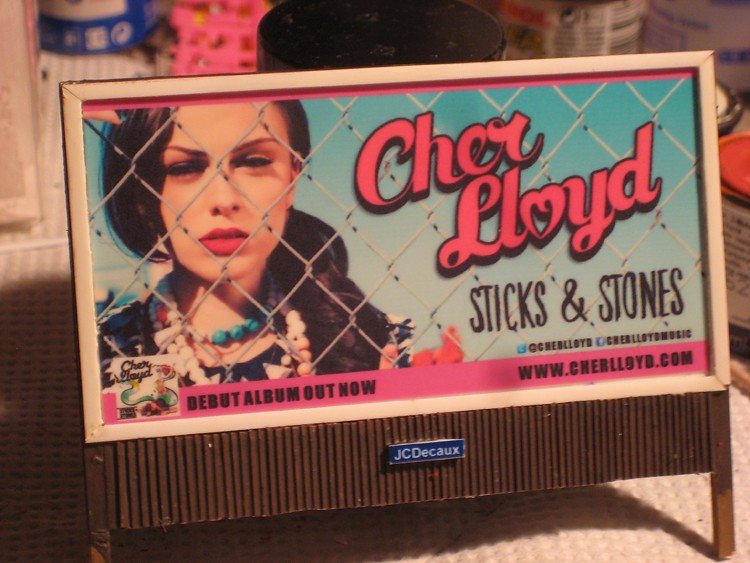
Decided to add a splash of colour to Loftus Road in the form of a billboard, as found at the real Kenny O.
 Loftus Road by Worthing MRC by jamesmakin2002, on Flickr
Billboards are a fascinating subject and a great way of adding an extra slice of real life to a layout. Some great, hard hitting advertising campaigns have been pulled off over the years using well positioned 48 sheet boards as a basis.
As a marketing professional I looked through dozens of sets of well respected and acclaimed creative from the leading agencies in the business over the last few years...and then rejected them all in favour of a chavvy popstar!!
Occupying a prime position on Loftus Road, in front of the Underground line, the billboard was completely scratchbuilt from metal and plasticard, and took somewhat longer than expected! Here's how it went...
 Loftus Road by Worthing MRC by jamesmakin2002, on Flickr
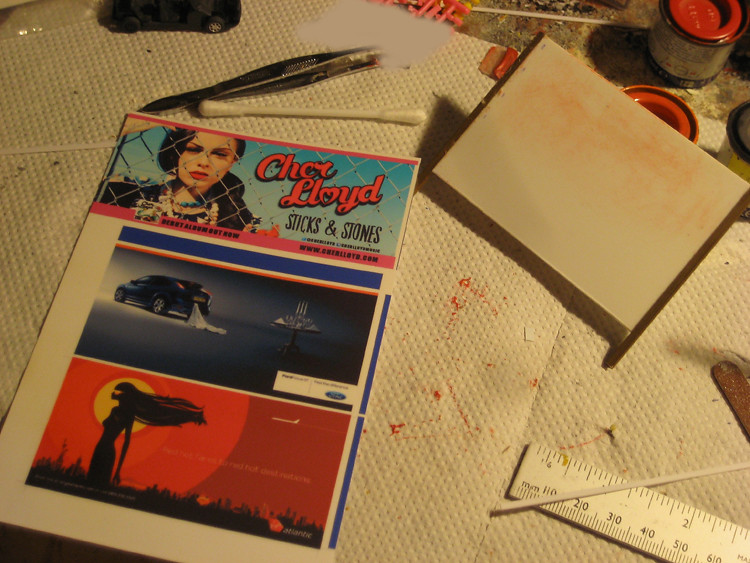
The starting point was the striking imagery. I've trawled the avertising archives and found some gems for future use, but was most taken by the bright pink colours of the chavette's Sticks & Stones album campaign. I copied these from online and retouched in Photoshop. For the reverse of the billboard it was a decision between the beautiful red Virgin Atlantic creative and one for the Ford Focus ST...some may be able to guess which image won!
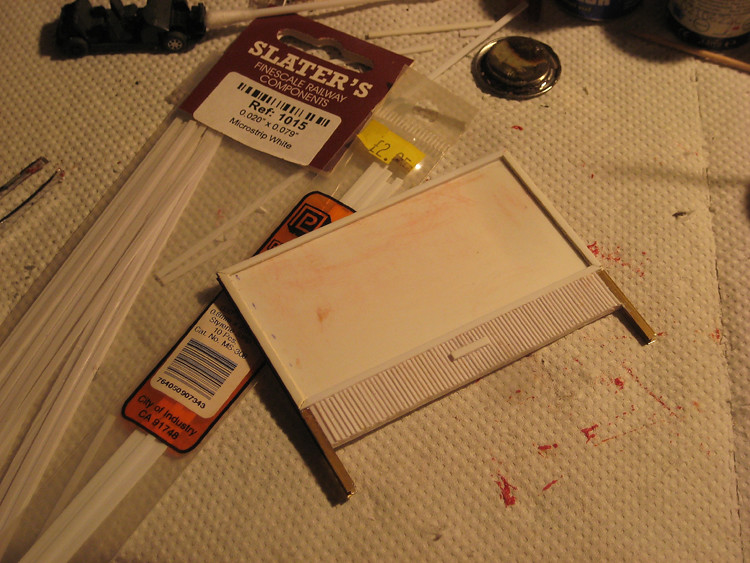
For the billboard itself, thick plasticard was cut and framed with H section metal girder for strength, which will be vital given the vulnerable location on the layout and the controversial creative!
 Loftus Road by Worthing MRC by jamesmakin2002, on Flickr
The next step was building up the frame on the billboard. Thin plasticard was used to create this, with mitre joins at the edges for neatness. Many billboards have a wooden slatted section below the creative and I decided in my limited wisdom to have a go at scratchbuilding the slatting from single pieces of plastic! Over 70 pieces later, here we see the result!!
 Loftus Road by Worthing MRC by jamesmakin2002, on Flickr
When the slatting was completed (high on glue and some two hours later!) it was ready for painting in a brownish wood shade, and the billboard company JCDecaux's logo added for realism. The advertising creative was pasted in place using Kristal Klear and given a coat of matt varnish to tone it down and protect against the pounding of exhibition use.
 Loftus Road by Worthing MRC by jamesmakin2002, on Flickr
Finally, it was time to 'plant' the billboard and here we go! The board is placed at a slight angle so viewers can also see the Ford Focus ST advert if they look hard enough!
Quite a fun project!
-
22
-
Hi James,
A while back i bought the electrostar cabs from you and progress is slow but coming along together nicely. I have decided to model a Electrostar 375/3xx in Southeastern Livery to match my layout requirements. Following your second electrostar conversion has spurred me on to finish my 3-car electrostar.
I have chopped and reassembled to the correct length, re-motored and added the cabs and pantograph aswell. So i am at the stage of applying the livery. Currently, on a trip to take some photos of a three-car down in Kent at Dover. What i want to ask is how would you reccomend I apply Southeastern decals, numbers and first class lettering etc.?
Cheers,
Matt
Hi Matt!
Good to hear from you hope the project is going well!
Southeastern livery sounds fab - quite simple and stylish. I think that'd be fairly straightforward to do (none of those awful circles you get on Southern ones!) with a white base livery and then the rest in transfers.
I'm guessing that there have never been Southeastern transfers made so I'd have a stab at DIY transfers using your own images (steal these from the company website if the logo is still current or find side-on photos) and then pop these into something like Powerpoint, Paint or Photoshop and have a play with the sizes. There's probably some fancy new app that lets you do all this on an iPhone now haha!
For the transfer paper itself, you can't go wrong with Crafty Computer Paper (google) and then if you can print using a laser printer (less hassle than inkjet)...if you don't have one then most offices do...ahem! You can then seal the images with spray varnish and then treat like normal waterslide decals.
For your particular livery I'd try using clear-backed paper as the livery is so light it'd be perfect. For any colour darker than white I'd recommend using the white-backed papers and printing the body colour onto the background of the transfer (as am doing with the First Capital Connect livery).
White enamel paint is prone to yellowing so I'd probably advise dabbling in acrylics for this one, try spraying a matt white and then spraying some gloss acrylic varnish to get the ultra glossy surface for the transfers, followed by the matt acrylic varnish.
Hope this is useful mate! Let me know if you get any problems and feel free to share your results, exciting stuff!!
-
Avril Lavigne's new single 'Here's to Never Growing Up'
Quite mellow and more in common with her first album 'Let Go' than anything else so far. And I can't believe that was over 10 years ago, my young self is truly starting to feel rather old now haha!
Cheers
James
-
Hi James,
long time admirer of Wells Green, particularly as I'm a 'Crewie' myself (but don't tell anyone!!!)! I'm in the planning stages of a small depot layout, based around FM Rail and wish to recreate the blue pullman livery - but in my case I want to model 47709 Dionysos. I just wanted to ask you if you could remember what paint you used for the pullman blue please?
Also, are the any plans to replace Wells Green, now it's been retired?
Keep the updates and pictures coming.
Thanks
Chris
Hi Chris
Thanks for the kind words, best of luck with the FM Rail layout, sounds a bit different to the norm!
I would use that as an excuse to model some great locos - the Wessex Trains pink '31' and 47355 in the revised Fragonset livery spring to mind!
For my 47712 I opted for the Precision Paints Nanking Blue (of original 50s Blue Pullman fame), assuming that the chaps who painted the 47s used the same shade as the original Blue Pullmans which they were trying to recreate!
Wells Green's enjoying an easier life at the moment but I have accepted another invite for Poole in November 2014, meanwhile Worthing MRC's Loftus Road will be out more over the next few years to scratch my exhibiting itch but one day I hope to get out there with a new project!
There's still much indecision about my next layout, I've already built some baseboards and have several key locations I am determined to model, but just can't decide which will be next! Before building Wells Green I'd been a long time Western Region modeller so may be considering returning to my routes in some form or another

-
'Metal & Dust' by London Grammar
Haunting, spellbinding, intensity that just builds and builds - this is going to be huge.
-
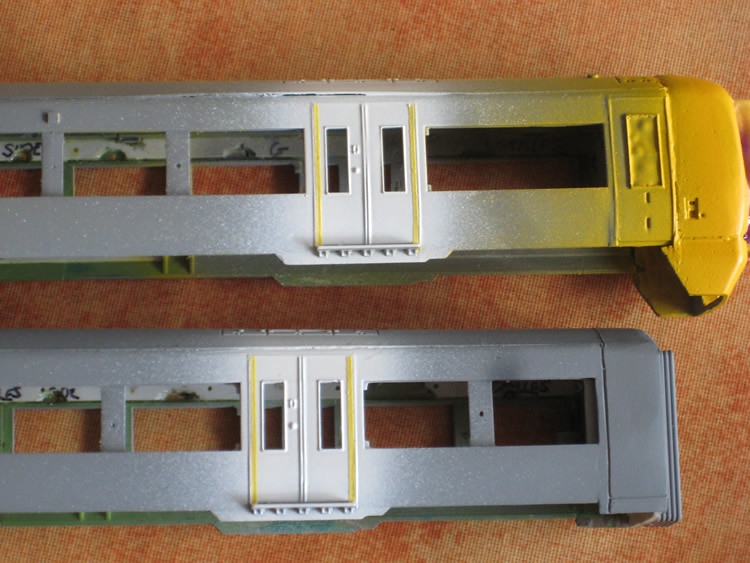
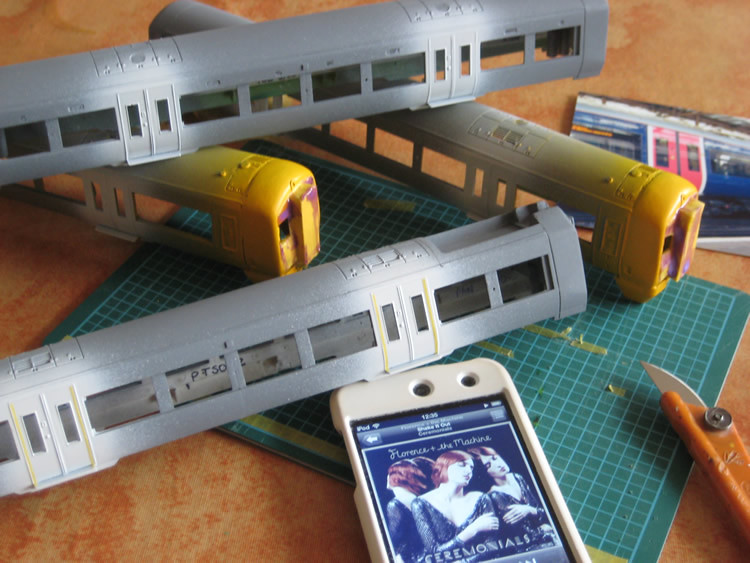
Evening chaps!
I've got a little bit further on the Electrostar project...
I would say it got 'interesting' but after hours of masking that probably isn't quite the right word to define it!!
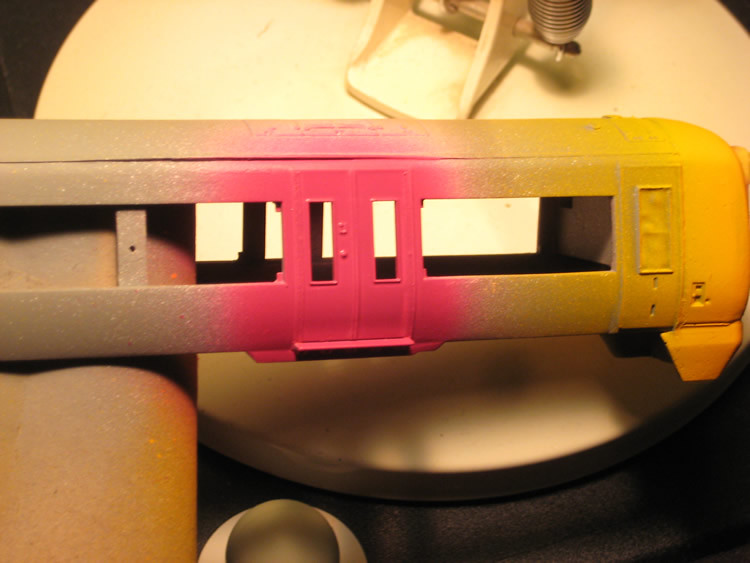
To start building up the First Capital Connect livery I'm starting with a base primer of Halfords Grey (which is generally just great for showing up surface imperfections anyway) and then going mental with the other jazz on top. Next applied is the obligatory Phoenix Warning Panel Yellow on the ends.
 Scratchbuilt Electrostar by James Makin by jamesmakin2002, on Flickr
The yellow was masked off with some of the lovely Tamiya tape, together with a few big dollops of Humbrol Maskol to seal in the awkward shapes during the next spraying stages. The FCC livery consists of an overall bluey colour with pink and white doors.
Humbrol White 34 was sprayed onto the door region to provide a good base for the hot Magenta and also to give the white stripes. This all sounded a fantastic plan until I realised I'd have to mask each white stripe!
Cutting and applying 32 identical 1mm stripes of masking tape proved very much less exciting than originally thought but by then I was already one foot in...
 Scratchbuilt Electrostar by James Makin by jamesmakin2002, on Flickr
Sharing a similar never-ending feeling you get to enduring Average Speed Cameras during motorway roadworks eventually the torture came to an end and I could start properly spanking it, or get busy with the airbrush!
Many modellers give out handy useful advice when doing projects like this but my top tip is to have some amazing music on standby to see you through the sheer boredom that is the less glamorous side of modelling. Relaxing and soulful, Florence + the Machine's 'Ceremonials' is still a superb album and worth of the accolade 'music to mask to'. Somehow there has yet to be a BRIT Award category for Masking but the album is on the shortlist with Moby's 'Play'. 'Gay Bar' by Electric Six was soon discounted.
 Scratchbuilt Electrostar by James Makin by jamesmakin2002, on Flickr
After many years of creating tatty austere freight locomotives, it was nice to begin painting an exciting colour!
A healthy dose of First Group Magenta forms the bodyside door colour, and should contrast nicely with the First blue once applied. The roof will be painted in Humbrol No.1 mediocre grey in due course and set the livery off well.
I like to give my viewers value for money so while I got bored waiting for paint to dry this afternoon I went off and made some Easter cakes, so for the 'OMWB Uncut' I present a couple of my other projects below! They are not DCC fitted.
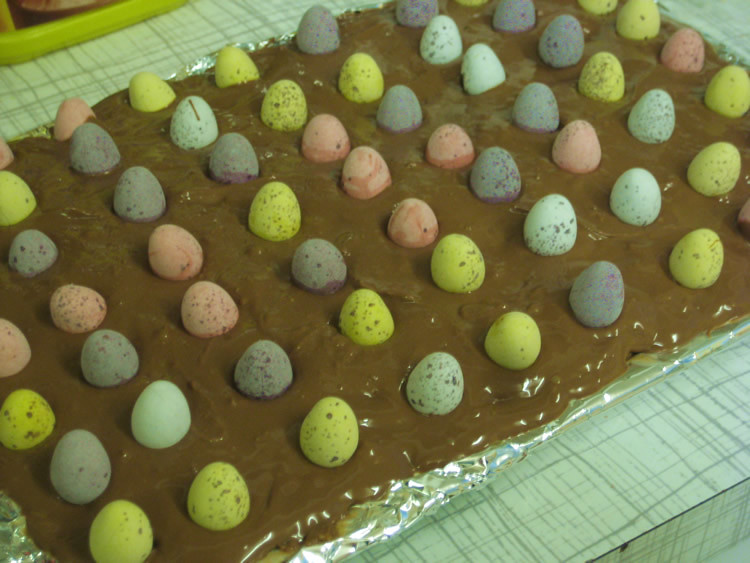 Easter surprise #1 - Mini Egg tray bake by jamesmakin2002, on Flickr
The above is a tray-bake consisting of Malteasers and white chocolate eggs mixed with syrup and crushed biscuit, topped with more chocolate and Mini Eggs, whilst below is a recipe I saw from Cadburys - chocolate brownie with buried Creme Eggs!
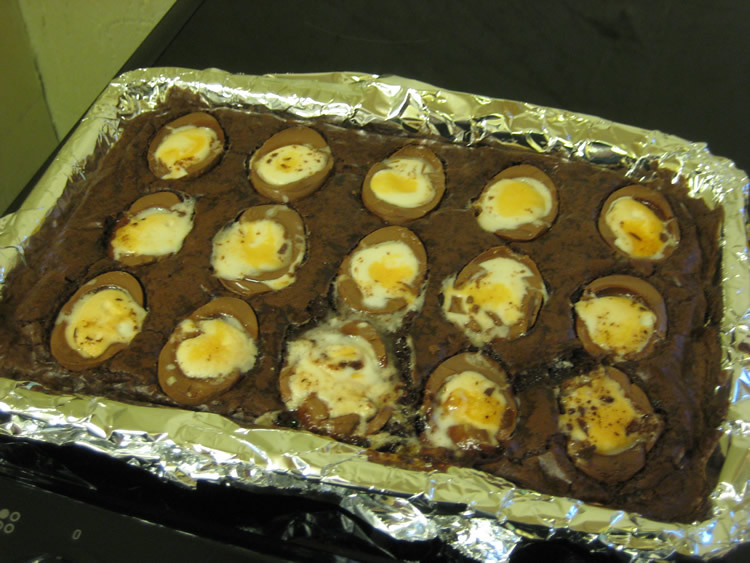 Easter surprise #2 - Creme Egg Brownie by jamesmakin2002, on Flickr
Willing to provide articles for the monthly magazines but beware the models may melt under studio lighting.
Happy Easter all,
James
-
13
-
-
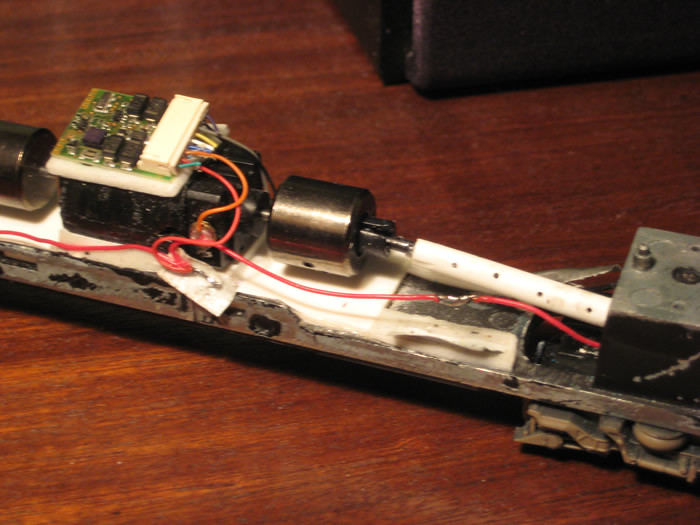
It's been a while since the last update!
I've got further with my new FCC 377/5 Electrostar, and it is going through the paintshop currently.
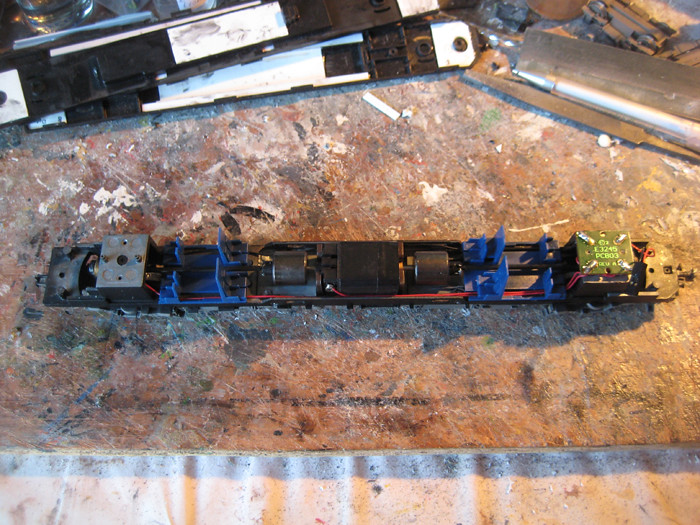
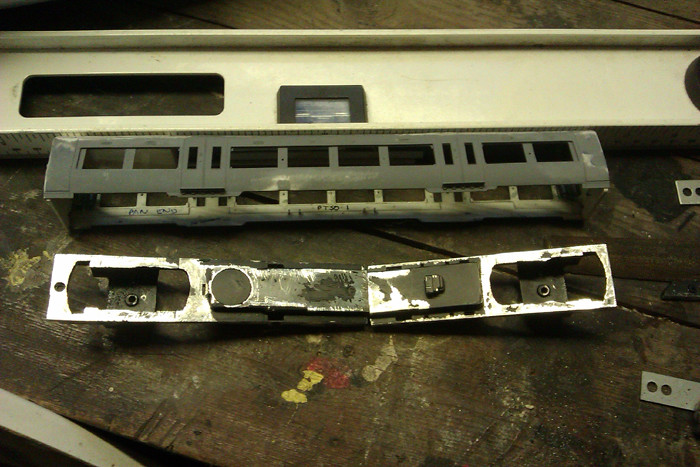
For all my resin Electrostar cab customers, a common question about the project is how the motor chassis is shortened, so I hope that this 'how to' guide explains in pictures better than I ever can!
Here's how it went -
 Scratchbuilt Electrostar by James Makin by jamesmakin2002, on Flickr
Above can be seen the original unmolested chassis. This is a great runner, but unfortunately too long for the Electrostar. So we must chop a big lump out of it!
 Scratchbuilt Electrostar by James Makin by jamesmakin2002, on Flickr
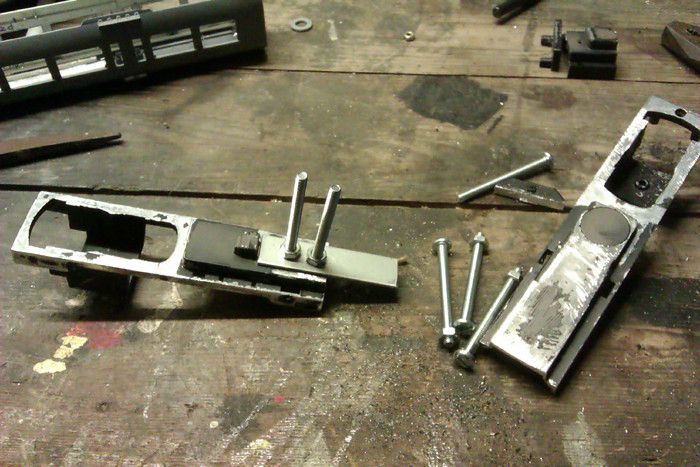
And here goes...! A hacksaw enabled steady progress through the metalwork as the chassis block was chopped to fit in the short bodyshell. The only important dimension was making sure the bogie pivot points were the correct difference apart.
Note that I am not using specific dimensions, merely fitting to an already-completed body - it is far more important that both chassis and body match each other well rather than aiming for minute length accuracy if the other one does not match - s'all about the partnership!
 Scratchbuilt Electrostar by James Makin by jamesmakin2002, on Flickr
As the same time, I was careful to cut in the right place to ensure the body could still clip into the side of the chassis in the original lugs- which means I can remove the screw holes and the body will still stay in place on the chassis.
 Scratchbuilt Electrostar by James Makin by jamesmakin2002, on Flickr
The chassis was then reattached together, using metal plate (also from the Bachmann Turbostar) and several bolts drilled through to hold it in place. These were then sawn off, and left a chassis as below:
 Scratchbuilt Electrostar by James Makin by jamesmakin2002, on Flickr
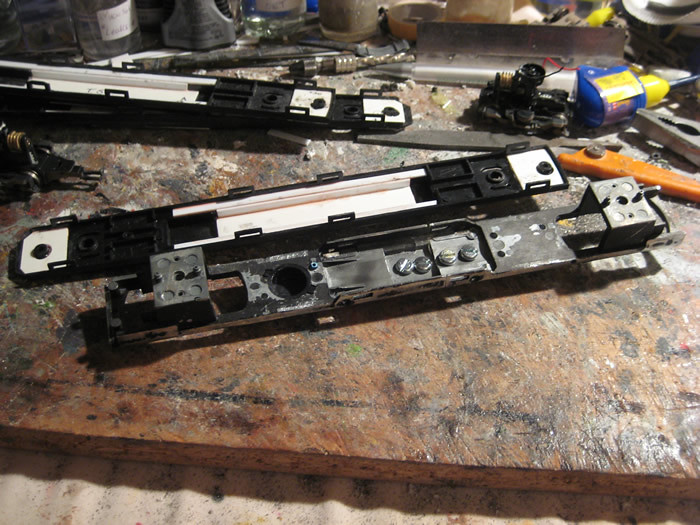
Now rejoined - it is time to add the all important motor! This was placed on top of a plasticard base, so as to raise the motor above the chassis to allow clearance for the flywheels.
 Scratchbuilt Electrostar by James Makin by jamesmakin2002, on Flickr
The next stage was to shorten the driveshafts - using plastic tubing and some glue to encase the original chopped Bachmann mouldings.
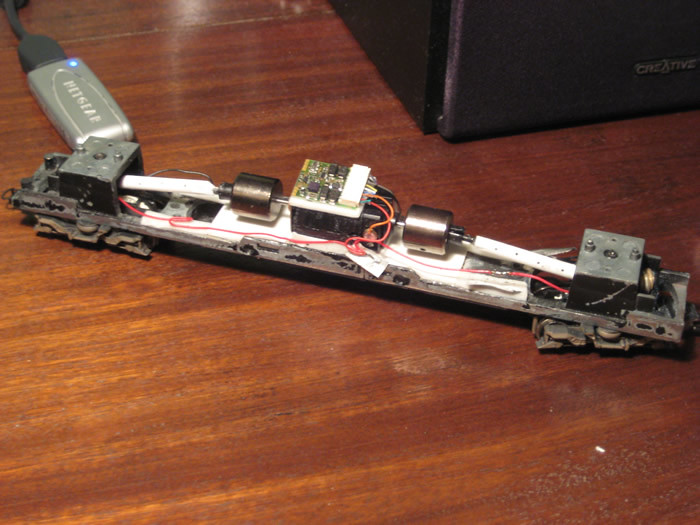 Scratchbuilt Electrostar by James Makin by jamesmakin2002, on Flickr
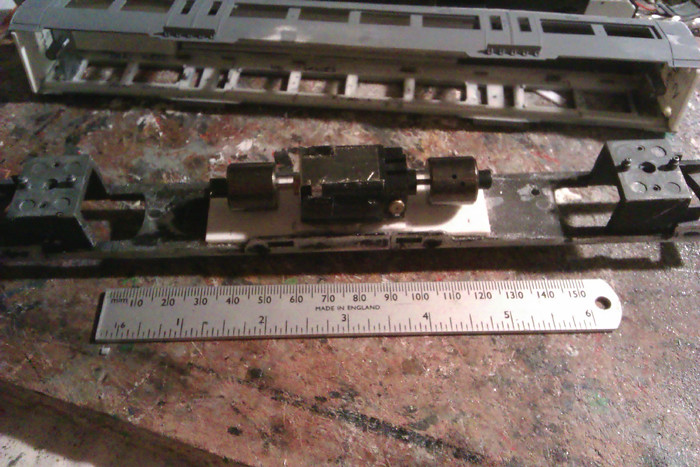
Finally reattached together and chipped up with a Lenz Gold decoder, the power unit is ready for a new life under a third rail electric unit, and with any luck should prove a very smooth runner!
 Scratchbuilt Electrostar by James Makin by jamesmakin2002, on Flickr
Hopefully this will be of use to my band of kitbuilding followers tackling these wonderful units - wishing you all the very best of luck!
For my next update I hope to have news of the First Group livery application - the fun part!
Cheers,
James
-
6
-
-
Many thanks for that information, just shows what superb results you can achieve with "out of the box track" so to speak stunning, its all about the weathering detailing once the track is laid

The only reason I asked as I used the combination Peco code 75 concrete sleeper and code 60 flat bottom rail but had issues with the class 50 rubbing the third rail, I even sunk the third rail pots into the sleepers? I wonder if this is just the case with using concrete sleepers as you have the wooden variety

Have you any issues with any stock fouling the third rail?
All the best Darren
Hi Darren,
Thanks, I know we've had some issues too - only very low-riding stock though such as some of the Freightliner container flats - believe those light blue Dapol flats had a problem but thankfully most of the stock is ok though!
The third-rail is to be given a planned re-fresh in the future so hopefully we can get the rails that little bit lower to accept all stock.
Bit of a pain though...you don't get this kind of problem with overhead electrification...


-
3
-
-
Hi James!
An excellent layout!
Definently one of the best layouts I have seen!
How is the FCC 377 going?
The FCC 377's entering the Wells Green paintshop tomorrow, exciting stuff! Yellow going on first to be followed by the ludicrous pink later in the week!
Can't wait to get it off the workbench now, got so many special ideas for future Loftus Road stock going through the head right now!
Cheers
James
-
2
-
-
'Red' from the lovely Taylor Swift
Perfect in every way!
-
- Popular Post
- Popular Post
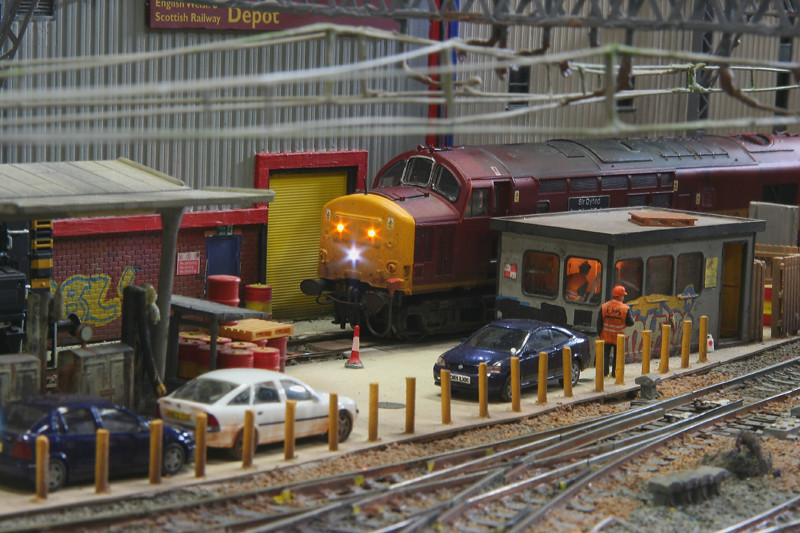
Hi Guys
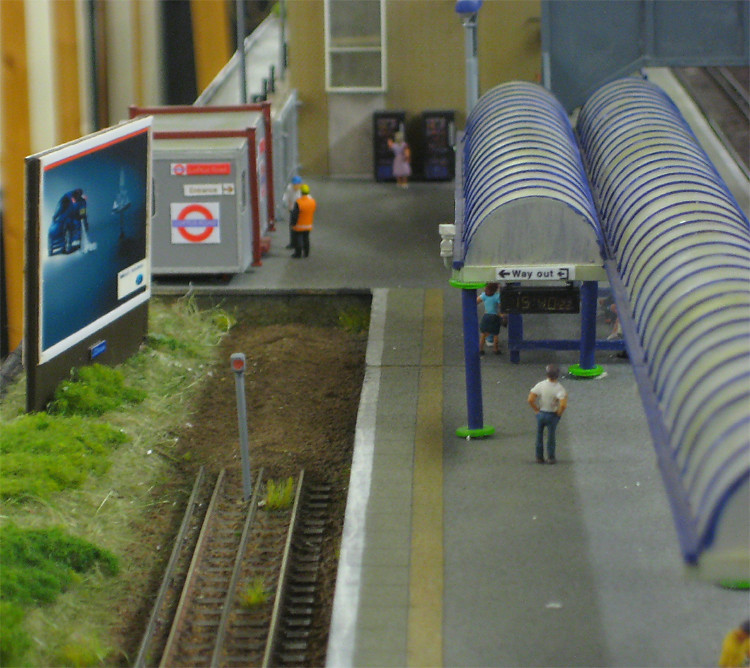
Worthing MRC have made more progress with our 'Loftus Road' layout, our take on a 2000's period West London Line - with more than a few nods to Kensington Olympia.
The scenery on the 20'x10' layout is nearing completion following the recent British Railway Modelling article, thought we'd share a few more images taken at the recent East Grinstead show.
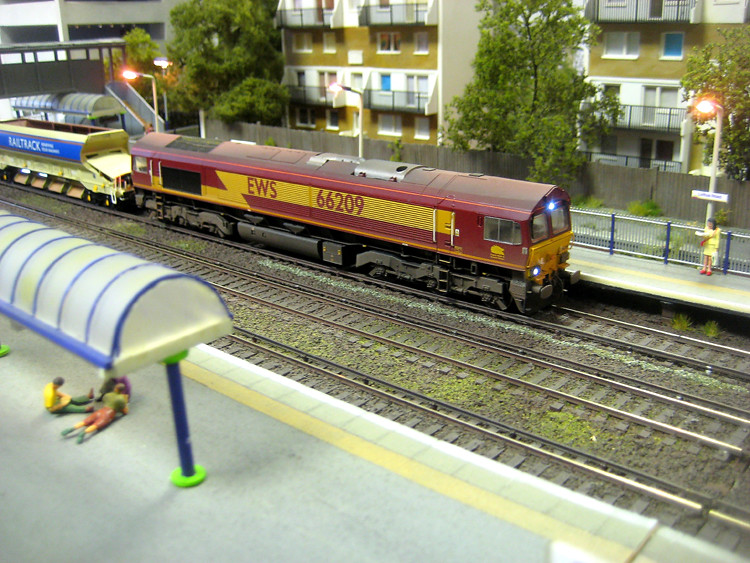 Loftus Road by Worthing MRC by jamesmakin2002, on Flickr
Mark Butcher's EWS 66209 passes with a train of Network Rail Autoballasters during a Sunday possession.
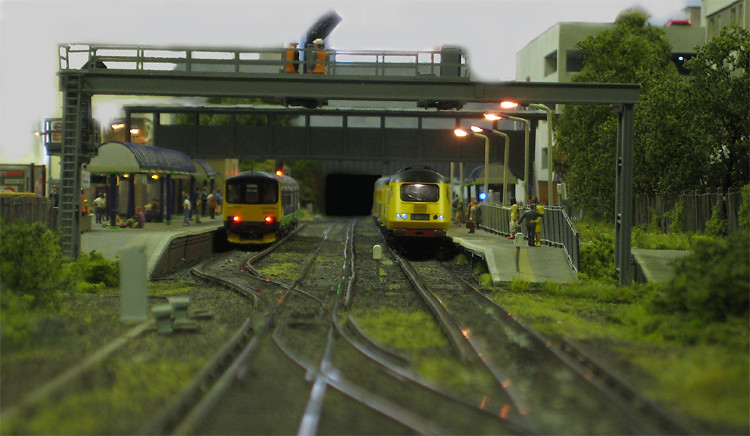 Loftus Road by Worthing MRC by jamesmakin2002, on Flickr
Meanwhile, Network Rail's NMT rubs shoulders with the regular stopping Silverlink services at Loftus Road. The signal gantries were scratchbuilt by Pete Hollman, while the signature footbridge is a work of art from Martin Browning.
 Loftus Road by Worthing MRC by jamesmakin2002, on Flickr
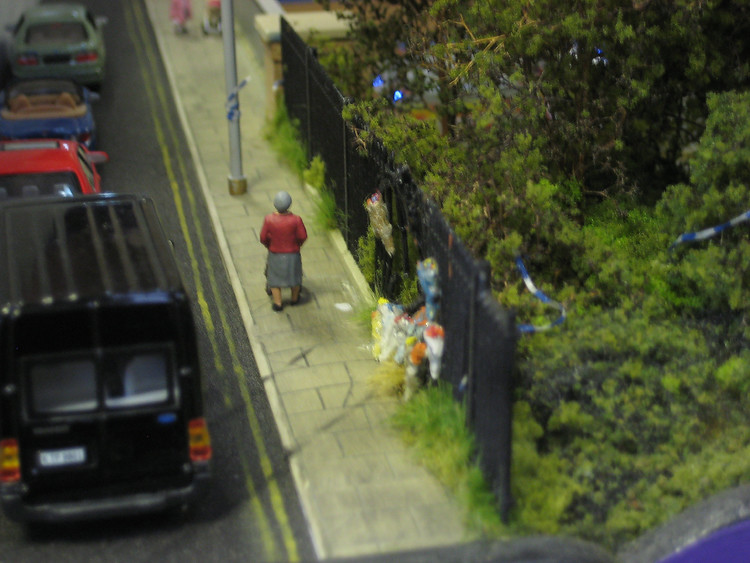
Tragedy hits West London as an elderly lady passes by the site of a recent fatal car accident. I made the bouquets from rolled up tin foil and cellophane, Police tape is minty fresh dental floss!
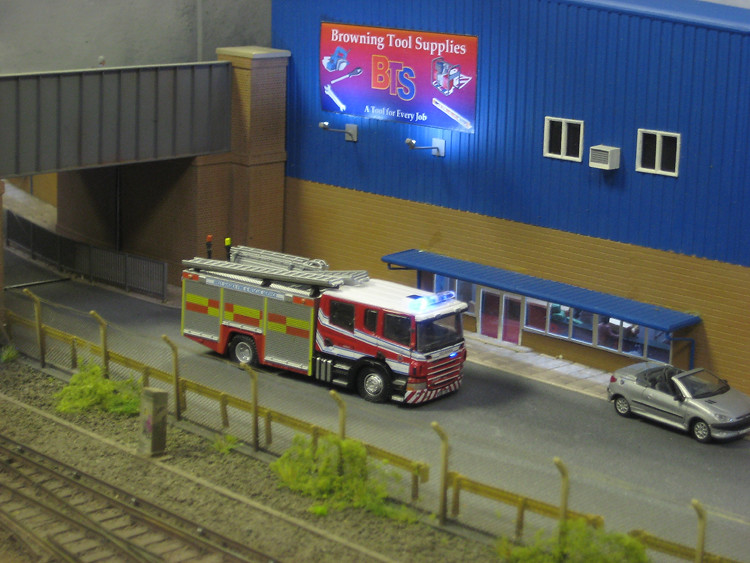
Below, the Fire brigade investigate the cause of another bin fire close to Browning Tool Supplies. Pete Hollman labouriously added the fibre optic lighting to the front, rear and roof of the model.
 Loftus Road by Worthing MRC by jamesmakin2002, on Flickr
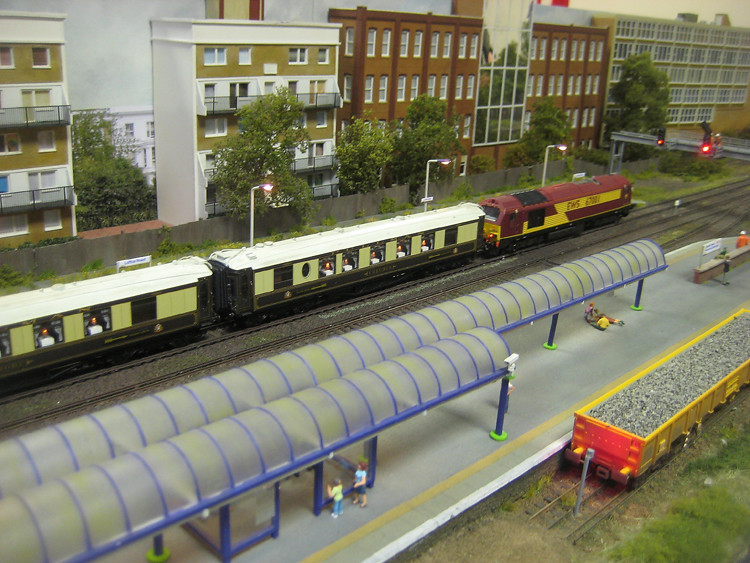
Whilst the station is more commonly served by Silverlink and Southern services from Clapham Junction and the London Overground, now and then there are specials, in this case a chartered Pullman set, hauled here by EWS' 67001. Disinterested boys play with their iPads on the platform, whilst the CCTV keeps a close eye on the passengers threatening to damage the shelters.
 Loftus Road by Worthing MRC by jamesmakin2002, on Flickr
We hope you enjoy the latest update.
More great news is that we've just received the go-ahead to further extend the layout and we hope to bring more updates on this exciting new development in the coming weeks.
We are always on the lookout for exhibition opportunities for the layout, so if you organise a show, or know of someone who does and would like to invite Loftus Road, please drop us a line!
Cheers,
James
-
35
-
I'm afraid that's been the going rate (especially for the SOs) for some time - it isn't one off or a fluke. The last batches of Hornby Intercity Mk3 SOs (R4295 and R4295A) sold out very quickly, another case of demand rather being underestimated.....
Fair play it is a nice livery too!
I don't buy coaches that often and still fondly remember the days I started in the hobby as a kid with pocket money and a coach was about £12 from Gamleys!
-
I'm watching this at the moment -
http://www.ebay.co.uk/itm/230943571121?ssPageName=STRK:MEWAX:IT&_trksid=p3984.m1423.l2649
Hornby Intercity Swallow Mk3 currently at £46 (with 30mins still to go) - I was originally on the lookout for some cheapy Mk3s to respray for my next HST project and bowled over when I saw what the bidding has reached haha!
These keen bidders - Ricky Gervais' 'Extras' catchphrase comes to mind - are you having a laugh?!
Excellent news for the seller though, wish it was me! Tempting to cash in on these BREL junkies and shed a few of my coaches!
-
Post War Years - All Eyes
Lovely bit of synth. Album coming out in a couple of weeks, can barely wait!
-
Some hauntingly good Norwegian electropop from way back in '09
-
Hi guys,
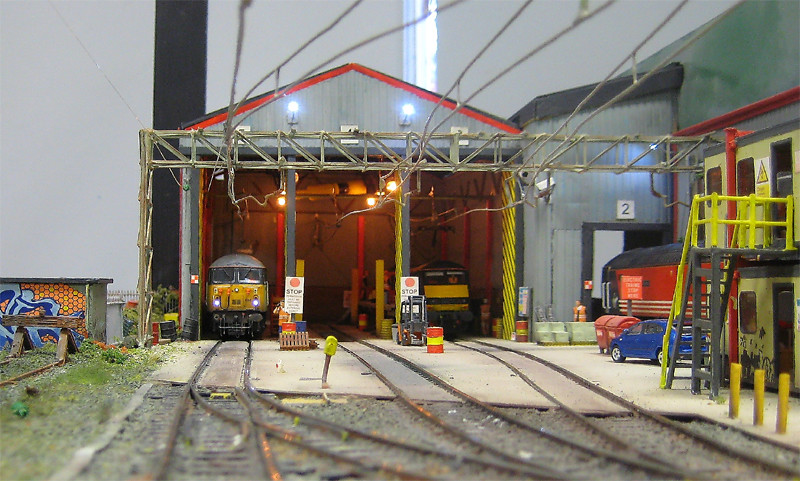
I recently did a feature on Wells Green TMD for BRM Magazine and for this I ended up delving through shedloads of pics of the layout in my personal collection, it was tricky choosing the final ones for the article, and hope you didn't mind me sharing a few 'maybe's!
"Wells Green: The Directors Cut"!!
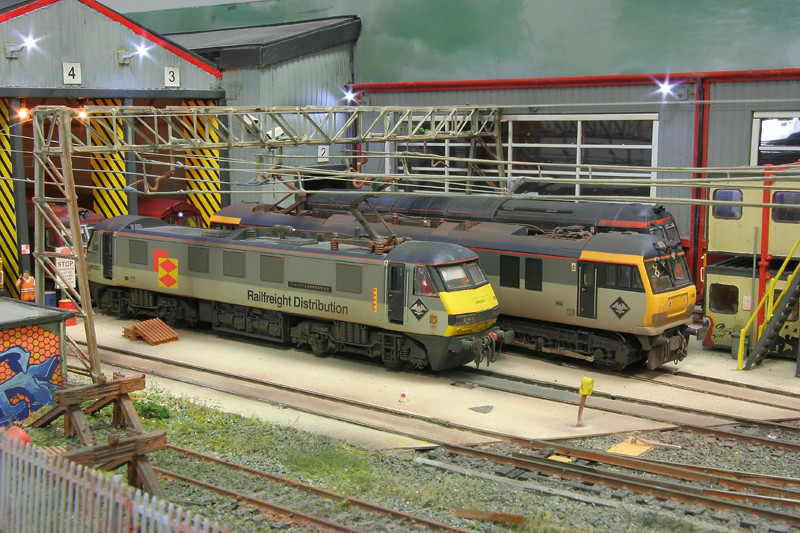
 Wells Green TMD by James Makin by jamesmakin2002, on Flickr
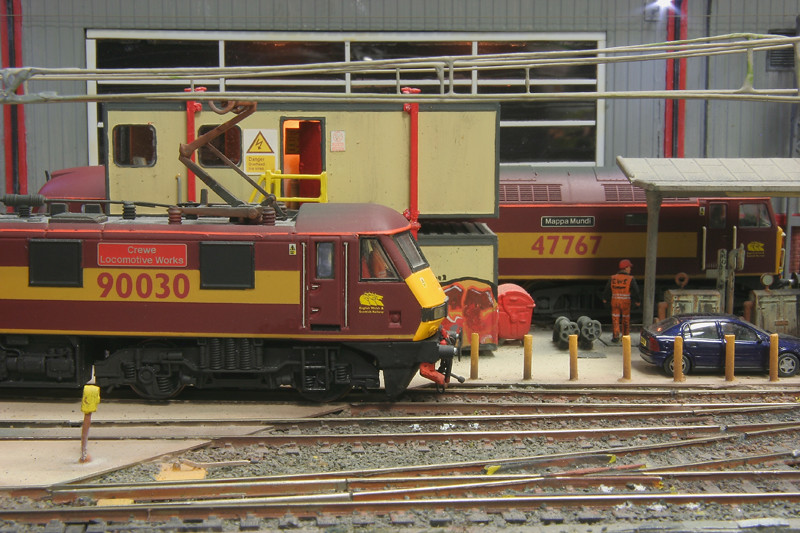
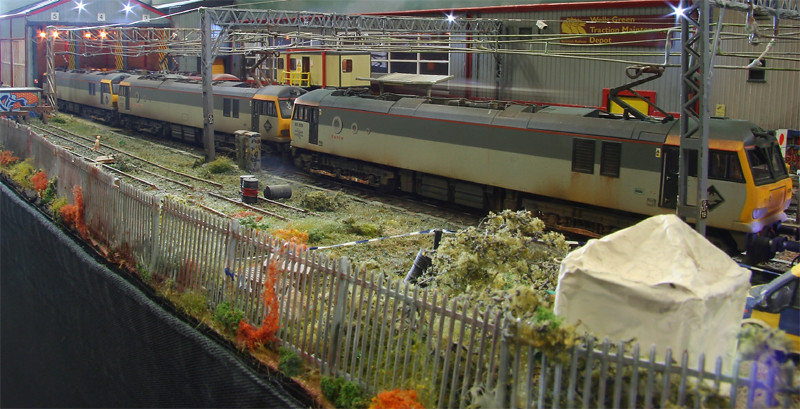
47767 Mappa Mundi, 60038 & 56033 Shotton Paper Mill
 Wells Green TMD by James Makin by jamesmakin2002, on Flickr
90030 Crewe Locomotive Works & that pesky 47767! If I recall, the real thing was only in service a few weeks after being refurbished before catching fire...
 Wells Green TMD by James Makin by jamesmakin2002, on Flickr
90022 Freightconnection & 92035 Mendelssohn
 Wells Green TMD by James Makin by jamesmakin2002, on Flickr
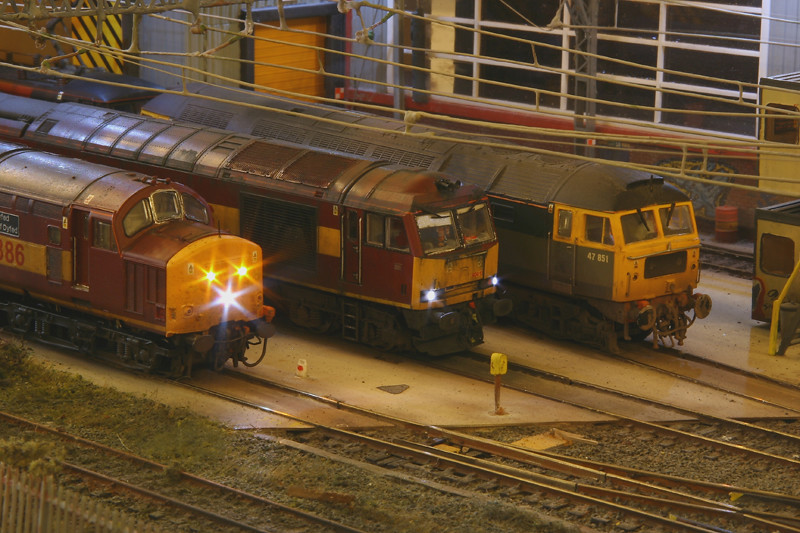
37886 Sir Dyfed/County of Dyfed, 60017 Shotton Steel Centenary Year 1996 & Virgin's 47851 Traction Magazine
I still really miss the Virgin Cross Country XLRA pool 47/8s, amazing times!
 Wells Green TMD by James Makin by jamesmakin2002, on Flickr
56033, 90022 & 47831 Bolton Wanderer
 Wells Green TMD by James Makin by jamesmakin2002, on Flickr
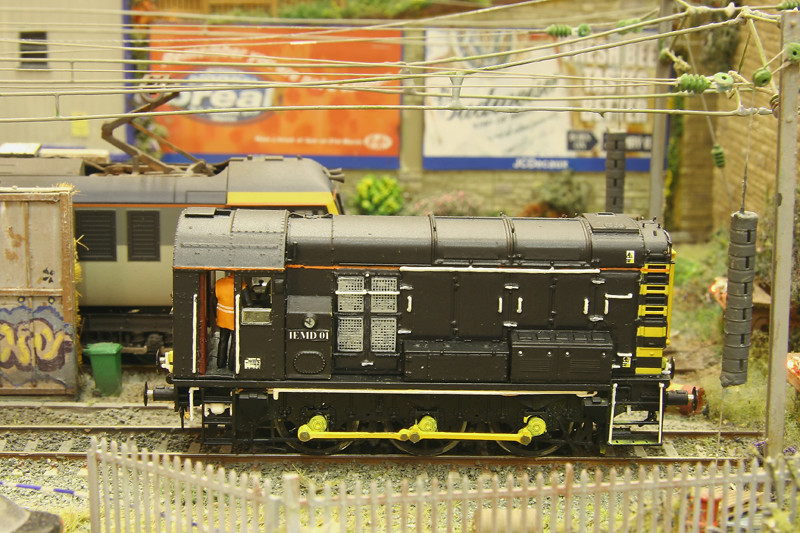
My favourite loco! Crewe IEMD's own depot shunter, IEMD 01. A real must-have for Wells Green TMD.
 Wells Green TMD by James Makin by jamesmakin2002, on Flickr
37886 on the fuelling point. Those company-car Vauxhalls were fairly nice, current vehicles when the layout was built, scary! How many do you see left on the roads now in decent condition?!
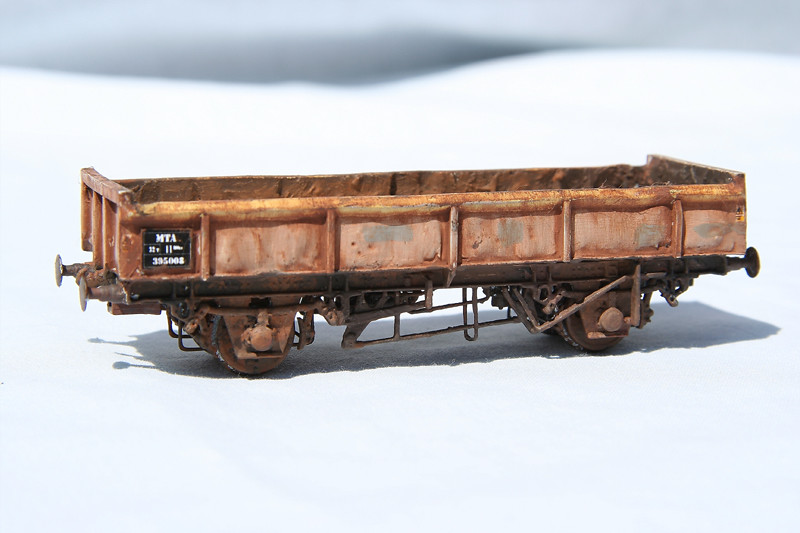 MTA Doorand 395008 by James Makin by jamesmakin2002, on Flickr
In between modelling loco's I'd occasionally model the odd wagon, this is MTA 'Doorand' 395008, a heavily modified EWS MTA. The underframe has been completely rebuilt with lots of fiddly pipework!
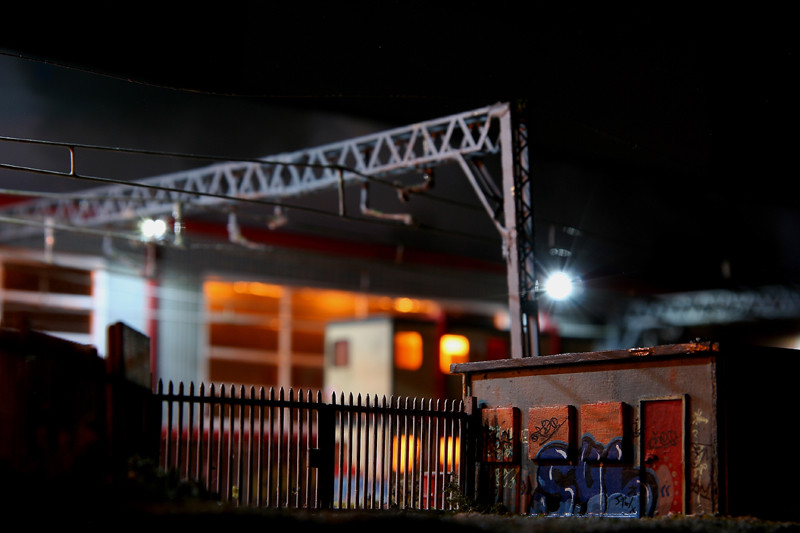 Wells Green TMD by James Makin by jamesmakin2002, on Flickr
A freezing dark night at Wells Green!
 Wells Green TMD by James Makin by jamesmakin2002, on Flickr
One of my non-EWS locos for the layout from a while back. The name really dates the project
 Wells Green TMD by James Makin by jamesmakin2002, on Flickr
What better way to re-create Crewe IEMD than a 92 stack!
 Wells Green TMD by James Makin by jamesmakin2002, on Flickr
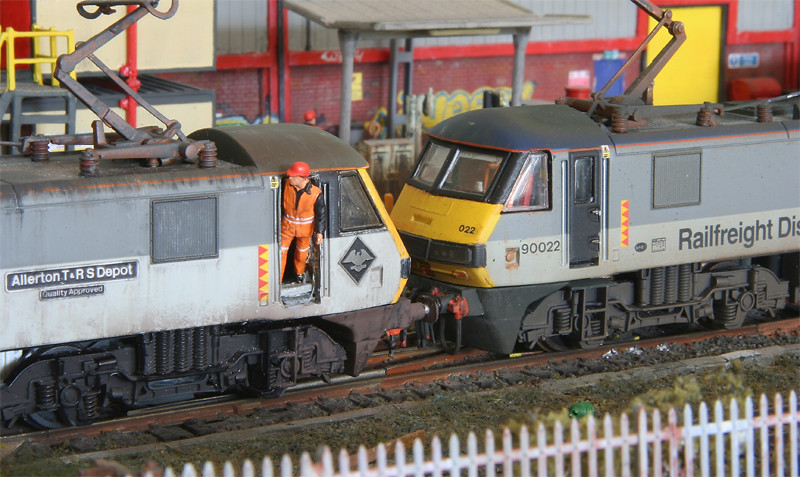
90027 Allerton T&RS Depot & 90022 Freightconnection. 90027 was the first electric loco I ever tackled and still my favourite.
 Wells Green TMD by James Makin by jamesmakin2002, on Flickr
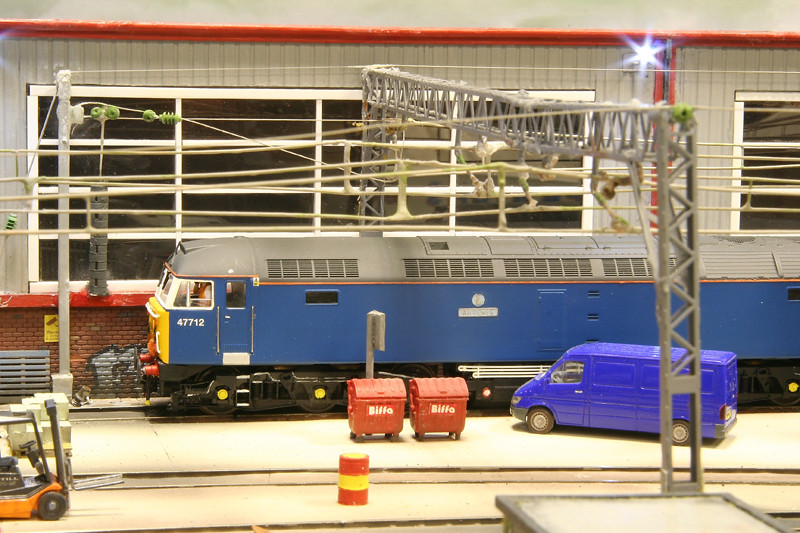
A pic of 47712 Artemis in the FM Rail Blue Pullman livery. In late 2005 I'd heard that the locos would be painted in the colour scheme and hurriedly bought a donor model and rushed this model out just as it was released from works!
Modelling the now-historic 2002 - 2006 period, this retro livery was ironically probably the last ever "current" model I have and ever will do!
 Wells Green TMD by James Makin by jamesmakin2002, on Flickr
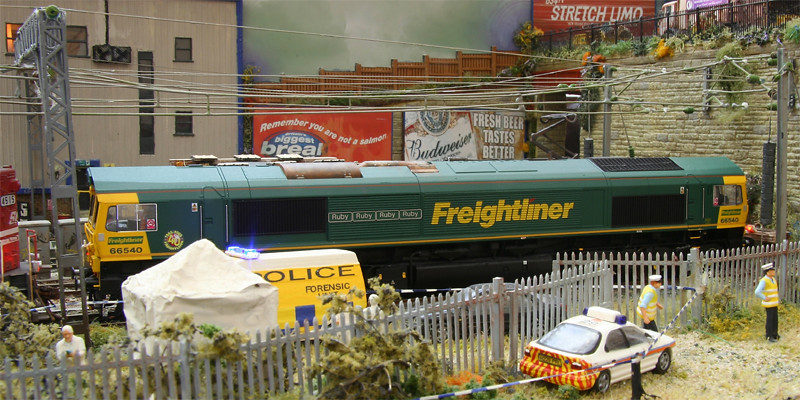
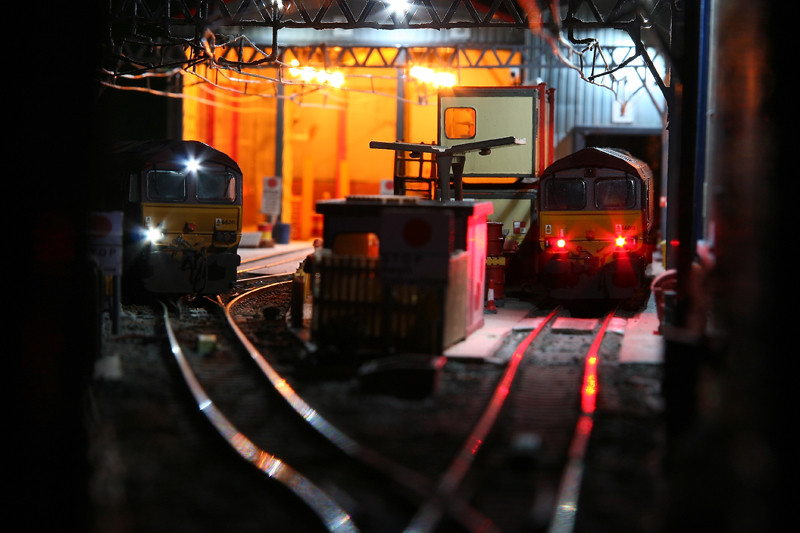
Finally one last night shot to leave with, 66241 and 66010. The 66's are an iconic part of the railway scene from the early 2000s and I wouldn't have it any other way!
-
16
-
-
Very impressive! Any chance of producing those cabs in N gauge? The reason I ask (beyond modelling in N gauge) is that the conversion might be easier as the sides could probably be done more simply using vinyl overlays. The great advantage of N gauge is that detail can be suggested rather than modelled explicitly.
Thanks! It'd be great to model these in N Gauge but it'd require all new masters etc which would take a fair old while to produce!
A good mate of mine is pondering doing just that very thing though (he has produced other N gauge items like ticket barriers, station DOO mirrors etc for sale on eBay occasionally), he's done a 319 end and said he was considering a 377 resin/plastic end. I'll have a word and if he gets round to finishing his models then I'll put links on this thread.
Cheers,
James

LOFTUS ROAD by Worthing MRC
in Layout topics
Posted
Thanks that's really nice! I know the guys will be really happy, there's a lot of effort put into the buildings, greenery and especially the fencing so always nice to hear feedback!
The next step is putting together the new baseboards for the larger fiddle yard (more trains, hooray!) and the new scenic extension to capture even more of that 'London feel'! Very exciting times await!