


Les Green
-
Posts
437 -
Joined
-
Last visited
-
Days Won
5
Content Type
Profiles
Forums
Blogs
Gallery
Events
Exhibition Layout Details
Store
Posts posted by Les Green
-
-
This is the link to the last nights TV programme starring Liverpool Lime Street. Not sure how long the link will remain active.
https://www.facebook.com/bbcnorthwesttonight/videos/1388688097828915/
-
Two years ago....
In November 2014 we took the layout to Cologne for the four day "31 inter modellbahn ausstellung 2014 keulen". The largest model railway exhibition in Europe with some 60,000 visitors.
For some reason, I've just found this YouTube clip of our layout, taken by a visitor to the show:
It certainly brings back some good memories of a great trip abroad, but also reminds me of how much the layout has developed over the two years.
Our next trip abroad is to Glasgow in February.
Till then, have a Merry Christmas and we look forward to seeing you in the New Year.
Steve.
And notice the complete lack of barriers. Something we are not used to in the UK!
-
- Popular Post
- Popular Post
Yesterday we installed the North Western Hotel on the layout. Previous to that Pete Goss had installed 156 figures on Lime Street. This was the first time the hotel had been photographed with the figures in position. We were lucky to share the moment with Andy York and here a few preliminary photos he took during his day with us.
First an overall view of the front of the hotel before it was put on the layout.

Note the crimson liveried doorman in front of the hotel. Also note the twists on the canopy support columns are left and right handed!

Viewed from inside the station. The row of station vendors will eventually be replaced by a more detailed set.

More photos when Andy has processed some more of his fantastic images.
-
 24
24
-
I Wondered about the station clock! And I wouldn't be a bit surprised!
The clocks don't work at the moment, but we have all the mechanisms to make them work. Just need a bit of spare time!
-
1
-
-
Do the phones work?
The problem with getting the phones working is finding the correct change in scale pre decimal old coinage. Decimal coins are not acceptable.
-
1
-
-
Absolutely staggering...beautiful work, and totally agree it needs to be preserved in perpetuity for future modellers...
More photos and videos, when you're ready please

David
The hotel staff and doorman will be arriving in a couple of weeks, so we will take more photos then!
-
1
-
-
I'll let you into the secret: it isn't a model. They found the shrink gun from 'Despicable Me'. This is the real hotel.
The reflection of my fingers and camera behind the phone box failed to shrink with our shrink gun. Must check the settings on the gun!
-
I couldn't resist putting a few more photos on of the hotel on the layout.


-
16
-
-
Seven years in the making. Five years of design and two years in the making! It is finally finished and will be going to the layout tomorrow. Hence the next set of photos will be of the hotel in place. But a few photos in my garage before it leaves!


-
18
-
-
Impressive. We had very little information on this building or its original use. Had I seen that picture before I started the model I may have done it differently. Though artists impressions sometimes were vastly different to the real thing.
Drawings now modified! I had the same ornate windows on the west wall. I would think it would be a plain wall if they chopped the west wing off when the hotel was built!
Thanks for the information.
-
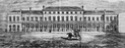
I'm sure I don't need to tell you gentlemen that the Lord Nelson Street building was designed by William Tite and dated from 1849. The building is shown in the print below, and is the same one in the photo in the post above, although by then with three rather ugly storeys added. The print seems to comply with the photo quite well, although the west wing has been displaced by the new North Western hotel, and the balcony has disappeared.
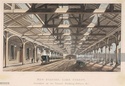
Also attached is a print showing the interior of the first Lime Street station. I don't think that the building on the left is part of William Tite's building as this dated to about the the same time as the northern iron and glass roof.
I hope this is of use, but suspect you have already seen these prints.
Impressive. We had very little information on this building or its original use. Had I seen that picture before I started the model I may have done it differently. Though artists impressions sometimes were vastly different to the real thing.
-
Nice crisp castings!
Is that the range that ran parallel to Lord Nelson Street? I remember them being demolished, and always thought they were the cheap rooms suitable for commercial travellers!
Yes, it is the building that was on Lord Nelson Street. We only have two photos of the original building viewed from Lord Nelson Street. As we cannot find any photos from the station side, mainly because it is hidden by the station roof, we are making the front the same as the back originally was. Our model will also be mostly hidden by the station roof!

-
12
-
-
Just found two etches that are supposed to fit on the bogie beams. Problem was I used the wider bogie as we don't have any tight curves. This was as recommended in the instructions. To widen the bogie any more is not possible. I have already had to omit a couple of spacing washers. I wish I had used the narrow version of the bogie, but there is no going back now. Getting less and less impressed with this kit as I go along.
-
I have been asked how we produce some of our castings for the buildings on the Lime Street layout. Once the hotel model is complete my next project is the office block along the North side of the platforms. Again this is a large building almost a metre long and five storeys high. Some of the windows along the front have stone pediments, some curved and some angled. These, I thought, would be ideal for castings to be made. So here goes on the technique used.
Detail from the 3D model of the building showing the window pediments.

From this drawing the two types of pediment are isolated.

and these are incorporated into a box so that a master can be 3D printed to make the rubber casting moulds

The drawing .stl file is then uploaded to the Shapeways web site for 3D printing in Frosted Ultra Detail. A few days later the 3D print arrives in a large box!

Using this a rubber mould using Sylmasta products is made

This is then used to cast the final pediments ready to incorporate in the office block model

I hasten to add that these components are the very first components to be made for the final model. The actual model has been designed and awaits the laser cutting process by Chris Dening at CD3D models of Harrogate.
Note that the clear liquid drops in the angled pediment are just water drops. I had just washed the castings before I took the photo and I had not dried them properly!
-
13
-
-
A few photos showing the progress of the Royal Scot chassis. I have made the cylinder unit and the spring/brakes unit as separate units. The cylinder assembly just slots on to the chassis. The brake gear assembly screws into the chassis from below, rather than above as the instructions indicate. Screwing in from the bottom requires six 10ba bolts. The kit instructions use twelve 14ba bolts screwed in from the top, a very fiddly operation!

The top view shows the six threaded bushes for the brakes and the forward one for the front bogie.

Finally the spring/brake assembly. Once fitted the axle bushes are located securely.

Hope it all works in the end!
-
2
-
-
At last I have finished the front bogie. I have ignored some of the instructions I received from Brassmasters and gone my own route to completion. The springs I have bought fit the bogie better than the supplied ones with the kit. Only time will tell if they are OK. If not then it will be difficult to replace them. I have reversed the technique for holding the bogie in position. I have soldered a threaded bush on to the mainframes which enables me to move the bogie forward 1mm to clear the front brakes. The bogie has a bolt with two thin nuts locked on. (At least they will be thin when they are a permanent fixture!) Hopefully that should all work.


The wheels are on straight. Perspective in this photo shows otherwise!

-
3
-
-
Les
Understood - but Glasgow is a long way!
Do you have anything else south of the border in 2017?
Best wishes
Tony
Our current bookings are:
Glasgow - February 2017
Doncaster - February 2018
Newcastle - November 2018
Wigan - November 2019
Hope that is of use.
Les
-
Would that be Doncaster?
In which case, you are currently missing from the list of layouts (as you were initially for Peterborough!).
Here's hoping that you will be there!
Tony
Doncaster 2018, not 2017. Our next outing is Glasgow in February 2017.
Les
-
Weathering of the hotel is in progress. I think this picture shows the immense size of this model!

-
16
-
-
Still working on the front bogie. I think I am more or less sorted with it now. Brassmasters sent me a couple of photos of a completed bogie that were useful in some respects. The lateral springs included in the kit seemed a bit small. This I have queried with Brassmasters and sent them photos of the packet contents to check if I have the right springs. Their conclusion was that the four small springs I have in the kit will fit the lateral spring shafts. Now anyone who has tried to fit a small spring with an inside diameter of 0.6mm on to a 1mm outside diameter shaft is going to fail. I am not impressed with their solution at all! Especially as the photos show a spring of considerably larger diameter than the ones supplied in the kit. I have sourced some other springs and I await their delivery before I can do the final assembly. I have modified the bogie locating screw by inserting a threaded bush in the loco frames. The screw holding the bogie is then screwed from the bottom. This may be a better solution. It also offers me the chance of moving the bogie pivot forward a bit if need be. I will take some photos when i am happy it all works. Thanks for all the help so far.
-
Change of plans……..
In a previous post I mentioned the Lime Street Crew were going on a “Jolly”.
Unfortunately it turned out to be not so Jolly for John.
We had all gone on a two day break to Hamburg to visit Miniatur Wunderland – the worlds largest model railway which I’m sure you’ll all have seen on TV or YouTube.
On the first evening John had an accident – he fell heavily in a restaurant and broke his shoulder. The local A&E dealt with him very well with X-rays and a sling and we continued with a very enjoyable couple of days in Hamburg.
However, John’s injuries are such that we have reluctantly decided that we will not be able to take the layout to Peterborough next month.
I know a number of our followers on RmWeb were looking forward to seeing us there, just as we were all looking forward to going and we are very disappointed to let everyone down.
Once we know how John’s recovery is progressing, we’ll let you know of our future plans.
In the meantime, we’ll all keep making progress on the various layout developments, and it will be all the better when we get a new opportunity to exhibit it.
Steve.
It looks like we will be attending the BRM show in February 2018 instead of this Peterborough show.
-
1
-
-
Hi Les,
I found a couple of pictures of my completed Brassmasters bogie. It's actually the bogie from the Jubilee chassis rather that the Scot but they should be useful. I seem to remember having to shorten the two compensating springs as they were a bit long. Other than that it was built as per the instrucitons.
 Brassmasters Bogie 009 - S.JPGBrassmasters Bogie 018 - S.JPG
Justin
Looks good. Useful photos. What keeps the bogie securing nut on. Loctite?
-
The weathering of the hotel is now progressing.


-
16
-
-
Les:
Do you have access to a copy of MRJ 149? There's a good photo of the finished bogie in it.
Yes. I will get a copy in the next few days.


Lime Street Station
in Layout topics
Posted
I could come and show you plenty of photos and details of the construction etc as I will be in Sydney area in March/April. Send me a pm.