


sparky
-
Posts
160 -
Joined
-
Last visited
Content Type
Profiles
Forums
Blogs
Gallery
Events
Exhibition Layout Details
Store
Posts posted by sparky
-
-
- Popular Post
- Popular Post
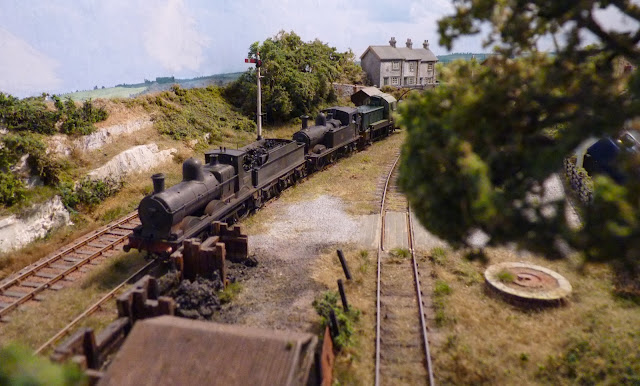
Thanks for your interest in the layout chaps, with it being so small its difficult to keep the photos coming without showing the same old scenes. Nevertheless here are a few more views of the layout, pending the addition of some signal wire pulleys.

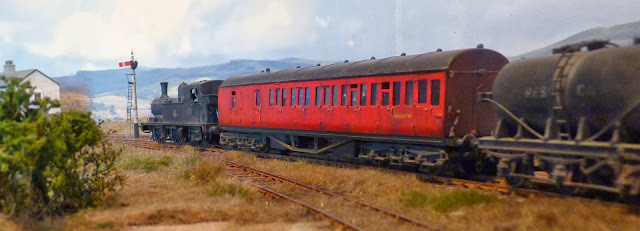
4678 is detailed Bachmann model, which has been converted to EM with Ultrascale wheels

The allotment huts are the work of my dear friend Iain Robinson, and feature full interior detail, even down to a pin up.

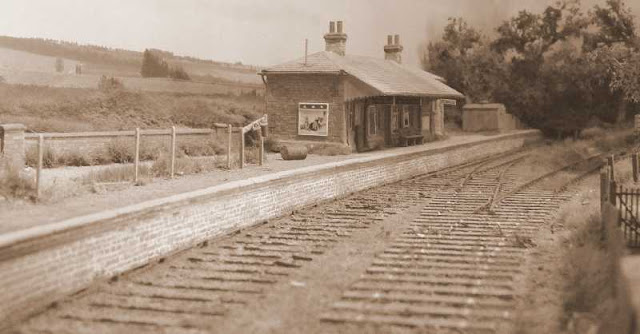
Llangunllo is set in the late 1950's, and well off the beaten track.

The long grass around the goods yard area, and between the track is slowly being built up with Mininatur static grass fibres.

Finally 4678 departs light engine in the direction of Titley Junction
-
 22
22
-
- Popular Post
- Popular Post
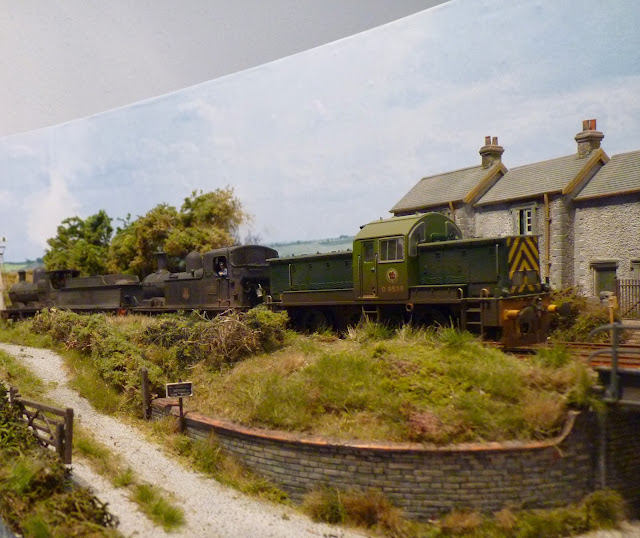
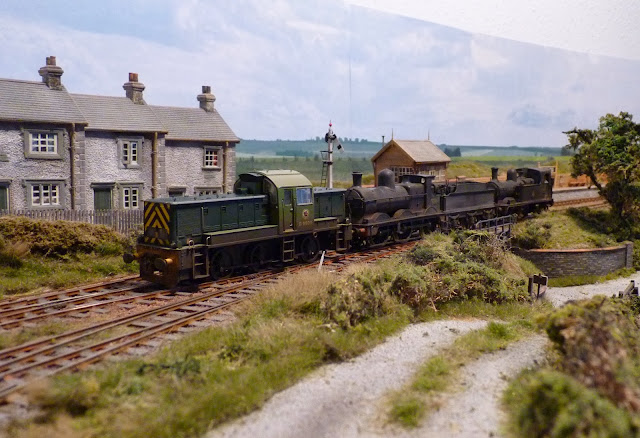
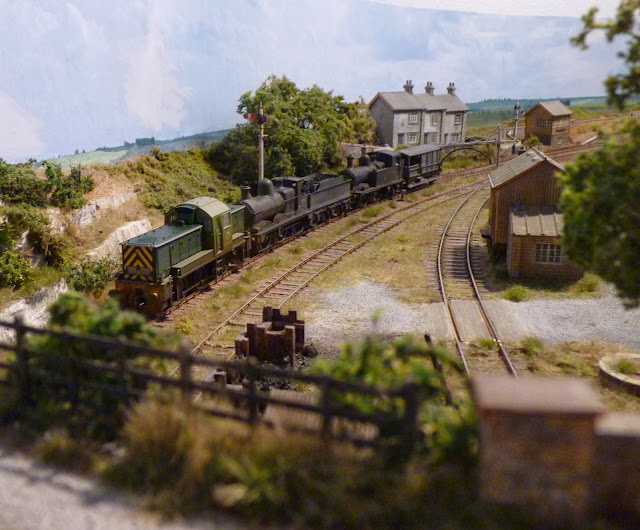
This selection of photos is of the new Llangunllo, and brings things more or less up to date, so I will disappear for now until I've got something new to share.
Cheers,
Geoff


-
27
-
- Popular Post
- Popular Post
Just a quick thank you for all your comments, and likes etc, etc.
I'm afraid that I don't spend a lot of time posting on forums, so it might be a while before anything new appears. In the meantime here's a few photos of the old version of Llangunllo, that were taken for my article in MRJ last year, but missed the cut.


Geoff
-
29
-
You can find a little more about Llangunllo here http://www.rmweb.co.uk/community/index.php?/topic/25359-penhyddthe-final-chapter/page-3&do=findComment&comment=2846912
Geoff
-
- Popular Post
- Popular Post
Hi,
Its been an awful long time since I posted here, but due to having my arm twisted I've agreed to post an update on the Penhydd story. I always felt a little guilty when I shut my Llangunllo blog down, leaving those of you who have followed my modelling in limbo. Alas the idiots out there left me with little choice, sorry about that, but if you could have seen what I had to deal with, then you would have done the same.
Llangunllo was an experiment, could less really can mean more, well for me I can honestly say that has been the case. Of course short trains, and small layouts aren't everyone's cup of tea, they didn't appeal to me at one time either. But with the passing of the years my attitude has changed, and now I'm content to model a slice of countryside through which a railway happens to pass, Its been an enjoyable journey, and I hope you enjoy this brief trip along the line.
Geoff

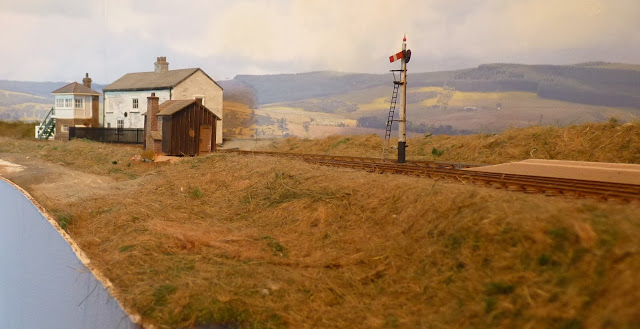
The River Lugg, and a scene inspired by on St. Mary's crossing signal box

Looking towards Knighton, which is somewhere in the distant hills. The goods shed is based on the one that once stood at Llanbister Road.

My version of original Limekilns station building, more commonly known as Dolyhir on the New Radnor Branch.

Track is to EM standards, and uses ply sleepers and C & L GWR two bolt chairs.

The coach is a Comet A44 Driving trailer, and makes a refreshing change from the usual auto train. The fiddle yard is fully scenic to give the impression of the line continuing into the distance towards Titley Junction

Road to nowhere, the building on the right is an offstage dairy. Its not modelled in full, the rest being left to your, and my imagination.
-
35
-
Thanks for your interest in Penhydd, and Llangunllo guys, as Richard pointed out my Dad is currently on holiday and rarely visits the forum these days. So rather than hear things from the horses mouth I'll do my best to fill you in. I'm afraid the blog has gone for good, things started to go wrong a while back, people couldn't comment, and at one time my Dad couldn't even reply to the comments that had got through. Then posts began to disappear, along with the blog list another bits and pieces, then the abusive comments started to arrive. From then on things continued to get worse, and eventually my Dad decided to delete all three of his blogs.
However all is not lost for you can still read about Penhydd and Llangunllo here on the forum at http://www.westernthunder.co.uk/index.php?threads/llangunllo-the-next-chapter.456/. And here at at http://www.rmweb.co.uk/community/index.php?/topic/25359-penhyddthe-final-chapter/?hl=penhydd, there might still be something on the old RMweb site as well, failing that all 109 Llangunllo posts can be found here at http://llangunllo1.rssing.com/chan-51234596/latest.php
Its a shame that the decent guys such as yourself can no longer view the blogs, but he just couldn't continue with them the way things were. As far as I'm aware my father has no future plans as regards blogging, but I believe a series of articles are planned for one of the modelling magazines.
Best Regards,
Simon
-
 1
1
-
-
No sure that Penhydd is quite finished with. Check Geoffs blog http://thechroniclesofpenhydd.blogspot.co.uk/
Penhydd never did get finished and last March it was dismantled, the old blog can still be viewed by clicking the above link. I had intended bringing the story to a close here but due to one thing or another I never got around to doing so, the following photos are the last to be taken before the axe fell and feature the branch stalwarts 1455 and 2538 being towed away to pastures new.............
Penhydd's replacement follows the same theme and has been slowly taking shape in the form of a remote might have been country through station between Titley Junction and Llanbister Road.
.
The full story to date can be found here........................ http://radnorailways.blogspot.co.uk/
-
11
-
-
- Popular Post
- Popular Post
Since Mickey asked this question, "Talking of creameries, Does Geoff / Sparky not post here any more? " on the November RM thread I have received a few emails asking the same thing. The truth is I had announced on my blog here earlier this year that I felt I had taken Penhydd as far as I could, so rather than just repeat the same old stuff I decided to pull the plug on things whilst I was ahead. The content hasn't been lost because it can all be viewed on my external Chronicles of Penhydd blog should you wish. Another factor in my decision was the software problems that the forum was experiencing around that time which made it much easier to post updates on my own blog.rather than here.
Lastly I feel a little awkward posting here now it's a commercial site seeing as I write for a competitors magazine, however I must point out that no pressure has been put on me by any editor and the decision and view is mine alone. Hopefully this has set the record straight and before the rumours start circulating I have not fallen out with anyone here, well not as far as I know ?
At the moment Penhydd has been dismantled and it's replacement planned so I will leave you with these last images and my thanks for your interest shown in the model over the past years.


Best Wishes,
Geoff
-
23
-
- Popular Post
- Popular Post
Totally seamless! I can only assume you resurfaced the whole of Penhydd Hall Lane to avoid a joint.
Regards
Richard
Cheers Richard,
Sorry that I haven't replied earlier but I rarely visit these parts.
I didn't actually resurface the whole road but just added a patch made from Das modelling clay which was stippled with a stiff brush until it's texture matched the other surface. Washes of Paynes grey and white acrylic paint were then appled until the colour matched, finally a dusting with baby powder blended all together.
A couple of photos showing the completed lane, a new lighting rig will take care of the shadows thrown by the tree.....I hope !


I might as well post a couple of photos of 1455 whilst I am here for those who might not have seen it on my blog.
This is a modified Airfix body with much added detail and runs on a Comet chassis built with the floating sub chassis option.


-
24
-
Many thanks to old friends and new for all your kind comments.
 steve fay, on 14 October 2011 - 21:46 , said:
This is an excellent representation of a GW BLT.
The modelling is superb.
I know some people say these themes are done to death but just looking at this it's re invented it all over.
Brilliant.
Cheers Steve,
The idea behind Penhydd was to get away from the usual chocolate box GWR and model it as I knew it in the 1950's. The WR being just as rundown and dirty as the rest of the BR system. I also set the location of the model on the Welsh Borders rather than the usual Devon and Cornish locations.
So instead of green engines with shining brass and copper you see them in weathered black livery, in fact everything has been toned down to reflect a less colourful age and a place well off the beaten track, rather than a bright, busy seaside terminus and I feel it makes a huge difference .
Lovely Layout Geoff, very inspiring.
What's the overall size?? It looks huge, but I have a feeling it's not as big as it looks.
All the best,
Matt.
Hi Matt,
The attached plan will give you an idea of size, note that the siding with the goods shed on it has now been extended onto the cassette deck which has been widened ready for a new creamery.

The new goods yard arrangement


I feel a curved baseboard and backscene with a big sky and low horizon add to the feeling of space. With a straight plank you normally see everything at once but with a curve if planned carefully that is not possible. As this last photo taken from near the control panel demonstrates
I don't normally update this thread as I have a blog here on the forum " The Penhydd Diary " and my own blogspot " The Chronicles of Penhydd" you can see more about the layout on those sites and you should find links somewhere on this thread to take you there.
Cheers,
Geoff
-
13
-
-
Cheers Simon,
How long did it take you to dig this one out, my last post here was dated 18th December 2010 and I had forgot all about it !
You will find more recent post here........http://www.rmweb.co.uk/community/index.php?/blog/69/entry-7259-progressupdated/
The Pannier has changed a lot since then and now looks something like this.

Cheers,
Geoff
-
5
-
-
Evening All,
Having received a few request for news of Penhydd here is a brief update as to the current state of play.
The Hymek is now complete and numbered D7039, it is seen here entering Penhydd with empty milk tanks.

Another milk tank has been converted from the Dapol model and features an end filler cap and different catwalk / ladder assembly. Three more tanks await conversion and will be tackled in the New Year, together with the long awaited dairy.

Pannier tank 4678 was completed today but no pics. have been taken yet.
This one taken at the beginning of the conversion shows extra lamp irons, a new smoke box dart and sanding gear linkages. New No. plates made from Martin Finney etched parts have also been fitted. Despite looking a little heavy the lamp irons are to scale and look much neater now they have been blackened. Wheels are by Ultrascale and are a simple drop in conversion job.

I have also been asked if I have a general view of the whole layout, after looking through my pics. I came up with this old one.

Finally

-
10
-
-
The downside of this, Geoff - and one of the reasons you went for the blog type of posting initially - is that you will get lots of compliments (many of which would be more personal and meaningful as a PM) and lots of "me too" posts.
The only way to combat this is with a regular stream of updates, so that we don't have to wait too long for another inspiring selection of photos!
(Dang: I've drifted into compliments territory.)
To be honest Simon I thought blogs were the way to go but I don't feel the majority of people feel comfortable with them, somehow discussions don't seem to flow.
I do agree with you that PM's should be used more and indeed I have made many friends that way.
Lovely, bags pf atmosphere and great attention to detail.
Do you use a grassmaster?
Hi Blackrat,
No I don't use a Grassmaster, I use a mix of hanging basket liner, Silflor and static grass applied with a simple puffer bottle. I did a tutorial showing my methods on my blog here on RMweb http://www.rmweb.co....lflor-tutorial/
Cheers,
Geoff
-
There are not many passengers on that bubble car Geoff.I can see your station being closed by Mr Beeching.

They all crawled out of the pub and went by bus Rob !

-
6
-
-
Have to say that I think your layout looks stunning in your pics.
Colin
Cheers Colin.
There is an alternative thread for this sort of picture...
So my son keeps telling me but I am happy posting here.

Anyway moving on, a little more weathering was done on the Hymek today and then the clock was wound forward to the swinging sixties.
Having dropped the brakevan off a couple of empty milk tanks were propelled under the bridge and into the dairy siding.


Whilst all this was going on a Bubblecar was waiting for the road with a local passenger.


Cheers,
Geoff
-
8
-
-
Those milk tanks look just as I remember them on the Whitland- Kensington workings in the early 1970s. I wonder if one of the etching suppliers might be persuaded to do some of the various combinations of ladders and platforms which were a characteristic feature of these wagons?
Hi Brian,
Now that has given me an idea, David Geen does a kit in 4mm scale for a GWR tank, now I wonder if the ladders and platforms are available seperately ?
Cheers,
Geoff.
-
Evening Chaps,
I mentioned earlier that I was converting an old Lima milk tank to EM and making one or two improvements to it as I went along. The completed model can be seen on on the right in the following photo, beside it is the Dapol model. Another tank has already been converted to EM and I am toying with the idea of modelling it with an end filler cap

Just musing, but would it be possible to put a blob of filler on the inside (small blob) and outside (larger blob) to give an impression of the chairs?
I am thinking of the work of that EM master Peter Denny, who used a big blob of solder on the outside and a touch of poly filler on the inside.
It has crossed my mind Simon and when I first built the points I did try cutting a few chairs from waste sleeper base to see if I could improve the look of things. To be honest adding the chairs drove me crazy, so I think it would be rather difficult at this stage to add a uniform blob of filler and retain my sanity.
Hi Geoff
I must admit that I hadn't come across your layout before on the Forum and just wanted to say I think you have done a brilliant job in evoking that most elusive of things - atmosphere. Either it exists on a layout or it doesn't - no matter how good the modelling. I certainly agree with a previous comment as well about the superb realism on the weathering of the milk tanker - it's certainly how I remember them. Any info on how you achieved that would be very welcome. In the meanwhile I shall hide my tankers until I can arouse some confidence to have another crack!!
Really great Geoff & many congratulations and I look forward to any future photos you may post
All the best
exmoordave
Thank you Dave,
I think in some respects the forum has become a victim of it's own success, you could spend so much time here trying to view all the content..
As for milk tanks I can't remember taking much notice of them, I was more interested in what was pulling the train rather than what was behind it ! However I have been lucky enough to come across a few colour photo's and have used them for reference.
Precision paints and Carrs weathering powders have been used on the models. I started off painting the solebars and tank in Dull Dirty Black, some of which was slighty removed around the tank lettering with a cotton bud. Below the solebar I have used a mix of the same black with Brake Dust, the mix being varied as I have gone along. Some of this has also been lightly brushed on the frames, tank supports, headstocks and brushed up from under the tank. White milk stains are Dull White mixed with a wash of dirty thinners and allowed to run down the tank onto the frames. A little light rust has been dry brushed over raised detail such as rivets etc. Whilst the paint was still tacky shades of grey weathering powders were added to the tank with a little rust thrown in for good measure. Off white powders were placed over the white stains and rust also applied to the axle boxes and brack blocks, you will find that the powders will help blend everything together.
I hope the above is of help and you will get those tanks out and see what you can do. The most difficult part is plucking up the courage to weather a brand new model, so practice and experiment on an old broken one first.
your memory has served you well, your recollection from your personal observations is plain to see, and the overall, consistently excellent effect is due in no small part to that first-hand experience that you bring to the picture. All that can be seen is plausible, nothing out of place, and no hint of any "model of a model" cliche - this is very definitely a model of a railway rather than a model railway.
Thank You John, it is very satifying that so many others can see what Penhydd is all about.
Before I sign off just a couple of photos showing the milk tanks in action.


Cheers,
Geoff.
-
8
-
-
Fantastic

Oozes atmosphere - if the pics were b&w, you could think they were from the '50s
Thanks Jules,
You mean like this ?

Cheers,
Geoff
-
6
-
-
Hi Chaps,
Hi
Good to see you back one here, more photo please .
Darren01
Thanks Darren,
I will slowly add more photos but am wary of duplicating those on my old blog
Geoff, I dont say this lightly but that milk tanker is probably one of the most convincingly weathered freight vehicles I've ever seen - it certainly belies its origins and proves that overall appearance and colouration are just as (or more) important than absolute fidelity to prototype
Thank you Ian that is praise indeed, but I have to say I had a pretty good mentor didn't I ?

For those of you who haven't read Ian's weathering topic then do so, his methods really do work and with a little practice you will soon have some nicely weatherd stock
I think Dapol made a huge mistake with the 6 wheel tank because with a little more effort they could have produced a superb replica rather than the cross breed they have. As I write this another tank, this time a converted and I hope improved old Lima example is in the final stages of weathering.
The pic. below is another shot of the Dapol model in different surroundings.

Hi Sparky
Have to concur with all the other respondents: fantastic layout and full of atmosphere. Back scene really effective. Did you trace the outline of a photograph and then paint with watercolours/oils/emulsions? I must say, personally, I prefer painted backscenes to the new panoramic photo variety. Perhaps I'm just a traditionalist?
Regards,
Jonte
Jonte, Alan,
Thanks for your comments,
I expect you will be a little disappointed to learn that the backscene is German ! I got it from http://www.internati...ackscenes.html. Look at the one titled "The Valley " and it's extension piece. I cut most of the foreground away just leaving a low horizon and large expanse of sky. This gives a feeling of depth and certainly makes the layout look wider than it's 16" max width.
Don't rest on your laurels, mate, but it doesn't get much better than this, does it?
One thing I noticed about the PCB pointwork, is that I cannot see the gap in the copper surface. I presume you have gone to the small trouble of applying filler?
The impact of this is immense: although it will never look as good as chaired track, the thing that usually lets PCB track down is the gap left on the surface: another example of appearance and condition having a big impact on the final scene. Here the eye is not drawn to an easily rectifiable omission, because you have rectified it, and the missing chairs are not so obvious as the eye is elsewhere, focussed on the trains/backgroun, etc.
Hi Simon,
It certainly doesn't get any better, Ians comment has really made my day I can tell you. Don't worry though my feet are still on the ground and my hat still fits.
Yes I did fill the PCB gaps, all it takes is a little Squadron Green and as you point out makes all the difference. I think the absence of chairs is more noticeable on the inside of the rails. When I started to build the pointwork for Penhydd it was a case of ply and rivet or PCB. The new systems by C & L and later Exactoscale were still to appear, if I was starting again then I would be tempted to try the new "Timber Tracks " products. PCB has however served me well, reliability being superb when operated with slow action Tortoise motors.
Paul,
Glad you found the tree thread of use and the photos inspiring.
Cheers,
Geoff
-
2
-
-
Hi Chaps,
Hi Geoff
You have that right! I am still toying with the idea of backlighting the layout
Really looking forward to your new pics
Cheers
Jim
Interesting Jim, knowing you we should see some interesting shots., thought pic. of the week showing New St. was brilliant.
I tried capturing a natural sunrise on Penhydd earlier this year as when it rises and shines it casts a fantastic effect over the layout. I couldn't quite capture the scene with my camera though, mind you I didn't get many chances with our weather this year !
Anyway moving on, some rather nice comments have been made about the layouts atmosphere........thank you. Those who have followed Penhydd on my blog or the old RMweb will be aware that the whole idea behind the layout was to capture the feel of the rural branchline as I experienced it in the fifties and sixties.
This whole thread kicked off with the arrival of an early evening passenger train and I will pick up the story from there.

Having passed the small goods yard 4560 rumbles over the bridge and into the platform.

Once uncoupled she runs into the loop prior to backing into the cattle dock to collect one solitary milk tank. The tank is a modified Dapol model and is heavily weathered, the real things were filthy.

With the tank coupled upto the train 4560 gets the right away...................

................next stop Presteign and then all stations to Leominster.

Cheers,
Geoff
-
11
-
-
Well thanks Chaps for all your kind words

All this has come as a surprise as the post was a result of my son uploading one of my pics. elsewhere on the forum. The Mod's decided it was more suited to this area and so moved it here thus starting a new thread !
To be honest I prefer it here with the old format and so will be taking Penhydd off blog. and posting anything new here. I won't be moving any material from the blog here as it is available on http://thechronicles...d.blogspot.com/
As for shadows Jim, you are going to need them all on New St., !!
I have a new batch of pics. and will post them here soon.
Cheers,
Geoff
-
1
-
-
- Popular Post
- Popular Post
On a late summer evening 4560 passes Penhydd goods yard with a local passenger

Cheers,
Geoff-
25


Change here for Penhydd, Llangunllo & Bleddfa Road.
in Layout topics
Posted
Cheers Alan,