


Paddy802
-
Posts
45 -
Joined
-
Last visited
Content Type
Profiles
Forums
Blogs
Gallery
Events
Exhibition Layout Details
Store
Blog Comments posted by Paddy802
-
-

Thanks for the info regarding the figures. Sorry not to have replied earlier but i`ve been away and only just got to look at your blog again.
Many thanks.
Jim.
Hi Jim
No worries, I'm not on the web to often either. Sort of dip a toe now and again lol.
Paddy
-
Unfortunately you're right. Mainly Trains did close last year with Dave Cleal's retirement.
Sadly the way of many small firms these days.
Nice looking engine!
John.
It is sad news. Hopefully there isn't going to be a decline in the kit and detailing companies as time goes on, it will be a sad day when we have to make do with the RTR models as they are from the bigger companies. I've noticed as time goes by and some of the older modellers retire from the scene that the younger modellers are missing out on lost knowledge. I watched 2 you tube videos on weathering the other day and in both they didn't know what the sand filler caps were!
I certainly am no font of knowledge but I try and read up on the locomotive I'm dealing with.
Or in the case of this locomotive some one else did the research and I just read the magazine article!!!
Thanks for the kind comment and the info.
Paddy
-
Nice work. Could I ask where the loco crew came from? they`re very realistic.
Look forward to seeing more pictures when time allows.
Hi Jim, the figures are from 'ModelU' it's the company that scans and 3D prints real people, they have a web site where I bought a big heap for my loco's. They come unpainted and are 3D printed red plastic. Non of them are scans of me just the readily available figures of the web site.
-
Brilliant Model, with a beautiful paint job to finish it.
-
Thank you Paul.
-

Hi
Usually they are grey depending on region, I'm sure GWR would have had a more elaborate paint scheme and a conical top sometimes. The Base seems quite high but there may have been a small square for track side positioned water towers of this sort. Although I have seen pictures of them on the end of station platforms, the sock piping that is replicated by the black rubber on the model often dangled but a few feet from the floor.
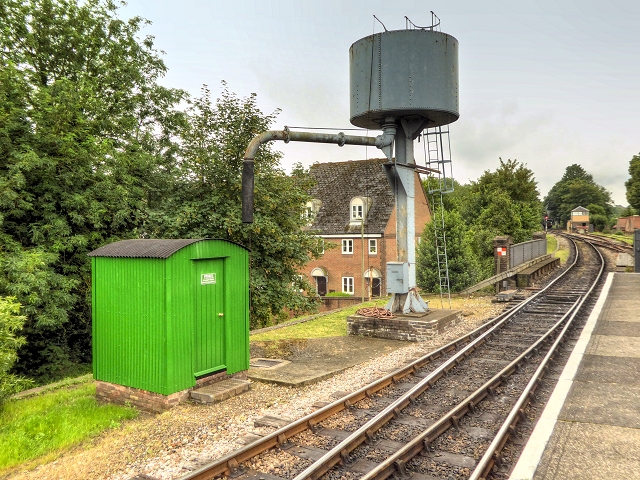
Hopefully the above image may be of some use.
Cheers Paddy
-
Great layout Paddy, I'm following for more info. I'm intrigued by your ballasting method using grout, any more details ? Regards Tom
Hi Tom
I was looking up methods for ballasting on google and found an image which blew me away, so I followed the link :
http://model-railroad-hobbyist.com/node/26947
I varied my method slightly, I still used Mosaic dark grey tile grout (There is even an excellent concrete colour which I also bought for possible future uses). As I'd already started ballasting the traditional way with fine black cinder ballast which is found in most model shops, I wanted to maintain consistency, so I still went ahead and ballasted in fact covered any area that was to be ash and cinders with the 'woodland scenics' fine cinder ballast. I then drenched it with Surgical spirits that I'd put in a fine mist spray bottle, I got both the bottles and the surgical spirit from Sainsburys pharmacy section (Top tip when asked why you need 3 bottles of surgical spirit by the pharmacy staff, do not say for cheap drinking like I did.. oops). I then secured the ballast with the old 1/4 PVA to 3/4 water mix (roughly) and a drop of washing up liquid method. I also found that keeping the surgical spirit at hand meant that if I had any glue mix that wasn't sinking into the ballast a quick blast from the surgical spirit helped the ballast to absorb it. I then left it over night till dry.
When it came to using the grout I put the grout on dry (in powder form) you don't need a lot and a teaspoon was used for this, along with an old paint brush to spread it about, once I'd got an even spread I then used a larger spray bottle of nothing but water to drench the grout. I will say make sure that all areas which you don't want grouted are clear before this stage (a slightly damp brush is good for this) and also keep a good distance away from the grout with the water spray as if to close the pressure blows it every where, whilst still damp I pushed an old truck with quite big flanges along the track I'd just grouted.
The grout drys really quickly so within a few hours I was hoovering up loose bits and cleaning the track, I obviously kept all turn out ties free of ballast and grout so they could still move.
I had two practice goes on two lengths of spare track, one method being the above and the second being that I mixed the grout first in a bucket and splodge it on before spreading it about, the second method would be good for concrete, compressed and hard standing but it had a bit of a shine to it that I didn't like, but I'm sure sanding would rectify this, I didn't fancy sanding 7 feet of base board though (The hoover filters couldn't take it).
I bought the grout from the same dealer as mentioned in the link :
I still had enough grout left to fix a few tiles in the bathroom as well.
I will also say that nearly every rail forum discussion (especially the American ones) I read about using grout said avoid this method, but I found it was both quick and easy and a little bit of tidying up round the point work isn't really the end of the world.
Hope this helped. Cheers Paddy
-
Thanks for the positive messages, I think I'm at the stage that is most enjoyable as a modeller now, to be honest its all been enjoyable, bar the tiling of roofs!!!!
I've picked up a lot of skills with this layout that mean I'd be more confident and probably save a lot more money when the time comes round to building another layout.
-
Hi Paddy, sorry not to answer sooner but I`ve only just got back on the computer. Thank you for your kind comments. The puddles were created using Woodland Scenics Realistic Water. It really needs using around this time of the year as it cures better above 50deg F. All the instructions for using it are on the bottle. I find adding puddles adds just a wee bit more to the overall effect. Apologies again for not answering sooner. Although I`ve used this forum for a while now I`m never really sure if I `m in the right place when answering people.
I shall watch your progress with interest.
Cheers just now,
Jim.
Thanks Jim, I am mightily impressed with your layout, its very atmospheric and well thought out with excellent modelling. Thanks for the tips with regards to the water, my layout is in the conservatory so the preferable high temperature is no problem!!
Cheers Paddy
-

They look Brilliant. Plasticard is a gift from the modelling Gods.
Not to deviate from your excellent modelling but of interest what did you use for the puddles?
Paddy
-
I used a similar technique to make my control panel, even to the point that I also used a knife to cut the ply sheet, how I've still got my fingers I don't know. Anyways yours looks better than mine by a long shot!!
-
Thank you Londontram, I'm pleased with the result. I didn't want things to be overcrowded but I'm struggling to to get bits and pieces to fit. I'm currently constructing the sand house and have spent some time on it, only for it to be placed behind the engine shed out of sight.
-
Thanks Don, I'll be ordering one up, I have seen that faller do one but its very chunky and a bit short. The Brass masters one is far superior. I have been up a caged ladder in my past but the feeling I got was its more to bounce and bang off on the fall down, with the traditional open ladder its not the fall that hurts just the landing!!!!
-
I too dislike ladders and heights, luckily my job keeps my feet firmly on the ground most of the time. By hoop's I presume its the handrails to the side which arch over at the summit? Would you have an idea to roughly where about the hatch would be?
-
I see that you have neatly scored representation of the planks and their lengths, however (sorry to be pedantic) there is no access hatch to service the water inlet and valve -- (much larger but similar to the domestic toilet cistern).
Making a cover avoids having to show the internal bracing of the tank panels, and the water inlet, -- Definitely a bonus.
I'm on shaky ground when I suggest that there would be an indication of the water level somewhere on an outside wall. Other RMwebbers will be more knowledgeable on this than me! We had such indicators on the industrial water towers where I worked ....Many years ago !
Your right Don it does need an access hatch, which I never put in ( Doh!! ),it shouldn't be to big a problem as the planking is balsa strips stuck to a rectangle of cardboard, which should be fairly easy to cut. There is a small hole at the front left corner of the cover which is for the water level meter, but as its a small piece that I keep knocking off I haven't refitted it yet, but will do once the whole structure is planted permanently.
I can't believe I didn't put a hatch in though (Double Doh!!)
Cheers Paddy
-
What an awesome and dominating building, brilliant. Paddy
-
I think I'm correct in assuming that even such large tanks were covered in wooden planks. That might help your water problem. Nice work, though. Very impressive.
I took your advice Heather and have made up and painted the planking to day, it should be dry by tomorrow and then can be fitted. Thanks Paddy.
-
Thank you all for the kind comments.
-
Looks very good. That second shot in particular has so much atmopshere, and all the shades blending nicely together.
Sorry about your teeth, I hope there will be a few left when you're done :-)
Thanks. I have started the laborious process of engine shed roofs again after the fun of weathering. I'd put a post up about my recent modelling but model roofing is very very very very dull!!
-
Liking the ashplant. Looks much like the set up at Kingmoor and Upperby. Dave.
Thanks most of the ideas came from a book I have on Ex LNWR depots, and what was available commercially and within budget. I actually live in Upperby and walk the dog by the old depot but there isn't much left, just the carriage sheds. Paddy.


Getting ready for Taunton
in Ouse Viaduct/Balcombe/Lewes project
A blog by 10800 in RMweb Blogs
Posted
Just found this Blog. That is an awesome piece of modelling!
Paddy