


jwealleans
-
Posts
7,546 -
Joined
-
Last visited
-
Days Won
1
Content Type
Profiles
Forums
Blogs
Gallery
Events
Exhibition Layout Details
Store
Posts posted by jwealleans
-
-
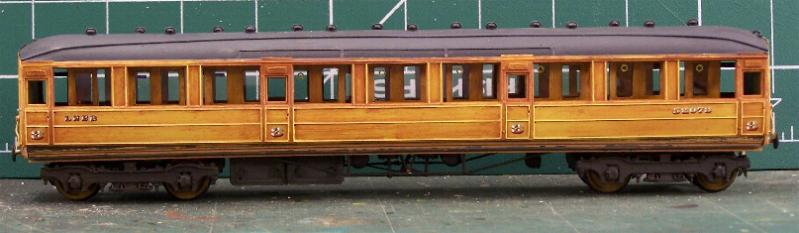
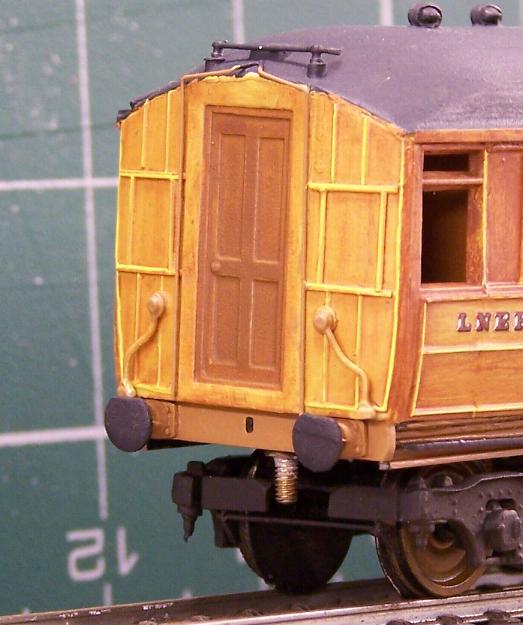
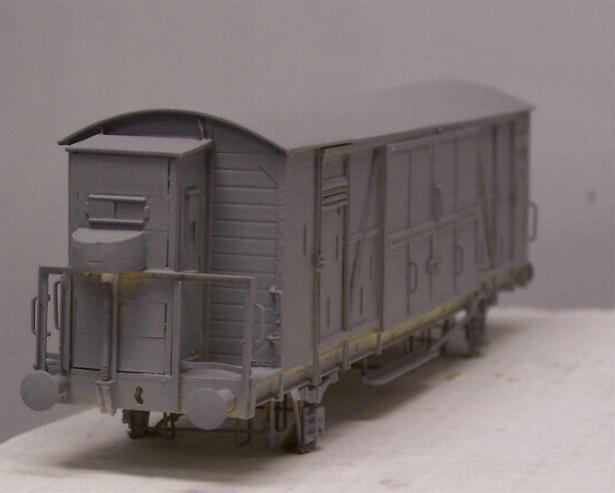
A quiet and hangover free day today and I hope the rest of the year is as productive. I've got to the stage with the coach where I need to leave it for a few days for the paint to harden and to be able to pick out the details I've missed when I next look at it. Bill B kindly pointed out what the unidentified bits on the etch were so I've added those in. I added the stepboards to the bogies last night and primed everything so it can harden off for a week or so. Door vents were superglued into place after the etch primer on the body.

So, today I turned my attention to what was actually supposed to be the project last Christmas. Now you can imminently get them off the shelf there may not be too many more of these built:
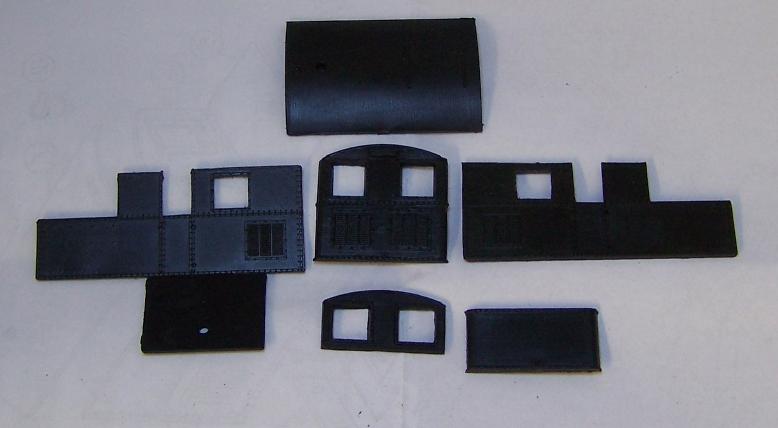
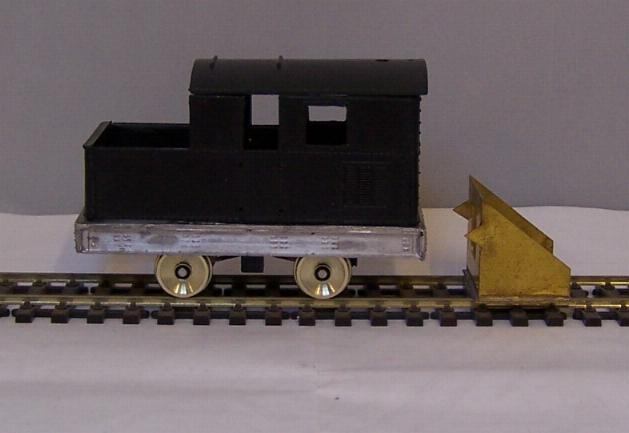
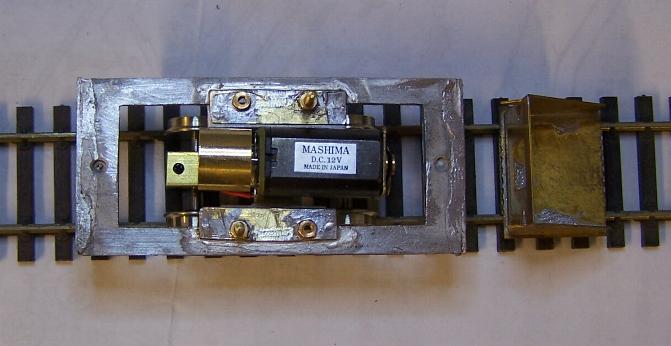
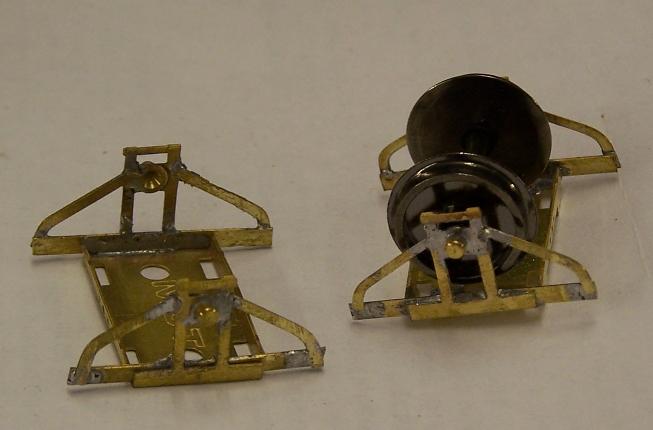
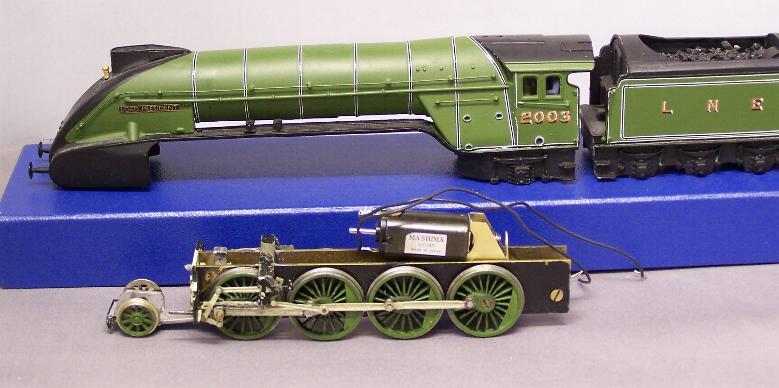
Nu-Cast Sentinel Shunter, available (in this case) from Sherwood Models in Nottingham. Mine was just south of ??30 - I see tonight they're up to ??32.50. I have two of these in the kit pile, the other being a Crownline brass one. Now there's one on the way (and I shall have to have one) it's time they were built, otherwsie it may well never happen. I was more organised about things this year and early in December I contacted Geoff Baxter at Hollywood Foundry to sort out a power unit for it. He was very helpful and about a fortnight ago this arrived from down under:
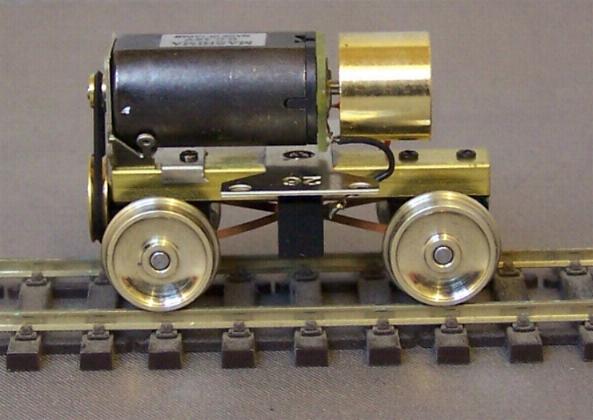
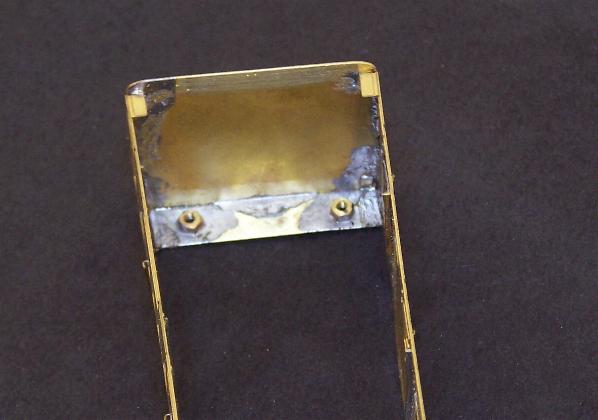
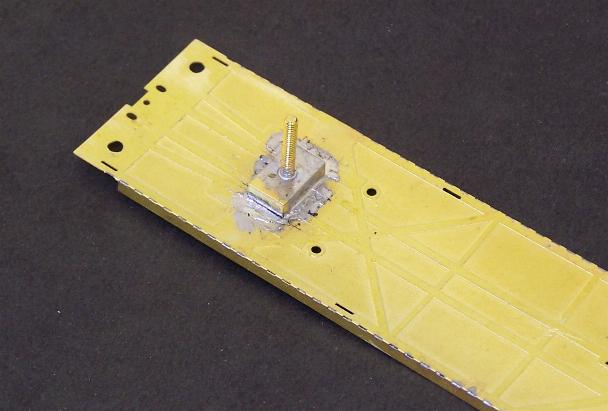
I've heard good things about these BullAnt units and I was not keen on the Spud or even Black Beetle for the Sentinel after seeing the poor performance of the one we have at Ormesby. This has a Mashima 1020 and a 38:1 belt drive (as recommended). As the kit is designed for a motor bogie there's a certain amount of modification to do, but I measured up the kit and specified a 26 mm fixed transverse 'batwing' mount. The kit has a large whitemetal piece which solders to the underside of the running plate, arches up inside the body and has a fixing hole for the bogie in the centre. I dispensed with this piece and made two small brass plates with 10BA captive nuts which I attached each side of the running plate. They were filed back so that the body is an interference fit on top. Hopefully the picture makes it clearer:
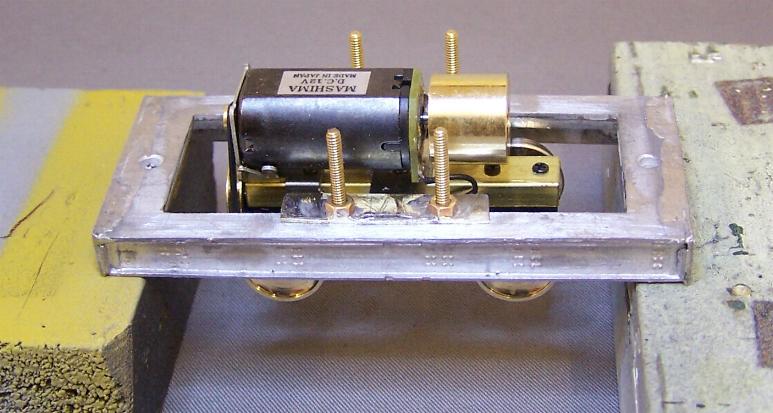
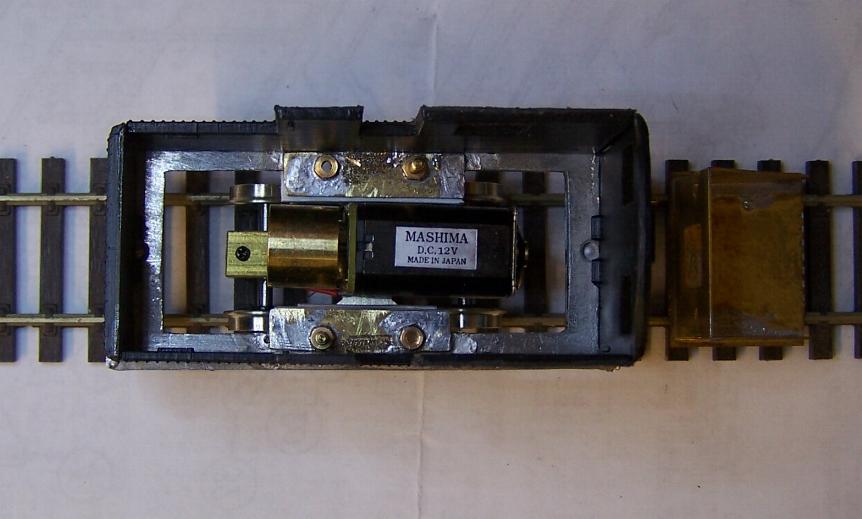
With the fixings in place the assembly was checked for height and plastikard packed under the running plate until it corresponded to the buffer jig (another useful little Bill Bedford item).
The packing was then glued into place and the whole thing checked again. The motor fits under and inside the body shell quite comfortably.
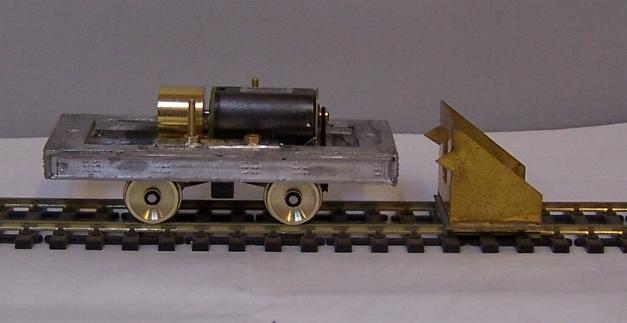
The unit must have taken a knock on the way over as the batwing was bent when it arrived and the motor isn't straight on the chassis. I haven't had the chance to run it in yet so we'll have to see whether it's survived OK. A quick test with two wires seemed to show it running freely enough. As you can see below, there's plenty of room within the unit to add lead sheet ballast (important as I've removed a fair bit of weight by dispensing with that whitemetal lump).
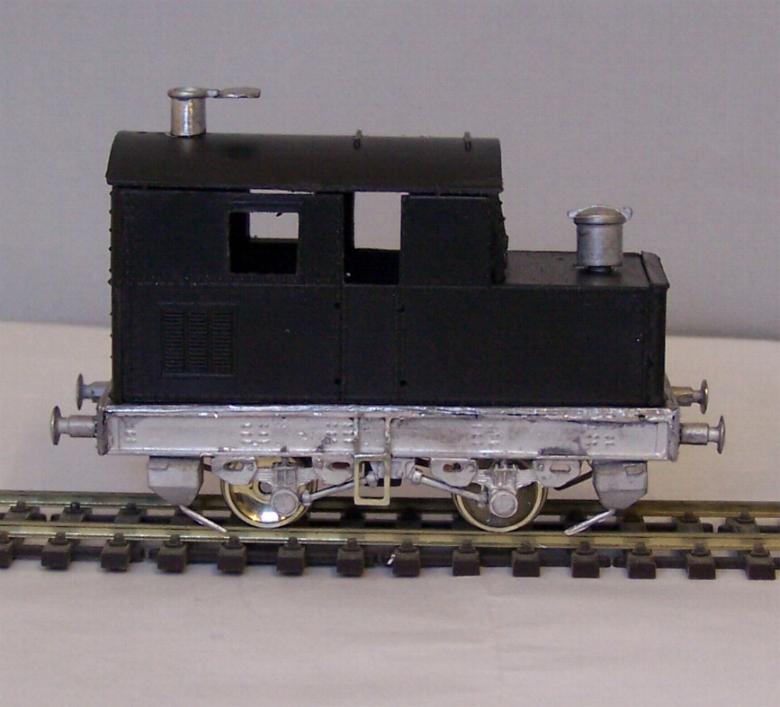
Once you've got that bit working, it's quite straightforward to solder on all the extra bits and make it look like a Sentinel. Here it's all just posed as I need to wash the chassis before I Araldite the body and lead into place. Disappointingly the kit seems to have a shorter wheelbase than the real thing (presumably to suit the Spud?) so one axlebox doesn't line up at each side. I have a plan, but it's no more cunning than painting it all black and running it in dim light. There are a few details to add; pipe runs along the solebars, handrails and the roof hatch, which I will try to replace with something more realistic than the lump of plastic which comes in the kit.
Some other items which have passed over the workbench this week, mainly catching up with all the plastic kits I started when travelling late last year:
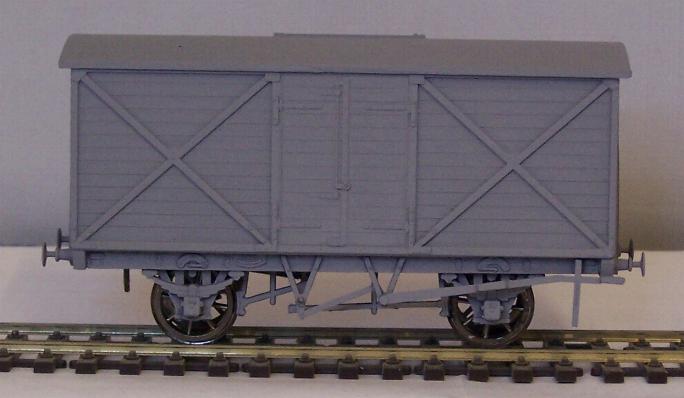
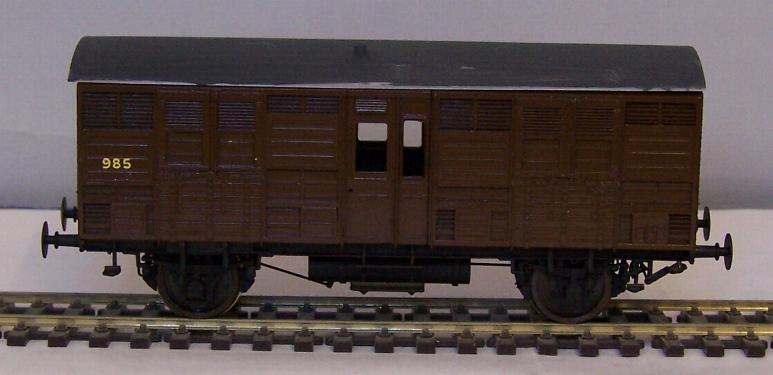
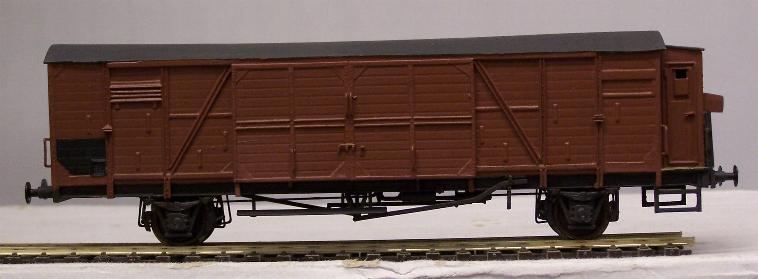
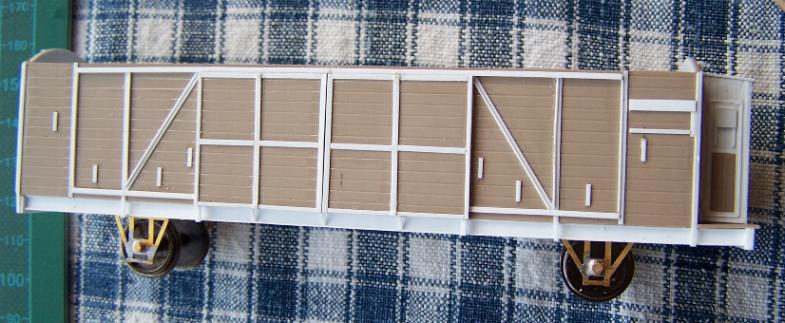
Ex- L& Y van. An MAJ kit I bought at Middlesbrough show earlier in the year. This one has been built as the version with the roof door.
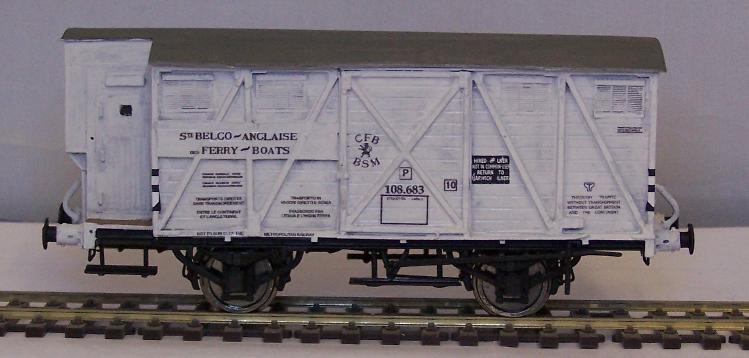
I finally applied the transfers to the other ferry van I built in the late summer. This just needs handrails (they go through the transfers in a couple of places) to finish.
This is not usually my thing, but it was in a job lot of kits I bought from a mate in the Ely club. I started to do the transfers but the HMRS sheet doesn't seem to have the right size 'GW' so I may try the Old Time Transfers which I believe are made for this kit.
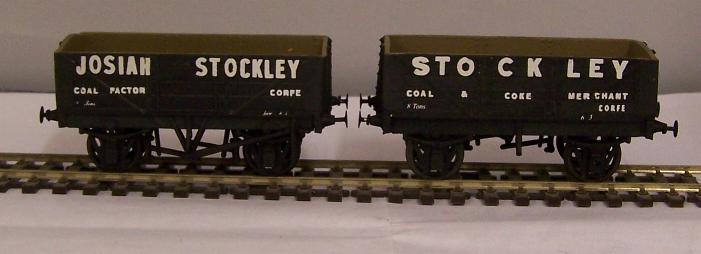
These are for the Ormesby Hall Corfe layout, finished in the (fictitious) livery of our local coal merchant using HMRS transfers.
Finally, the new Cambrian Midland van, also for Corfe.

-
 3
3
-
-
As you say, Ravenser, I'm sure we had this discussion on the old RMWeb (or an old RMWeb at least). There were both Midland and LNWR coaches in M & GN stock and they went to the LNER in 1936. I was looking at a photo today of a Midland corridor clerestory in M&GN livery and there are others if I dig around. There's a fairly recent book on the M & GN which has photos you'll probably find useful. I was flicking through it at the Leeds show.
The 51L coaches were from the Chowbent range, I believe.
The stock did include a number of Great Eastern coach types just like the ones I built last year (on my workbench thread) and available from Worsley Works or Bill Bedford.
Livery would certainly have been brown - the LNER didn't bother trying to strip paint from coaches once they'd been painted, they just painted them brown. There's a thread on the LNER forum somewhere about the shade - Dan Pinnock says it was close to Humbrol 133, some photos show it very close to Humbrol 186, Coachmann reckons Precision Track Dirt (I haven't tried that one yet). I've used Triumph Russett Brown on NPCS which looks on the dark side of the range, as does Precision 62 (Coach Teak).
As with all things East Anglian, Buckjumper probably has the most comprehensive answers.
Mick - I meant to say something complimentary a couple of days ago when you posted these pictures. TPO is a top job. Have you thought of making the lights work? I do like the A3 as well.
Did you see my note on the LNER forum about 51L doing a Jubilee kit next (still next) year?
-
 1
1
-
-
I've spent a bit of time contemplating details (and jigsaws!) over the last couple of days (that and the shower blew up, which is more modelling time wasted...)
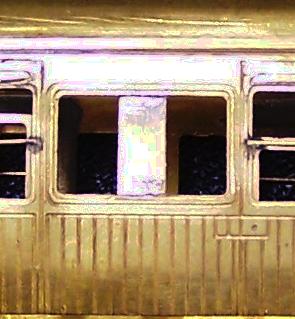
The end drawing in Nick Campling's book is a composite of the two ends, I've decided. All the photos I have (6 different coaches, including the one in said book) show steps and handrails at one end, alarm and electrical gear at the other. Bill has etched up the kit with everything at the one end, but it's no great hardship to move the alarm and switch gear to the other. Most of the pictures I have also show two more torpedo vents over the luggage compartment, but I have two good shots of one in this condition, so that is what it will be.
The underframe had had truss rods and dynamo added. Battery boxes I made up from plastikard and they'll be stuck on once it's been primed. Brake cylinders were in the bits drawer; 51L or mainly Trains, probably.
While I had the plastikard out I started to make up bits for the interior. I usually have these removable, but as the partitions are soldered in I'll probably build this one in situ.
-
4
-
-
Yep, great to see this back again. Always worth taking the time to appreciate it.
-
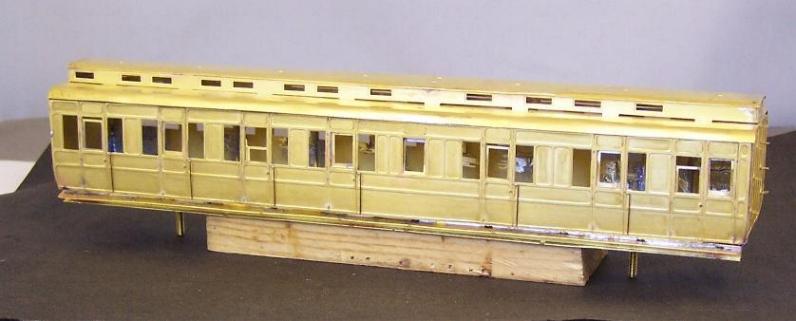
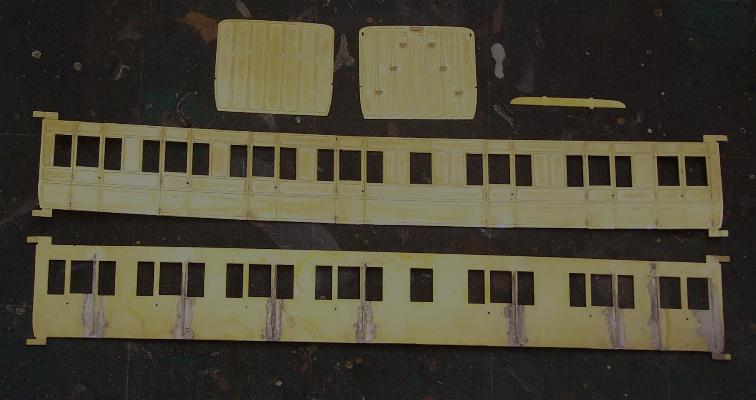
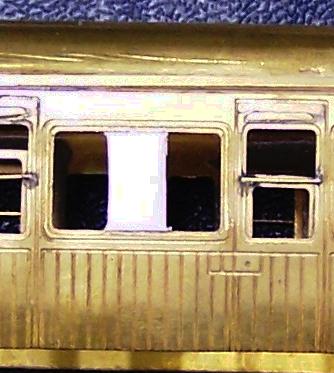
First thing today was to attach body to roof. This was done from one end, then tacking the roof at each of the bracing ribs, alternating from side to side to keep it square and ensuring that the roof and the other end still met. I didn't see the need to seam the solder all the way along as it's quite rigid and there are no visible gaps as it is. I usually put some .75mm angle along this joint to hide any irregularities and straighten the sides, but there just isn't a cornice on this coach. As it happens it all fitted together really well.
Next the interior. Bill provides all the transverse bulkheads which go right across the coach, obviously intending that they be used to brace the body and the roof be removable. My method makes that impossible so you have to remove the part of the partition which would foul the tumblehome, as below. I have to do this with al my coaches and I've found that the gap inside is almost impossible to detect even if you're looking for it. On a layout it's invisible.
The partitions were then built up and tacked to the body. Between these and the buffer beams they've straightened the transverse arch in the floor.
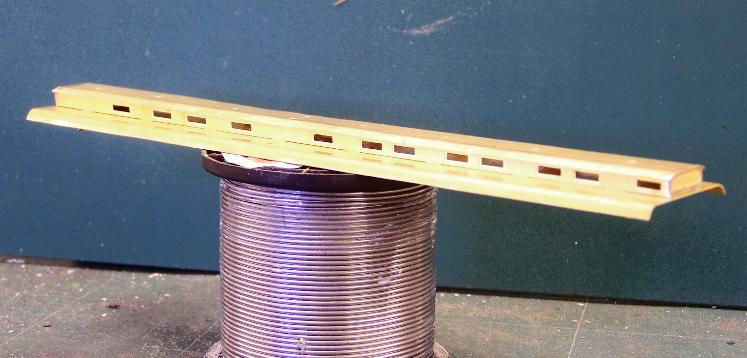
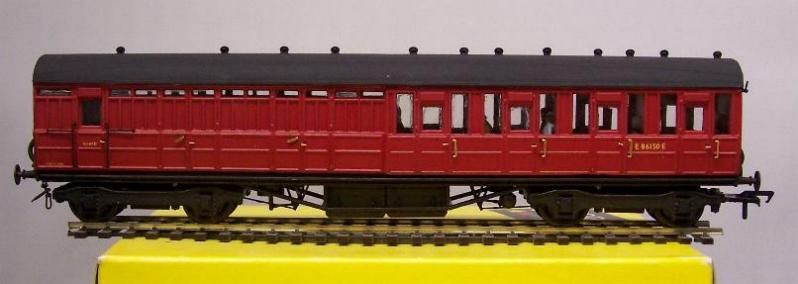
I made up the bogies next. These are 247 Developments HR stepless as I was advised they're the nearest to GE you can readily obtain. I was a bit disappointed with them - they were way out of square and I had to extend them sideways a long way to get even 24mm axles to fit and turn freely. They still need steps adding. Here I've also added the buffer beams and buffers - 51L L & Y coach buffers, again the nearest you can obtain commercially. There were two laminations for the buffer beams - I know that in the past I've found the thickness of brass Bill uses a bit flimsy for buffer beams but these were fine once made up. The body is also very rigid now it's all built up and soldered together.
Put together it's starting to look much more like the finished article. It sits about half a mil high, which needs working on. I've added the vents on the roof - the GE were a bit tight when it comes to ventilators.

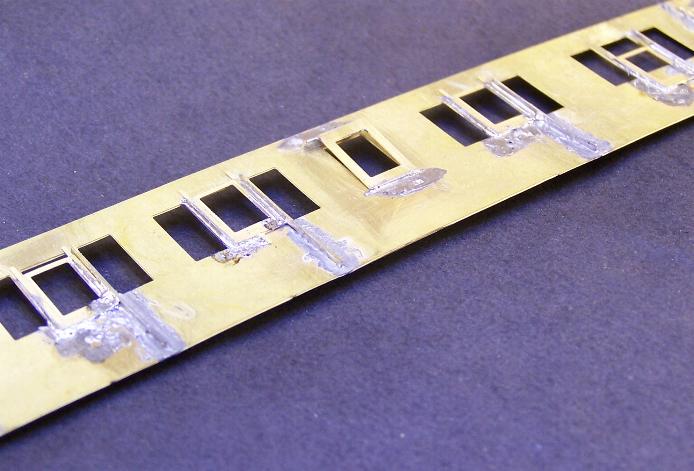
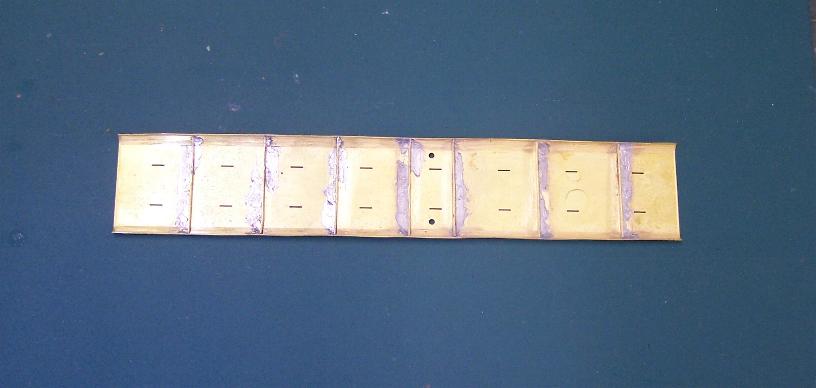
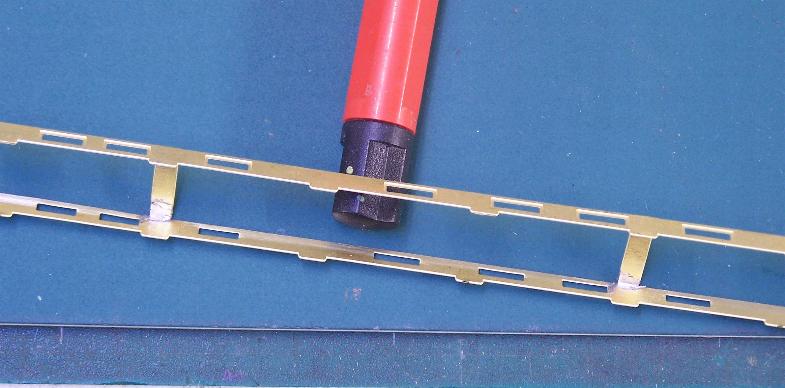
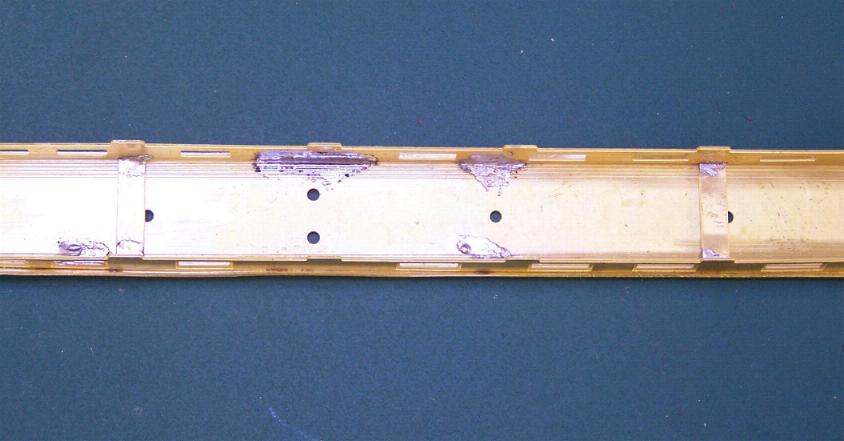
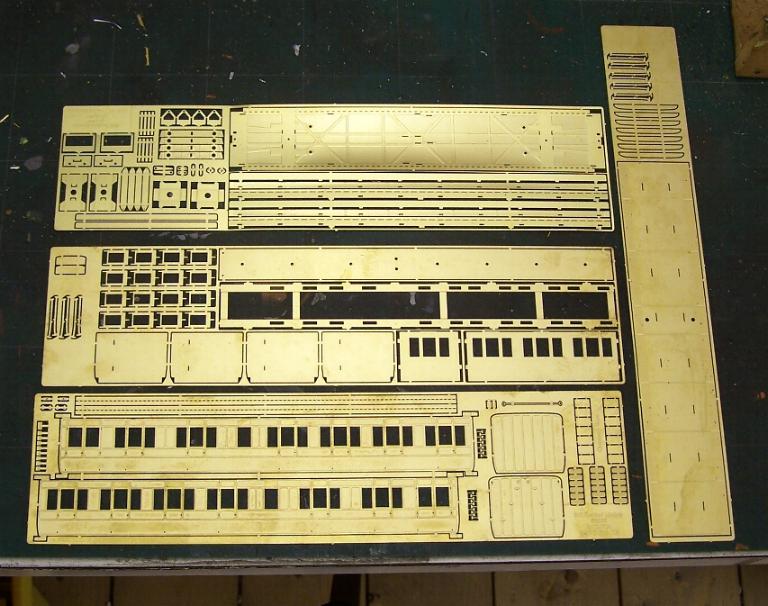
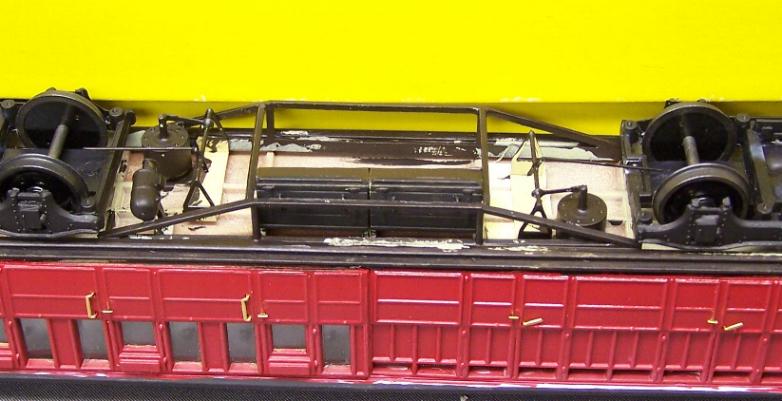
That will be it for tonight, then I have the joys of the underframe to move on to. Which brings me to my last point - unidentified bits on the etch. Perhaps anyone with more knowledge of underframes than me might help: what are these bits for?
I can see the stepboards and supports (bottom and upper centre) - these were removed by the 1950s so won't be used. Brake linkage arms I can also pick out. The four items with a triangular end and hole I can't identify, nor the bits centre right - are they battery box supports? There were also some parts I assume were for use with Bill's own bogies to space the body to the right height and allow some lateral and fore and aft movement. I've used those with the 247 bogies by soldering them to the underside of the bogie mounts to allow the bogies to rock, one for and aft, the other side to side.
-
2
-
-
Back to the sides today, once I'd reattached the roof rib which came off when I was washing the whole thing down.
Droplights were the next job. I generally hate these as I get them both cockeyed and too high/low. However the vertical formers for the hinges also serve to locate the droplights vertically, so all you have to do is decide whether you want them open, closed or at a point in between.
There were two too few droplights. This wasn't a problem as I have plenty left over from the GE rake I built last year and I wanted to do something different with the lavatory windows. Nick Campling's book shows one open, revealing that it is a hopper window (it is hinged at the bottom and opens inwards from the top). I wanted to show this on the model and so a bit of scrap etch and a spare droplight and away we went.
Droplights done, I went to grab handles. I do these last so I don't risk deforming them by pressing on the back of the side when working on something else. They're slightly cranked at the top then curve in towards the side as they go down. I bent them up from .33 wire and then used a bit of card to space them off the side and soldered them from the back. It's also worth going back over all the holes you drilled out in the sides at this point as you may well have filled them with solder, droplight (if open) or both.
Once these are done, grind/file/sand the back of the side smooth. That will help when you glaze the coach and also ensure that the sides fit over the floor, which has a small fold up section at each side which holds the sides straight. It was now time to put sides and ends together. Bill provides these fold up bits of etch to help attach sides to ends.

That done, I moved onto my own method of attaching body shell to floor. I put a brass strip with two captive nuts across the end of the coach and then use 10 BA bolts up though the floor to fasten it all together. I found that the lower attaching bits above fouled my brass strip so I ground them off again at this end.
I could have attached sides to roof, but I wanted to give it all a thorough wash first. I also still need to attach the vents to the roof. I moved on to the floor. This is quite thin brass and has become curved across its width while still in the etch. I expect attaching the internal partitions and buffer beams will help straighten it out. Here all I've done is attach the bogie mounts - captive 8 BA bolt inside - and make the holes to screw up into the body to marry the whole thing up.
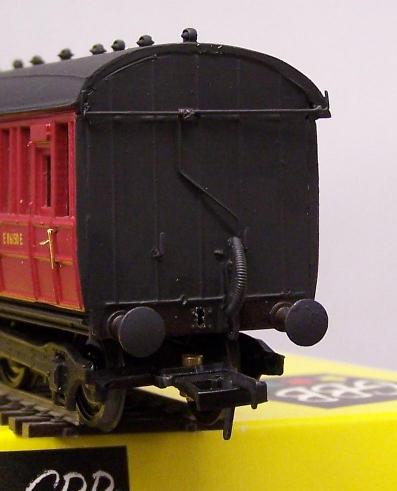
Finally here it is looking much more like a coach. Note that I haven't put all the end gear on - alarm gear and the like will be attached after I've soldered roof to body as there's too much of a likelihood of it falling off if I put it on now.
Last thing is another scrub in shiny sinks and into the airing cupboard overnight. Only one of the grab handles came undone, so I must have had a good day with the iron.
-
2
-
-
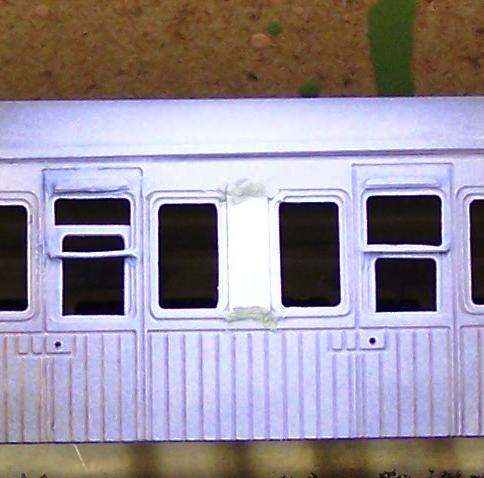
I had a request on the LNER forum to go into detail with this coach so here it is. I have had a bit of time before Christmas and today to crack on with it and it is coming together as I hope you'll see.
I had got as far as preparing the roof and clerestory, the main thing I had been asked about.
Bill supplies bracer/forming pieces for the roof which were soldered into place. I had some trouble bending the quite sharp curve of this roof and it will need tidying up. Conversely as this coach will be towards the end of its life some irregularity won't be the end of the world.
The clerestory itself folds up from a one piece etch with these cross pieces to space and brace it. Already quite solid and square.
This was then tacked to the roof piece. I did have some trouble with the ends, which are a separate piece and weren't as high as the clerestory sides no matter how I tried to get them to fit; I had to attach about half a mil. of scrap etch on the bottom to fill a gap. No photo, I'm afraid.
The tabs on the clerestory sides locate into slots on the roof - here it is all in place, a satisfying first time fit and very much better than the floppy mess I had with the Peter K kit.
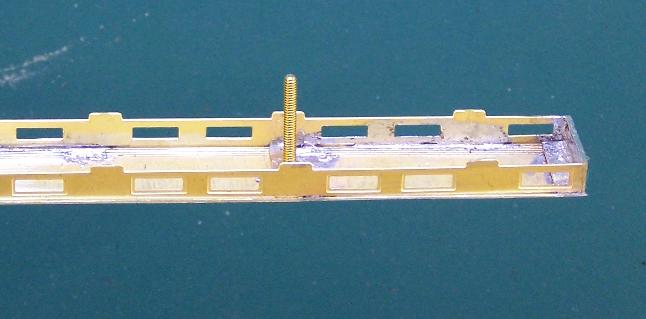
Finally, I will make the clerestory removable to glaze after painting (or if the glazing ever falls out). I drilled a 2mm hole through the roof from underneath, making sure to mark the underside of the clerestory with the drill. The mark was then used to site a 10 BA bolt which is soldered into place. I usually use some 1/4 " ones you can get from Eileen's, but I seem to be all out. These will be trimmed later. The nut then screws up from underneath and hold it in place. The complication with this coach are the ventilators which look like plates attached to the roof along each side of the clerestory. I intend to solder these to the roof and make them a snug fit against the removable part. It shouldn't be coming on and off very often.
-
1
-
-
A little progress with the CL - sides now have the hinge sections fitted, steps added to one end.
-
1
-
-
ISTR I asked Gary that at Leeds and yes, they are. Mick's got them in his hand, of course, but my inclination would be to go for these over the Peter K ones as I believe the latter are dimensionally challenged somewhere.
You won't be surprised to hear that I have a pair in the 'to build' pile....
-
1
-
-
I think you're right, Jon, I haven't seen those before either. I'll have to have another search myself.
-
I thought Miss P's post was quite out of character. While I agree with the basic request, I'm not sure that a limited edition commission is the place a manufacturer or sponsor would take a punt on the market for such a model being there.
Maybe Andy can amend the forum code such that every time anyone froths about a Blue Pullman it's replaced with a request for undecorated models?
-
1
-
-
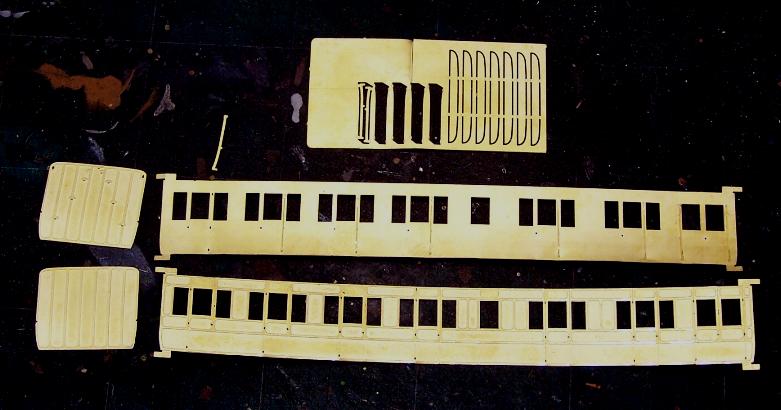
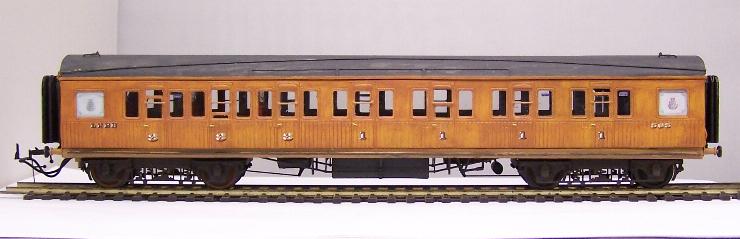
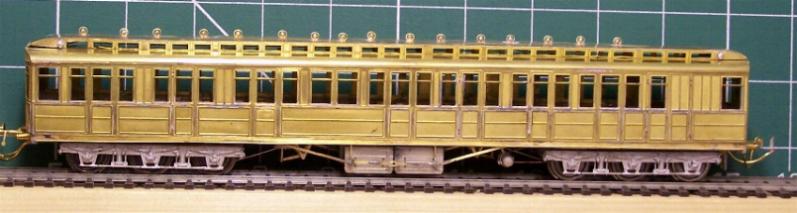
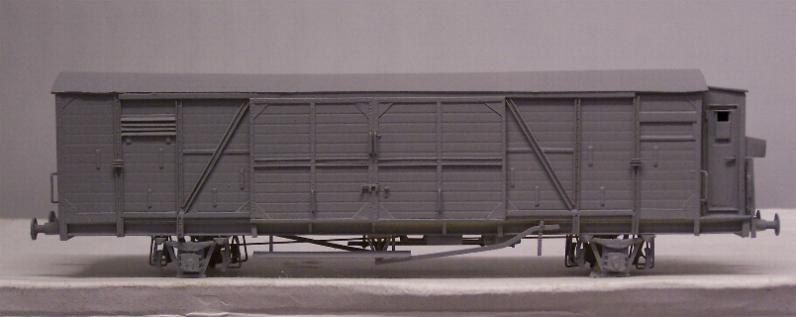
So, here we are on Page 2. While some paint dries I've started another kit, which has been hanging around since early summer but was unavoidably delayed. It's a Bill Bedford Great Eastern Clerestory Lavatory Composite. Drawn and pictured in Nick Campling's carriage book.
Very early days with this one, so here's the kit laid out as it came in the packet
.. and a short time later with the door seams graven into the lower panel, tumblehome formed and the hinge pieces ready to be attached to one side.
-
1
-
-
I think the photo Mike refers to is in Ransome-Wallis, Train Ferries of Western Europe - a highly recommended book which can be picked up very cheaply. There's another photo in there showing aferry heeled over to the maximum (IIRC) 5 degrees of list - looks alarming but apparently wasn't excessively so.
The Harwich ferry doesn't seem to have used this parallel shunting approach - I've more than one photo of a single loco on the linkspan with no reach wagons in use. One is a J19 as well, so not lightweights.
Did this technique evolve at Dover after they did away with the reach wagons?
-
Cheers, Pete. They're a bit fiddly for my rather ham fists - probably be better with a hold and fold, when I treat myself to one - but they certainly look the part. I have asked Andy for his pictures of the van (see the Hull Show thread) and if he's agreeable I'll pass them on to you if you want to use them.
This is port #25 - I'm hoping Page 2 will start now as people have apparently starved to death waiting for Page 1 to load ....
(photo download speeds at fault, not RMWeb).
-
More plastic in hotel rooms last week. I picked these kits up from Leeds a couple of weeks ago; most of them are for Corfe but the Long Low was for me, initially to satisfy my curiosity about backdating to the MR version but now I have it it will go onto Thurston.
We're going to build a few wagons for our (fictitious) coal merhant on Corfe. As we're in the general south west of the country we decided some of the round-ended varieties of wagon would give a bit more character.
These are a Hurst Nelson (C52) and Wheeler and Gregory (C53). They take a bit more care than most plastic kits but can be made up quite well.
The different profiles and sizes of these wagons is what gives pregrouping stock and trains so much character. The other Cambrian kit I put together is the Midland van which was discussed on the old forum. The one piece underframe speeds up assembly no end. These are all assembled as they come out of the packet apart from substitution of steel buffer heads for the plastic ones.
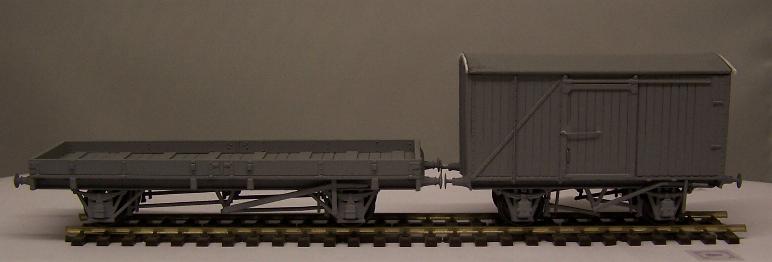
The white ends are some Evergreen strip - I managed to make the body longer than the roof, not sure how, but the strip will ensure that it projects slightly over the end as per the prototype. The Long Low; well, what can you say - usual Roger quality, opened the bag and it almost assembled itself. The only change I made was using .9 wire for the brake cross shaft instead of what was supplied.
-
Cheers, chaps. Rob - the crests were actually sent to me by Graeme King, who'd traced/drawn them out of the Dow book. They're just printed onto plain paper and stuck to the back of the glazing material. The glue has discoloured one of them slightly but it'll not show when weathered.
The Peter K kits are a bit of a challenge; the clerestory on mine was very flimsy indeed and still doesn't really bear very close examination. The one Mozzer built (is he still building it?) had the etchings doubled up so you folded them over, which would be much stronger. The sides are done like that to the upper half has more relief. You can't get the bogies either, of course. I am tempted by some of the others they advertise but, like you, I have a few things to build first....
Jon - look forward to seeing your van. Who did the transfers for you? I ordered some for mine in April from some German firm - forget the name now - but they never turned up and he never asked for payment. Bit late now if he gets round to it.
-
There has been progress with a few projects recently but nothing worth posting. Reinvigorated by a visit to Hull Show, however, I thought I'd put some of it up here to remind anyone reading that I am still active. Just.
These coaches are now pretty well complete. I picked up a pack of Preiser figures at Hull and they'll be riding in style sometime fairly soon.
This GWR fish van is now done and I have another matching one to give the same treatment to. We did eventually manage to get the BB spring units to derail but we had to go awfully fast to do it.
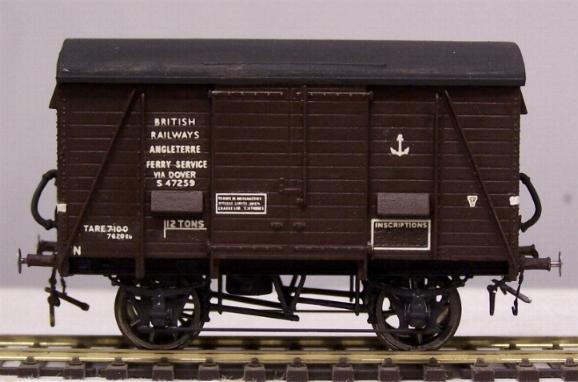
Finally most of my modelling time has been spent on this, with which I'm mighty pleased. These were the first ferry vans I came across when I started researching and I've just had a yen to have some since then. There's another on the stocks and then we'll see how many more I can motivate myself to knock up.
Sincere thanks to our Glorious Leader for allowing me to use Keyhaven Quay to photograph it and then keeping it on display for most of the day. My camera was about to expire when I took this - I'll replace it with one of Andy's eventually as they'll undoubtedly be much better.
Is it me or is there a man in the foreground being sick?
-
While it's relatively quiet on here, Brian, I'd just like to say how much I've enjoyed this thread now and on the old RMweb. I don't model diesels or 7mm, but it's a pleasure to see fine modelling clearly explained and clearly enjoyed as well. That 20 with the cab lighting really was outstanding.
-
Satisfying, isn't it, Rob? You've made a nice looking job of that - once the wheels are painted and possibly a more satin finish to bring out the detail better, that will really look the dog's. The lining really brings these black locos out - once you've started doing them you really notice when it hasn't been done.
-
I can see your pics, Mick. This looks a good start. Whose are the cast bogies you've used? ABS ones have been quite hard to get hold of recently.
-
Well, now we're all here I look forward to adding more to the topic, but not before the end of the week. Top marks to Martin Wynne for the Transfer Utility - couldn't have been easier.
-
West End Workbench
by jwealleans
postimg.cc
Comment posted by Neil on Mon Jul 13, 2009 5:25 pm
Oooo, just caught up with your work again Jonathan and I'm hugely impressed by the train ferry wagons, not just the quality of build but the inventiveness to step so far off the beaten path. I've noticed lots of rivets sprinkled about and the odd oblique reference to them in the text. I may well have missed the full explanation of how they are done but could I trouble you for a recap?
postimg.cc
Comment posted by micklner on Mon Jul 13, 2009 5:40 pm
Cracking work and excellent pictures

Mick
postimg.cc
Comment posted by jonhall on Mon Jul 13, 2009 5:59 pm
jwealleans wrote:
I've also seen identical vans belonging to the SBAFB: I don't know whether they were built to the same diagram or were war reparations for the ones lost in the east.
I think that the Austrian's may have had 15 as well - not sure how OBB was formed post WW2, but they could easily have been a sub-set of the 300 German vans.I didn't imeadiately recognise the initials SBAFB, so Googled it (obvious to me now! ) however I found this page - not sure if youve seen it?
http://communities.zeelandnet.nl/data/h ... page=70954
Jon
postimg.cc
??? posted on Tue Jul 14, 2009 7:47 am
Thank you chaps. I ought to have time to get a couple more built before we go out again next February to Glasgow. Jon - that chap is one of my Belgian correspondents. His group built a ferry open for their 7mm layout and one of his friends supplied all those Belgian drawings you've seen. Very helpful bloke.
Neil - Mick b really put me on to these rivet transfers - have a look at the OF CCT about 3/4 of the way down the page here. Those black blobs are resin cast rivets. They work like waterslide transfers. I'd have been raving and gibbering if I'd had to do all those on the Italian vans by one of the manual methods. You can get them direct from the US or in the UK from a company called Historex. Various different sizes available. If you search for 'Archer' on the forum you'll find they're breaking out all over the place.
postimg.cc
Comment posted by Phil on Tue Jul 14, 2009 9:23 am
Stunned by your feryvans Jonathan. Some really great work there.
During my European modelling period I bought a book on "foreign" rolling stock in use in Austria. One notable photograph in the book, taken not too long after the end of WW2, showed an SR 12T van in one of the Viennese marshalling yards. The war effort rolling stock certainly travelled !!
On a slighty different note, but staying in Austria, in 1981 I saw a pair of BR ferry tubes in the yard at Steyr.
postimg.cc
Comment posted by Grimleygrid on Tue Jul 14, 2009 9:49 am
Just been looking through your recent updates, great weathering Sir.
postimg.cc
??? posted on Sun Jul 26, 2009 3:04 pm
Thank you all for your kind words. They are appreciated. Mr. Grimley - I don't do diesels as you can tell, but I do enjoy your thread when I catch up with it.
The war effort rolling stock certainly travelled !
One of the SR ferry opens which was in Europe when war broke out didn't come back until 1951. Wouldn't you love to know where that had been all that time?Since Hartlepool I've had a few days off and started catching up on a few jobs for other people as well as some for myself.
I bought an Adams Radial from Mr. Ripley OTP last year for use on Corfe. It arrived with a Ks motor and wheels - the motor has been replaced - and now runs very nicely thanks to Peter Simmerson's magic touch. It's come to me for detailing and finishing. I've added Alan Gibson wheels front and back, extra details as per a drawing and photographs in a Southern locomotives book Peter lent me and I'm now hesitating over whether to strip and repaint or not.
This is out of my area, so please tell me if there's a major detail I've missed or got wrong.
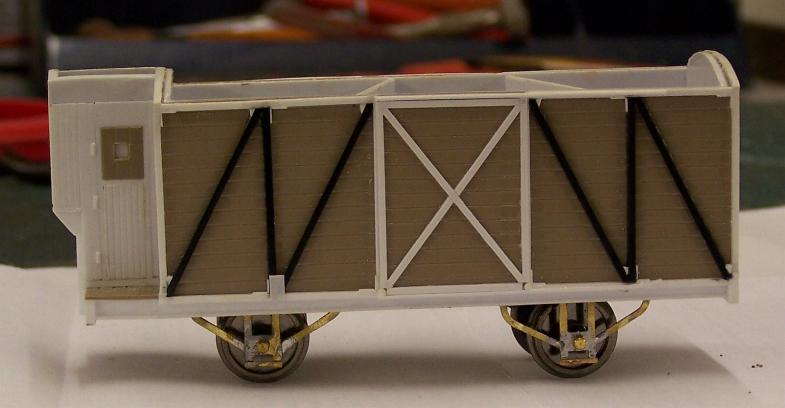
This is also from Corfe: one of a pair which have been serial deraillers since I've been going along there. I've fitted a Bill Bedford springing unit which seems to have done the trick at the moment. I'm waiting for some information on the brake layout before I detail and reassemble it. We think it's an Ian Kirk kit - there's nothing on it to indicate manufacturer. I see there is a GW fish van listed in Swampy's post on Roger's Kirk/Ashby thread, so presumably this is it.

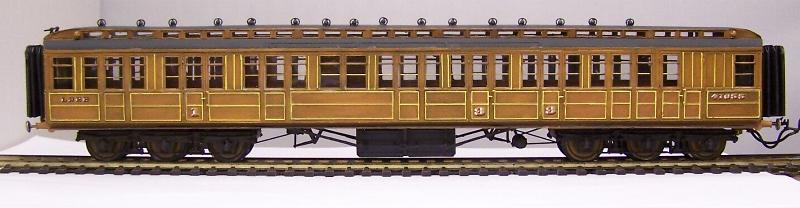
Finally, one for me. This is Mozzer territory, especially as he sold me the kit. Peter K ECJS 67' Luggage Composite. 247 bogies and a Blacksmiths roof. I spent yesterday evening bored out of my mind making hinges and I have the other side still to do. The clerestory etch is also very fragile and seems to be curling its lip at me at one end. I sense a small application of brute force and ignorance.
Hopefully the first of a few pregrouping coaches I have in mind to build next. Incidentally, Brian, if you read this - what are the brass bits in the bogie pack for?
postimg.cc
??? posted on Thu Jul 30, 2009 6:08 am
Further updates as I plod on with this coach.
Underframe fittings are Comet - truss rods butchered to get a turnbuckle in the middle - and 51L. The LNER converted these to electric lighting so I've used LNER battery boxes and dynamo. We now need buffers and some more of those exquisite roof vents from that nice Major Clanger and she's well away. The clerestory needs more fettling as well, although for once the camera makes it look better than it really is.
postimg.cc
??? posted on Tue Aug 04, 2009 8:34 pm
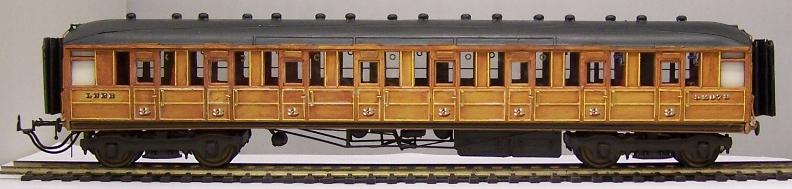
Still on a coaching theme, I started the next of the series over the weekend while it rained. I thought this might be marginally easier than the Peter K simply because more of it would be present and I'd have less to make. I was expecting to have to alter some of the components as I went along.
It's a Jidenco GCR 60' Composite. Possibly the first thing, certainly the first coach, I bought on Ebay. I don't know how long it's been kicking around in the heap so I was determined to build it. It wasn't as bad as I might have feared, actually; the end profile matched perfectly to a drawing in Nick Campling's book and the sides, although 2mm too long, are slightly too long right along their length so everything is in the right place relative to everything else. It's gone together quite well - for once the roof was just a bit snug so a bit of filler will be required in the corners. I've had to move the solebars out to allow the bogies to pivot enough for 3' curves. The bogies are a fold up etch and look very frail and easily distorted to me.
Just the trussing and undergear to fabricate and attach after a tedious evening sweating vents and window bars into place.
This is almost ready for primer - just alarm gear and destination board holders to make up. Those vents from 51L really look the business.
postimg.cc
Comment posted by jonhall on Fri Aug 07, 2009 5:45 pm
jonhall wrote:
jwealleans wrote:
Are we going to see any pictures of yours?
Sadly if you go back to this post from last October, you wouldn't notice the difference...
viewtopic.php?f=5&t=31894#p487008
However I now have transfers and renewed enthusiasm, so next on the shopping list, red oxide primer, RAL8012 rot-braun paint, and a fresh round-tuit, and I'll be well away

Jon
A little progress viewtopic.php?f=5&t=31894&p=745964#p745964
Jon
postimg.cc
??? posted on Tue Aug 11, 2009 6:41 am
Some progress to report although I've been otherwise employed while the weather has been good. The Jidenco kit proved more problematic than it seemed initially. Someone on another forum pointed out that the windows on the corridor side are incorrect; in the photo above there should be two small windows between the third and fourth door from the right instead of the one large one. This is because that is the point at which third and first class meet and there's a door in the corridor to keep the riff-raff out.
That part of the coach isn't shown on Nick Campling's drawing, but there's an outline in the back of George Dow's Great Central Vol. 3 which gave me enough to go on. I couldn't put up with it as it was (I'd probably have noticed when I built the interior) so I decided it had to be altered.
First step was to solder a brass strip across the offending window to support the plastikard insert. This is narrower than the required panel to make it easier to shape the plastic.
20 thou plastikard was then used to make a panel of roughly the right shape and size and this was inserted into the gap.
Evergreen strip was used to make the shape of the beading round the window and this was stuck in place and left to harden. A piece 5 thou was then shaped to the panel between the beading and stuck in place. The whole thing was then filed and sanded down and filler used to correct gaps and missing bits of beading.
Since these pictures I've filled the rest of the redundant beading lines with Milliput and it's awaiting a fresh coat of primer and another round of filing and sanding.
The bogies on this kit, as well as being very flimsy as described above, also foul the solebars with very little deflection. I raised the whole coach .5 mm, rounded down the corners of the bogies and shaved a touch off the bottom of the solebars, but we still found a problem in running trials last night. It's fine on 3' curves but fell off on pointwork. Some more surgery on the bogie corners will be required.
postimg.cc
Comment posted by Adam on Tue Aug 11, 2009 8:48 pm
jwealleans wrote:
I've finished the lettering on this Ratio one which seems to have dragged for ages. I also found an old PC models etch - no idea where it came from - which had hooks and loops for safety chains so they've been added, if you can make them out.
Jonathan
Hope you don't mind me pointing out that the full size version of the Ratio effort was very different below the solebar - 9' wheelbase and a strange variety of offset push rod style of brakegear. They may have been given a through air pipe as well. The details are in SR Wagons vol. 4, a book I really must get my own copy of this, but I can't find any shots of this precise form of brakegear on the web unfortunately, but a bit like this:
http://southernrailway.net/search/displ ... _fd0=33506
Adam
postimg.cc
??? posted on Wed Aug 12, 2009 6:08 am
Hi Adam,
I don't mind at all. I never completed the brake gear on this van because I'm not sure that what was in the kit was adequate or it didn't look right, I can't quite recall now. At the time I only had the Ratio instructions to follow and I was more concerned with researching the lettering. I now have the relevant section of Southern wagons Vol. 4 and the brake gear looks very like what the LNER used on their grain hoppers, with the offset V hanger and drop link. This just has a vac cylinder added to the whole shebang as well.
There is another pipe - may be air, may be train heat - on the photos I've got but it would just get in the way of the couplings so I didn't bother.
postimg.cc
??? posted on Thu Sep 03, 2009 5:45 pm
Well, nearly three weeks of progress to catch up on. The camera was away on holiday for part of that, though. The initial two coaches are well on the way with just some details and fettling before I glaze them. I had the Bob Moore out this lunchtime and I'm quite pleased. Interiors are almost complete as well. Here they're just put together for the camera.
The clerestory needs a fair bit of filling and fiddling to make it fit gaplessly. I'm waiting for some Southern Pride seats for the first class section of this coach.
I'm not sure what (if any) lining was applied to these GC coaches by the LNER. The rainstrip looks a bit heavy too.
I had a trip away for work a couple of weeks ago and I like to take a plastic project with me for working in hotel rooms - apart from the practicalities of lugging a soldering iron, I'm always bothered about setting off the fire alarm. I've had an ECJS conversion from some Kirk sides in the to do box for about a year, so I cracked into that while I had nothing better to do in Littlehampton. Here it is. It's a cut and shut from three sides of Kirk kit 8846 (I think) - whatever it is it's the only one with a set of three large windows together which is what makes this coach distinctive.
The end lights were boarded up during the 1920s.
Finally something I'll pick up and crack on with after the coaches; a pair of ex-ROD ferry vans. These stalled while I made up the very unusual W irons, which I did using MJT ones with some scrap fret. I've done the first pair, so the second one shouldn't take too long.
postimg.cc
Comment posted by robpulham on Sun Sep 20, 2009 7:47 pm
Looking good Jonathan, seeing your work with the Bob Moore has inspired me to get out my Peter Spoorer pen and line my triplet set. I am quite happy with the results and will post some pictures on my WB as soon as I have finished the last car. I may feel brave enough to tackle the Claud then.
postimg.cc
-
West End Workbench
by jwealleans
postimg.cc
Comment posted by micklner on Fri May 15, 2009 8:25 pm
Hi
I like the P2 with some new front bogie wheels and the drivers painted it will look really good. Any idea what curves it will go around?
The K3 will be interesting as well.
cheers
Mick
postimg.cc
Comment posted by gr.king on Sat May 16, 2009 10:56 am
Just a thought - I haven't had the RCTS and Yeadon books out to check, but if the K3 you want to depict is RHD then is it sufficient to just reverse the Bachmann model, or should you also have the (admittedly similar looking) earlier, not-quite-so-long cab with rounded-top windows (i.e. the final version of the Darlington cab) rather than Bachmann's modelled full-length group-standard cab?
postimg.cc
??? posted on Sat May 16, 2009 12:15 pm
Mick - it went round 3' curves before I got hold of it.... I'm not sure I've got the chassis back into the body quite right. The chassis is very narrow allowing lots of sideplay - that might be the secret.
Graham - thanks for that well-aimed spanner. I really don't know and I don't have Yeadon to hand (not that it has a picture of 61834/120). As it isn't mine and it's unlikely ever to find itself next to one with the correct cab, that might be one detail too far. Does the SEF kit contain sides for that cab variant?
postimg.cc
Comment posted by mozzer models on Sat May 16, 2009 12:39 pm
jwealleans wrote:
Does the SEF kit contain sides for that cab variant?
yes then theres the 1/2 kit so you can build a 2nd loco from the extra bitsso if you get both kits you can build 2 verents
postimg.cc
??? posted on Sun May 17, 2009 6:45 am
What I was thinking about was comparing the SEF etch to the Bachmann cab side - which I did last night. I can see what Graeme means, although I'm not going to do anything about it. You could file the more curved window shape into the Bachmann cab but it would be largely hidden by the roof. Not having a side on photo of 61834 to check against anyway I think we'll leave it at that.
It wouldn't be too hard to fit the SEF cab to a Bachmann body if you wanted to go that route.
postimg.cc
Comment posted by gr.king on Sun May 17, 2009 10:08 am
I don't blame you for leaving the cab well alone. It would take a pedant like me, who happens to have studied the subject, to spot the minor discrepancy.
I won't be attending to every tiny detail in my B1 to B2 conversion when I get on with that, either.
postimg.cc
??? posted on Fri May 22, 2009 7:21 am
Following on from the above, the two K3s now well on the way and really only awaiting touching up, weathering and coal.
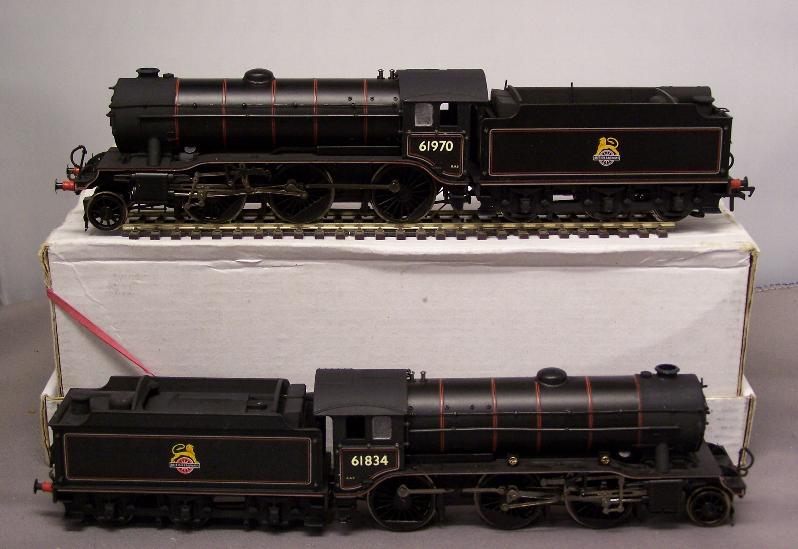
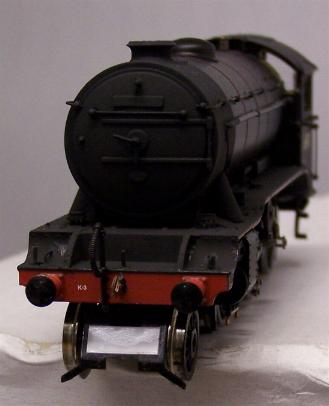
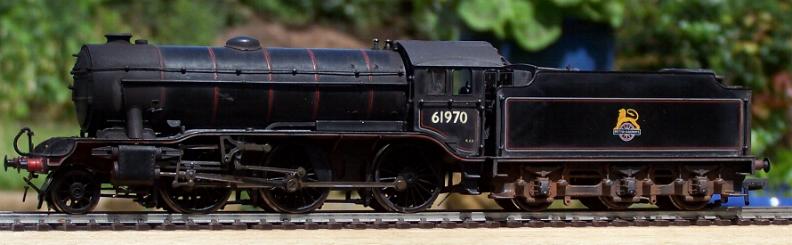
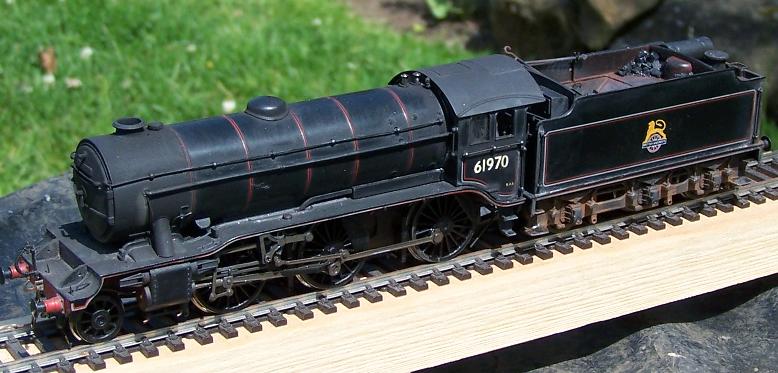
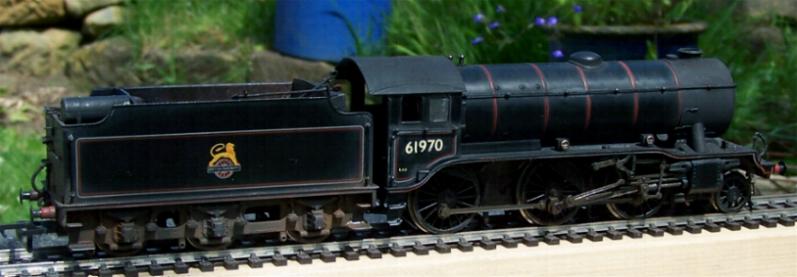
61970 hasn't had a great deal done - additional pipework around the smokebox, removed the AWS reservoir (on the other side), lifting holes in the front frames, replacement fire iron holder half way along the coal space. Screw link coupling on the front (the rear will retain the Bachy coupling). Smokebox, running plate and cab roof painted with a mix of Humbrol 33 and Gunmetal and cab roof and smokebox have also been matt varnished. I have fitted the extra Bachmann detailing bits to both locos as well. While I had the boilers off I've filed down the mould seam along the top. I'm not going to try to touch up the finish here, but will hide it with weathering.
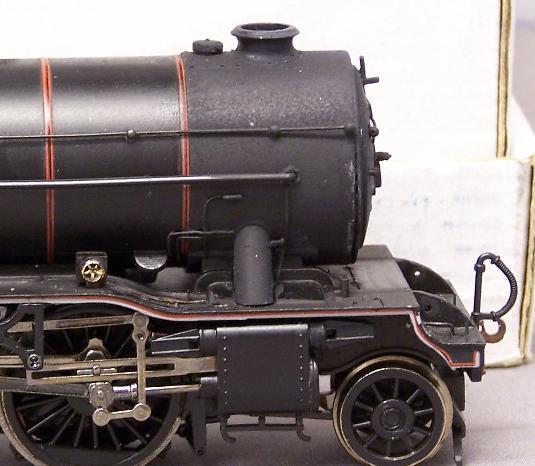
61834 has had all of the above plus removal of the tender vac tank, screw coupling and additional lamp iron on rear of tender, change of driving position as already discussed and removal of the front buffers - this loco had Spencer-Moulton ones. The close up above is a bit harsh but hopefully you can see the lubricator pipework I've tried to represent and the picking out of the lubricator handwheels in brass. While you have them in bits the backhead is easy to paint up as well and makes quite a difference to the cab interior. I still need to straighten the steam pipe and make a new reversing rod - the other one pinged off into oblivion last night. As it's to some extent hidden by the lubricator on this side it's less crucial than I thought.
To pick up on Graeme's point above the cab windows on 61834 should be more arched than the GS ones shown here. You'd need to fill some of the Bachmann windows in at the top then file in a new shape and replace the beading.... or cadge some of the SEF etched sides from someone and make up a new cab with them and the Bachmann bits.
Also making some progress last night after a long wait for buffers, these two. I had an order in with ABS but in view of the fact that Adrian's been ill I found some SR van buffers in the MT list and pinched some GN ones from another kit. Now they're painted I may even get them finished over the weekend.
postimg.cc
Comment posted by 31A on Mon May 25, 2009 1:55 pm
Nice work with the K3s, Jonathan

Had you thought about fitting front steps? I wondered whether the recently-reviewed Comet loco steps would be suitable, but haven't investigated yet. Or maybe they would restrict the swing of the pony wheels too much?
postimg.cc
??? posted on Mon May 25, 2009 4:52 pm
I've been mulling that over, Steve, but I haven't decided yet. They ought to be there - I ought to fit a set to my own for that matter - but I haven't had a good look at the Comet etch yet. I'm waiting for the buffers from Kean Maygib (via Dave Smith) so I'm stopped with at least one of them for the moment.
In the meantime I've been going crosseyed and stir crazy sticking rivets on these German vans.
Edit - I forgot to mention a big thumbs up to Nick Campling or whoever chose the pictures for his K3 article in Modellers Backtrack Vol 1 No. 2. Both sides of 61834 on the same page! Just what the modeller ordered.
postimg.cc
??? posted on Wed Jun 10, 2009 7:18 pm
Hartlepool show looms and I need to get a few things finished in time... I've all but completed riveting the German vans and now some fresh supplies of Evergreen strip have arrived I can get the second one completed. The first one has had underframe and external brass detailing added and the roofs went on today.
I've finished the lettering on this Ratio one which seems to have dragged for ages. I also found an old PC models etch - no idea where it came from - which had hooks and loops for safety chains so they've been added, if you can make them out.
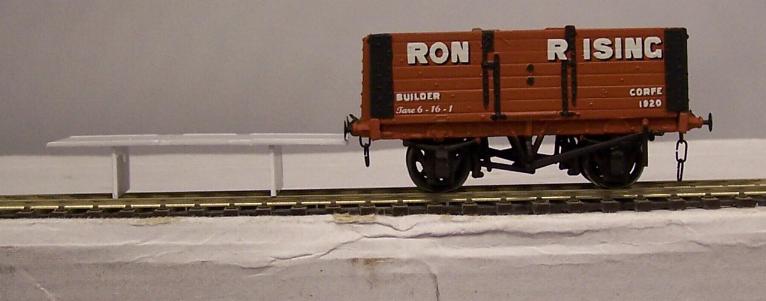
This Cambrian open has been lettered up as a small personal tribute to the late Ron Rising, who built Corfe, the lovely layout I'm privileged to operate on summer weekends. The plastikard structure next to it will form the base for a coal load.
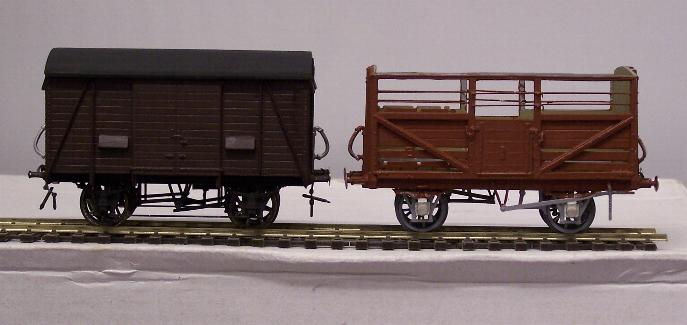
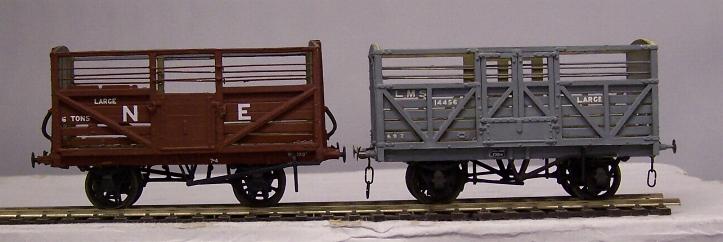
I've also completed the lettering on this pair of cattle vans and they just need roofs attaching. The Slaters one was built just as is.
Finally, though not much has happened to the K3s, I have carved off the gaping orifice where the front tension lock coupling goes and plated it over. Once this is black it'll be hard to make out that there's no real detail there.
postimg.cc
??? posted on Thu Jun 25, 2009 12:45 pm
First of the K3s ready for action. Still no sign of buffers for the other one.
postimg.cc
Comment posted by 31A on Fri Jun 26, 2009 1:28 pm
The K3 looks well with some subtle weathering Jonathan! Where did you get the fire irons?
postimg.cc
??? posted on Fri Jun 26, 2009 1:42 pm
Cheers, Steve. I had that picture of 61859 in mind as I did it. T-Cut and cotton buds - it's the only way. 61834 on the other hand is in for a pasting, looking at the state she's in on that Ian C Allen pic you tipped me off about.
The fire irons are Springside - I ended up with quite a few a few years ago after a chap I bought them for at the club sadly died and I'm still working my way through them.
postimg.cc
Comment posted by 31A on Fri Jun 26, 2009 2:07 pm
That's interesting Jonathan, I've used T-cut to 'improve' green engines but hadn't thought to use it on black ones; it certainly looks a big improvement, almost the 'blackberry black' description that people used to use for LNW engines. I'll give it a go sometime, although my next effort will probably be an Ivatt 4 Mogul and as such likely to be a bit of a 'minger'
 Must look out for the Springside fire irons as I've just been making some fuse wire copies of the old Hornby plastic ones, which is a bit fiddly.
postimg.cc
??? posted on Mon Jun 29, 2009 6:55 am
Bit of a major weathering and finishing session this weekend. I shan't bore you with most of it as it's all been in these pages before, but some of the more recent stuff:
Transfers for these are in the post from John Peck and I hope to have them applied by the end of the week. I am still awaiting springs from Dart Castings for the second one.
This was built for me by Mozzer as a prize from the last Members Day. Now the transfers for it are also in the post, I've started painting it. I used Halfords Triumph Russet Brown as recommended by Peter Tatlow in an MRJ article. I'm quite pleased with it so far. It's a GE CCT from a D & S kit.
Finally, I have to confess to a 'Metropolitan moment' when it came to weathering this, which I have become very attached to since building it. In the end, though, I swallowed my objections and it went under the airbrush with everything else.
postimg.cc
??? posted on Fri Jul 03, 2009 6:01 pm
Came back from a trip to the sunny south to find two packages on the doorstep. Firstly the estimable John Peck had come up with the goods for the Great Eastern CCT and the German vans.
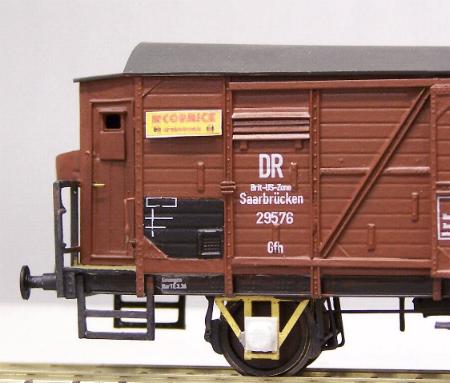
This is the prewar livery.
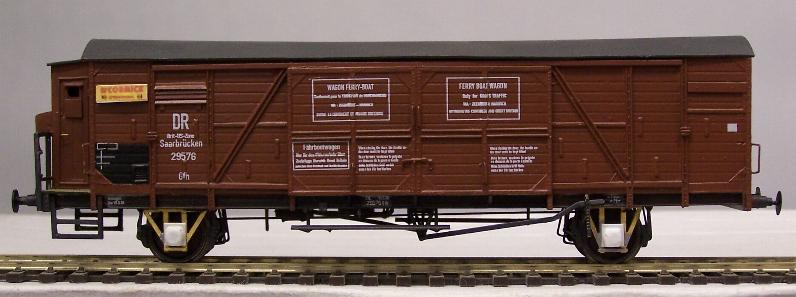
This one carries the postwar markings. These seem to have been a bit of a moveable feast but I worked from a photo which was fairly shortly after the war. Note that it's still branded 'Brit - US - Zone' - how long did that last?
The photo I worked from, kindly supplied by the German Railway Society, showed the van carrying a label for McCormick Tractors. Maximum respect to McCormick for coming up with an image of the label. This one is a rough print attached with blutak but I'll have some better quality ones done by Hartlepool.
I also found an envelope from Dave Smith at Blacksmith Models which brought the Spencer Moulton buffers for the other K3. Hopefully I can get this one weathered in time for Hartlepool as well.
Lastly, just before I went away I had this package from Pete Harvey with some etches I'd commissioned. Three days in a hotel offered the chance to make a start on the eventual carrier vehicle. I hope it's up to the standard of the etches.
As the man said, can you guess what it is yet?
postimg.cc
Comment posted by 31A on Fri Jul 03, 2009 9:13 pm
Ooh I like those Continental vans Jonathan; the transfers really finish them off nicely! Wouldn't want to letter that lot by hand

As the man said, can you guess what it is yet?
Pre-war ferry van
postimg.cc
??? posted on Sat Jul 04, 2009 10:27 am
Cheers, Steve. There's one of these in the ICA picture you sent me; it's too far back to spot the detail, but that large framed lettering on the door gives it away.
I think hand lettering is something you should either do well or not at all. I know I can't do it well, so I prefer to go the transfer route. They're by far the most expensive part of the project, but you can count on John Peck doing a good job and it's surprising how much they lift the rest of the vehicle. They also gloss over the less accomplished parts of my dodgy building. With these especially, because there's so much of it, I really had to go this route. Getting them straight was also a challenge - my doors aren't quite parallel all over and lining those big boxes up against one horizontal left them way off against another. Another benefit of Mr. Peck's transfers is that he does you three of everything so I was able to scrape off the set I got cockeyed and replace them.
Pre-war ferry van
Yes. Not much of a surprise, really.postimg.cc
Comment posted by jonhall on Thu Jul 09, 2009 6:26 pm
jwealleans wrote:
This one carries the postwar markings. These seem to have been a bit of a moveable feast but I worked from a photo which was fairly shortly after the war. Note that it's still branded 'Brit - US - Zone' - how long did that last?
The photo I worked from, kindly supplied by the German Railway Society, showed the van carrying a label for McCormick Tractors. Maximum respect to McCormick for coming up with an image of the label. This one is a rough print attached with blutak but I'll have some better quality ones done by Hartlepool.
Jonathan,What colour paint did you use for the German van? Thanks for the transfers that arrived today, I now need to sort out some paint! According to the Gassner website http://www.gassner-beschriftungen.de/E3 ... wagen.html RAL8012 should be the right colour, but I guess any red-brown paint would do??
Jon
postimg.cc
??? posted on Thu Jul 09, 2009 7:42 pm
Hi Jon,
I had the Roco HO one to work against and after several poor attempts at mixing up a similar shade, I ended up searching on RAL8012 and found quite a few places in this country who do one. The one I ended up with is by Lifecolor, Ref. UA211, 'Rotbraun'. I was a little dubious as it's acrylic (new territory for me) and the vehicles had already had enamel primer. No problems at all, several thin coats and plenty of drying time and they both came out fine, even with enamel varnish over the top.
Are we going to see any pictures of yours?
postimg.cc
Comment posted by jonhall on Thu Jul 09, 2009 8:52 pm
jwealleans wrote:
Are we going to see any pictures of yours?
Sadly if you go back to this post from last October, you wouldn't notice the difference...viewtopic.php?f=5&t=31894#p487008
However I now have transfers and renewed enthusiasm, so next on the shopping list, red oxide primer, RAL8012 rot-braun paint, and a fresh round-tuit, and I'll be well away
Jon
postimg.cc
??? posted on Fri Jul 10, 2009 10:32 am
I seem to have been ready for Hartlepool a great deal sooner than usual so have been clearing the bench a bit. This has been hanging about for ages waiting for me to get my proverbial finger out and have a go at making the transfers.
Built by the Ince Waggon Works for the ROD during WW I, sold to the Belgians in advance of the opening of the ferry service in 1924. Some of these had an open brake platform added. I have a drawing but no photos - anyone know of any?
This is a Slaters kit, door rubbing plate moved, new buffers (Andy Hart), extra V hanger (51L) and replacement door spring (Masokits). Vac pipes (through air pipe if you want to be pedantic) are MJT. It should have safety chains but I want to have room to be able to couple it up. The transfers were made by taking a photograph of the original, cutting out the letters using GIMP and then printing on Crafty Computer Decal Paper. The very small printing I did using a similar font and typing it in. The larger text and the crest had to be done manually as they're clearly hand lettered. I'm really pleased with the way they've come out. The 'Hired by LNER' text is John Peck's - left over from the Italian vans - and although the Crafty paper is coarser it compares well. White corner markers were cut from Modelmaster stripes for a 16 tonner.
According to a Belgian correspondent of mine, the originals vanished - along with much Belgian railway equipment - towards the Eastern Front in the later stages of the Second War.
postimg.cc
Comment posted by 31A on Fri Jul 10, 2009 6:55 pm
Ooh that's nice Jonathan, something a bit different!

According to a Belgian correspondent of mine, the originals vanished - along with much Belgian railway equipment - towards the Eastern Front in the later stages of the Second War.
I hope the Germans were duly impressed (and the Russians)!
postimg.cc
Comment posted by jonhall on Sun Jul 12, 2009 11:46 am
Jonathan
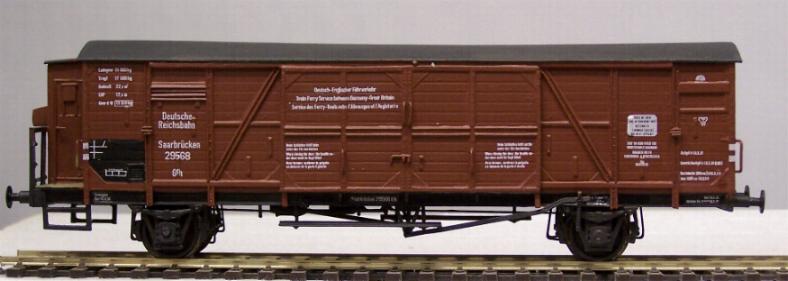
I think I can add a bit to the details of your Saarbrucken vans, built pre-war, the numbers you have used are for the East German (DR) wagons. Some also went to the West (DB) numbered 180000-180159 as type Gb21 or Gbh21 (the h signifies if it still retains the brakeman's hut). Post 1964 the remaining non-hut wagons were re-coded Hfk 310, and re-numbered with UIC codes 21 80 209 0 000 to 088 however as they were withdrawn by 1968 it's not clear if they actually got re-numbered or not.
This has been cobbled together from the book Guterwagen Band (volume) 1 Gedeckte Wagen (vans) Authors Stefan Carstens and Rudolf Ossig ISBN 3-921590-07-8 published by Bahn&Modell specials (reprinted by MIBA) which shows two pictures 180065 which ratains the brakemans hut, but has rebuilt vents, and 180106 which has lost the hut, but retains the original vents.
I've also used a BR ferry wagon index from 1966 to get the numbers/renumbers.
Jon
postimg.cc
??? posted on Mon Jul 13, 2009 8:56 am
Cheers for that, Jon. The photo I used for the post war version wasn't dated or located but must have been taken before 1955 as that's when the article it accompanied was published. (My thanks to Tony Adams of the German Railway Society for that). I did know that they lost the brake huts during the 1950s and i have seen pictures from an article in Continental Modeller with some variation in vents and detailing. I've also seen identical vans belonging to the SBAFB: I don't know whether they were built to the same diagram or were war reparations for the ones lost in the east.
A few photos I took at Hartlepool, where things ran very well on the whole.
The other K3 which has featured in the thread above, weathered after an Ian C Allen photo of 61834, absolutely filthy, hauling a rake of continental vans near Newmarket.
The train - Italian vans now weathered. The German ones still need some work - with impeccable timing, the springs from Dart Castings arrived on the Saturday of the show - but no-one seemed to notice.
Bit off its usual haunt, the milk train for Pilmoor at Ormesby Hall.
Finally, thanks to Ian Ward for the loan of his DC kits Wickham Trolley.
postimg.cc
-
West End Workbench
by jwealleans
__________________________________________
Comment posted by jonhall on Fri Mar 06, 2009 7:50 am
 green with envy
 I must finish my Belgian van.
I must finish my Belgian van.
I must finish my Belgian van.
I must finish my Belgian van.
I must finish my Belgian van.
I must finish my Belgian van.
I must finish my Belgian van.
I must finish my Belgian van.
I must finish my Belgian van.
I must finish..........
Jon
__________________________________________
??? posted on Fri Mar 06, 2009 8:09 am
Are you building 9 of them, then, Jon?
__________________________________________
Comment posted by robpulham on Fri Mar 06, 2009 10:41 am
These leave you speechless!!!!Is the horse box the GWR parkside one?
__________________________________________
??? posted on Fri Mar 06, 2009 11:00 am
Well cheers, Rob. Yes it is - PC79 and so new it isn't even shown as available on their own website (?). Plenty on the stand at Harrogate, though. I have a brass one (Blacksmith) in GWR livery and they make a nice model. Very easy to put together as well.
Nice tender, BTW. I meant to put a comment on there yesterday.
__________________________________________
Comment posted by jonhall on Fri Mar 06, 2009 12:14 pm
jwealleans wrote:
Are you building 9 of them, then, Jon?
Well I did threaten to resin cast it, but sadly I didn't design that in from the start, so there are various undercuts that won't work. So now I'm just waiting for a fresh supply of enthusiasm, and round-tuits to arrive.Jon
__________________________________________
??? posted on Fri Mar 06, 2009 12:35 pm
Now, if you resin cast them I might well be in for a batch. Depending what prototype you pick, obviously.
__________________________________________
??? posted on Sun Mar 29, 2009 9:51 am
Hmmm... three weeks since I posted. Someone needs to do something about having to waste good modelling time working. Anyway, travelling generally means plastic kits and having launched into a number recently I'm making an effort to finish a few off before starting anything else. So, appearing on the workbench tonight....
Ian Kirk non-corridor 4 compartment Gresley BT. This is for a club colleague and so hasn't had the full treatment; other than the battery boxes and some extra brake gear bits it's as it fell out of the packet. I've had it kicking around for ages so it needed to be built. Seats are loose and unpainted (just in there to ensure that they fitted). I'll also have to wait until I see him at York show to put the roof on in case he wants passengers adding.
Next an array of trucks selected at random from the kit pile before departing on my travels; from the top left they are an ex-ROD 7 plank open (Slaters kit with slightly different strapping, extra body securing brackets and replacement buffers and axleboxes). Then a Roger Chivers LMS tube wagon. Not much to say - lovely kit, fell together, built very much as it came. I had a look round on here for other people building them but didn't really find any evidence.
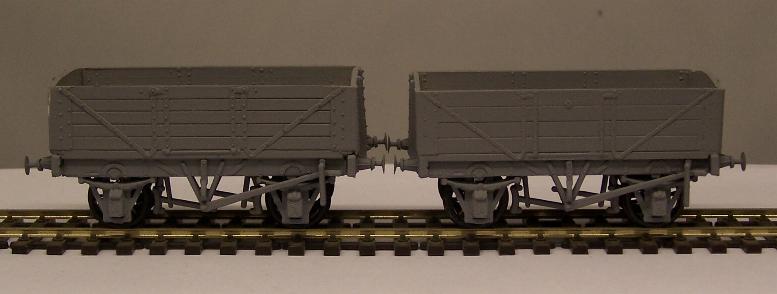
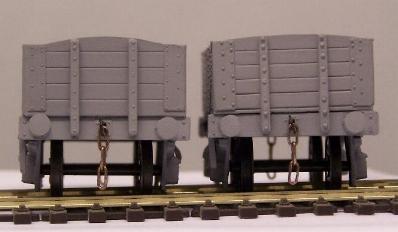
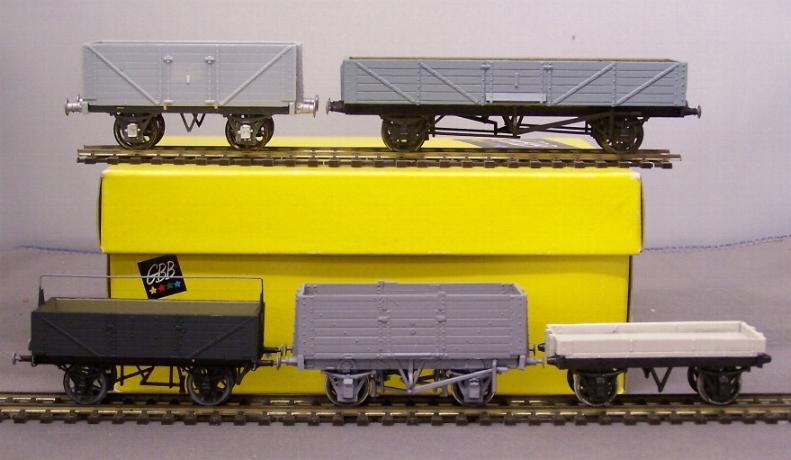
On the bottom row, Coopercraft GWR open - my first kit from them and a bit quirky, but doesn't look bad in the end. I'd like to see a picture of that handbrake assembly if anyone has one - I'm sure there should be more bits associated with it somewhere underneath. Finally a pair of Cambrian kits - a Gloucester 6 1/2 plank and a 15' one plank. These were harder work than the others - the corners took quite a bit of fettling and I had to reposition the solebars several times before the wheelsets fitted correctly - even though I'd taken heed of the instructions and bought Kean Maygibs instead of my usual Hornby. I suppose it's like everything - you get used to the way one kit manufacturer works and if you don't build any for a while you forget the wrinkles. I'm quite happy with them now.
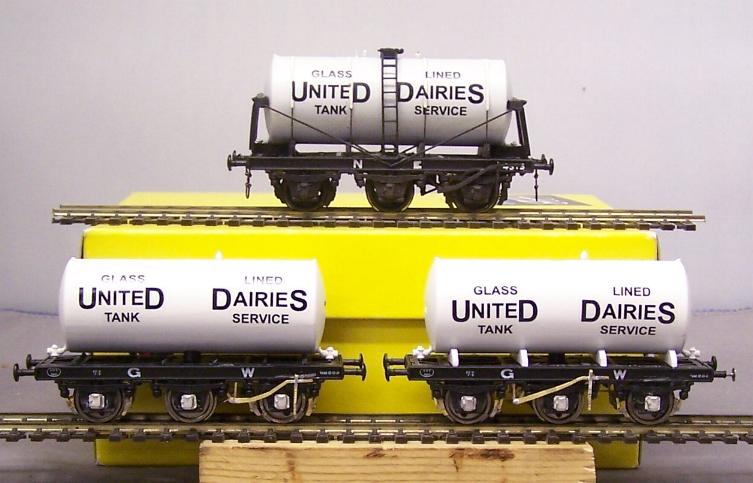
Lastly - and late for the new season - the rest of the milk tanks I started pages (and ages) ago to run on Pilmoor. The two new ones and the original above. Still in an inaccurate livery as I have still got nowhere with identifying the colour scheme of the originals.
__________________________________________
??? posted on Wed May 06, 2009 7:13 am
Some updates on what's been ticking over on the WB in the last couple of weeks. One of the milk tankers has stopped as I cut the strapping to the wrong length and didn't have enough to make new ones for both of them. The other has moved on somewhat and is almost ready for final painting.
Kirk coach is also almost complete - just the door and grab handles to add (and the brake rigging to straighten by the look of it). For not much extra work you can really bring these on from the basic kit.
The Roger Chivers LMS tube has finished very nicely. the Coopercraft GW open is less pleasing - the transfers are very poor having silvered badly from the start and now peeling off. I'll dump them and find an HMRS sheet. I'm told the brake gear is wrong as well bit I'm in a position of complete ignorance as far as that goes.
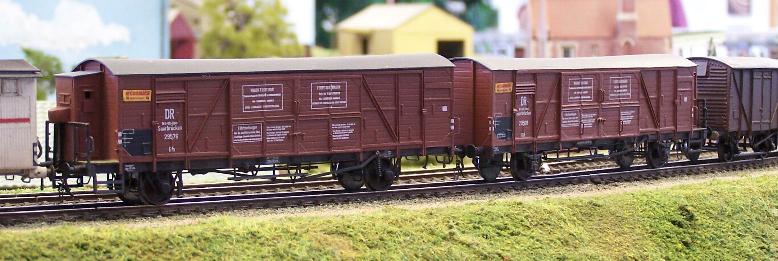
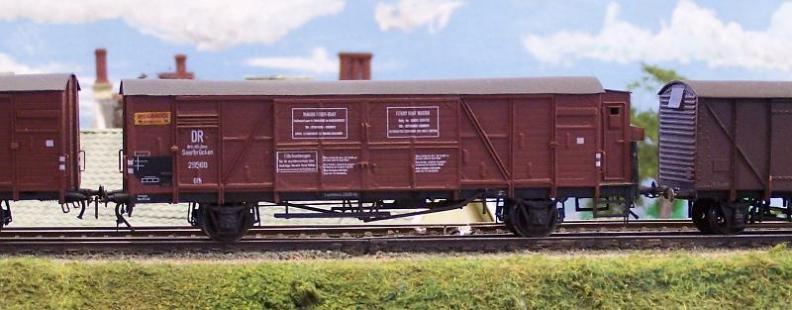
Lastly, these have been taking up most of my time - a pair of German 'Saarbrucken' ferry wagons. These were first built in 1926 by the DR and lasted until the 1960s in traffic. Very long wheelbase and the characteristically Continental brakeman's hut. As well as photos and a very basic diagram I have a Roco HO model of these which I'm assured is very accurate and extremely helpful for those dark or out of focus areas on the pictures I've gathered up. I also have buffers of the correct pattern and a promise of transfers after meeting the German railway Society at Kidderminster Show. I think they'll rather stand out in a row of 12 ton vans.
__________________________________________
Comment posted by robpulham on Wed May 06, 2009 10:26 am
Jonathan what have you used for your tank strapping? are they the originals that came with the tanks? I need some for my triple gas tank wagon that's lurking about part assembled. I used brass strip on the last one but the tank barrels on this one are plastic tube not brass.
__________________________________________
Comment posted by CHRIS LNER on Wed May 06, 2009 10:41 am
Hello Jonathan
Ive just found this thread, most interesting reading, also I like the ian kirk coach,very smart. what paint do you use?
__________________________________________
Comment posted by jonhall on Wed May 06, 2009 11:08 am
jwealleans wrote:
Lastly, these have been taking up most of my time - a pair of German 'Saarbrucken' ferry wagons. These were built during the 1930s by the DR and lasted until the 1960s in traffic. Very long wheelbase and the characteristically Continental brakeman's hut. As well as photos and a very basic diagram I have a Roco HO model of these which I'm assured is very accurate and extremely helpful for those dark or out of focus areas on the pictures I've gathered up. I also have buffers of the correct pattern and a promise of transfers after meeting the German railway Society at Kidderminster Show. I think they'll rather stand out in a row of 12 ton vans.
Have you seen the photo in this book?http://www.miba.de/verlag/15088114.htm
I don't think it has a drawing, but there is one of an Hfs van, I think it's available from Midland Counties.
When I asked the GRS about ferry van transfers they couldn't really help, but I did buy or order a sets of Gassner and Kreye standard freight stock lettering to do the bulk of the job.
Jon
__________________________________________
??? posted on Wed May 06, 2009 11:30 am
Rob - there were no straps on the tanker as bought - it's the cheapest Hornby one I could find. (GW, grey tank). The strapping is .75mm brass strip I bought from Eileen's at York. Mainly Trains do something similar as 'boiler bands'. They're just bent over and superglued into place. They ought to have turnbuckles on them but I've yet to find a practical way to represent them.
Chris - For BR Crimson I use Halfords BMW Zinnobar Red. It's very close to the Precision colour which I then use with a brush to touch up.
Jon - thanks for that but I don't read German so it probably isn't worth my investing. I have a couple of photos from the HMRS collection and a couple more I found on the net. The drawing came from the WW 2 Railway Study Group website and is very basic indeed - just overall dimensions. I've scaled everything else from the photos and the Roco model. The transfers I haven't heard back from them about so the chap may have been mistaken. He did seem very confident. Plan B is just to scan the Roco sides and enlarge it all slightly.
__________________________________________
Comment posted by 60B on Wed May 06, 2009 11:37 am
How well does the Ian Kirk go together?
__________________________________________
??? posted on Wed May 06, 2009 11:56 am
How well does the Ian Kirk go together?
Well, hello. They show their ago a bit compared to the best plastic kits but with care they're not bad. You sometimes have to file the floor back/fill in a gap where there's a narrower brake section. Roof fitting is always a bit of a nightmare especially with the domed end roofs. They're never the right length. If I build them for myself I use cast bogies (ABS) as they're a bit too light with the plastic ones. I also use Comet bits of the underframe fittings and change the roof vents (MJT generally). If you trim off the moulded door handles and replace with MJT it makes a world of difference to the appearance.Where they do score is that they're very easy to cut and shut. have a look back through the start of the WB for a set of 52'6" ones I did a couple of years ago. I have an ECJS one lined up to do as well.
__________________________________________
Comment posted by 60B on Wed May 06, 2009 12:03 pm
Thank you for that, doesn't sound too difficult at least.
__________________________________________
Comment posted by 60B on Wed May 06, 2009 12:22 pm
Found one on eBay but not sure wether to go for it:
http://cgi.ebay.co.uk/KIRK-COACH-KIT-00 ... m153.l1262
__________________________________________
??? posted on Wed May 06, 2009 12:48 pm
Also available from Coopercraft directly (http://www.cooper-craft.co.uk/) but with the postage they're exactly the same price.
__________________________________________
Comment posted by 60B on Wed May 06, 2009 12:56 pm
Thanks very much. I'll get on it when I check my balances.
edit - What did you do for wheelsets?
__________________________________________
Comment posted by CHRIS LNER on Thu May 07, 2009 4:59 pm
Thanks about the paint, I was just curious.
by the way I like the D16 on the first page
 I hope to get my dodgy one up to sratch
__________________________________________
Comment posted by gr.king on Thu May 07, 2009 5:04 pm
I've only just seen your 2007 cut n' shut Kirk GE section bow-ended coaches Jonathon. Nice application of the method, and it obviously allows you to resolve neatly any problems of non-matching roof and body lengths in the original 61'6" kits
What's the origin of that D16?
__________________________________________
??? posted on Thu May 07, 2009 8:37 pm
60B - I use Hornby wheels on all my rolling stock except where they have to be split spoke or Mansell. They catch the chairs on very finescale track but they're fine on Peco Code 75 which is about as finescale as I ever intend to get.
Graeme - the D16 is a Little Engines one which was a free gift on Ebay. I bought a Mallard Models kit (which I have still never built) and the bloke threw that in with it. It had been built - glued - half disassembled and then abandoned. It was incomplete but when I got hold of the instructions - courtesy of the late George Walker - it was only missing detail bits. It was finished just as RMWeb 3 was abandoned as I recall. I was tipped off about the trick of balancing the tender on the back of the dragbeam and with all the weight of the body it pulls quite well, though it's still a bit noisy.
__________________________________________
Comment posted by 60B on Thu May 07, 2009 8:47 pm
Thank you very much, Johnathan.
__________________________________________
??? posted on Fri May 15, 2009 8:42 am
Assorted projects on the WB in the last few days.
German vans making slow progress but the details are starting to appear. Thanks to the German Railway Society I now have the fonts to create the transfers for these which was going to be one of the hardest things to dig out.
Gresley BT(4) pretty well complete. For the benefit of 60B, I've shown the bits which I've added to the basic Kirk kit. Door and grab handles are MJT as are the roof vents.
The rather anaemic brake gear on the end is replaced with bits of wire. The link to the vac pipe should be flush to the end and should probably come down on the other side of the upstand. MJT sprung buffers make a difference if you want to go that far; these are the brass ones which came with the kit.
Underneath, the trussing has the cross members added (there should also be diagonal bracing but I'm only trying to suggest an effect here) and the battery box/dynamo/brake gear replaced with Comet parts. What I should also have done before sticking the roof on was put the 'No Smoking' stickers in the windows - they're surprisingly noticeable when they're in place.
A small project for one of the other members at Ormesby; his P2 was not used on the layout as it simply didn't run fast enough. I've replaced the Comet gearbox (I think a 50:1) with a 38:1 to see what difference that makes. This is a K's kit, still with the original wheels and valve gear. I'll do some tidying up on the lining and paintwork after we've done some running trials.
Another Ormesby project but from Corfe this time; this had been built with the two W irons linked by a piece of thin wire which was then soldered to the weight in the centre of the wagon. It's a technique Ron Rising used a great deal and it's surprisingly effective. This one had been bent out of square however and so I'm replacing with more conventional 3 point suspension. I'm interested to know whether this is a genuine LSWR vehicle; it looks to me like a Ratio GWR kit (is it an 'Open C'?)
Finally something Steve (31A) and I have been discussing; I have two K3s to renumber and weather for Thurston. One of them is to be 61834 as pictured by Dr Ian C Allen hauling a rake of Continental vans near Newmarket. 61834 was one of the batch built with flared tenders and right hand drive. The standard Bachmann issue is LHD. I took it to bits last night - surprising how far you can break them down - and started the conversion. Bachmann have made it quite easy, actually, as the pipe is attached rather than moulded to the boiler. Fill in one set of holes, drill out another. The reversing rod is moulded onto the end of the casing under the firebox but can be cut off and stuck onto the other side quite easily. It's as supplied above. I've moved it slightly inboard when reattaching it so I can stick it along its length to the boiler just to give it more chance of staying put. There's a useful thread on K3 detailing here, most of which I will be applying to these two.
__________________________________________
Comment posted by Adam on Fri May 15, 2009 9:48 am
The wagon is indeed a Ratio Open C - the Dean Churchward brakes are enough to confirm that it definitively is not an SR vehicle - though looking at it, the axleguards have been replaced with the LSWR variety at some point which is a concession of a sort I suppose!
Adam
__________________________________________
Comment posted by 60B on Fri May 15, 2009 4:03 pm
jwealleans wrote:
For the benefit of 60B, I've shown the bits which I've added to the basic Kirk kit. Door and grab handles are MJT as are the roof vents.
Thanks very much, John.Now,with this info, I can take over the world...umm, I mean order the kit.
__________________________________________


West End Workbench
in Kitbuilding & Scratchbuilding
Posted
Hi Mick,
You must have posted before I added my edit - there is plenty of space for lead sheet and I will be adding some fore and aft. I haven't weighed it yet, but there are weighting recommendations in the BullAnt instructions. I will miss the club night on Monday, though, so it may be a couple of weeks before it gets a run out.
I bought a BullAnt Major at the same time to use in my railcar kit. If that's a success I'll suggest we adapt the Ormesby one the same way. We can't use it on the automated shuttle at the moment as it goes like the proverbial off a shovel one way and an arthritic tortoise the other.
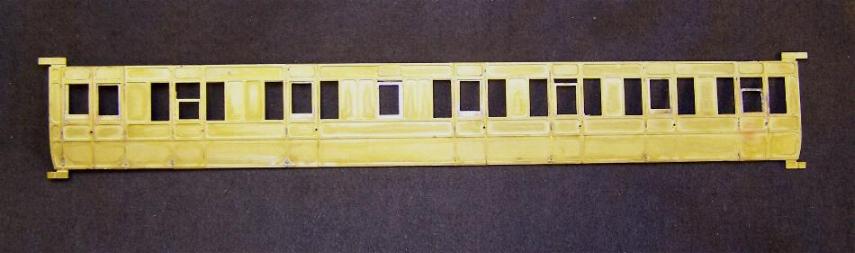
The coach has had Halfords Filler primer on the outside (the garish yellow) and a pale yellow on the inside - what you can see at the bottom is overspray from the pale yellow. I'm going to try it in Larry Goddard's recommendation of Precision Track Dirt.