


C&WR
-
Posts
1,763 -
Joined
-
Last visited
-
Days Won
2
Content Type
Profiles
Forums
Blogs
Gallery
Events
Exhibition Layout Details
Store
Posts posted by C&WR
-
-
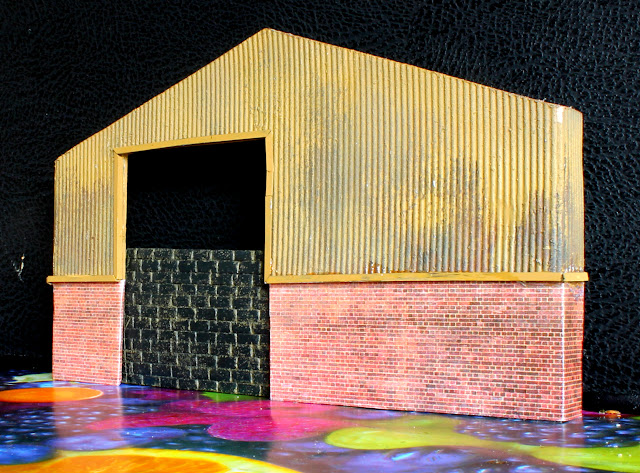
Having lost my modelling mojo completely last autumn (it's a long story, I won't bore you, but it included a lot of problems at home and work) the good weather or something seems to have invigorated me. Having decided that the end of the branch line if not a classic GWR-BLT* is still going to be a bit rural I have broken it to family that the factories etc mean I will be making another layout.
One of the constraints of this bit of Wallington is that I have a space like a right-angled triangle with a slightly concave hypotenuse to fill. The base, to the left of the layout is about 27cm and the other cathetus is 90cm. The triangle is truncated at the far angle from the right angle,and gives about 7cm clearance between the backboardand the cess of the track. A picture paints a thousand words, so here's what I mean:

The bit to be filled is the sandy-coloured area to the right, and the position of the John Ahern-inspired small station building is probably where the station itself will go. The branch will then go via Wallington Sands Halt to Wallington Super Mare itself.
The idea for the end of the branch is to have some railway infrastructure (the Toad is sitting on the position of a cattle dock), perhaps a small village square, definitely a Railway Inn & whatever I can do with housing. Low relief is going to be my friend!
Therefore armed with my trusty John Ahern, and shamelessly cribbing from John Whiffen (sorry, but your low relief stuff is a bit deep but I am using your papers) I sketched out some cottages:

After about 40 minutes or so (I was working in between turns in a game of LEGO Minotaurus with TLHC& TSC) I had the basic shape cut out, the end walls taped in place for now:

After removing the end walls and taking to the various openings with an emery board I was ready to clad the thing, using pink blotting paper, some cream note paper & Scalescenes aged red brick.The brick part will have blue brick window sills & red brick ornamental lintel:

From the other way. The bricked up window is an idea I loved so much from Scalescenes it had to be done:
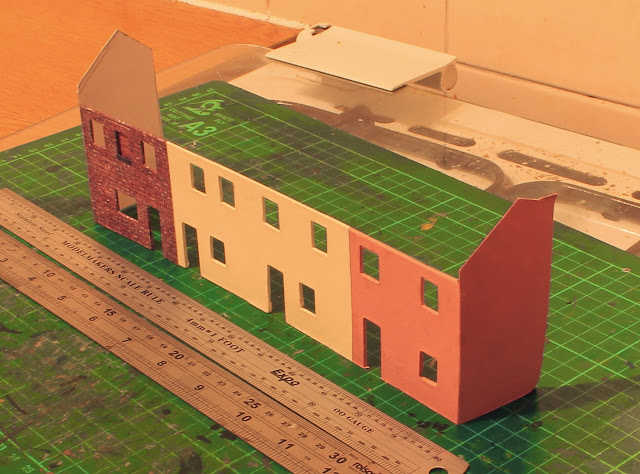
Fairly please bearing in mind that, including distractions, this took about three hours including photography and writing the post. Not looking forward to the roof. I find it very difficult to make these work round chimneys, there will be quite a lot of flashing deployed I fear!
*In the days of the GWR if a BLT had been invented it would have been magnificent, not like the curly Travellers' Fayre sandwiches beloved of '70s comedians!
-
 2
2
-
-
Rather pleased with a Bachmann Intermodal pair with containers for £20. Not sure if a Hornby Class 59 for a shade over £40 is a great bargain, but I am pleased with it, just looking forward to it arriving!
-
1
-
-
Thank you both! I felt I had a very pleasing weekend on the railway, even if the scenic modelling side was all of about a foot-and-a-half. The red bushes don;t look quite so red in the flesh, I suspect how they appear here is to do with the minimal photo editing I did.
The Intermodal set was a bargain, Julian, even when postage added. I saw one at Railex in a similar condition for £30 so very happy! I like having this more modern stuff to go with my 220 & 166 as TSC always demanded to stay and watch the freight trains when he alighted at the station in my village. On one occasion an EWS 59 or 66 running light engine pulled up at the station and the driver asked us about an unattended bag which had been spotted on CCTV - I was able to reassure him it belonged to a bloke who had missed a train, had an hour wait, and had gone downstairs for a cigarette.
As for the first pic, John, I was having great difficulty seeing anything at all on the live screen on the camera (it was placed where I couldn't use the viewfinder) so it was a bit of a point and pray shot. I rather like it, though, even though the Prairie I had carefully placed to be on shed in the background is obscured...
-
2
-
-
So, success! Got to Railex and managed not to break the bank, although did pick up some handy scenic bits. Was very tempted by a Lima Class 57 in Freightliner livery to go with my modern container train, but more of that later. Delighted to see Black Country Blues in the flesh for the first time after following it on here and had a good chat with one of the operators, although Andy Y a bit busy so didn't get to say hello.
Lunch at the pub was also fabulous, and the beer in its usual good state. TLHC gave me a frosty look when I suggested she should take my wallet to go and buy ingredients for supper and collect me when done, but that's understandable when it would have been at least a 40-minute round trip to do so!
And so to the railway. It was to be a GWR weekend with a bit of work & some modern interlopers. First of all I got round to adding the hawser & hook to the yard crane and planting it. Hot a great pic, but I had to take it into the light & was using a table lamp as a fill in. Julian might recognise a couple of the wagons, many thanks as they have been added to my PO coal train set:

The modern interlopers were a Bachmann Intermodal twin set I saw on eBay. At £20 they were great value, so they have been added to my spine wagons even if this is not prototypical:

Quick shots between containers at the dilapidated warehouse:


I need to build a bigger railway to do this lot justice:


Thought I'd mock up a container yard:


There is the slight possibility I might have clicked on "bid" on eBay for an EWS Class 59 to pull this lot. If I had, hypothetically, have won the auction I felt something EWS would go better as general motive power when running up to date at Wallington. The locomotive, let's say I had bought it
will bewould be delivered to the office this week
The final bit of work is sorting out the surroundings of the branch lie from the steam/lake back towards the terminus. If you remember some time ago I made a brick-and-flint wall for this purpose, and bought extra lichen at Railex to finish the job. A few layers of different coloured flock, and a good overlay of static grass and here we are:
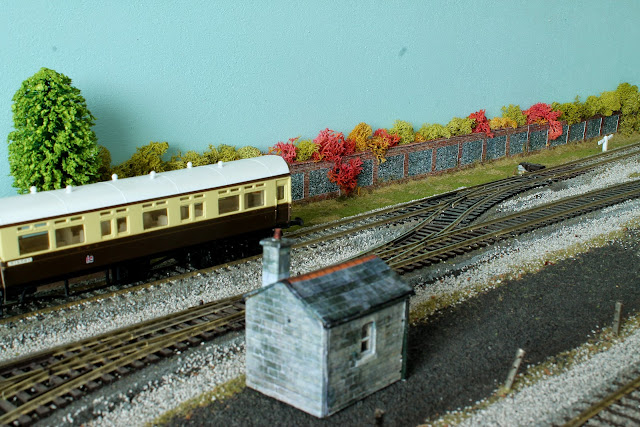

Have now measured out the very end to make a little village (mainly in low relief) so I can get that corner finished too...
-
6
-
-
Excellent, bank holiday weekend approaches. With luck this means Aylesbury Railex, a visit to the pub I modeled ages ago and a trip back to the layout

-
3
-
-
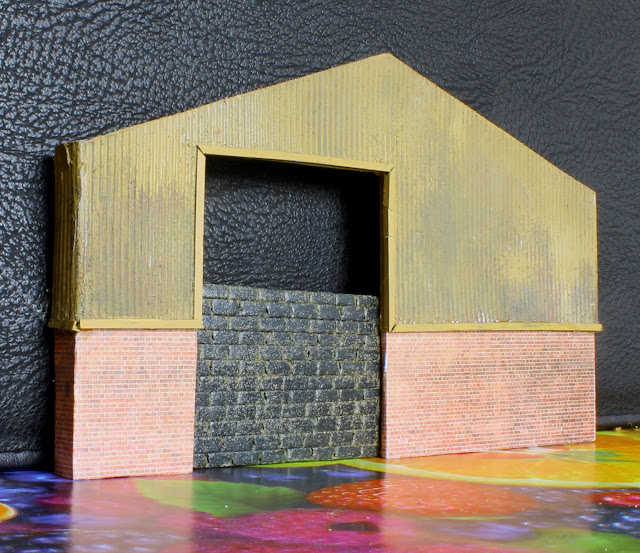
Finally got onto some mossing-up of the building. I took some of the lichen left over from my wargaming days (so that will be about 30-years-old) in the packet at the font of this pic and chopped it finely with my best herb-chopping knife. This was then mixed up with some Woodland Scenics green grass and burnt grass flock.
I then mixed up a solution of PVA and water and tried to dribble the powder down the roof. Not quite sure:
Blast, it looks like a hanging basket, not dirty old moss! What seems to look finely chopped to the naked eye, at normal viewing distance and even on the plate looks like the Chelsea Flower Show here:

I know I can tone it down again by washing it over with black, but I was so pleased to have the red and sickly yellow colours in. I then took a dry brush to it again to remove the worst:

Let's hope it looks a bit better after this treatment:

Not as easy as some people make it look, this!
-
6
-
-
That's really nice work. Properly used like the real thing...
-
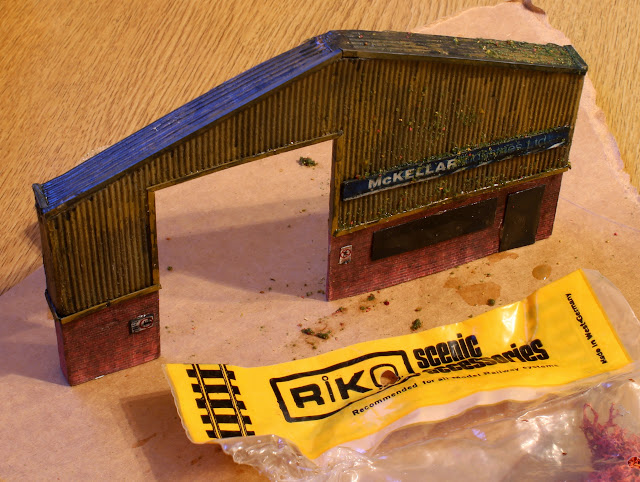
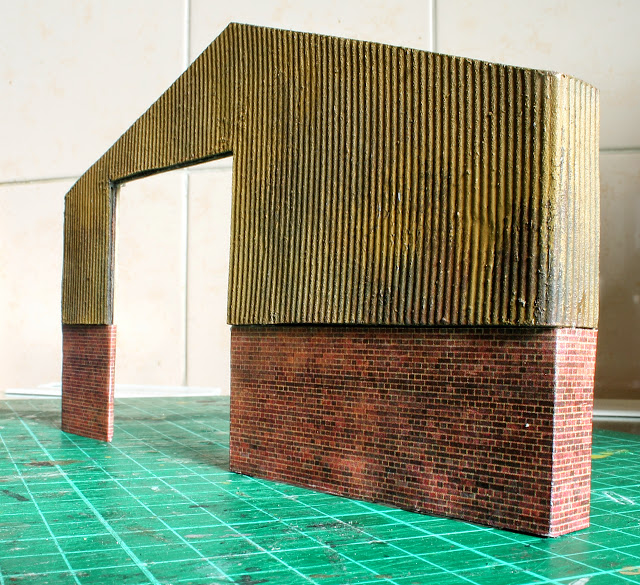
Finally I get to the laptop. Been sooo busy! First of all here's the work on the roof:

This has been done in the same way as the rest of the cladding with a coat of gunmetal enamel washed with rust enamel, but this time I salt weathered it - sprinkled the surface with table salt, let this clump together, then airbrushed a over the top before then taking to it with a toothbrush & water. The plumber thought I was mad Saturday morning as he worked inside and I worked in the garden...

I then added some of the angle strip round the gable end. I'm thinking about how to do the sides. This was painted up like the previous bits & again taken to with a cotton bud and thinners:
As you can see in the previous pic and below I also went to town on the roof with thinned black acrylics again:

This has now been given a liberal coat of PlastiKote. I'm worried I may have overdone this a bit as it's made some blobs here & there, but I do still have moss & so on to go on once I've sorted the edging on the sides.
-
2
-
-
Just realised from Chrs P Bacon's #3337. Misha is a boy's name, diminutive of Mikhail, and Sasha is normally the diminutive of Alexander slthough can be used for Alexandra. Spotter that I am, never thought I'd use that O-Level Russian on here!
Cracking joke, though, shared elsewhere...
-
Thank you, chaps! Interesting you were R Signals (V), Edwardian. I served with 35 (SM) Sig Regt (V) in the mid '90s where I commanded the Radio Troop. I then moved to 39 (Skinners) Sig Regt (V) and was in the Middlesex Yeomanry, hence leading the Squadron at Calvary Sunday yesterday.
Have done quite well on the warehouse. Only thing is that my firewall seems to be blocking Picasa so can't get them up!
-
1
-
-
Thanks, Edwardian, very kind of you to say. I was lucky to find this and other sites to encourage me; more so that of all that all my old railway stuff was still about the house & operational; and most of all that my father was prepared to get stuck in & together with my mother subsidise some of the stuff when I was supposed to be saving for a house!
I think card modelling and i just got on from the beginning of my new adventures in railways, although I have loved the polystyrene kit side from childhood too. I am trying to find some of my first models built for wargaming/RPGs back when I was 11 or 12. I built some houses in card with the walls then rendered in Polyfilla, roofs with individually cut tiles, windows with scribing filled with paint etc & even then used to fashion door handles out of my ubiquitous bag-tie wire!
The only real problem I have now is where to put the stuff I make! I should be more focused and finish the branch line end of the railway. Next time I am home I will perhaps make a template of the space available so I can build where I live now and then take the stuff back...
-
3
-
-
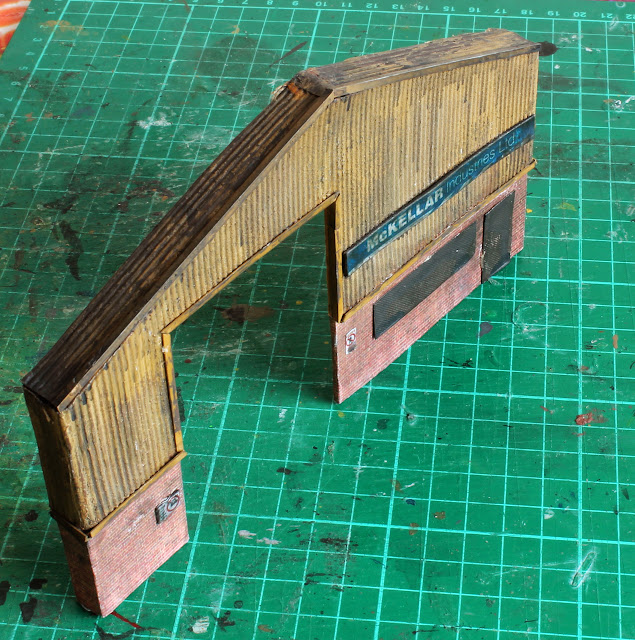
And here we go - with the signage on. I's not this wonky for real, honest!

The showroom door and windows are supposed to be covered up with that mesh stuff used on disused buildings. I used some etch to make it:

Now to sort the roof!
-
5
-
-
And even further back a shoemaker would have been a 'cordwainer'
So disappointed not a Cordwangler!
Joe, he was a young cordwangler,Munging greebles he did go,And he loved a bogler's daughterBy the name of Chiswick Flo.Vain she was and like a grussetThough her gander parts were fine,But she sneered at his cordwangleAs it hung upon the line.So he stole a woggler's moolyFor to make a wedding ring,But the Bow Street Runners caught himAnd the judge said "He will swing."Oh, they hung him by the postern,Nailed his mooly to the fenceFor to warn all young cordwanglersThat it was a grave offence.There's a moral to this story,Though your cordwangle be poor,Keep your hands off other's moolies,For it is against the law.How did they get away with it!-
7
-
-
Cheers, Lee. It's all been a bit busy with TLHC's mother over from NZ, but I've snatched some work time. I have weathered up some signage for the building (and rescued one tiny one from the carpet monster) and also painted some extra bits to go on.
The signs are currently Blu-Tacked in place so I can decide if I like them. This may be subject to popular vote! Off up the Gherkin tonight so pics tomorrow I hope.
-
1
-
-
Very nice - capture the modern re-use of old buildings well. Are the walls from your ramps/staircases scratchbuilt? I made similar for my promenade & station.
-
As promised the update on the warehouse. I am still not sure if the block work is high enough in the main loading bay door (there will be other blocked up apertures) as IIRC it went much further up in the original.
First with the painted styrene angle section on:
Some of the edging broke when I removed it from the card to which it had been Blu-Tacked, but I kept these bits to add to the air of dilapidation. Similarly I didn;t get too hung up over bits which hadn't bonded properly.
I then had at the edging with a cotton bud soaked in acrylic thinners. This exposed the undercoat. I also made up a wash of Tamiya rubber black and dribbled this down the corrugations:

I did try some of this wash on the brick paper having tested to se it wouldn't make the colur run. It seemed quite safe although did cause a little bubblng. Thankfully this seems to have settled down:

Next phases in hand - I have given some generic business sign boards good coat of PlastiKote so I can weather them up too...
-
3
-
-
Call me old-fashioned but:
http://pages.ebay.com/link/?nav=item.view&alt=web&id=331509504727
I think I'll stick to scratchbuilding. Either that or I'll do without
Only about £50 more than these go for usually. Bearing in mind the vendor & there's been some work done on it not as horrendous as I would have expected.
I've whinged on this thread loads of times about wanting FGW stuff but finding the prices stupid beyond belief!
-
Usual standards all round, Lee

-
Bah! Managed to get some styrene painted up for the warehouse. Usual deal, coat of enamel gun metal washed with rust, then after dried some of that acrylic sandy colour over the top.
Only thing is I did the coat of acrylic a bit too well. I had thought I could just chip it with a fingernail or toothbrush, but to no avail. Knew I should have salted it or used some hairspray! Ho-hum, possibly back to square one, although when I have got TSC home from Cubs, eaten supper & done the ironing I may try giving it a swipe with thinners to let the base coats show through...
-
Thanks, chaps. Some bits of styrene arrived to go on the warehouse so hoping that having done some DIY last night I may get a chance to model tonight!
-
1
-
-
That backscene really is the cherry on the icing on the cake and the layout has been beautifully shot too, not suggesting your other pics were ropy.
I've taken inspiration for building cameos on individual baseboards to take back to Wallington. Just need to finish the low relief thing I've been waiting for bits for...
-
Been jolly busy with Auditors in and various other things that happen in a School holiday. I've also just had a little bit of styrene delivered to augment the dilapidated warehouse above which I hope isn't cheating too much vis-a-vis the John Ahern/scrap materials at home intentions for the building!
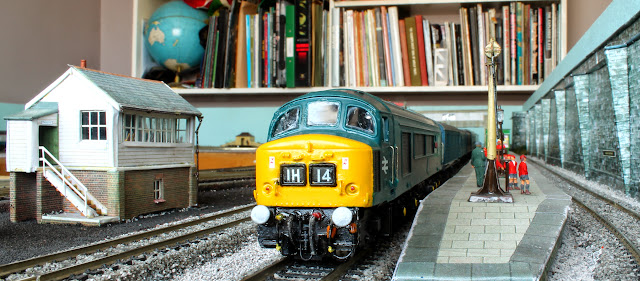
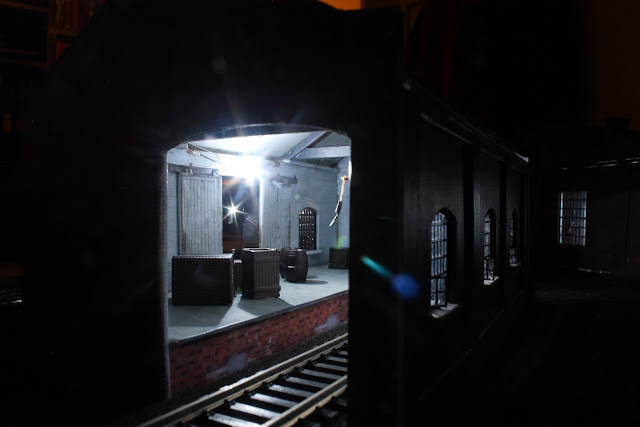
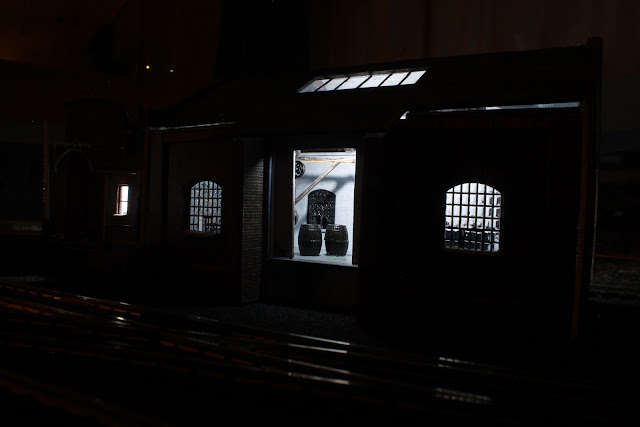
Did manage a trip to Wallington over Easter weekend. Apart from measuring up for a little cameo to be built at home & taken back to the layout it was mainly a running weekend:
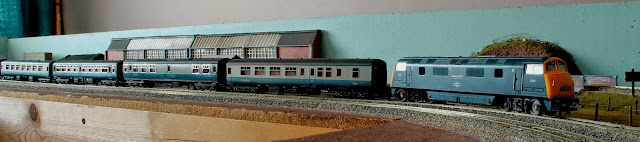
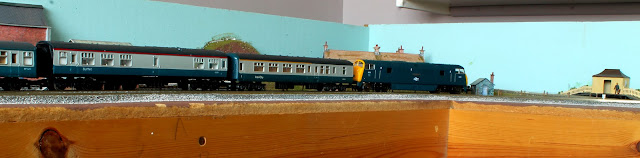
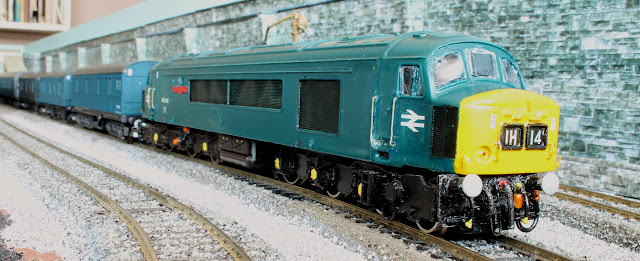
My bodged 45, but I do like it:


And a couple of the lighting in the good shed:
-
4
-
-
Are you sure that's a painting?
It's ink on paper, 66.5 x 90cm. I'm going to be checking if she does prints, I think that's rather wonderful!
-
1
-
-
Woo-hoo! Easter Holidays mean I now work something approaching normal office hours and have been inclined to model. A little bit of progress on my disused warehouse model. First I added a carcass of mountboard to keep the corrugated card firm and to give something to build onto:
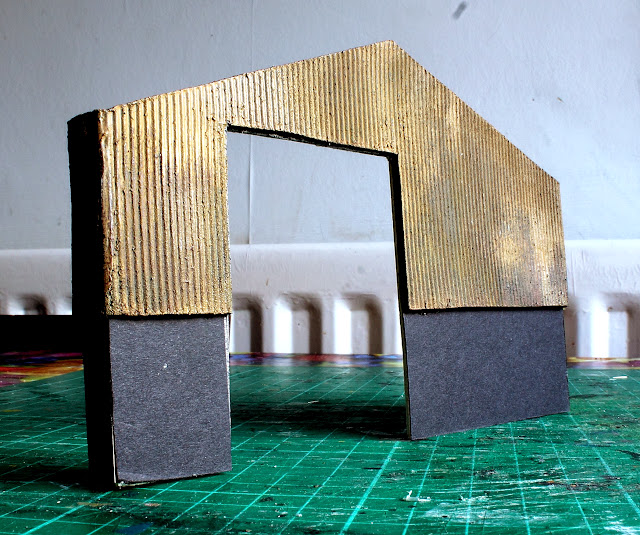
John Ahern used to use strip wood to brace his buildings. As I keep banging on about him I thought I'd practise what he preached so liberated some wood from the workshop bin. I cut this to shape to help form the corners:

I then clad the base of the building in brickwork:

Funny how a moderate bit of tinkering with a photo and a change in the light can affect the results. I'm please by the nice, sharp corner in the bricks here:
As a complete aside the Art Master at School, who kindly gives me the mountboard offcuts for modelling, was interested to hear I am trying to model urban decay. He mentioned the artist Juliette Losq, a friend of his wife, who draws and paints this kind of thing. A great example, and not too off topic for a railway site is this:
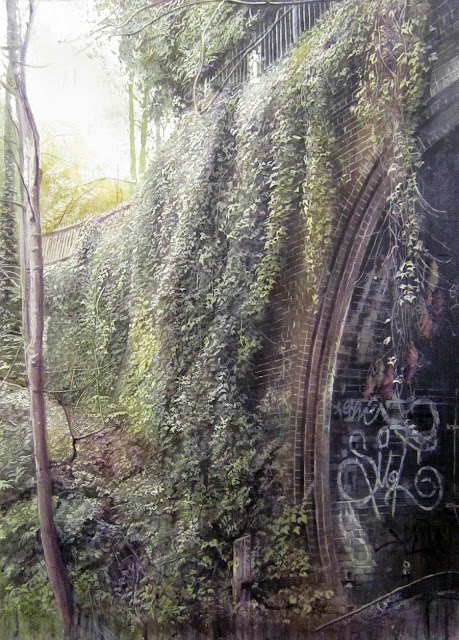
More similar on her website archive here...
-
5
-

A New Start
in Layout topics
Posted · Edited by C&WR
Thanks, altone. I've just had a scan through the thread and it seems I've never posted a picture of all the wagons together. I am having firewall problems getting into Picasa, so can't look now. However there are shots on pages 1 and 2 of some of the wagons, and towards the bottom of this post.
It's not hugely impressive yet, numbering about five vans. IIRC they are all Dapol and include an Ale Wagon (converted cattle truck) and ones from breweries in either real or imagined liveries. Wessex Wagons are a very good source, as are Model Railway Clubs/Societies round the country which do them as specials.
It can be a very expensive hobby as there are lots out there - i have restricted myself to breweries whose products I have enjoyed over the years or which have certain resonances with the family - my late uncle was a fan of Fremlins so I have one from a brewery that either took over or was taken over by them & so on...