
.jpeg.93dcb7ae109704b6cdee1d9e015047dd.jpeg)
.jpeg.bbb1f906427fbb68c4f987479a3678ba.jpeg)
alanbuttler
-
Posts
752 -
Joined
-
Last visited
Content Type
Profiles
Forums
Blogs
Gallery
Events
Exhibition Layout Details
Store
Blog Comments posted by alanbuttler
-
-
.thumb.jpeg.3955886fc58580247a46965a1bd9db57.jpeg) 38 minutes ago, 37114 said:
38 minutes ago, 37114 said:Look forward to seeing the figures Alan, the guy holding the red flag on Avon Street crossing while the 03 passed over was a classic shot for me and part of the inspiration that made me model the area.
That is first on the list :-) Along with the driver chatting out the window to him
-
1 hour ago, 37114 said:
It looks very good, I think all it needs to finish off is toning down with a very fine layer of what is often referred to as "traffic film" basically a fine spray of mud/dust. I use a very diluted mix of thinners/Humbrol 26 as a wash then wiped off while wet. It stays in the crevices but takes the gloss/shine off a vehicle effectively.
I love the Diarama by the way, I built a 4mm layout inspired by Avon Street a few years ago (Peafore Yard) and am now building a 7mm version (Peasevern Yard) which features the Barton Road crossing gates and features the brick building which stood for years by the Barton Road crossing on the backscene.
Thanks, I'll give that a try. My airbrush compressor is on the blink at the moment so when I've worked out what is up with it I'll revisit the transit.
I've really enjoyed reading about your two layouts, it is such a photogenic subject area. I found that Bristol archive site particularily inspiring and I'll be creating some new figures based on the guys in those photos.
-
 1
1
-
-
1 hour ago, Mikkel said:
It's a pleasure to see you modelling again, Alan. I don't know how you find time for it whilst running a business - although I realise this also has the purpose of creating some displays for the figures.
The Gundam pens look interesting, must have a browse to see what they're about. Excellent close-ups too, what are you using for camera?
Thanks Mikkel, it does feel good and is reconnecting me with my products in a really nice way. I'm sure these dioramas are also going to inspire many new ideas. I realised a while back that the only way I was going to get any modelling done was if I could do it in a work setting :-D
-
1
-
-
8 minutes ago, Andy M said:
Great to see you back modelling Alan, I need to follow your lead and park some of the work stuff!
Regards,
Andy.
Good to hear from you Andy :-) Hoping to post more over the coming weeks
-
 1
1
-
-
1 hour ago, 5&9Models said:
That looks superb!
Thanks - I can't take create for the scene, that is the work of Dan Evason at Tunnel Lane Models (https://www.facebook.com/groups/tunnellanemodelrailways/). He made 3 dioramas for Modelu for product photography :-)
-
16 minutes ago, Mikkel said:
Welcome back Alan! Great to see a post from you here. One or two things have happened for you in the meantime!
")
I look forward to seeing these dioramas being populated and, er, locolated. They look superb already.
In the meantime, here's someone you may recognize - or not, I suppose you have done so many figures now you can't keep track.
I recognise that chap, 1404 I think :-D
Thanks Mikkel, it is good to be back and making time for modelling. Just been scanning back through my posts and it is strange to think when I was detailing the pannier or snapping bits of dukedogs that Modelu wasn't even on the horizon! Just on a practical level looking at how much I was relying on brass details and scratch built bits. Seems like another world now with what is possible with the printer.
-
3
-
-
5 minutes ago, Harlequin said:
Hi Alan, The dioramas look great.
Will any of them work for the Big Four era? (Steam at it's zenith rather than steam in decline?)
Yes depending on the camera angles! I'm looking to paint some of the pre-grouping figures for product shots so Portmadoc and Barton Road would definitely suit those periods.
-
 1
1
-
-

This is great, Ian, oozes atmosphere! Do you mind if I share it? I'm thinking of a Modelu customer gallery and this would be a perfect addition.
-
Hi Dan,
It indeed is and I have started doing just that
 Some of the loco crew needed hats (52,53,54 & 55). I've also swapped heads around on a few where people have requested it. I can do this to order, but I'll have to think on how practical it is.
 -
Hi Ian,
It's always nice to see the results of my figures when painted, you've done a nice job on these. Looking at the original scan it looks like the scan itself did not have a lot of facial detail. For future figures I'm looking at rescanning the head and shoulders separately as this will allow for a much higher resolution face. The scanner captures about 2 million triangles in the bounding box of the scan, so when you only scan the head and shoulders you are getting all 2 mill of triangular detail in that area. Then it is a short edit job to marry the head & shoulder scan onto the full body scan. That's the theory! I'll see how it works out in practice with the next installment of figures.
Alan
-

You still hear the 97's shooting past LE doing ERTMS training from time to time - I live a little further up the line between Caersws and Pontdolgoch. How about doing Scafell Halt and traces of the old siding to the Penstrowed quarry
-
Thanks for the behind the scenes shot Mikkel! It's really motivational for me to push on with Oswestry seeing those kind of shots. LED lamps might help with heat if that becomes an issue. If you ever want to feature yourself in a cameo role let me know when you are next in the UK and I'll get my 3D scanner out

-
It's posts like this that got me back into modelling
Another cinematic experience you've created Mikkel, super macro shots - the pigeon on the roof truss is excellent, camera angles, lighting - it all has the air of someone who works in film/production, did you story board it all first? Great stuff, you're like the Wes Anderson of Railway Modelling
-
That's a great tip, thanks a million Rabs, I wasn't looking forward to getting the putty in there without completely messing up the whole thing.
-
.thumb.jpg.085c107229df4f5bccbda11fdde9b65d.jpg)
Good stuff Sierd, I didn't realise you had a blog! Just catching up now
When I can start running a service from Oswestry up to Aberdovey then? 
-
I've seen a couple of folks remove the top feed, Paul Marshall-Potter has done it to one of his Albion Yard Panniers but hasn't shared the secrets as yet
https://albionyard.wordpress.com/2014/11/14/severn-dean/
I've an old Replica 57xx which is in the project box for a top feed removal. I seem to spend all my time with top feeds, either trying to accurately draw them in 3D for the Dukedogs, or fretting over the challenge of removing them from a Pannier or 14xx!
-
Hi Martin - you've not missed it, I forgot to post about it!
A few notes on the open spectacle windows which I've forgot to mention - I used a tapered reamer to remove the moulded window rim, then opened the window up just enough to slot in brass spectacle window from the Mainly Trains etch. Glue'n'Glaze was used beforehand. The idea was inspired by a picture of 7739 / L.94 I took at Tyseley. Same goes for the cab pipe drapped out the window and the steam heating cocks:
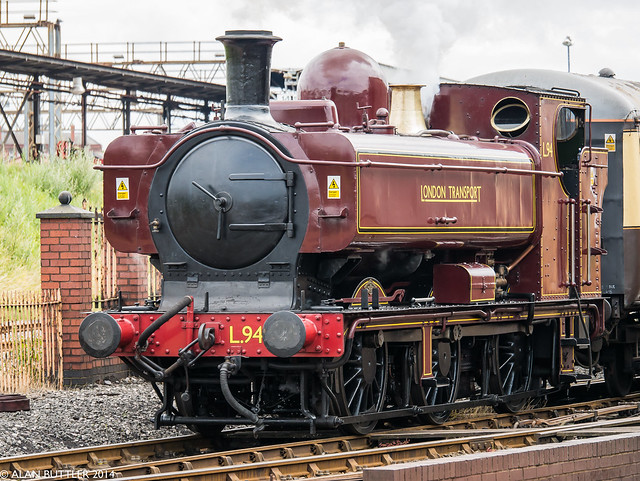
GWR 5700 Class No.7792 / L.94 by CAMBRIAN AL, on Flickr
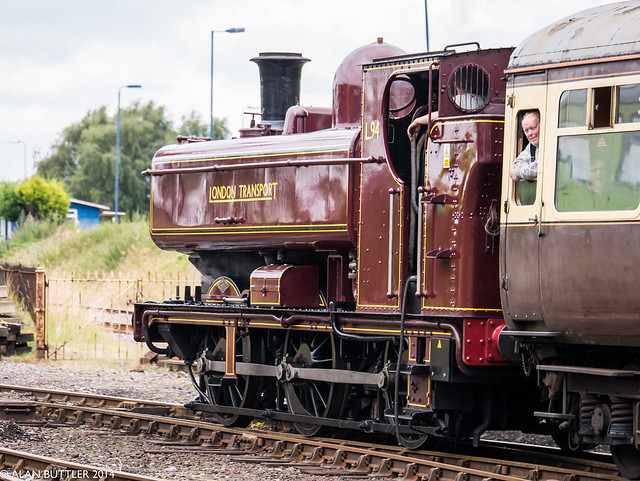
GWR 5700 Class No.7792 / L.94 by CAMBRIAN AL, on Flickr
-
Great start Paul. Sketchup is perfect for getting a feel for things before setting to work. If you switch to 2D view, you can then print these out once you have them to scale, I used that method for Oswestry Works to get a full size mock up with the prints stuck to foam board. It was a quick and easy way to get a feel for the size of the diorama, what constraints there were on getting the camera inside the building etc.
One note - those blue faces, that means they are inside out, not a problem for what you are doing here but should you want to 3D print something, the faces need to be reversed (right click on face, click Reverse Face).
-
Thanks Mike, Nick. I think I'll bit the bullet and make a start on the chassis, as you say Mike there are plenty of build posts to reference from. I'll save the tougher jobs for Missenden - a Comet Manor and Mogul chassis... all I've read about the Mogul build is pain and torment! I've also a Comet Dean Goods which might be a better starting point and an excuse to start detailing 2538
-
If the top feed isn't finally fixed, try wrapping a piece of fine wet and dry paper around the boiler barrel and rubbing the base over this. Works well for plastics, brass and white metal.
Nick
Great tip Nick, thank you!
-
Lovely detailing of an already excellent model.
There's something about the lines of a Dukedog and your individual enhancements certainly guild the lilly.
The 3D printed parts are nice and crisp too.
Cheers,
Mark
Thanks Mark, its been a real pleasure working on these, with such a good model to work from in the first place its nice to just concentrate on these additional bits instead of improving what's already there.
-
Hi Paul, thank's for that, I'll see how it goes when I get round to tackling it
-

Looking good, this is the best way I think to start to learn the program. I did similar with a signal box and through that process learnt many time saving techniques to employ in future designs. I'd suggest for anything that you will be using more than one of, windows for example or doors, make them components. Anything else make groups so they don't interfere with other geometry near them as you move things around. Will you be planning to laser cut this building?
-
Alan, I am most impressed, as usual. I need to delve into all this a lot more, before diving into the deep end myself. One question regarding SketchUp. Do you construct the parts in real dimensions and then scale down to 4mm:1ft? It would seem that this technique would lend itself to multiple scales as well as getting things like rivets right first time? This does presuppose that good drawings and/or the real thing is available to measure.
I've found it best to draw in real dimensions and then scale down as you say, Sketchup struggles at very small dimensions so drawing at 4mm:1ft you will find certain functions like follow me, or offset don't work properly as there is not enough resolution in the dimensions to create the wireframes (something I found on the Missenden Abbey 3D course). Good drawings make everything a lot easier as you can import the drawing directly into sketchup and use it as a guide - if you have 4 hours to spare watch this rather intense video of a chap creating a 'working' Flying Scotsman in Sketchup from the works drawings:
It's impressive to see his mastery of the product, I'm far from that level and just creating these test parts posed some head scratching, especially the top feed.
Also now the excitement of something actually printing out in Spot HT, I can look at the results a little more critically this morning! They are not to the standard I'd expect (based on the W&LLR print), there is some banding, I'm sure the finer detail should come out better and there is some flashing on the steps. All solvable I'm sure but it will need some more tinkering
.thumb.jpeg.3955886fc58580247a46965a1bd9db57.jpeg)


")


.thumb.jpg.085c107229df4f5bccbda11fdde9b65d.jpg)

Mk1 Transit for Barton Road
in Modelu's Workbench
A blog by alanbuttler in RMweb Blogs
Posted
Thanks Tim, I was just thinking this morning about how to add a few dents and scrapes :-) Will post up some more photos this evening after I've had a go at it