


RJdeVries
-
Posts
137 -
Joined
-
Last visited
Content Type
Profiles
Forums
Blogs
Gallery
Events
Exhibition Layout Details
Store
Posts posted by RJdeVries
-
-
Last week I recieved a package from Slaters plasticcard and that included a set of
vacuum pipes for the bufferbeams in between both DMBS and DTCL
 Vacuum hoses attached by Robbert Jan., on Flickr
Vacuum hoses attached by Robbert Jan., on Flickr
Vacuum hoses attached by Robbert Jan., on Flickr
And all coupled up it looks like this, almost there, the real test will be on the
actual railway and through points and curves.
Vacuum hoses attached by Robbert Jan., on Flickr
Vacuum hoses attached by Robbert Jan., on Flickr
Hope you enjoy,
Regards,
Robbert Jan.
-
 8
8
-
-
1 hour ago, EasternO said:
They are very compact gearmotors. Where did you get them and what ratio is the motor unit on its own? I like the size of them very much.
I've bought the motor and gears at a German company
called Lemo Solar.
The motor I've bought has a 6:1 ratio that suits the Class 101
perfectly.
Regards,
Robbert Jan.
-
3
-
-
It's been a while but I havn't forgotten about this forum, I just can't be everywhere
at the same time and posting from a mobile device is a real pain to do.
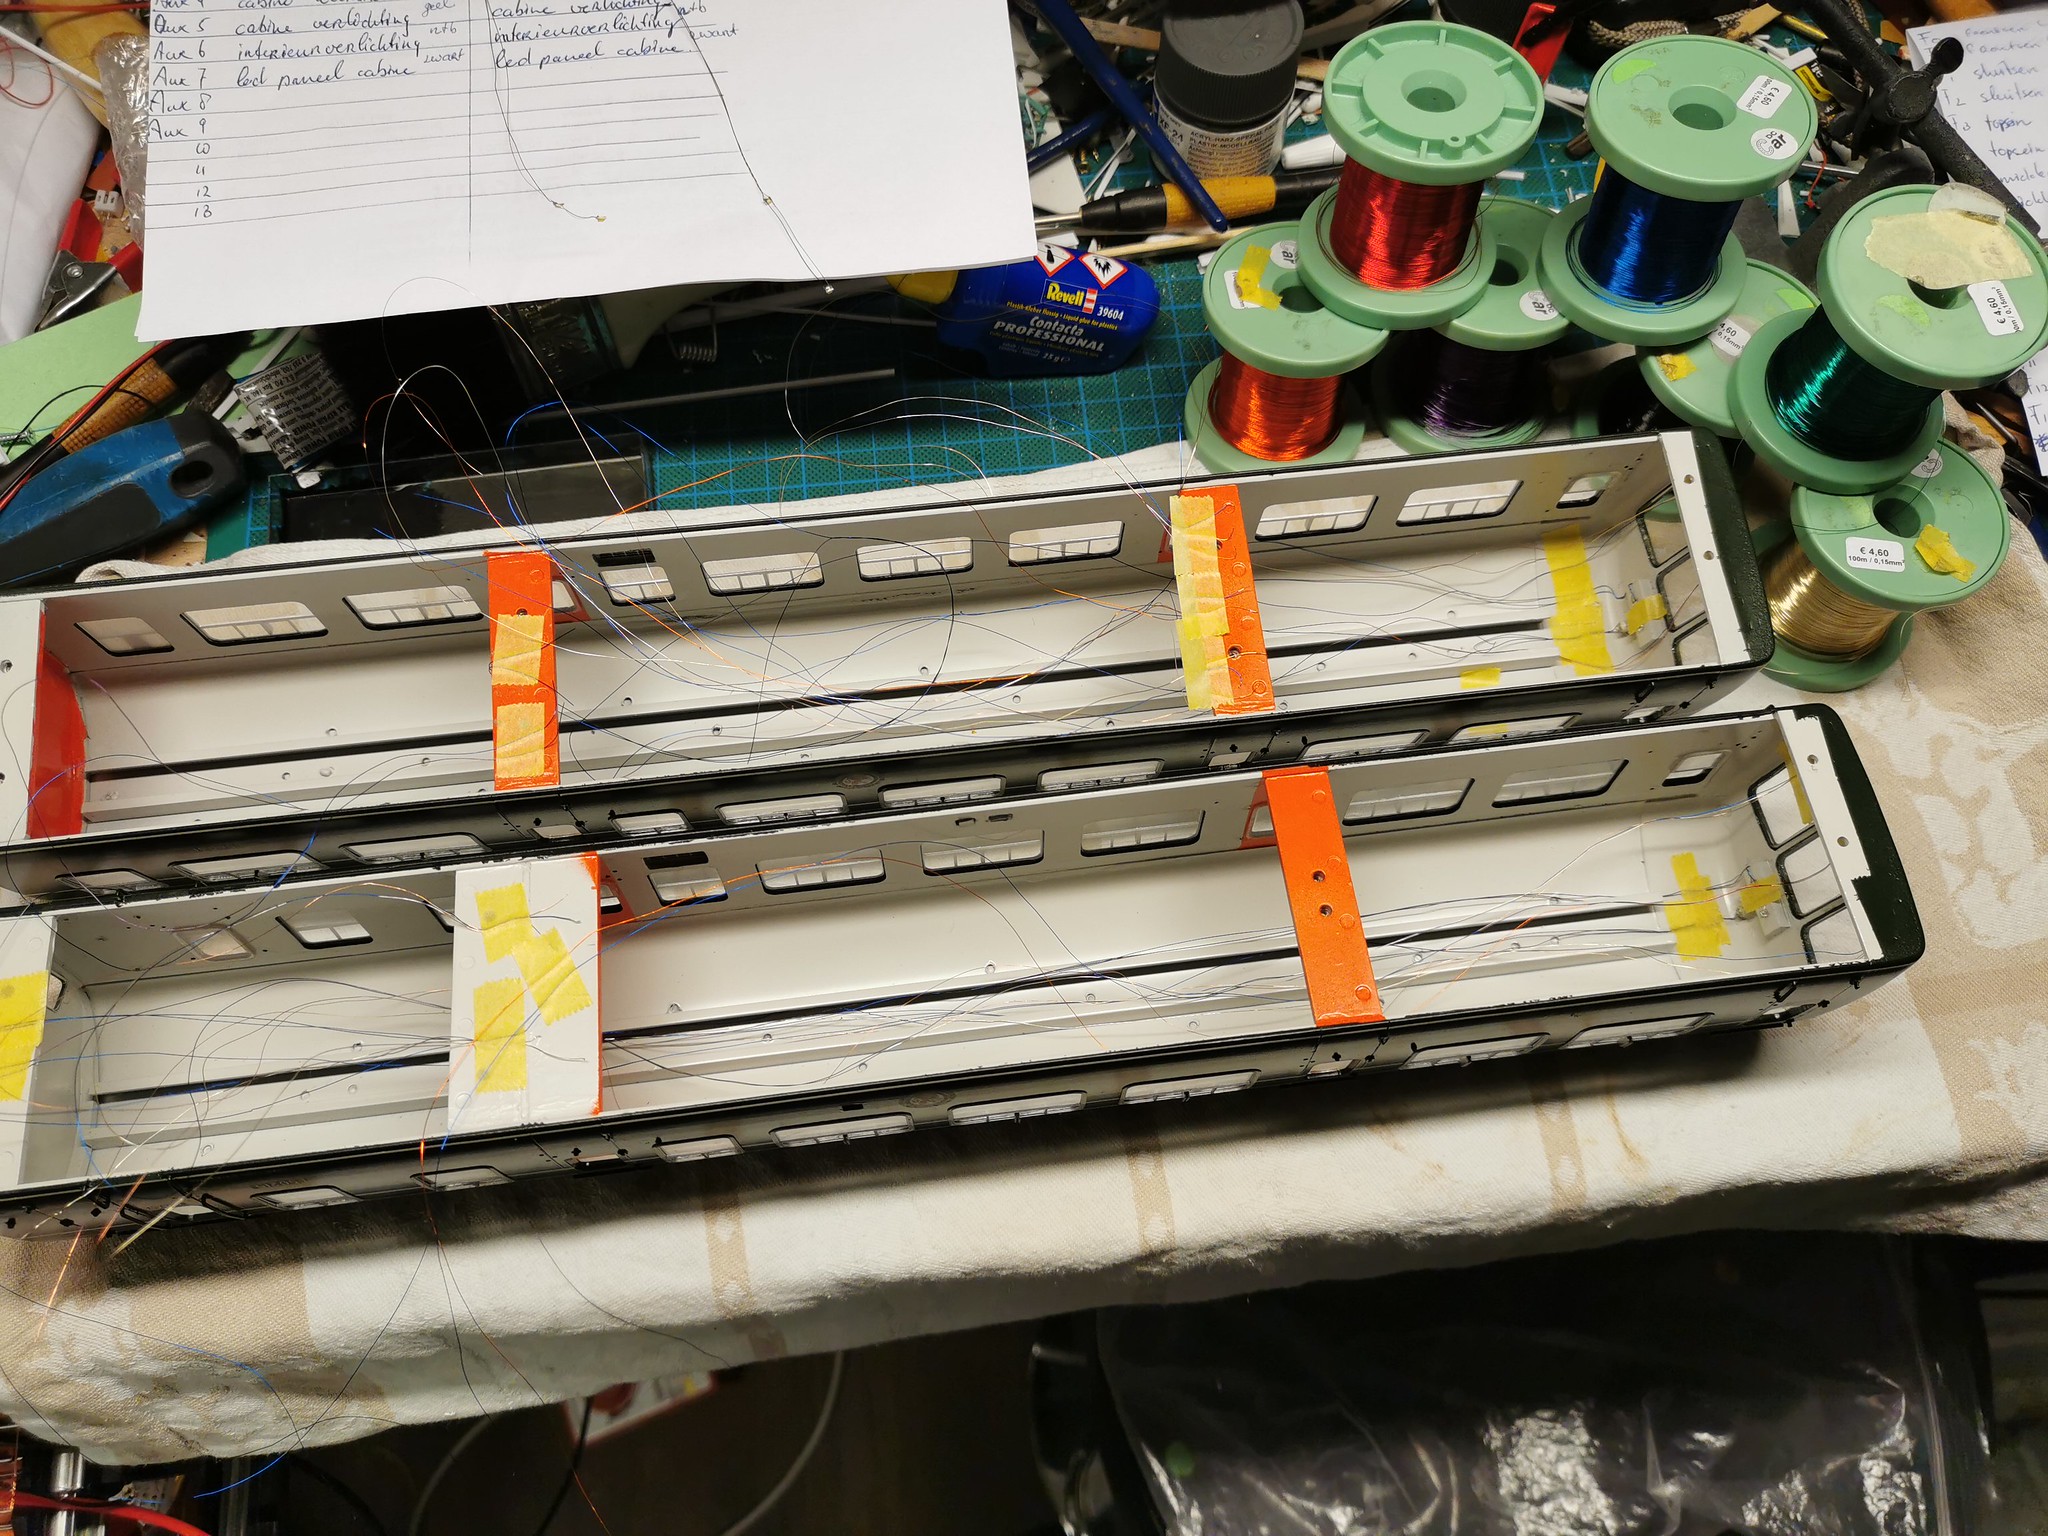
Since the last time I managed to fit all the glass so the unit is watertight at last.
This meant that I could proceed with the plans I had for the inside of the
DMBS and DTCL, lots of lights that can be switched on or off through the Dcc decoder.
IMG_20221102_170921 by Robbert Jan., on Flickr
IMG_20221102_124225 by Robbert Jan., on Flickr
Lots of wires, very tiny wires and an assortment of small led's where used to
illuminate the cab ends, markers, headcode, taillamps (and seperate lantern), the lot.
Below is a short clip of the DTCL and it's functions.
For some added realism I've added a small plug underneith the bufferbeam that will
allow for a separate lamp to be plugged in.
IMG_20230226_163643 by Robbert Jan., on Flickr
And speaking of plugs, MU plugs to be precise.
Class 101 MU cables pt2 by Robbert Jan., on Flickr
Class 101 MU cables pt2 by Robbert Jan., on Flickr
These MU plugs are functional as in they are there to take the track power from
one carriage to the other making sure the decoder doesn't run out of juice.
A very small pcb plug is used on either end with the actual white metal
castings being converted in to plugs and sockets, this way it looks almost factory.
Below is a picture of the connectors used, 1.27mm is the distance between pins.
Class 101 MU cables pt2 by Robbert Jan., on Flickr
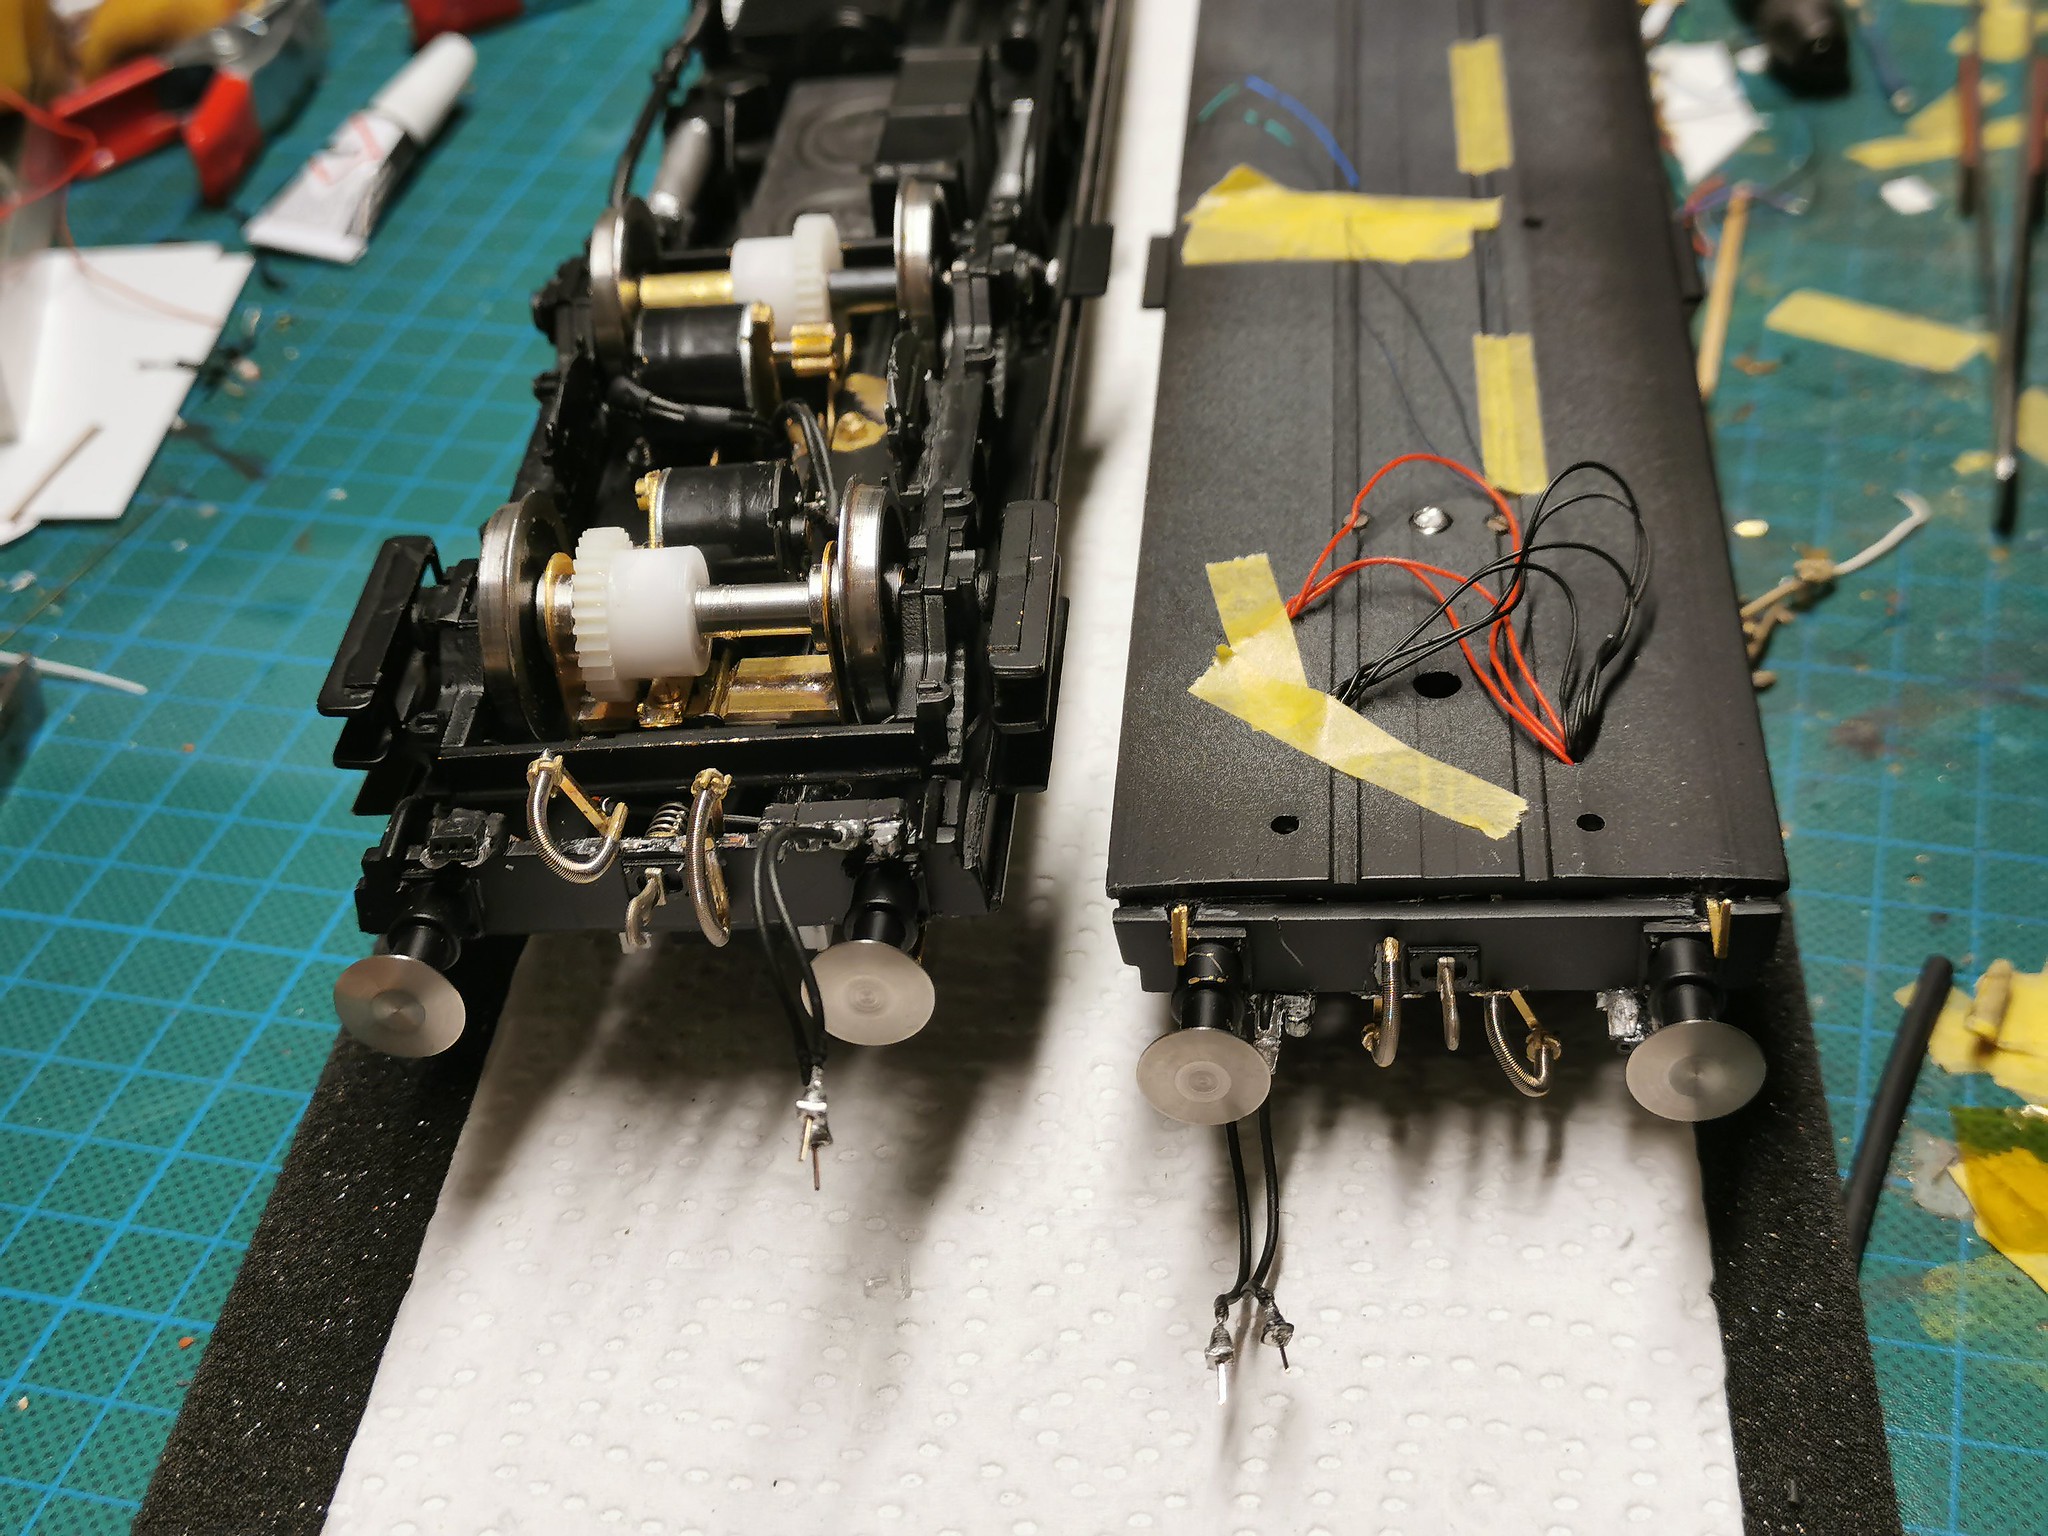
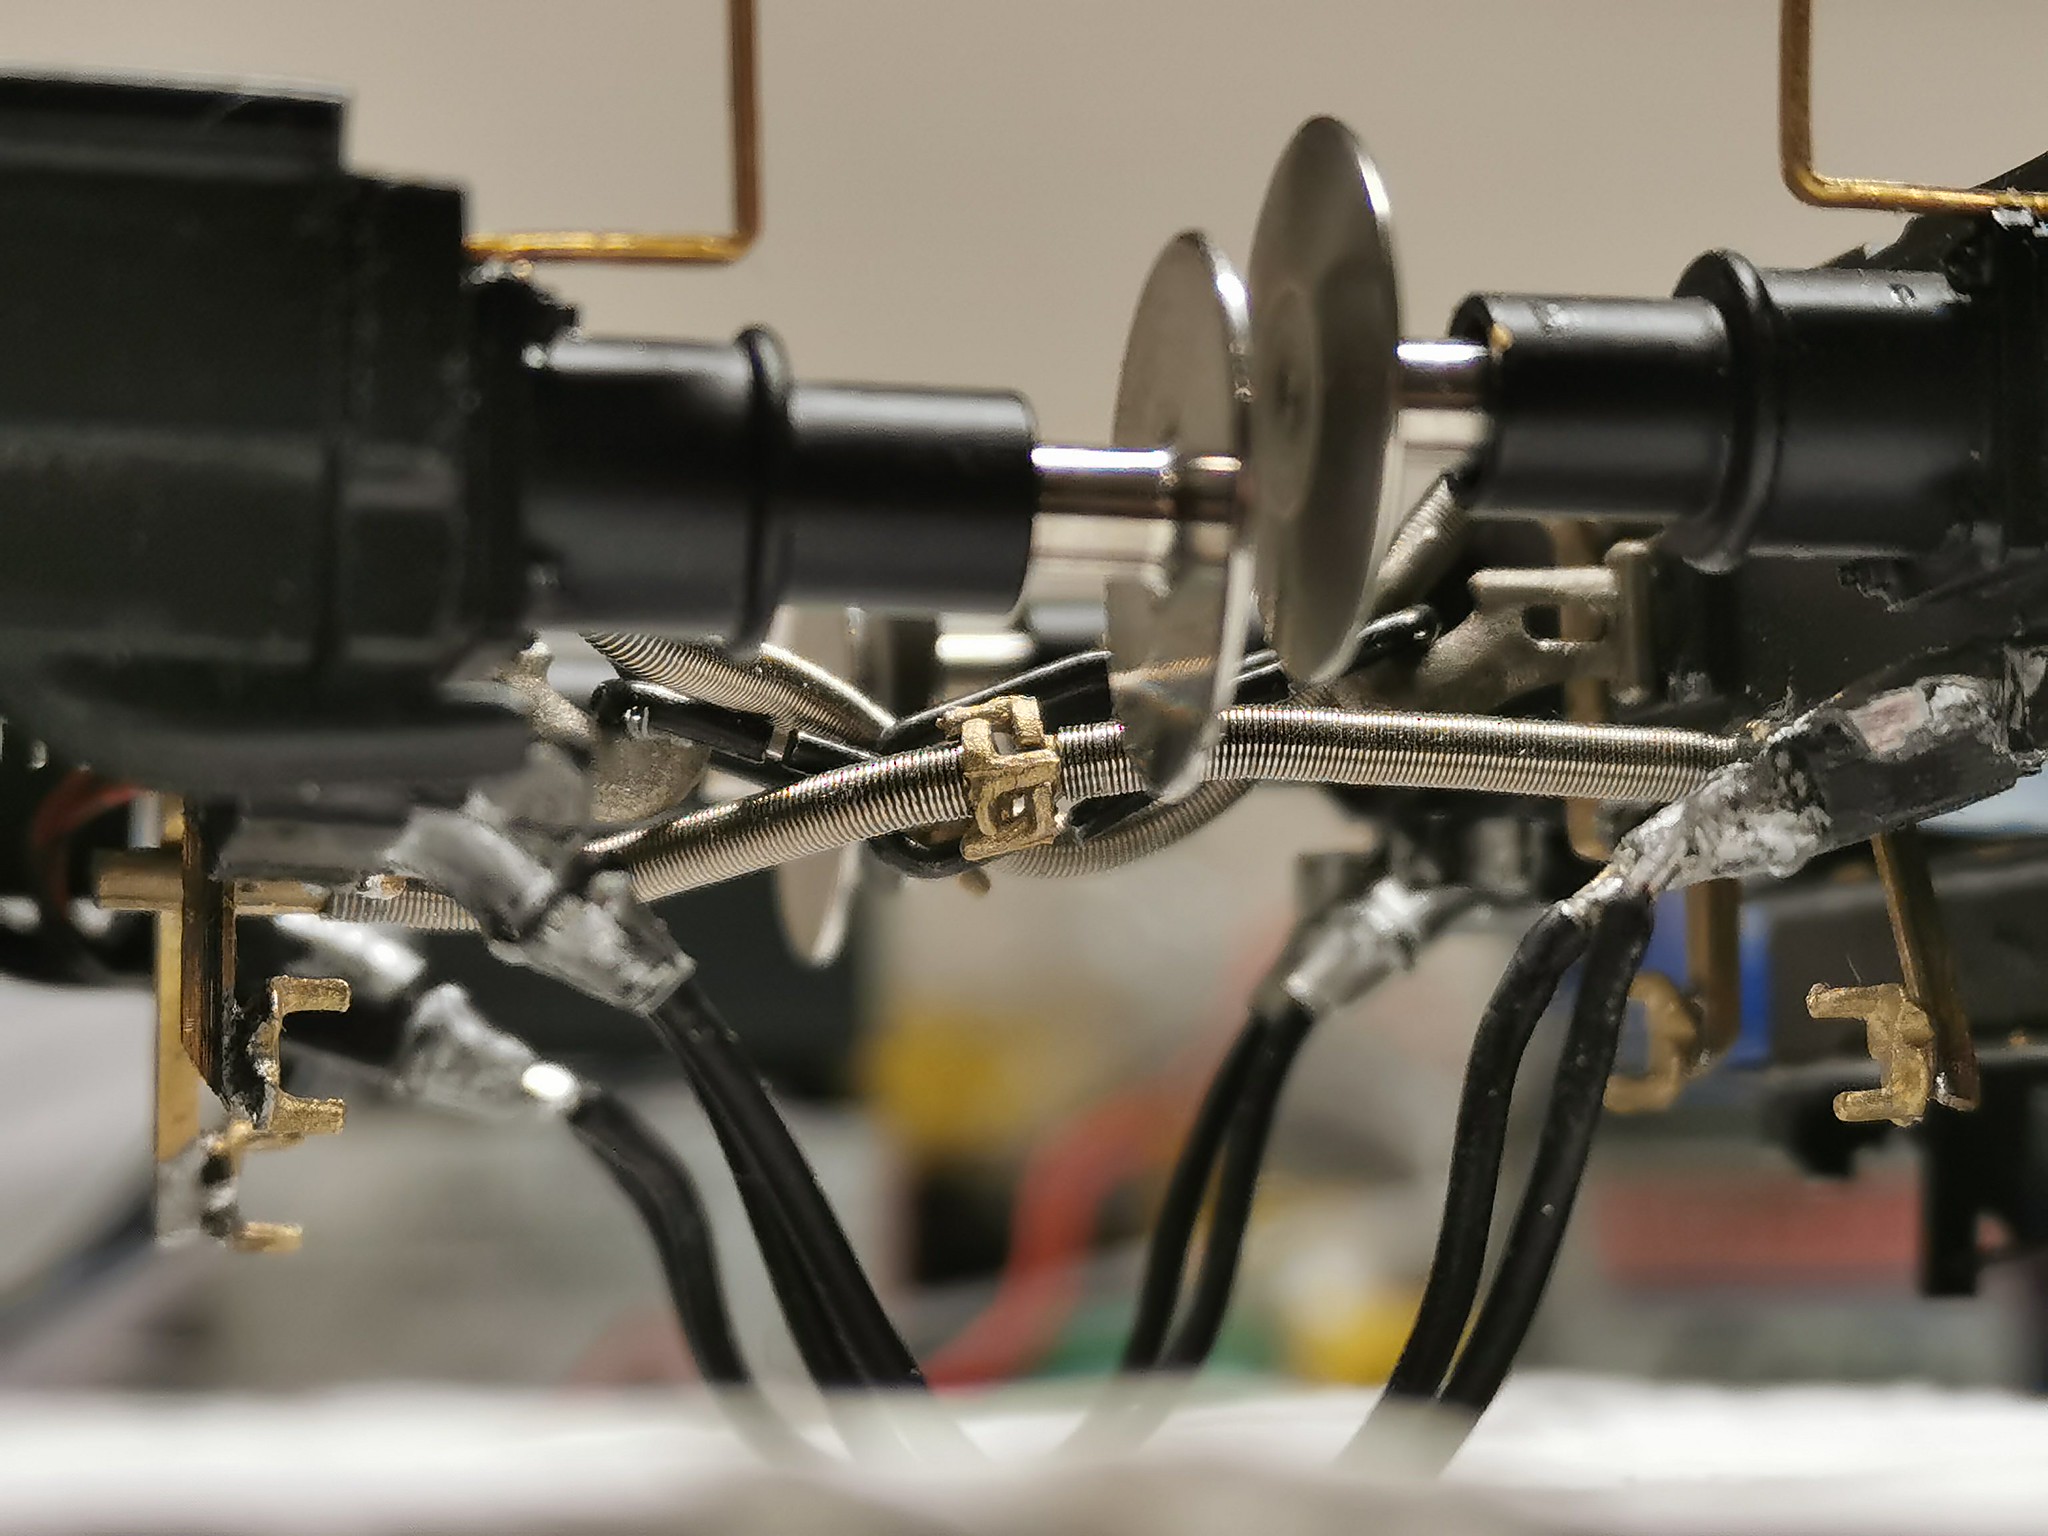
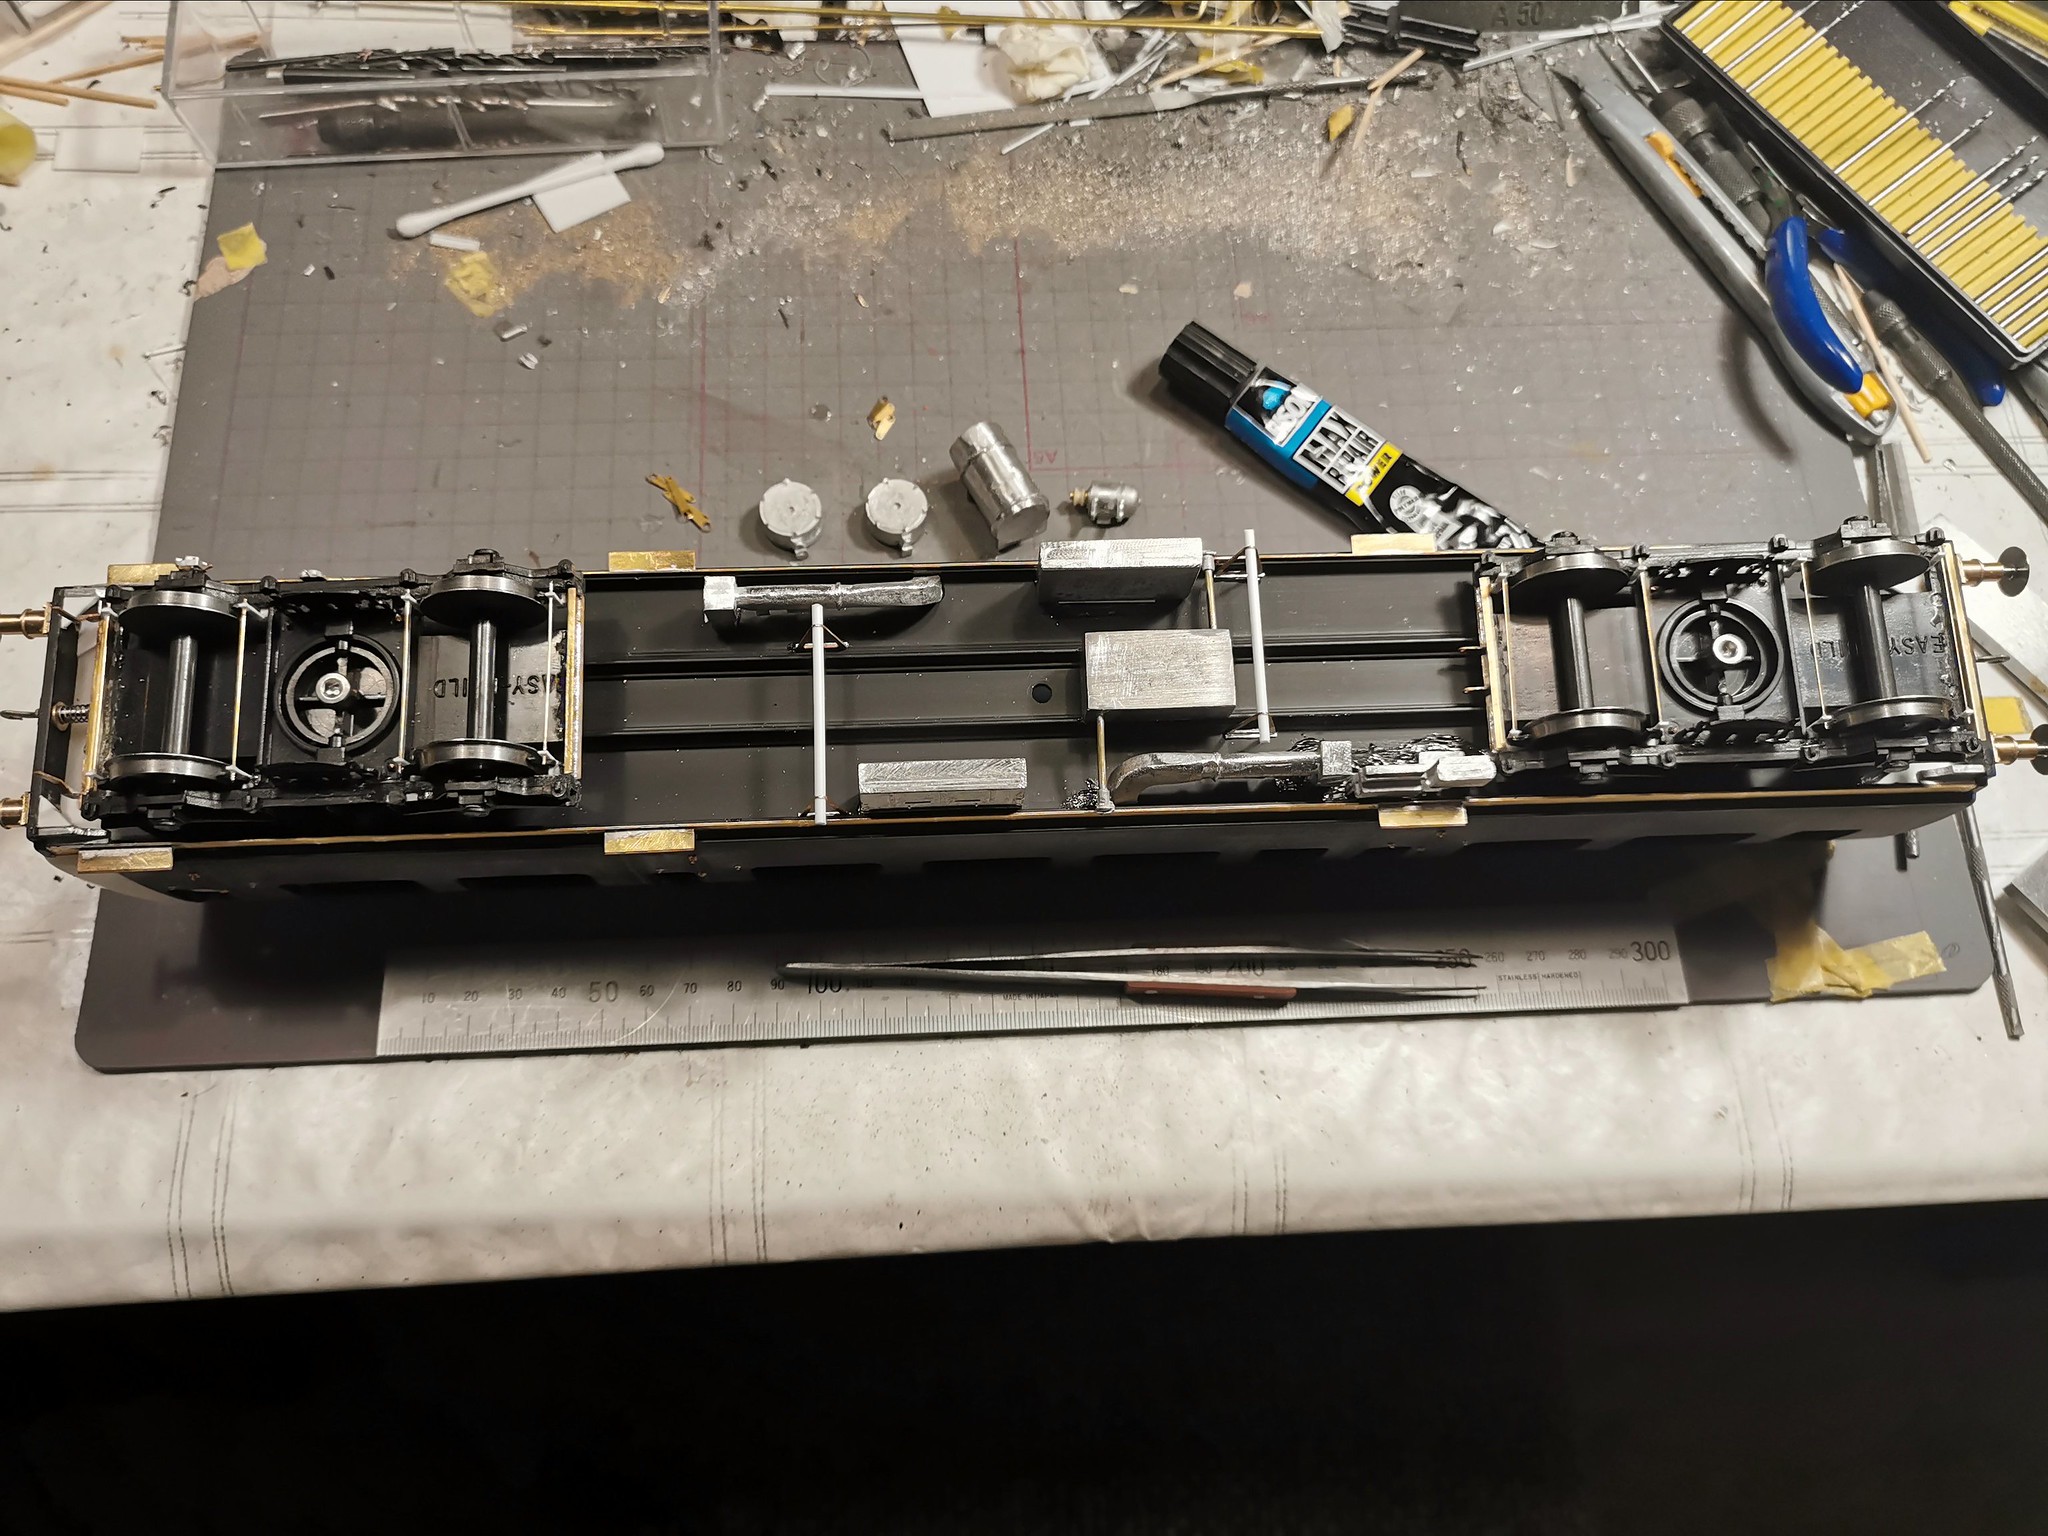
And last but certainly not least, I made a huge modification to the power bogie
as I wanted to do away with the motor standing up into the guards compartiment.
Compensated powered wheelset by Robbert Jan., on Flickr
A complete drive mechanism contained within the power bogie using a pair of
small gear reduction electric motors and a set of brass and acetate gears.
Compensated powered wheelset by Robbert Jan., on Flickr
Above is seen the compensated wheelset with the motor attached to the
actual brass frame that comes with the kit, it runs sweet as a nut, even on Dcc
after a lot of tweaking of the settings on the decoder.
So basically this in the now, I'm currently sorting out the wiring and placement
of the decoder plug pcb, it will live in the guards compartment but just underneith
the window line and that means I can camouflage it with some random items
like packages, maybe a bicycle and ofcourse a guard.
Hope you enjoy,
Regards,
Robbert Jan.
-
7
-
 10
10
-
-
It's a very good looking model, with a lot of etched parts and a nice finish.
These models as "ready made" are not cheap at a 50€ but mine was damaged
with a broken rear wheel that is was reduced to 20€, a drop of adhesive solved
the issue.
They do seem to have some kind of similiar background, I've never heard of
the verhicle shown but a "Pelican" would also be a nice conversation piece on a layout.
Regards,
Robbert Jan.
-
It again has been while, not that I've not been up to anything :)
My latest purchase has been signed off and has joined the fleet.
She will be running as number 7, as it's the 7th loco purchased.
A custom set of nameplates is being produced as we speak.
Kerr Stuard Victory weathered by Robbert Jan., on Flickr
Kerr Stuard Victory weathered by Robbert Jan., on Flickr
Got the Kerr Stuard "Victory" through Rails and it arrived just 2 weeks
later, not to bad considering it sometimes takes a month to get
a parcel across the channel.
Next on the agenda was weathering a set of 3 Accurascale Mdo's which
also where sent from Rails in the same parcel.
IMG_20230108_193242 by Robbert Jan., on Flickr
The first steps are the same for any rolling stock I tackle, a wash with either
black or very dark grey enamels (revell 6, 8 or 9)
Followed by Mig/Ammo Acrylic rust tones from set 7106 consisting of 6 very
usefull paints for this kind of weathering.
IMG_20230108_193229 by Robbert Jan., on Flickr
After the initial weathering I recieved a few comments saying that I should enhance
the flaps on the inside, these are not visible nor modelled so I did an outline in
paint and made the best of it.
IMG_20230115_151333 by Robbert Jan., on Flickr
IMG_20230116_202055 by Robbert Jan., on Flickr
I've also been working on finishing the headstock, which is finally secured in place
and weathered up, ready for some fine detailing.
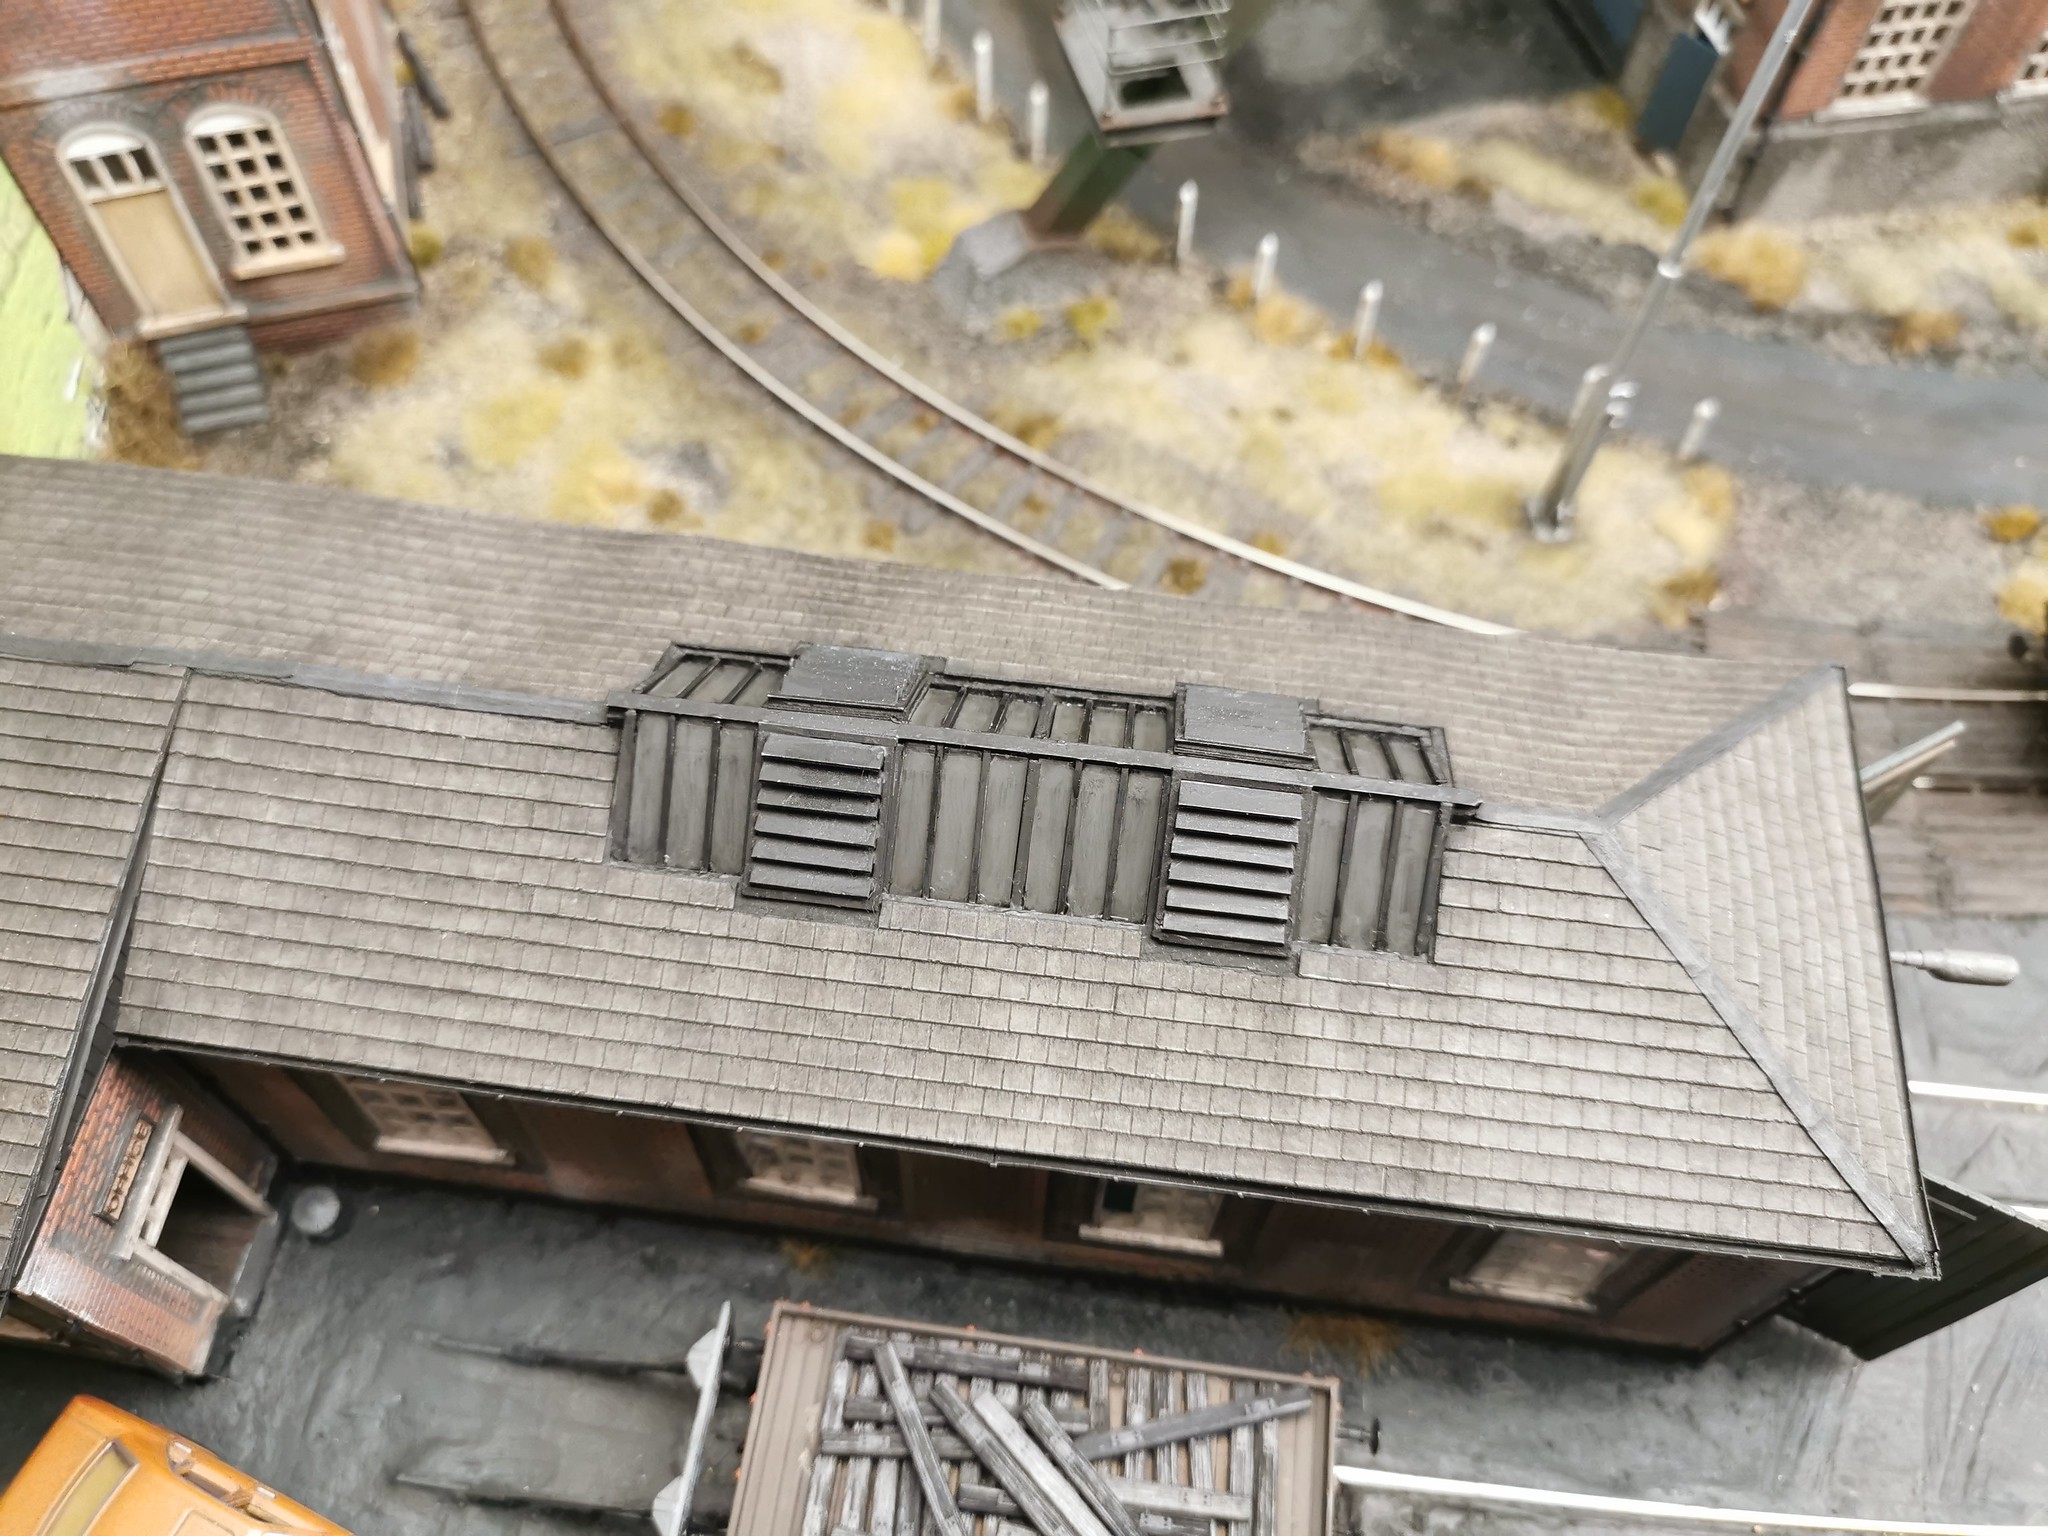
The engine shed was a good weeks work, making sure all the small details where
done and ready to be glued in place, even the roof is done.
IMG_20230120_135446 by Robbert Jan., on Flickr
IMG_20230120_195557 by Robbert Jan., on Flickr
The inside of the shed is now a very gloomy place, someone commented that he never
felt the urge to mop a floor so badly, but luckily those cleaning items are hidden.
IMG_20230120_195606 by Robbert Jan., on Flickr
Most of the little bits, workbench, cabinet etc are by Modelu, the barrels are
a ready made Artitec product, the drill press is something out of the parts box.
Another little ready made gem by Artitec is this Bischoff Polytrack, basically
a JCB-esq machine from Germany, it took my fancy and with it being discounted
it now lives on the Colliery.
Artitec Bischoff Polytrac by Robbert Jan., on Flickr
What is next, more weathering, the Cornish Engine needs to fixed in place and so much more.
Hope you enjoy!
Regards,
Robbert Jan.
-
5
-
3
-
-
Thanks Tom, Steve and Vecchio for commenting 👍
The first show is a fact, and it has been a blast, the reactions where
positive and people where really interrested in the techniques used.
The R&J Colliery by Robbert Jan., on Flickr
The layout is now also sitting pretty on her own feet with a nice dark
curtain hiding most of her underbits.
IMG_20221112_153014 by Robbert Jan., on Flickr
All of the stock behaved very well, cleaning the track en locomotives has
not disapointed as only one loco didn't make the grade being that the
pickups where not up to snuff.
I was particularly pleased with the 0-4-0 sentinel "Hendrik" (after my late grandfather)
which runs so silky smooth across pointwork with just 2 small tantalum capacitors
installed (and a lot of extra lead weights)
IMG_20221112_153111 by Robbert Jan., on Flickr
And after the show ends it's time to sum up what needs attention, first off the
flap on the side where I can insert the coal shutes, it's to small and the lip that
prevents stock from coming of the layout prevents me from cleaning any loose
coal, so it had to be changed.
IMG_20221113_213631 by Robbert Jan., on Flickr
A nice new "catflap" on the side, which conveniently also doubles as a passage for
additional wagons on to a new extended siding 😃
IMG_20221114_142439 by Robbert Jan., on Flickr
IMG_20221114_142559 by Robbert Jan., on Flickr
It's just clamped in place, no fysical connection, no power as it's for wagons only.
Now I can at least run a train of 4 wagons instead of just 2, happy days.
Regards,
Robbert Jan.
-
11
-
1
-
-
A little update,
Lots has been done to the layout, but most noticably is the addition of
autumn colored shrubs and bushes to create that autumn vibe.
Autumn has arrived by Robbert Jan., on Flickr
IMG_20221108_171000 by Robbert Jan., on Flickr
Autumn has arrived by Robbert Jan., on Flickr
A very large undertaking was replacing the card roadsurface covering the
magnorail track, it has been troublesome at times and finally I made the
call to replace it with a suitable thickness of plasticcard, 0,25mm
IMG_20221031_124811 by Robbert Jan., on Flickr
The road taken up and the magnorail exposed, the chain is removed.
The biggest hurdle was the bridge as this is a single sheet of plasticcard,
meaning that I needed to do some surgery to be able to slide it in.
IMG_20221031_124817 by Robbert Jan., on Flickr
But eventually a clean white road surface was layed and the sections
where glued together to create smoother seams.
IMG_20221031_193414 by Robbert Jan., on Flickr
On the rear of the layout sits the motor unit that drives the chain, it is also
covered with plasticcard but that would have left me with no way to insert the chain.
IMG_20221031_193512 by Robbert Jan., on Flickr
So a little hatch was made up using a pair of hinges from a sigarbox.
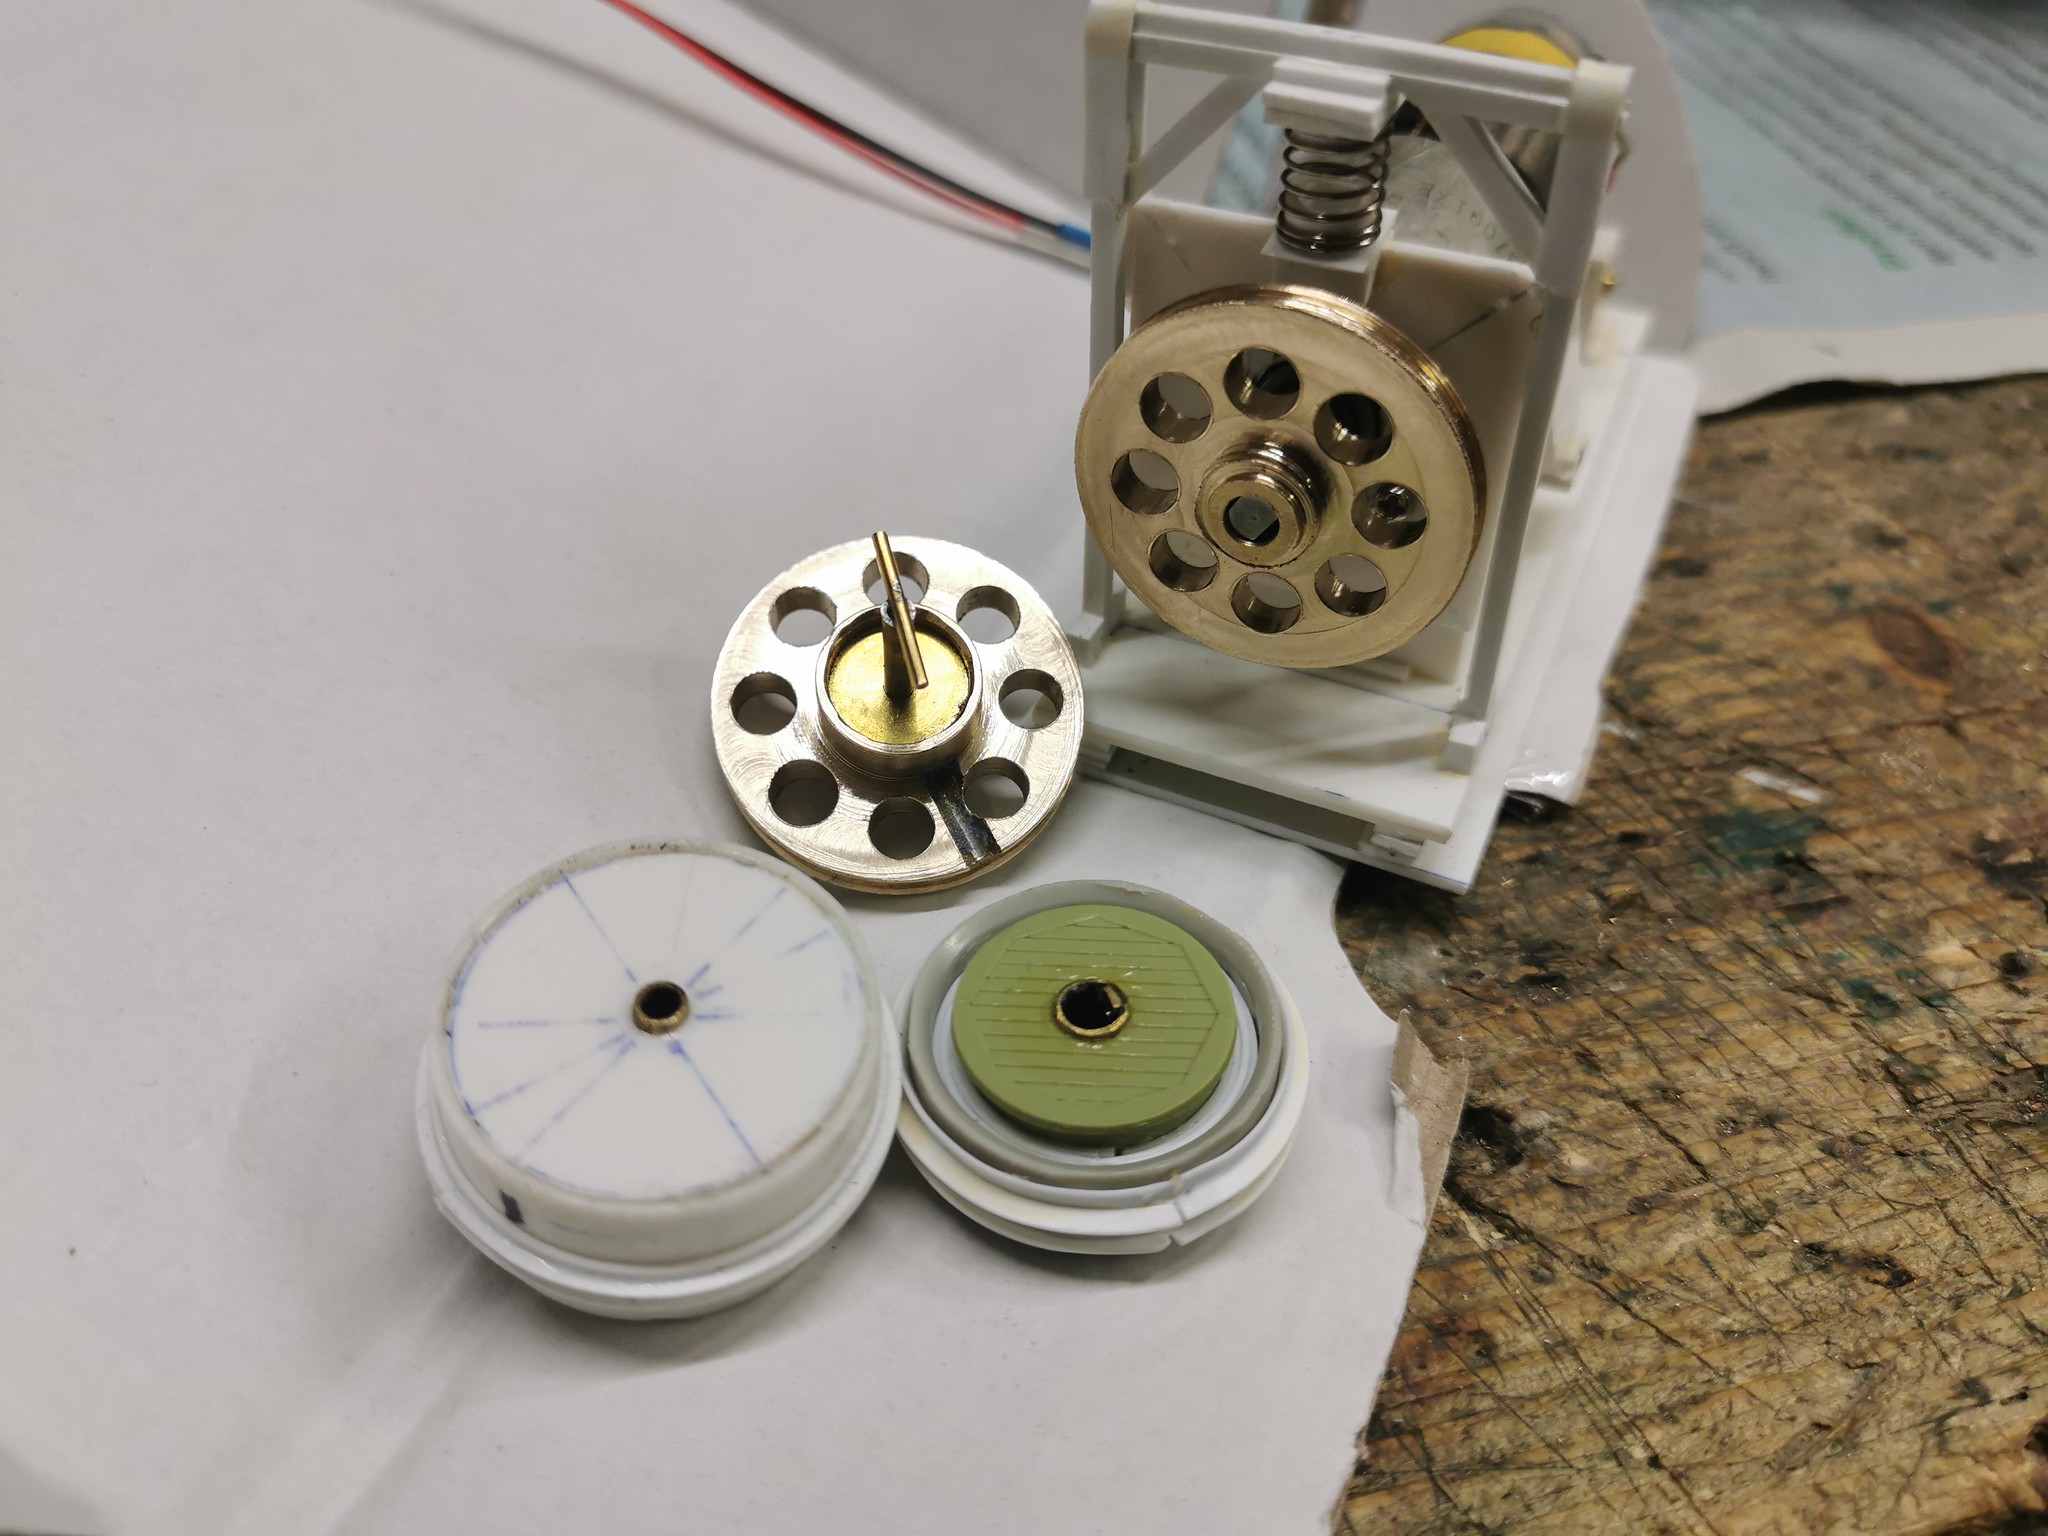
Another upgrade was installed at the headgear and it's drive and tail pulley.
These where plastic and kind of nasty so I made a new pair out of scrap
brass from my dads stash, a bit of turning on the lathe and the finishing
work was done on the milling machine.
IMG_20221029_190906 by Robbert Jan., on Flickr
These don't wobble all over the place anymore.
I'm currently preparing for the first "trail" show next saturday to see how the
layout is recieved, and to give it a good shake down test, hoping to find no issues.
Regards,
Robbert Jan.
-
10
-
3
-
-
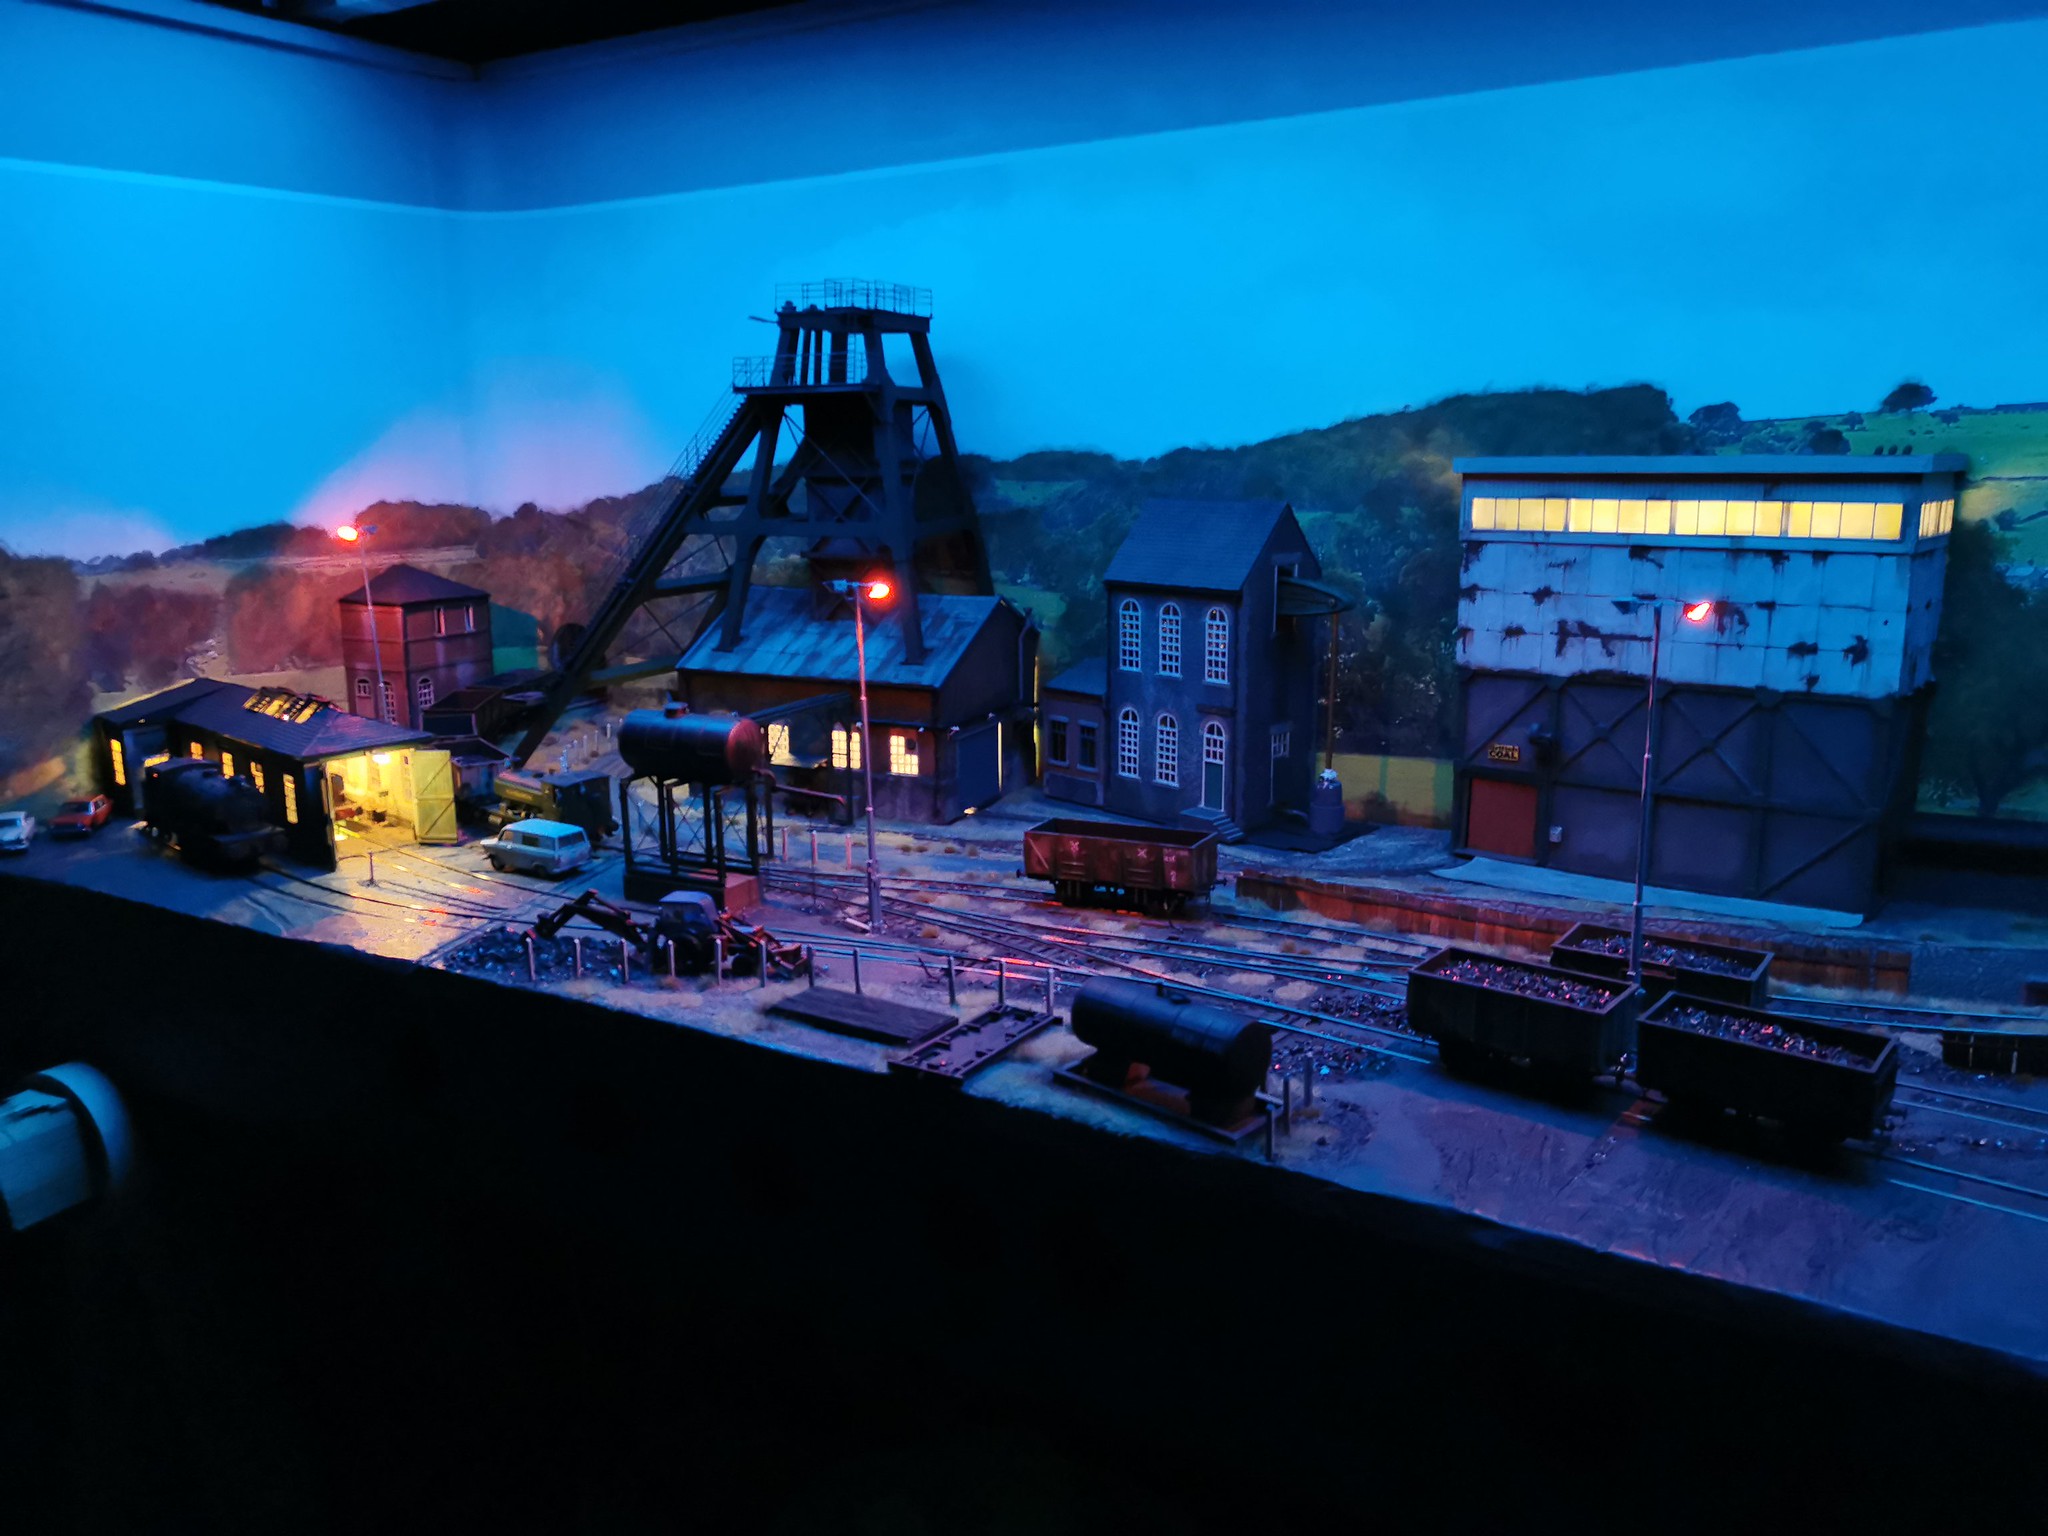
The last few days have been spent wiring the first of many lights.
I'm using a led panel to generate the different ambient colors,
the blue is merely for demonstration purposes.
IMG_20221020_194927 by Robbert Jan., on Flickr
IMG_20221019_162039 by Robbert Jan., on Flickr
Underneith the layout I've mounted the digikeijs dr4018 switching decoders
that control the lights and give them their unique startup sequence, like
fluorecents and sodium lights.
Up top I've been working on a few small projects such as a pair of explosives
wagons, a small forklift and I managed to finally obtain a driver for my
narrow gauge locomotive.
IMG_20221023_165255 by Robbert Jan., on Flickr
On the other end the screening and loading facility has been fitted permanently
so the landscaping around it can be finished at last
A busy afternoon at the Colliery. by Robbert Jan., on Flickr
The headstock finally has a pair of realistic sheaves courtesy of MIB Models (Alan)
IMG_20221027_122851 by Robbert Jan., on Flickr
IMG_20221027_122837 by Robbert Jan., on Flickr
I've fitted a brass bushing and some plasticcard detailing to it,
its not done and it will be painted etc, but for now I'm pretty chuffed.
Regards,
Robbert Jan.
-
5
-
7
-
-
Thanks Mikkel,
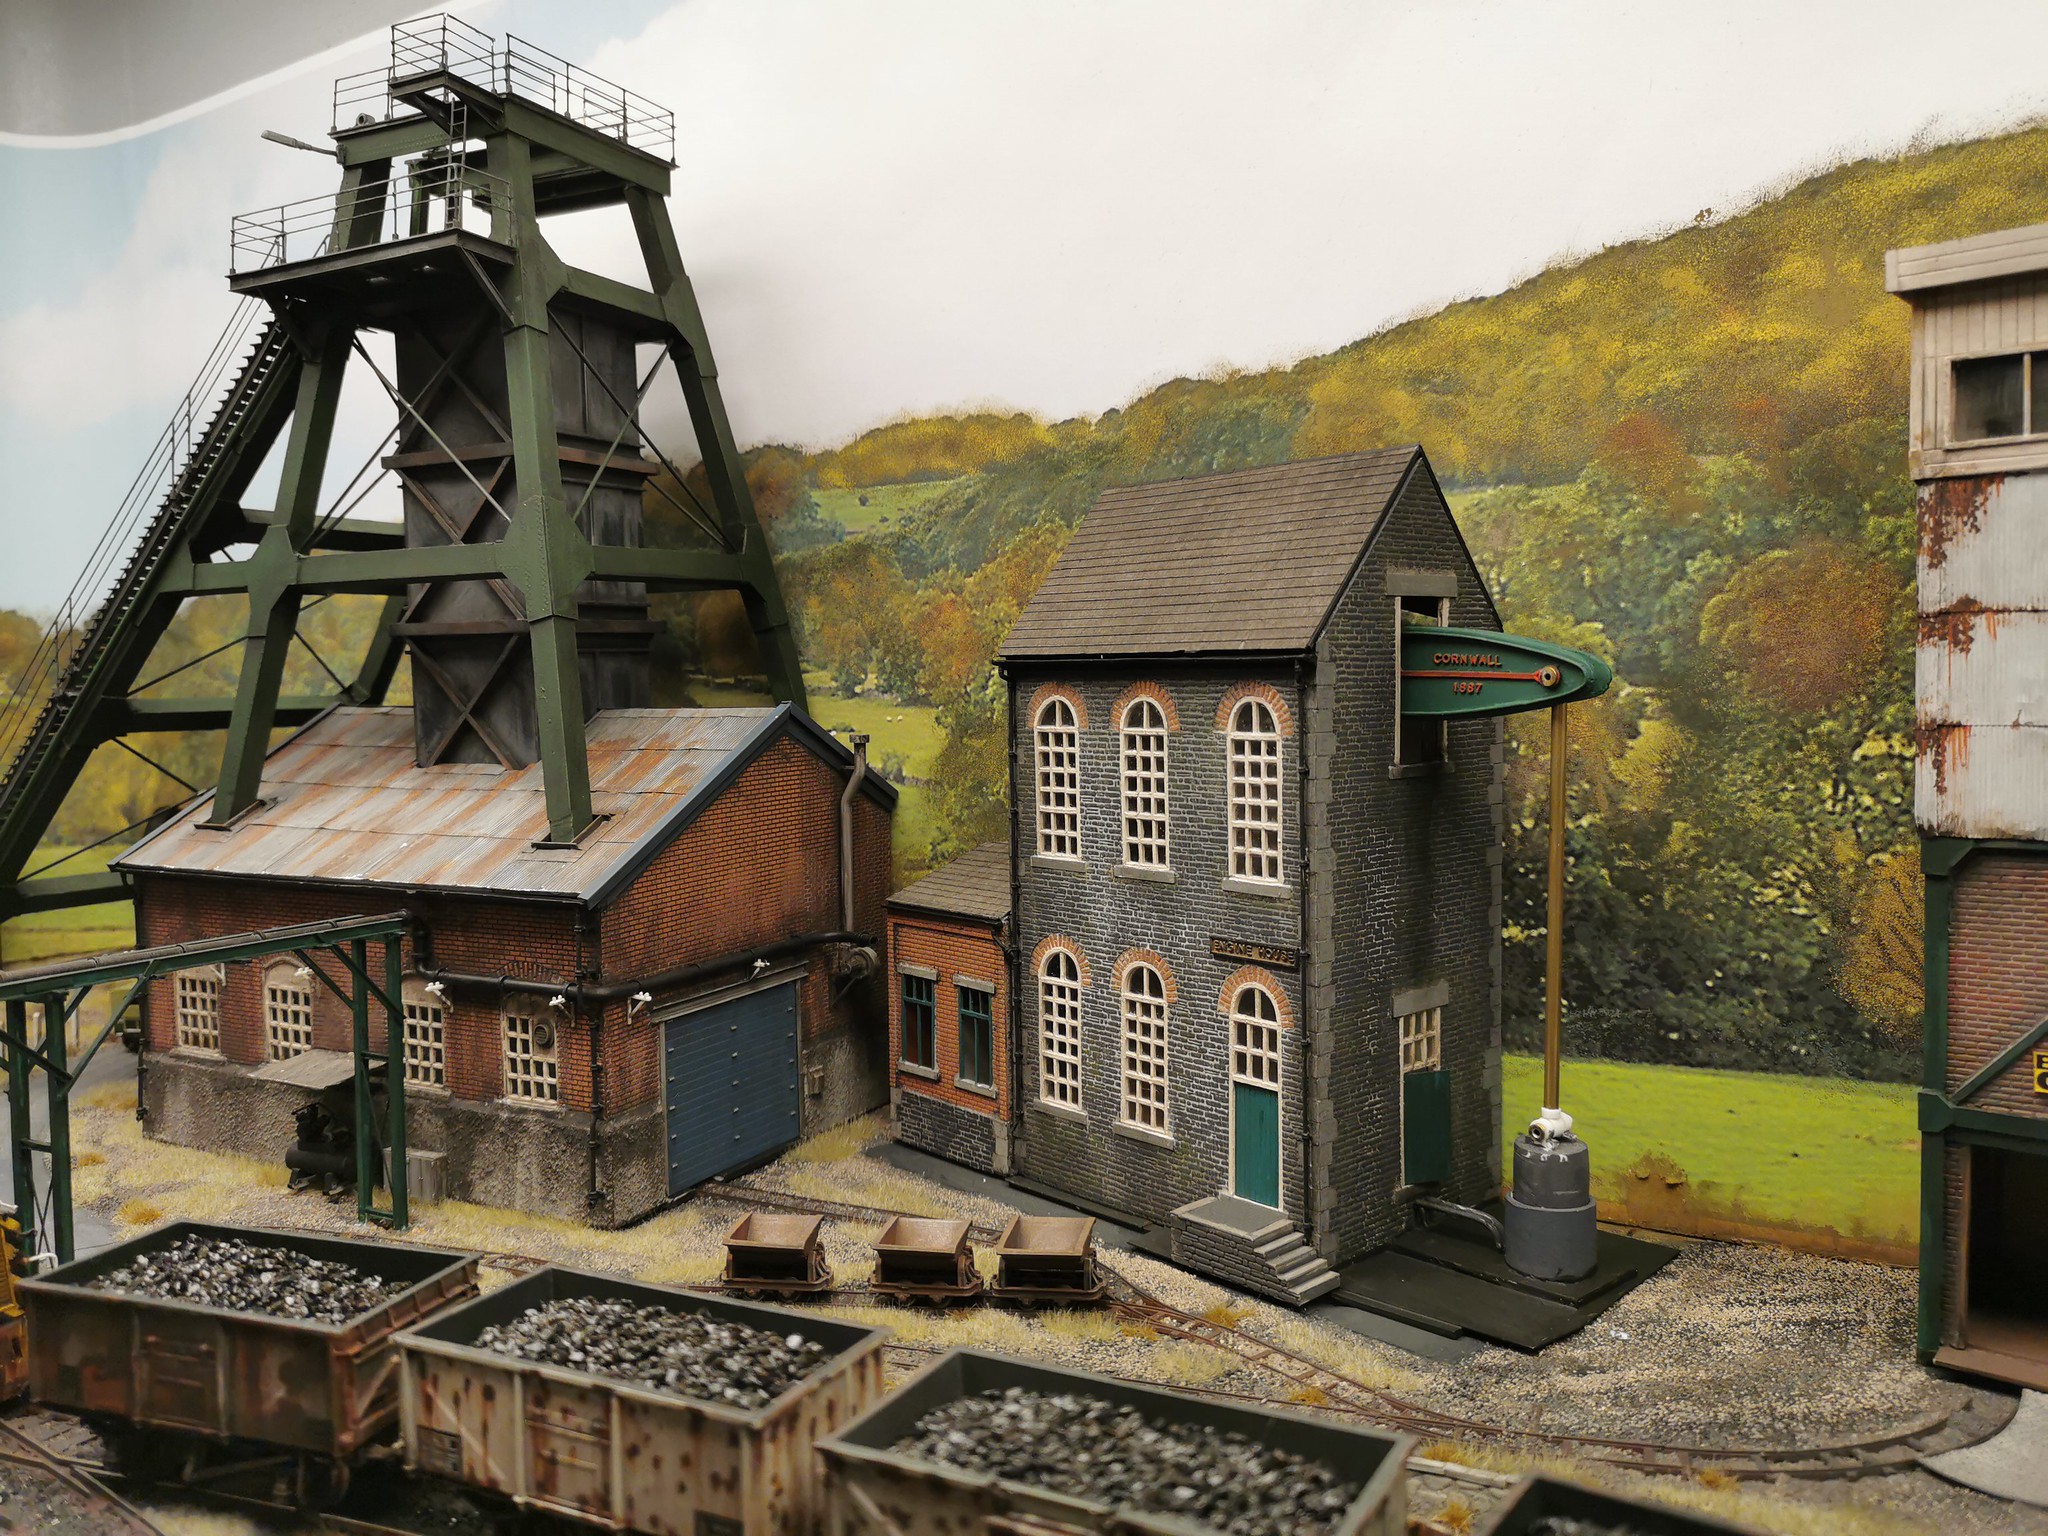
I have indeed used the engine shed as a view blocker towards the curve out of the layout,
on the other end the loading facility has a similair job but it also disguises the 180 degree
turntable for the magnorail system.
All of the other buildings are fully scatchbuild semi relief and they make for an interresting
arrangement with the mayority of the small railyard in front.
Both grounded van body's also take away a direct view, but can be viewed through as the
doors are open on both sides.
I'm keeping my fingers crossed on how the layout will be recieved, and how the technical
side of things holds up to a days running.
Meanwhile I've been working on more little and larger things, mainly adding further
weathering to the buildings and the cars on the layout.
(photos are not in order of time taken)
IMG_20221017_193742 by Robbert Jan., on Flickr
IMG_20221017_192845 by Robbert Jan., on Flickr
I've washed the cars with a thinned revell 9 (dark grey) to enhance the details and
make them a bit more grubby, some of them atleast.
I still don't get why the transit had to be white....
I've also added lights underneith the loading facility, just so one can see the action
as it is quite dark under there, even when the layout is fully illuminated.
IMG_20221014_170632 by Robbert Jan., on Flickr
IMG_20221014_170813 by Robbert Jan., on Flickr
IMG_20221014_170823 by Robbert Jan., on Flickr
The led's are wired up in groups and soldered to a small pcb with 1,2k Ohm resistors.
A little side project I've completed is a cleaning wagon on an old tanker chassis.
It's loosely based on the system underneith a Roco clean wagon but ive left a
gap in the middle of the pad (trackrubber sections) to any details in the
center of the track won't be destroyed.
IMG_20221015_192816 by Robbert Jan., on Flickr
IMG_20221015_192836 by Robbert Jan., on Flickr
IMG_20221015_200026 by Robbert Jan., on Flickr
It's not designed to be pulled by an engine but rather as a manual cleaning device.
It however keeps me from destroying details in and around the trackwork as it
works as a guide, it has already been proven usefull.
Regards,
Robbert Jan.
-
8
-
4
-
-
Thank you very much Jamie,
It has been quite the journey these few years and with lack of interest
mainly due to there not being any exhibitions in the Netherlands.
But with the whole circus alive again the first show is isn't very far away
now so a lot of catching up is in order.
I do hope it is well received 👍🏻
Regards,
Robbert Jan.
-
 1
1
-
-
- Popular Post
- Popular Post
This will be a bit of a time warp, a good 2 years has passed and although
progress has been slow I've made some substantial effort;
I'm just going to post the pictures from last week as the difference with
the one's in my last posting is enormous!
IMG_20221014_192335 by Robbert Jan., on Flickr
Weathering etc. by Robbert Jan., on Flickr
IMG_20221015_194536 by Robbert Jan., on Flickr
I mean, a serious difference since last time and now working towards the
first show for it's debut.
Regards,
Robbert Jan.
-
22
-
7
-
 4
4
-
- Popular Post
- Popular Post
-
36
-
2
-
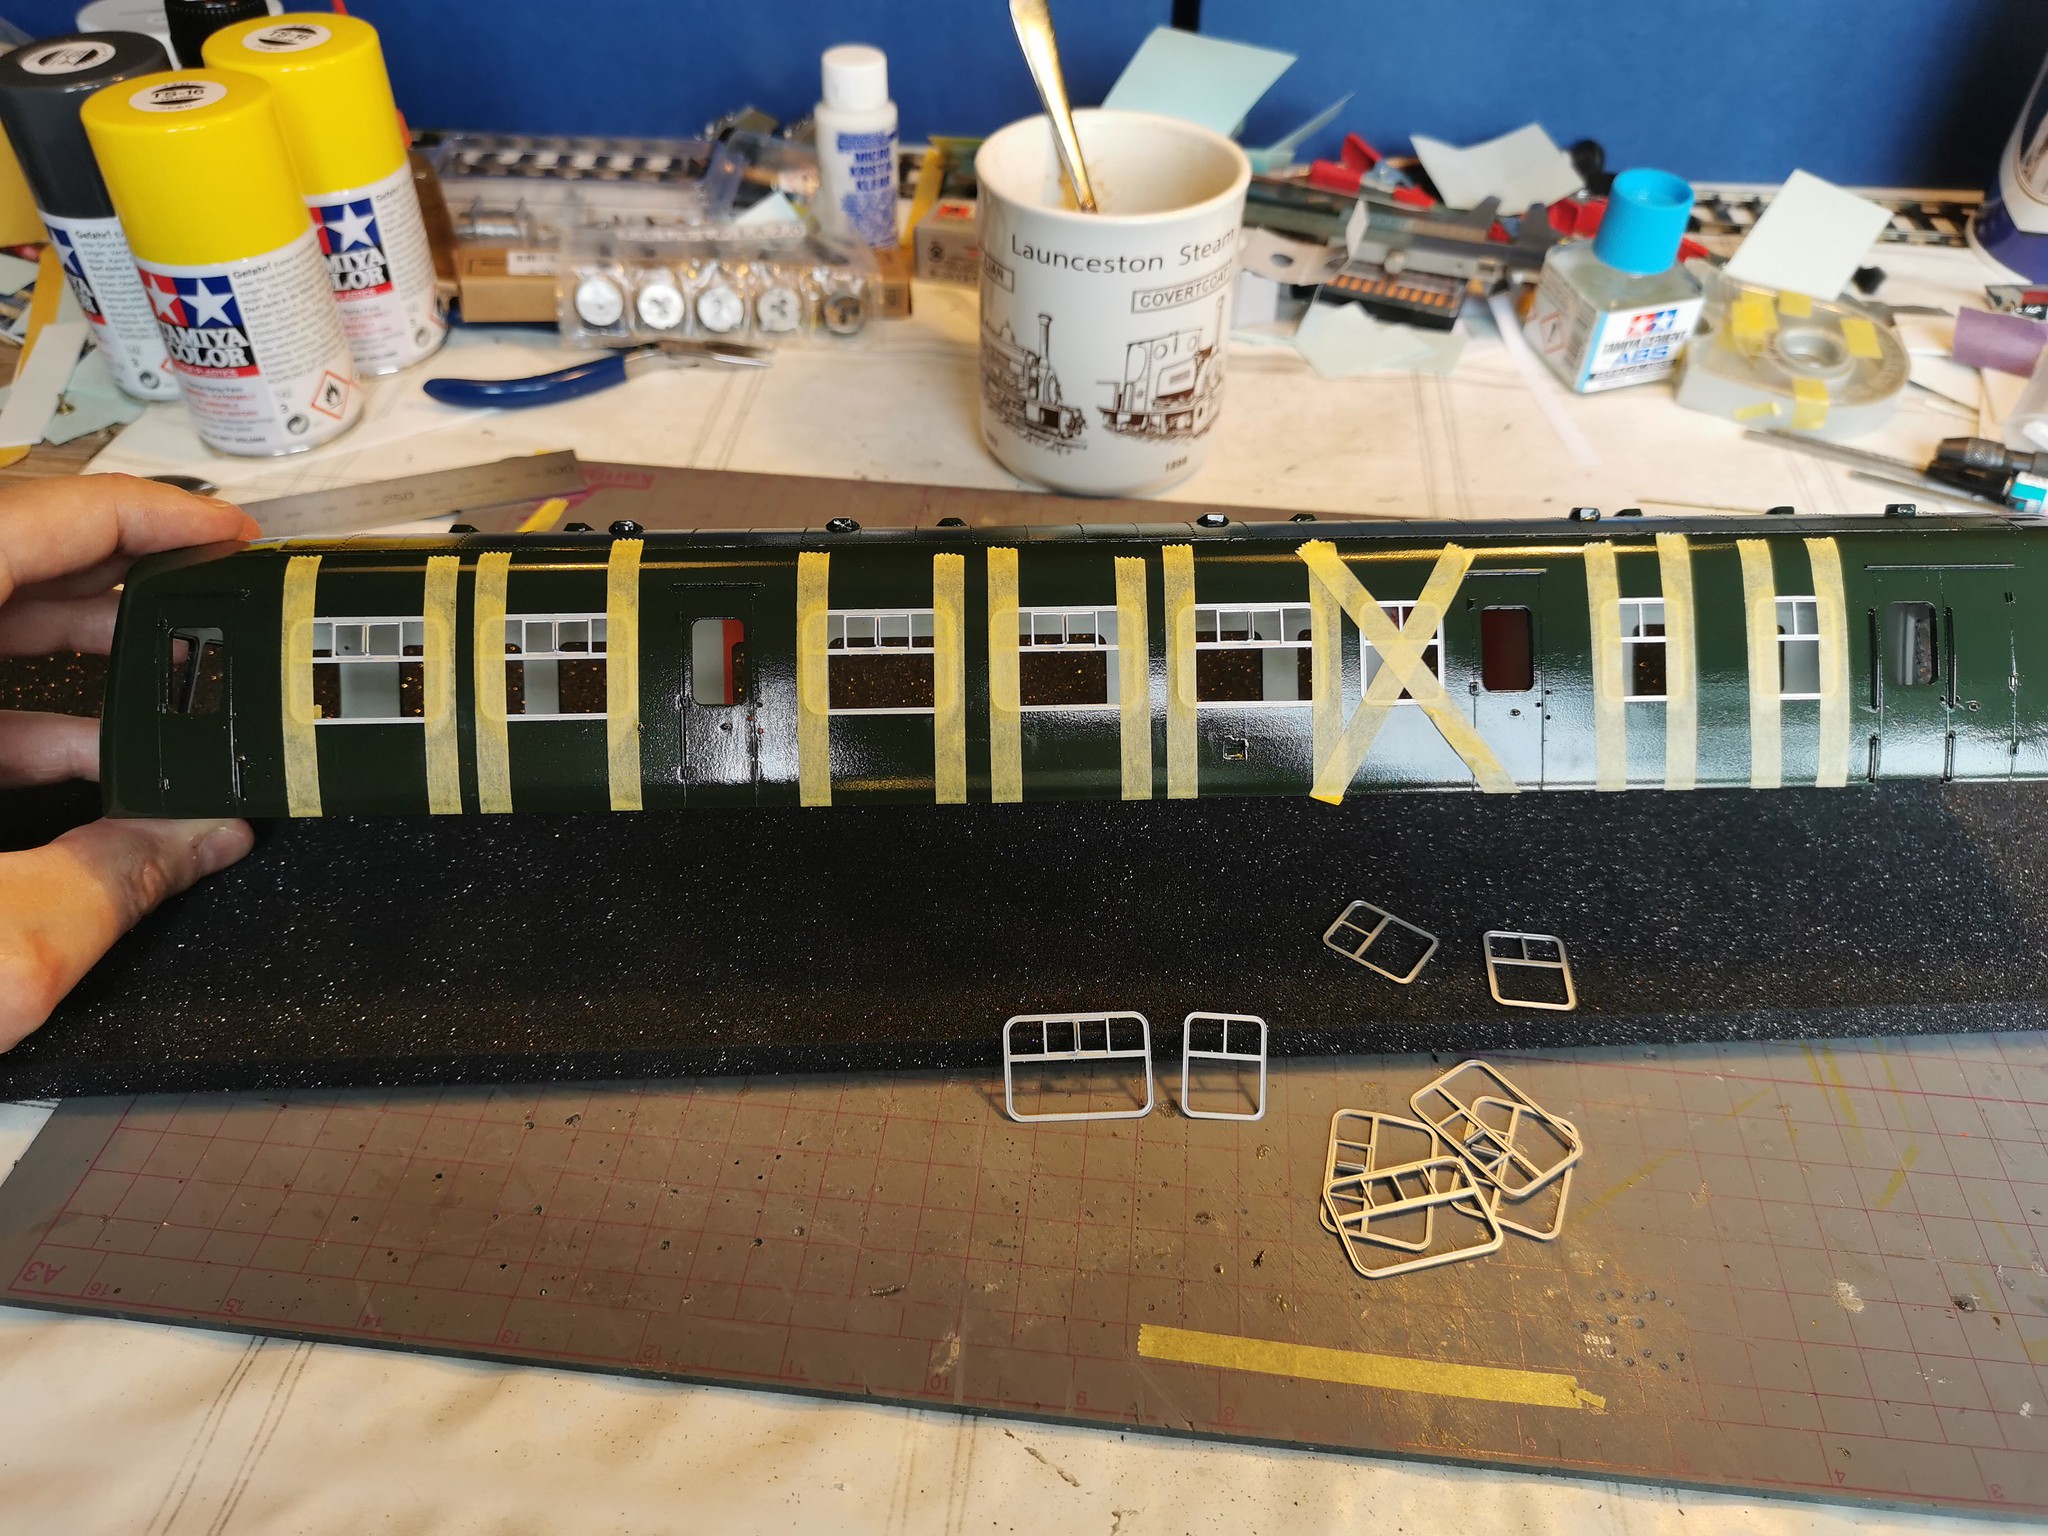
Last week I managed to fit the windows to the Class 101, the etches where al cut out and
filed smooth before a coat of primer and Tamiya ts-17 "gloss aluminum"
Fitting window frames Class 101 by Robbert Jan., on Flickr
Today I've applied all of the lining, a lot of work and something I've not done on this
large a scale, the Fox lining pack was just enough for the 2 cars with a small amount
remainging.
Class 101 Striped and with Whiskers. by Robbert Jan., on Flickr
Class 101 Striped and with Whiskers. by Robbert Jan., on Flickr
With the whiskers in place it really looks the part and gives me the energy to proceed
to the next challenge.
Hope you enjoy!
Regards,
Robbert Jan.
-
16
-
2
-
1
-
-
Hello again,
Yesterday looked like a good day to paint both body shells, with temperatures at a
steady 20 degrees outside it was time to take the plunge.
Painting the Class 101 green! by Robbert Jan., on Flickr
A small amount of primer was applied to the areas that I have been working on
such as the driprails and missing top hinges (left those of deliberately to make
sanding the join between wall and roof easier)
Then a quick dusting with the body up side down so the lower end of the walls
is also covered appropriately.
Painting the Class 101 green! by Robbert Jan., on Flickr
And then it's a case of slowly building up the layers using Tamiya TS-9 "British Green"
(I can't buy railmatch or any paint at all in the UK because of the policy that is in place
regarding liquids etc)
IMG_20220708_192018 by Robbert Jan., on Flickr
IMG_20220708_192106 by Robbert Jan., on Flickr
I've only found one or two spots that need a bit of tlc afterwards but otherwise it looks
good and I'm happy so far, atleast to a point that I went and removed the masking to
look for any overspray.
IMG_20220708_192317 by Robbert Jan., on Flickr
With just 1 spot where the green had managed to intrude in to the interior I was pretty
pleased and after a few hours I took the last pictures on the garden railway sitting
pretty on the underframes.
IMG_20220708_194047 by Robbert Jan., on Flickr
IMG_20220708_194108 by Robbert Jan., on Flickr
IMG_20220708_193927 by Robbert Jan., on Flickr
There is still heaps of work, the next job is the roof panels as these will become grey.
The window frames are still stored and will be something that I'll tackle soon after
I figure out how to gently bow the frames before inserting as I don't want them to be
under constant tension. (they are etched and flat but the walls are slightly curved)
Enough to do!
Hope you enjoy,
Regards,
Robbert Jan.
-
10
-
2
-
1
-
-
I've been building the kit for just under a year now, on and off I will add.
The kit is definitely not for first time modellers as it requires a fair amount
of knowledge and skill, especially with the materials used.
I've added a lot of details myself improving the final look using photographs
to make sure items are in the right location, it is still not done though
and more details will be added later on.
Regards,
Robbert Jan.
-
2
-
-
3 hours ago, Hal Nail said:
Coming along nicely!
Ive just moved and am toying with a garden line and the above photo caught my eye. Is there an advisable width for boards to prevent things plungung off in the case of a derailment, or do things tend to stay upright anyway? (hope I'm not tempting fate!).
Hello Hal Nail,
Thanks for the comment, the layout is completely raised to a maximum
height of about 2 feet at the lowest point in the garden.
The boards are approximately 5 inches wide so, yes, if a train derails
it will plummet in to the abyss (and yes it has happened once
with little damage)
I've chosen to build the garden railway on this narrow base so it blends
in with the garden.
(photo's can be found on my Flickr page in a separate album.)
@D6775 I can't wait to see how my handy work will look in a coat of
BR (Locomotive) green 🤞🏻
Regards,
Robbert Jan.
-
It has been a while but I've not forgotten about the Class 101 and the build hasn't stopped.
I've been painting most of the larger pieces after completing most of the detailing.
Class 101 underframes painted by Robbert Jan., on Flickr
The photo above is from the 22nd of last month, that day the underframes, bogies and
body shells where primed and partially painted.
Spray painting the underframe and bogies by Robbert Jan., on Flickr
Spray painting the underframe and bogies by Robbert Jan., on Flickr
The underbodys where sprayed with a grey Tamiya primer prior to a bit of red for the
cab end bufferbeams followed by a coat of matt black.
Painting red and black by Robbert Jan., on Flickr
There is still a lot of work left to do finishing the paintjob but that is for another time,
for now it is looking very decent.
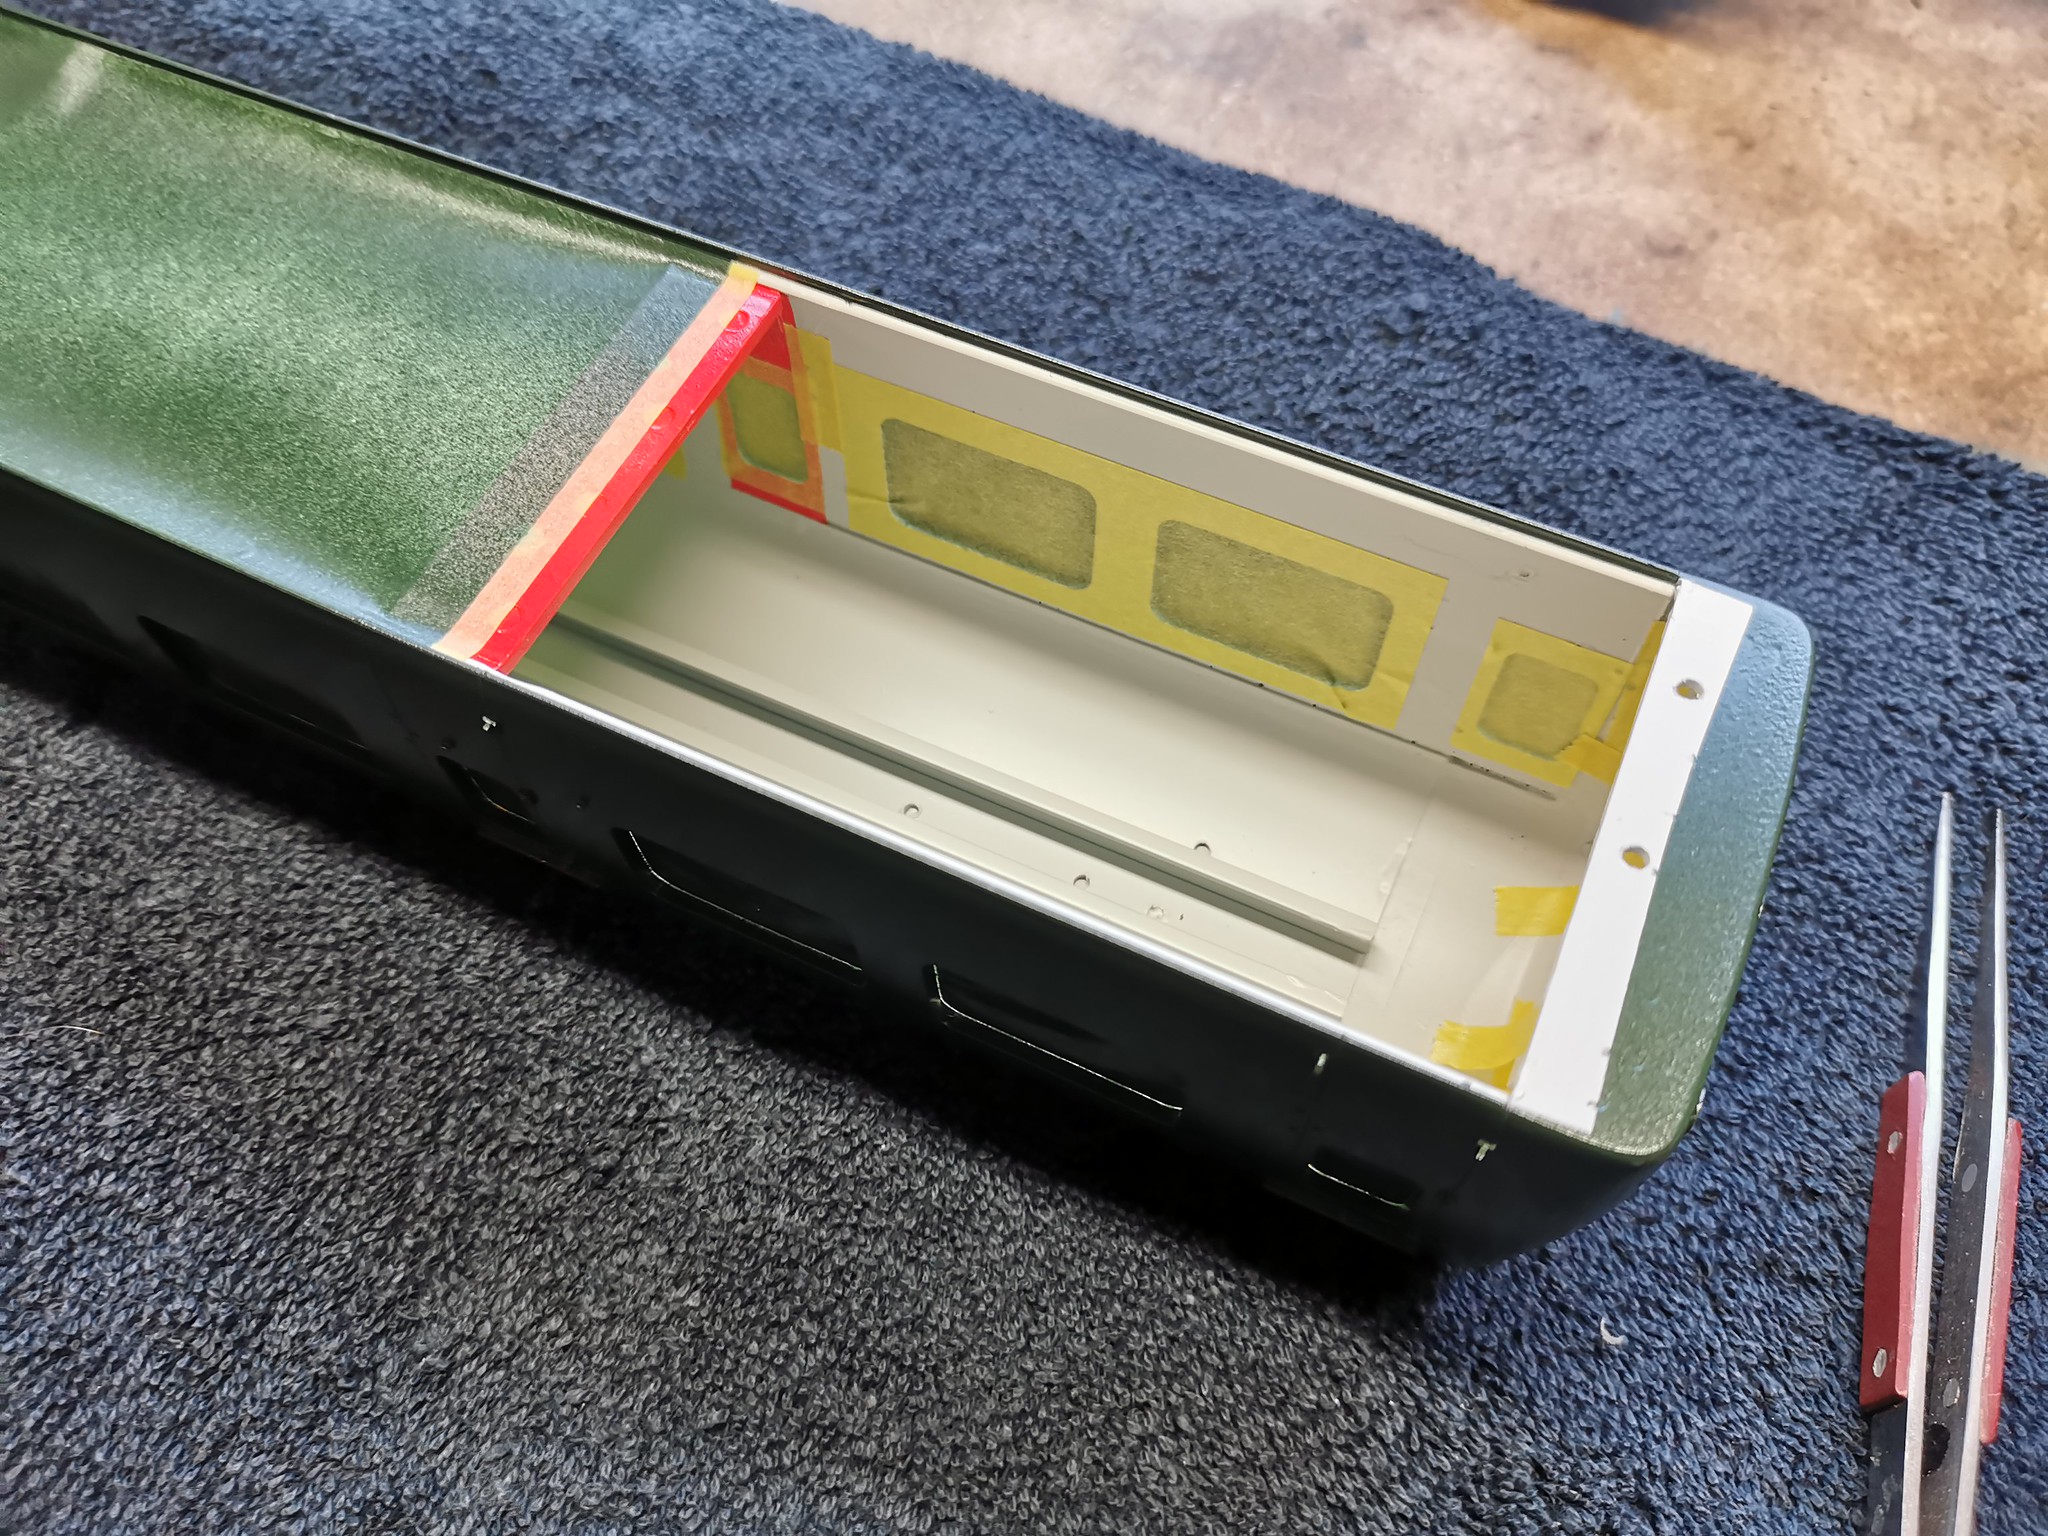
My attention then turned to the body shells, these where painted and off white on the
inside, followed my a lot of masking and some hints of orange formica.
Painting the interior bits Class 101 by Robbert Jan., on Flickr
As I'm building a heritage unit this will depict a specific period in time with the 70's
interior being in place, it also pops and draws one's eye to the interior.
Minor modifications where done to the interior walls such as a sliding door and
handrails.
Painting the interior bits Class 101 by Robbert Jan., on Flickr
Interior detailing class 101 by Robbert Jan., on Flickr
All together with the blue floors it looks very 70's, the floors will be toned down with a
darker wash as these would have been well worn by the time of preservation.
2nd and 1st class seating was also completed, in blue and grey ready for install.
Interior detailing class 101 by Robbert Jan., on Flickr
Yesterday was spend adding the final details to the body prior to a last dusting of
primer before the BR green will be applied.
Class 101 detailing prior to painting by Robbert Jan., on Flickr
The hinges where added, carefully, as these sit in the join between the cab moulding
and the side wall, no rush!
Other holes had to be drilled according to photo's, the handrail for instance that
is also present on the opposite side.
Class 101 detailing prior to painting by Robbert Jan., on Flickr
Class 101 detailing prior to painting by Robbert Jan., on Flickr
Above all doors I've glued on a short driprail to complete the 50's look that the
preservation society longed for.
Hope you enjoy!
Regards,
Robbert Jan.-
8
-
-
Thanks gentlemen!
Meanwhile a spell of relatively good weather had me taking some pictures outside
on the temporary bridge (the layout is still in storage)
Class 101 in the garden. by Robbert Jan., on Flickr
Class 101 in the garden. by Robbert Jan., on Flickr
After this photo session I went and finished the bogie steps, a fiddly job that
had me scratching my head on noumerous occasions.
DMBS Bogie steps by Robbert Jan., on Flickr
Guards area bogie steps by Robbert Jan., on Flickr
DTCL Bogie steps by Robbert Jan., on Flickr
The etched parts where modified to get them to resemble the original, meaning the
larger step beneath the guards compartiment is comprized of 2 regular steps soldered
together.
I also had to do some minor work to the "power bogie" as this was not sitting level
with the track, it was by no means finished but I couldn't get my head around a
good way to solve the problem and retaining the option to take the bogie apart
with the 4 bolts in the center structure.
Class 101 Bogie strenghtening by Robbert Jan., on Flickr
The solution was making a pair of triangles that slot in to the ABS sides, keeping the
sides level and giving the whole bogie it's final shape, level with the body.
I've also soldered in a pair of brass channels as the section of the bogie was fairly
weak and prone to bending under stress.
Another weekend well spent
")
Regards,
Robbert Jan.
-
9
-
-
It has been a while but there is progress on the build.
Dapol Class 122 by Robbert Jan., on Flickr
First of the Class 101 has got a sister, a Class 122 by Dapol.
And then on with the building of the kit;
The body had to be attached to the chassis at one point, this requires the
body stretchers to be glued in to place.
As I was already planning to have the body removable as a whole, with the
complete chassis untouched, it needed a different approach.
Class 101 body stretchers by Robbert Jan., on Flickr
So i will make use of 3 stretchers, on behind each gangway at the enterance doors
and one at the very rear, these will be glued in to place.
To make attaching the body to the chassis easy and durable (instead of putting a screw
in to plastic) I decided to use a brass strip with m2 nuts soldered to it.
Lining up 6 holes was a challenge in its own right, I had to drill the holes in the chassis
prior to glueing the stretchers in to the body, this made for some tense moments
hoping that all holes lined up when both are offered up to eachother.
Body fastners etc for the 101 by Robbert Jan., on Flickr
The most difficult part was working around the details that are already underneith the
chassis, but in the end I managed to make it all work, the DMBS has an extra stretcher
in white because the position for the bolts that where supposed to go there is taken
up by the speaker.
Body fastners etc for the 101 by Robbert Jan., on Flickr
Another job that needed doing was glueing in place the body side grill, its just stuck on
to the side but it looked out of place, photographs confirmed that it is almost flush
with the side, so I scribed around the outer edge and made a new hole in the side.
Class 101 side grill and coolant filler by Robbert Jan., on Flickr
Class 101 side grill and coolant filler by Robbert Jan., on Flickr
A nice (nearly) flush mounted grill, and whilst at it a pair of recessed coolant filler caps
where also added to the sides of the DMBS.
Class 101 side grill and coolant filler by Robbert Jan., on Flickr
Hopefully I can go ahead and prime the body very soon, weather permitting.
Regards,
Robbert Jan.
-
10
-
-
Thanks Paul,
It wanted to try a new approach having seen this style of pickup
on the Dapol 87xx and various kit build locomotives.
I'm will use wiper pickups on the motor bogie as there is little room
so fosforbronze pickups will have to do.
Regards,
Robbert Jan.
-
I've been busy again the last few days, adding the white metal multiple cable equipment to the
bufferbeams and preparing these for the cables themselves when all is painted.
Class 101 Vacpipes by Robbert Jan., on Flickr
The other major modification is the vacuum pipes, these have been made using spare parts from
a pair of Slaters kits as I was not going to build these particular kits with vacuum brakes.
4 lenghts of 1mm brass angle where used to make the 4 mounts underneith the bufferbeam.
For the pipework I used some left over brass castings that just had the right size and shape.
Class 101 Vacpipes by Robbert Jan., on Flickr
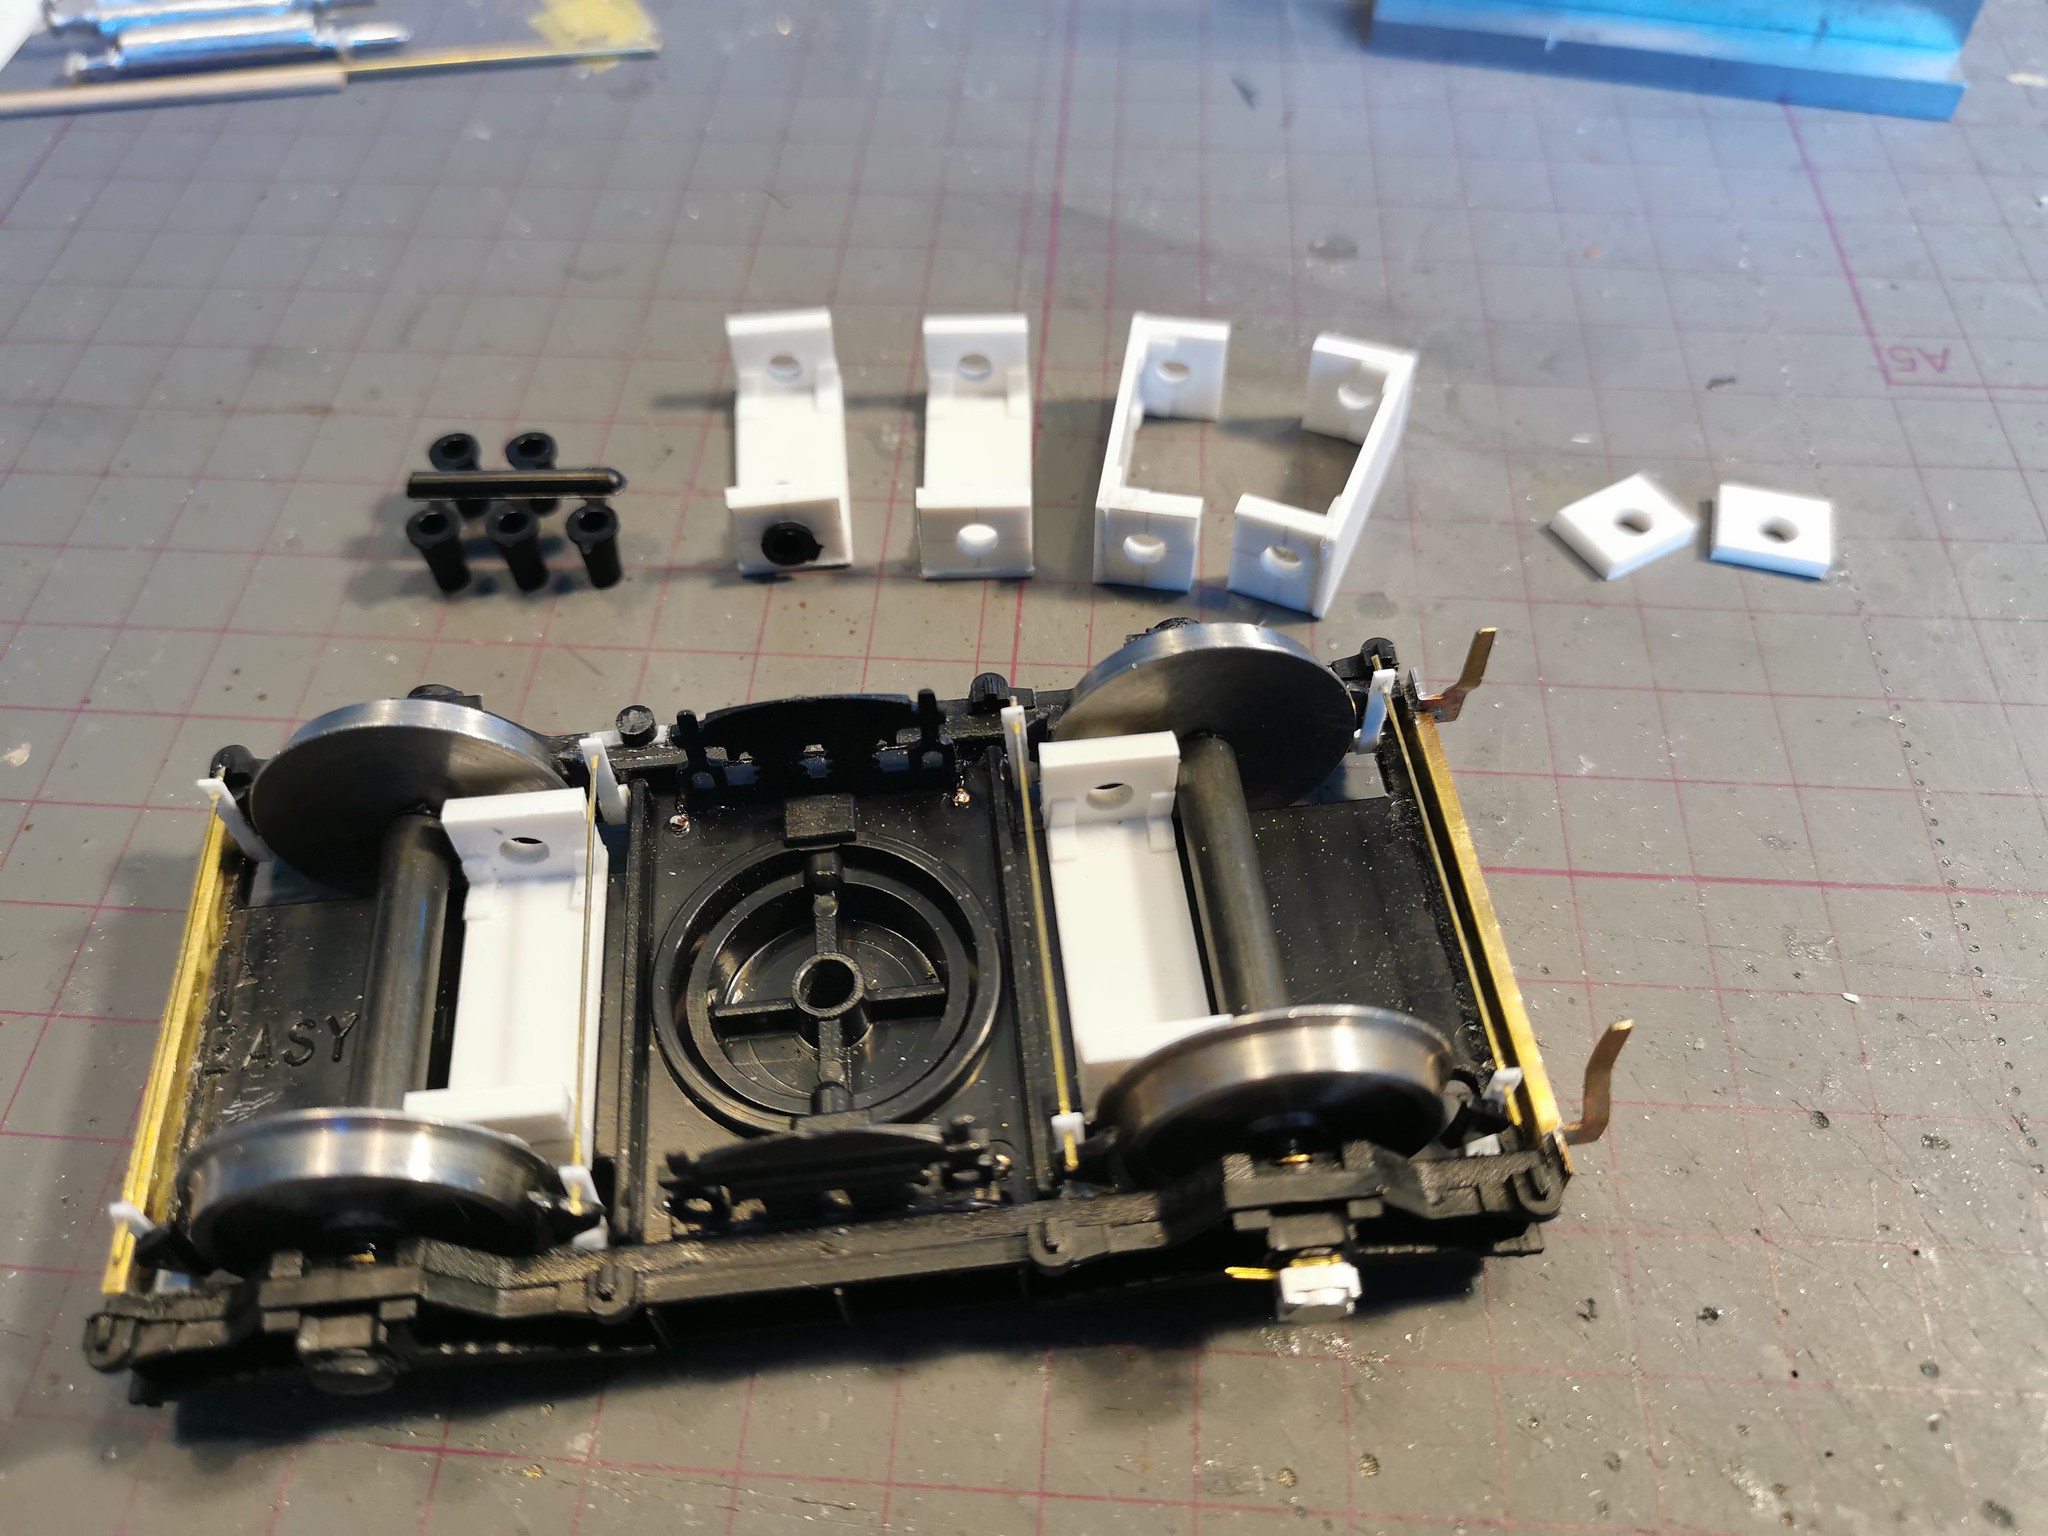
With the above ticked off the list another little job was waiting for attention, the pickups.
Bogie Pickup Mount by Robbert Jan., on Flickr
I've made inserts from plasticcard that sit inside of the bogie, these will be bolted in place
so I can remove them to replace the plunger pickup would it be worn or maybe even dirty.
The mount has since been shaped and is now almost invisible looking at the bogie from
the side, neat and tidy.
Regards,
Robbert Jan.
-
10
-
2
-
-
The past few days have been "exhausting" as this was a part of the Class 101 that had not yet been touched.
Exhausting work by Robbert Jan., on Flickr
This is version 1, the exhaust pipe has the right shape but the cannister coming of the manifold was a
bit to tall and it made the exhaust hang to low, aswell as pushing the engine up in to the floor.
So the cannister was ajusted for height and soldered back in place, the opposite side had the same
treatment, the exhaustpipe is a lot simpler to make and it was done in half a hour.
Underframe detailing by Robbert Jan., on Flickr
Both exhaustpipes are made from 2mm Evergreen rod as I didn't have brass on hand, maybe a good
thing as the styrene rod is malleable enough, especcialy when softened with plastic glue.
Underframe detailing by Robbert Jan., on Flickr
The exhaustpipes do need some more brackets like the real thing, but they are atleast on the verhicle.
Meanwhile I also made some smaller detailing parts like the brackets holding the fuel tanks to the floor.
Underframe detailing by Robbert Jan., on Flickr
Even the battery cabinet has some brackets surrounding the perimeter so these where also glued on
using 0,5mm square stock.
All in all I'm pretty pleased with the progress so far, on to the next challenge.
Regards,
Robbert Jan.
-
3
-
5
-
-
It's been almost a week so time for an update on the project.
I've been assembling the fuel tanks that go underneith the DMBS, taking care to notch
one so it has plenty of clearance so not to interfere with the speaker.
Speaker mounting. by Robbert Jan., on Flickr
Speaker mounting. by Robbert Jan., on Flickr
With the undercarriage of the DMBS almost done I turned my attention to the DTCL, cleaning up
all of the white metal bits and glueing them in place using the manual and lots of photo reference
material as I didn't quite get the bits to sit right.
Class 101 DTCL by Robbert Jan., on Flickr
Class 101 DTCL by Robbert Jan., on Flickr
The vacuumcilinders where installed this morning and I went and finished the assembly this
afternoon, looking pretty smart.
Brake system details by Robbert Jan., on Flickr
Brake system details by Robbert Jan., on Flickr
Both vacuumcilinders are supported by plasticcard strip that is in between the cilinder and floor.
The axle is a 2mm styrene rod as I didn't have any 2mm brass in house, it has no function so
it will do the "esthetic" job allright.
Now I just need to find a place for the vacuum tank as I can't find any pictures of a DTCL with
the tank in place....
Regards,
Robbert Jan.
-
6
-
5
-
-
With the buffers in the right place I put my focus towards the undercarriage and started
cleaning up the various bits of cast white metal.
I determined that the engine blocks wherem't equal to one and other and although they
won't be seen together at any point I decided to make a pair from scratch.
AEC 220 by Robbert Jan., on Flickr
I've only used the flywheel (has been reversed, it was backwards) , oil filler pipe and recently
the adapter piece for the exhaust system.
Undercarriage bits and bobs. by Robbert Jan., on Flickr
All of the pieces where glued to the undercarriage and left to dry overnight before I went and
did the other side.
Drivers side by Robbert Jan., on Flickr
Placing all of the bits also gave me a good idea of where to place the speaker so it wouldn't be
very visible, in between both space heaters near the end of the DMBS turned out to be a good spot.
Underframe details. by Robbert Jan., on Flickr
It's an ESU bass-reflex speaker (50344) and it's very similair to the EM-1 but with the added bonus
that it can be used on it's own rather then in conjuntion with another speaker due to a low (0,5) watt rating.
(this low rating is likely to fry the amplifier on a decoder)
Next job is the detailing of the DTCL.
Regards,
Robbert Jan.-
10
-


")


EasyBuild Metro-Cammell Class 101 kit, first steps in to 7mm kitbuilding.
in 7mm+ modelling
Posted
A month had passed again but I've not been sitting at idle.
After re-instating the garden railway last week I managed to
have a proper first running session with the Class 101.
Although it was quite windy today I managed to make a video
of the first departure out of the station. (to be)
Besides the Class 101 being able to run as a solo Dmu it also sports a
whole range of light functons that can be seen below.
Now it is finally at a stage that I can tackle the interior as I do not need
to alter anything anymore, and ofcourse the corridor connection and a pair of
exhaust pipes are in order.
Hope you enjoy!
Regards,
Robbert Jan.