


simon br blue
-
Posts
386 -
Joined
-
Last visited
Content Type
Profiles
Forums
Blogs
Gallery
Events
Exhibition Layout Details
Store
Posts posted by simon br blue
-
-
The finish on the tram body looks good and also good to see that the bodyside bands are still clear after the painting.
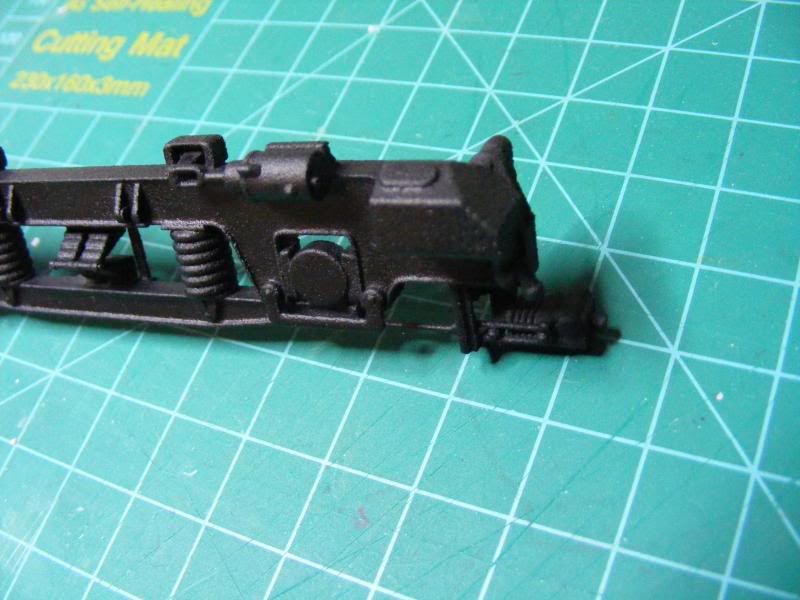
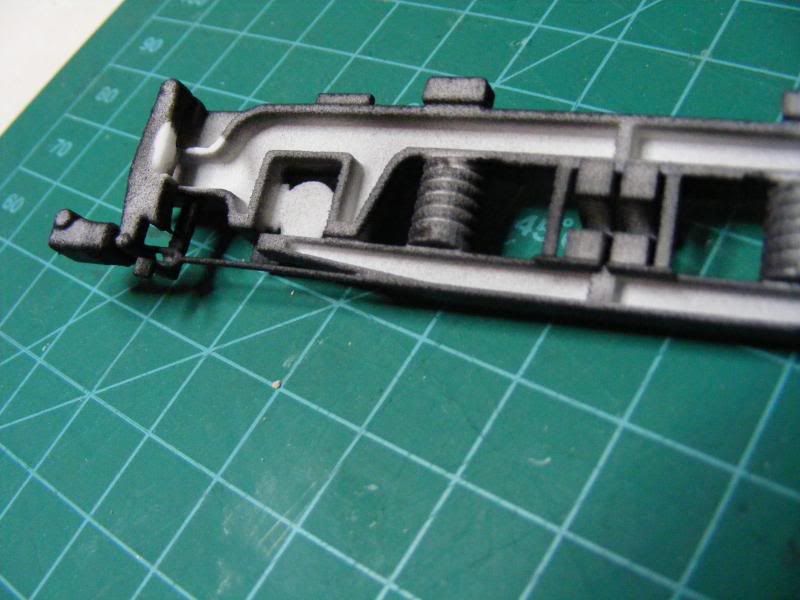
I've given the class 20 bogie a coat of black primer to see what the finish looks like. I've also taken a pic of the back of the bogie to show the hollow frames that help to heep the price down.
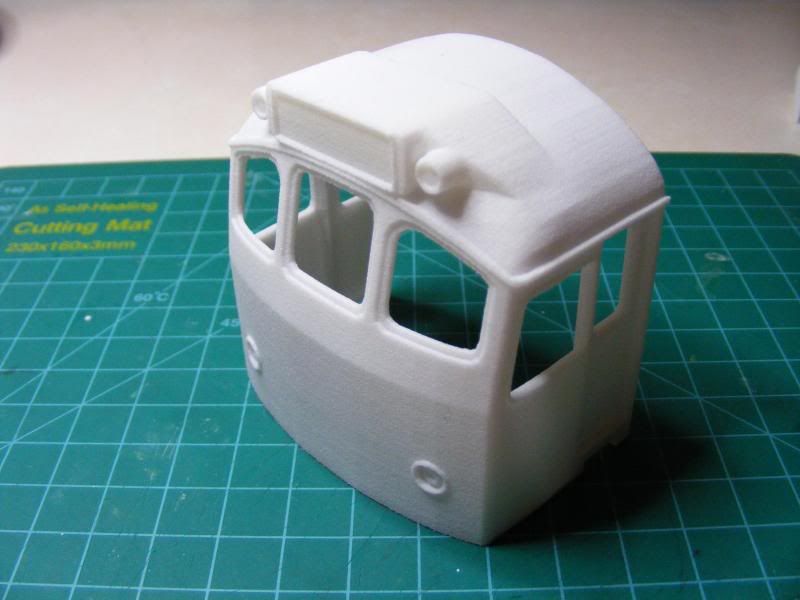
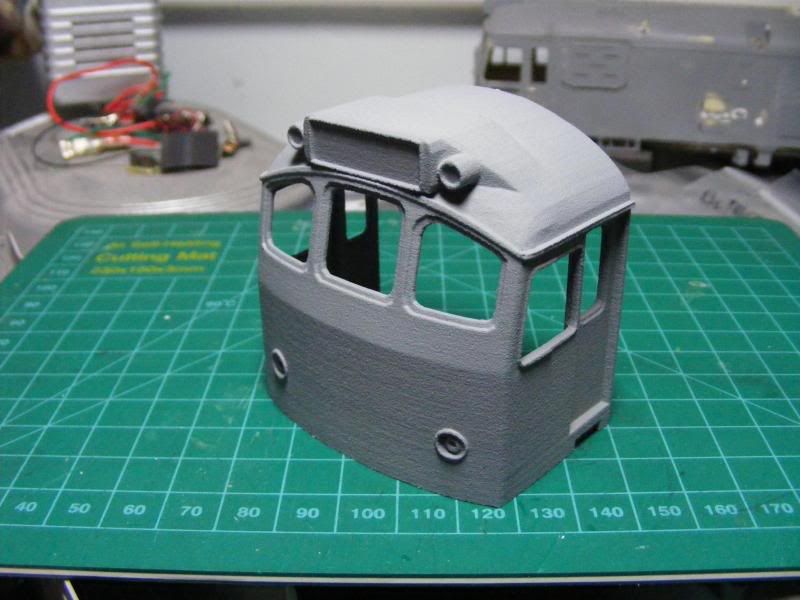
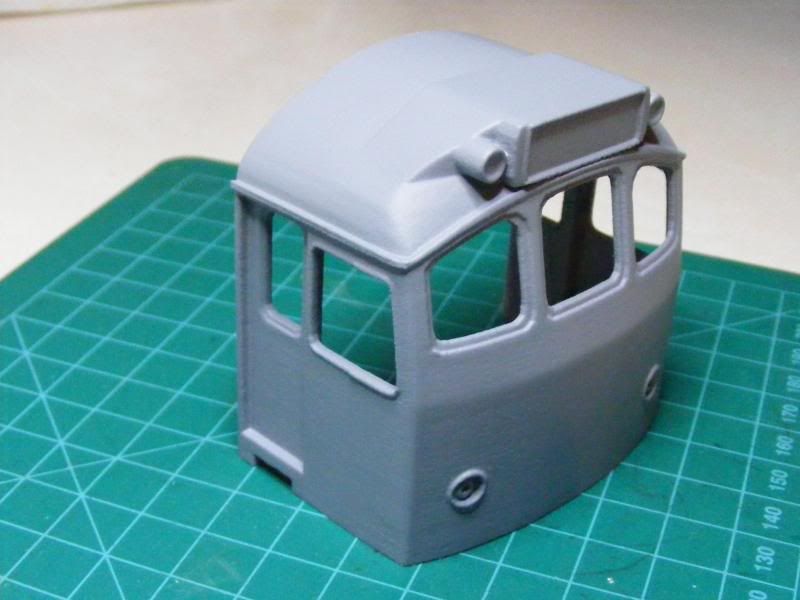
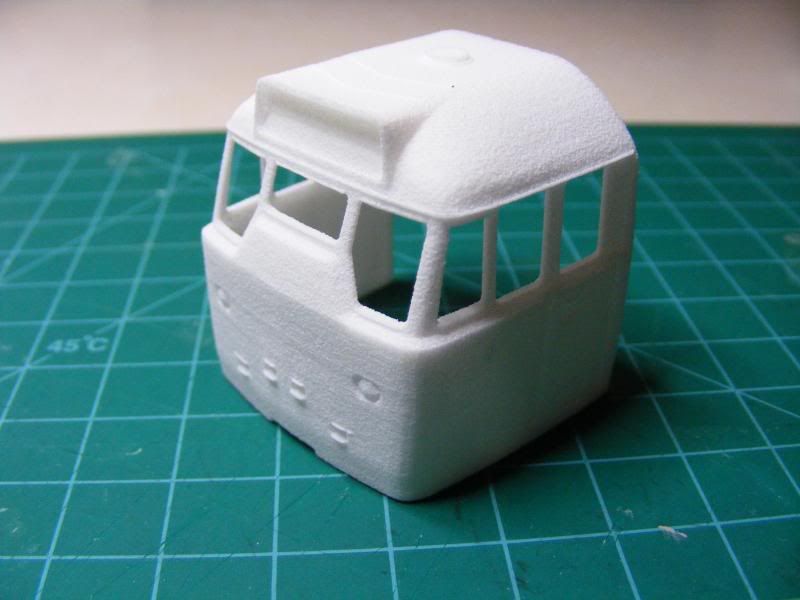
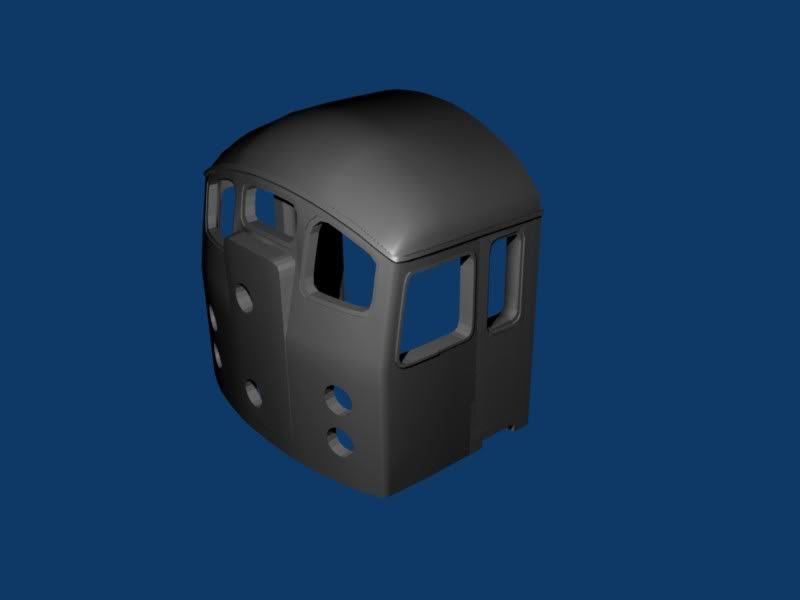
The class 25/3 7mm cab has also had a couple of coats of primer (with sanding in between coats) to smooth the surface. The pics below hopefully show how it has got smoother - If I make a resin casting and then prime and paint it when attached to the body I think it will be plenty smooth enough.
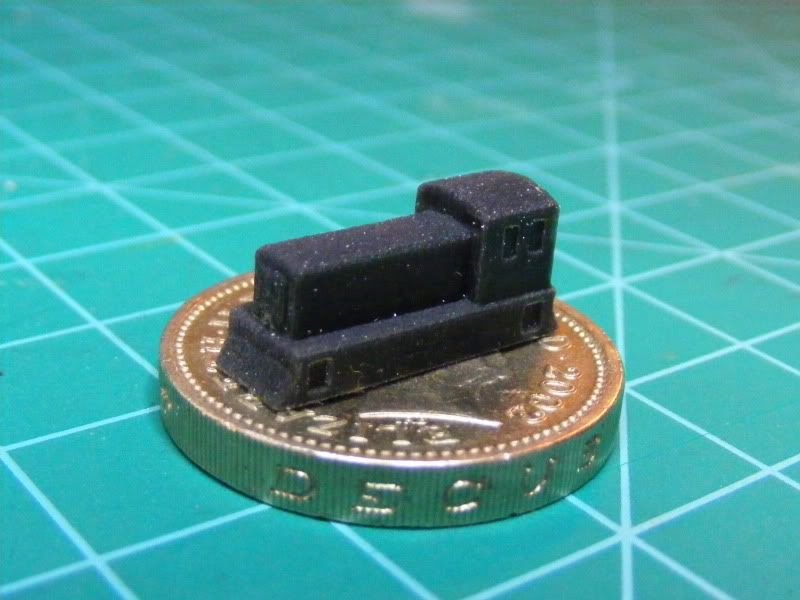
I have also been playing with the Z gauge Wisbech and Upwell stock I had printed. The 04 had a coat of grey primer then matt black paint(which hasn't turned out matt). I painted the windows dark grey and drew the bonnet doors, vents and cowcatchers on in pencil. I also had a go at painting on the number and lion and wheel emblem - harder than it looks in Z gauge. I also added a vaccum hose made from an old bit of wire.
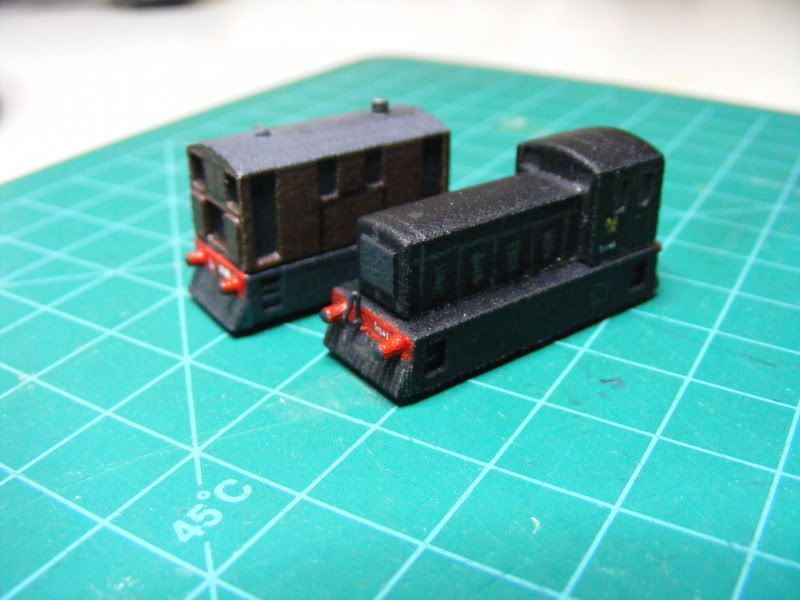
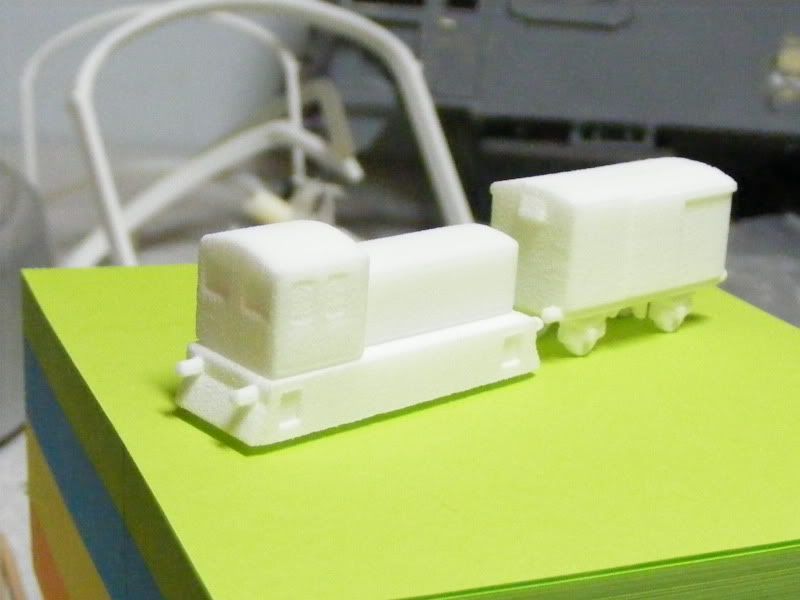
I have painted the wagons that I had printed last time. Again they were primed and then hand painted. The 3 vans were all painted differnetly to try and look like a cross section of hte vans used on the line, The 1st 16t mineral was painted to be a good condition wagon but on the second I tried to make it look rusty and heavily weathered. The guards van was simply painted grey and some lines drawn on to represent the doors and handrails.
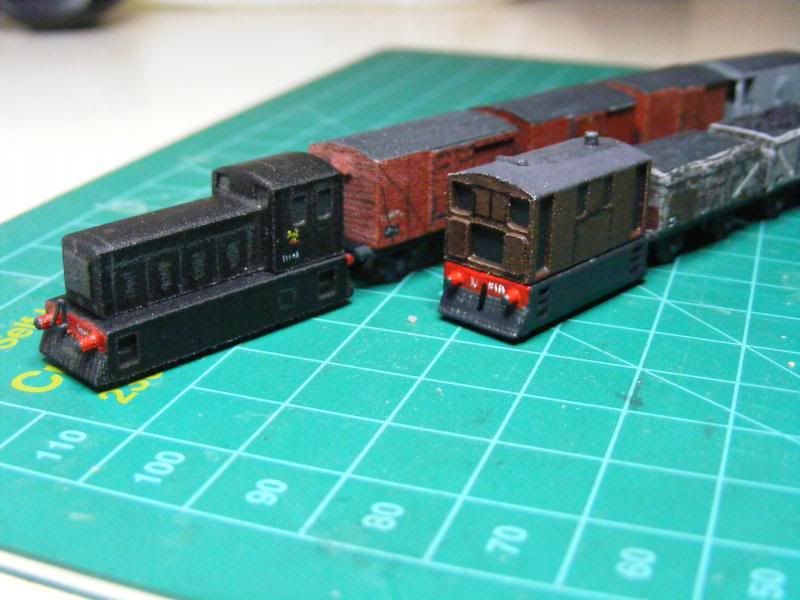
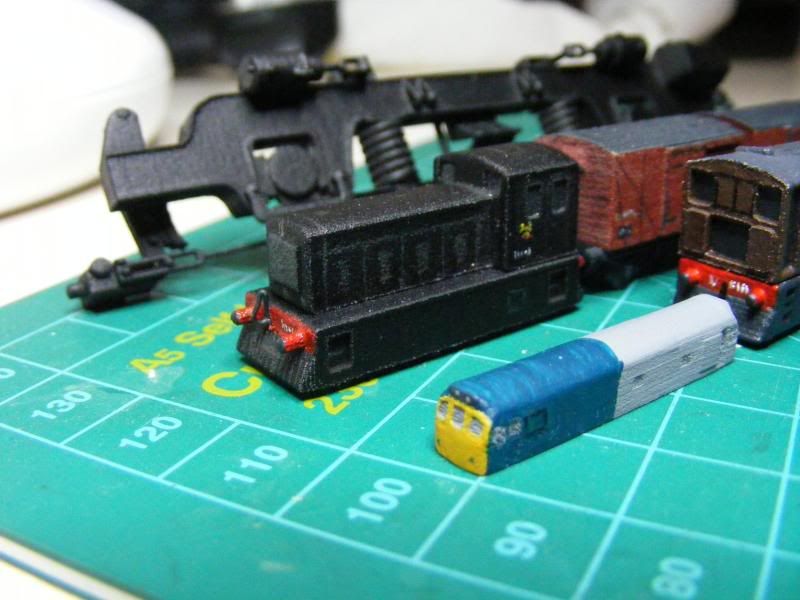
The final pic show several items placed next to each other. I was surprised by how big the 04 looks in the pic when next to the T gauge 25 (the 04 is only 30mm long).
-
 3
3
-
-
Simon kindly offered me some advice re shapeways stuff, so I hope he won't mind me posting a picture of my Middleton Bogie tram printed by Shapeways in the white detail medium, I'm pretty happy with it to be honest, only arrived today so this is completely 'raw'.

Hi Mark,that looks good. How fine are the window supports? Hope you post a pic whe it's got some paint on it.
Tricky-CRS the walls on the t gauge 25 were 2mm as it was only a test and wouldn't ever have anything inside it. You could probably go down to about 1mm but then you run the risk of it not printing correctly. I think you would struggle to get a motor mechinism inside but you could always run it as a dummy and have a powered mk1 or mk2 coach pushing it along. The other option would be to print a model with cabs joined by the roof without any bodyside and add these later using thin plasticard as the sides don't have much detail on them anyway.
John, the shunter looks good. I have seen the Irish stuff on shapeways but never seen a printed model. I think the way forward using shapeways would be to sand and finish the basic model then add etched parts. Or if making more than a couple cast some in resin and then add the etched parts as John and Perti have done.
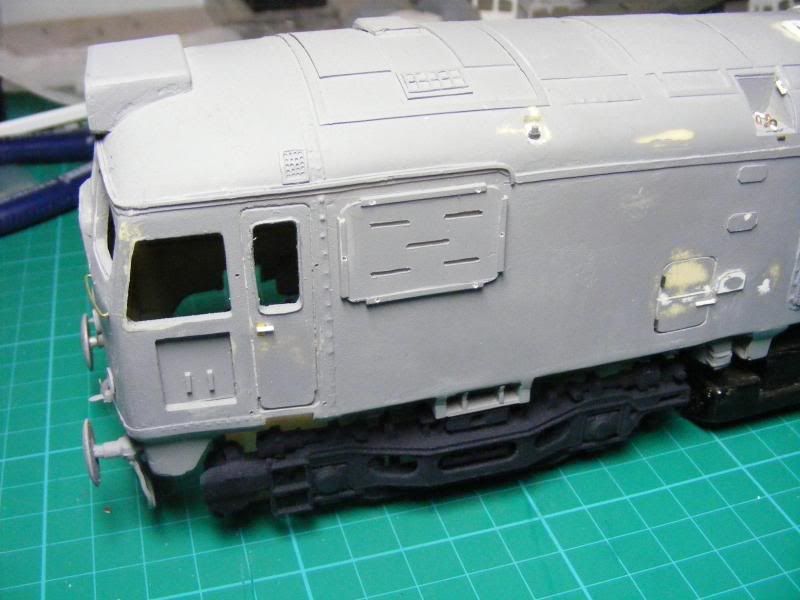
I've added a couple of coats of primer to the O gauge 25 cab and will try to take a pic over the weekend.
-
I've had a go at painting some of the parts. Firstly with primer and then a couple of the smaller parts by hand with some acrylic paint.
The J70 looks ok but is still a bit rough (I didn't bother to sand any of these parts) The colours are probably not correct either - they are just what I could lay my hands on tonight. I drew a couple of lines on with a black pen and used a pencil to draw the cowcatcher bars on.
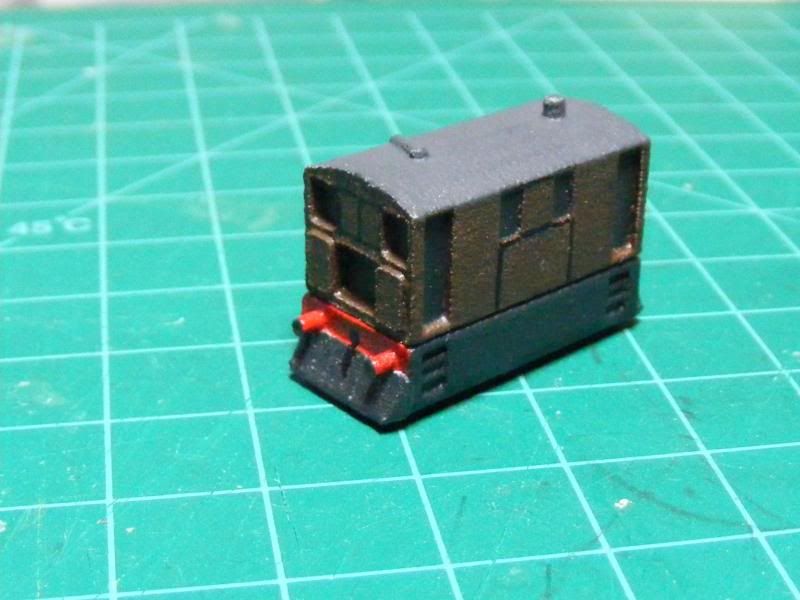
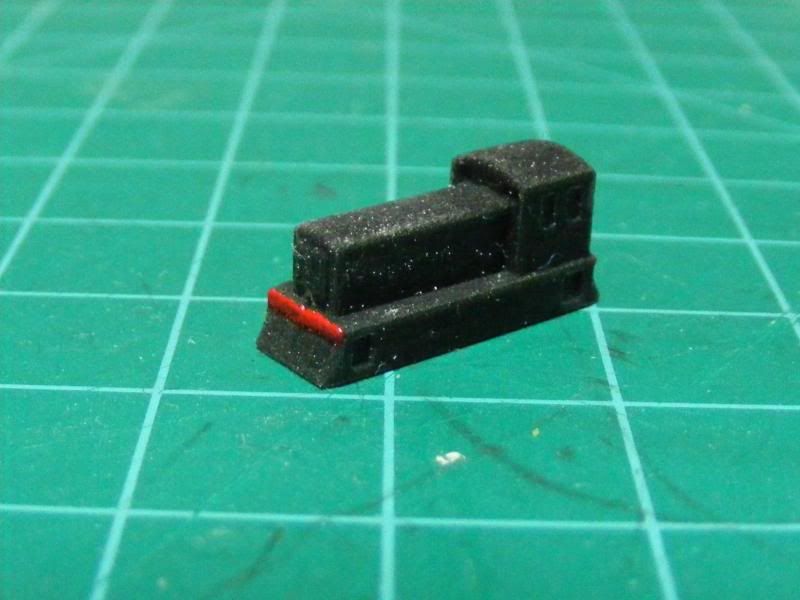
All I did with the class 04 tram was to paint the bufferbeam red. The white specks on the body are/is dust. It must be a nightmare trying to keep a t gauge layout clean.
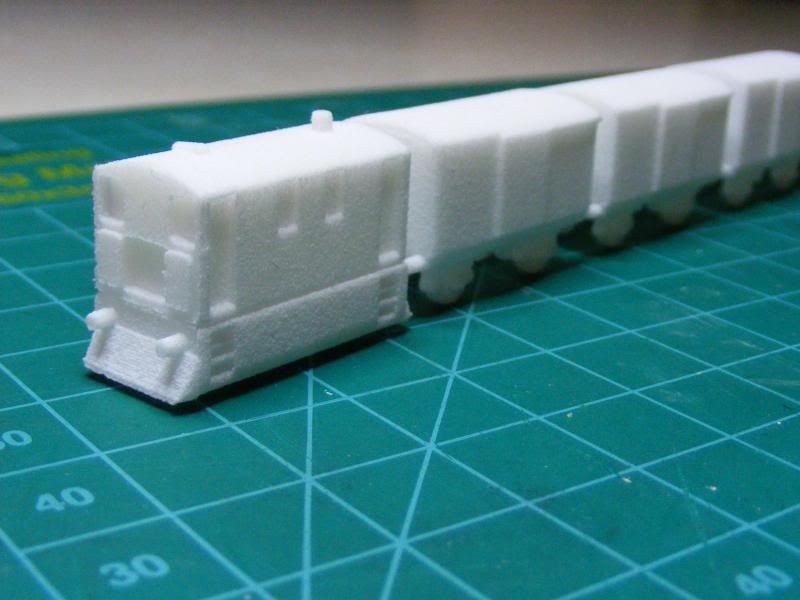
The last pic for tonight is a pair of T gauge class 25 bodies. Only a quick paint and not a great finish when viewed close up. 2 things apparent after painting is that the roof in particular on the back model (printed in WSF) is rough/fuzzy but this could easily be sorted with a sand and repaint. The other thing to show up is the layered finish to the windows on the front model (printed in white detail). Overall I think they look better than before painting as you can see some of the detail, the lights were put on with a pencil and the domino lights were done with a cocktail stick dipped in paint.

-
1
-
-
I did try a t gauge clas 25 but it didn't look very good. I think the simple shape of the 04 worked well. The 25 was just a scaled down version of a 7mm cab which I don't think helped. The white detail looks about the same as black detail but the white, strong and flexible looks very fluffy. It might look better with some paint on, i will also have a go at painting the z gauge bits if the weather ever gets better. The reason for doing the 04 in black was that all the would really need painting would be the red bufferbeam.
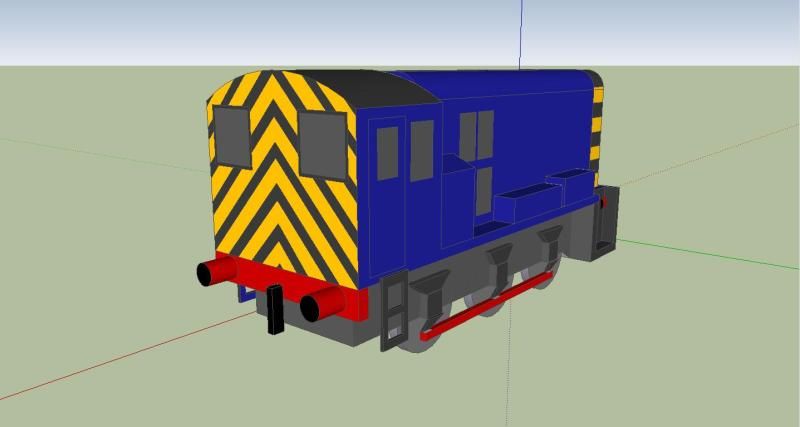
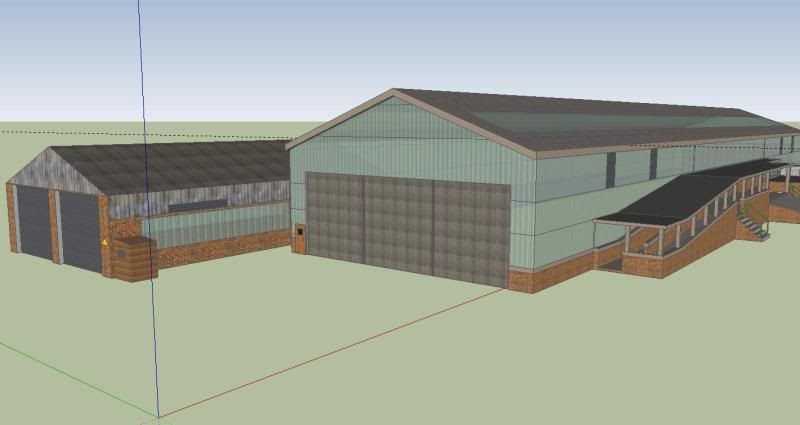
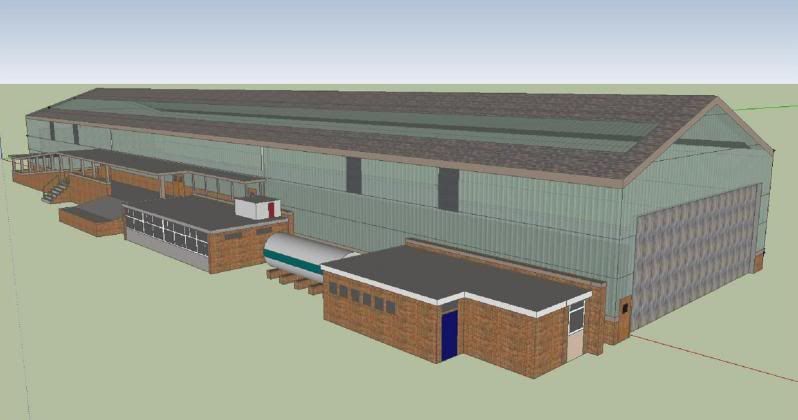
I did have a go at drawing a loco in sketchup but it was only a quick attempt. I also managed to draw part of March depot which was easier as there are not many curved edges.
-
4
-
-
Time for another update.
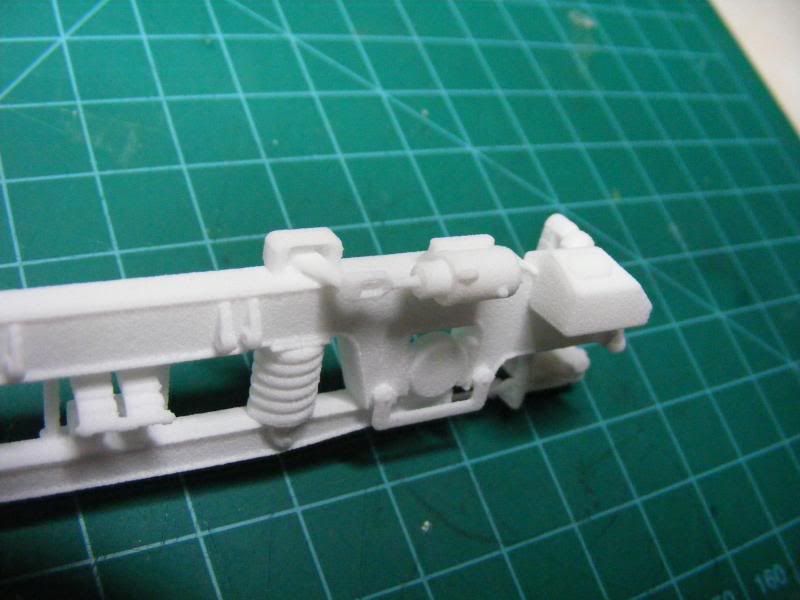
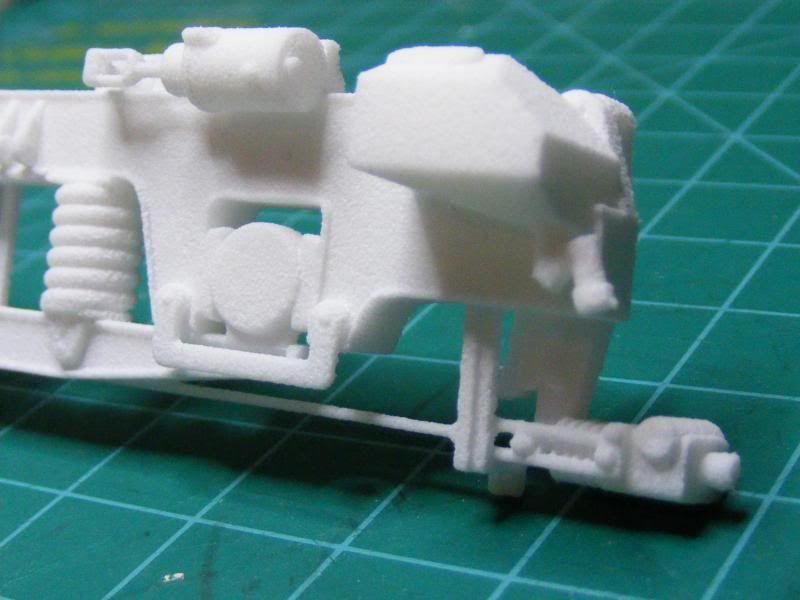
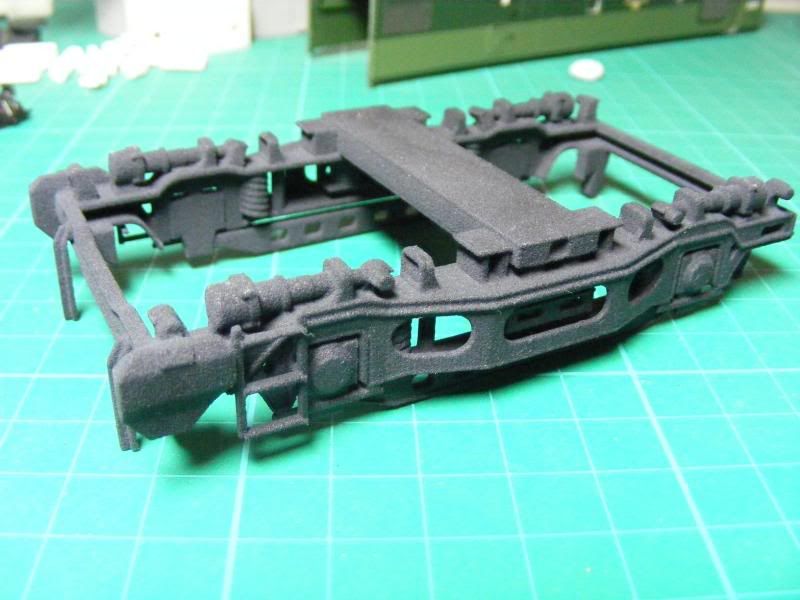
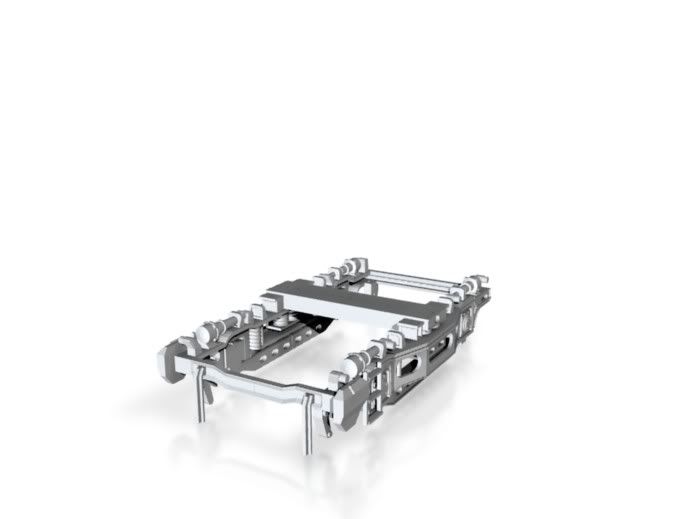
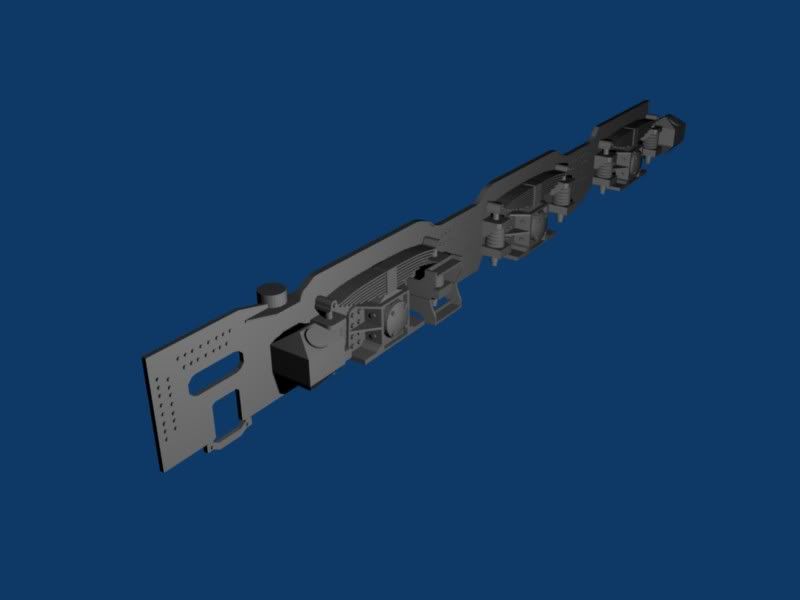
In the most recent order from shapeways I got a 7mm class 20 bogie. I don't have a plan to build an 0 gauge class 20 but after drawing it I secided to get it printed to see how fine some of parts could be. The brake rigging is 0.8mm thick and the cylinder arms/pushrods are 0.9mm dia. The overall look is ok and the only area that doesn't look to great is the brake blocks as these have a layered effect- I think the bogie was printed vertically. Another area that would need modifying is the 4 small brackets on the bogie frame that should have holes in them but the gap has closed up as the dia was too small.
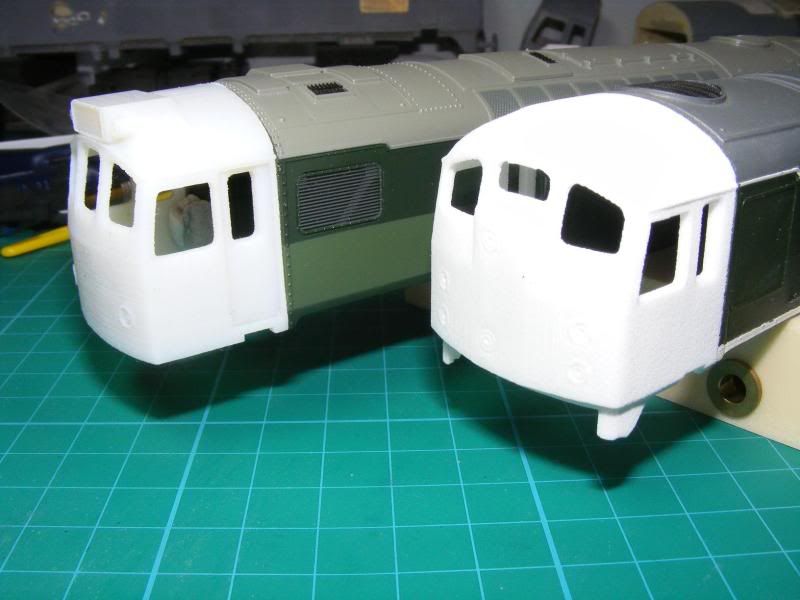
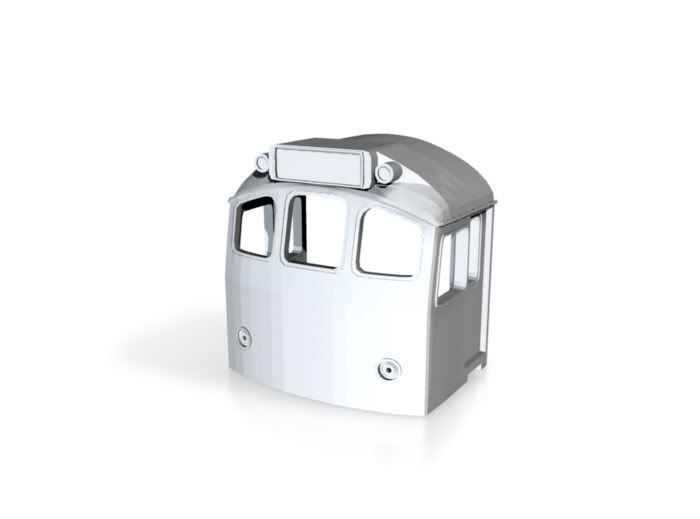
I also ordered another resized 7mm class 25.3 cab to see if it would match upto the Steve Beattie body I have. I also modified the drawing to try to reduce the angled affect of the original model (caused by the low poly count of my original drawing). I think it is an improvement over the previous model particually around the cab roof area. It's a reasonable match for the 25 body and I'll try and paint and sand the model when I get a chance. If it still looks ok I'll have a go at casting a couple in resin.
Another new model that I had printed was a class 31 cab that I drew last year. As with the 20 cab printed previously I printed it in 4mm to see how it compared with the Airfix, lima and Hornby models I have. It does look like a 31 but i'm not sure it is completely accurate. I think there is something wrong with the cab window area but I can't quite put my finger on it (the quality of the photo isn't great and the area above the nose doesn't show up very well). The front steps and tail lights haven't printed very well but if it was printed in a larger scale I think they would be ok.
THe final item I had printed was a z gauge J70 tram engine to go with the class 04 and van printed last time. The detail and finish doesn't look great but it is less than 3cm long.
-
5
-
-
I've seen the dutch train and tank tracks on shapeways and would like to get something printed to this standard as this is at the moment shapeways biggest failing. I'm sure several modellers on this forum would also be happy to pay more money for finer detail.
Hi Stuart, your etch looks like a big improvement on the original farish cabfront. I didn't know that it was possible to use sketchup as drawings of etching. Can you post some details of how it's done using sketchup as I'd like to have ago at drawing parts to be etched.
-
I had another delivery from shapeways last week and a couple of the items were done as a test to see what small sized items would come out like. One was a class 04 tram engine printed in black detail and was T scale - 1:450
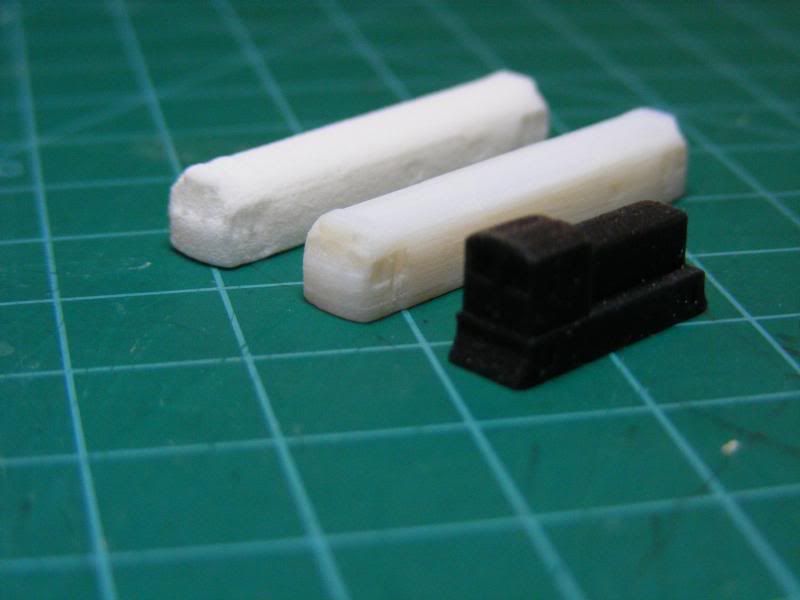
The second was a z gauge tram and a fruit van printed in the basic white strong and flexible material.
 .
.-
2
-
-
I've not done much modelling recently but in the last order from shapeways I got a 1/32 cab test printed to see if the size looked ok.
At the moment I'm still playing around trying to get the 7mm cab to line up exactly with the Steve Beattie body. I'm hoping the next print will be spot on then I can cast some in resin.
I also printed a class 20 cab and nose that I've drawn -only basic details and printed in oo gauge to see if it looks the same as a Bachmann 20.
-
2
-
-
A bit of an update.
I have cast a couple of cabs. I'm happy with the smoothness but no so happy about the detail/edge of the front widscreens.
I've not done anymore on the 7mm class 25/3 cab but hopefully I'll get time soon to resize and order another version (I'll also try to smooth the roof out as well).
-
Here is a link to another service provider that offer parts with the level of resolution you are lookin for:
And another one:
Have you tried Solidscape printers for making masters for brass castings, by the way?
Regards, HÃ¥vard H
The items on the website look good. Has anyone got a quote from either company?
-
Just to update the thread (I'm more than happy for this thread to be used for a discussion on 3D printing and posting examples).
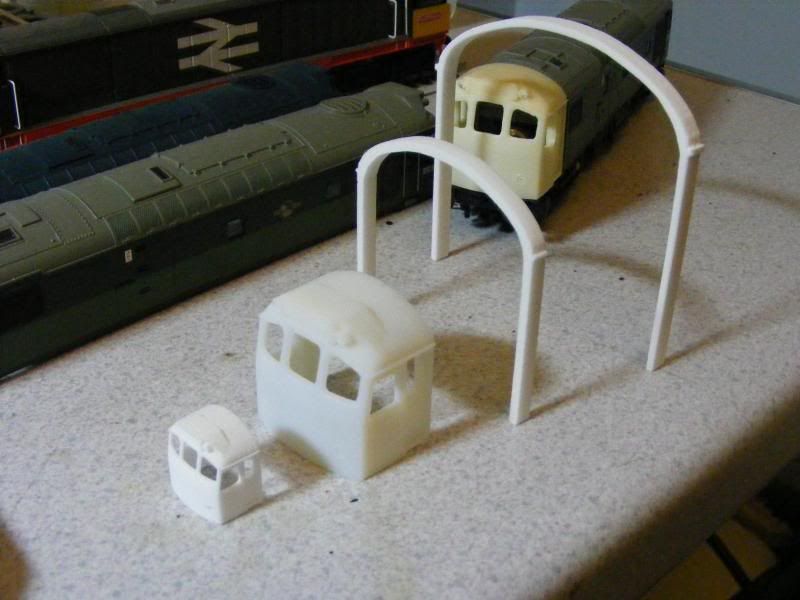
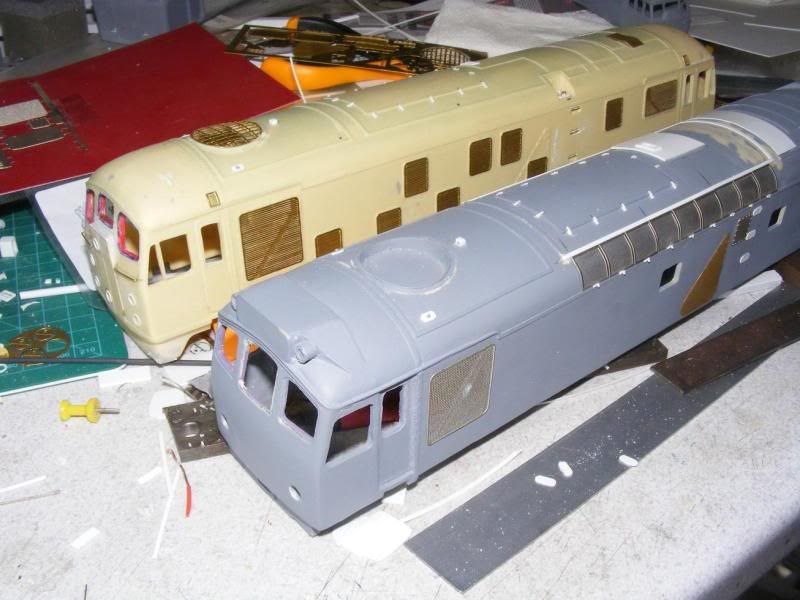
To see if the detail and overall finish improves with larger items I decided to get a 7mm class 25 cab printed. I also got a 2mm class 25 cab printed to see what detail would come out. I'm happy with the finish of the 7mm version as with a coat of paint and then a quick sand the results would be ok. The only downside is that the surface ridges have shown up more on the roof- down to the way I drew the roof originally.
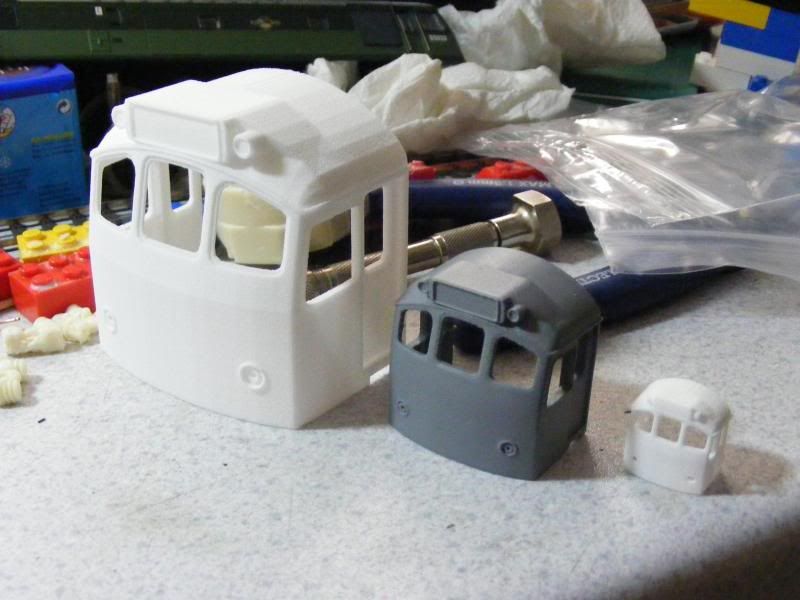
The 2mm version has printed ok with all the features visible except the raised surround to the headcode box. I don't think it would make a great model if you were to try and smooth the surface and try to replace farish cabs on a N gauge model. I have got another 2mm cab coming however as shapeways were at the time producing models made out of a different more expensive material (white detail as used on a couple of previous models)to a higher resolution than normal and as the 2mm cab didn't cost much I decided to order one to see what the resolution is like. I'll post a pick when it arrives.
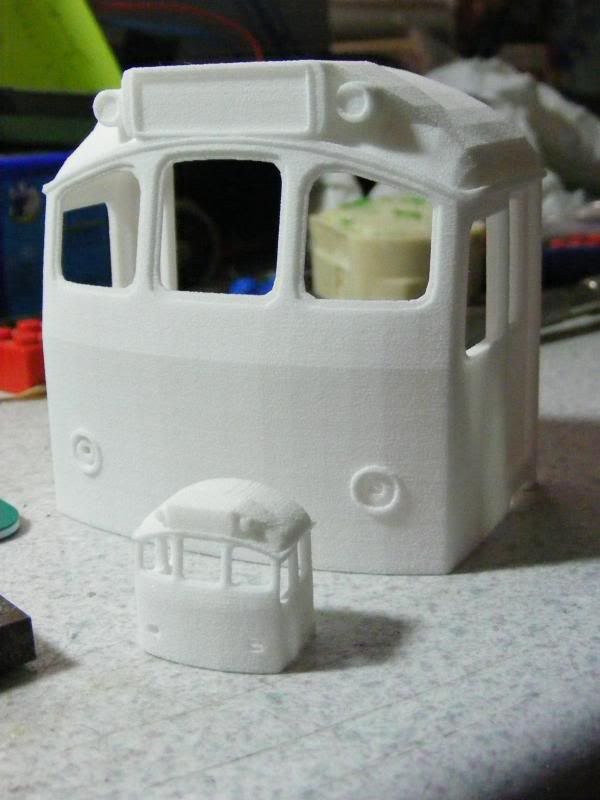
The only disappointment is that the 7mm model is slightly oversize (or at least is larger/wider than the Steve Beattie bodyshells I have)I will have to rescale the drawing and have another go. The 2mm version may also be the incorrect size but I don't have a N gauge 25 to compare it to.
-
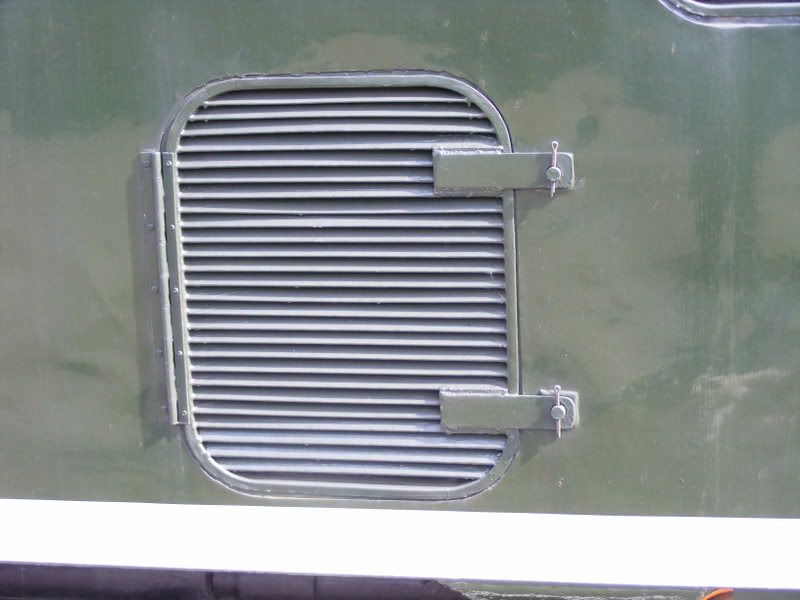
That part looks great. Would the cost come down if the part was thinner? Do you think it could be used to make class 25 bodyside grill in o gauge or 1/32 as a master for resin casting?
-
The shape looks good but the tail light castings look poor.
-
What about purchasing a pair of resin class 40 cabs from MMP and using them. Not sure if the shape spot on but as they are resin you could easily modify them.
Simon.
-
Got the most recent print from shapeways.
The first part is a complete class 24 bogie in 7mm printed in 'black strong and flexible'. I'm happy with the detail and that the steps and pipe run have printed OK There is only a couple of bits of brake rigging that I would need to add before using it (possibly also a couple of coats of paint to smooth the surface).
Below I have put it under a class 24 shell (without wheels).
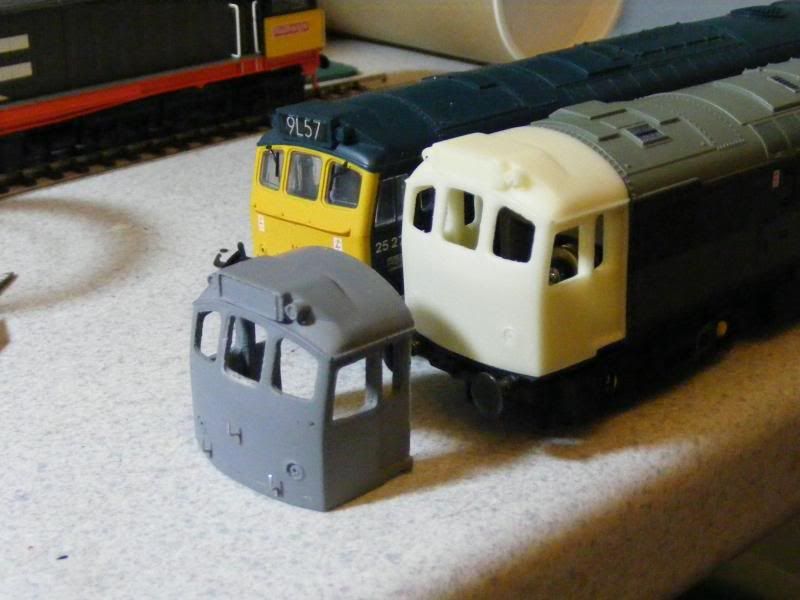
I also has a 4mm class 24 and 25 printed in different materials to see how the tail light detail would show up. The camera doesn't show the detail very well so I've given the 24 cab a coat of primer to see if it helps.
I also quickly blu tacked the cabs on to see how they lined upto a Bachmann and Hornby 25 bodies.
-
Just ordered a couple more parts from shapeways.
I also had a quote back from Fineline and the price for a 4mm 25.3 cab was £150 in total. So I'll stick with shapeways at least until I've got the cab shape correct.
-
A quick update on the class 25 parts.
I tried a print of the complete bogie but after ordering it I wasw told that it was not possible to print it due to the minimum wall thickness of some of the parts of the bogie. I have made a couple of changes and will try again when I next order.
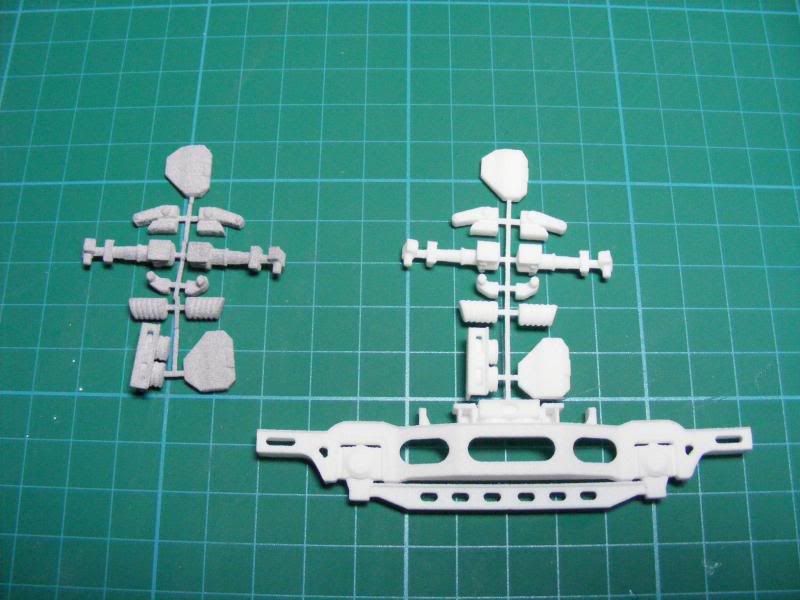
I did manage to get 2 other bogie parts printed. On the left is the components for the 24 bogie seperated and put onto a spur (to keep them together when being printed and to test how thin a part can be). It is printed in a material called Alumide which was ment to be smoother than 'white strong and flexible' (used on the part to the right which is the same except it has a bogie attached). I might try to make a resin casting of the bogie sideframe and then purchase sets of the detail parts to make a bogie for the Steve Beattie 24 shells I have.
Below is the latest 4mm class 25 cab printed in Alumide. I tried this new material because it was ment to have a smoother surface finish but looking at it I think it is worse than white strong and flexible material. I also think that it must shrink at some point as the cab is smaller than previous cabs even though it was ment to be 1mm wider so it would match the Bachmann body. I have also added the horn grill covers near the headcode box and the lip around the headcode glass.
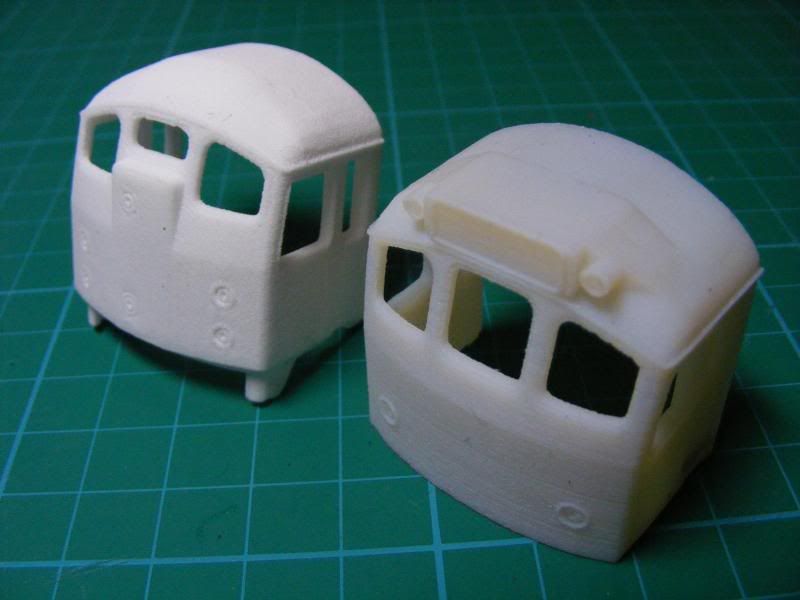
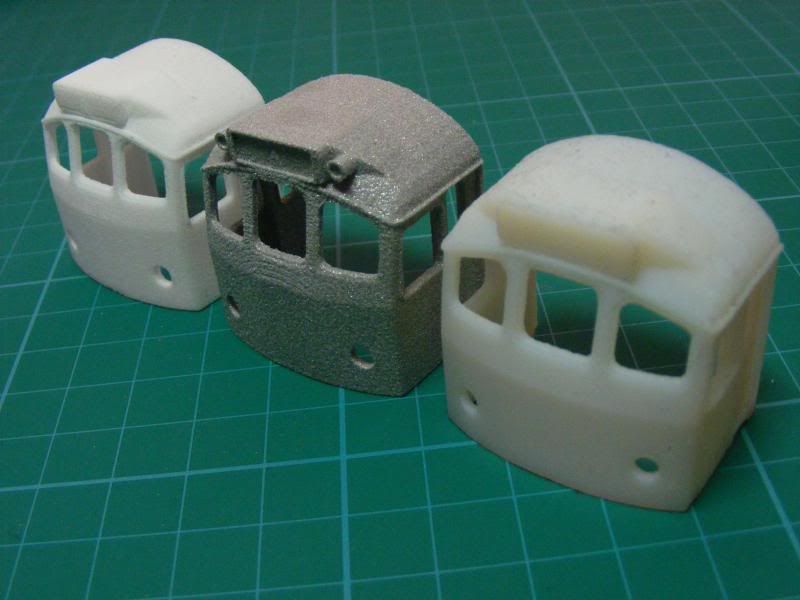
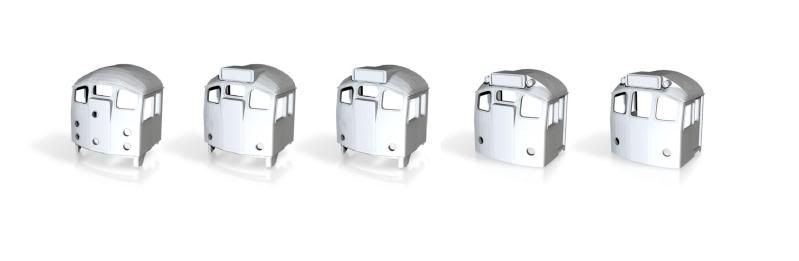
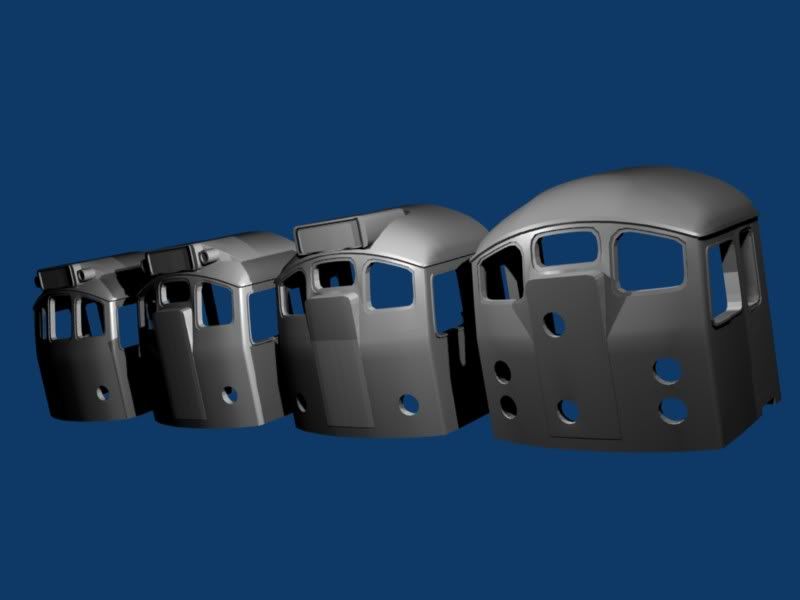
Below is a pic of 3 different cabs made from 3 different materials. I have to say that I think the smoothest is 'white detail' (right in pic) but hte only problen is this material doesn't show the fine surface detail.
I have already made some changes to the cabs above to produce V4. This will have the tail lights included and should hopefully fit the Bachmann shell perfectly. I will also get a 24 cab printed in 4mm and a 7mm cab profile (to see how it matches upto a Steve Beattie shell).

-
Finished a basic model for each of the cab types and have ordered some more test parts from shapeways (mostly bogie parts) but will post results when they arrive.
-
1
-
-
Done a bit more work on the class 24 cab.
Here's a pic of work in progress.
-
2
-
-
Quick update-
I've not ordered anymore prints yet. I've looked at the fineline site and tried a quote and got a message that they're not taking on new customers from the UK but got directed to a UK company that works with fineline so I'll have to speak to them when I get time.
I have also modified the basic cab to produce a class 25/1, 24/1 and 24/0 (although the 24's are not finished yet and still need the bufferbeam skirt/valance adding).
I have also made a class 40 bogie sideframe that I can hopefully use with a brass body purchased from ebay and a pair of MMP resin cabs.
-
2
-
-
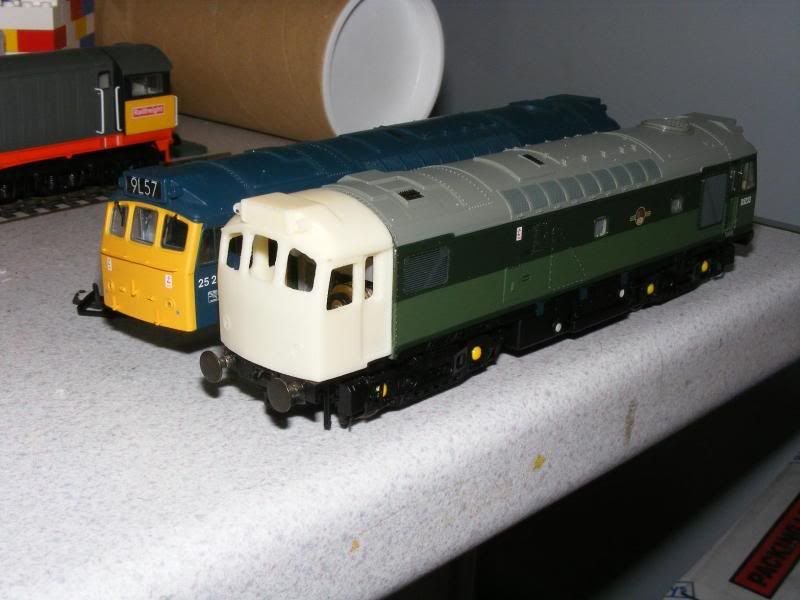
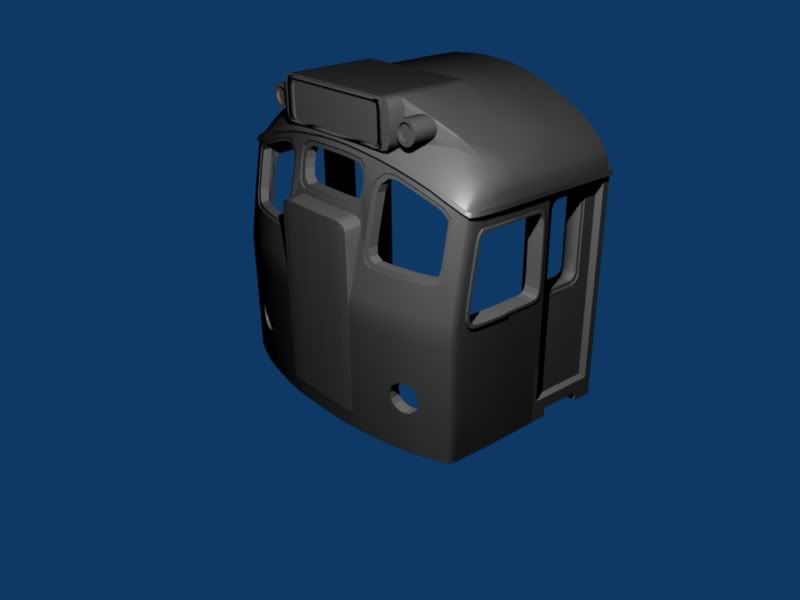
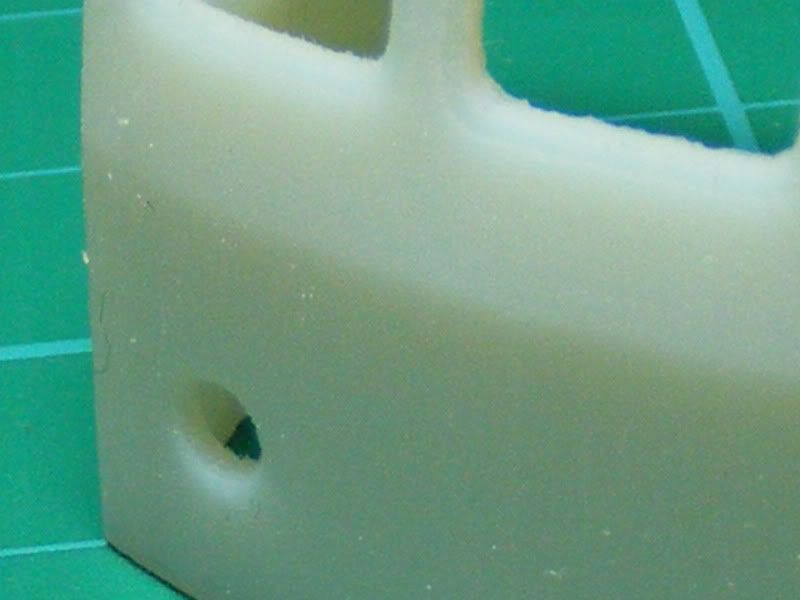
I have given the cab a coat of paint and a sand and it does look better (I only sanded the lower cab front so that the original finish can be seen on the windows and roof). Another sand and paint and I think it would be ok. the other option would be to make a resin copy of it, sand detail and paint that and then use that as a master for some 25 cabs.
-
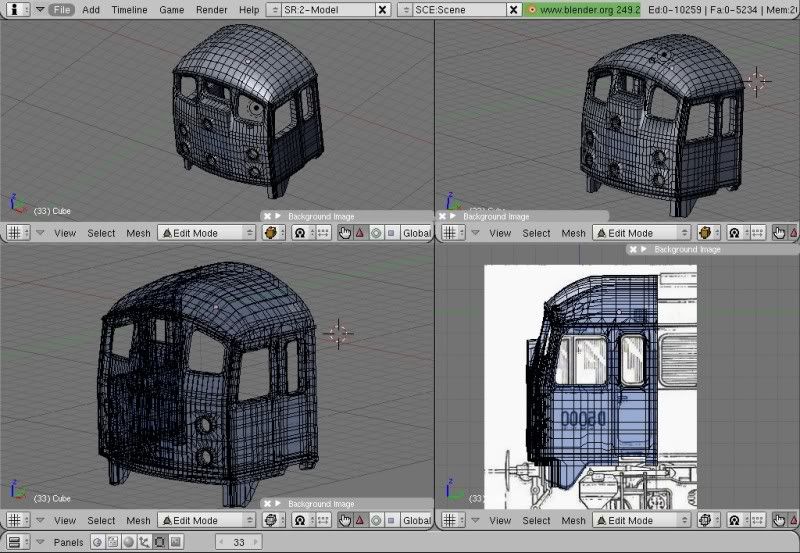
I'm very intrigued by this. What CAD software did you use by the way?
I use a program called Blender. The reason I chose it was because it was free. It's not too hard to master and the best way is to watch tutorials on youtube. Then start off with something simple like a loco roof or part of a car. The most important thing is to get some good drawings of the prototype (Side, end and roof) to work from. I got the drawings for the bogies from the National Rail Museum archive when I visited the museum last year.
-
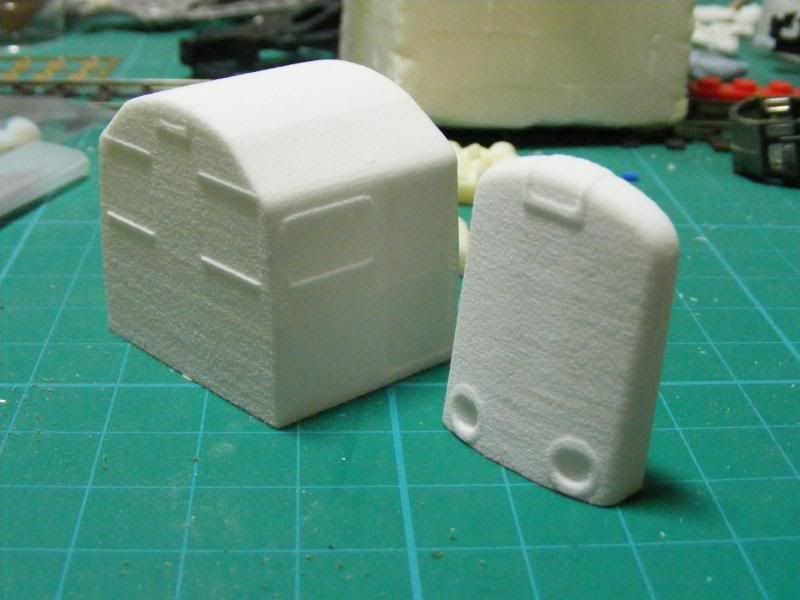
Are these castings, or are they built up in very thin layers as a sort of 3D printing? The complex shapes come out well. The surface finish looks a bit rough, but that should be fairly easy to fettle up with a bit of fine wet and dry paper. I'd certainly be interested to learn more about the process, including practical aspects like costs.
They are 3D printed in layers. For information about the process-shapeways.com
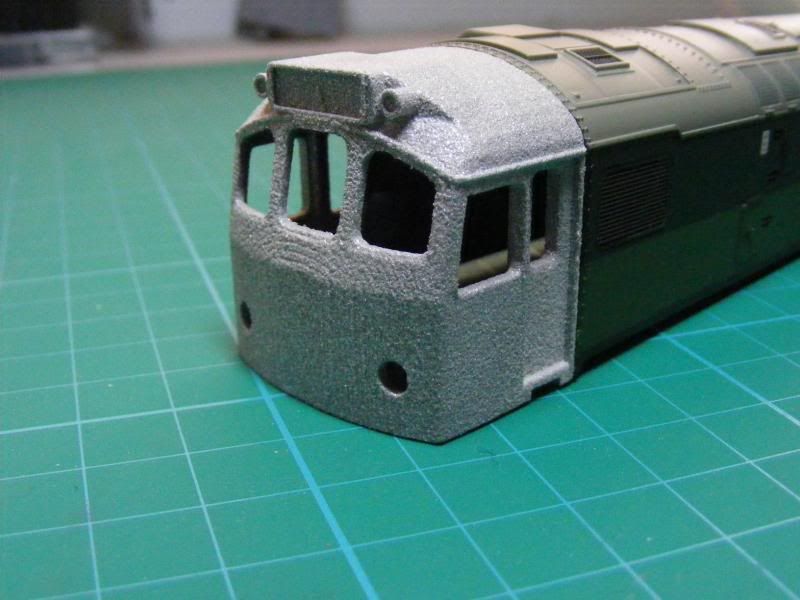
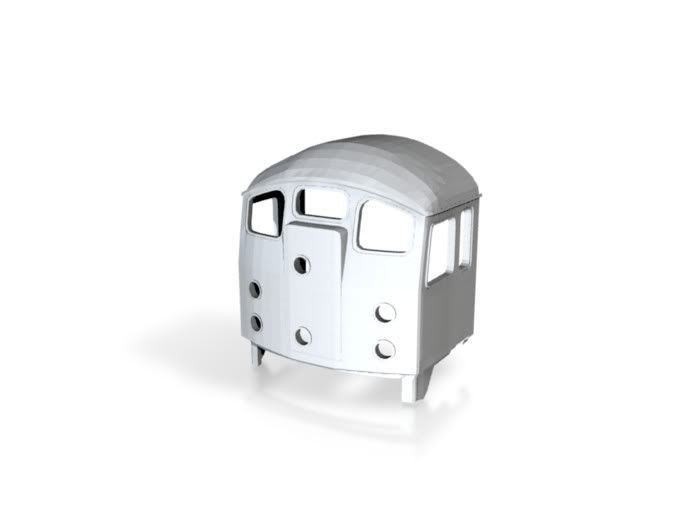
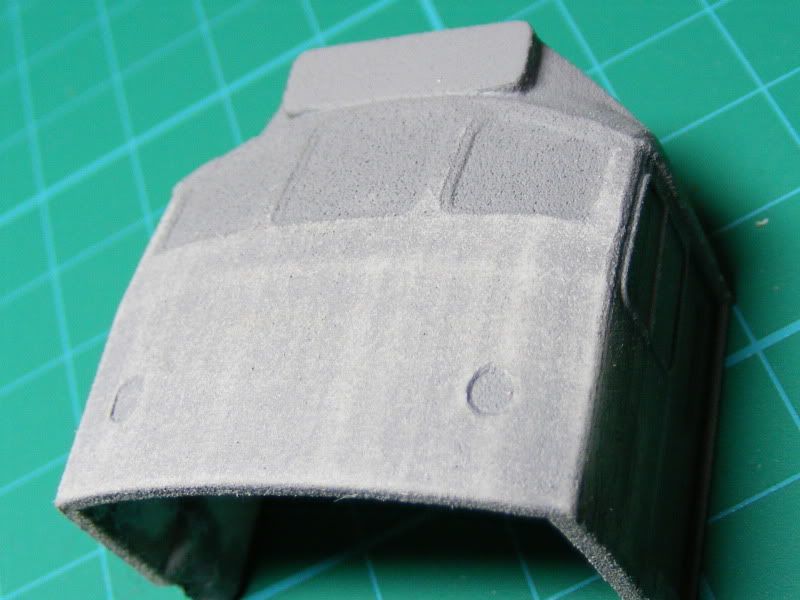
The surface finish seems to be the biggest problem with the process. In the pic below you can really see the layered effect.
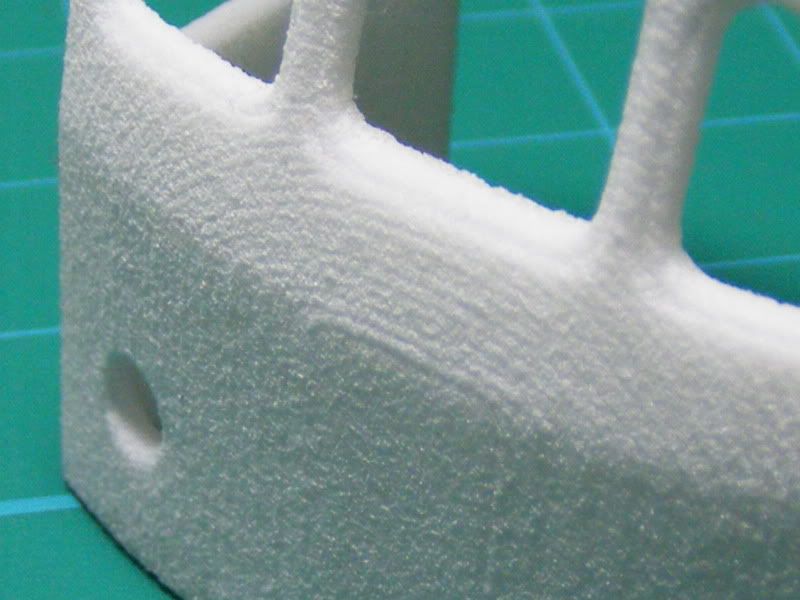
One of the other material does give a smoother finish but the detail level and minimum thickness of the material isn't as good.
From a quick test I think it will be hard to smooth the material evenly, If the weather is ok later in the week I might try to paint a cab to see what the finish is like and then possibly try to sand and paint again afterwards.
A couple of problems with the proces i have found so far is that each material has a minimum wall thickness. white strong and flexible can be used to produce the thinest walls (0.7mm)but it is also has a rough surface finish. But even using white strong and flexible some details didn't come out- The first cab had a surround to the tail lights but when printed it didn't show up very well. It was hard when drawing the bogie to make sure all the shapes involved had a 1mm thickness in all directions. I was planning to model the pipe that runs along the side of the bogie but it would have needed to be to overscale to be able to print it and had the same problem with the brake rodding/equipment.
The costs are worked out with a set price per cm3 so the bigger the volume the more expensive it is (volume of the model not the dimensions of the model). The materials have different prices from 90p per cm3 (white strong and flexible) upto ??6.20 per cm3(for metal).
The cabs cost roughly ??15.
-
Interesting stuff, may I ask who's kits are the 7mm class 25's in the background of the pics do you have any plans to actually produce 7mm parts to sell ?
Cheers
Phill
The 7mm class 24s and 25s in the background are Steve Beattie resin shells purchased from ebay.
I have got 8 bodies, some etched grills and some bogie castings. The quality of the steve beattie bogie detail castings are not too good so I might try to produce some resin castings (if I did I would need to get another sideframe printed with the details not attached to alow it to be cast). I would also like to try a class 25/3 cab in 7mm as the 25/3 in the picture is a modified 25/1 shell and I'm not happy with the windows.
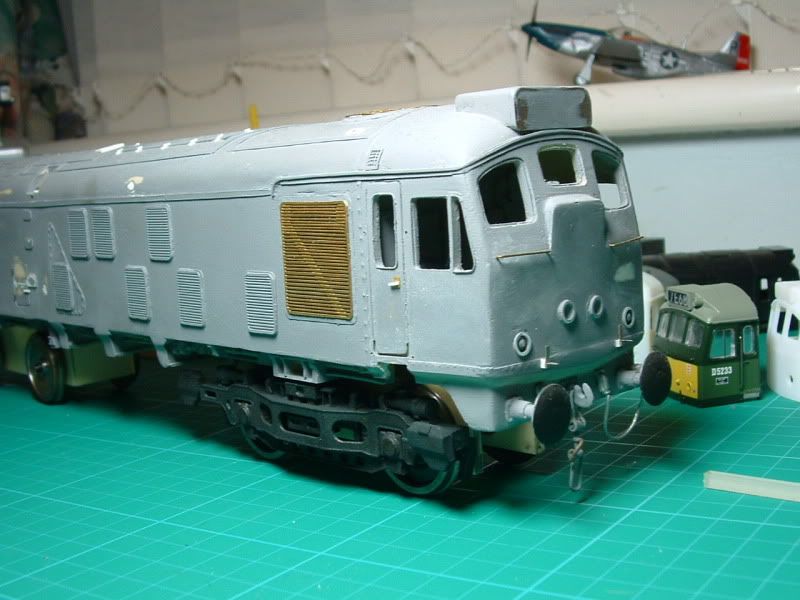
The pic below shows a test of a 7mm cab profile printed in clear material to see how well it matches the Steve Beattie body.
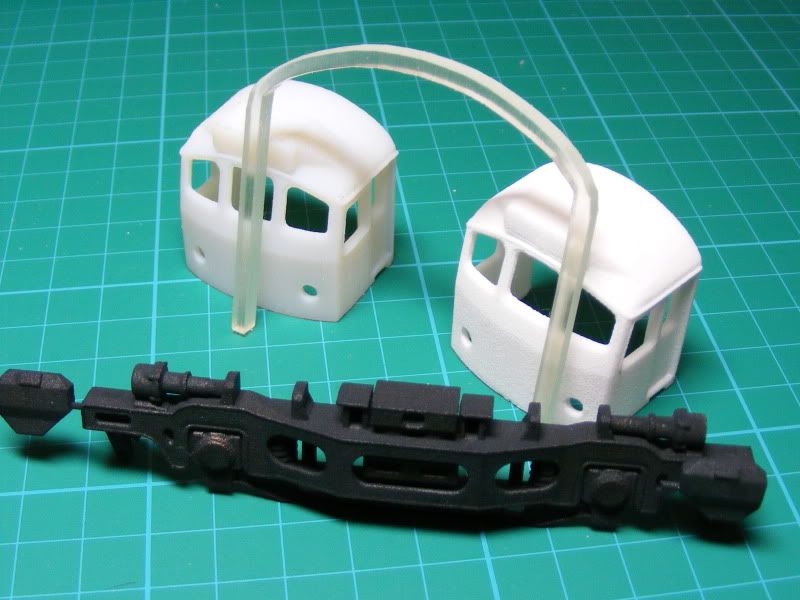
There are 4 different materials used in the pic above-
Right cab - white strong and flexible
Left cab - white detail
Bogie - Black strong and flexible
7mm cab profile- Transparent detail
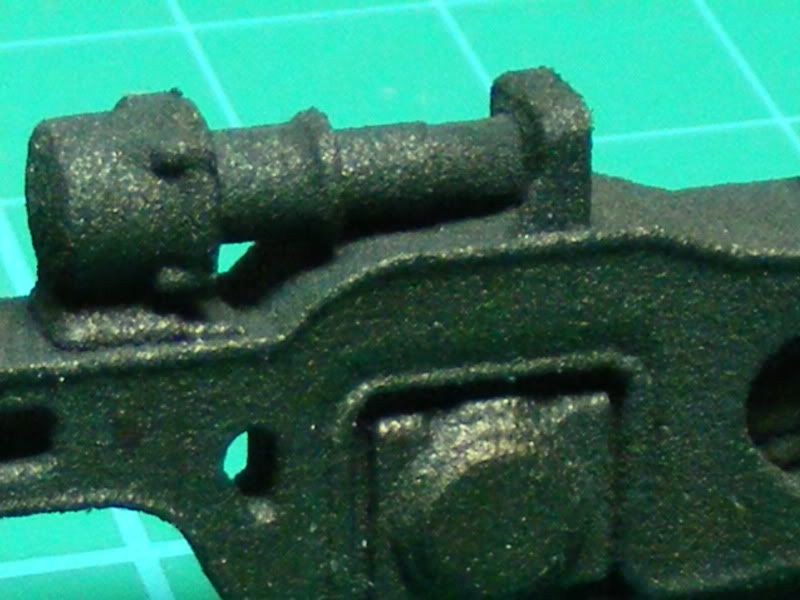
The pic above is a close up of the 7mm bogie to show the roughness of the surface. Looking at it in the flesh I would say it is fine for a bogie and the black material it was printed in gives it an almost dirty/oily finish and could be fitted to a model without painting. The cost of the sideframe in the black material was ??15.
-
2
-


How realistic are your models? Photo challenge.
in Modelling musings & miscellany
Posted
Thats a great shot. How did you get the smoke/haze around the lights?