


simon br blue
-
Posts
386 -
Joined
-
Last visited
Content Type
Profiles
Forums
Blogs
Gallery
Events
Exhibition Layout Details
Store
Posts posted by simon br blue
-
-
Lovely shot, that's how I remember 08s... Interesting to see a green air brake only conversion; when did these start?
Bill
Looking at the photo the pipe looks to be a vac pipe making it vacuum only. Still a good photo.
-
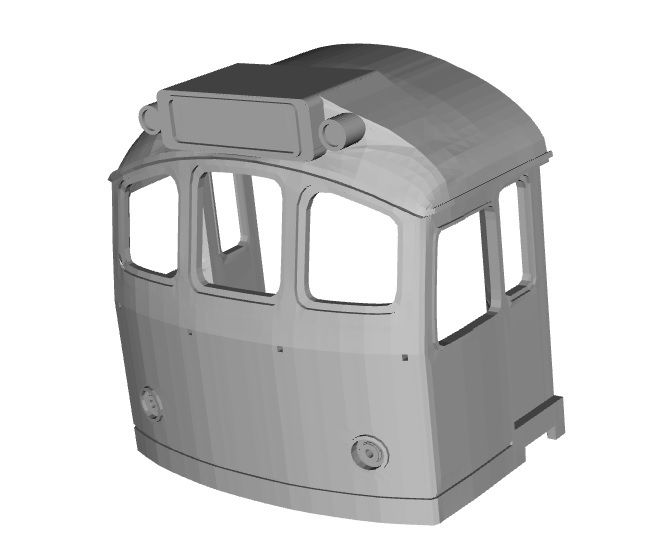
The original cab was drawn using the drawings but the most recent mods were done using a front on photo as nearly every set of 25 drawings seem to be different - probably why Bachman got the original 25 the wrong in the first place.
-
 1
1
-
-
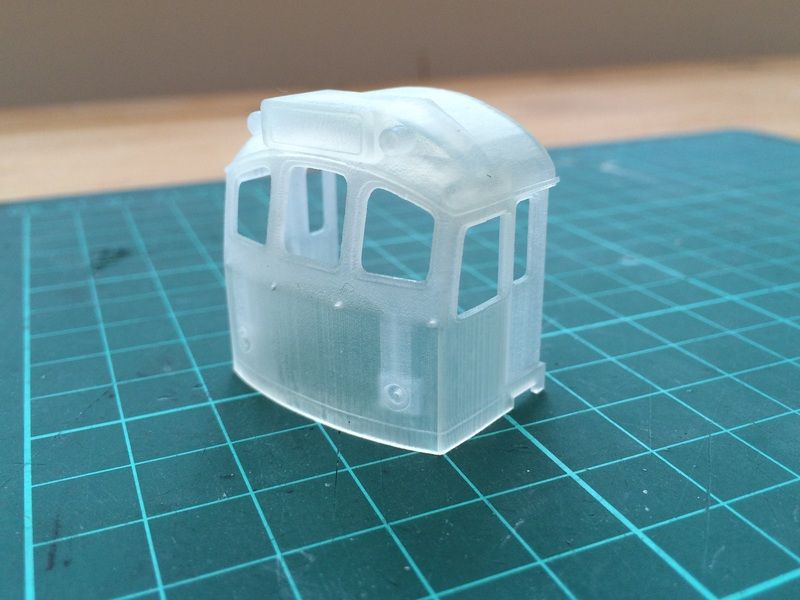
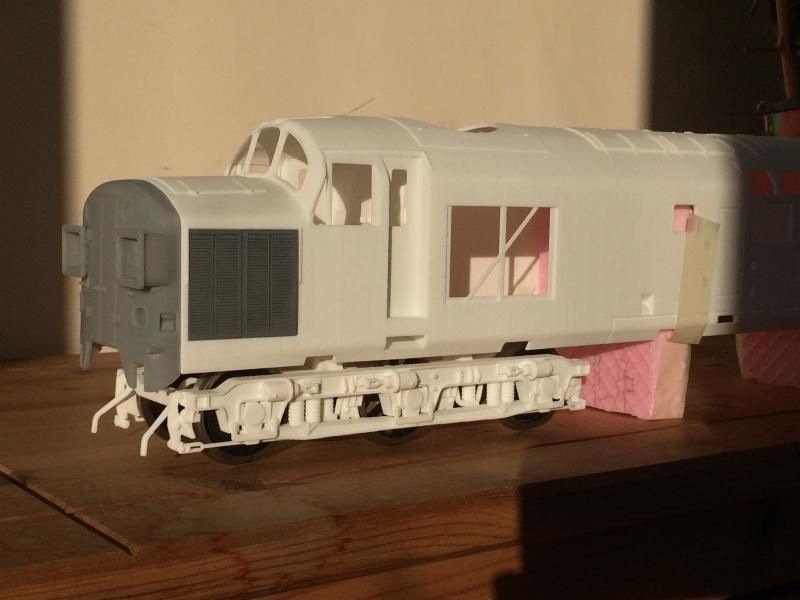
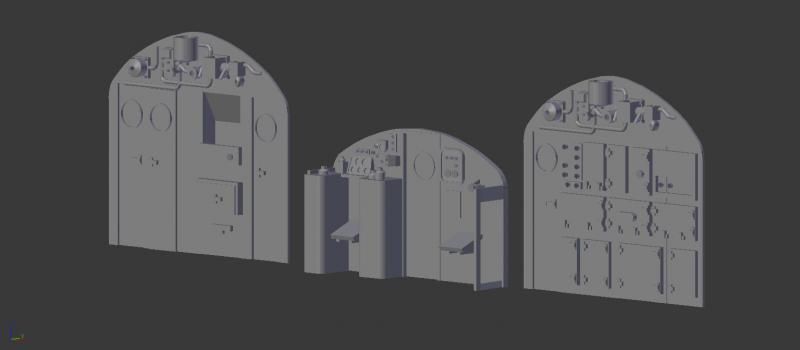
Got a delivery from Shapeways with some more parts including the new version of a 4mm 25/3 cab printed in FXD. I'll post some pics to compare it with the old shell when I've cleaned it and primed it.
Simon.
-
5
-
-
Arrghh! I'm so sorry to say this because I so wanted to be over the moon with the 3d cabs but there's something not right going on there. The height from the bottom of the windows to the bottom of the cab looks too high to me, and the cab roof profile doesn't look right to my eyes either I'm afraid, if anything I think the curve is too pronounced now. I think the cabs are definitely too deep, looking at where the seem is the proportion of the cab looks better. You did a good job grafting them on and it's a bit better than the Bachmann, but there's still some work to do on those prints I think. Compared to the Bachmann you can see the buffers are now too low, which indicates the cab is too long, and could the indicator box be a little too shallow too?
Always useful to get constructive feedback. I had some spare time tonight and I've modified the 25.3 cab a bit - deepened the front windows slightly and raised the base a little, also reworked the headcode box a bit. Picture of the cab below. What do you think?
Regards
Simon.
-
As shapeways have 15% off I placed an order today for a couple of things.
I've ordered another class 37 bogie and cab interior.
Also ordered a Redland PHA end wagon.
And also ordered a class 37 fuel/water tank set.
-
3
-
-
Good to see the 25's coming along Rob, sorry I thought I'd put some centre lamp irons in with the cabs.
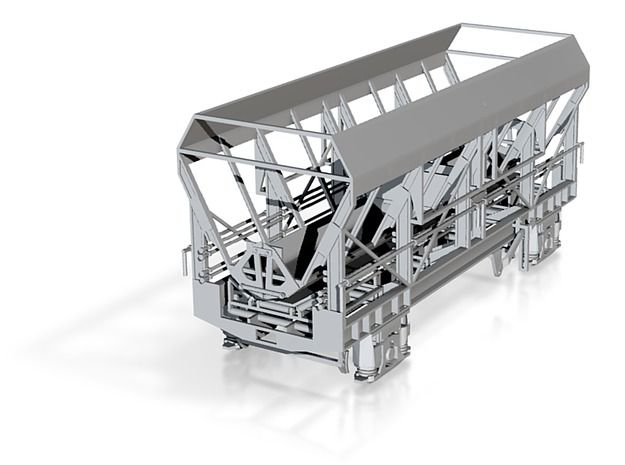
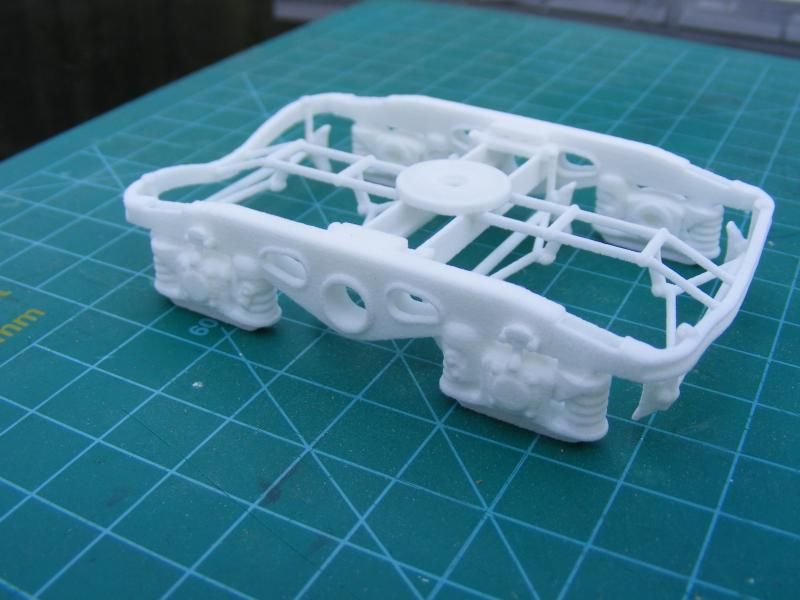
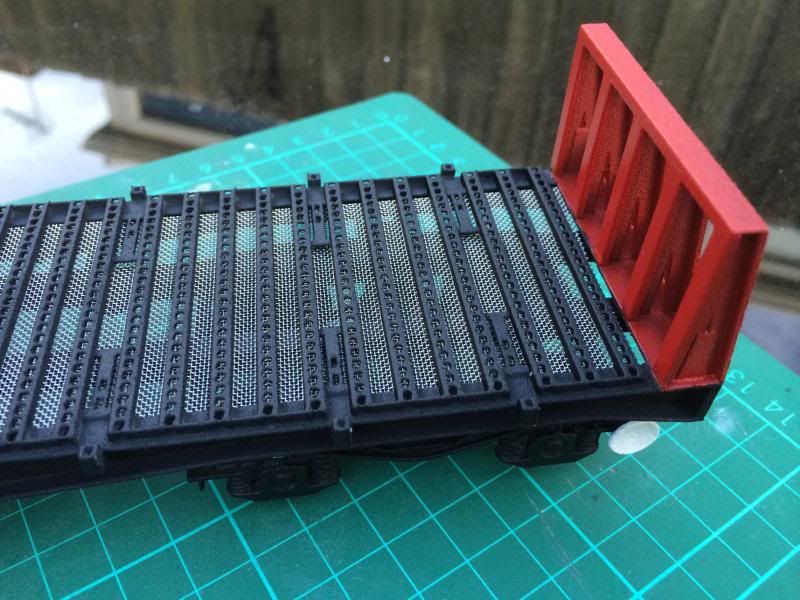
Got another delivery from Shapeways on Friday. This was placed at Christmas when Shapeways had 20 off WSF, sadly A couple one wagon chassis was damaged and part of the 7mm BBA went missing but as usual shapeways customer service is sorting it.
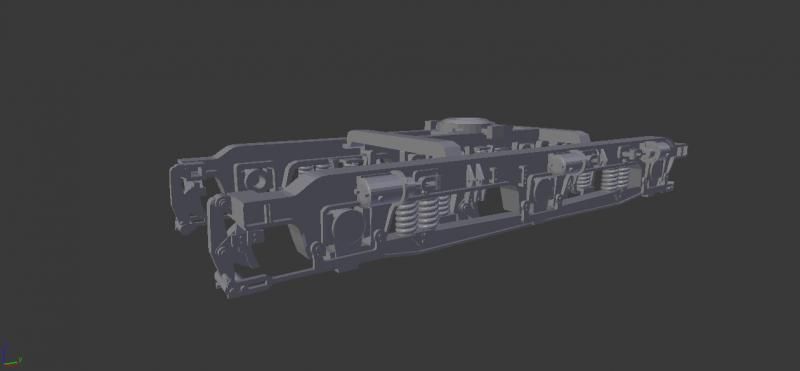
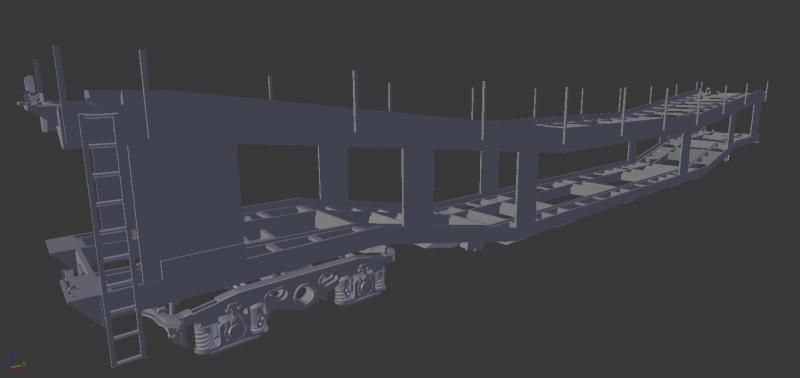
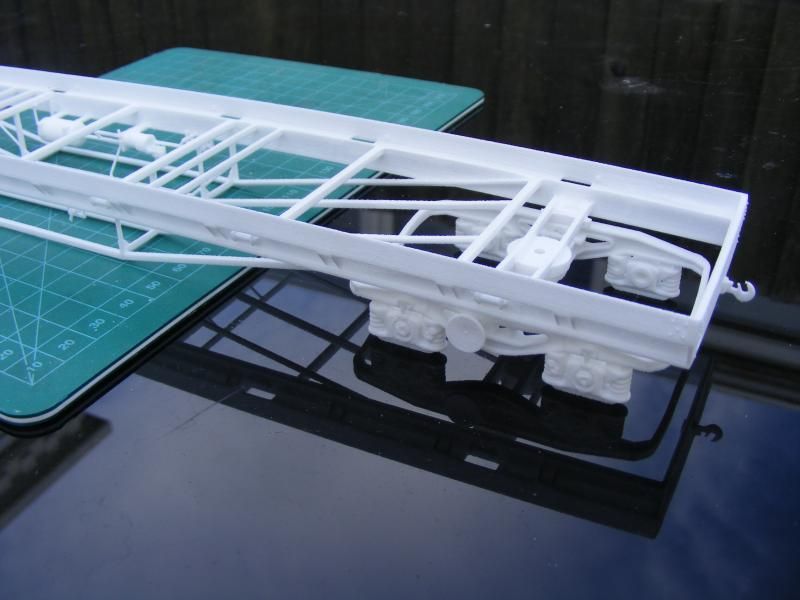
One of the items was a class 37 bogie and a separate inner chassis. Picture below shows it under the 37 fitted with an odd collection of wheels I had to hand. It looks OK and will need separate cab steps adding, there is also a clearance issue between the wheels and the end frame but then version one normally requires some work. Also printed was a bogie mount that fits to the bottom of the door frame and also helps to position the cab interior.
-
8
-
-
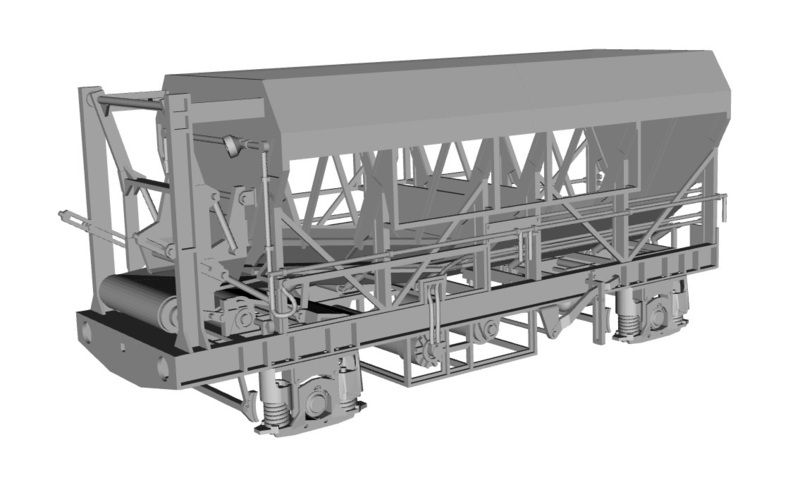
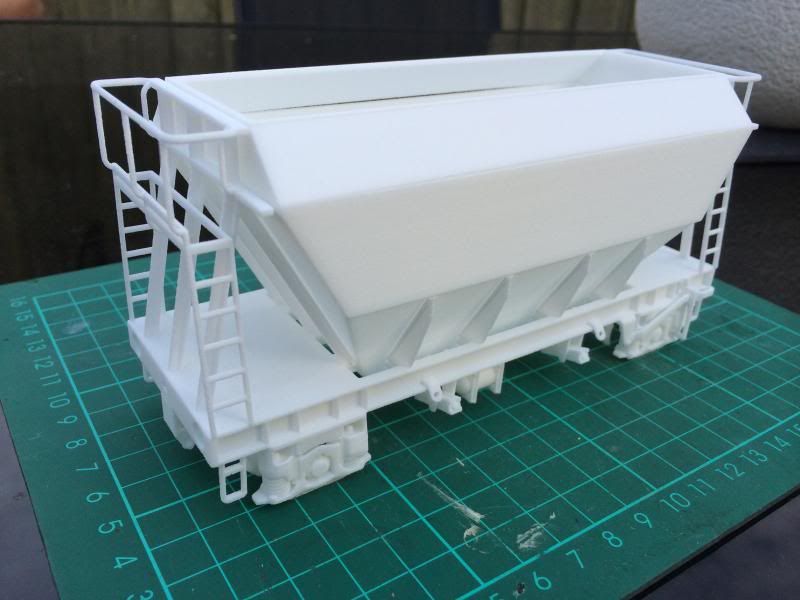
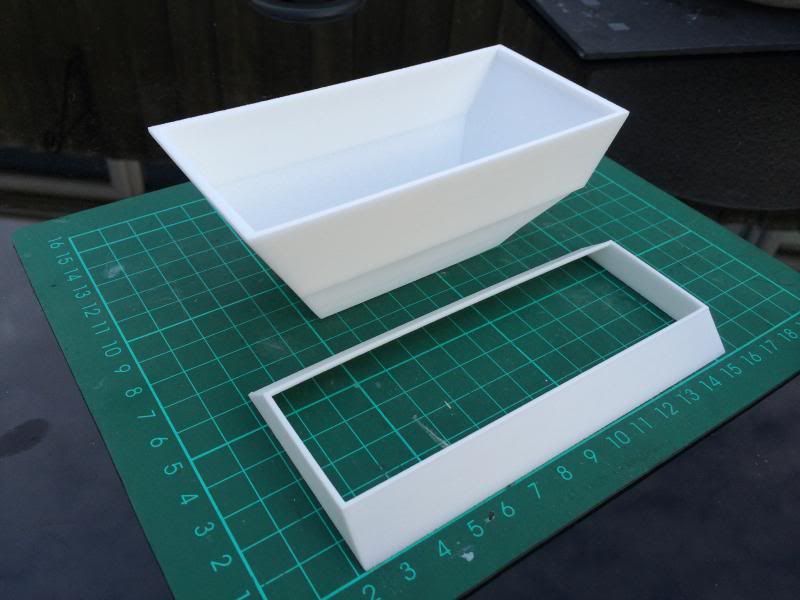
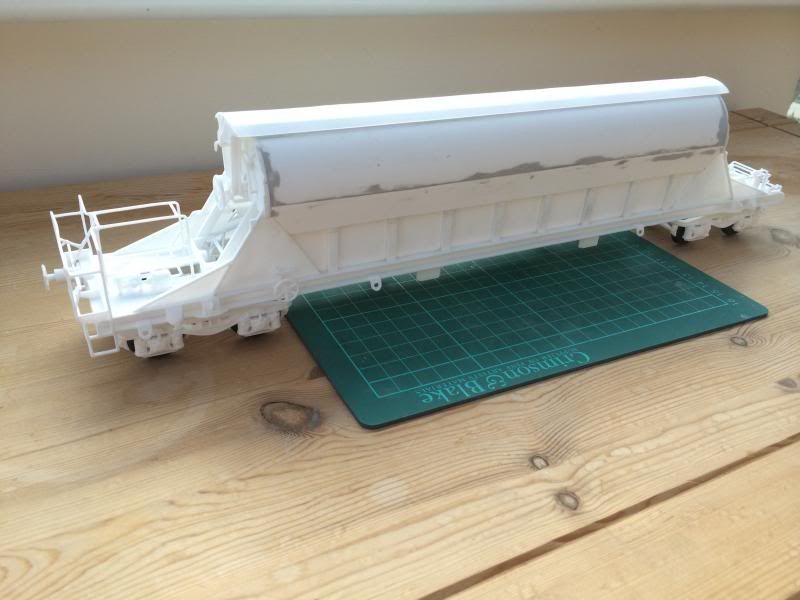
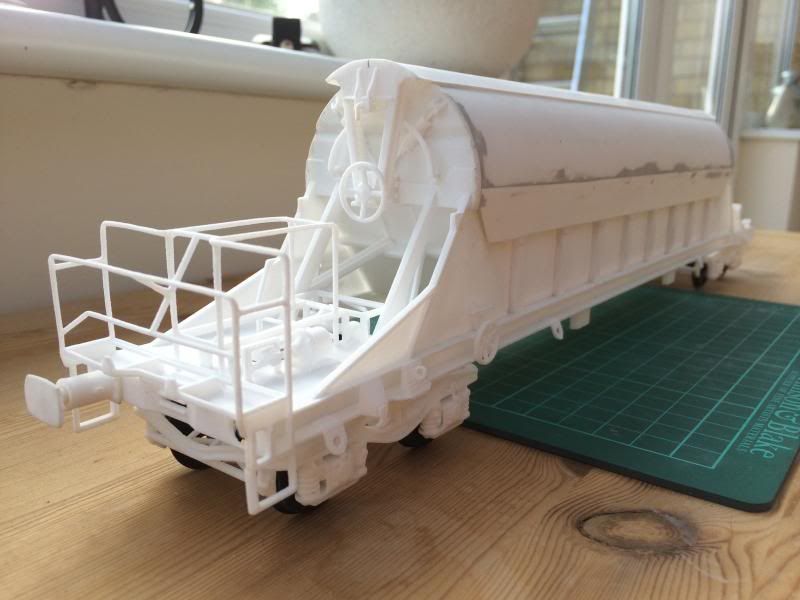
I have done a bit more on the PHA wagons.
Nearly finished both the motor wagon and the rake end wagons to go with the middle wagon.
Pictures below of the 2 new wagons.
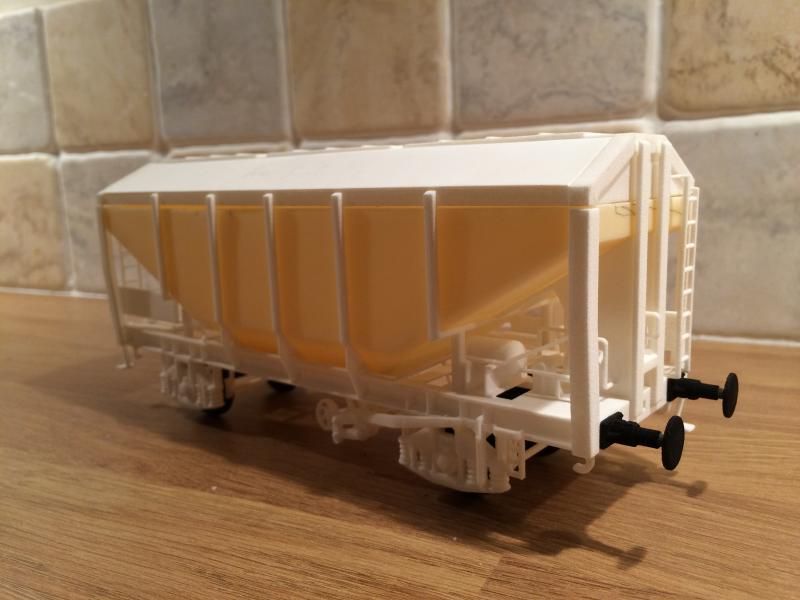
I did have a look at prices for 4mm versions. These would need to be printed in FUD (and would probably need some small modifications to make them less fragile). The prices are cheaper than I thought they'd be, they would be roughly £35 per hopper wagon and the parts for the conveyor wagon would be about £70 (+ a Hornby KFA wagon).
As for the 7mm version I would like to get the already printed hopper sorted before printing more wagons to make up a set (probably a 5 wagon set as would cost be a bit much to print a 10 rake in one go).
Rob good to see you've made a start on the 25 cabs, I was hoping to get some work done on mine over Christmas but didn't in the end.
-
Looks good. I think the reason why the wagons look tall is that from side on or at rail level the discharge doors were visible below sole bar level making the wagon look taller. Would it be easy to resize the hopper up to 7mm?
Are all the parts cut out individually or is it done as a net to be folded up?
Simon.
-
With a spot of gentle sanding, the 37 body is going to look great! I'm also impressed with the finish of the Materialise Prime Grey - is it much more expensive than Shapeways WSF?
The surface finish of Prime Grey is better but it works out about 50-100% more depending on the shape and size of the model.
That PHA looks the business Simon.
I do hope you are considering a 4mm version, be nice to have 20 or so wagons and recreate the Lafarge self discharge train...minus the clever wagon that discharges to the rail side.
Nick
I could easily resize the PHA and Conveyor wagon to 4mm but it wouldn't be cheap as it would need printing in FUD. I'll have a look at the costs and upload a test.
I did manage to get another couple of items ordered in the Shapeways 20% off Christmas sale, included in the order was a class 37 bogie and cab interior to go with the 37 shell.
-
1
-
-
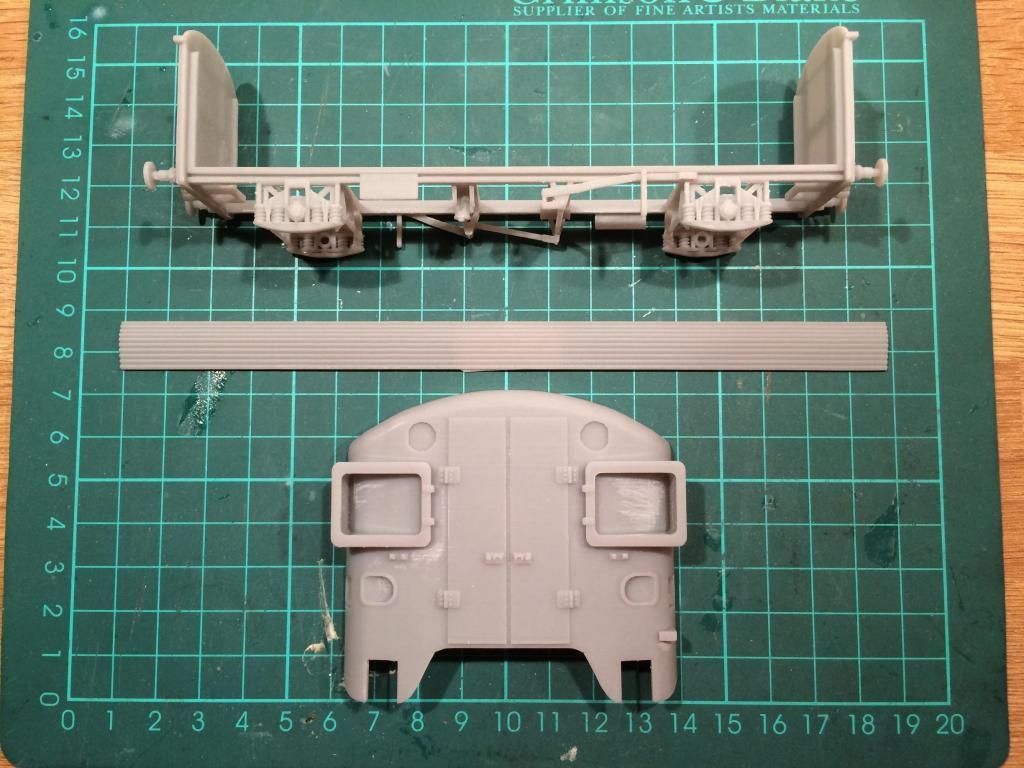
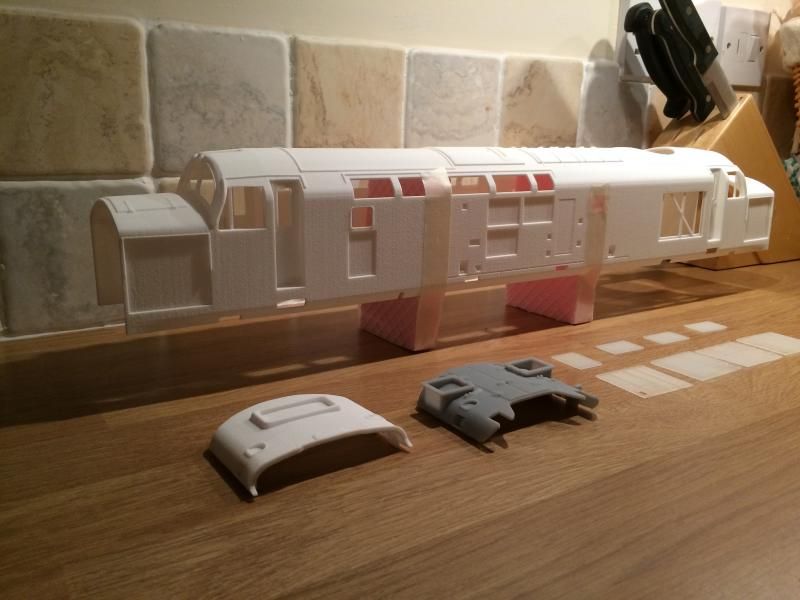
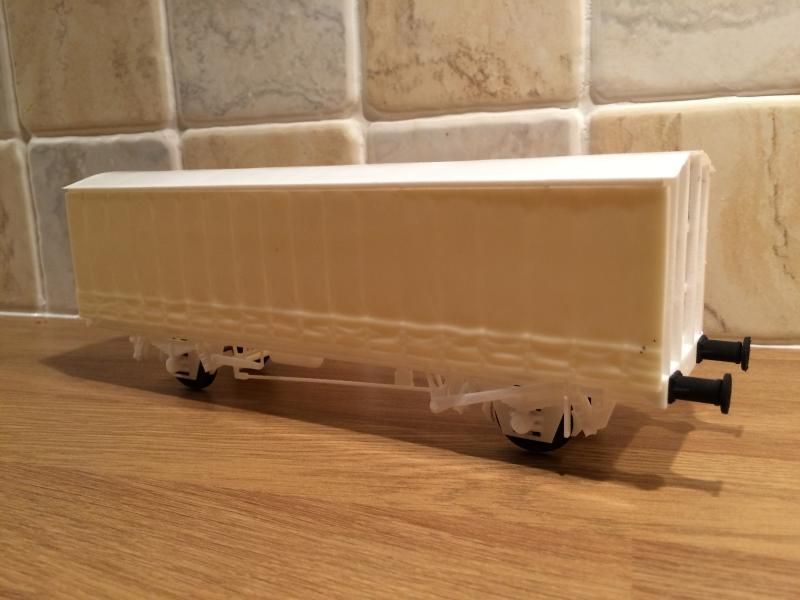
My order turned up yesterday from the 20% off black Friday sale and the Imaterialise free shipping offer.
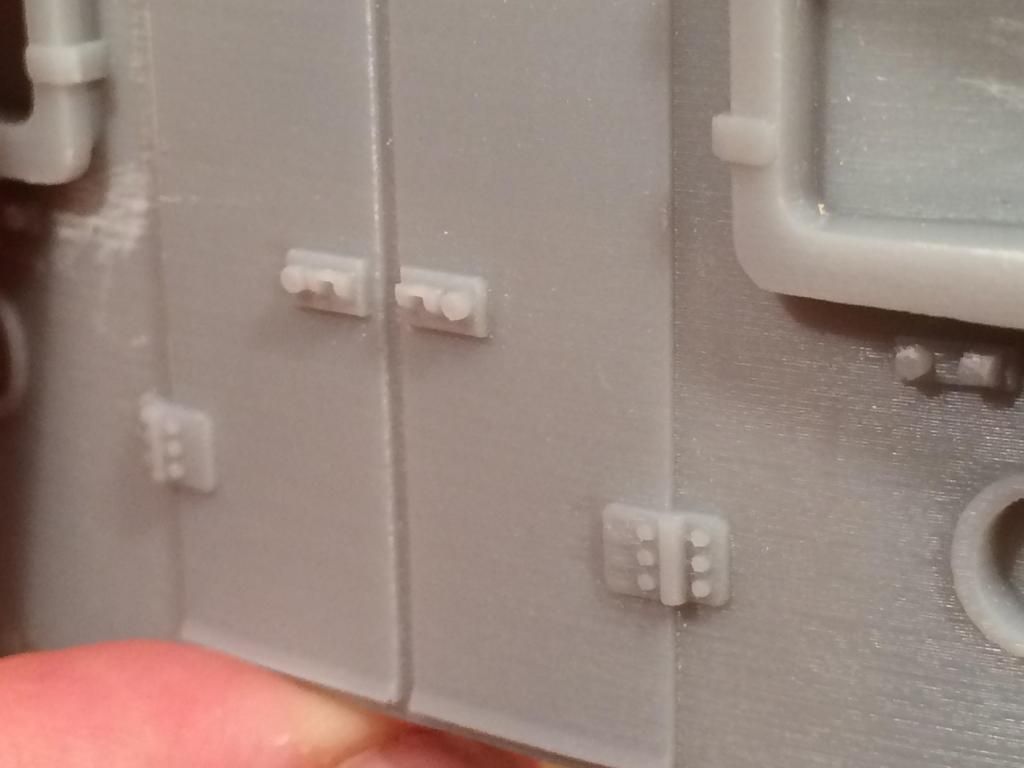
Firstly the Imaterialise order. as they had free shipping I went for 3 items (all in prime grey) - A 4mm Campbell's soup chassis and a class 37 nose and cantrail grill.
The wagon has turned out well and has crisper detail than WSF but I had to thicken up a couple of parts for it to be printable, one problem that I've got to chase up with them is the part of the chassis looks like its got glue on it. The 37 nose looks good with some nice detail on hinges. As with all prime grey it will need some cleaning up to remove the remnants of the support structure from printing.
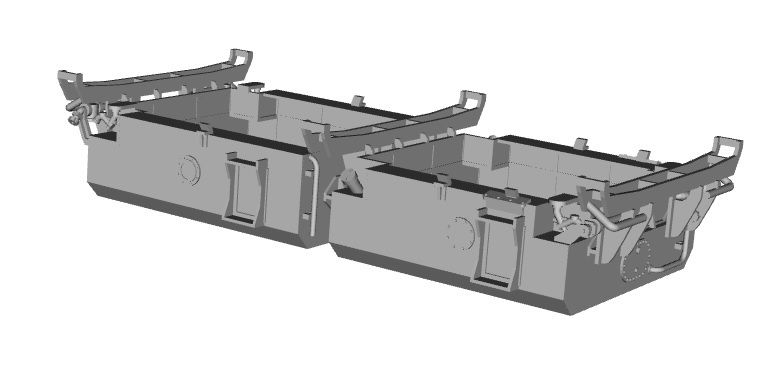
Next the shapeways order, a couple of wagons - another Grainflow PAA and a Redland PHA. The PHA looks good and now needs some Plasticard adding to make the hopper body - then I'll need to find a way of making a flexible belt to connect between wagons (after buying at least one more wagon to connect to). If I can get an end wagon or motor wagon finished before the 23rd I'll get one ordered.
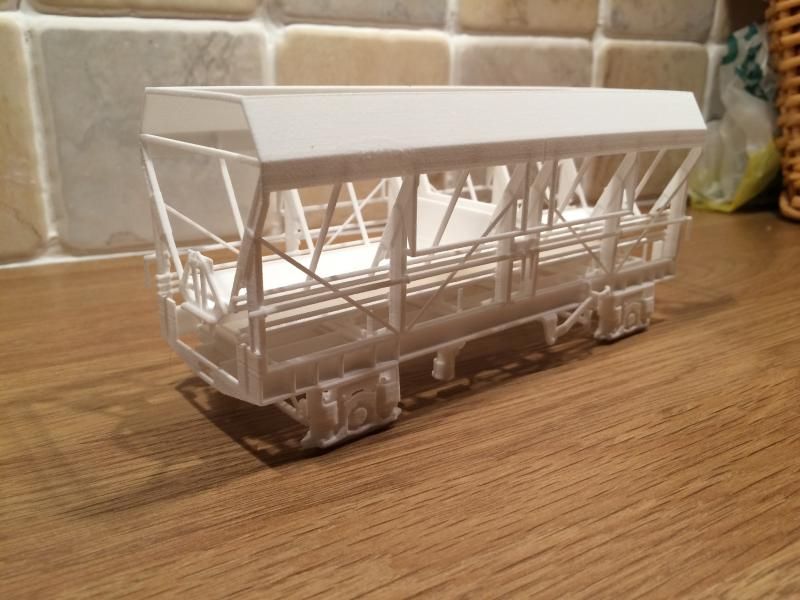
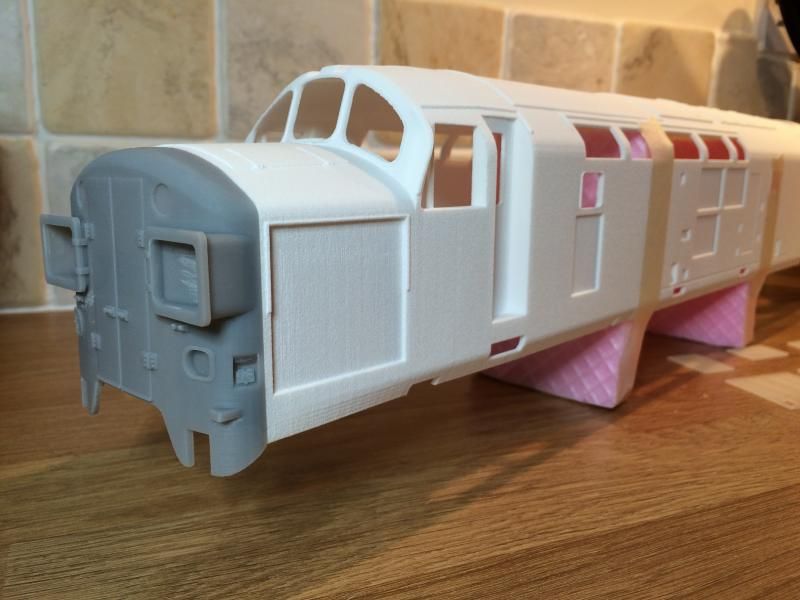
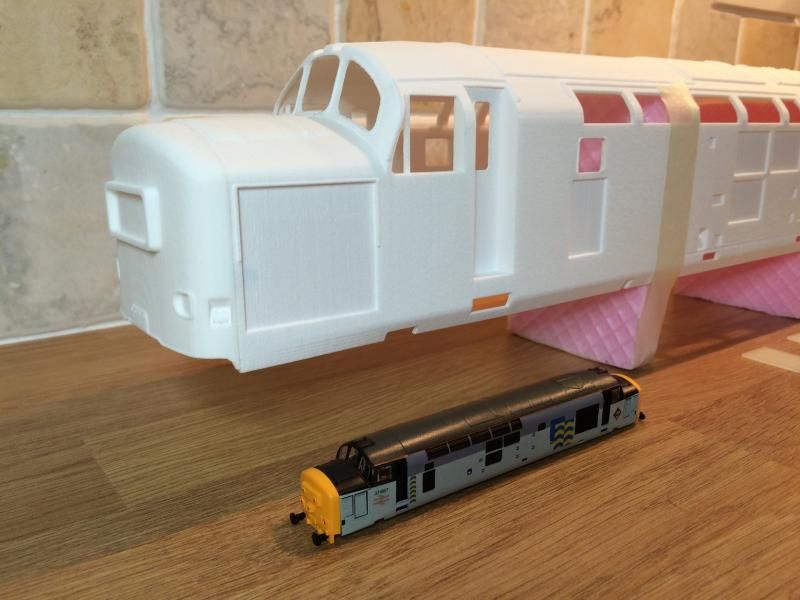
Now for the main part of the order. The order from Imaterialise had a large class 37 nose and the nose fits onto a 1/32 scale class 37 body. One of the benefits of shapeways price change is that some of the larger, open but not delicate or thin models are now cheaper such as a large loco body and with 20% off it would have been rude not to get something ordered. As with the previously printed class 20 the shell is quite basic with openings left to fit finer details in such as the grills. The cantrail grills are prime grey and the bodyside and nose end grills are FUD as I think WSF wouldn't give great definition of the finer grills. I also got a basic centre headcode nose printed at the same time.
On the list to get draw before the 23rd is also a set of bufferbeams, a pair of bogies and a fuel tank frame.
-
7
-
-
Would autoballasters be possible in 7mm? I'm likening the wagons, shame I can't get my grubby hands on them

An autoballaster would be possible if there were any accurate drawings available - using the same method as the Polybulk sides to reduce cost but at a guess they would cost about £120 each to print. If you want any 7mm wagons let me know and I can make them available on Shapeways.
I would also like a 7mm class kit 68 please and some delners for a body snatcher conversion I'm doing from a 7mm Heljan.
I was thinking about doing a 68 and have the drawings out of Express magazine but I've got enough half finished projects on the go at the moment. The delner couplers would be easy to do if you have some drawings available.
-
One way to avoid non manifold edges and making some items easy to draw (on the tender sideframes for example) is to draw it 2D and then extrude the sideframe to the thickness required when complete.
Regards
Simon.
-
Are the tanks you are looking for on the page linked below?
https://www.flickr.com/photos/nicholasy/sets/72157631658415147/
Looks like the walkway is made from the same mesh/style used on other tank wagons, with strips around the edge and 2 sections splitting up the 3 tank fittings.
-
I'm guessing the sound is genuine and not added afterwards - so the sound is of the original class 30 Mirrlees engines?
-
1
-
-
No reason a hopper couldn't be cast in N (Stephen Harris does it very well with some of his 2mm FS kits).
Cheers, Mike
I think a Cast hopper with an etched hopper support especially if a mk1 hopper was modelled as below.
http://paulbartlett.zenfolio.com/selfdischarge/he7244#he7244
Started working on one of the end hopper wagons but no pictures as yet.
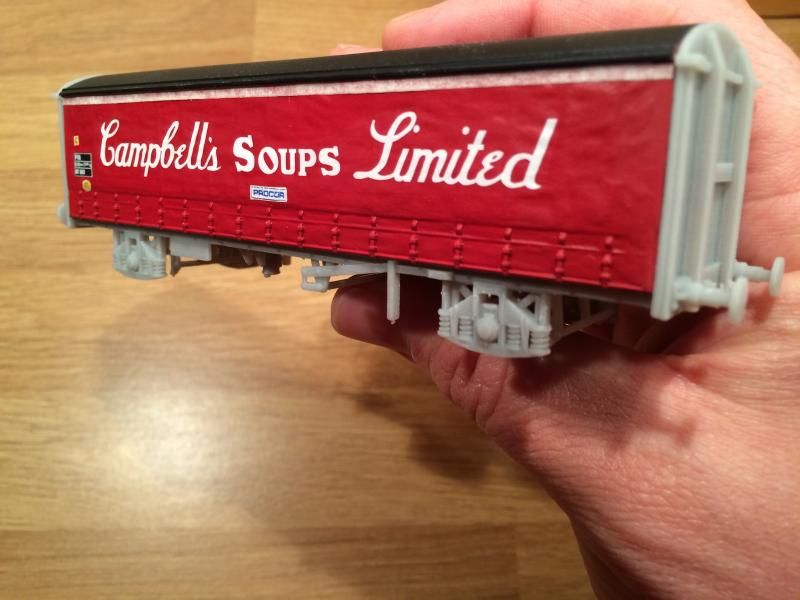
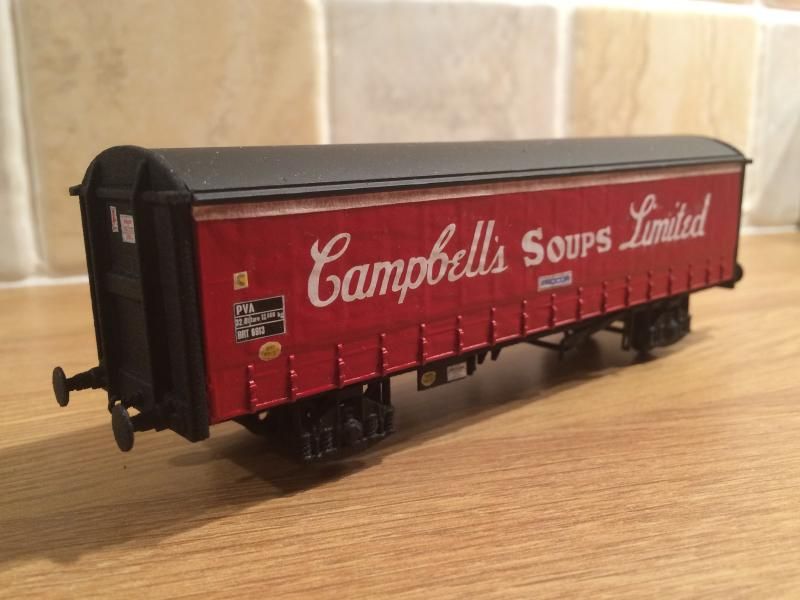
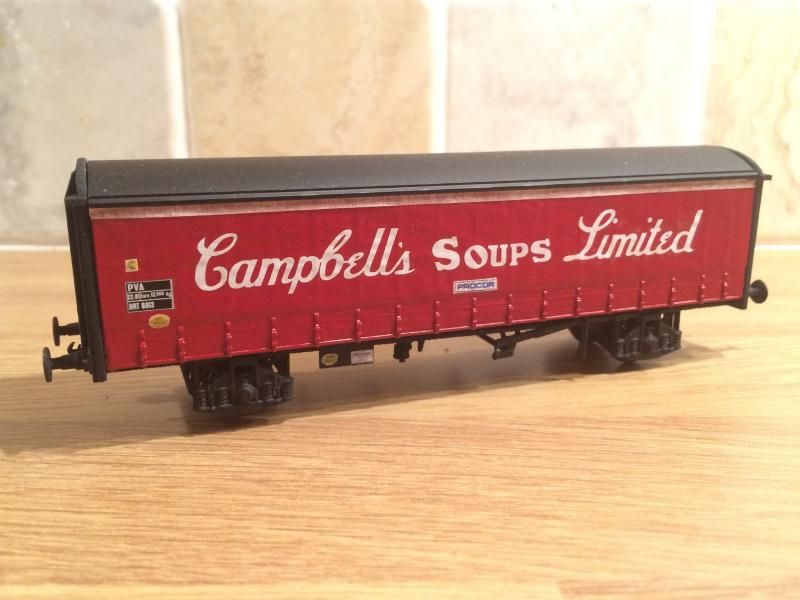
Added some transfers to the 7mm Campbell's wagon. Next job will be to paint the curtain straps and catches.
-
6
-
-
Would you consider doing the Redland kit in N gauge? after the petfood wagons I am looking at the self discharge train....
I think it would be very delicate in 2mm when printed in FUD, not sure if other finer printers could print it of again if it would be too thin especially the conveyor.
I did upload a 4mm FUD test and according to the Shapeways upload tool it would be printable. I'll have to see what the hoppers look like when I've drawn them as they should be thicker and easier to print.
Simon.
-
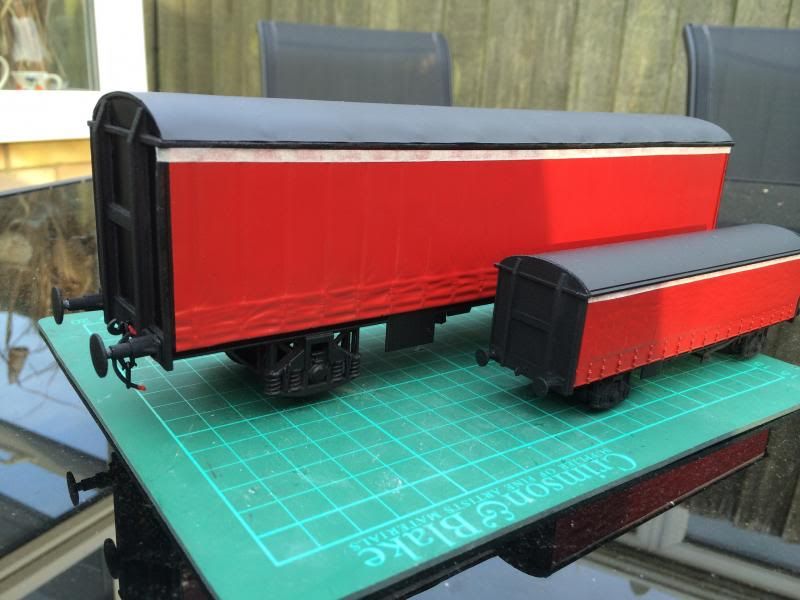
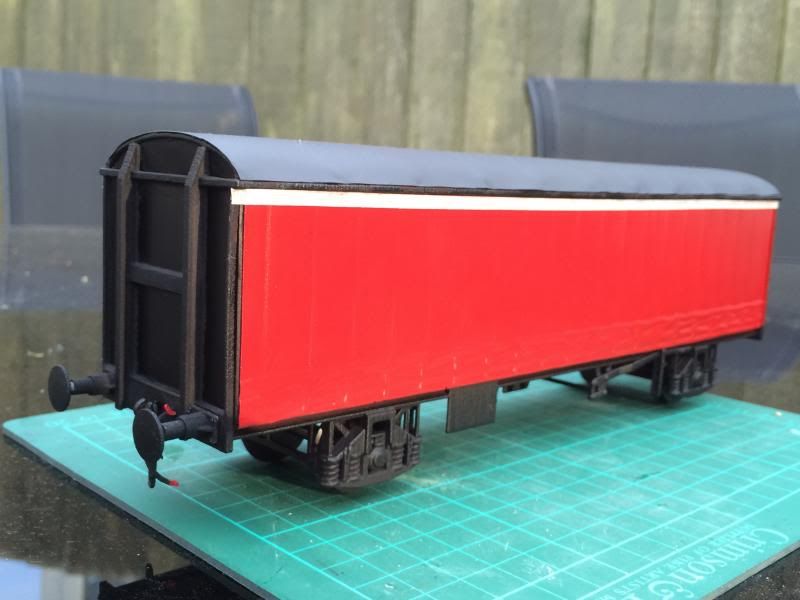
Bit of an update,
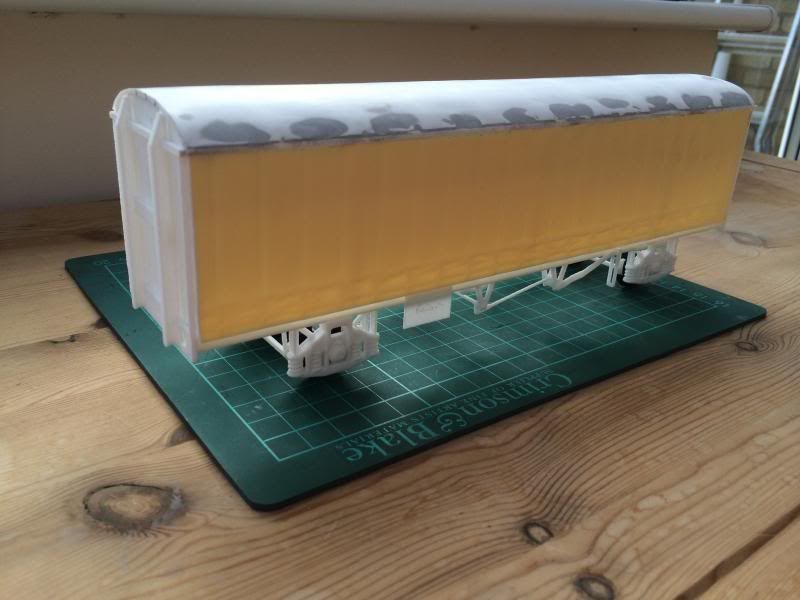
Done some work on a couple of wagons, firstly added some resin sides and a roof to the Railiner. Next step will be to give it a paint and make some transfers.
Some more progress on the Grainflow PAA, I've cast a resin hopper body, next job will be to glue the top and hopper together before painting it.
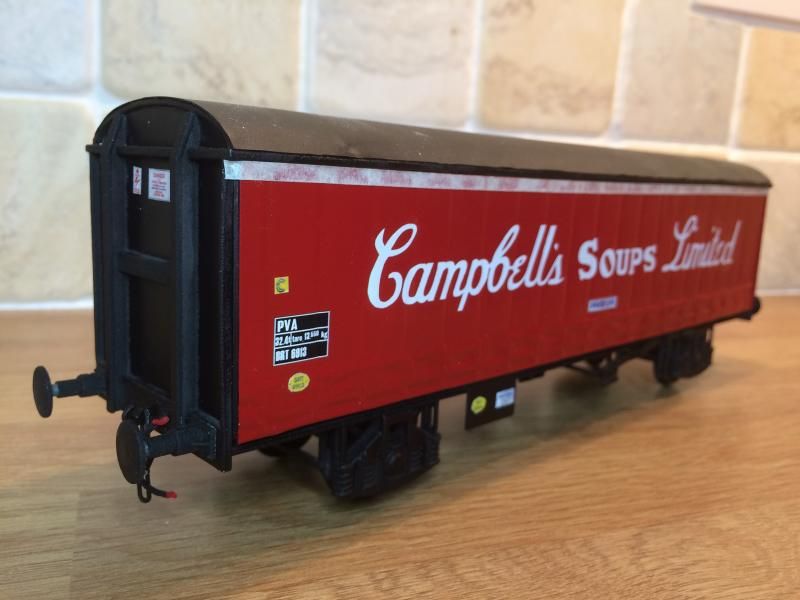
A bit more progress on the Campbell's soup wagon, I've added some transfers to the 4mm version. The main Campbell's logo transfers and data panel were produced for me but the others are home made.
Now onto some new arrivals -
My order placed before the Shapeways price increase turned up with some new and updated wagons.
The two updated models are the Campbell's wagon which I've made the end and roof stiffer, this is also one of the models which has gone up in price allot but interestingly the price doesn't go up much more if I make the roof and ends solid. The second modified model is the Polybulk which was modified to make the sides stiffer and to add a solid walkway as this area was not much more expensive to make solid than to have open in the original model.
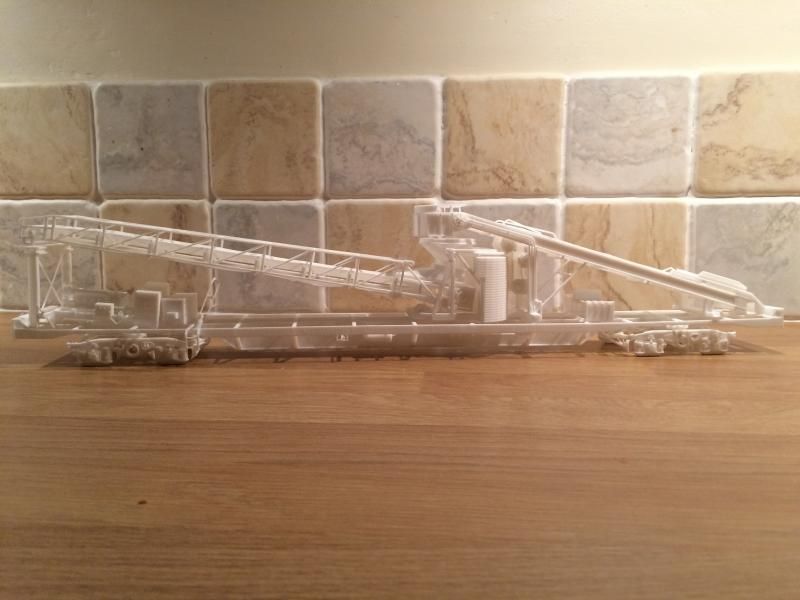
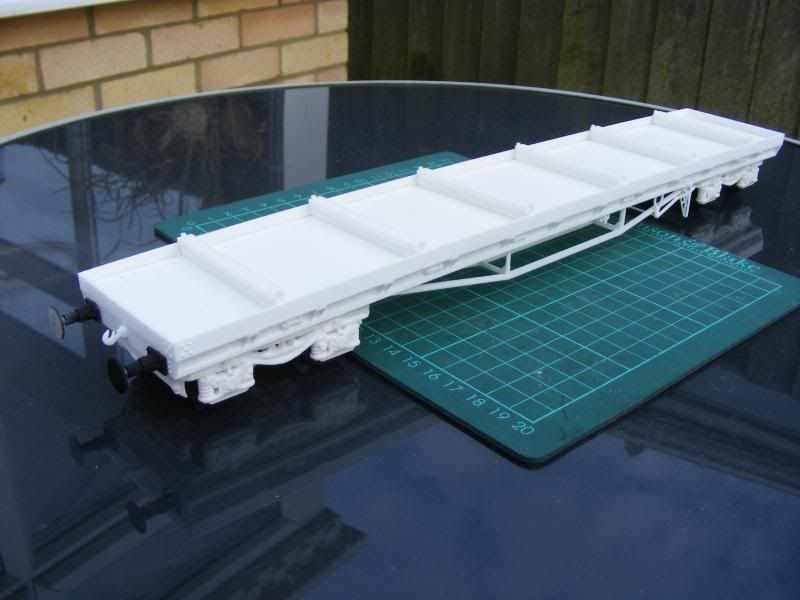
The other 2 models are new and were printed because the price was a bout to double on them. The Procar 80 car transporter was done to see how a long model would print and it looks to have turned out well and isn't distorted. It should also be good addition to the speedlink wagons as they didn't always run in long rakes like the other transporters, the bogies are also the same as the one on the PXA wagon.
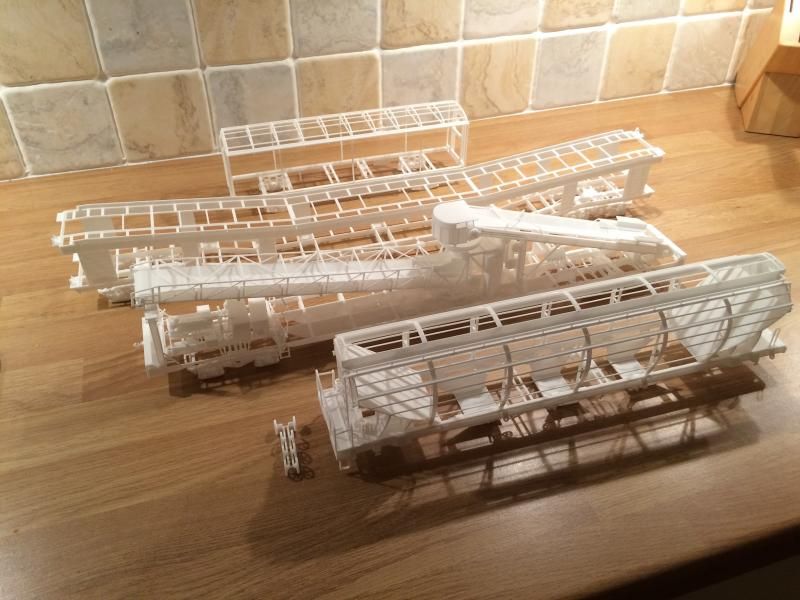
The PXA wagon has turned out well and I'm particularly impressed with the look of the conveyor belts. It was printed in several part separately and they won't all line up correctly on the wagon until the plastic deck has been added. Most of the detail has come out well on the engine and pipework.
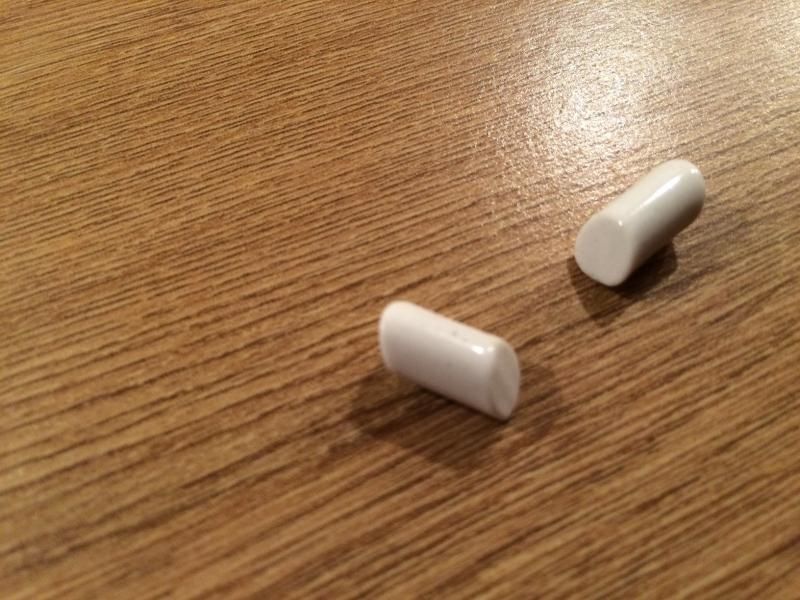
The final picture is of some beads that I found wedged in one of the polished bogies - I guess its what Shapeways use to smooth/polish models, the feel like they're made of ceramic.
Simon.
-
4
-
-
Time for another update.
Some developments and some new wagons but the biggest news is the soon to happen Shapeways price change, which will make a lot of my models too expensive to realistically build up a rake of wagons.
One wagon that I've drawn but not had printed is a Procar 80 car transporter. To keep the price down (not that it matters much now) the deck was open and I would use small scale mesh to represent the mesh the cars would drive on. The railings are separate fittings and the bogies were redrawn from the previous order when I tested the polished WSF bogies. I might still try to get one of these printed before the prices change.
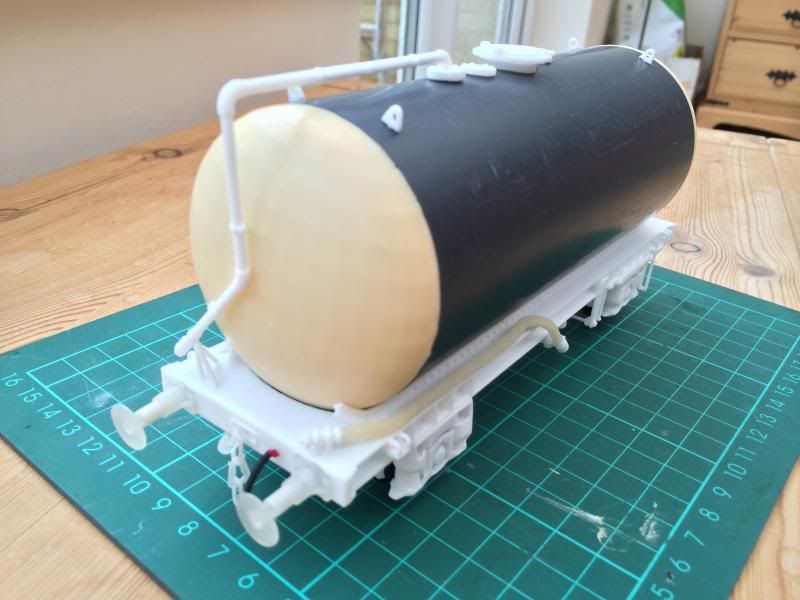
Another wagon that I drew and am currently getting printed is the a TTV LPG tank. For this tank I've also drawn some transfers to put on the tank.
Another wagon set that I was working on but may now have to rethink was the Redland/Lafarge Self Discharge train.
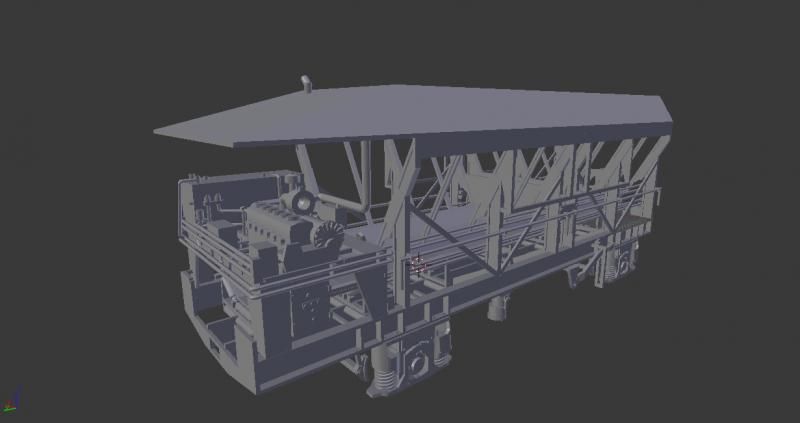
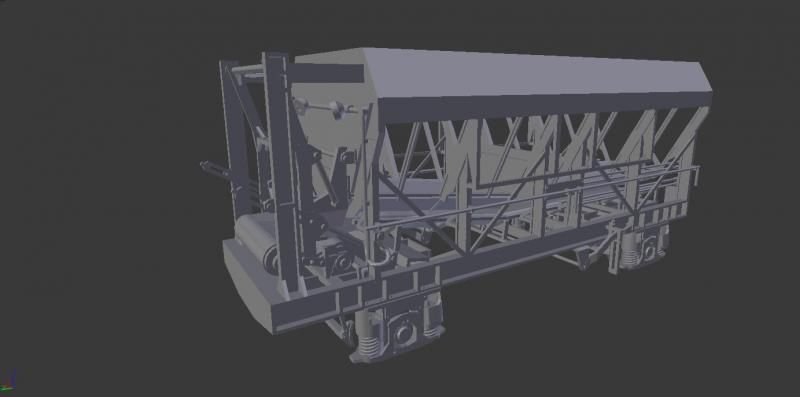
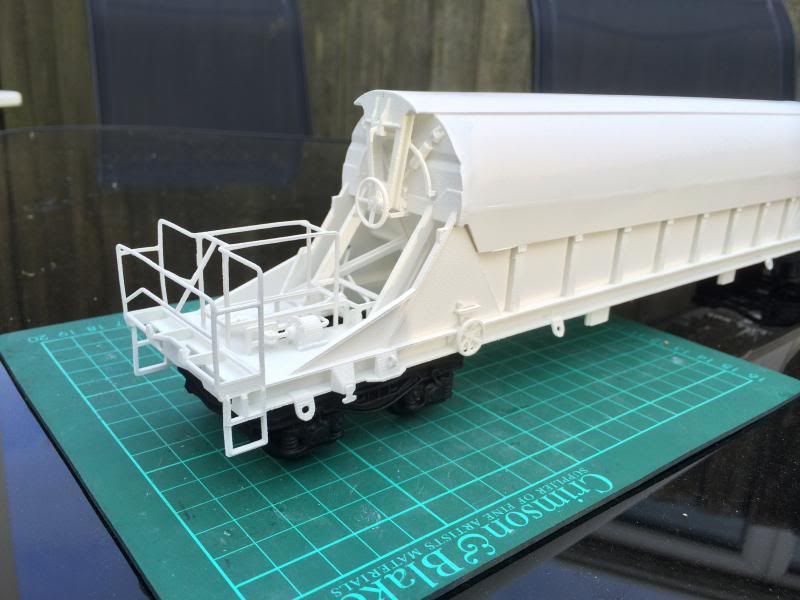
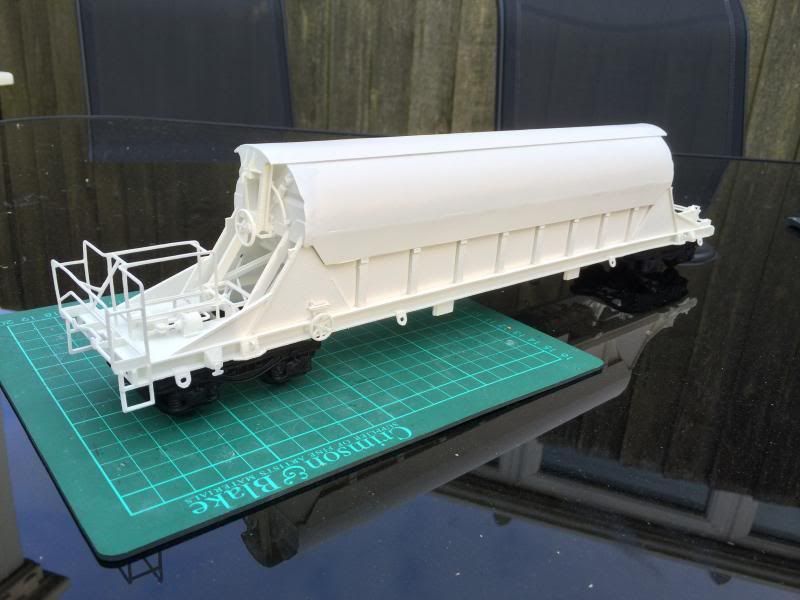
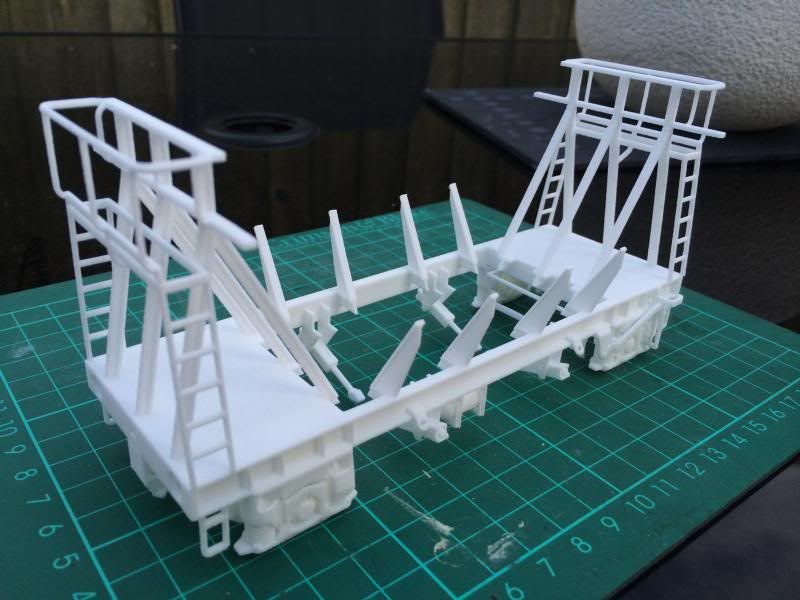
The first wagon drawn was the KJA discharge wagon, this was easily the most complex wagon I've drawn with the conveyors, engine and hydraulics. The wagon was designed so that the discharge conveyor would pivot and raise and lower. I may still get one printed before the price rise - it will still cost about £100 to print but alot less that it would after the 7th of october (£180). I I'm part way through drawing the hopper wagons - starting with the centre wagon and then modifying that to made wagons at the end of each rake.
Regards
Simon.
-
4
-
-
Time for another little update on wagon progress.
This time it's 2D printing. A the wagons have progressed I've been looking for ways to finish them off and only found limited transfers available for the wagons which made me think about drawing my own.
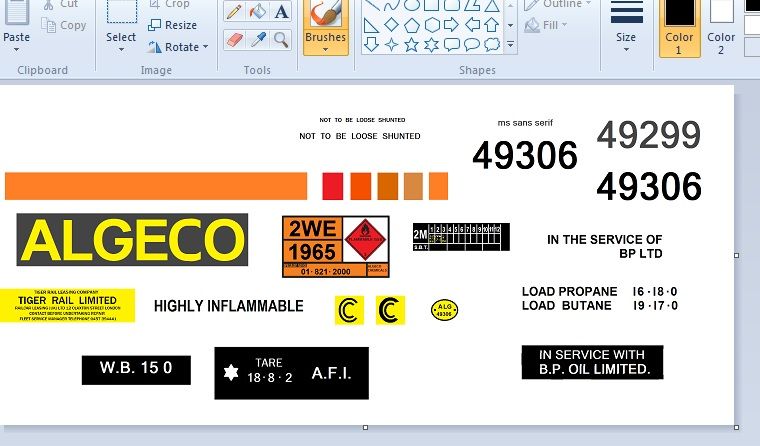
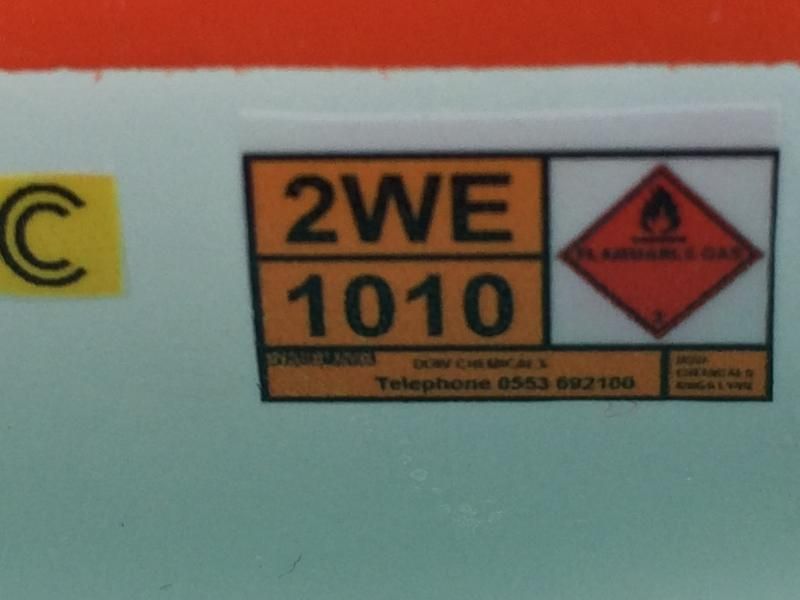
I did this in Microsoft paint - basic but simple program, scaled and printed using Microsoft word onto decal paper bought off Ebay. First test was some decals for the Dow chemical tank drawn by working out dimensions and colours from pictures. Picture below show the transfers (printed on clear paper as the tank body is white) on the test tank, not in the correct position but just to see what they looked like and what detail I could get with my desktop printer.
The second wagon tested was the nearly finished CO2 tank, with transfers made up in same manner as before. both the tank wagons had the stripe painted on but in future I might try printing the stripe.
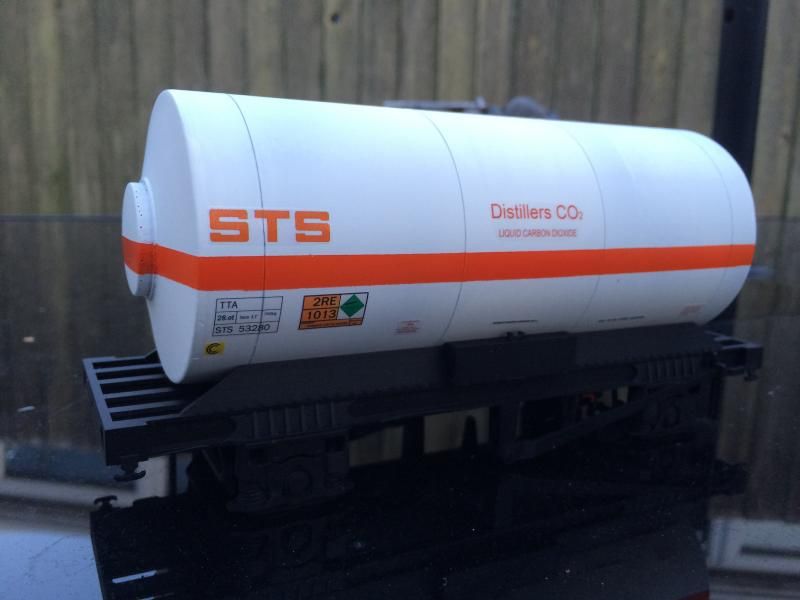
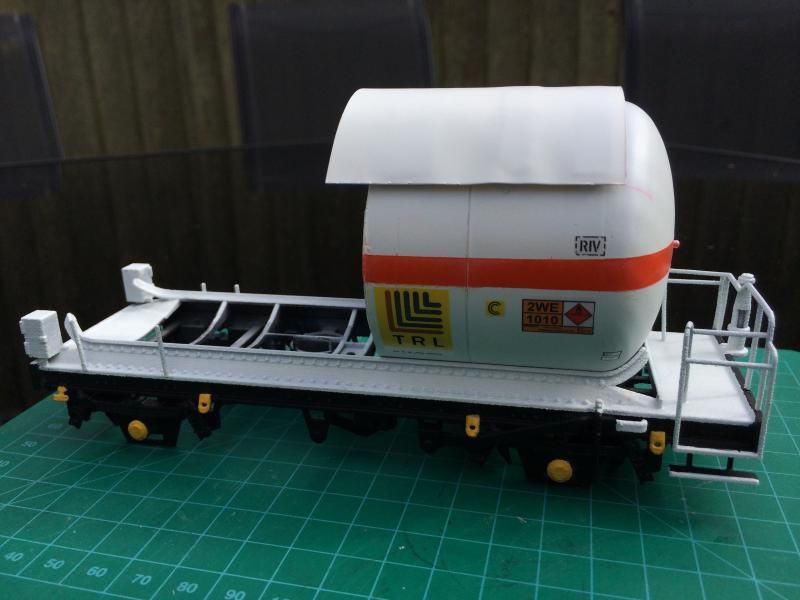
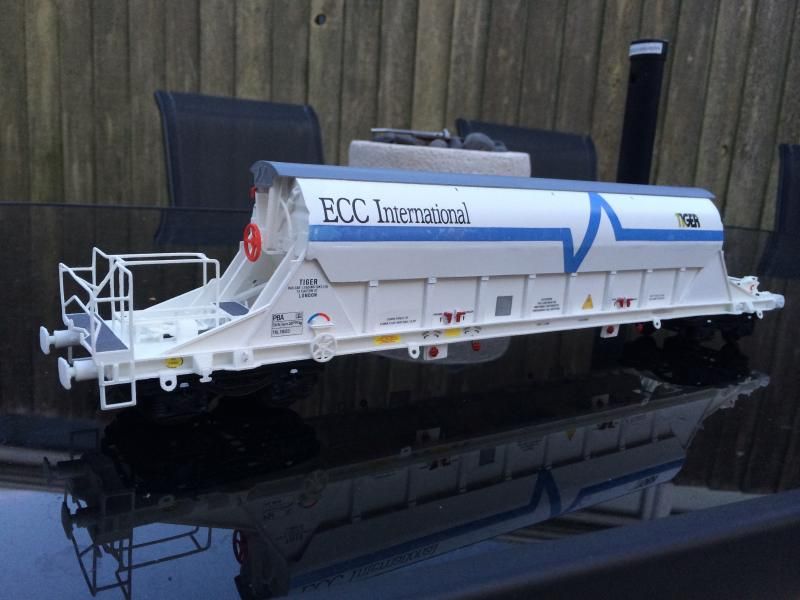
The final wagon to test the new method of transfers on was the PBA Tiger. For this wagon I had previously purchased part of the transfers from precision labels after they had scaled up their 4mm versions. This had the ECC logo and tiger branding with a couple of other decals but I had to draw some of the extra lettering and also required the blue stripe. I drew the stripe in 3 parts and added this to the model - this was easier than masking the stripe (which is currently on the other side of the model but didn't turn out very well). One slight issue with the stripe is the patchy colour of the blue (probably to do with the way I coated the decal paper and maybe the micro sol/set) but when looking at the weathered prototypes it looks ok as most seem to have weathered quite badly in real life. The tiger only needs a couple more transfers on this side and the other side completing before it'll be ready for some weathering.
-
4
-
-
Time for another update.
All wagon progress this time.
Firstly I've added a deck and primed the OTA wagon. Just needs a topcoat and some logs.
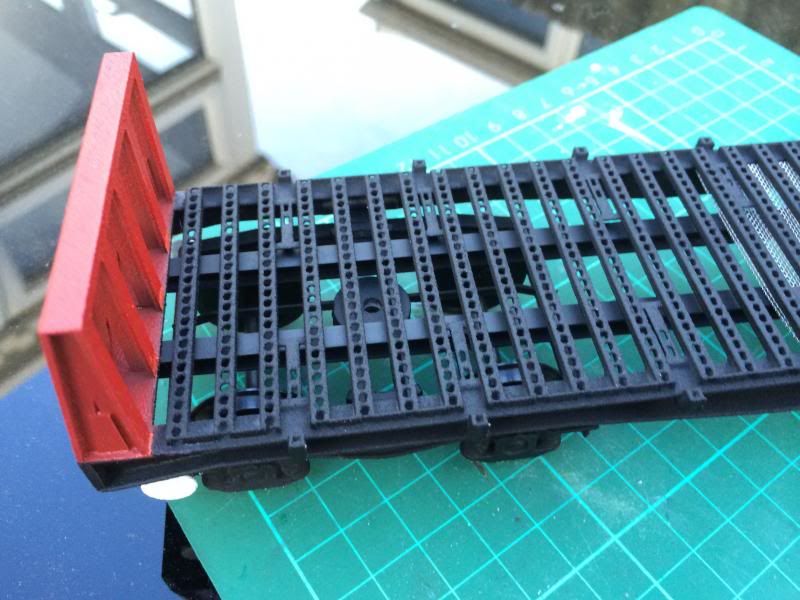
I have also printed another BDA wagon - the second type with disc brakes and different bogies. I got this done as I got some store credit for the original one that had poorly printed sides (something to do with some poor quality powder they had in one of the printers).
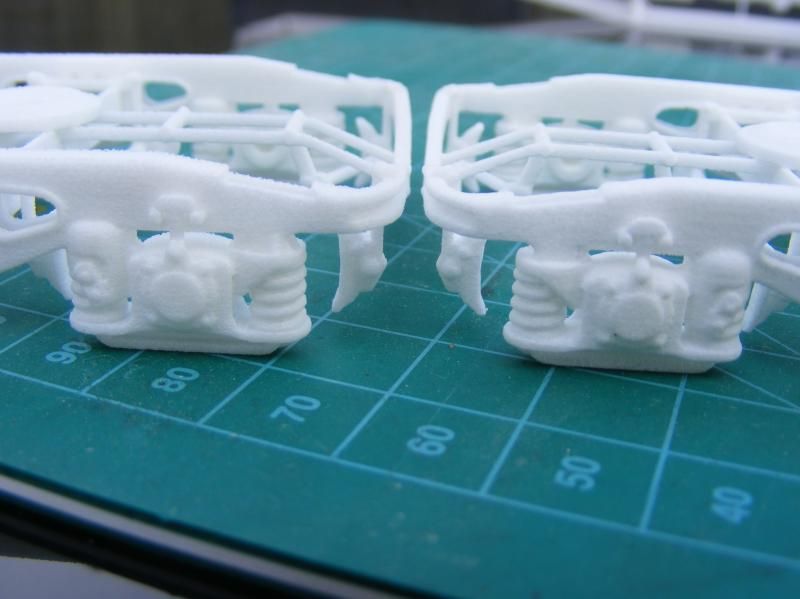
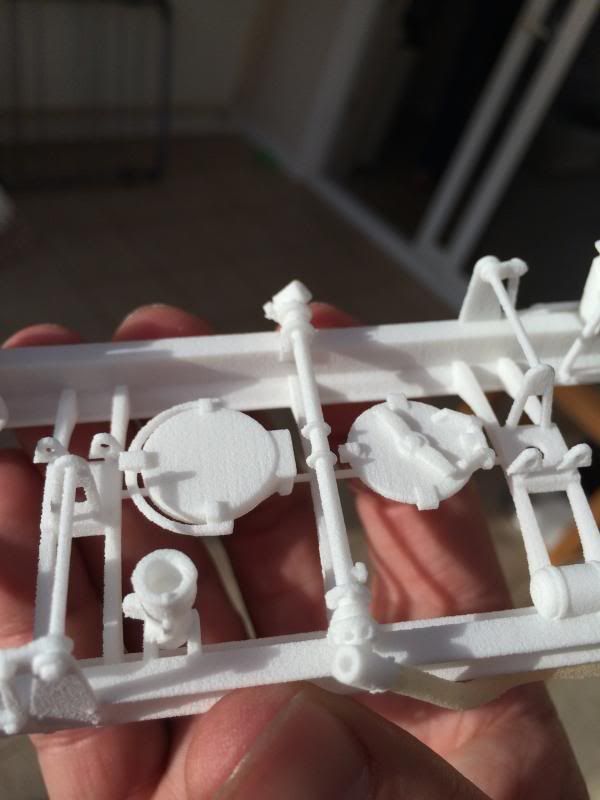
In my most recent order I got a pair of Y25 bogies printed (the cast type?), I've not got a wagon to put on top of these but I did them as a test with one printed normally in WSF and a second printed in WSF polished to see what the difference was and see if a bogie could withstand polishing. Have to say I'm impressed and it looks good and there's no damage, some of the bolt head details have been rounded off a little bit but overall happy - next order I'll get some standard Y25's printed to see what they're like and if they can be printed (the one this time was done with 'print it anyway'). First picture shows hte smooth bogie and the second shows the difference between the two - particularly noticeable on the slope on the top of the frame which is a bit fluffy and stepped in the non polished. The polished surface is also nice and smooth to rub. Not pictured but I also ordered a set of buffers polished and they turned out OK as well and should slide easily when sprung.
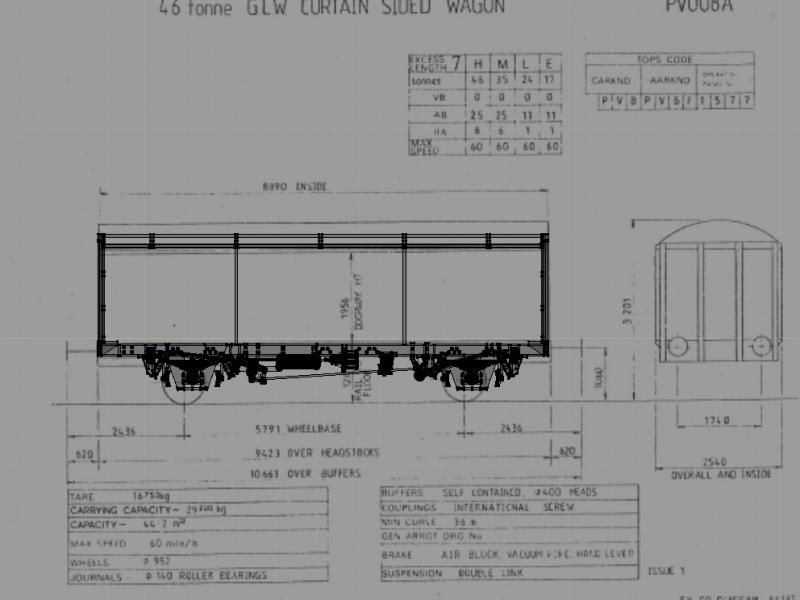
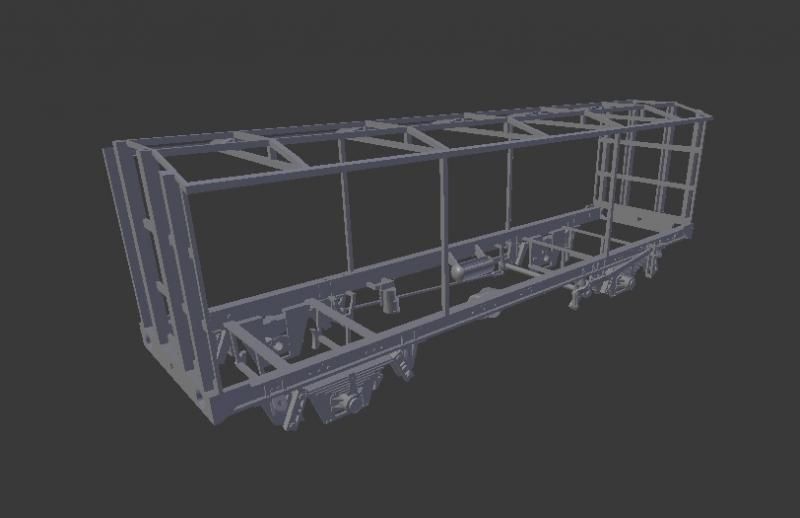
A wagon that I've drawn but not printed yet is the Railiner experimental curtain side wagon. This will use a cut down Campbell's soup cast curtain side with a plasticard roof formed over the frame the same as the Campbell's wagon. The wagon chassis was modified from the DOW chemical tank wagon as the original used a ferry tank wagon chassis. One issue I did have was finding a set of drawings as the BR diagram had a number of errors including the off set wheelbase, roof shape and height.
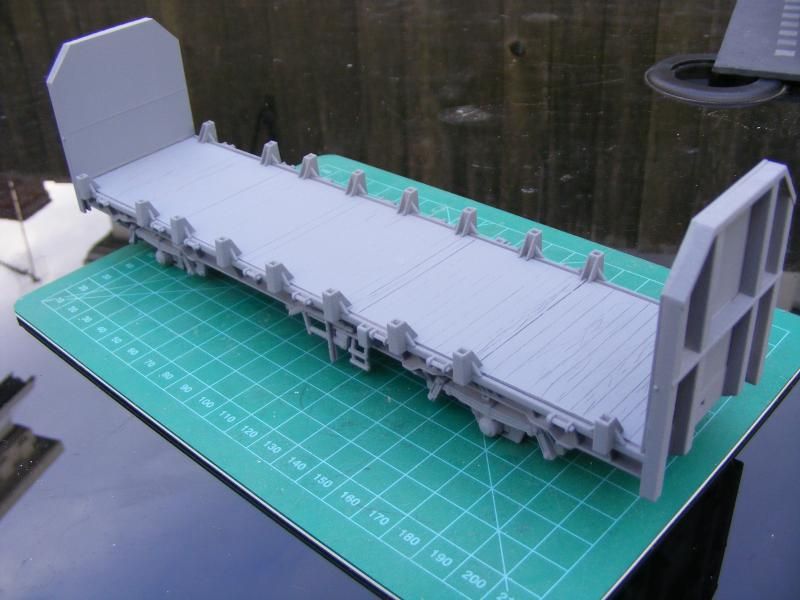
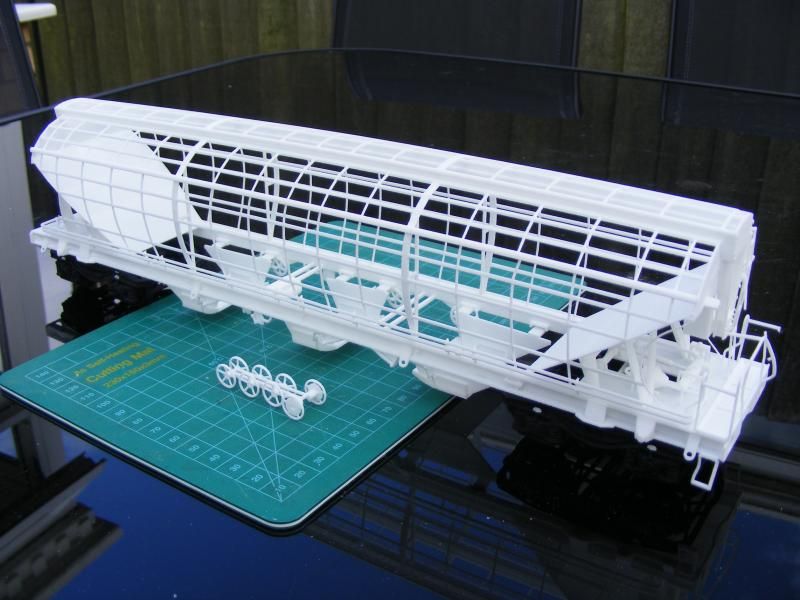
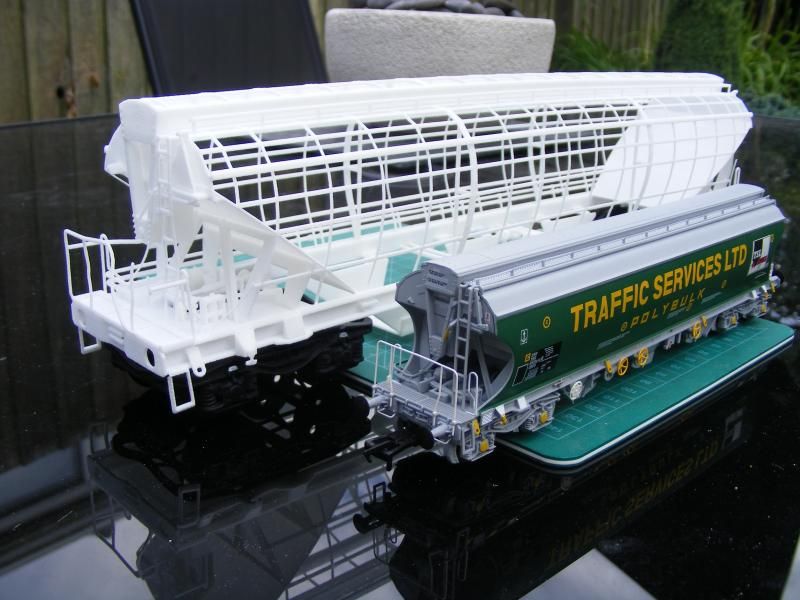
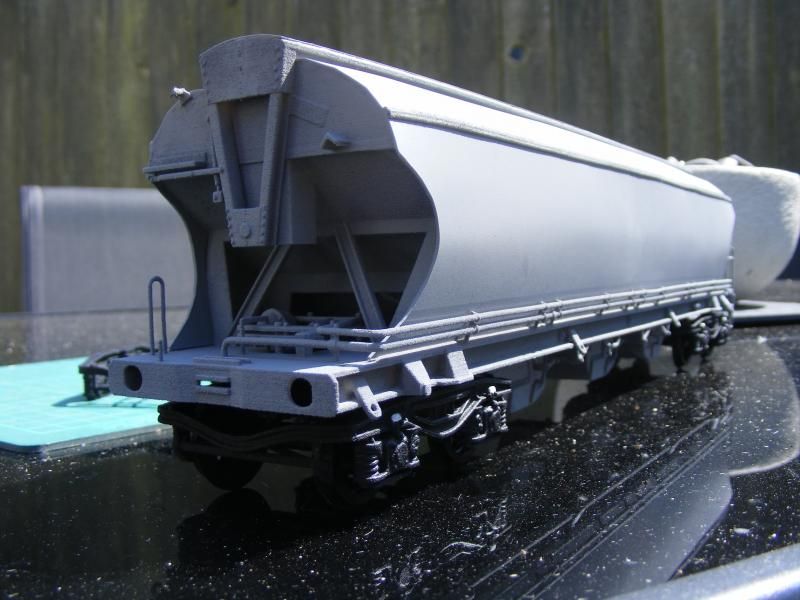
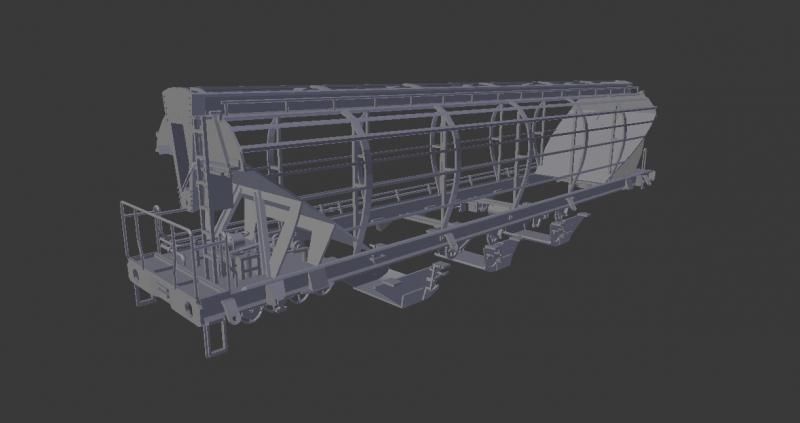
The final new wagon I've had printed is a Polybulk. I drew this using a combination of a wagon diagram, a side on picture and some measurements from the Bachmann model. To keep costs down I decided to draw a framework skellington that I could add plasticard to. I added groves to fit the plastic into at the top and bottom of the hopper and printed the discharge doors and hand wheels separate. When it arrived there was a problem with the model as the end handrail was damaged but I was able to get store credit for a couple of euros to allow a replacement handrail to be printed with the next order. Adding the plastic to the sides wasn't as easy as I'd hoped - was a bit like trying to squeeze a bike tire onto a flexible bike wheel using cocktail sticks instead of a pair of spoons. I did get them in place eventually but have already made a mk2 (pictured at the bottom) with less framework but hopefully a stiffer construction. I also need to modify a Y25 bogie with bigger/thicker brake shoes. Not sure what livery it will be as hoped I could get a 7mm set from Fox transfers for the traffic services livery but would need to order 25 sets to make it worth them resizing their HO ones. Once the ends have had a sand I'll have to sort out the little bits of damage before sorting the livery anyway.
-
7
-
-
Thanks Richard,
I'll have a look at your idea if the reprint of the wagon comes back looking the same (I'm going to get another print after I found some issues with the current model- not related to the bending). I noticed some marks on the model sides - as can be seen below the wagon side almost looks like wood instead of metal after a coat of paint. Also visible is a test deck part painted to represent weathered wood.
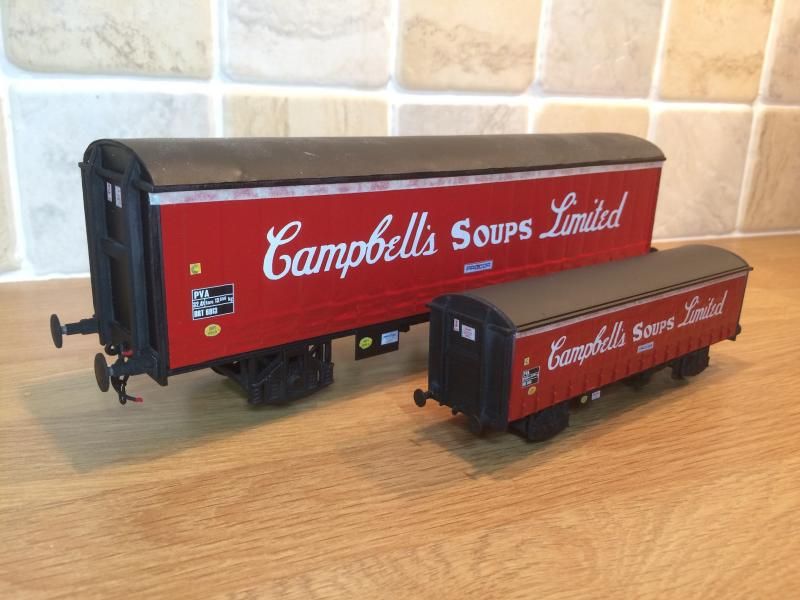
Also painted recently were 2 PVB Campbell's soup wagons (4 and 7mm).
I've done a bit more on the BAA, I've test fitted the central framework made from 2 sections of evergreen I beam. I also redesigned the bogie mounts to clamp the beams and intern the mesh deck to the underside of the wagon. The first picture shows the wagon without the deck and the second with the mesh added. I will probably end up weathering this as I've not seen a picture of the deck looking clean.
Another wagon that's had a coat of paint this week was the PBA. It will need another coat of white but it's getting there.
As mentioned the other week Shapeways had 15% off WSF orders so I took the opportunity to order another hopper body along with a chassis. I went for a 7mm Redland PGA wagon with the hopper designed so that it could also be used for a BIS PAA wagon, this design is basically a 7mm WSF version of the 4mm FUD models printed the other year. I might get some hopper bodies cast in resin as a rake of Redland hoppers would look good behind a Heljan class 60.
-
5
-
-
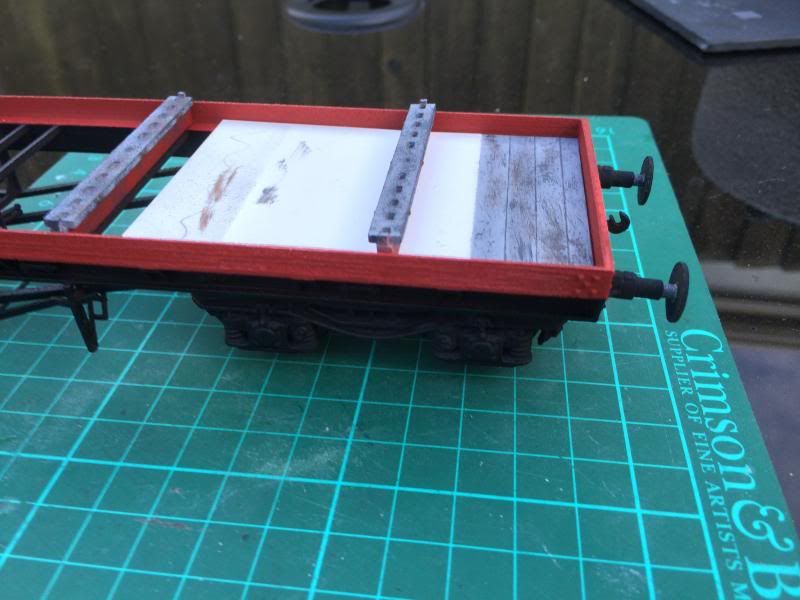
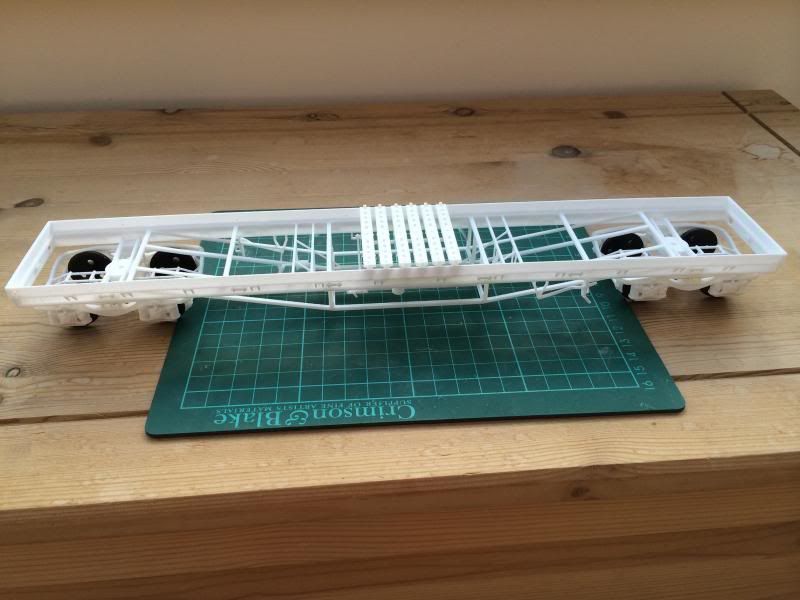
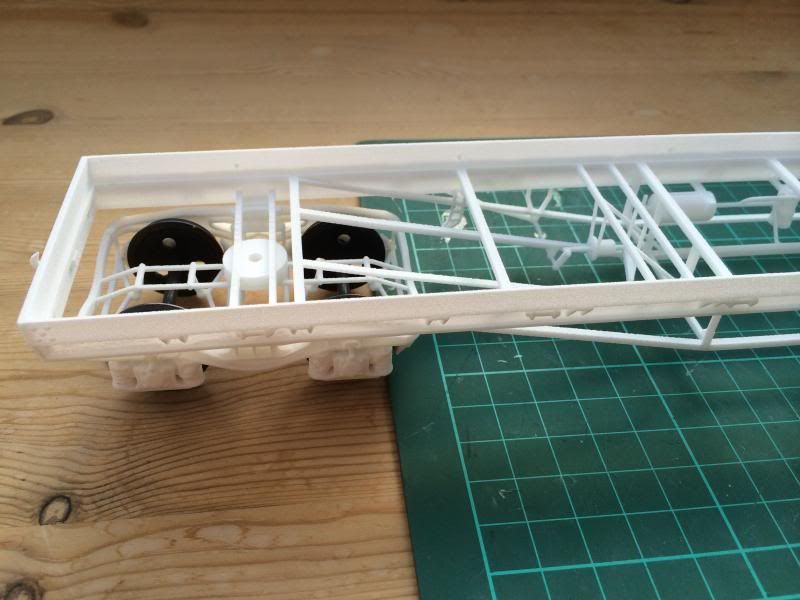
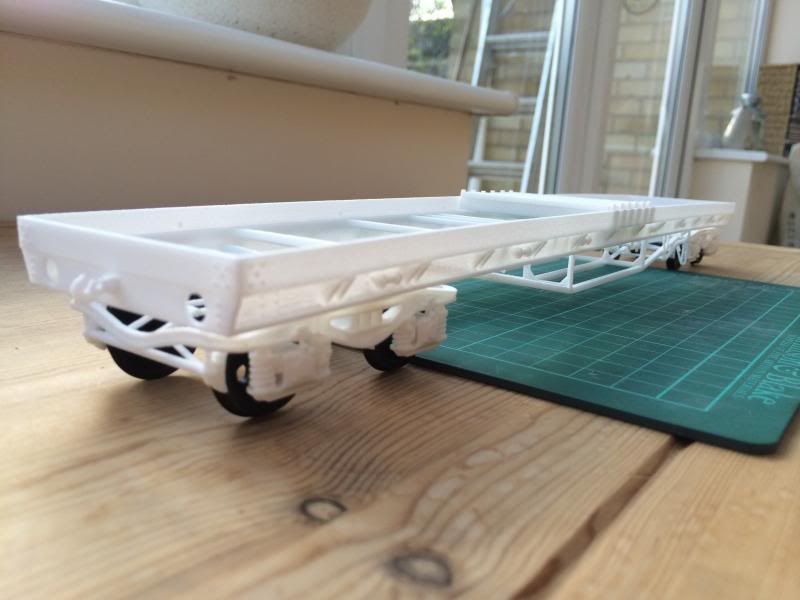
I've made the deck for the BDA from Plasticard, just cut out and scribed some planks on. The pictures below show the deck and the stanchions, these aren't glued down yet - the deck is held down by the same clips that help to align the stanchions. Only thing left to do is glue the parts down (hopefully I can glue the deck in a position that helps remove some of the hump in the wagon). Also whilst making the deck I did notice a printing fault on the model which I've passed to Shapeways to investigate.

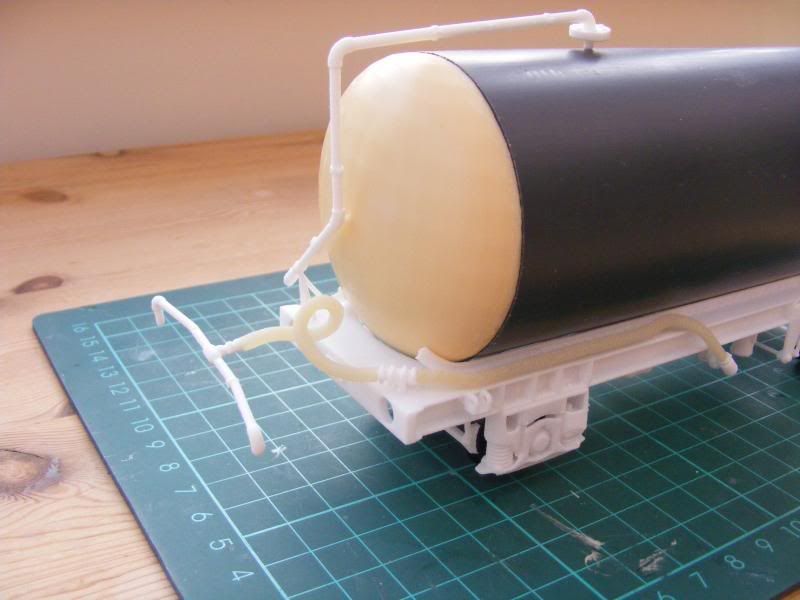
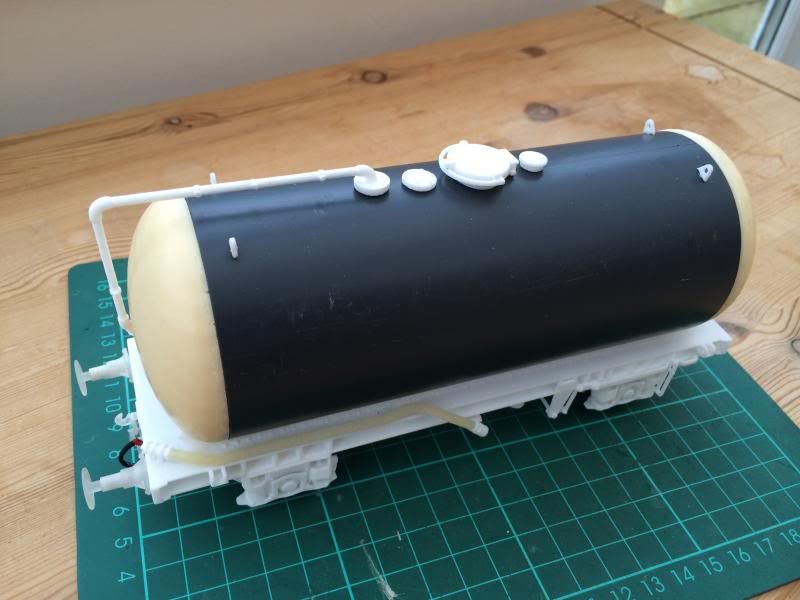
I've also done some more on the TTA tank. I've drilled an pushed the fittings into the tank barrel, this did show up one mistake I'd made when drawing the pipework as I'd made the filler pipe too short, but everything else looks ok and I've ordered another from shapeways. The fit of the rubber hoses looks quite good but may need a piece of wire inserting to allow them to be connected or disconnected easily.
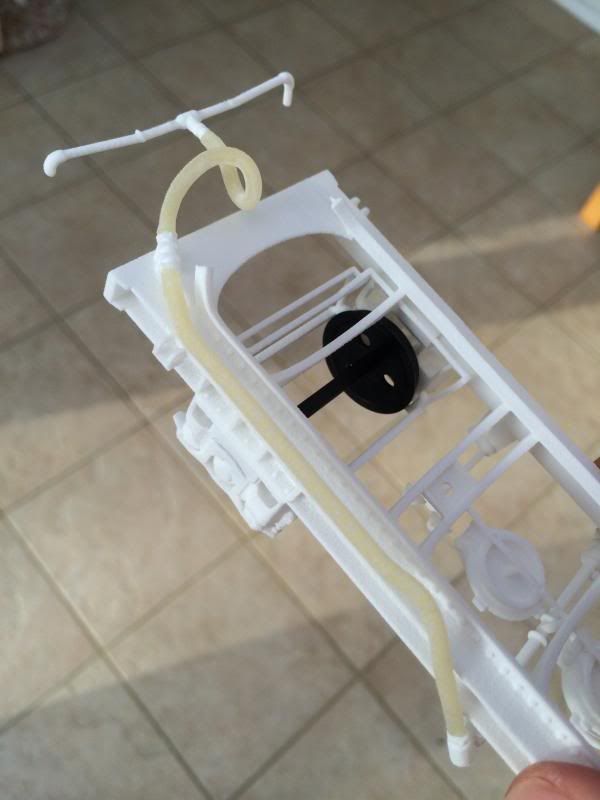
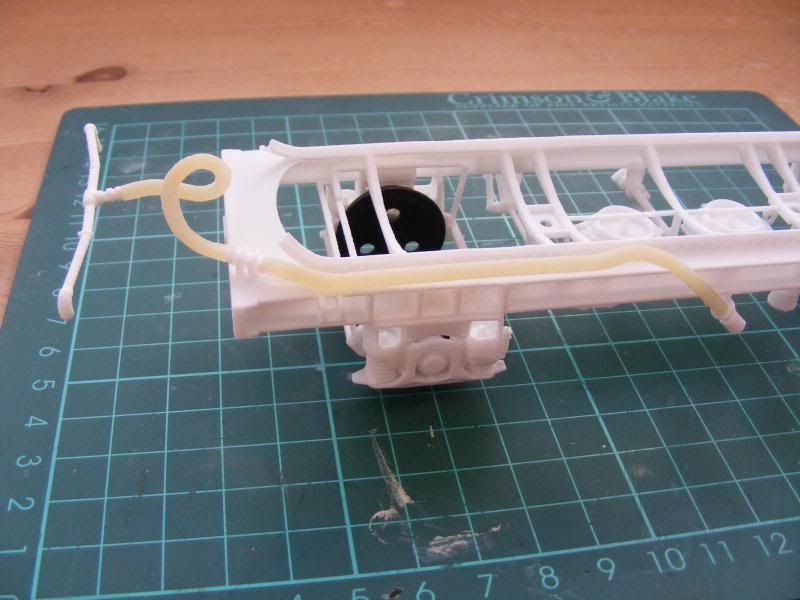
Just needs some etched walkways now

-
2
-
-
Hi The BDA is very good, without deck it looks like the "burnt out" version I saw on a freight in South Wales after brigade attended to the well alight waggon ! Will the crown come out under load? The real ones -well some had a crown I saw at Bescot years ago.
Would a 1/32 be possible ?
Robert
Hi Robert,
yes it would be possible to print in 1/32 but would cost about £130 to print including bogies.
Regards
Simon.
-
Time for another update,
I've done some more work on the PBA and have now glued the pipe to the body and fitted the top hatch, now it just needs a clean up and some paint. I have used the replacement parts printed with the previous order to replace the broken details on this original shell, also visible in the photo below is one of the sprung buffers test fitted.
Another wagon I've done some work on is the Campbell's PVB which has had one side glued on and a plasticard roof fitted - I made the mistake of cutting the plasticard too narrow which didn't make it easy to glue one side down which in turn meant I had to do some filling to get it looking OK. Once I glue the other side on it will also be ready for the paintshop - I may need to add some weight to this wagon as it's quite light.
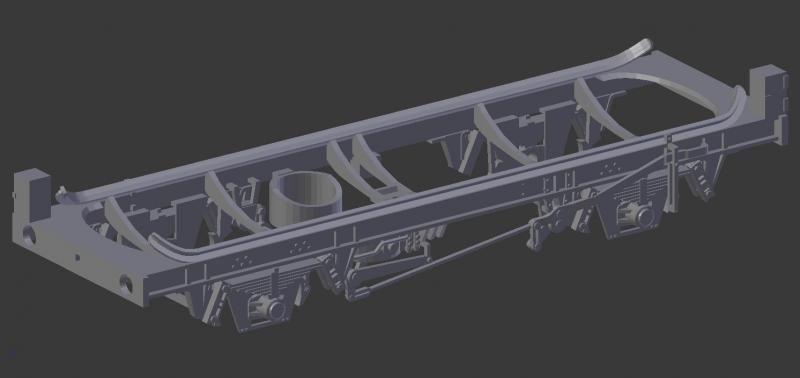
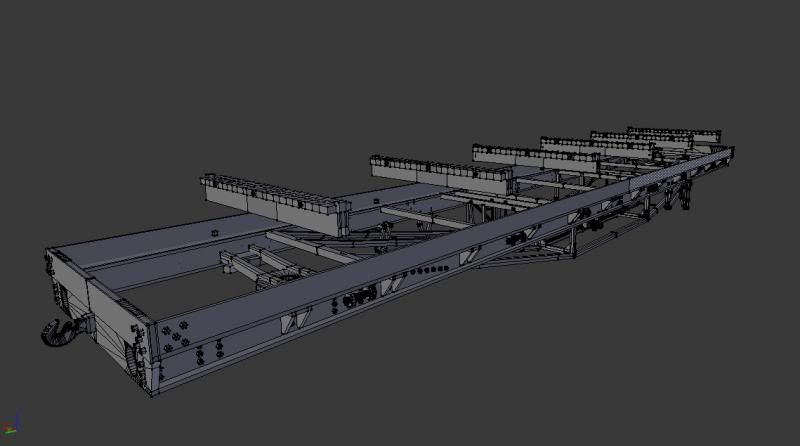
I received another order from shapeways earlier in the week and this had a TTA tank wagon chassis (more on this in the next update) and also another new type of wagon to add to the fleet. This was in the form of a BDA- I already had the correct bogies so decided to try and draw one using a basic drawing from a weight diagram book and the Bachmann model. The wagon was nice and simple and easy to draw and not printing the deck makes it cheap for a large wagon. I did make one mistake and forgot to leave holes at the edge where the straps would feed through the deck onto the ratchet points to secure a load but this shouldn't be too noticeable when the deck and a load is added. One problem I will need to contact Shapeways about is the shape of the wagon - it's bowed up in the middle (same as the Bachmann model but not something I did when drawing the wagon), I guess its from some sort of shrinkage during/after the printing process to do with the underframe support framework but could be wrong. The removable bolsters have printed well as a separate part and even fit over the spacers I added to the wagon side to help position them.
Also after seeing the 15% off WSF at the moment I might have to get another order in soon.
-
8
-


3D printing class 25 parts .... Also class 20,37, 2mm and 7mm wagons and 1/32 bogies
in 3D Printing, Laser Cutting, CAD & CNC
Posted