


Signaller69
-
Posts
3,102 -
Joined
-
Last visited
Content Type
Profiles
Forums
Blogs
Gallery
Events
Exhibition Layout Details
Store
Posts posted by Signaller69
-
-
- Popular Post
- Popular Post
Tonight I finally managed to run a loco on the new track formation after a few weeks of Club nights sorting the wiring. All now works correctly (having initially got a couple of wires crossed), including the point motors, which is a huge relief.
Finally I can paint the track and then start to redo the ballasting and other scenics.
I even took a couple of photos in celebration!

-
 21
21
-
Had a great weekend at Rainhill show and put "a few faces to names" which is always nice. All ran well apart from having to sort a Seep point motor polarity switch, my own doing as it was slightly off centre, and chose the show to reveal itself as is typical! I only managed a few photos (with apologies for the gap below due to unresolved strange posting issues).


-
12
-
-
I also have trouble now replying to quotes; I can post a few words as above but then I lose the keyboard option and it jumps to the bottom of the box (add media/submit). It's really odd.
-
10 hours ago, Mikkel said:
Just testing. This is your photo re-uploaded from my Samsung phone.

Is it my phone causing the issue then? It didn't have any issues up to a month or so back?
-
I am having much frustration with posting on my own topics, where photos will upload but won't insert into the topic where I want them, and huge gaps appear for no reason I can explain between paragraphs and photos. My phone (Samsung Android A12) is up to date with updates. I did report this to admins a couple of weeks or so back but had no response. It is ruining my experience on RMweb and I don't look in much now due to this and the pop up ads which all seem to work perfectly.
Anyway I am adding a random photo immediately below this which may illustrate the problem!
Any help please?
Martyn.
-
 1
1
-
-
Quite a bit of work undertaken and last minute stock testing ready for Rainhill show this weekend.
-
9
-
-
A low relief admin building has been knocked up from card to fill the gap in the backscene, but needs a little more work yet. Photo somewhere below........
-
13
-
 1
1
-
-
I've been having problems posting elsewhere on RMweb lately, not sure if it's my Samsung phone browser (recently updated) - as another user has said to me he has similar issues - or some issue with RMweb not liking Android phones, so this is kind of a test post; if there is a huge gap between this text and the photo I can assure you it is not of my doing!
Anyway, work is once more underway on the layout, which is due to make its exhibition debut at Rainhill show on 4th & 5th March, so photos of progress will (hopefully) appear shortly.
Otherwise I have been mainly doing more stock cut & shut projects of late.

-
13
-
-
Thanks @46256.
The Stove is almost complete now.

-
7
-
-
I give up. I have NO IDEA what happened with my last post! It was quite short and the photos were in the right places. RMweb somehow stretched it out to pretty much fill a page! So now posting photos (on the same phone i've had for 6 months) seems an issue. I've had no problem posting anywhere else?
*edit* having reported the problem, I think admin have now removed all the empty space!
-
1
-
-
The Saloon is progressing at a snail's pace, having been lined and given its identity, the underframe painted and a start made on the interior.
I have been sidetracked by making a start on the 6w ex-LMS Stove 'R', using one of the Airfix Stanier coaches to produce the bodywork. The chassis is from plasticard and cast metal axleboxes which I picked up as part of a job lot some time ago. This will be in very tatty BR Crimson, following a Dave Larkin 1974 photo.
-
14
-
 1
1
-
3
-
-
Stevebr no updates except to say work is still going on with wiring, which needs testing prior to scenic work commencing. But it is still happening!
-
2
-
-
After an evening making 6 sets of footsteps, the finishing line is in sight!
Just put an order in to Railtec for various transfers, including the white coach lining which I have run out of. Livery is the very early 70s variation applied to Inspection Saloons without the top blue band below the guttering.
The underframe had to be totally re-arranged and there is still the roof water piping and various handrails etc to add.
-
15
-
-
2 hours ago, ISW said:
Martyn,
That 'little job' is mighty impressive and very well executed. What microscope did you use ... (!?)
Ian
Thanks Ian,
I used the old fashioned method of popping to the local for a couple of scoops (for medicinal Dutch courage of course!) then on returning home, donning my beer goggles (well, reading glasses, but the effect is much the same!). A length of microstrip was wrapped tight-ish, several times around a suitably sized square piece of wood, before being sliced along one side to give 4 equally sized frames which were then manipulated into place with Mek Pak. Don't think I could have achieved it without said beer goggles (or beer) though! 😁
-
3
-
 1
1
-
1
-
-
I have done one job which was proving a stumbling block to progress, namely opening the end windows out and adding microstrip frames to give the rounded corners.
After a light sanding I will probably drill the roof for the new vents next, before adding the rest of the end details.
Happy New Year all.
Martyn.
-
16
-
-
3 hours ago, Ramblin Rich said:
Nice work on the inspection saloon. I've always though the outermost side windows looked too close to the ends compared to all other Mk1s; presumably it improves the views for the 'officials' onboard! It's a good bit of cut & shut to get a non-standard window layout like that.
Thanks Rich, using the standard Triang window spacing meant I could keep almost all the joins along the door seams which helps keep things a little neater. Possibly not "inch perfect" but certainly close enough for my needs!
Martyn.
-
4
-
-
Not much modelling done due to seasonal commitments but the Inspection Saloon is slowly progressing.
Plasticard "ribs" were added inside the bodysides, with corresponding lugs to fit the Bachmann chassis. Once the end windows were roughly drilled out, the bodysides were fixed in place, with a bead of epoxy resin added along the roof join to give added strength. Hopefully some further fettling will occur over the Christmas period.
Happy Christmas all.
Martyn.
-
15
-
3
-
 1
1
-
-
I visited Port Sunlight Toyfair last Sunday which yielded more "useful junk" from the £2 boxes......
The crimson & cream Airfix Staniers will donate a set of bogies for a departmental coach project, with the bodies probably destined to be used for a 6w BGZ on a scratch chassis. The 2 Trix Mk1s and Lima 117 underframe will meld into another Class 126 DMBSL eventually.
I have started the Mk1 Inspection Saloon, Triang BSK sides being cut & shut to be spliced into the Bachmann Mk1 Suburban shell, once the end windows have been drilled and filed out.
The left over brake sections, in their turn, will produce another Mk1 BG.
On a seasonally silly note, my good lady actually insisted on a "Christmas train" under the Christmas tree this year! This £15 'O' Gauge - ish set from B&M was considered suitably, erm, "Christmassy". Lots of play value with 2 points, a station, Loco & Tender, 2 4w coaches and 2 wagons. Loco has "sedate" and "a bit faster" speed options, no reverse though!
And no, I'm not planning a cut & shut on any of this! My Granddaughter will enjoy it though I'm sure......
Happy Christmas all.
Martyn.
-
10
-
-
On 01/12/2022 at 10:36, keefer said:
No problem Martyn, it was after I'd posted I realised the number may have been different according to the period modelled.
EDIT: Couldn't remember where I'd seen it but the first Platform 5 book in 1979 had them listed as SC1705/6E - which really they should be as there were also Mk1 RB with the same numbers, M1705/6.
Still very nice work 🙂
Thanks, yes, a very good point, it does seem odd that the suffix wasn't used on 1705. It appears a lot of such suffixes were dropped around this time, the LMS BG's and Southern Van 'B' springs to mind, but possibly there were no number conflicts there (or perhaps built just in BR days so weren't deemed necesssary)?
-
1
-
-
On 09/11/2022 at 00:57, Ken.W said:
Have just seen this as this thread has re-surfaced
LNER Coaches (Harris) mentions that the BR re-building included conversion to propane cooking, so underframe bottle cabinets would have been added
Worth pointing out too, that both vac cylinders are on the same (kitchen) side of the coach (as seen in various photos above), which appears different to the original build spec of the more conventional "diagonally opposite" arrangement.
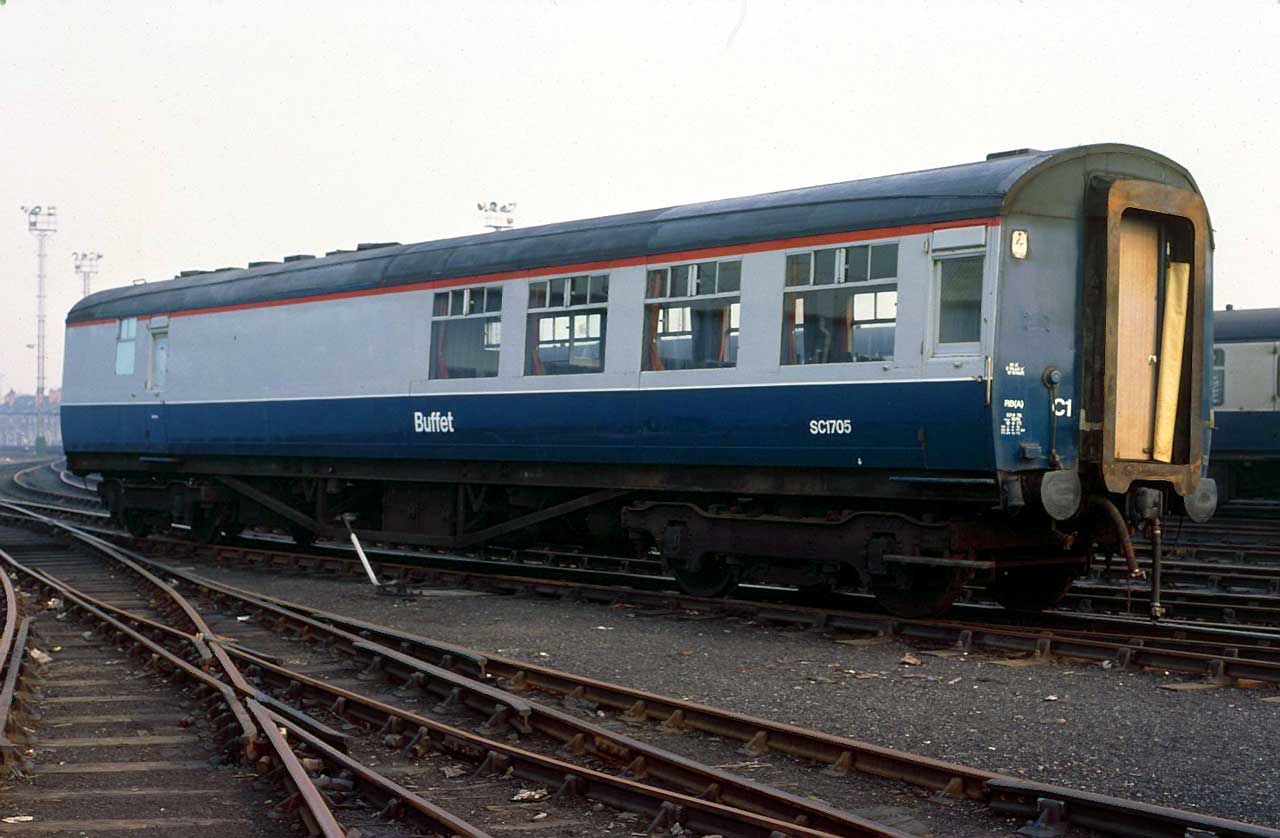
Here is my Bachmann cut & shut conversion of SC1705 in 1970s condition:
As they've not been mentioned, there are a couple of photos on the Eastbank site too:
http://www.eastbank.org.uk/images/Coaches/CS0227.jpg
http://www.eastbank.org.uk/images/Coaches/CS0225.jpg
Martyn.
-
7
-
-
On 27/11/2022 at 16:45, davidw said:
That Thompson buffet is extraordinary good.
On 27/11/2022 at 21:35, keefer said:Excellent work Martyn, I'm a sucker for blue/grey-era oddities like the Thomsons - the fact that they were still running and used equivalent to Mk1 stock in the '70s, so much more interesting!
BTW there were two surviving Thomson RB - 1705 and 1706. Upon withdrawal in 1979, they went to Penmanshiel as workers' accomodation after the tunnel collapse.
Regarding the underframes, there are new Flickr links in this old thread recently (apologies if you've already seen them): Thomson Buffet Cars 1705/6
Also love the 131 - such a handy ScR unit to have, as you say often added to a 3-car for extra power/parcels capacity but sometimes as a replacement power car. Can also be out on its own though!
EDIT: you might need an 'E' suffix for the number - E1705E
Thanks for your kind words gents, I must admit that given the amount of cutting, filling and shutting involved, I am rather pleased with how it turned out.
Keefer, thanks for the links, funnily enough someone elsewhere sent me the same photo link. 1706 of course survives to this day, sadly 1705 didn't quite make it to preservation, being cut up in the late 80s iirc. It seems to have ended its revenue days on ScR, during which time it was simply numbered "SC1705" (no suffix), as per this link:
http://www.eastbank.org.uk/images/Coaches/CS0227.jpg
Martyn.
-
2
-
1
-
-
The Station Master's house is now in place; it needs another chimney adding on the side wall but it's not obvious unless you are familiar with the prototype. Space constraints mean it is not quite orientated correctly but the 'L' shape is more obvious and I feel it gives a much better representation than my first attempt.
The sawmill components are all now fixed in place, hopefully I might have a couple of suitable figures in my bits box, and some more bits of timber etc.
Either way, the layout will be loaded into the car by the morning and off to play trains at tomorrow's Rainhill show!
-
11
-
2
-
-
A couple of areas - the sawmill and Highlight Engineering yard - which used Faller printed "old concrete" hardstanding (but lacked any relief whatsoever) have been resurfaced with textured paint instead. This led to a rebuild of the sawmill area and decluttering the latter.
(Yes I am aware of the tractor doing a handstand in the lower pic!😆)
A MMR laser cut sawmill kit provided the saw table and a cut-down lean-to type shed, with some timber and personnel etc, yet to be added later this week.
Perhaps foolishly (at this stage of the game), I have also decided to make the visible part of the Station masters house more prominent than the simple frontage featured previously thus:
Still a big compromise of course, as there is not room to feature the whole 'L' shaped house, so the front and one side are being built and hopefully the roof lines will coincide with the manner in which it sits against the back- and end- scenes and better hide the dreaded "corner in the sky"......
this means some necessary ground work being undertaken too, as can be seen - and it all needs completing and detailing by Thursday evening!
The joy of Exhibition deadlines!😁
-
11
-
-
The layout is set up and had a bit of a clean and vac job. A few minor jobs will be undertaken before it appears at Rainhill on 26th November. I have a small list of what I want to alter, hopefully it will all get done before the show! Photos of progress will follow.
-
9
-


Signaller69's projects
in Modifying & Detailing RTR stock
Posted
The Saloon is finished, 6w also Stove complete other than handrails and development towards the ScR Griddle car is underway with help from Worseley Works. Plus weathering continues on the Crinan fleet.
I am experiencing posting issues on RMweb with random huge spaces between text and photos which are not of my doing so posting involves a lot of time removing this gap (see my previous post which is not playing ball at all, even with editing). I have reported this but not had any response or solution.