


Tricky
-
Posts
1,479 -
Joined
-
Last visited
Content Type
Profiles
Forums
Blogs
Gallery
Events
Exhibition Layout Details
Store
Posts posted by Tricky
-
-
2 hours ago, Compound2632 said:
Should anybody fancy modelling Tewkesbury's first station from a different angle, here's a piece of inspiration:

[Embedded link to catalogue thumbnail of MRSC 63264.]
Forgive me if I speak out of turn - wasn't there some debate if this is in fact Tewks? I seem to recall someone saying the stone archway didn't correspond somehow?
-
14 hours ago, t-b-g said:
I am so pleased to see this project up and running again.
It is a delightful little scene.
Perhaps an entry into the small layout competition at Stafford next year might encourage you to stick with it?
Thanks Tony - as I recall the original inspiration was yours!
-
38 minutes ago, Dave Hunt said:
It was good to see you at Stafford, Richard, and to have a couple of chat sessions. I hope that it was remunerative for you.
Dave
Good to see you too Dave. It was a thoroughly enjoyable weekend!
-
 1
1
-
-
38 minutes ago, daifly said:
And your building and painting advice and explanations were invaluable so thank you again from me. (and thanks for the hut - it has a new home earmarked.)
Dave
Don’t forget to use the voucher!
-
 1
1
-
-
10 minutes ago, t-b-g said:
I am so pleased to see this project up and running again.
It is a delightful little scene.
Perhaps an entry into the small layout competition at Stafford next year might encourage you to stick with it?
Not sure I'm up to speed on the competition?! I will be demo-ing again hoepfully next year if they will have me. It was great fun!
-
1
-
-
True to my word, I spent a bit of time in Tewks this morning - I just hope I can keep it up!
So the first job was to check everything still works electrically, and surprisingly it wasn’t too bad. A couple of loose wires and possibly a dodgy tortoise but apart from that all sound. I gave the rail tops a good clean as well so it feels like it really is under way!
One slightly odd thing - any ideas why the controller doesn’t work? Definitely power to the rails…?-
9
-
-
- Popular Post
- Popular Post
Big News!! After a bit of a light-bulb moment, I suddenly realised that it wasn’t right that Tewks should be left languishing in the cold, dark depths of my storage under-croft so this morning I convinced myself I could make room for it once more in the workshop and went ahead and dug it out. So here it is! I have to say I have renewed enthusiasm to get it finished and maybe even exhibit it - this time without radio control, but good old DCC!!
The curved backscene is still in store as I can’t quite get to it yet and it will need repainting anyway. The overall condition is quite good although the fascia will need painting again. In the meantime I will continue work on the buildings. I will endeavour to post progress updates on here….-
20
-
 1
1
-
Unfortunate typo….!!!
-
 7
7
-
-
- Popular Post
- Popular Post
A couple of arty shots from a little diorama I’ve been working on.
-
33
-
 18
18
-
 3
3
-
On 08/07/2023 at 08:42, Compound2632 said:
I'm off to the L&NWR Society's modelling day at the Study Centre at Kenilworth today, despite all I have to show as progress since last year being two cattle wagons and a brake van, all work in progress.
Is my signal box still there?
-
2
-
-
An update - groundworks behind the wall and tunnel progressing well. Cellotex, polyfilla and grubby green/brown acrylic. Looks a bit ‘train set’ at the moment! Next will be static grass and build up the vegetation. Still thinking about the foreground!
Also undercoated the woodwork, favouring Farriw & Ball ‘Downpipe’ as the top coat colour.
-
8
-
-
21 hours ago, Rowan said:
Thanks Guys (& Gals) for the suggestions - most helpful. I have many, many other questions but not for this thread. But one that is linked, how do you make/buy horse droppings for I would imagine there will be a few piles dotted around! Cheers.
I also made horse poo! Except
one was 7mm, not 4mm. There’s a previous post on here somewhere of how I did it. Poss on my ‘Midland in Bristol’ diorama.
-
19 hours ago, Worsdell forever said:
Thank you for the kind recommendation. I did an article in a previous MRJ describing one technique of using sanded polyfilla. As a previous poster said, don’t be tempted to make the surface too undulating, especially in 4mm. The odd pothole here or there but easy to overdo. I would paint it with enamels and acrylics and use real ash from my log burner to soften the overall effect.
Not a silly question at all - quite a good one actually! -
A few photos I took today of progress. The retaining wall is almost finished, I need to weather the stone coping and capping and paint the back of the tunnel mouth black. I’ve finished the wooden hut too. I’m now on the search for atmospheric prototype photos to give me some inspiration for how I might finish off the scenery, details and groundworks.
-
7
-
-
-
Posting two days in a row!!
Fab progress on the diorama, outdoor photos help too!
-
6
-
-
Thought it was about time I posted an update on the on-spec diorama. I’ve had one of those days where I finally got round to doing something about a few jobs that have been hanging around and literally gathering dust, so I blew (or hoovered!) the dust off and begun by adding ply and mdf packing around the trackbed to bring the ground level up.
Then I began to build the mdf fascia surround. Tomorrow I will continue this work and perhaps get as far as machining up a moulding to trim around the mdf. I would like to think now I’ve actually begun work on the diorama again that I can maintain some momentum!
Sorry if these photos just look like a mass of g cramps and weights! I reckon tomorrow once I’ve added the rest of the fascia and take all the cramps off it should make a lot more sense!
-
8
-
-
1 hour ago, Philou said:
I love the attention made to the brickwork coursing - very good. If it's not a trade secret, with what and on what did you scribe - if indeed it was scribed?
Cheers,
Philip
Thanks, yes, as mentioned above, hand scribed Das on a ply base from memory. The same method as I used on the dock wall on Midland in Bristol.
-
3
-
-
1 hour ago, Rowsley17D said:
Whose bricks are they? They're best embossed ones I've ever seen where the mortar is not as thick as a brick.
Thanks. They were hand scribed into Das clay.
-
1
-
5
-
5
-
-
- Popular Post
- Popular Post
Apologies if this has been on here before. A little building I made about 7 or 8 years ago, before the laser cutter arrived!
-
42
-
22
-
2
-
Shame on me as I see I’ve not been on here since Feb!
Anyway, the latest kit to roll off the R&D bench is this GW Sand Bin & Furnace. This is in 7mm at the moment with a 4mm version to follow.-
8
-
-
- Popular Post
- Popular Post
Not been on here for a good while. My meagre offering:
-
39
-
Thought I’d put a question out here - it’s a question I’ve posed on social media as well….
Ive developed a 4mm kit for a GWR coal stage which is beginning to sell reasonably well. I have been asked by a couple of people for a 7mm version but ideally I’d like a couple more requests before I go through the process of upscaling and producing. If you or anyone else you know would be interested then I’d love to hear from you. The photos here are a completed 4mm kit build and a fully painted and finished version. The kit includes all walls, brick detailing, chute canopy, internal floor, tank parts with engraved river detail, doors, windows and stair parts. The 4mm version is available to buy through my online shop.
Thanks!
-
6
-
-
5 hours ago, Dave Hunt said:
As the future owner of the shed, Richard, I'm delighted to say that I'm impressed!
Dave
Thanks Dave, you will hopefully be equally impressed with today’s progress: I made a solid start on the 36 chimneys, each one having to be notched into the roof. I started in the centre and worked out to the ends where the last grill will be made to measure. All the chimneys were stuck down to a board and planks stuck along them all, then separated and the remaining 3 faces stuck with planks thus ensuring each chimney has the same number and spacing. It’s quite satisfying to see a nice straight row of chimneys! One row done, 3 more. Please note the roof is temporarily ‘plonked’ in the last photo!
-
10
-


Midland in Tewkesbury
in 7mm+ modelling
Posted
Todays update. I’m on a roll!
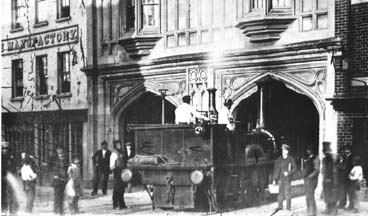
This area in front of the mill has always troubled me:
I’ve never been too happy with either the composition or quality, so it had to go.
I found this photo:
Which has far better composition (as it’s real!), has the mill in the background and a bit of water. So I chopped out the existing and cleaned up the area.
Then I cut a wedge-shaped piece of ply to build out the trackbed edge, glued on some spacers and then glued on the wedge.