


Norton Wood
-
Posts
323 -
Joined
-
Last visited
Content Type
Profiles
Forums
Blogs
Gallery
Events
Exhibition Layout Details
Store
Posts posted by Norton Wood
-
-
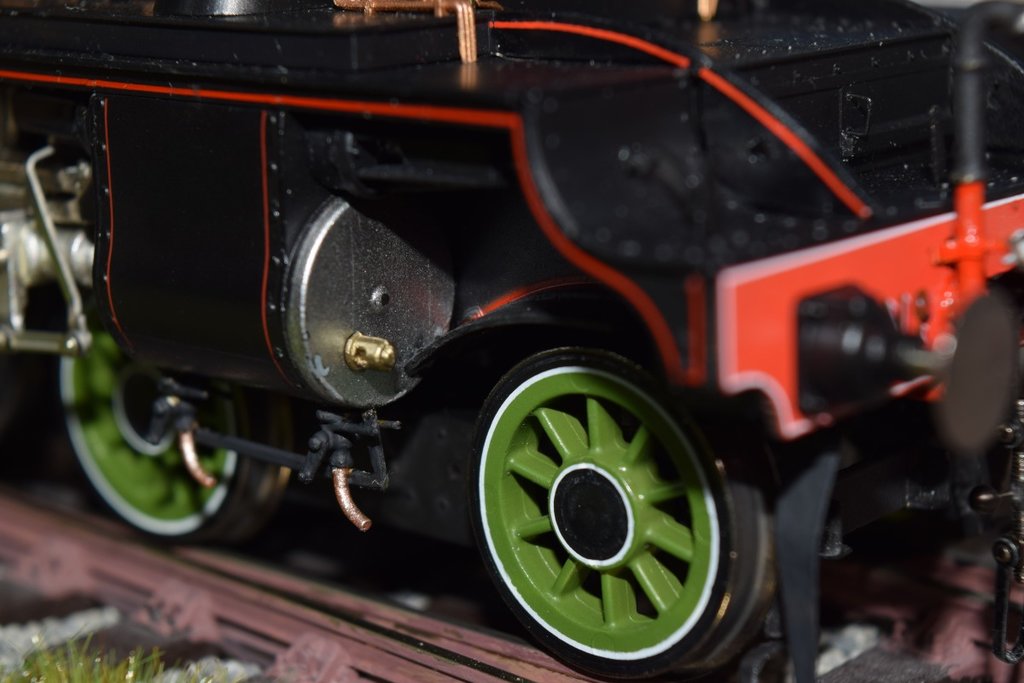
With my LNER (GE) 52'6 Coaches at home I couldn't just sit and wait to get them to a stage where they are almost finished ready for painting. So I took the time during my lunch and tea brake (while working from home) to crack on and finish them to a point.
For the 1st/3rd Composite, I decided to fit the vehicle out with the Angle Iron underframe, followed by the battery boxes. A fairly easy job to do. Plus I have glued the roof in place while still being able to remove the sole-bar underframe. Having previous experience on these kits I have learnt gluing the roof & sides are the better thing to do rather than glue the sole bar to the sides. This has shown a few imperfections with the printing process however nothing that cannot be solved with tiny amounts of filler ( All to do next time).

As for the 3rd Brake, I decided I would go for the Truss Rodding type, at this moment in time I am waiting on the Truss Rodding to appear from dart castings along with the T door handles & grab handles adjacent to the door. Adding to that I have also glued the roof to the sides of the vehicle while being able to remove the sole bar & fitted the torpedo vents onto the roof.
So all in all not a bad hour & a half's work.
-
 5
5
-
-
For the layout I purchased a pair of the LNER 52'6 Teak kits from Isinglass, they arrived yesterday and the same day they were together. I have left the roof & sole bar separate for painting, kit has has been fine to put together, had a few issues with the roofs fitting perfectly. But nothing I cannot solve with a bit of glue or swapping to find the perfect fit.
In addition, Bure Valley models have produced in connection with Bachmann a copy of the signal box at Wroxham, just for interest I borrowed one and put it on the layout to compare the different signal boxes. In this case I find myself split between the Wroxham box and the box I has specially built for the layout. Thoughts?
-
6
-
-
For any modelers, who are not on Facebook, a recent post by Niu Models on the LNER J15 Back-cab & Weather boards which you can fit onto the tender. As it's early day's but it won't be long before they become available.
Photo's by Niu Models
-
1
-
 2
2
-
-
17 hours ago, OhOh said:
Wondering earlier today if I might be brave enough to attempt painting my Hornby GWR 4 wheelers into something hopefully looking like LNER teak, I stumbled across this info courtesy of Phoenix Paints.
If you've not already seen it, I hope it might be of interest/help.
Gra
Always helpful thank you, I have painted a full Quint Articulated set and a Pigeon Van now. Made plenty of mistakes along the way, but all the better for having made them. I did find a thread on RM Web which demonstrated the way to paint Teak onto vehicles. Showing the various stages of the painting. But since doing these I've realized less "Golden Teak" is more. Painting Teak is an art in dry brushing. which has worked when I was doing a friends Quad Art set.
My First proper go at Teak painting
Second go at Teak painting
My most recent go at Teak painting
-
4
-
-
1 hour ago, micklner said:
Horseboxes all over in "Teak" paint as below.If a steel underframe vehicle as below photo Black . Normally the same rule on all pre grouping Coaching stock. The Coach in the photo above is far too dark a shade.
Yes this was a mistake I learned rather quickly, so I have painted it as you can see, this is an old photo as the sole-bar is now black. But yes, I'm likely to paint the pre-grouping stock in the same livery as the Horsebox.
-
2
-
-
1 hour ago, 31A said:
The numbers and lettering would be the standard LNER style, the same as Gresley stock, yes.
As to the colour of the coaches, pre-grouping coaches which had always been varnished teak carried on being varnished teak, until or unless the teak got so worn and panels were replaced etc., that it wasn't 'presentable' any longer, at which point they would have been painted plain all over brown (i.e. no attempt to paint false graining). Quite possibly the 'house conversion' coach in your picture is an ex Great Eastern coach which avoided being painted before it was withdrawn.
Coaches which had been painted a different colour by the Pre Grouping railway company (e.g. Crimson Lake) were painted the all over brown as soon as they needed repainting after Grouping. The 'brown' colour is some times described as 'teak colour' but I don't think it was the same (bright) colour that was used for the underframes of Gresley coaches. I think the colour was a bit variable depending on which Works painted it, but the K&ESR coach in your picture is probably pretty close to what it would have looked like.
Thank you, I previously painted my LNER Horsebox using the Golden Teak livery only, (It has been since repainted correctly) and I've found this to be a rather close livery to the one shown by the K&ESR photo. As I'm modelling the layout in 1937, I'm wondering if it's worth doing a mixture in Varnished Teak and some in the Brown colour. But thank you for your comments.

-
1
-
-
Currently looking into the liveries carried by Pre-Grouping coaching stock once the LNER was formed. I am looking a various liveries, but so far I only have a number of options presented from restored coaching stock or from recently recovered coaches used as houses. Was it the dirty brown shown by the vehicle from the K&ESR or a representation livery for teak or varnished look?
It looks to me as if the numbers applied were the same as those applied to Gresley stock, being the Gold & Red numbering & lettering?
Opinions and information always welcome.
-
4
-
-
Ah well thank you,
It has bugged me but nice to hear you say it's fine. I did do a fair amount of research plus looking at the Isinglass drawings, B&W plus a few colour photo's and it's been a hard one to get right around the bufferbeams. But I think it looks good with a Teak colour bufferbeam.
The weathered Claud was 62581 I believe, funny as I volunteer at a heritage railway, and Alan Baker ( Former Fireman on BR M&GN & GE) said 2581 was his first Claud to work on! Mmmh I'll have to see about that might solve my running problems and enable me to just sort a few things out.
-
1
-
-
2 minutes ago, 31A said:
Always nice to see a GE based layout, and good to see how you're progressing with this!
Re. the Hornby D16/3, I think whether or not they pull well has something to do with the arm that carries the bogie; it seems to be designed to carry some of the front end weight but if it carries too much it takes traction from the driving wheels - it's worth "fiddling with" it for want of a better explanation!
Yes! There's not many GE layouts kicking about, as I live in Norfolk it be rude not to have a go. Yes it's been very strange, my current 8837 is a poor runner but my LNER 8802 is amazing along with my Re-numbered BR (Early Crest) Claud 62614. These two have pulled the Quint set with ease on another layout. I must admit since doing a Quad set for a friend I am becoming far more un-happy with my work on the Teaking effect so I'm likely to purchase another 2 sets and get a proper teak effect to them.
-
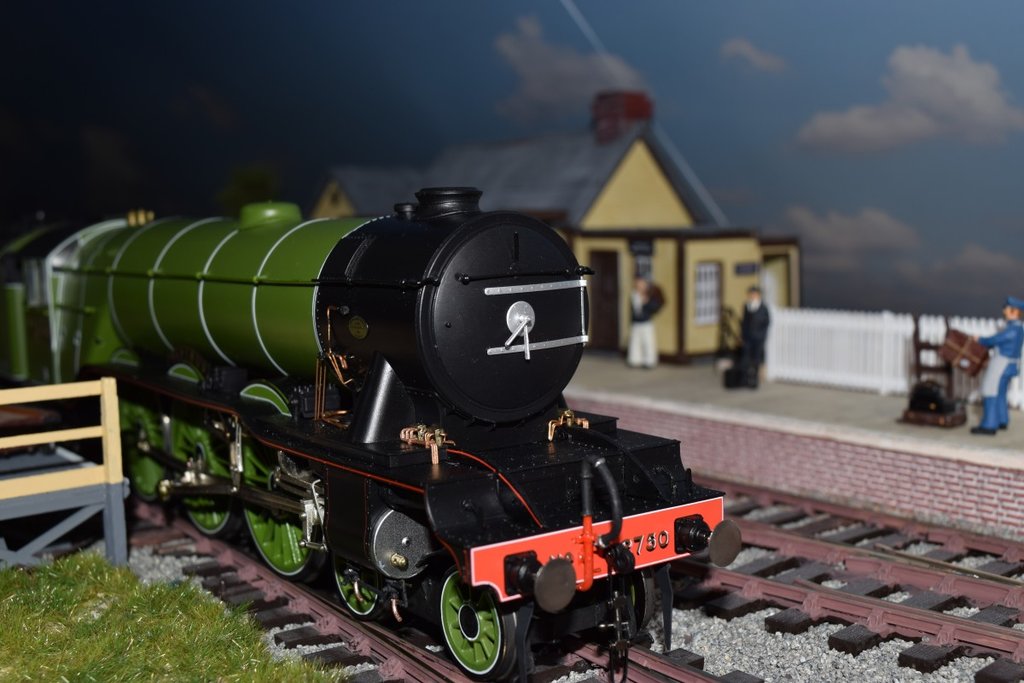
Thought I'd change my tactic's a little, and have a topic based on my Exhibition layout, rather than a blog to follow, anyway here's my most recent progress, hopefully I'll get a few more updates within the next few weeks.
Track work
Of course as Peco has been busy and I am sure the Double Slip will come out when it can, so recently a brief focus has turned to ballasting, now this is a job which I must admit I wasn't happy with so the likelihood of it remaining down on the board is low. However for a first go it's not too bad however there are issues with some ballast catching on the flanges of the locomotives & rolling stock. You will have to trust me when I say that the photo does not do the work I have carried out any justice. Since that photo a lot of work was carried out to clean the track up and ensure smooth running.
Locomotives
I have recently taken stock of a new LNER D16/3 No.8802, in recent history Hornby's LNER D16 suffered with poor weight distribution which in turn meant the locomotives would wheel slip and have a very low capacity to operate any significant load. Particularly on track which has any incline the locomotive simply will not pull it, so on occasion a run up was required to get it up there!! However a friend of mine bought the LNER Apple Green Claud 8900 'Claud Hamilton' now this seemed to operate in a much better way than either of our original LNER Black Claud's ever did (This was the first batch Claud No.8825) I recently took 8802 to operate on a layout which has gradients and is designed to haul to scale length trains and the locomotive performed beautifully. 8802 will replace my current 8837, as 8837 will be renumbered to carry another number as the original 8837 has the double snifiting valves which this model has.
This also ties nicely with rolling stock, however since building my LNER J68 in O Gauge and I recomend you have a look through, I recently gained a large amount of confidence to purchase & build brass kits of LNER locomotives for this layout. Hot off the press news @David Eveleigh is looking to produce the LNER(GER) T26 and for those interested the Little Sharpie. This locomotive will become a welcome edition to the MEP Fleet, with the potential of having 2 in the future.
LNER E4 7504 seen here in 1936. This will be the locomotive I look to replicate... ( Photographer Unknown)
Rolling Stock
On a final note, having found David's work on the internet I am very happy to be able to decide to look into ordering 5/6 of these lovely looking coaches from David. To begin with we will focus on the GER 6 Wheeled stock, and put them into the LNER Colour scheme which was effectively painted Teak. Not a nice colour for such lovely coaches but it is a necessary job. I may eventually purchase the same set again and look to do them in the GER Crimson colour scheme. Eventually I plan to have 4 of the 4 Wheeled Stock as one of the 6 Wheeler's will sit among the 4 wheeler stock. A much more cost effective way of modelling then purchasing a higher priced LNER mock up from the Hattons Genesis coaches. I will note that those coaches are great for people looking to get basic coaches for there Pre-grouping locomotives, and both being at a very competitive price David's product at £37 and Hattons at £30. Personally that extra £7 is worth the money as a modeler you can pay for the detail and the accuracy which the Hattons model will not give you if your a serious modeler like myself.
Photo's above are the property of eveleigh creations 2020)
On another plus planning has begun for purchase of the Isinglass LNER 52-6 Teak coaches which were a regular site on the LNER(GE) Section, I have begun with purchasing drawings and within a few weeks of this coming out I should have the first of the 4/5 coaches required. The aim will be to use them in a variety of passenger roles mixing them with the Hornby 61ft 6in types as that was regularly seen on the LNER(GE) Section and something I wish to replicate.
So all in all lots going on and lots being planned it's just a case of getting the beginning items for this layout together!!
-
5
-
-
@David Eveleigh Hi,
It's Tom, we've been talking via email re the E4 & Little Sharpie. I've been flicking through a lot of photo's for the E4's using the Yeadon's and various online cases and I've managed to find a number of photo's for you. I've attached the links to those photographs. Interestingly I found an E4 at Cambridge with the North Eastern style type of cab.
https://thetransportlibrary.co.uk/index.php?route=product/product&product_id=66776
https://thetransportlibrary.co.uk/index.php?route=product/product&product_id=66703
https://www.flickr.com/photos/93456400@N04/15159066123
-
9 hours ago, micklner said:
Yes, it ran in testing for about two weeks , there are no definate dates in the book.
Does seem very odd, for Hornby to do that, but I suppose it's to save some money, I mean Hornby could very well modify there P2 for the streamlined P2's.
So just my luck Rails then announce that they are no longer trading with Hornby better look else where for my W1!

-
 1
1
-
-
Yes, but as you can see in the photo's they've molded the double chimney. I think the loco had the original look but the with double chimney for a period of 2 weeks then was re-designed. Then rebuilt to the Streamlined condition. I ought to get the book solely dedicated to the W1. As I work on the footplate of std gauge locomotives and I understand how they operate but this marine boiler I find it very hard to follow in terms of how it actually worked.

-
9 hours ago, WisTramwayMan said:
Re the Apple Green one, as concerns being in service this is hypothetical, so why not issue it with "British Enterprise" etched nameplates (not printed, so could be displayed at the buyer's discretion) ? I think named and in Apple Green it would look superb....
Oh course, it wouldn't be authentic, but then again the only truly authentic one is Battleship Grey un-named.
A good idea for the nameplates to go with the Apple Green version, I really hope it sells well...And just looking at Hatton's website the Original & Apple Green versions have sold out so fantastic work from Hornby.
8 hours ago, Cor-onGRT4 said:Anyone noticed there are 4 type of chimney fronts on the sprues for the original built one, for future release versions?
The rebuilt versions is one piece of body, so not for this one.
I had thought this myself, now looking back at the 3D printed models that were shown on announcing day, the Original W1 on show has the double chimney. So I would imagine that Hornby have 4 front ends for us the modeler to look at purchasing. Looking at the Yeadon's book on the W1 the loco received a number of alterations before being re-built to the streamliner look. Very interesting, and highly commendable to see.
-
I always had an intention to purchase the Rebuilt LNER W1, this photo just confirms that, glad I pre-ordered one while I could! I do like the look of the Apple Green, but like others I wouldn't get it.
-
1
-
 1
1
-
-
On 22/03/2012 at 17:57, HARRYMALLARD said:
It was this picture that I noticed the TEAS sign on the roof and realised. That this layout was featured in railway modeller around 2000 I think, under the name Holiday Haunts.
cheers Harry
Nice to see another J68, and funny enough 7045. Which I have just completed-
2
-
-
1 hour ago, JamieR4489 said:
I don't think there'll ever be a definitive list of workings for any particular shed but I've scanned the RCTS volume on the A3s and A4s and the best I can come up with for A4s is 'besides working to Newcastle (and King's Cross on the summer non-stop "Flying Scotsman"), the A4's (sic) worked daily to Glasgow and Dundee. In later years they also appeared on the Perth road'
Haymarket A4s were also used on the Coronation.
For A3s, there's a bit more detail as it mentions the 11am Glasgow-Edinburgh, 8-30am Corstorphine-Waverley before working the Up Thames-Forth express. Running in turns were the 5-23pm stopper to Larbert. Some 1920s working which may well have carried on into the late '30s were the 1-15pm, 1-50pm, 7-45pm and 11-5pm workings from Waverley and the corresponding return runs from Newcastle (I don't know which workings these were) and there was also the 7-35am to Glasgow (and, I presume, the corresponding return working).
To find which trains a shed's locos were allocated to, the best thing I've found to do is to find a picture of an engine based at your choice of shed and work out what the train is behind it, although this requires you to have access to Carriage Working Notes and knowledge of carriage types.
Hope this helps,
Jamie
Hi Jamie,
Thanks, very helpful. I have a photo of A3 2500 Windsor Lad on a Edinburgh-Aberdeen Express seen here at Princes St Gardens, I've been on the LNER Encyclopedia Forum's and a few authors to get the closest coach formation to match the photo . The last two have been more logical in there choice, as you cannot tell what they are. I ask about the A4 because I'm trying to justify getting an 0 Gauge A4 to go with the Set I am building for the A3 ( Below).
Formation below:
No.1 – BTK – 4 Compartment Brake -
No.2 – TK – Dia 155 -
No.3 – RC – Dia 187 -
No.4 – CK – 1st 3rd -
No.5 – TK – Dia 155
No.6 – BTK (3) Compartment Brake -
-
6
-
-
23 minutes ago, landscapes said:
Hi Tom
Thank you for your kind comments,
Haymarket Pacific locomotives We’re used on many duties.
The ones I know of from Edinburgh to locations like Carlisle on the Waverley rout and expresses south usually as far as Newcastle.
Then there we’re expresses further North to locations such as Glasgow, Perth and Aberdeen , these all could have been worked by a Pacific locomotive With a non corridor tender.
Obviously Pacific’s with corridor tenders were used for the non stop Anglo Scottish expresses such as the Elizabethan.
Although I have studied Haymarket MPD in great depth to enable me to build the layout my trainspotting days in the early sixties we’re in London we’re I grew up so I am not that familiar with the train workings to and from Edinburgh.
There are a quite a few members on RMWed who often comment on my own Haymarket Thread who have a much better knowledge of the workings of Haymarket locomotives than me.
maybe if any read this they may be able to help and provide more information For you.
Regards
David
Thank you, alright I look forward to seeing what those who know far better than me have to say. I've planned to get the Hattons A3 & A4. Both planned as Haymarket engines (Windsor Lad & Golden Plover) set in the late 30's. The A4 would have done anything, as she was fitted with a streamlined corridor tender and the A3 with the High-sided Non-corridor tender.
-
1 hour ago, landscapes said:
Hi
Tonights photos stay with movements from the turntable down to the coaling tower, water tank and ash pits.
This time we see two of Nigel Gresley's finest, A4's, 60011 Empire of India a resident Haymarket loco and visiting A4 60017 Silver Fox.
Both standard Hornby RTR Locomotives with 60017 Silver Fox has had a name and number change but I cannot remember the donor locomotives identity.
Regards
David
Wow, amazing. It's great seeing modelling like this makes you feel like you are there!!
I have question, what sort of duties would these engines do, for example I have an A3 ( 2500) Windsor Lad which was a Haymarket engine, I was wondering if anyone could guide me to the sort of duties and Non-corridor A3 would have been upto in the 1930's. I assume she'd of carried out expresses and worked out of Scotland into England on short(ish) out and back trips.
Thank you in advance
Tom
-
23 hours ago, dodge605 said:
Have used Slaters short handrail knobs, made up off loco with solder and then fitted,happy with result
Fantastic work, proves it can be done and it looks good. A project for me to do in the future
")
-
1
-
 1
1
-
-
On 09/05/2020 at 08:25, delticfan said:
Sad is a bit emotional, they are a doddle to fix but you will need a drill bit and handrail bits, Eileen’s Emporium for those. Next interesting bit for me is adding my numbers, I’m using Fox numbers which don’t look bad only a little carrier film noticeable. I trial glossed a Heljan wagon panel last night with Mr Hobby Gloss varnish using their self levelling thinners so its super smooth for the decals, will trial those today then the tricky bit varnish to match the rest of the loco, it’s almost Matt but just not quite, satin maybe to shiny hence the wagon trial.
I look forward to your results
I've ordered a Un-numbered LNER Apple Green A3 which I am using Fox Decals for so it would be nice to see how it looks once you've finished the work.
Thanks
Tom
-
1 hour ago, Adrian Stevenson said:
Hi Tom, I asked the same question. You can get them here:
https://www.lgminiatures.co.uk/product/10-005-lner-gresley-locomotives-a1a3a4p1-etc/
No connection to the company. Hope this helps?
Cheers, Ade.
Hello,
Fantastic! Thank you very much!
Cheers
Tom
-
1
-
-
On 23/12/2019 at 16:36, Franzburg said:
Shortly before Christmas 3 further photos of Papyrus. Real coal for the tender (on plasticard) and mudguards prototypically broadened a little bit with plasticard.
Rgds and blessed Christmas
Bernd
Hi,
Where did you get the fittings for the correct A3 Cylinder Cocks? I've been looking and struggling to find the right place for them
Thank you
Tom
-
10 hours ago, Headstock said:
Thanks N W,
I have never used any of the 'stretch it across the opening' products, it again seems a very flimsy solution, is that so?
It can be, it's why I ended up choosing to not fill the windows with it. I applied a thin layer onto the bodyside around the window then applied the clear plastic over the top. I did find it came away in places so around those area's I applied an extremely thin piece of PVA glue not covering the window. To note at the minute I have only glazed the No.5 & No.4 coach.
Thanks
Tom
-
1
-


")


Mile End Park - LNER 1938 Exhibition Layout
in Layout topics
Posted
Thank you, I thought about this and the box which I specifically built will most likely remain on the layout. But I'm certainly keen to have a box which is more accurate for the layout as the box really isn't that big for the type of terminus station I have right now. This is the only argument I have within my head.