
magmouse
-
Posts
1,081 -
Joined
-
Last visited
Content Type
Profiles
Forums
Blogs
Gallery
Events
Exhibition Layout Details
Store
Blog Comments posted by magmouse
-
-
2 hours ago, kitpw said:
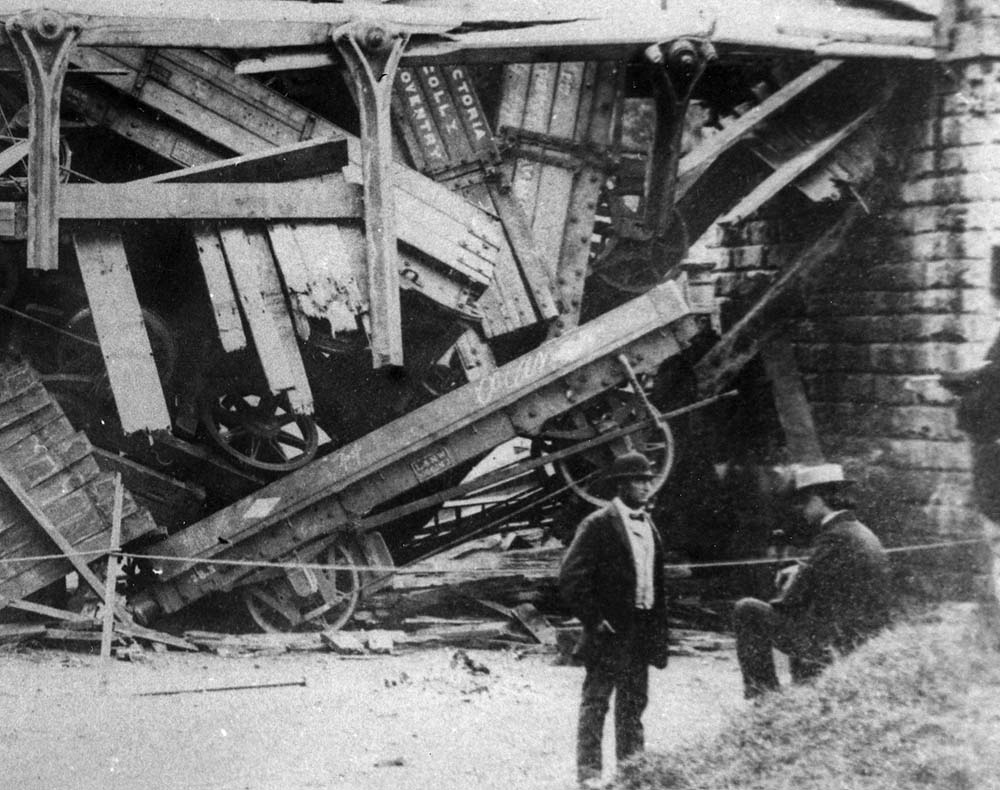
I'm interested in the spring question - I've encountered a similar problem but in the opposite direction - springs too deep that won't fit between sole bar and top of axle box. It set me to wondering how far the springs flex when a load is applied? Do the ex-works photos/shop drawings (unloaded) show a marked difference to the in-service (loaded) shape of the spring? I've been looking but haven't reached any conclusion - I guess the springs flex more with age in any case.
A good question, that I haven't given much thought to. This picture is perhaps an extreme case of spring compression under load:

[embedded image from https://www.warwickshirerailways.com/lms/lnwr_oldmil1446b.htm]
I assume the bump stops fitted above the centre of wagon springs were designed to limit spring deflection under excessive load at a point prior to the spring breaking or being permanently deformed. That doesn't mean that the spring deflection under normal, maximum loading would be as much as that, however. There was some discussion recently (on the D299 thread?) of buffer heights, and how they seem to have varied quite a bit, which presumably relates to both spring deflection both under load, and over time as they aged.
None of which quite addresses the question of how we should reflect all this in our models...
2 hours ago, kitpw said:Are you working to S7 standards or 31.5/32mm? The degree of inset of sole bar relative to the wagon side is obviously affected by the placing of the W irons (axle guards) which are attached to the sole bars. I've noticed that if the sole bar/W irons are set correctly for the prototype, the wheel face with a less than prototype track gauge (31.5mm in my case) is too far behind the W irons - I think it's more obvious on some vehicles than others. But you seem to have the opposite question on the 2 plank wagon if I've understood correctly!
Wheels are normal O-gauge finescale, mainly from Slaters and sometimes Peco. When I get to building track, I plan to work to 31.5mm gauge, for the visual benefit of finer flange ways on turnouts. The spacing of solebars and w-irons is something I have been fretting about a fair bit recently. You may have seen my thoughts on this, and subsequent discussion in the comments, in my blog post about the sheeted 5-plank, built with the Slaters (ex Coopercraft) kit.
I am currently working on a scratch built 1-plank open, with wooden underframe. I don't have a detailed drawing, just the basic diagram drawing in the bible, with detail measurements scaled from photos. Working inwards from the overall width (known exactly from records), an estimate of the thickness of the curb rail and solebars gives a spacing between inside faces of the solebars which seems excessive. I realise I may have made a mistake in not allowing for a packing piece between the curb rail and the solebar, which I have seen in drawings of other wagons - after completing this part of the build, naturally.
I'll describe all this in more detail when I write up the current build, but the short version, for now, is I don't feel confident I am always getting these dimensions correct. And as you point out, working to a compromised gauge means the positioning of the wheel face relative to everything else will always be wrong (though slightly compensated for by the width of the wheel treads). S7 is the only answer to that...
Nick.
-
 3
3
-
-
6 hours ago, Annie said:
Excellent work and very nicely done Nick.
Thanks, Annie - much appreciated.Nick.
-
1
-
-
8 minutes ago, wenlock said:
Really excellent Nick! The extra solebar detail, along with door retaining chains really add to the wagon.
I’m thoroughly enjoying reading this series of wagon posts, very inspirational stuff.
BW
Dave
Thanks, Dave - Sherton Abbas has been a big inspiration for me (and many others) too! Hopefully at some point I can build a layout that begins to approach your level of quality consistently across all aspects of the layout, which you do so well.
Nick.
-
2
-
 1
1
-
-
Thanks, Graham - all that is interesting information.
My own research - less comprehensive than yours - came to the conclusion that either no 4-plank wagons were fitted with sheet supporters from new, or only a small proportion, possibly the last ones to be built (noting that 4-plank wagons were still being built after the first 5-plank wagons were introduced, which seem to have had supporters from new).
And, yes, I had noticed to two possible heights for the pivot point. I chose for the wagon described in this blog entry to go for the higher position, but I have built another with a sheet rail in the lower position (to be described in a future blog post). I wanted to do this for variety, especially in the ridge height of my various sheeted wagons. With the lower position, the end number has to squeeze between the corner plate and the end stanchion. On the prototype this was managed by the painters painting very squashed up numerals - I elected for a number with three ones in it: 41211! See below.
Regarding whether the bar is common to the two types, I would say it can't be, as the length of the vertical part of the bar is determined by the distance from the pivot to the top edge of the sides of the wagon. The bar, when lowered, has to land exactly on the top edge, otherwise it would be in the way and prone to damage. Looking at photos of wagons with the bar lowered, this is always the case. The size of the bar is determined not by how far up the pivot point is, but how far down it is, below the top of the wagon sides and ends. Look at pictures of the 7-plank wagon to see this.
I would expect all the other parts to be the same - the semicircular guide, the pivot casting, and the spacer blocks. The trapezoid piece of sheet metal attached to the verticals is probably the same, I would think, with it's vertical positioning adjusted in relation to the top edge of the wagon ends.
Is there somewhere where we can see the work of your S7 group? It would be great to have a look.
Nick.
-
2
-
-
1 hour ago, 57xx said:
If you do a matching pair of 1 side +1 end glued square with the block, then when you come to glue the two resulting parts, it's hard not to get a square (rectangular for the pedants) final assembly of the sides and ends.
Yes, that is what I do, though you still can’t use the block to hold everything square with the magnets.1 hour ago, 57xx said:The are known as 123 (or sometimes 321) blocks, as they traditionally are 1" x2" x3".
Brilliant - just the info needed. Thanks -Nick.
-
1
-
-
22 minutes ago, Compound2632 said:
indeterminate, unpredictable, and large
The Dark Energy of railway modelling, causing the miniature universe to expand...
"Expands? Into what?" asks the layman. But that is the wrong question. It just -
.
.
.
.
.
< < < < < e - x - p - a - n - d - s > > > > >
-
 1
1
-
 1
1
-
-
1 hour ago, Compound2632 said:
Which begs the question how many wagons is too many!
19 minutes ago, Peter Eaton said:must make life easier if the same wagons can be made to look loaded & unloaded.
Photographers tend to build up large collections of camera bags and tripods, each for slightly different purposes and situations. The joke goes:
Q: how many bags/tripods does a photographer need?
A: N+1, where N is the number they currently have.
I feel the same applies to wagons...
Nick.
-
1
-
-
14 minutes ago, Peter Eaton said:
Hello,
Wagon loads, with my wagons but being coal loads I used a fine track pin, head in the wagon.thus the pin protrudes upwards, as coal can be pained black & blends in quite well. Can be lifted out with pliers. If clever you could glue one loose prominent brick to pull on. Like your wagon build & interesting you have found model loose bricks as I have an interest in some Palbrick wagons in manufacture at the moment !
must make life easier if the same wagons can be made to look loaded & unloaded.
thanks,
Peter
Thanks Peter - the pin trick is clever, and allows you to exert a bit more pull than a magnet, if needed.
The loose bricks give a really nice effect, but don't underestimate the time taken to stack them all in position. A rake of Palbricks will look great, but expect to spend more time making the loads than building the wagons.
Nick.
-
2
-
-
Thanks, Kit.
Yes, the black/grey thing is another rabbit hole, which has been discussed here before in various places. In some ways less contentious, as one person's dirty black is another person's less-dirty grey... I have an ulterior motive to work on the basis of grey for loco coal wagons, which is that logically they would then have been red in the earlier period. I have a fancy for the 20T diagram N4 loco coal wagon, with Thomas brake and cast number plates, shown in new condition in the Bible. I am convinced that wagon is in red!
The brake gear on this one uses a WEP etching for all the main parts, except the 'swan' lever and ratchet mechanism, which is the original plastic moulding in the kit. The moulding for the shoes and push rods is nice, but has the rods the wrong way round for DC brakes (they should be left-over-right for DC). The WEP etch gets this right, but still has the shoes too far from the wheels (a pet peeve of mine), so I solder it all up, cut the rods from the tumbler with a piercing saw, and re-solder.
Thanks for the link to the blocks - they look great. I have seen them before in the background of people's workbench photos, but I struggled to locate them because I didn't know what they are called and therefore couldn't search for them online! I think I will get a couple of the smaller ones - they look ideal for assembling wagons, etc.
Nick.
-
1
-
-
18 minutes ago, Compound2632 said:
Don't overlook Burton casks in D299s. (You have, I can see, been reading the Sheffield Park article again.)
Of course - that will be a blog post soon, once I have done a little re-weathering, as per our earlier discussion regarding pre-grouping rust, or lack thereof.
Nick.
-
2
-
-
12 minutes ago, Compound2632 said:
Have you seen the one with working sliding door that @Tricky has built?
Then there's poseable roof hatches, of the sliding and rolling varieties...
The possibilities in the senior scale are numerous!
I haven't seen Tricky's one - I'll have to look that up. And yes, the recent consideration of roof hatches on your D299 thread caught my eye. I have on my list LNWR and SER vans to bring bottled beer from Burton on Trent and Canterbury - they are a thirsty lot in Netherport.
-
1
-
-
45 minutes ago, Mikkel said:
What an excellent result, hardly recongizable from the original kit. And a convincing proof of concept with the scrapper!
I like the angle block + magnets. Is it a dedicated item for modelling or a good find?
Thanks, Mikkel. I am pleased with this one, which I think catches the character of the original.
The angle block is from Axminster Tools, what they call a "Ground Angle Plate - 50mm": https://www.axminstertools.com/axminster-ground-angle-plate-50mm-800300?queryID=3730d40a3b5b0c5ff7d9a6eff2bedea3
It isn't cheap, but very useful, being accurately ground to have right angles to all the reference faces, heavy enough to act as a weight while glue dries, and usable with small magnets as clamps.
The only downside is it is just too big to fit inside most pre-grouping wagons, so you can do the first corner, but not the second. The loco coal wagon here is unusually wide for the period, so I was able to fit the block inside it.
Nick.
-
 1
1
-
 1
1
-
-
1 hour ago, Compound2632 said:
I suppose that the same applies to the 4 mm scale kit?
Checking in the Bible, the first square-cornered types were diagram N20 in 1915, and the Slaters (ex Coopercraft) 7mm kit would be a reasonable match for that, except the width issue still applies. I assume the same would be true for the 4mm kit, but I haven't looked at it closely.
After that, a series of diagrams relate to increases in capacity (up to 12T), length, brake gear, etc.
For those not familiar, and trying to understand the diagram numbers, the reason for the jump from the N13 I modelled to N20 is that there was a diagram N19, which was an N13 with DCIII brakes and (on later batches) self-contained buffers, and other diagrams for larger capacity wagons (12T, 20/21T, 40T).
Nick.
-
1
-
-
16 minutes ago, Compound2632 said:
There's a lot to be said for modelling vans...
But -1. For a pre-grouping layout, you shouldn’t have too many, and,
2. Where is the fun in that?
-
1
-
1
-
-
All this does make me wonder, though, how many empty wagons I should have. At the moment my planned wagon fleet has a couple of empties on the list, one of which will be a spacer wagon for an overhanging timber load, but is that enough? Assuming there is a balance of traffic (possibly true for my port setting, perhaps less likely at a branch terminus) then general merchandise wagons can be utilised in both directions, and so spend most of their time loaded. And of course, sheets hide what is going on - including loads of spare sheets, as discussed elsewhere recently.
Nick.
-
10 minutes ago, Mikkel said:
But sometimes I may want an empty wagon, or a different load. You know, like on the railway 🙂
Sure - so you make another wagon. You like making wagons, so it’s all good!Nick.
-
2
-
-
11 minutes ago, Compound2632 said:
The wagon and the load are one.
Ah - the metaphysics of modelling! Certainly, the more I read the rule book on correct loading of wagons, and want to replicate those practices in my models, the more I realise there are very few loads that can be made removable. Almost all loads are roped, scotched, sheeted, chained or otherwise firmly attached to the wagon, with the exception of bulk loads such as coal, sand, and so on. The bricks in this wagon are unusual, in that they are individual objects that can be stacked, and don’t need to be constrained or covered, and so are potentially removable.Nick.
-
1
-
1
-
-
29 minutes ago, 57xx said:
That was a lot of work you had to put in to that kit, but well worth the final result.
Thanks - yes, this one is definitely not a ‘shake the box’’ kit, at least if you want it to represent a diagram N13 accurately. It would be close to a later type (N20, N21? I don’t have the books to hand) though the doors were wider on those, I think.24 minutes ago, Compound2632 said:There are vertical rows (columns?) of rivets on the ends that don't get a mention... Also the triangular fillets on the corners of the top angle.
Good point - the corner rivets are Archers transfers, and could have done with being a size larger to be closer to the moulded ones. The triangular fillets are just pieces of plasticard - a distinctive feature of the prototype, and especially visible on a model which tends to be viewed from above.24 minutes ago, Compound2632 said:Coal is, or can be, shiny - especially, I think, as hewn out of the seam, and of one of the harder varieties. This should be Welsh steam coal - I don't know how hard that was.
Indeed, though looking at photos you don’t often get really large flat faces of coal catching the light, as tends to happen with at model scale. We can make this worse by using multiple-source lighting, so there is more chance of light reflecting off a face and into the eye - you therefore get more ‘sparkle’ than you would with a single light source (the sun) or diffused light (sky or overcast).Anthracite is the hardest and shiniest coal, I think, with steam coal one or two steps along the spectrum towards the very soft coals.
Nick.
-
1
-
1
-
-
Using the screws to allow a magnet to get the load out is a nice idea. So far with coal loads I have fixed them permanently, and my plan is to have equally as many full and empty wagons - not the same wagon modelled twice, but corresponding pairs to represent types and traffic routes. So there will be 4 PO wagons for the local coal merchant, 2 full and 2 empty, and ditto for South Wales colliery wagons, and ditto again for loco coal. Luckily I like building wagons!
Over time, the importance of interior detailing - when visible - has grown for me. Especially since we tend to view from above, it seems strange to pay a lot of attention to the outside of a wagon, and leave the inside with little or no detail at all. It does add to the work, but as I say, I like building wagons…
Nick.
-
1
-
-
2 hours ago, Compound2632 said:
For a moment there, I thought it was going to be individual bricks all the way down!
Remember, it’s all theatre! You only see what you can see….2 hours ago, Compound2632 said:But why bother with the wagon floor if there's going to be a former supporting the top layer of bricks?
Good question - the former, with its bricks, was designed to be removable. It has supports about one third and two thirds along the length of the wagon, the idea being you can push down on one end and the other end will flip up so you can grip it and remove it. However, in my desire to minimise the gap around the edges, and with the protruding internal ironwork detail, the load is now wedged in place, and I am reluctant to try and get it out, for fear of damaging it and/or the wagon.
Nick.
-
1
-
-
6 minutes ago, Mikkel said:
The only problem is that with one MR wagon and one LSWR wagon you may have reached the ceiling of your quota for pre-pooling foreign wagons. Unless Netherport staion is biger than I think? In any case, don't let that stop you, the more you build the happier we are 🙂
Yes, I have been thinking about that. At the moment, my planned wagon stock has 20 GWR revenue-earning wagons, 6 non-revenue (a Cordon gas tank and some loco coal wagons), 8 private owner coal wagons, and 8 non-GWR wagons.Coal wagon numbers are doubled, with half full and half empty. 8 non-GWR wagons is disproportionately high, as you note, but my thinking is that I would only run one or two at a time. In my head, each has a justification - a plausible imagined reason to be present - but they certainly shouldn’t all be seen together.
Netherport isn’t all that big, as I see it, but it is more than just a branch terminus - the harbour and an engineering works bring additional traffic, beyond the needs of the town itself.
At some point I should do a post explaining the plan - it would be interesting to get people’s thoughts on it.
Nick.
-
3
-
-
6 minutes ago, Chrisbr said:
Anther excellent wagon build and I love the way the sides are clearly not fixed to the ends and could easily drop if only the retaining rings were removed...
Thanks, Chris - I particularly like that aspect as well. It's great when a model looks 'constructed' from components, rather than 'moulded' as a single thing.
Nick.
-
1
-
-
36 minutes ago, Dave John said:
Nicely done, I bet it sits well with the weight of the whitemetal body.
Facing brick was traditionally thinner than common brick, so it could be a load of those.
Yes, it is quite hefty, but I weight my wagons to around 1 gram per millimetre of length, so it isn't too much over that.
And that's for the note about facing bricks - that will be my post-hoc justification from now on...
Nick.
-
2
-
-
2 hours ago, Western Star said:
I shall try to follow this approach for our wagons. What colour of "brick" have you used? Roughly how many bricks per layer?
thank you, Graham
The packet describes the bricks as:
Juweela Bricks
1:48 Med Red
JU24023 Qty 1000 av.
I still have some left from the nominal 1000 in the packet - maybe a quarter - so one pack should be enough for any normal sized wagon. Because of the way I made the former, there is only one row of overlap where the upper and lower layers meet.
One thing I have noticed in pictures, after I finished this wagon, is there are quite often a few 'loose' bricks that aren't neatly stacked, lying on top. Possibly they shifted in transit, or the last few bricks in a load just get put in any which way.
In case you haven't seen them, there are a couple of useful videos, which show how bricks were loaded - including some rather extraordinary loading of a 1-plank wagon:
http://www.ampthill.tv/archive/ZZ/Brickmaking 1938/Bricks Cine 1938.mp4 - see 11.56 onwards for bricks being loaded, and overhead views of wagons showing the tops of the bricks as loaded.
And a video of bricks being loaded and train of wagons with bricks passing, plus following discussion :
Nick.
-
3
-
1
-


GWR 2-plank open wagon
in Netherport - GWR 1908 7mm (mostly wagons for now!)
A blog by magmouse in RMweb Blogs
Posted
Me too. In my youth, I went from OO to EM and then to P4. At each stage the improvement was well worth the additional work - the difference from OO to EM is huge, but implies you have to re-wheel everything. EM to P4 is a smaller gain visually, but since you have already committed to re-wheeling, the extra work isn't that great (mainly compensation for some locos and longer wheelbase stock, as a minimum). It became obvious P4 was a no-brainer*, and visually transformational compared with OO.
With 7mm scale, though, there is a useful but not massive visual advantage in going from finescale to S7. The amount of work isn't too great if you are kit or scratch building, as I mainly am, but you loose interoperability with other layouts. If I was part of a group of S7 modellers with shared interests, it would make sense, but right now, I would rather keep a wider compatibility in case I get involved with a club or group at some point in the future.
Nick.
* This is strictly a personal view - no disrespect intended towards people who make other choices, that suit what they want out of their modelling and their situation.