Jump to content
 

Low-tech coach restoration (2)


Mikkel

4,874 views

As mentioned in the previous blog entry, I've been restoring a small collection of secondhand scratchbuilt 4- and 6-wheelers. I should point out that I'm cutting some corners here: The premise for this project has been to see what I could do with the coaches with simple means and materials, and without breaking them down into their constituent parts and starting over.


P2036441.jpg


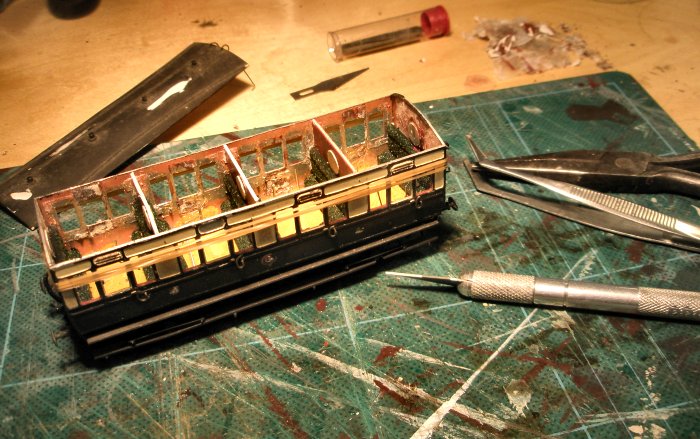
First job was to remove the rooves and discard the glazing and droplights, which were beyond saving. The coaches have etched brass sides, but have been assembled with glue. However the original builder did it properly and only the coach seen here (another First to dia R1) needed a bit of reinforcement in the corners.


Pc216283c.jpg


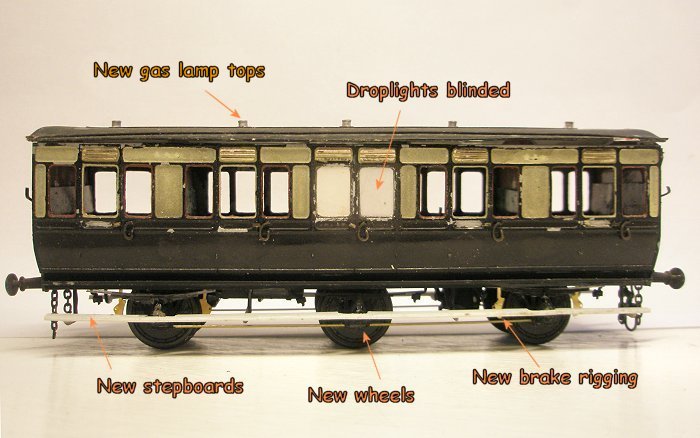
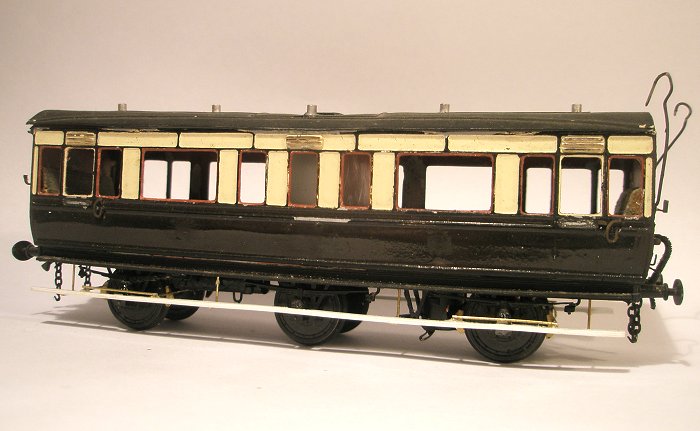
This 6-wheel First/Second Compo to diagram U16 was restored some time ago. Most of the repairs are hopefully self-explanatory. The coach was built with droplights in the luggage doors, which it shouldn't have. This mistake is probably due to an error in Russell's Great Western Coaches vol 1 (p47). Fortunately I have a copy of the Newsletter of the Great Western Study Group No. 51 (1996), which includes an invaluable list of known errors in the Russell volume.


Pc216285b.jpg


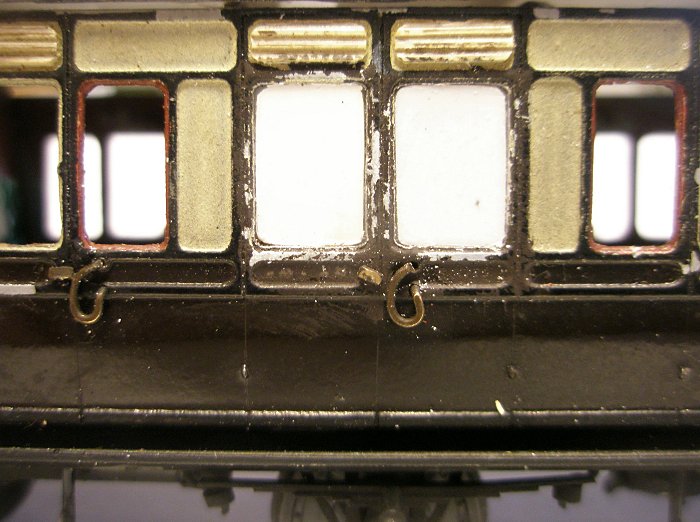
The windows were blinded with plastikard filed to shape. A bit tricky, but filing and fitting can be a strangely pleasing exercise, I find.


P2046453cxb.jpg


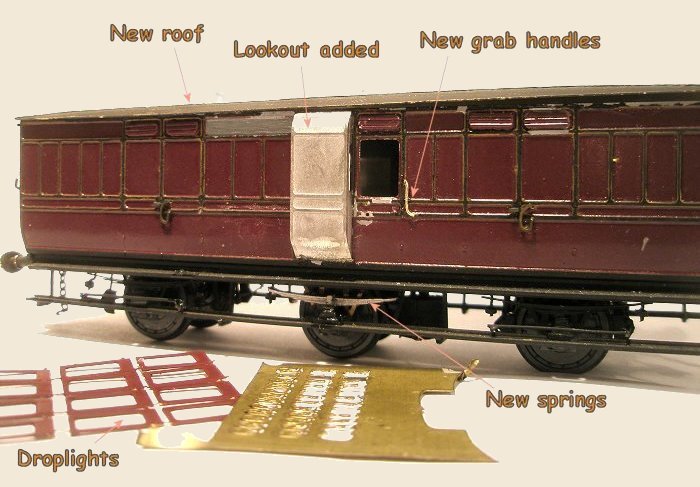
This 6-wheeler was originally a W3 parcels van. Certainly an interesting prototype, but I already had a W1 parcels van and didn't really need another. So feeling a bit reckless I converted it to a V13 PBV, which as far as I can see has virtually the same dimensions. The main difference was that the V13 had guards lookouts, and I found some in an old K's kit that happened to have the right measurements. I wait with baited breath for someone to tell me that there was some major difference between W3 and V13s that I haven't noticed! (if so please do tell, it has not been painted yet so there is still time to change it back!).


P1116532b.jpg


On some of the coaches I added new springs, while on others I repaired the existing ones with thin strips of glazing (the thinnest material I had to hand). I am not sure the latter is totally rational, but then modellers rarely are :-)


P2066466.jpg


Here we have another unusual beast - a six-wheel saloon to diagram G20, the one that is preserved at Didcot. It is currently receiving the standard treatment of repairs.


P1116513.jpg


The interior of the G20 Saloon, which has had a new lick of paint. I haven't been able to find any drawings of this diagram, so I am not sure if the arrangement of the seating and tables is correct?


P1116515b.jpg


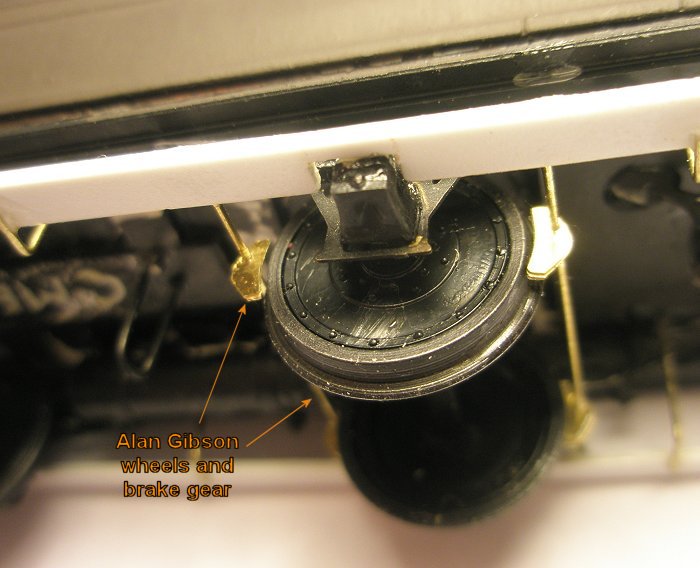
The brake gear has been replaced on some of the coaches. This is of course a simplified representation. In fact, brake gear has for too long been one of my blind spots and I'd like to learn the details better.


That's it for now. So far I'm very much enjoying this work. It may not be text-book modelling, but I find it relaxing and it's nice to breathe some life back into these old models.


Go to part 3

  • Like 27
  • Craftsmanship/clever 1

25 Comments


Recommended Comments

I look forward to seeing more done to this bunch.

I have never liked doing coaches, maybe it is because I have never done enough to be confident.

Are they going to chocolate and cream or red?

Link to comment
  • RMweb Gold

Hi Pete. They will all be chocolate and cream. I think the original owner had a mix of both variants, which would nice in a way - but the lake doesn't really fit my normal period. I hope you do some more coaches. Your SDJR 6-wheeler was delightful and done in a more thorough way than what these coaches here are being treated to.

Link to comment

Hi Mikkel -


Nice series of projects - and I'm glad you resisted stripping them down to their component parts - you would undoubtedly end up with distortion problems.  I'm pretty certain John Lewis on the GWSG is an absolute fount of knowledge on the braking systems - I've got a couple of his books so I'll peruse them & let you know.


Happy New Year


Ian

Link to comment
  • RMweb Gold

Hi Ian, yes, I think you are right about the distortion issues. Although perhaps if I had put them in some sort of solvent-dissolving bath they might have come apart without that problem? But it all seemed a bit too risky.


Thanks very much regarding John's books. If he's written anything on brake gear I'd be glad to know. I owe myself a christmas present anyway :-) Happy new year to you too!

Link to comment

Hi Mikkel, the brakegear on these is fairly simple, like wagons with clasp brakes but none of the complexity of handbrake levers and all that goes with them. The only parts that are difficult to make are the A frames between the brake shoes. I usually take mine from a Mainly Trains etch intended for DC wagon brakegear. See second photo on this page. If you need them, I've a couple of detail photos of examples at Didcot.


Nick

Link to comment
  • RMweb Gold

Hi Nick, many thanks for that. I had forgotten that shot of your W1.


The brakegear does seem simple. I'll try it out on a later project - good to know about the Mainly Trains etch.

Link to comment
  • RMweb Gold

PS: Now I can't get my mind off that brake gear. Once you start thinking about such details it becomes hard to ignore them!


I have had a closer look at the brake gear that has survived on some of the coaches I'm restoring. The A frames between the brake shoes seem to be of a different pattern than the W1 - eg here is one of the R1 4-wheelers (cobwebs and all!). I wonder if that is correct / worth keeping...


P1016559.jpg

Link to comment

Not bad, but more impressionist than accurate. The two A frames should be the same size. The lower (outer) one should have a short piece from the apex to the lever that hangs down from the floor. The upper (inner) one should have a longer piece from the apex to the lever.


Nick

Link to comment
  • RMweb Gold

The two A frames should be the same size. 


OK, that's what I was wondering about. No good then. Thanks as ever.

Link to comment

Mikkel,


Realy like what you're doing here.  I'm sure the end results will be well worth the effort you are spending and compliment your other period stock.


I look forward to seeing further blog entries in this series.


Ian

Link to comment

Hi Mikkel


The saloon is unlikely to have had a vestibule in the middle as it would have been hired out to a single party travelling together. Similar coaches just have end armrests on the seats next to the door. I hope this coment isn't too late!

Link to comment
  • RMweb Gold

Ian, thanks, I don't really need more stock for Farthing, but as so often it's the process more than the goal that's enjoyable :-)


Mikkel - where did you source the new spring castings for the V13?


These are from the old IKB range, ref 4200. The BGS took over the range and I've found them on their website just now.  Look on page 32 (sic!) of the 4mm parts page F4200: (IKB 4200) Coach spring 6'  White metal casting (or just search for "4200").


Not sure if the price is for just one - there seem to have been 3 in my pack but maybe I ordered only 3!


Hi Mikkel


The saloon is unlikely to have had a vestibule in the middle as it would have been hired out to a single party travelling together. Similar coaches just have end armrests on the seats next to the door. I hope this coment isn't too late!


Thanks and not too late :-)


But I wonder: The photos below of the restored G20 at Didcot do seem to show internal partitions - unless the restoration did not follow the prototype?


http://www.flickr.com/photos/camperdown/6766965233/

http://www.flickr.com/photos/camperdown/6766965631/

Link to comment

Apart from the ex-IKB part, Mainly Trains also have a 6' spring, MT119.


My photos of the Didcot G20 are mostly of the underside but one definitely shows a parition. Indeed the external appearance of G20 would suggest that it is a double saloon. They were third class saloons, and Harris says on p44


"Fifty-four three-centre roof, six-wheel third saloons were built to two diagrams from 1892-98. They had two open saloons divided centrally by a lavatory and WC, and all seem to have been withdrawn by the 1920s"


The other diagram was G19.


Nick

  • Like 1
Link to comment
  • RMweb Gold

I think you are right Nick. I had not thought of checking Harris.


It seems there is another G20 preserved at Buckfastleigh (didn't know that), which does not appear to have partitions. But as it is used for meetings and events that may well be a modern feature. http://www.train-photos.com/picture/number13612.asp


FWIW, these notes to the new Shirescenes conversion kit also suggest that the Buckfastleigh one has been altered in other aspects. http://www.dartcastings.co.uk/shire/S108M.php


BTW you mentioned you took photos of the G20 underframe, but according to the Dart Castings notes that's not an original one.


In any case, I tend to trust Harris (certainly more than Russell).

Link to comment

...

BTW you mentioned you took photos of the G20 underframe, but according to the Dart Castings notes that's not an original one...

Yes, the body came from a house and the underframe from a tool van (see here). Plenty of genuine bits, though.


Nick

Link to comment

I was sat in the Bucks G20 the week before Xmas, it now only has the end seats to the original pattern. I will be up there again shortly if you need any specific pictures.

Link to comment
  • RMweb Gold

That's a nice page about the Didcot G20.


So dd, were you having a christmas lunch in the G20? :-)  Thanks for the offer on pictures but I think I'm OK as it is.


"Fifty-four three-centre roof, six-wheel third saloons were built to two diagrams from 1892-98.


In a way it is a little surprising (in a pleasant way) that saloons would be built for third class passengers. I would have thought that at that time, the hire of a family saloon was such an exclusive and expensive thing that it would have been the domain of the better-off only.

Link to comment

...In a way it is a little surprising (in a pleasant way) that saloons would be built for third class passengers...

Yes, I found that interesting. Harris mentions all available saloons being pressed into service for the Henley Regatta and the GWS page mentions major horse race meetings as typical uses. We often get the impression that wealthy families might book a saloon for holiday journeys where the family and servants all needed to travel, but I wonder whether for major events it was more common for the railway to announce that saloons, both first and third class, would be available for booking on the special services put on for these events. In other words, that they were regarded as a normal part of the service, at least for those making advance bookings.


Nick

Link to comment
  • RMweb Gold

In other words, that they were regarded as a normal part of the service, at least for those making advance bookings.


Interesting. I'm trying to think if I have come across any posters etc announcing special trains and events which might give a clue to that, but can't recall any off-hand.


It occurs to me that both I and the original builder have presumed that the upholstery of the saloon should be dark green as per first class. But since this is third class, it should presumably be either the standard third class red, or maybe (as per Harris' summary on p31) "leather" as for smoking compts.


 and the GWS page mentions major horse race meetings as typical uses. 


It did occur to me that the good people of Farthing deserve a race special sometime soon :-)

Link to comment

Hi Mikkel,


The interior of the G20 at Didcot (No. 2511) is authentic down to the last detail - it was very little modified by those people that used the body as a house. This is a case of ongoing conservation rather than restoration.


In its time as 10 River Gardens, the only major change to it was that there was a bay window cut into one end. The fact that it was under the cover of the roof of the building meant that it was almost perfectly preserved and the reinstatement of the end to remove the window was the biggest task undertaken on the body. The underframe came from a 6 wheel tool van (the body of which is still at 81E an is in use as the antiquary shop!) and is VERY similar to the one it possessed in its former life as a coach.


The interior you have is correct in as much as there is a partition in the middle as this is where the lavatory is. The bits you see there are vaguely right and will certainly be good enough to see through the window of a 4mm coach. Why not put a few scenic photographs on the walls as per the original? This would draw the eye a bit and make it more authentic.


I hope this helps!


All the best,


Castle

Link to comment
  • RMweb Gold

Hi Castle,


Many thanks for this - exactly the confirmation I was hoping for. Sadly I have never been to Didcot (but one fine day in the not too distant future!) so this kind of information is very valuable for me.


Good idea about the scenic photos, a job for tomorrow! I assume the lavatory windows were frosted in 1907? I'll look in my books for other examples from this period.


As for the upholserty I think I'll give it a red/leathery tint since it was 3rd class.

  • Like 1
Link to comment

Hi Mikkel,


I guess the windows are frosted - I will have a look later in the week when I am next on shed and I can ask the experts if they are about (!) too.


I will be doing another RMWEB modellers tour of Didcot some time this summer so if you are in the UK make sure you come along! Not sure on the dates yet as I want to pick a day when there are some nice 'toys' running to see and that is convenient for people too.


All the best,


Castle

Link to comment
  • RMweb Gold

Many thanks! The Didcot tour sounds fantastic. Doesn't look like funds will allow much travelling this summer, but I'll certainly keep it in mind if there's a windfall, or if work happens to take me to the UK.

Link to comment

Create an account or sign in to comment

You need to be a member in order to leave a comment

Create an account

Sign up for a new account in our community. It's easy!

Register a new account

Sign in

Already have an account? Sign in here.

Sign In Now

×
×
  • Create New...