


Tangoman69
-
Posts
207 -
Joined
-
Last visited
1 Follower

Recent Profile Visitors


Tangoman69's Achievements
2.7k
Reputation
Bookmarks
-
ISO container weathering
James Makin's Workbench - 1990s dirty diesels & grotty wagonsWhere did the time go?
The last update I posted was before DEMU Showcase, where we took Worthing MRC's Loftus Road up for a fantastic weekend, and after so much hard work in the run up, we've all taken a mini-break from modelling, but it wasn't long before the fingers started itching again!
I did fancy a change from the HAA coal hoppers however, so I present something I've not really tackled much before...a shipping container!
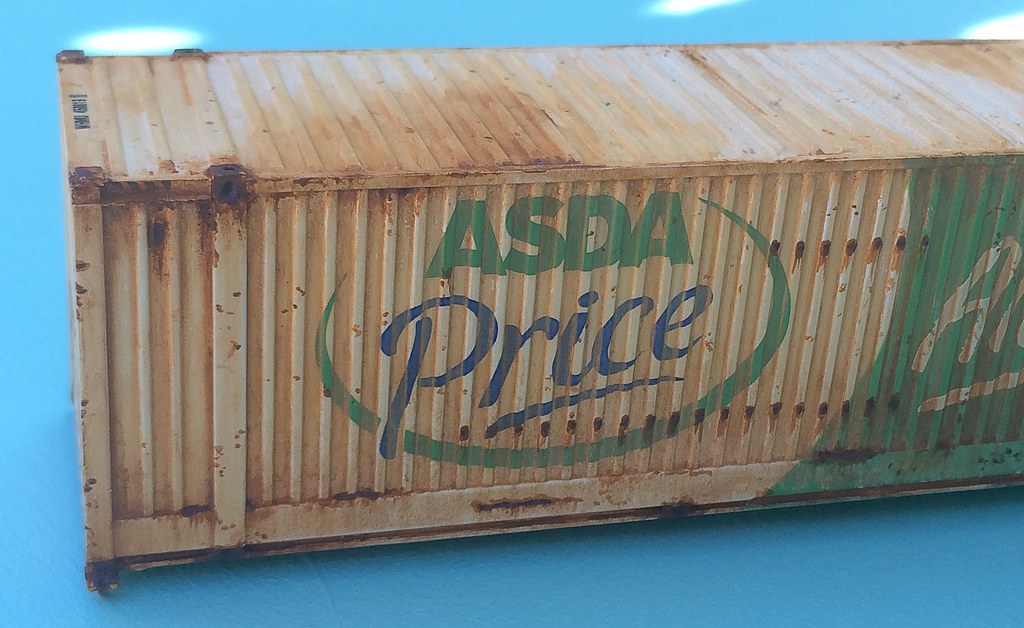
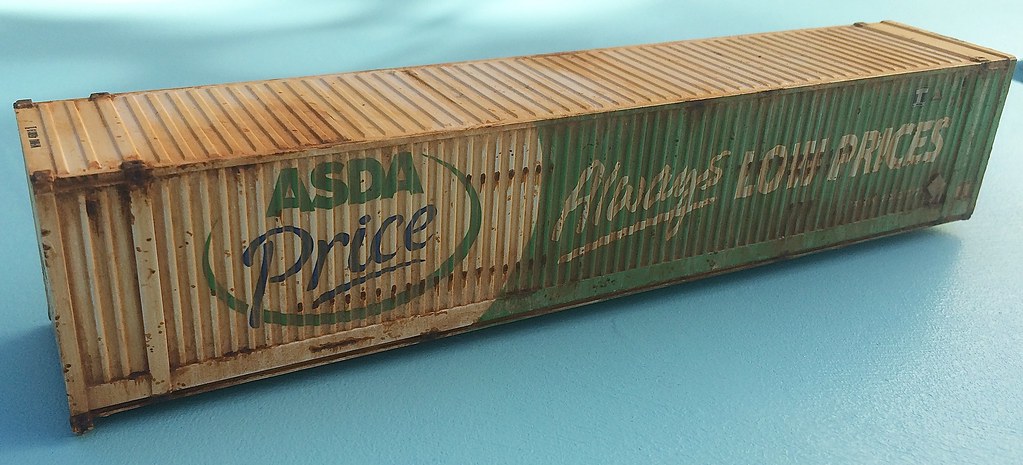 Weathered container by James Makin by jamesmakin2002, on Flickr
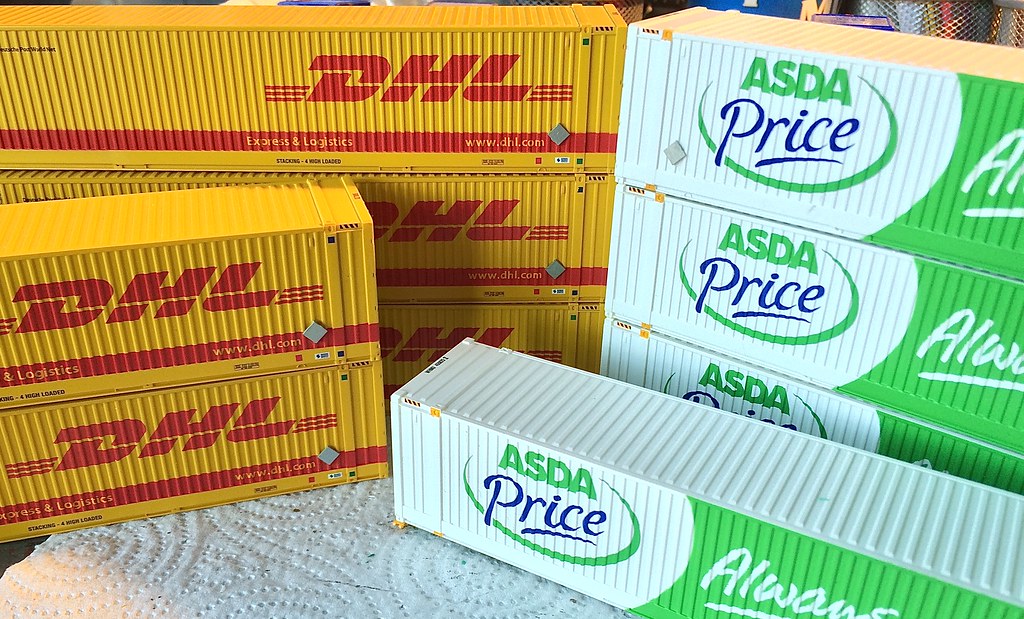
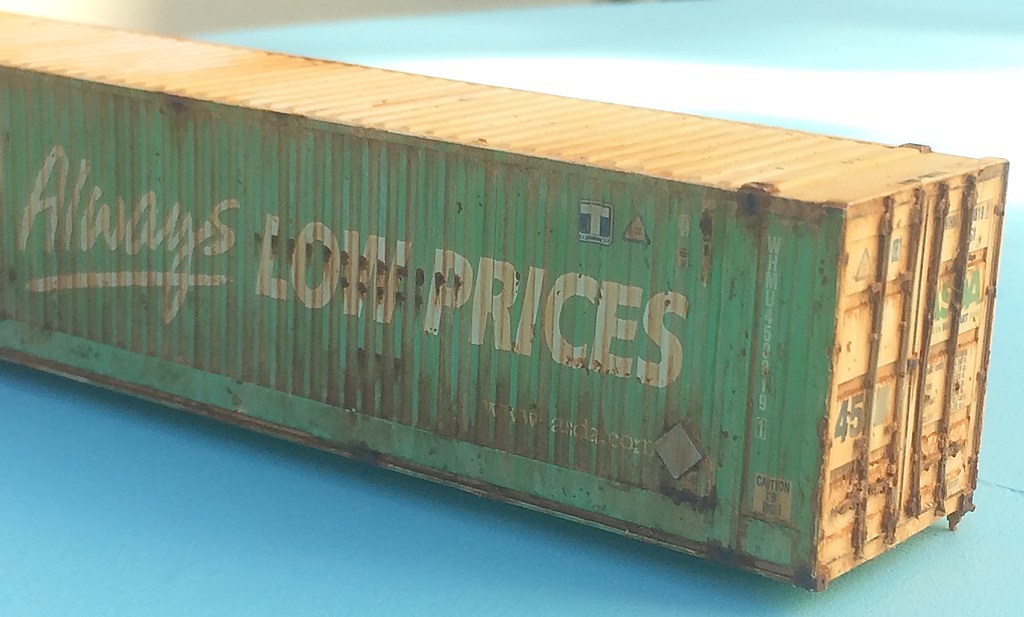
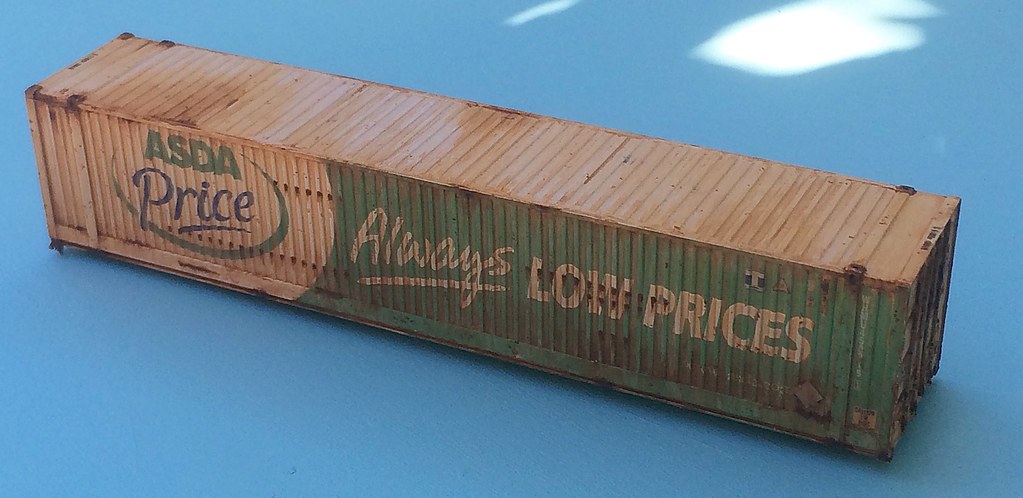
 This ASDA 45' box is a Bachmann example, from fellow Worthing MRC gang member Mark Butcher. While at DEMU Showcase, I mentioned how shiny Mark's out-of-the box containers are, and how good it would be to get them weathered...I was soon presented with a box of 9 to be going on with..!
 Weathered container by James Makin by jamesmakin2002, on Flickr
I've tackled a fair variety of stock in my near-20 years of ruining toy trains but incredibly it wasn't until this year that I'd weathered my first container, a grounded one for Loftus Road -
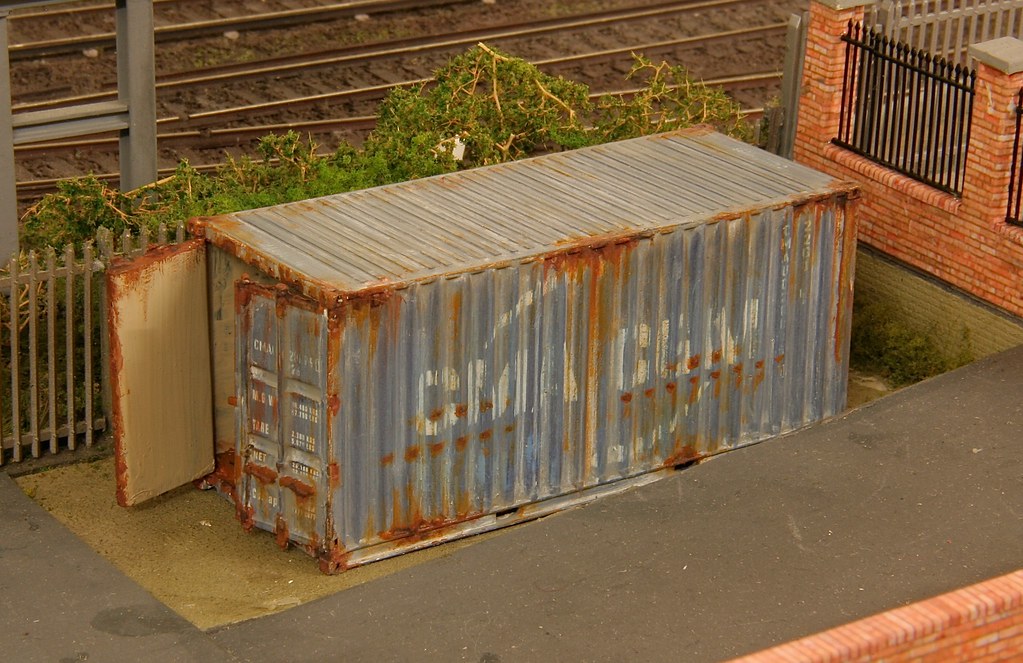 Loftus Road by Worthing MRC by jamesmakin2002, on Flickr
I discovered it was actually quite a fun past-time!
So I set to work on Flickr, finding prototype shots for each of the 9 containers, and then whipped out the paints! Depending on the prototype, the livery was attacked with fine sandpaper, or faded down. This was achieved by spraying over with matt varnish to get a good 'key', then running over layers of whites and greys in the paint-on/wipe-off technique.
Then it was a case of adding the inevitable dirty brown..!
 Weathered container by James Makin by jamesmakin2002, on Flickr
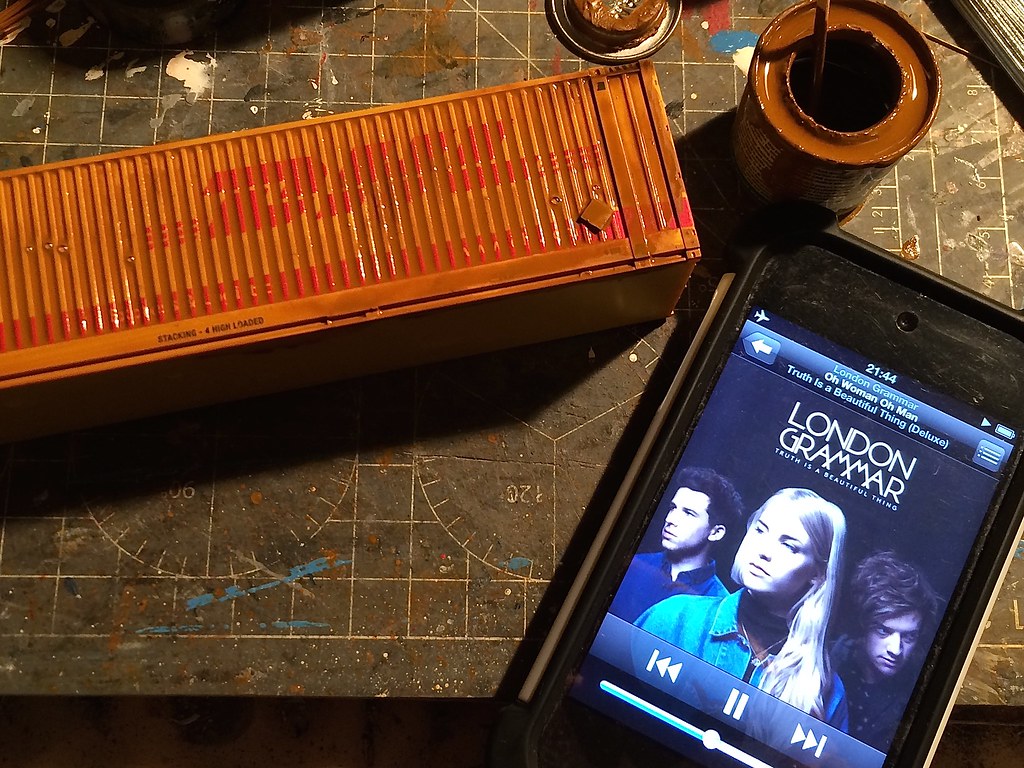
Starting with Humbrol 62, this was painted all over, and then rubbed off, and followed by darker browns in the form of Humbrol 186, 113 and 251, to really build up the layers as required. Now I'm new to this shipping container lark, but London Grammar's latest album seems to be very much the music to do it to.
After much painting, wiping and covering myself in brown paint, it started to come together!
 Weathered container by James Makin by jamesmakin2002, on Flickr
One important insight I can share, when you've been extensively weathering with brown enamel paint, always ensure that all remnants of paint are removed from your hands and fingernails before leaving the house - greeting others with brown-stained fingers does raise interesting questions around your personal hygiene!
 Weathered container by James Makin by jamesmakin2002, on Flickr
The paint-on/wipe-off gives a great vertical streaky effect on the metal, the next step was to create the huge gashes and dents these containers pick up - normally leaving horizontal lines of paint missing with rust breaking through - maybe where they've been banged against each other or loaded into pocket wagons perhaps.
This was done just by starting to dollop on small amounts of the lightest brown, and then work up to darkest in the centre of the rust spot, about 5 different shades of brown came together to get the final effect.
 Weathered container by James Makin by jamesmakin2002, on Flickr
Studying the prototype pictures carefully, the major area of wear is around the container locking & lifting points, even on a good-condition container these soon seem to lose paint and the rusting process begins, all good fun!
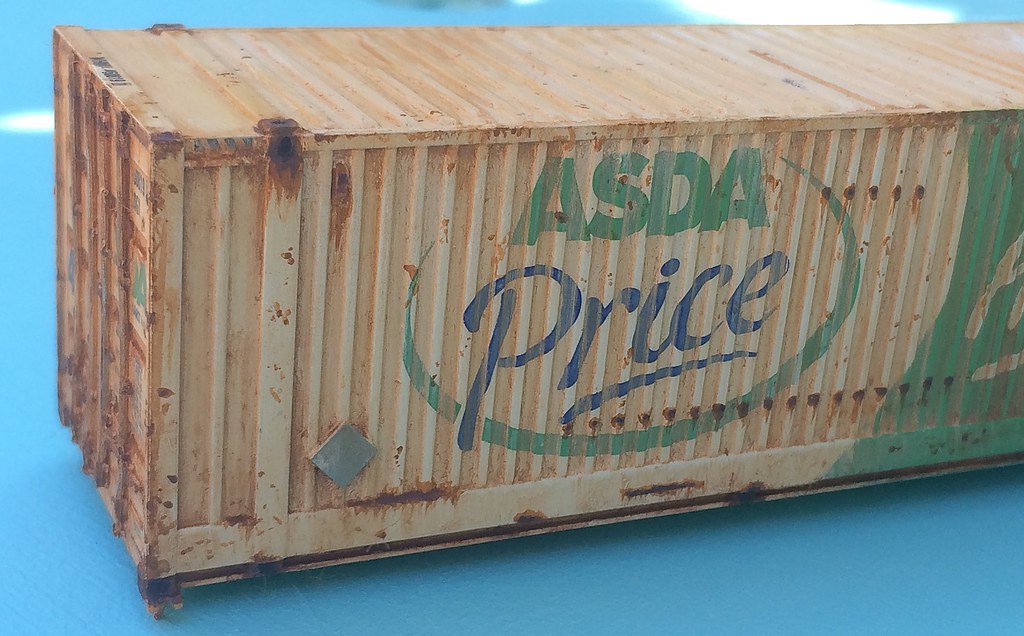 Weathered container by James Makin by jamesmakin2002, on Flickr
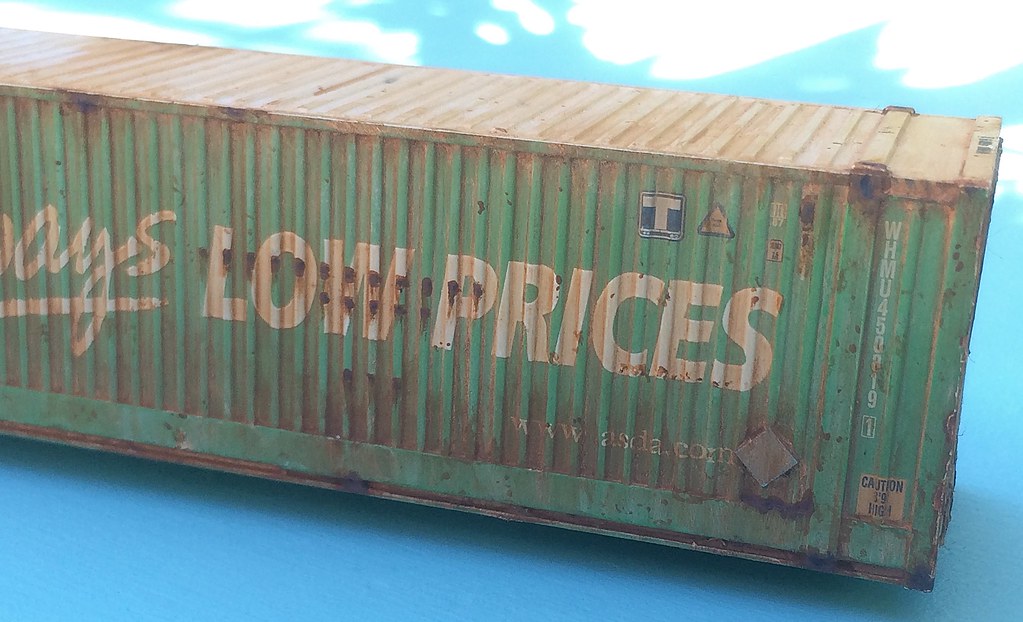 Weathered container by James Makin by jamesmakin2002, on Flickr
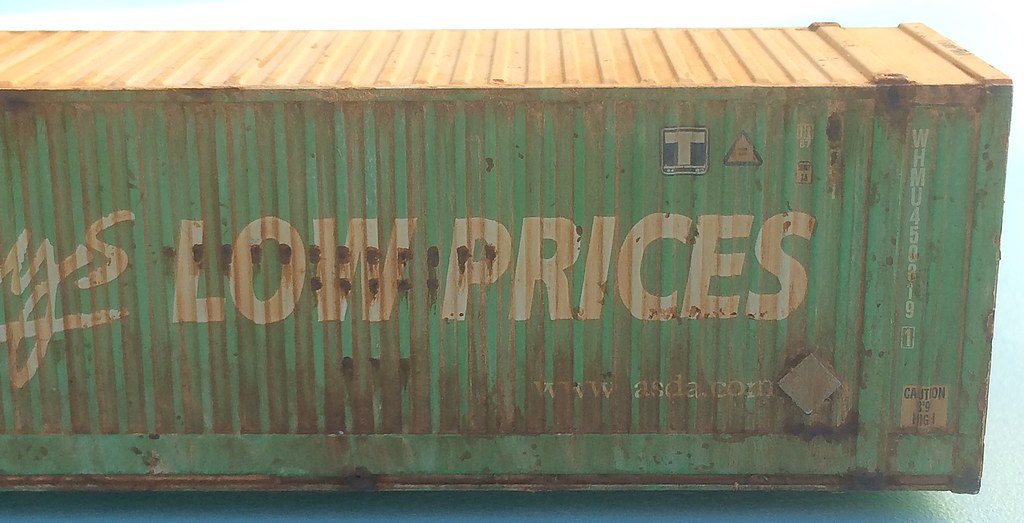
Once the major rust spots were tackled, I noticed that the ASDA container had thousands of tiny specks along the metal work, just small grazes, dirt and suchlike that over time had ground into the paintwork, so these were added with a 00000 brush, painstakingly one at a time!
 Weathered container by James Makin by jamesmakin2002, on Flickr
The roof was given an uneven wash of dirt too, and then it was now ready to be reunited with Mark's container wagon, looking somewhat more shabby than when it left it!
 Weathered container by James Makin by jamesmakin2002, on Flickr
I've still got 8 more to complete for Mark shortly, in various conditions from 'nearly new', to 'faded has-beens' and through to the above, which looks ready for scrapping - I don't think anyone would miss that one falling over the side of a ship!
-
ISO Containers 2
James Makin's Workbench - 1990s dirty diesels & grotty wagonsI've been working on a few things lately...a couple of fun loco projects, and inbetween, messing around with a few containers!
Spurred on by the recent batch of containers I'd tackled for my mate Mark, I decided to take a look at the collection I'd been building in recent years, to get a Freightliner train of my own ready for Worthing MRC's Loftus Road & my own future Didcot layout.
 Maersk container by James Makin by jamesmakin2002, on Flickr
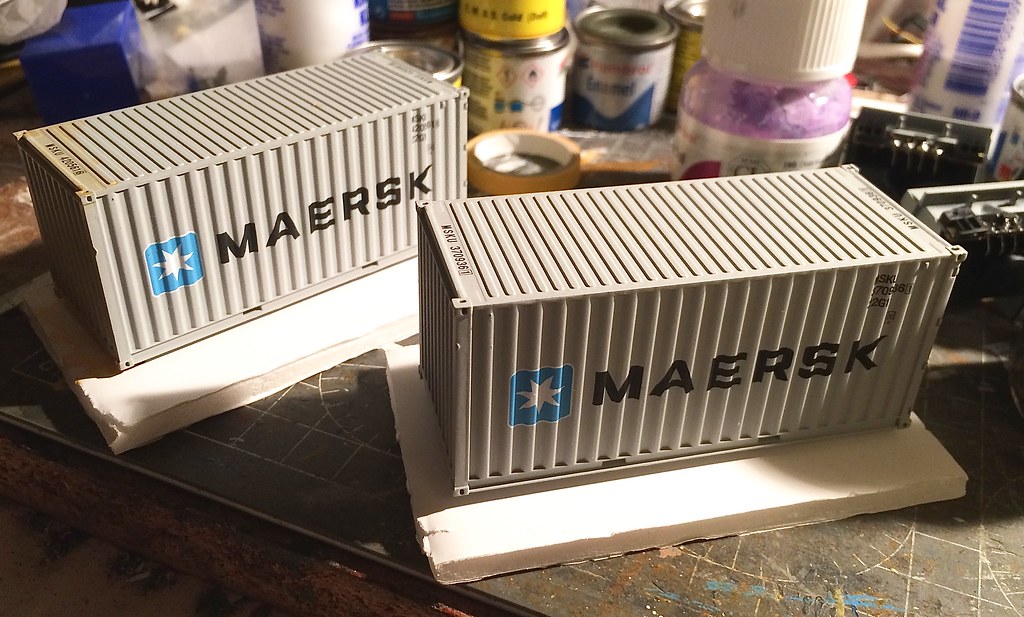
I bought my way into this container game in style at Warley a couple of years back - Dapol were selling on the FEA twins with Maersk 20' and 40' containers for a very reasonable £25 a pair, I went straight in and bought 6 pairs - two feet in there! So I've now got a billion boring grey Maersk containers and have gradually spent the last few months bartering exchanges for other people's containers in more jazzy liveries!
But I knew I'd have to do a few Maersk ones, so here goes...!
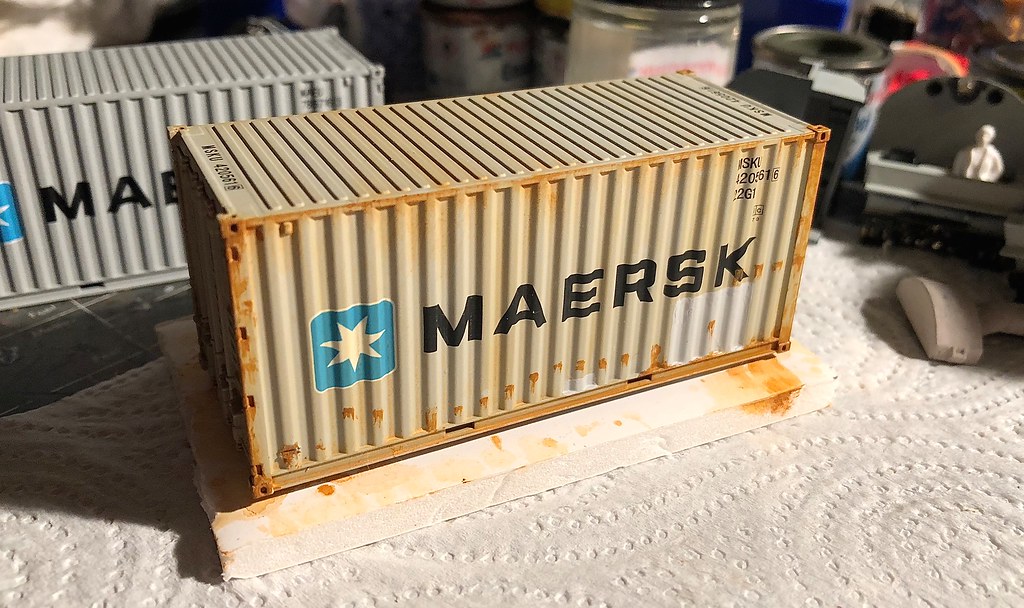
 Maersk container by James Makin by jamesmakin2002, on Flickr
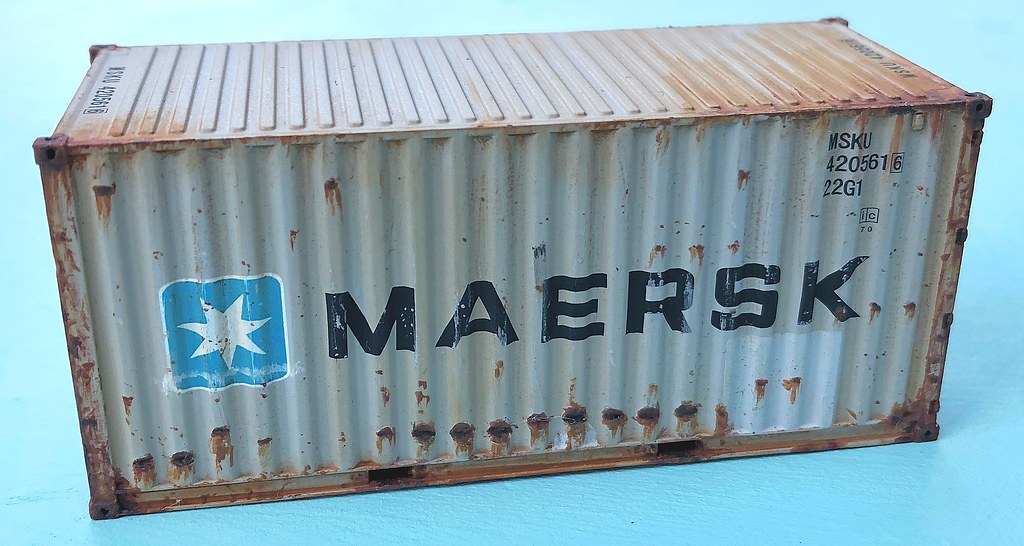
I started with two 20' boxes - pretty cute little things! Based on my learnings with Mark's 45ft containers, I decided to mount these on a base of foamboard for the weathering process - save my fingers getting covered in the weathering washes being applied!
The containers were given a coating of matt varnish initially, this tones down any shiny appearance, and really gives a great 'key' for any weathering washes to stick to the sides of the container. One of the boxes is in almost-new appearance, with only minor weathering to the locking points, whilst the other has seen some action! Both were based on actual photographs found on Flickr (see if you can find the same ones!).
 Maersk container by James Makin by jamesmakin2002, on Flickr
I focused on the dirtier of the two, whilst the cleaner version is still being finished currently (ironic!). A coating of Humbrol 62 Matt Leather was washed on, followed by a patch-paint in fresh new grey at one end, whilst the beginnings of a container dent were modelled.
The majority of the damages to these containers appear at the extremities, around the locking points and the corners, which are frequently heavily scratched, devoid of paint and covered in superficial rusting and water stains.
Fast-forward with the weathering and here we are!
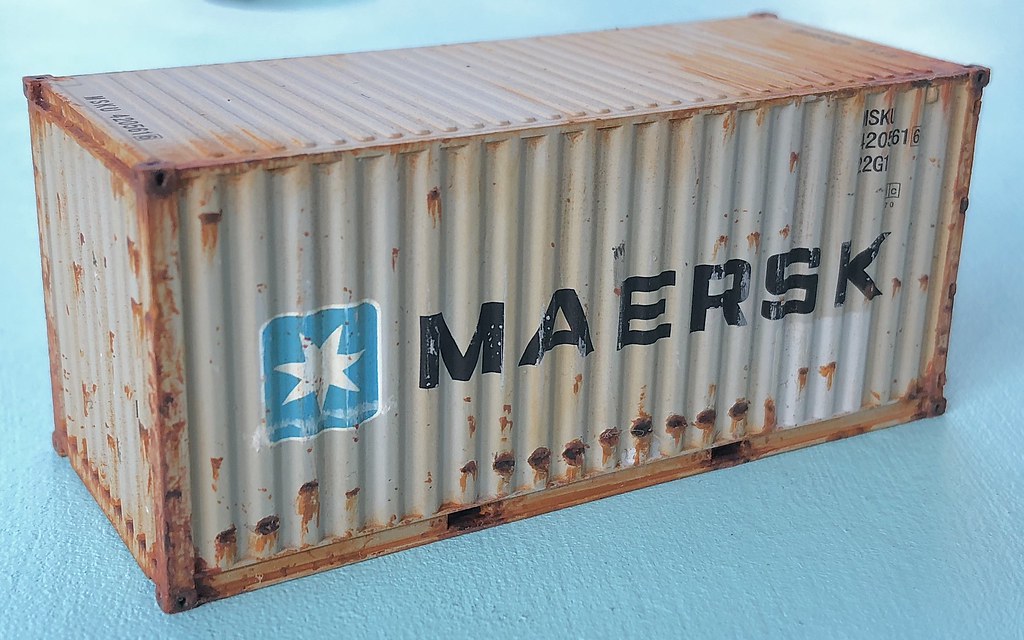 IMMaersk container by James Makin_0349 by jamesmakin2002, on Flickr
The rust effects were built up from light to dark, applied with 00000 brushes.
 Maersk container by James Makin by jamesmakin2002, on Flickr
One very noticeable thing with this container, and many others, it had a significant dent along the vertical side ribbing. I did a trial with using a soldering iron applied down the side to bend into the vertical ribs, with some potential success. It needed fettling, and can definitely be improved upon, but does give a good effect - now when you look down the side of the container, it's not just a paint effect, it has a scale dent!
 Maersk container by James Makin by jamesmakin2002, on Flickr
It only took a few evenings to pull together, and marks the first complete container for my own Freightliner set - and I'm already planning out an expensive trip to the C-Rail stand at Warley to stock up on some more exotic containers to replace my Maersk fleet - watch this space!
If anyone is desperately looking for Maersk 20' or 40' containers and has some interesting Dapol or C-Rail containers for swapsies, then by all means, drop me a PM and we can chat further!
Cheers,
James
-
156 underframe
Jonathan's Modern Image Workbench (3D-printed class 323 EMU, class 156s, 3-car 144s, a 141, 4-car class 465s)

-
Class 60 weathering
James Makin's Workbench - 1990s dirty diesels & grotty wagonsTime to conquer Ben Lui..!
60031 by James Makin by James Makin - Account 3, on Flickr
Gently picking off the '60's one by one, it was only a matter of time before a former Trainload Metals machine would get added to the fleet, and here we can now welcome 60031 Ben Lui, modelled in early 1998 condition.
60031 by James Makin by James Makin - Account 3, on Flickr
I've a soft spot for all the Trainload sectors, and though my favourite one still alternates on a regular basis, it's hard not to like the bold yellow and blue chevrons that still look so fresh, even some 37 years since first being unveiled.
Where to start? Much as I'd love a nice Cavalex '60' when it drops, for now we'll make do with a bargain used Hornby one, and picked up for £70, couldn't say fairer than that!
60031 by James Makin by James Makin - Account 3, on Flickr
The donor model was once a Mainline Grey 'Canisp' example, with the old branding removed back to the base colours and gloss varnished, ready for the new decals to be applied. Railtec's excellent Trainload decals were added, alongside numbers and electrification flashes where needed.
60031 by James Makin by James Makin - Account 3, on Flickr
At this stage of the project, a couple of the unique details could be added - the bodyside doors on one side was a slightly lighter grey than the rest of the loco, and interestingly, a little bit of the blue triangle was missing from the sector logo, so this was carefully cut away before the model was finally sealed with a coat of Railmatch matt varnish.
60031 by James Makin by James Makin - Account 3, on Flickr
The bodyshell was then left for around a month for the varnish layer to harden, after which the invasive paint-on & wipe-off layers of weathering could commence - the dangers of not waiting could be that the varnish layer is accidentally stripped off when enamel thinners is used for the washes, so it's worth waiting! I know many modellers have moved over to acrylics these days but I'm a bit basic and just stick to my old fashioned techniques, I may do some experimenting one day with the new generation of acrylics that seem to have moved on a whole load since first fettling with them in the late 90s!
60031 by James Makin by James Makin - Account 3, on Flickr
Time for the weathering stage, and accompanied by a lovely bit of Röyksopp, the layers of browns were added onto the luscious triple grey body - starting with shades of Humbrol 113 and Humbrol 251.
60031 by James Makin by James Makin - Account 3, on Flickr
I tend to vary the application of the paints depending upon the final look being sought, in this case going for nearly-neat paint, but other times I'll mix a large amount of thinners - you get a feel over time fo the effect you're looking for and how much to thin the paint, it is ideal for a bit of trial and error!
Next, a kitchen towel is used to wipe vertically downward and remove most of the paint in one go:
60031 by James Makin by James Makin - Account 3, on Flickr
Thanks to the layer of matt varnish applied previously, the paint will then cling to the bodyside, leaving you the option to remove as much as you like, using cotton buds dipped in enamel thinners - letting you create streaks dirt patches as you wish.
60031 by James Makin by James Makin - Account 3, on Flickr
One feature of 60031 noted from photographs of the time, was an ingrained dirt build up on the bodyside around one end of the bodyshell, and this was recreated by rolling a cotton bud around in some thinned paint on the body, with lots of fettling before getting the effect being sought!
As well as this, Ben Lui also had a long scrape on the side too - possibly some sort of shunting yard mishap maybe?
60031 by James Makin by James Makin - Account 3, on Flickr
Regardless of how it happened, it was recreated by running a strip of Tamiya masking tape down the side, and touching in the relevant areas with a fine 5/0 brush and three different shades of brown and grey paint to replicate the damages.
60031 by James Makin by James Makin - Account 3, on Flickr
60031 in all its glory! The bold blue and yellow of the Trainload Metals markings really set off the triple grey, it is a shame that more of the Metals machines didn't make it far into the privatisation period, '031 was one of the very last!
60031 by James Makin by James Makin - Account 3, on Flickr
The machine would lose one of its Ben Lui nameplates around 1996 - leaving just bolt holes and a few marks where it used to be - presumably liberated 'unofficially' and perhaps still out there on someone's wall, all these years later...
60031 by James Makin by James Makin - Account 3, on Flickr
After reassembly of the bodyshell, the chassis had the full-depth bufferbeams added at both ends, and the tension-lock coupler and self-catering swing function entirely removed, to be replaced with a 0.33mm brass wire loop, drilled into the chassis and superglued in place, to allow the usual bufferbeam pipe detailing to be fitted, yet still haul tension-lock-fitted stock.
60031 by James Makin by James Makin - Account 3, on Flickr
A view here showing the somewhat forlorn bodyside on 60031! The scrapes and damaged sector logo add to the character of the machine, whilst it would've been lovely to model the loco in peak ex-works condition, it's fun to do something that portrays the hard life and bad luck they often experienced!
60031 by James Makin by James Makin - Account 3, on Flickr
Up on the roof, the exhaust silencer was painted in several rusty shades, along with a bit of talcum powder mixed in for texture, before being coated with shades of roof dirt, dirty black and my custom black/blue exhaust fume mix too.
60031 by James Makin by James Makin - Account 3, on Flickr
60031 by James Makin by James Makin - Account 3, on Flickr
A driver was added in the cab - one of the cheap eBay Chinese 1:75 figures was chopped up and painted up, and homemade blinds added in each windscreen too.
60031 by James Makin by James Makin - Account 3, on Flickr
60031 was a hard working beast! New to BR's Trainload Metals sector in 1990, the locomotive was allocated to Thornaby and wore the iconic Kingfisher depot plaques, with the legacy of its time there being the scars left on the cabside where the plaques were removed in 1997.
60031 by James Makin by James Makin - Account 3, on Flickr
The geographical names on the '60's were most magical - namesake Ben Lui being one of the Scottish 'Munro's in the Grampian mountains of northeast Argyll, and measuring in at 3,710 feet tall.
60031 by James Makin by James Makin - Account 3, on Flickr
One of the fun little oddities seen on 60031 was the damaged No.2 end - a big punt in on the yellow just inboard of the buffer on the secondman's side - after some head scratching, this was achieved using a soldering iron, and touching in the damage with some spare yellow paint!
Completing the story, the real 60031 would go on to lose its remaining Ben Lui plate later in 1998, and then swapped the 'Metals' colours for a shiny coat of EWS red in 2002, along with a new name - ABP Connect. The mighty beast would continue in service until storage by DBS in 2009, after which it would see out the remainder of its years to date in the confines of Toton yard, alongside its many classmates all awaiting their final fate.
60031 by James Makin by James Makin - Account 3, on Flickr
It's been great fun bringing this one to life, part of the special club of '60's to retain the original sector colours into privatisation and into the history books, and what a looker it was back then!
Cheers,
James
-
Class 60 weathering
James Makin's Workbench - 1990s dirty diesels & grotty wagons60s are brilliant James! Definitely something great about a big T example.
Are we going to get a Toton style Class 60 line up?
What was your source of yellow paint?
I tried railmatch against a Hornby 60 and it looked far too orange but yours looks to have blended in nicely.


