


2996 Victor
-
Posts
678 -
Joined
-
Last visited
Content Type
Profiles
Forums
Blogs
Gallery
Events
Exhibition Layout Details
Store
Posts posted by 2996 Victor
-
-
Very much looking forward to seeing how the new project develops! Any teasers?
With kind regards,
Mark
-
4 hours ago, Compound2632 said:
I'm afraid I don't have the equipment for that.
All I had was a half-litre tin of rubber with its catalyst, and the same quantity of resin with its catalyst! No equipment as such.
For the mould, I used the cut out bottom of a plastic container. I can't remember what the mould-release agent was, probably just vaseline.
Popped the pattern into the bottom of the container, mixed some rubber with catalyst, gently poured it over the pattern to a depth of about half an inch, and Robert's your Mother's Brother.
-
 3
3
-
 2
2
-
-
9 hours ago, Compound2632 said:
Incremental progress report: I've managed to mass-produce buffer guide bases more-or-less to my satisfaction and fitted them with Slaters Midland carriage buffer guides to the D418. I'll have to unsolder the later from the S&DJR milk van to fit them to that too. Details and photo tomorrow.
I was going to suggest making one as a pattern and casting some in resin.
I made some unusual axlebox/spring assemblies this way some years ago, using a whitemetal axlebox and microstrip to build up the spring.
The mould-making kit was a home/DIY affair, with cold curing rubber and resin supplied with catalysts.
It worked very well, and the results were excellent.
-
2
-
 1
1
-
-
I can only echo everyone else, and say please don't demolish your existing layouts.
Good luck with the new project - I'll be watching with great interest.
Stay safe and stay well!
-
1
-
-
Thank you Alan @Quarryscapes and Stephen @Compound2632 - the left-handed brake is certainly an oddity, but the reasoning is easy to follow as the arrangement allows one-sided brake shoes to work both sides of the vehicle.
Looking again at the photo of the Kerry Branch train, the wagon appears to have its brake-gear on the side furthest from the camera, hence the left-handed lever is the duplicate.
On 07/04/2020 at 16:47, Compound2632 said:a gloat photo would be permissible
A gloat photo:
This afternoon, I did a bit of raw track-planning for Stage 1 of my project, which has the working title of Llanmaddog. Its inspired by Steve Howe's Lower Rose Goods. What we have are three terminal sidings and a goods loop, the goods shed being situated on the latter, the two lines leading off-stage to the fiddle yard. Stage 2, if I ever get that far, will have a passenger facility inserted between Stage 1 and the fiddle yard. Once I'm happy with the layout, I'll commit the design to paper with a few facilities drawn on.....
View from the "front", terminal sidings to the left, fiddle yard to the right, goods shed front right
view from the fiddle yard toward the buffer stops, the goods shed will be front left
The whole will be about 6ft x 18ins, if I actually build it - next thing will be baseboards.
Stay safe and stay well!
-
2
-
-
Nothing to report other than the arrival of my EMGS track work, and very nice it is, too! I'm looking forward to playing around with a few ideas for a small layout, and with time on my hands from the end of this week - one of the hazards of being a contract worker - I'll be able to hopefully get my ideas to gel. I should also be able to get a few more things done on the growing stock of part-built and almost-finished wagons!
Stay safe and stay well, everyone!
-
1
-
-
Phil,
Those are excellent vehicles, and the FR always makes for interesting prototypes!
The odd number of laminations is intriguing, and not something I would have thought of as being a contributory factor in maintaining the stability of the model.
Have you tried the same method on any 4mm scale vehicles?
Cheers,
Mark
-
Just to prove, if only to myself, that I haven't been entirely idle on the model making front, the Cambrian Railways wagons now have buffer housings, approximately 50% of their ironwork has been "blacked", and brake gear is mostly prepared. I'm hoping to get them finished this coming weekend! Lol!
I've also put together a couple of PO coal wagons, one Wheeler & Gregory and one Gloucester RC&W, both Cambrian Model Rail kits. The latter is almost finished pending a fictional livery that I alluded to previously.
I've finally also ordered some trackwork from the EMGS! Once I've worked out a layout I can see about a baseboard, although it'll be a micro.
I was thumbing through my copy of The Mawddwy, Van and Kerry Branches (OL32) by Cozens, Kidner and Poole, when a photo of the Kerry branch train c.1903 piqued my interest. The two-plank dropside wagon behind the carriage appears to be in pre-1899 livery, but bizarrely the brake gear has a left-handed lever! Looks like another wagon build.....
-
2
-
-
1 hour ago, Craigw said:
I have a few spare sprues which is a big help!
Will Peco supply spare sprues?
Regards,
Craig W
Spare sprues would be a help.....! Not sure about PECO supplying them, might be worth an email
")
-
36 minutes ago, Craigw said:
The sheet rails on these will be spares from Parkside Dundas. At one point you could order sprues from Parkside so i ordered the sprues containing the sheet supporter mechanism from the 011-015 kit. I also have some etches from Southwark Bridge Models of GWR wagon brake gear and fittings including the sheet supporter. I use the version of the 04 without the sheet support as the Coopercraft one is dreadful. I hope to get one done in the next day or two, if ok with you I will post a pic on here. I post my modelling stuff on my workbench on the Scalefour Society forum. I find it irritating posting such things on multiple sites.
Edit: Quick mobile photo attached of my pair of O11 built from Parkside-Dundas kits with extra detail
Regards,
Craig W

That's what I'd planned to do, although I'm not sure what to do with the Parkside O11/O15 kits afterwards......
Looking forward to seeing how yours turn out!
-
2 hours ago, Mikkel said:
One interesting wagon after another!
Congrats on solving the transfer challenge, it does look convincing. I'm not sure I would be patient enough to wait 3-4 days, but that says more about me than about the method
The tilt waggon is my favourite, very pleasing outline and detail, and an impressive scratchbuild.
Thank you, Mikkel, praise indeed - the Tilt Waggon still amazes me - I'm really not sure I could replicate it any time soon!
I know exactly what you mean about waiting - I'm a perpetual tinkerer and if something is frustrating me at all, I keep going back to it and fiddling, usually with disastrous results
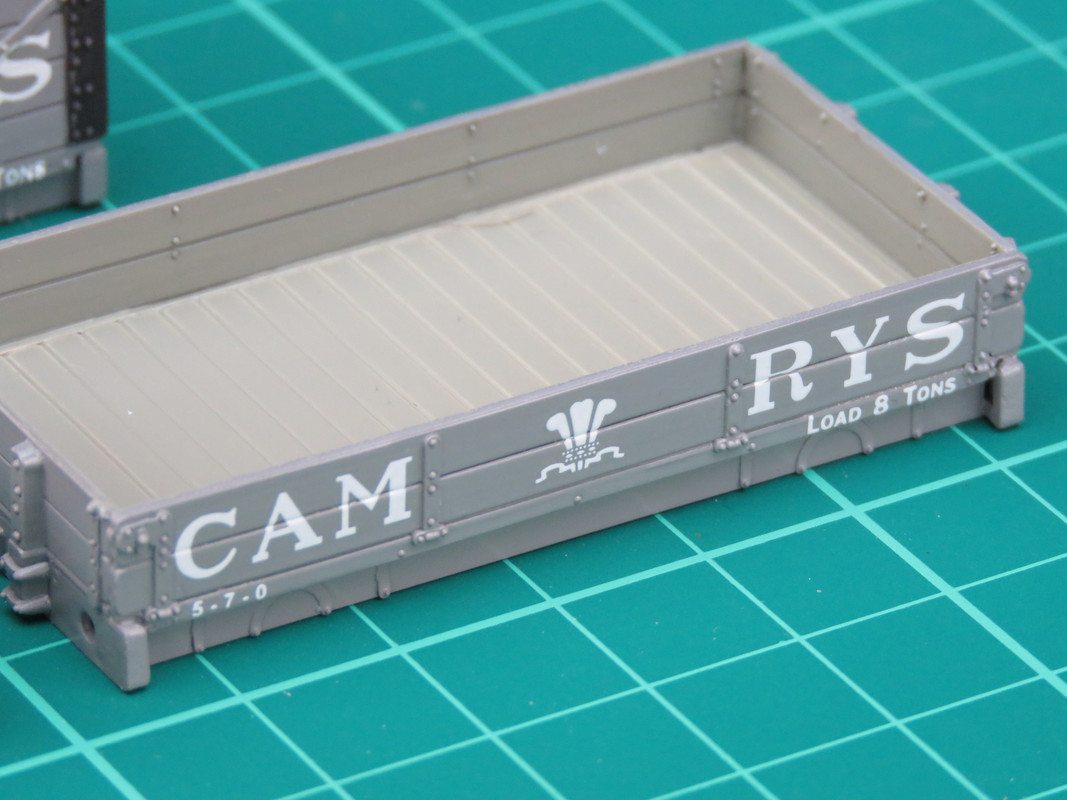
 Leaving anything to one side for that length of time isn't easy, and I did keep picking up these and inspecting them closely. I've taken a bit of time out of today's working at home, and applied a full set of transfers to the 3-plank fixed side, the CAM (feathers) RYS to another 2-plank dropside, and also the running numbers to the ends of all of them.
They all need their running gear now, while the rest of the ironwork still needs blacking, too.
Kindest regards,
Mark
-
1
-
-
9 hours ago, Adam said:
Just catching up with this thread while the baby dozes off on me (hence the absurd hour!). The Broad Gauge vehicles are hugely impressive with real finesse. Please finish that tilt waggon, it’s definitely worth the effort, though as a sucker for opens with ends higher than the sides they’re s favourite prototype.
Adam
Thank you, Adam, that's praise indeed!
It's my plan to renovate/upgrade the completed standard gauge wagons, and to finish the part-built wagons which are mostly the broad gauge ones (I'm also thinking about re-joining the Broad Gauge Society!), so one day it'll get done!
I hope your little one went back to sleep alright! Some of my happiest memories are of night feeds and cuddles with my three when they were tiny.
Kindest regards,
Mark
-
 1
1
-
-
48 minutes ago, ScottW said:
It is North British, Mark.
The idea behind the two temporary stays came from Chris Crofts which he described in his excellent MRJ articles.
Thanks, Scott, I'd forgotten about the Chris Crofts articles!
All the best,
Mark
-
1
-
1
-
-
8 minutes ago, ScottW said:
Once the basic body is made-up I install two lengths of thick Microstrip that are just a fraction longer than the inner width of the wagon. They are not glued in place, just held there by the pressure exerted on them by the wagon sides. As the solvent starts to dry it starts pulling on the sides of the wagon causing them to bow inwards. These two strips force the sides out and helps prevents them from bowing inwards as the solvent sets. I normally keep them in place till the time comes to paint the wagon.
Great thread by the way.

Hi @ScottW,
many thanks for your post! I've done similar with wagons that I intend to load, but have fixed the stays in place. However, I've not previously used stays in the way you describe but I certainly will in future! That's an excellent wagon, by the way, is it North British?
And many thanks for your kind words!
With best regards,
Mark
-
49 minutes ago, Quarryscapes said:
If you prefer, I have rubdown Cambrian Transfers available, they are just waiting for me to get off my backside and list them on eBay again - there's two variants for the Loco coal wagon, Oswestry style or Pickering style.
Thanks, Alan, that's good to know - I'll PM you tomorrow!
-
1
-
-
With hindsight, it was probably a bit on the thin side, but I was probably aiming for 2-1/2" sheeting which I believe(d) was more common in the 1850s/60s when these waggons were built. I think the bowing is mostly due to my method of making the planking.
Many thanks for your kind words re the WRRC Cam Rys transfers
I know others have had no issues with them, so I can only presume that the issues I've had are of my making! Hopefully, no-one else will have problems either, but if they should, perhaps the results of my travails will be of help!
As an aside, I've got one of @Quarryscapes Cambrian Railways 8-plank Loco Coal wagons on my bench, and a set of the WRRC's transfers for it - I started to apply the company lettering over the diagonal strapping before I'd blacked them! Which just goes to show that there's no hope.....
-
1
-
-
1 minute ago, Compound2632 said:
Preventative, I'm afraid. I've found his post on my thread:
My recent scratch-built bodies do show signs of warping in but I'll be bracing and loading.
Thanks!
I seem to recall my method "back then" was to make sides and ends from two laminations of styrene, a 20thou' inside and a 10thou' outside. Both were planked, but I used to use the side of a compass point to impress the plank grooves, rather than scribing/scratching material away. Although the 10thou' isn't really affected, this method does cause a small degree of "spread" in the styrene sheet, and causes the interior part to bow outward.....needing it to be bent back inward to counteract this. These days, I use an Olfa P-Cutter.
The passage of time hasn't been kind in some cases, although its interesting that the two painted waggons haven't suffered while some of the unpainted ones have! Perhaps I should have enlisted the help of Lee Marvin.....
-
1
-
-
I totally agree, Stephen - the other coal wag(g)ons that I'd intended to run loaded are braced inside to within an inch of their lives, and of course they've survived the decades in good shape!
I wonder what @airnimal might suggest - do you have any idea if the technique is preventative or remedial? I did think about trying a little gentle bending under very warm water, but I'm mindful that the styrene may be brittle after so long!
-
An early GWR Wooden Tilt Waggon:
Once again, this is a scratchbuild with the only bought-in parts being the four buffers, the four safety-chain hooks, and the wheels/inside-bearing compensation units. The rest I made entirely from styrene. It was built from a drawing in one of the BGS BroadSheet magazines, I don't recall which, and quite why I built it I'm now not sure, as my chosen period was "late BG" and this was very definitely an "early" design.
Some detail shots, just because:
This waggon would have had plate axleguards, which I hadn't made although I was thinking of using thin brass. It also had underslung springs, so I cast some in resin from a mould I made, the pattern being a scratchbuilt spring and keeper mated to a BGS whitemetal axlebox. They turned out rather well, and are still waiting to be used. One day I'll finish it!
-
3
-
 6
6
-
-
Broad Gauge!
GWR end-tipping coal waggons (notice - two "g"s!):
With the exception of the buffers and axleguards and end door lever/guide, which are Broad Gauge Society items, these waggons are entirely scratchbuilt in styrene. Dimensionally, I based them on the BGS cast whitemetal kit, an example of which I had but was unimpressed with (sorry!), and I thought I could do better. Its a pity I didn't know about Alan Prior's 19thC drawings book, as there is a drawing of these waggons in there (my copy arrived last week.....) However, they're not too bad, really, being 1mm shorter and 1mm narrower than the drawing.
I was building a batch of five, two were going to run empty and three loaded. These two are the most advanced, and sadly of the others the empty one's sides have warped.
Here are a couple of close-ups:
The bolt-heads are all tiny noggins of 10thou' styrene rod, I should think I used 10-15% of those I cut! Again, I can only say that my eyesight used to be a lot better than it is now, as the bolt-heads are pretty consistent. These days, I'd use Archers rivet transfers!
This is the basis of a BG Convertible 6-wheel fish truck (Tadpole in later years!):
Again, its entirely built in styrene. It looks like I finished the interior bolt-head detail, but not the exterior. Still, it shouldn't be too difficult to finish it off even after all this time. It even looks like I'd selected a running number! I also made a second set of sides and ends, which are still in flat-packed form.....
-
4
-
4
-
-
I spent last weekend at the Ancestral Home with my Mum as it was the twentieth anniversary, if that's what it can be called, of my Dad's passing on. He was just fifty-five.
I ventured into the loft to retrieve some aeroplane kits that have been languishing there for the best part of three decades, with the purpose of flooding the eBay market. Whilst under the rafters, I chanced upon an old cardboard box wherein lay treasures that I had long thought lost, kitbuilt and scratchbuilt wagons that date from twenty-five to thirty years ago! I hope you'll forgive me if I post some photos of them, as even now I'm quite proud of them!
First up, a group photo of the finished ones:
They're all straight kit-builds, no fancy stuff, just plenty of care taken to ensure they're squarely built and run true, which they did and still do. The Toad has suffered a bit of damage in that a footboard has detached, but that's all. The cattle wagon has a load of Merit Cows on board - unfortunately, they're Friesians when they should really be an indigenous breed!
A couple of the wagons have had an attempt at weathering, which isn't too great, and they'd all stand a bit of extra detail in the brake gear department - notice the rudimentary attempt at the DC brake gear swan-necked lever on the wooden Mink - but otherwise with a set of EM wheels and better weathering and they're good to go. Not bad for nearly thirty years old! Incidentally, the 7-plank open, the wooden Mink and the Toad are all hand-lettered
 I had pretty good eyesight back then.....
Here are a couple of part-built CooperCraft cattle wagons:
The one on wheels is compensated, and sports EM wheels already - I was building it for Dad's planned EM layout. On the other one, I've opened out end slots as per the design as built. This is one of those wagons that you remember doing but can't find! But it has been found and now it and its brother can be finished. Both wagons have had their roof profile corrected for the W1.
This is an early attempt at an S&DJR 3-plank dropside:
Built from the Slater's kit, of course, this is another one that I thought lost for all time. Behind it is one of my recent efforts, and apart from the lighter grey they match quite well. How does my hand lettering compare to the Pressfix transfers?
Lastly for this post, a PO coke wagon from the Ratio kit:
Again, hand-lettered to represent a local firm. My Mum attended the village primary school with Hartnell's grand-daughter!
-
7
-
1
-
-
In between ordering batches of WRRC Cambrian Railways transfer - I think I'm keeping the Circle's transfer sales afloat single-handed - I've been pondering another of my back-of-my-mind one-day projects. I've always fancied having a go at creating a fictional Col Stephens-type of Light Railway, and I've even mapped it out so that it sits in a real landscape and serves real communities.
In a recent edition of the Model Railway Journal, No.276, David Murdoch displays some of his 7mm scale whimsies, destined for the next instalment of his Much Cussing and Swearing saga. Now, while its amusing, a silly name has its cons as well its pros, and I've never really thought in terms of naming a layout in that way. But I must admit to being quite taken with some of his wagons and their owners' names.
Which leads me finally to the point of this post. I quite fancy the idea of allowing my limited imagination free reign on some whimsical PO wagons, and indeed have a few ideas for names. The wagons themselves would need to be of an appropriate era, i.e. I'd stick with my chosen period of 1900-1905 and so the wagons would be of types that could have been seen up until then, and they'd have to be constructed to the same standard, if such it is, as my "real" wagons.
A few of Cambrian Model Rail's PO wagon kits have wended their way to Victor Towers, as has an HMRS PO wagon lettering sheet, so we shall see what we shall see!
-
1
-
-
Well, I think I've cracked it! The method I've arrived at with the WRRC CamRys transfers is:
- use very warm water with a hefty drop of washing up liquid,
- apply the transfers without any softening/setting solution, gently tamp with a damp cotton bud and allow to dry thoroughly for three or four days,
- slit the transfers along plank grooves and wet the cut edges with very warm water/washing up liquid,
- wait a few moments and remove the majority of the water, gently tamp with a damp cotton bud and allow to dry,
- apply a small quantity of MicroSol to the cut edges and around any surface detail such as diagonal strapping, wait a few moments and gently tamp with a damp cotton bud.
Here are the three current culprits:
The results on the 4-plank still aren't perfect as the plank grooves are so deep, but they're much better, while the 2-plank dropsides look really quite respectable now! They seem to look better in reality, as well, so I'm going to leave it like that. Phew!
-
5
-
1
-
On 14/03/2020 at 20:31, Booking Hall said:
Unfortunately, I've just been told that the Brierfield St Lukes exhibition, in April, has been cancelled due to Coronavirus concerns, so unless something else comes along, Far Wittering won't be seen in public until November 2020.
Sorry to hear that, but understandable given the current situation. Hopefully it'll all be history soon and we can return to normality! Hope to be able to see the layout in the autumn.
Best regards,
Mark
-
1
-


")

 Leaving anything to one side for that length of time isn't easy, and I did keep picking up these and inspecting them closely. I've taken a bit of time out of today's working at home, and applied a full set of transfers to the 3-plank fixed side, the CAM (feathers) RYS to another 2-plank dropside, and also the running numbers to the ends of all of them.


 I had pretty good eyesight back then.....


The Osney Story: 0 Gauge Cameos and Dioramas
in Layout topics
Posted
Hi Rob,
This is going to be another corker, I'm certain! Bude Quay was/is a superbly atmospheric cameo, and I'm sure you'll have little trouble incorporating that ambience into a slightly bigger project. I have to agree that the extra two sidings will make sure it interesting to operate.
I'm curious, will the quay siding be operational as well? If it could be ostensibly connected to the rest of the track "somewhere offstage" (there doesn't need to be a visible connection, after all) so that wagons could be worked in and out of the quayside and along the other tracks? Just a thought!
Looking forward to seeing your progress.
Kind regards,
Mark