


JDaniels
-
Posts
132 -
Joined
-
Last visited
Content Type
Profiles
Forums
Blogs
Gallery
Events
Exhibition Layout Details
Store
Blog Comments posted by JDaniels
-
-

There's a hi-res photo of 319 on Flickr:—
https://www.flickr.com/photos/miocene/4849536836/sizes/l
This shows the upper-body lining to be brown (or possibly Indian Red) & not black. Unfortunately the door numbering is washed out by the flash, but 250 at Didcot has similar lettering in addition to the more conventional numbers in the eaves panels. I can only assume thet they're individual door numbers - 319 has C & D, 250 has R (fragment), T & W, & I also recorded A and c. The incidence of letters from the far end of the alphabet rather suggests that trains were permanently coupled as sets and painted as such.
Herewith scans of the tracings I took of 250's remnants:—


With regards to door lettering, there are differences over the years:—
 The difference 'twixt apparent yellow & gold might be explained by the use of transfers versus hand-applied gold leaf. I've seen transfers where a gilt effect was achieved by overprinting translucent yellow onto a silver foil - when the light catches it it's definitely gold, but in other lights it's decidedly yellow.
 Pete S.
Pete,
Thanks your comments.
The photo I took was at the other end of the coach where the number is clearer. Having looked more closely at the lining yes it could well be dark brown but it's so thin that you wonder why they bother.
The coach is a remarkable survivor. I never realised it was in the museum, we only went in because of the transport connection although my wife would rather have gone shopping. Hopefully my photo appears below but it loses something because of the reduction in file size. I spent some time studying the coach as it gave a vivid impression of what travelling on the GWR in the 19th century must have been like. Let's hope it's back on display soon.
-
Mikkel,
This is very interesting, thanks for the effort you have put into this, as has been observed elsewhere this is a great forum for sharing information. It does seem that in these accounts personal views seem to take priority over methodical accuracy but I suppose the people writing this would never have believed that 100 plus years on modellers would be debating the minutae of railway liveries.
With regard to the coach livery, some time ago I attached a photo of the BG coach at the Bristol Transport Museum. I gather that, very regrettably, this is now in store but as I recollect, when withdrawn it was made into a house (hovel may be a more appropriate word) and panelling was applied over the coach side. As a result, when discovered, the side was in exactly the condition it was when withdrawn. The original photo, before the file size was reduced, shows that the coach numbers were in the typeface as described by K14, but yellow with a reddish brown, perhaps slightly lighter, shading, and located in a panel over the door window. Incidentally, although difficult to differentiate between yellow and gilt the numbers on the Bristol coach (319-D) are distinctly more yellow than the gold "First" lettering. The "First" etc. lettering style looks to have never changed until WW2 when a more modern typeface was introduced. The upper panels were white rather than cream but then it's well known that this was a result of the varnish aging. The upper panels had very thin black lining, it wouldn't be noticeable in 4mm, whilst the lower panels were lined in black with a thin white line either side. Bolection mouldings were unpainted mahogany.
Incidentally, what did the "D" after the coach number denote?
Fortunately a lot of your research backs up what is already known and I think the Moores Monthly Magazine was a reference used in the RCTS GWR livery publication. The GWR magazine must also be a mine of information on these matters.
Thanks again for sharing this, it's much appreciated.
-
The best option for the different variations would be the Mallard kit if you can find one.
Don
Thanks Don,
I still have the instructions for the Mallard kit. Like the SEF kit that only comes with the later bunker.
I hated the kit, in particular the overlays. Rather than using a punch to knock out the rivet details, the Mallard kit comes with a thin NS overlays that goes over the thicker NS body. I couldn't satisfactorily bond the overlays to the body and ended up throwing the thing in the bin as my efforts began damaging the parts. I think it's the only kit I've actually thrown away and it put me off buying another etched kit. I did though summon up the courage to try again and was pleasantly surprised, the two I have made, from Peter K and Puffers (Rod Neep) were a pleasant surprise and went together well.
-
That looks superb John. For a moment I thought you had built the SEF one overnight!
Thanks Mikkel
No not quite that quick. I need to get the gears (High Level) but SEF did supply a Mashima motor. They have some in stock, as do High Level.
One problem I had with the M and L kit was a driving wheel loose on the axle. It slipped too easily. In a fit of extravagance I ordered Ultrascale wheels to replace the Gibson ones but have discovered that my temporary solution of superglue seems to have cured the problem. The Ultrascale wheels can go on the SEF kit. They are supposed to be good, at that price they should be solid gold!
-
Thanks John, very useful information (and very quick service by SEF!).
I agree, that's a pity. I don't suppose it provides for a roundtopped firebox then?
Hi Mikkel,
I'm afraid the firebox is cast integral with the boiler and tank tops.
The M & L kit, if you can get it, would be ideal for you as there were two separate fireboxes in the kit. Just to be different I modelled mine on 559 which retained the round topped firebox to the end and also, unusually, had top feed appartus. I committed the cardinal sin of modelling a particular example of the class based on one indistinct photo claiming to show 559. When I did acquire two much better photos I was relieved to see that the model was accurate in most respects although one showed the Swindon bunker with an internal box like arrangement, the other without.
I'll put a photo of 559 on my blog.
-
Thanks for the headsup on what the SEF 517 actually covers.
I've just had a closer look at the contents and the chassis in particular is very impressive. The kit even includes the "glazing" for the spectacle plates. Also included are proper handrail knobs, not those split pins although perhaps that really does show my age!
Also, the bunker sides are cast with the valance as one piece and it would be a brave person who decided to cut those off and replace them with an earlier style of bunker. It would have been easier if the bunker was a separate casting.
So really, if you didn't want to do too much work on the kit you're restricted to a 517 in it's later guise, say from 1924 onwards. I can't help feeling this is a missed opportunity, perhaps a version could be produced with an earlier style of bunker, most of the rest of the kit would be unchanged.
-
I may be wrong but I thought that the 517 kit looked like the old McGowan (?) kit for "Fair Rosamund", or I may be thinking of something else. All of this talk of 4mm scale 517's reminds me that I really ought to get in the loft and see what 4mm stuff I should get shut of (now I'm a 2mm modeller). I know that my P4 M&L 517 is up there somewhere looking like this gallery_12089_1634_133742.jpg
Ian
ian,
Thank you for your comments and the photo. I see your version has the outside bearings. The M & L kit I have only made the inside bearing version. The Finecast advert was a little confusing as it refers to being able to make both inside and outside bearing versions but my understanding is that the outside bearing locos had a 6in longer overall wheelbase. I don't suppose there is any provision to make this alteration in the kit so I guess you accept the discrepancy or perhaps move the trailing wheels back by this amount.(the coupled wheelbase did not change at 7ft 4in).
Perhaps rather hastily I've ordered one from Finecast so will report when it arrives. I gather it was sent today so should be with me very soon.
-
I saw the kit available at Scaleforum. I'm reasonably certain it is the long-wheelbase with outside rear bearings, and standard (narrow) tank, but SEF information on the new kit seems to be non-existent! (I suggest an e-mail to Dave Ellis to clarify.)
There is an RMweb thread somewhere, although that doesn't shed much more light on what the SEF kit actually is.
The RMweb thread and advert (with photo) is here:
I'm sure several of us would be interested to see better photos if you decide to buy the kit.
Thank for that guys.
It looks as though both wheelbases can be made from the kit but it doesn't mention whether the earlier bunker is included. The photo shows the later Collett bunker. This would rather restrict the period covered.
I recollect that the Metro kit had both bunkers, at the time I opted for the Collett version with full cab as I was then more interested in the early 1930's period. I still have the earlier bunker which, with careful selection of prototype, should be suitable for the 517 but this kit may have the alternatives.
I will not make any comment on marketing strategy!
-
Hi Mikkel,
Only just started looking at the blogs following a frustrating time grappling with 4 wheel coaches.
I agree that the period you are modelling shows the GWR at it's most elegant. I don't keep up with the proprietary scene as I should but the standard (and price) seems to be getting ever higher. I'm always impressed with the finish of proprietary models these days; the painting and lining is superb and you have to consider that these are churned out in their thousands. It therefore takes a special kind of confidence to take a hacksaw to an expensive model!
The photo of the prototype accompanying your blog is interesting as it shows the peculiar swirls on the paintwork that appear in photos of many other locomotives of this period. In the photo this is particularly prominent on the splashers and tender. I believe this was caused by the materials used to clean the locomotives at that time but I've yet to see any models showing this feature.
I like your step by step guide which has obviously taken you some time to do. It's much appreciated.
-
Good to see another excellent build of these, John. I heard from Dart Castings that they have some new roofs on the way, which sounds like a good idea.
Thanks Mikkel. The T47 (which I think was the 4 compatment brake third) had a different roof profile from the Ratio kit so if they are doing a roof for this version it will save messing around with boiling water and formers to shape the plasticard. GWR coach formations were often haphazard so the different profiles will add authenticity.
-
On the subject of GWR roofs, it has often struck me how white the roofs look on the old Broad Gauge carriages in the Swindon dump. Of course, some are dark and streaked, but most still look quite white!
 Mike
MikeMike,
Thanks for this, the old broad gauge coaches seem to keep their white roofs longer than those built later, the painting method must have changed. Certainly photos I have seen taken in the 1920's and 1930's show mainly varying shades of grey, mostly the darker end of the spectrum
I did have a look again at the HMRS GWR livery register to see what it had to say and there is a copy of the painting specification taken from a GWR apprentice's notebook dated 1918. The roof is basically white lead but what intrigued me was the instructions for painting wagons. These were "2 coats of white lead with a little black added followed by 1 coat of black with a little white lead added." And there we are debating the exact shade used by the GWR!
-
Ah yes, the gas piping - still missing on some of my 4-wheelers too I'm afraid. They are due for an overhaul when I get around to modelling the Up Main at Farthing!
Regarding coach roof colours - it has been mentioned on here before, but: It is interesting to browse the station views on "Britian from above" in this respect. One example here, from Newbury in 1928. The period will also matter of course, but the differences between roof weathering are interesting.
Image embedding permitted. If you register on the site, you can zoom in for closer views.

I'd love it to be at Didcot but we've nowhere to display it, so it's better off where it is at the moment. We do have the mortal remains of BG No. 250 that I've 'excavated' some livery details from - it's viewable in the Carriage shed, but I'd hesitate to describe it as being on display.
On the subject of roofs & colours, this might be of interest:—
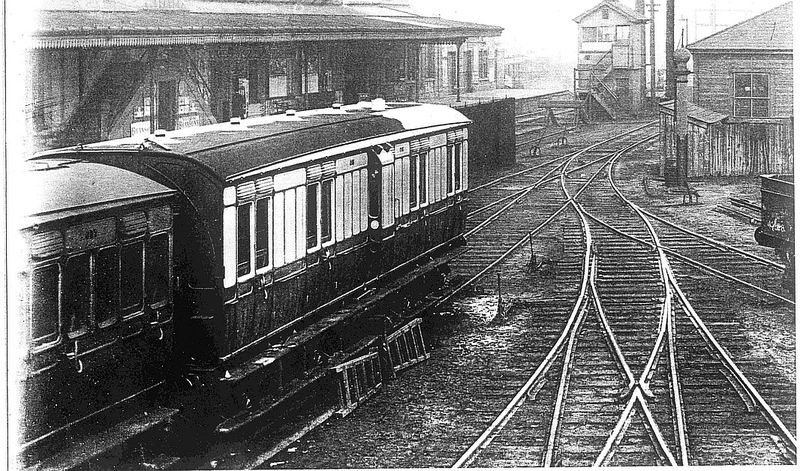
Taken at Swindon early 1900s. For some reason the Dean van has been hauled outside, interrupting the painters mid-tosh. The contrast between the white & the be-crudded colour is remarkable.
White might seem to be a 'daft' colour to pick, but I suspect that's more down to cost & ease of use. The bedding compound for a roof canvas was a mix of white lead, putty & linseed oil that was spread liberally over the boards & the canvas stretched over whilst it was still wet. More coats of this jollop were applied on top to seal everything in. White lead will darken in a polluted atmosphere, and the linseed would mean that it'd take weeks to fully dry, so soot, cinders & semi-carbonised cylinder oil from the loco will stick to it like **** to the proverbial blanket. Even with modern paints it happens - have a look at photos of SRM 93 - canvas covering but painted with modern bitumastic & that crud won't wash off!
Pete.
Mikkel, Pete,
Thank you very much for your responses. Pete, your detailed account of the way in which the roofs were painted has answered one question. I always thought that rain would wash some of the dirt off, we have a white car and whilst it gets dirty the underlying colour is always apparent. With the coaches if the muck sticks to the linseed oil as it dries it's never going to wash off. It also raises the question of the texture of the roof, I suppose with the dirt it would be a lot rougher than we perhaps imagine. As with the red wagons, it looks as though the colour is an incidental result of the preservatives used rather than a conscious decison to use a particular shade. BTW, you mention SRM 93. Congrats to all involved in the work, I went on it when visiting Didcot and it was a brilliant experience, it really feels like stepping back over 100 years.
Mikkel, thanks for sending the photo. It does show that the colours varied although I suspect even the one white roof is probably stained when looked at closely. At least with your gas piping you only have to model the main gas feeds. Later on there was s econd pipe for the incandescent gas (?) feed. Whilst sanding down the roof to remove the paint I also removed the rather ineffective rainstrips to be replaced with the same 20thou Plasticard as used for the gas pipes.
Thanks again both of you.
John
-
Good to see another one of these. While you are probably right that there is little visible difference between the original chassis and the MT one, your point about the fragile stepboards is important I think. I vividly remember several attempts at glueing those broken plastic stepboards together!
Like you I have been undecided about the roof colour, but I've now settled on medium grey and will repaint my white roofs at some point. I think they very quickly turned grey in reality, and somehow the coaches also simply look better with a slightly dark edge to highlight the livery - in my opinion.
Mikkel,
Thanks you for your entry.
It has always seemed odd to me that modellers concentrate on the underpinnings of wagons and coaches ignoring the top surfaces. This may be because the photos we see of the prototype are generally side on whilst when it comes to models we see them usually from above, in fact it is very difficult to find photos of the prototype showing the roof detail. On a model the lack of gas piping on the roof is far more obvious than the omission of internal parts of the brake gear. In fact even on broadside photos of the prototype, the brake gear is barely discernible.
As to coach roofs, yes I think I will use various shades from off white (rarely) to medium grey. A characteristic of GWR coaches as seen in photos was the various shades of grey whilst it wasn't unknown for the odd coach roof to be sparking white. Coach sets, such as the three four wheelers used on the Wrington Vale would, I have thought, been overhauled and painted together and the roofs would therefore be the same shade of grey. White was a ridiculous colour to use, only abandoned in 1940, guess why!
John
-
Re the 'M Shed' coach - here's a link to the Bristol Museum page for it:— http://museums.bristol.gov.uk/details.php?irn=138493 — pity it's listed as 'in store' & not on public display
They also have another one:— http://museums.bristol.gov.uk/details.php?irn=139196
P.
P, thanks your entry. Sorry about my previous attempt to reply.
It's a great shame that the coach side has been put into store. When I first saw it I thought it was remarkable but in a general transport museum with so many people these days interested in cars I guess they thought the space was better turned over to the Bristol Motor Company. It would be better if the remains of the coach were loaned to someone like the GWS at Didcot where it would be better appreciated.
-
Re the 'M Shed' coach - here's a link to the Bristol Museum page for it:— http://museums.bristol.gov.uk/details.php?irn=138493 — pity it's listed as 'in store' & not on public display
They also have another one:— http://museums.bristol.gov.uk/details.php?irn=139196
P.
-
Mike,
Excellent article as always. It's a real challenge modelling very early railways but also very rewarding.
You refer to the colours of the coaches. Were you aware that at the transport museum at Bristol (just along from the Great Britain, definitely also worth a visit) they have the side of a broad gauge coach in the same condition as when scrapped, presumably in the 1870's. The coach was used as a shed (probably living accomodation in those days!) and the side was panelled over for a hundred years or so. It's a remarkable example of long term preservation. I have a photo of it and having looked at it again the level of detail is breathtaking. As you say, the "cream" is more white. Lettering, coach numbers are all there. If you haven't seen it I would say it's well worth a visit.
John
-
Mikkel,
These are the first model tarpaulins I've seen that look like the real thing. I experimented with black plastic dustbin liner which captured the folds better than paper but it was impossible to then letter or paint (weather) them. As has been observed elsewhere sheeted wagons were far more common on the prototype than might be inferred from the models one sees and to model them in paper does not really cut it (excuse the pun) .
I was interested in your thoughts about seeing your own modelling through different eyes. Modelling always entails a degree of compromise, how many steam locomotives do you know of that have a large brass gear wheel under the chassis. Also, as has been demonstrated by the debates on the wagon red livery, sometimes the information is just not there or is often contradictory. I think everyone has to find their own level at which they compromise. As skills improve, and more importantly more time becomes available, then that level can rise. I discontinued my subsciption to MRJ many years ago as it always seemed to be a race to the peak of perfection requiring skills, tools, time and expense that were beyond the reach of many. We should be like golfers, enjoy the pastime even if you're not Rory McIlroy.
-
Reading K14s comments, could it be that the whole wagon (body and underframe) was coated in red lead and then tar applied to the metalwork (i.e frames as well as the wheels)? I appreciate that the postcard I mentioned may not be definitive evidence but whoever coloured it saw red and grey wagons (which fits with the period the original photo was taken) and the red wagons are clearly shown as having black underframes. I would guess too that the tar would have worn off with wear exposing the red lead underneath which may lead to further confusion. However wouldn't this hypothesis fit all the various theories mentioned here?
-
Thanks very much for sharing this John. I appreciate your paving the way for the rest of us. I think it will be worth it in the end - although that's easy for me to say of course!
Mikkel, you haven't seen the cost of having the professional paint job! From experience though I know that particularly where lining is concerned a proper paint job really lifts a model.
One point worth mentioning is that Dart Castings now do the correct size springs for these coaches. I hadn't realised it until I read the Dart Castings guide but the springs supplied with the Mainly Trains kit, and for that matter the CSP / Haye Developments kit are too short. The very comprehensive guide states that the springs should be 6ft whilst the MT ones are 5ft 6in and the Haye Developments ones only 4ft 6in. I've not done any further research on this but would have thought it should be realatively easy to swap the incorrect springs for the new Dart Castings ones.
Yes it's also good to see a new use for a cocktail stick!
-
Thanks for posting up your build of these as I have a few to make sometime in the future and it's good to know what trials and tribulations I may encounter. I always assumed that it would be quite a simple task but obviously not, at least I know what to look out for now.
Thanks
Jim
Also thanks from me for sharing your experiences. I suppose the MT chassis is unavailable now that Mainly Trains has stopped trading. Unless Shirescenes/Dart have taking it over, or the shop has been sold on.
Jim, Mikkel,
Thanks for your comments.
I don't suppose the chassis kit will be obtainable which is a shame. It's a great advance on the Ratio chassis and the compensation is an asset on this long wheelbase.
Jim, the problem I found was trying to fix the ends and sides in the correct position whilst ensuring the sides located in the roof. I wish I had another pair of hands! Trial and error is needed. The ends are possibly too narrow as the sides, when soldered to them, fit on top of the floor rather than just tucked over the solebar. It takes a lot of fiddling to get the sides to just overlap the solebar, I left a slight gap between the ends and the sides at the bottom to get this greater width which I then filled in with solder.
If I was doing this again; and I quite like the fact that the Shire Scene sides expand the variety of GWR 4 wheel coaches available; I would know the problems and adapt accordingly. It was annoying to have to cut off the fixing bracket on the ends but the replacement worked just as well. Locating the new bracket after I had the sides and ends in the correct position meant that when the screws were tightened up the whole assembly should revert to the correct position. Should also have mentioned that I fixed a narrow metal strip across the middle of the coach, resting on the floor, to connect the two sides together. I need to access the inside of the coach to put in the partitions and glazing hence the narrow strip.
If you want me to post a photo of the inside to show how I tackled this I'll be happy to do so.
Incidentally, I should have mentioned that the door and grab handles also need fixing, I will do this after painting.
It's great that we can all learn from each others endeavours!
-

Mark, you're right, this is not an easy kit, the biggest problem I had was with the chassis. I got it working reasonably well but was never satisfied with the appearance. To give some semblance of mainframes just behind the wheels (I model in EM) I applied plastikard overlays to the sides of the cast chassis. Alos I had to split the (not that well detailed) cylinder casting and separate the two halves to accomodate EM gauge standards.
Recently I bit the bullet and dismantled the chassis throwing away the casting. This was replaced with an Alan Gibson chassis with one axle sprung. I had to fashion an assembly from strip brass to take the top bearing that fits into the body. Because of the soldering required on the valve gear I was concerned that Gibson wheels would melt to used the Romford ones, now marketed by Markits. I used the NuCast valve gear without the combination lever as there was no way this would fit without fouling the valve gear. I do have some alternative etchings which I will try.
A High Level gearbox with the chunkiest Mashima motor that would fit between the two legs of the support structure completed the running gear.
If you want to see photos of my efforts have a look at my Blagdon blog.
It is a shame that currently no kit is availabe for the steam railmotor although I believe a RTR one is available (obviouly no good for EM modellers). These vehicles, in their day, were as much a part of the GWR branch line scene as the 48xx 0-4-2T's of later years and how many models are there of that prototype? I've tried to get hold of the Blacksmith chassis kit without success as I feel it would produce a better result, the NuCast body actually is quite a good representation of a Diagram O railmotor (although watch out for the water filler covers). If anyone knows where I can lay my hands on a Blacksmith chassis I'd be very pleased to hear from them.
-
Hi there,
I would`nt necessarily be worried about needing a lot of space in changing over to 7mm model railways. Save your pennies if you need to that is .... you can have a lot of fun with one 7mm RTR loco and a couple of wagons and a brake van. And if you consider DCC sound it will open up another stimulus of enjoyment.
Your right about the Dapol Terrier, it is an excellent model for the price.
I worry about Heljan though as they are not renouned for the quality of their mechanisms and motors.......
However , I would recommend you look at Minerva models who are going to produce a RTR 57XX.
Lionheart produce a 74XX but are a little more expensive.
John
Don't fight it, bow to the inevitable and enjoy 7mm.
Trying to turn a blind eye to O Gauge here.... but that Terrier......perhaps just a display model? Hmmmm... weakening
Thanks for all your comments.
Rosspop, you're quite right, I've seen a number of O gauge layouts in quite a restricted space. A small industrial complex for example although I'd prefer a quarry, something a little more natural looking than acres of brickwork. Incidentally the Terrier is available with DCC and sound, clearly quite a bit more expensive. I gather from the guys at Gaugemaster that the sound was matched to the real thing, presumably recorded on the Bluebell railway.
Hymekboy, yes I can understand you weakening. I saw the model at Gaugemaster and I'm pretty sure the photos reperesent a production version. I should have realised but I could have sent the link to the gallery, here it is:
There seems to be something of a renaissance when it comes to O gauge, I can understand it though, from my experience at exhibitions an O gauge layout on an 8ft by 3ft baseboard attracts more attention than a 4mm (whether it be OO, EM of P4) layout on the same size base.
I will get there eventually!
-

I still have one of those coach underframes on back order from MT - that said, I have another two to build (after the one I did in the summer) so I can do a 3 coach rake if nothing else.
I ought to get the Wild Swan book really. Just out of interest, did you find any photos of the rear bunker? I haven't added handrails as they weren't indicated on the kit, but all the photos I have are side-on or front three quarters.
I too am doing a three coach rake. I had some problems with the solebar overlays but otherwise the kits went together well. Whilst I enjoy putting an etched kit together I always have a problem with overlays, in this case I soldered them on rather than gluing as suggested. To avoid the white metal springs dissolving into a blob of metal I removed them, I think this is a better than as suggested in the instructions. At the stage now of doing the ends.
The plan of 1196 in the book shows a handrail on the left side of the bunker. This, I think. is as originally modified by the GWR. A note to the drawing states that a handrail was also fitted to the right side "later." In the late 1930's both handrails were raised to be nearer the top of the bunker, previously they were just above the concave curve of the modified bunker. By this time though the original GWR bunker had been further modified and was taller, from memory I think the old GEM kit represents the loco with the smaller, lower, bunker.
There is a photo of one of the Tanat Valley duo in the book (back cover actually) which shows the enlarged bunker with two handrails but still in the lower position.
I could try and scan a copy of the plan to you.
-
Al, it's a pity that the body is so poor. I too was seduced by the attractive prototype and brought the kit many years ago at a show for I think £ 20. Add in the Mainly Trains chassis (which I think is the one you have), a Mashima motor, Gibson wheels and a High Level gearbox and it was a comparatively cheap model. The Mainly Trains chassis is so good it makes the body look even worse. If I would change anything I would have compensated the chassis but there's not too much metal in the area where the hornblocks need to go. As for lettering, I think I read somewhere that the words "Great Western" were standard sized transfers, not painted to fit as with the wagon lettering. I managed to make my Pressfix transfers just fit by reducing the gap between the two words but even then it means the numberplate is partly underneath the cab handrails. There are some excellent photos and a detailed plan of these locomotives in the Wild Swan book "The Tanat Valley Light Railway" It appears that the Swindon painters have also closed the gap between the two words.
It's a shame that Mainly Trains are ceasing operation but I managed to obtain my three GWR 4 wheel coach underframes from them very recently.


Pre-grouping livery clippings
in The Farthing layouts
A blog by Mikkel in RMweb Blogs
Posted
Sorry I haven't mastered the art of copying photos.