


jdb82
-
Posts
485 -
Joined
-
Last visited
Content Type
Profiles
Forums
Blogs
Gallery
Events
Exhibition Layout Details
Store
Posts posted by jdb82
-
-
This book has been recommended before....
North Sunderland Railway by Alan Wright, one of the best sourcebooks for light railway ideas...
Dava
Great! I'll see if I can get my hands on a copy. Thanks Dava!
-
 1
1
-
-
Hi John
The L is a 0-6-0ST where as the H is a smaller 0-4-0ST. both classes were built over a long period of time so change in detail.
Marc
I see, schoolboy error!
Any idea where I can get my hands on some drawings?
-
Early MRJ's have featured several articles and drawings of various Manning Wardles by Don Townsley, e.g. Bamburgh of the NSLR, Morus, Ringing Rock etc. Also photos in the no 1 compendium. If you look up the MRJ index it will indicate the relative numbers and what is featured. They might be of use because most of the designs were similar with relative increases in wheelbase and wheel/boiler size.
Here is a shot of a 7mm MW I built sometime in the 90's. This has the early square riveted boiler and unequal wheelbase. There were lots of variations between classes and individual locos.
Slaters used to do MW wheels at one time I think (1/8" axles) but those on the loco are Wednesbury wheel castings, also on 1/8" axles. Most MW wheels are quite distinct with their double boss or cast weight opposite the crank. The coupling rods were made from the Alan Gibson 4mm etched universal type because they are quite small both in size and length. It is powered by a Mashima 1630 sitting vertically in the firebox, and driving a 80-1 gearbox driving the middle axle. I think even with the larger L class this would be the basic way to go, perhaps using a High Level gearbox these days.
Izzy
Hi Izzy,
I know this thread was written a little while ago, but I've just been reading through it with a view to one day scratch building an old Manning Wardle. Is this the H class, or an older class of loco? I was also wondering where you obtained your plans/drawings for it? Ideally I'm looking for something online as I live overseas, but haven't found anything yet!
Thanks!
John
-
Thought i'd post a few pictures of my CNC conversion of my Proxxon MF70 Mini Mill
This is the MF70 with the added stepper motors to the x,y,z axis. 3 NMEA17 stepper motors - £30 from eBay
and this is the electronics, a Arduino Uno plus a GRBL compatible stepper driver. £15.99 from ebay.
So total conversion costs - £45 plus a bit of aluminium/nylon stock for the stepper mounts and couplings.
I've used Fusion360 to generate a CAD drawing and the CAM processor has a GRBL driver for generating the G-Code. This is sent to the CNC Mill using Universal G-Code Platform. All the software is free to download of the web.
If anybody wants more details, just ask and I'll do a more detailed post.
Just ordered up some more bits to convert my Sieg X2 mill, but that's going to take a bit longer.
Yes please!
-
Ok now for the vid
didn't work. Anyone out there to tell me how. Peter(Pad) has done it, I think through youtube but I don't know how.
Pete
If you have uploaded your vid to YouTube, you need to click on "Share" to obtain the weblink, then copy and paste the weblink to here. The weblink will most likely start with "https:"; remove the "s" from that; it should then play directly here.
Once you have uploaded the video to YouTube and copied the link as per Horsetan's instructions, you can then go to the full editor in RMWeb (click the "reply with attachments" button), click on the "Special BBCode" (third from the top left), choose 'media' and paste in your YouTube link. This embeds the video into your post :-)
-
That looks like it has a bleed valve, you can put a length of tube on the outlet, and run it into a bottle or something under your desk, and open that valve very slightly - it should hiss gently, and blow the water out continuously. (and still maintain spraying pressure)
If it's made for a nail bar, you'd have to assume it's going to get more use, and more continuous use than even the most determined modeller would ever subject it to.
best
Simon
Cheers Simon, I'll give it a go. It does hiss and I do get a small puddle underneath it.
Think it's aimed at more of a hobbyist nail painter than nail bar use though - it was only about 60 quid ;-)
-
Condensation is a problem with all air delivered paint. Have you a water trap on the compressor?
Yep, although it has clearly collected quite a bit - this is a good 24hrs after use, and there was a little puddle on the floor.
It's a pretty cheap compressor - one of Sparmax's basic models; no tank, and I'm still using the basic coiled hose that came with it. You have to take what you can find out here! Really meant for painting nails I believe....the shop assistant gave me a bit of a funny look when I bought it!
The humidity here is pretty high, and that can't help.....
I might need to limit my spraying time each session - it was only towards the end of covering the whole body I had any problems

-
True to form, I lost the badminton. I consoled myself by priming 'Hamburg', which seemed like good therapy (or at least provided me with a good excuse to get to the workbench!).
Got into all the nooks and crannies, and behind all the pipework fine, and seem to have a nice smooth base coat. I did end up with some condensation being blown through the airbrush, which has discoloured the primer (on the left tank top, and the side of the right tank), but doesn't seem to have affected the surface texture at all. As the top coat will be black, I don't envisage this being a problem. Hopefully.
Does anyone else have a problem with condensation and airbrushes? I wondered if it was partly a product of living in a hot, humid climate?


Slightly disappointed by how many imperfections, especially with the castings, have been shown up by the primer that I hadn't spotted before painting! Close-up + primer = cruel
-
7
-
-
I had forgotten your location. I am much closer to Barnsley. I have often delayed loco painting until we have that three day heatwave that passes for summer round here.
Not sure how an equatorial climate effects the weathering of brass..speeds it up?
Haha, we certainly don't need to wait too long for that 'warm' day! To be honest though, when it comes to the weathering of brass, I've not really had anything to compare it to, as I never built a kit in the UK. From a visual perspective, I tend to have 24 hrs before I notice much of a difference in colour. The heat certainly helps with paint drying times though!
-
Looking great. I have always found that an immediate coat of primer is required. Overnight gives shiny brass too long to start oxidizing. The same applies to soldering, reclean the contact area immediately before applying flux.
Part of the problem with an immediate coat it that I can’t really get inside the smoke box to dry it out that quickly. After being immersed in water it takes overnight to really dry it out. Maybe the oven is the way forwards as Regularity suggests above. I have some time this morning, so another quick going over with the Gariflex block, another dunk in the cleaner, a bake in the oven and then a coat of primer seems to be the order of the day.And while I remember, warming the loco with a hair dryer before painting helps too.
No doubt you are about to get lots of advice on the relative merits of tarbrush,airbrush and rattle can.
And then the quarter finals of the Brunei Badminton open, as I actually managed to win a couple of matches yesterday
-
2
-
-
With work as crazy as normal, and my attempt to make it past the first round of the Brunei Badminton Open this year, there has been absolutely zero progress mid-week!
I did spend a couple of hours de-tarnishing and generally cleaning her up this afternoon though, which has allowed me a moment of indulgence with probably a good 30 minutes just spent admiring my hand-work. I'm generally quite self-critical, but I'm just allowing myself a moment of thinking that actually, for a first build, I've not done too bad a job
 . I now have more cleaning up to do: the mountain of Gariflex 'droppings' and picking out tens of fibreglass shards from my fingers.....
I make no apologies for the number of photos that follow ;-)
Now it's off to the ultrasonic cleaner for a bath, before it gets a coat of primer, hopefully tomorrow morning.


-
1
-
-
It seems like a common experience to lose paint on the edges of foot plates, etc. I’ve not tried it, but perhaps metal black the body before paint?
Best
Simon
Can you do that on the treads of wheels too? Do you know if it affects conductivity?
-
If you have one or access to one, an abrasive powder airbrush is the best way to key the surface just prior to priming.
Unfortunately not. The paint on the chassis seems to be holding up with me handling it, however anything with a hard edge easily takes paint off. The primer certainly hasn't 'etched' into the surface from what i can see.
-
I don't like shiny brass when it comes to painting. Brass is very hard to get paint to stick too. So the smoother shinier it is the harder it is. Yes it needs to be very clean.
In that case, my plan might be to polish it, admire it, and then ruff it up a bit with some wet&dry.....not too much mind - don't want scratches!
-
You’ve reached that stage where it looks almost too beautiful to paint.
Nice workmanship.
I think I might just admire it for a while.... I love an engine in the nude
She’s quite tarnished and grubby currently after sitting on my desk for several weeks. No doubt there’ll be a few photos posted here once she’s shiney and sparkling, before getting covered in monochrome primer....
-
Hiya,
Backscratchers do work, if the wheels and tyre backs are clean and smooth (Slaters wheels typically have a moulding pip or two on the back which needs polishing off on wet&dry on a flat surface) and the wire is springy enough(ideally you want 3-4 cm of ~ 0.4 or 0.5 mm wire - More is better as long as it can’t short) , and there is not too much sideplay in the wheelsets.
Fundamentally, they’re just like plungers, though I find they gather more fluff. The other issue is that their flexibility in the inboards-outboards direction is typically the same as in the up-down direction, and this is their downfall, as the wire can end up shorting on the frames, brakes etc.
HTH
Simon
Things improved a little bit after a bit of running in this evening; though still not perfect. I think I might get the finer grades of wet and dry paper out and really polloh the back of the flange up to try and smooth it out.
-
Fitted the pickups this afternoon. I'd read about various different options for pickups. I don't have any plungers here, and top wipers as described in the instructions would have been too visible for my liking. The Slaters wheels used are all insulated, so split frame pickup (is that the right name?!) wouldn't be an option. I went for the wire on the back of the flange option.
It seems to work OK. Some of the time. It's fine once it gets going, but can be a bit sticky to start off, and need a tap to get it moving (see video below). Is there anything I can do to improve this, or have I just chosen an inefficient pickup method?!
Thought I'd see what the loco looked like all put together, just to indulge myself. Think it'll look pretty good once the body is painted up. Not looking forwards to trying to clean all the nooks and cranny's up though!

-
5
-
-
And now with the chassis built up, brake blocks and hangers on. And it still runs smoothly. Bonus.
I'll cut down the crankpins and blacken the nuts once I'm sure everything is as correct and final as it's going to be!

And just to prove it still runs slowly:
-
8
-
-
Been a bit slow progress this week. Suitably grubby weathering effects have been played with, some more successfully than others. Not entirely happy with how the chassis has turned out, but it could be worse.
I might have to do something with the wheels. I'm quite pleased with how they've turned out colour-wise, but in some places, theres a bit of an edge where the pain has met the masking I put over the tread/flange. I wonder if I've been too generous with the paint and made too thick a layer.
The coupling rods have turned out nicely - a bit of thinned black gloss paint was used for the oily areas.


And this is what I'm aiming for..... I'm not quite there, but not a million miles away.

Next job is to put everything back together again and see if it still runs!
-
4
-
-
Wheels all masked up and primed, ready for their red coat, and the chassis has it's red coat too. 'Hamburg' has it's outer frames painted red as well as the inside. Result - it all (currently) looks very red! Especially with red coupling rods and red wheels.....It won't stay that way though, lots of black and 'frame dirt' will be applied, black weathering powders and some kind of glossy thinned black to make the oily bits, errr, well.....oily.


-
3
-
-
It turns out ultrasonic cleaners work. Just given the tank in mine a wipe with some kitchen roll, and this was the result - the only things I have cleaned in there are the cab pieces, chassis, brake hangers and coupling rods in one session! Dread to think what it will be like after the main body has had half an hour in there!

-
1
-
-
Good to see you back at the bench! The Johnson looks interesting.....is it all coming apart, or just the chassis?
-
A bit of friendly advice: don't overdo the white.
In the same situation, I have dry-brushed 'steel' over the glass and that gives a fair impression. I treat similarly brass fittings and copper pipework.
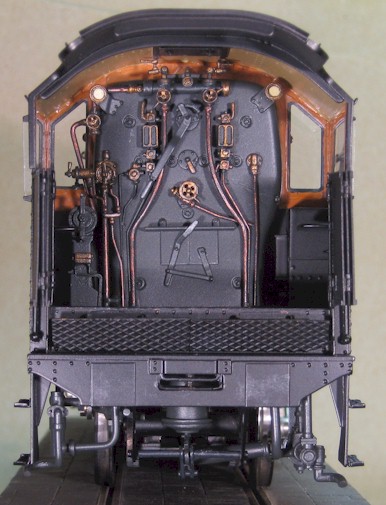
This view of the cab of an 8F doesn't show the glass very well at all but it does show the idea with the copper and brass rather better.
David
Thanks David, a useful tip! I’ll be sure to give it a go
-
I reckon that looks b....y good!
The water glasses should probably be a bit cleaner, at least where the glass would be, otherwise, exceedingly, delightfully “industrial” & lived-in.
Best
Simon
Cheers Simon - need to think about the glasses, and how to make a brass casting look clear! I need to get hold of some suitable white paint. Maybe a tester pot of white gloss from the local hardware shop, in the absence of any 'proper' modelling paint


Manning Wardle L class drawings?
in UK Prototype Questions
Posted
Thanks Izzy, that's really helpful. It's a beautiful little model you built!