

Jaggzuk
-
Posts
784 -
Joined
-
Last visited
-
Days Won
1
Content Type
Profiles
Forums
Blogs
Gallery
Events
Exhibition Layout Details
Store
Posts posted by Jaggzuk
-
-
Great show this year! Really enjoyed all the layouts and the quality was really good.
For me with two young boys the quieter aspect of this show is perfect, when compared to the likes of York and Doncaster shows. The cafe is a lot more economical too.
Yes the fact that the show appears to be quiet, whether this was the case or not I do not know, makes watching the layouts easier and a lot less stressful. You do not have to wait or fight to get a glimps of each layout. I think the largeish well lit exhibition space also helps. The one thing I found a tad odd was getting hot feet, until I realised it was the very warm underfloor heating!
I found the Ops helpful with questions I had and the traiders I bought from were nice.
The location is good too and very easy to get to with parking directly outside.
My boys had a great time as did I and we enjoyed ourselves.
Thanks for the show, see you next year.
-
Not the longest platforms in the world, but this is the best we can get, which I think looks OK. With a footbridge in the middle too that should hopefully hide the shortness issue. The platform overlap with the points is unavoidable really, well, it is only an 8x4 after all.

I have plumped for the Scalescenes Medium Station (R004) and will also go for the R007 Footbridge. I have not used Scalescenes yet, so this is a good opportunity for a trial. The main reason I went for this station was I wanted a town looking building in red brick and this looked the part. Plus, I have already got red brick platforms; which I've had a long time, see diorama comment below.
I am working on the single track platform being 12 feet wide, with all structures being at least 6 foot from the platform edge; based on the general view here http://www.rmweb.co.uk/community/index.php?/topic/56653-how-wide-should-a-platform-be/
The plan will be to add some nice curved canopies at a later date, probably using some laser cut parts. But this will wait till the boys are a tad older and bit less clumsy ;-)
Talking about already having the platforms kits, made me hunt out a photo of my one and only previous effort at scenics, which I sort of forgotten I had done. A little 12" diorama for my Dad back in 2014 when he was in a care home. It included Metcalfe platform, static grass, a bit of ballasting and a tiny bit of weathering. I also made the two wagon loads, including real coal, see my old Blog on how .http://www.rmweb.co.uk/community/index.php?/blog/469/entry-13100-mgr-wagon-haa-making-coal-loads/. A nice memory.
So the next stage is going to be to build the platforms and then the buildings.
-
 1
1
-
-
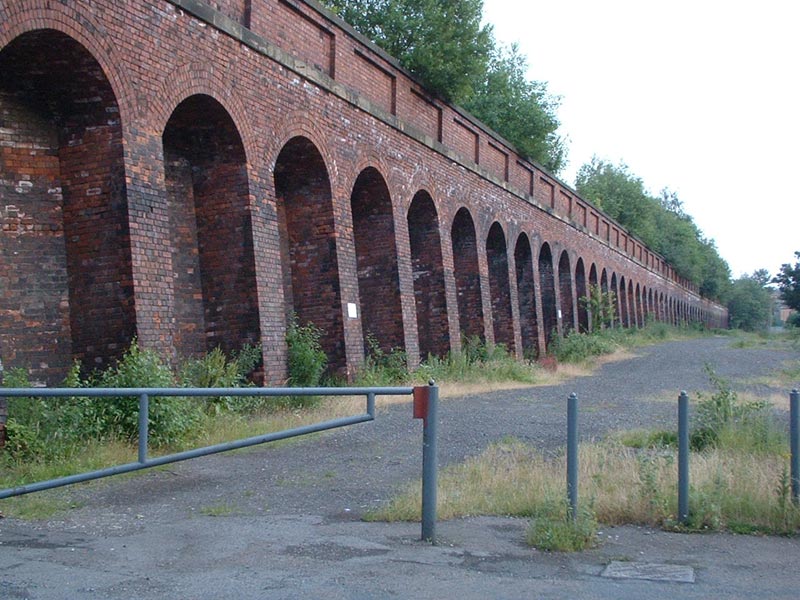
Here are a few of the infrastructure images I used as a reference for my retaining walls. Hopefully, these show what I was trying to recreate with the calcite staining. I think in model terms less is more, certainly with the first one.
Going to have a change of scene and look at the station and platform area and decide which station kit I am going to go for: Metcalfe, Superquck Scalescenes or other make? The main thing it has to be a kit for speed of build.
-
2
-
-
It's lovely to see this layout evolve. Family involvement, great layout plan, lots of stuff for us all to see, learn from and enjoy.
Thanks Steve, I am enjoying doing it, learning new techniques and then sharing it all here on RMW. I guess as I have for so many years been a silent reader, it is nice to give back. One thing I do find hard is that fine line between spending too much time in the fine detail vs general scenic progress for the boys; like I really need a station and platforms!
great work on the weathering it looks very real wish i could have the courage to do more of it . Again nice work.
Andi
Well Andi after reading other peoples topics on weathering and watch quite a few online tutorial videos, it was just a case of saying to myself "oh just get on with it. And if all goes wrong, just make another kit up" Mind you, when it comes to weathering up that very clean looking Class 37, that's another matter ;-) . For me it was also about looking at as many real-life examples to get the feel in my head of what I was trying to create. I will post some example photos later.
Cracking job Paul, really good mate.
You often see brick cuttings with stone bridges or tunnel portals, so it's not out of place, but maybe the portal could just be weathered darker to make it fit in?
For something like that I would make up a dilute wash of Humbrol Acrylic 91, apply it and then dab most of it off again with kitchen roll, to give a browny-green stain.
Cheers,
Al.
Ok, sounds like I can stick with the stone one. None of the tunnels are finished yet anyway, as they are all missing the parapet/tops and as you say needs a good weathering. Thanks for the tip. Will also try warm up the grey to be more like grit stone and do it such that the stones look a bit more 3D in relief; might be a big ask though for this Metacafe flat card.
-
1
-
-
Well it all done and in place, both sides of the incline up to the flyover, now have weathered retaining walls. Really pleased with the results and it really helps to set the scene with the lower tunnel and the curve up on to the flyover. I am also pleased that the transition from the retaining walls in to the rock hillside cutting works too and will so much more once I add grass and bushes etc.
So this is my first real effort in to weathering (only second to the PW hut seen earlier), and I have to say it is really satisfying work. Both with the real world research and then working out how to apply paint to replicate things.
The wall leading up to the tunnel was my first effort and was all brush applied paint. The base coat was a watered down acrylic brown wash and then I used Green Earth Colour from Woodland Scenics for the algae stains. I found the WS paint (liquid pigment) was really good as it was not too thick and allowed the depth of colour to be built up slowly; no obvious dried edges.
For the other section of walling around the loop from the flyover, I used the same method of stain and calcite application, but I use my airbrush to apply the base brown wash. For this I used Vallejo Model Air paint Dark Earth. I think I prefer the second attempt and found the airbrush really fun to use and gave a nice dappled shade of brown over the card print.
Top - all brush applied, Bottom - airbrush base colour with brush for stains, my favourite section is the 2nd from the right
Now a few scene shots.
Oops forgot to remove my camera pillow!
Not sure about the stone tunnel portal now, may needs a brick one instead? Any views on this?
The next task will be to fill the gap behind the walls and the polystyrene track base. Then ballast and scenics.
-
7
-
-
After a quick search on the web, it is quite apparent there is not a lot out there in kit or ready made form for true 4 barrier LX. However, I did come across a gem, https://www.youtube.com/watch?v=J8ux7OmFKbw. Yep, that is in 4mm, with working barrier skirts and lights. A bit more of a search on the layout name lead me to Dagworth of this parish and his layout Ravensclyffe http://www.rmweb.co.uk/community/index.php?/topic/3288-ravensclyffe/
And to top it all off, here are his step by step photos of the barrier construction https://www.flickr.com/photos/dagworth/sets/72157631808497111/. There was a construction topic in old RMweb, but that appears to have been lost.
So, over to you now Chris, working gates and lights ? ;-)
I will certainly be bottom drawing a link those photos for future ref. and a project, one day.
-
1
-
-
Great to have an update Cbris. Sometimes life just distractes us with other commitments.
The aerial view really helps to give some context of the layout as a whole. Love the deails you have been doing, must get some point motors, AWS etc. as they look great and help to distract the eye from the Peco point deficiencies.
The wire detail to the points motor works really well.
Looking forward to the next installment.
-
Agree with ianLMS, Luke Towan has some great highly detailed videos
-
Cheers Vecchio for the comments, I have quiet enjoyed playing around with ideas and trying out techniques. The layout, apart of being for the boys, is also a playground for improving my modelling skills; which I am really enjoying.
Al and Vulcan Product Fan, thanks for your suggestions, going to have to have a look another layouts on RMweb and see which feels the most realistic to me. I have to say Autumn, damp and gloom looks the easiest to achieve. I would love to do winter and snow, saw a layout at Shildon MRS and the snow effect was very good. Summer is lovely and I am always impressed by modellers that do fantastic flowers and bushes in bloom etc, but the time I do not have plus would be too delicate for the boys. Jury out still.
Back on the ballast front, oh no!! I have finally achieved a good buff coloured real granite chip ballast. This is using Peco medium grey. It was covered in a uniform light grey dust, but once washed looked much better and varied in tone. Still too bright in shade, so I paint washed with a mix of my two brown acrylic paints and the result is just what I have been after for my countryside areas. Mixed with pink and a touch of Guagemaster grey the look should be right.
Buff, left, original Peco grey right.
-
2
-
-
So as I travel on my daily commute by train through a bit of North Yorkshire, I am looking at the Autumn turning landscape, muted colours, not much colour in the trees yet and I am wondering, which season to set the layout in?
Each season brings specific modeling techniques and I am not sure which one to go for. Any sugestions, and dare I say the easiest?
-
Wow, those are stunning, not sure my weathered Metcalfe kits will come anywhere close. I love the feel they create and the lichen roof is perfect.
Have been a silent follower on your Bakewell layout as your scenics and detail are a great inspiration. But somehow I completely missed the fact that you are planning a new layout now, so I am having a big read to catch up. Looking forward to your progress.
Cheers for the comments.
Paul
-
"The railway is actually in the Musee des Arts et Metiers in Paris" - just fantastic!!! Did not expect that.
What a find, great they kept it, quite beautify really with the way the floor boards are laid, especially round the corners. An incredible museum.
https://commons.wikimedia.org/wiki/File:Mus%C3%A9e_des_Arts_et_M%C3%A9tiers_13,_Paris.JPG
Thanks
-
Yes Al, I am really please with how the calcite marks came out.
I found these two images on the web that gave me the idea for using a long retaining wall leading up to my flyover, I just looked the look.
Taken from http://www.lostrailwayswestyorkshire.co.uk/Dewsbury%20Loop.htm as I am not sure of the copyright of actually posting the image.
Quite like this look and feel too http://www.geograph.org.uk/photo/2094370
Plus, I see a lot of bridges, structures and infrastructure in various states of condition out on the railways with my work.
-
2
-
-
Something new tonight, weathering Metacafe kits (apart from a very quick job on the PWay hut) this was on the red brick retaining wall panels to the flyover approach. These need to be done before they are fixed in place.
I used a mixture of acrylic paint and Woodland Scenics Green undercoat. A muddy water wash, follows by darker stains and green algae growth followed by by white calcite marks and soot stains.
I think a much better toned down look now, will obviously get better as I do more. But happy with the basic look.
Left panel un-weathered.
-
6
-
-
Hi, great layout, sorry a rephrase awesome layout and the photography, second to none! Been a follower for some time now, so i hope you do not mind a couple of question. Your Class 101s, I note the powered drawbars, what do these actually power? And do they work when on DCC. Is it a NEM pocket too?
Paul
-
Small layouts make it quite fun trying to fit everything in, my lad now wants a freight container port, as he saw a container crane at a recent model show!
I did not know Dapol made this! So would you say this is a better product than the Peco offering? The masts and registration arm looks marginally more detailed on the Dapol, but the cost difference varies quite a bit.
Peco http://www.peco-uk.com/page.asp?id=catenary
Single Mast and registration arm - £7.95
200mm catenary wire, pack 5 - £10
Price per 2m - £99.50
Dapol - http://Dapol.co.uk/index.php?route=product/category&path=177_62_150
Mast and registration arm, pack of 10 - £11.35
203mm catenary wire - pack 10 £27.95
Price per 2m - £37.95
Did you pick Dapol's offering for any reason?
-
Cheers for the recent comments/support guys. Keeps me motivated and stops me sitting at the PC researching ;-)
-
1
-
-
Nice looking layout, growing well. Very intrigued by the landform method, not come across that one. Could be very used for filling some of the voids I have around my layout.
Shall follow with interest.
Paul
-
Great progress and looking really nice.
Your photos of the mark 3 catenary are spot on and creat a whole new atmosphere looking under the wires. I had a look back at previous posts trying to see whether these are scratch built or bought. Can you let me know, sorry if I missed the previous post.
In looking back over your 8 pages of posts, it really brought home your progress and that you have a great way at taking all your photos. They are all at nice low angle, no airplane shots, which has created the feel that it is a much bigger layout that it actually is.
Also, as you have built up the scenic aspect and shown what you have bought and done, you have ended up doing lots of mini product reviews; at great resource to look back over.
Anyway fab layout.
Paul
-
1
-
-
A quick update to show the first bit of ballasting done. All dry and set nice and hard.
Quite pleased with the look, especially the gradual change in colour from brown of the station area to grey out in the open country side. This was all done by blending the mix of ballast shades as I went along the track from all the pots I now have. This will reduce the need to apply further weathering, apart from oil deposit at the signals and rusting up the chairs.
The Flying Scotsman makes an appearance to test you the new ballast.
I am now working on the land levels for the retaining walls round to the flyover. These were all made up from Metacafe kits some while back, but now need to be glued in place so I can then ballast up the track top and bottom.
-
3
-
-
Here some pictures of shunter locomotive class 08489 on the layout. It is equipped with a Hornby DCC decoder. Its operation is higher than the Bachmann model, its engraving seems finer. With the weathered from TMC, it is really a beautiful model.
Really love the look of the 08. Has to be my favorite version, BR Blue, wasp stripes with yellow buffer beam. So in-vocative of the era, especially on your shunting duties. The speedlink/railfreight train is great.
I especially like your angle of view with the photos, nice a low at ground level looking past bits of scenery, very nice and much more realistic.
-
Well first step has turned into second step, last night I took a deep breath and ballasted a 1/4 curve each on the the two inner loops. Photos to come once fully dry.This first step is really good.
My first thoughts are "Few, I think it looks OK, that's a relief!". For me this is a huge step as if it looked wrong to my eye, I would not be happy.
Hopefully now I can perfect my process and make some good progress.
-
2
-
-
So there I am on the PC checking out to see if the bargains I got from Shildon MR show were in fact bargains and I here shouts of " stop stop major derailment". I shuddered to think what damage has just been caused to the MGR train that had been running round at high speed in the other room.
I keep my head down as I did not hear the sound of rolling stock hitting the floor.
When I do go in to see what has transpired, yes indeed there had been a real derailment, but this had been turned in to a major disaster zone requiring two breakdown cranes from the nearby depot (red boxes) to carry out a tandem lift. Kids imagination hay!! We would have just put the trucks back on the track to carried on.
And as for the bargains, well pretty good, Christmas sorted for the boys at least. One Railroad Flying Scotsman with a chipped cab roof for £28 (the chip looks more like the open air vent in the roof than anything to worry about), five Railroad LNER Teak Coaches for £40 and a Strathclyde Class 156 for £50 (a bit top end price for that one I think).
Also managed to pick a few bit and bobs from a good tools stand, including some large syringes with integral curved nose tip; ideal for ballast gluing.
Show was pretty good, most layouts being regulars to the show and all seen before. All for the amazing sum of "Free Entry", as always with events at NRM Shildon.
-
5
-
-
First step on the ballasting.
Ran a bead of neat PVA along the cess side of each piece of track and then sprinkled dry ballast, of varying colours, on to it. This creates a neat(ish) edge to the ballast shoulder. It will also help to keep the dry ballast in place when I sprinkle and brush it on to the track before applying traditional 50:50 PVA water mix with a dropper.
Quite pleased with the neat edge, it will all flatten out a bit more once the PVA has full dried and shrunk back.
-
4
-


 I keep my head down as I did not hear the sound of rolling stock hitting the floor.


New whitt
in Layout topics
Posted
Love the canopy.
Just seen one of these kits on a layout at the Hartlepool show and really look the look of it. How robust is it once the roof is on? If I go for it mine will end up being on the platform near the front of the layout and so will likely get knocked a bit with the boys reaching over?
Also, I will have to modify it a bit too as my bay platform has one straight side and one curved side. So how easy do you think it will be to modify it to fit.?
Cheers