


Jaggzuk
-
Posts
781 -
Joined
-
Last visited
-
Days Won
1
Content Type
Profiles
Forums
Blogs
Gallery
Events
Exhibition Layout Details
Store
Posts posted by Jaggzuk
-
-
Well I have managed to get my modeling mojo back and have almost completed a Metcalfe factory kit which I started on a camping holiday last summer! Nice to be back, will post some photos shortly.
The only downer was to find that some of the flat laminated sections of the kit I had already made up but not yet formed into the building shape had warped even though they were kept flat in a box of half made bits. Next time, I think the parts need to be kept flat under weights.
The other issue I am having is glue. I used some superglue (not a well known brand, but bought off a tool stand at a model show) to fix NEM couplings to some coach bogies, only to find they just snap off when hauling 3 to 4 coaches together in a rake. Under test I have actually found the glue was pretty weak and to be honest did not stick. Any advice on NEM fish tail pocket and gluing as liquid poly did not work on this type of plastic.
So today I have bought a variety of well known brands to try out: Locktite, Gorilla and Bosstick. I will feedback on my results.
-
 1
1
-
-
So far no leaks.
The pond lining is formed from a base of 3-4 inch of concrete and then two layers of mortar render about 5mm thick each. All concrete and render mixes had fibre reinforcement added to reduce hairline cracking and to add strength. The key element was the use of two liquid additives, Sika SBR Admixture and Sika Proof, the second one was added to the render and this creates the waterproof barrier.
Wickes sell the whole Sika product range http://www.wickes.co.uk/Sika-Proof-5l/p/133791
The whole reason I went for concrete and render was due to the pond odd shape and rasied walls. A local aquatic centre recommended this method as to have used liner would have required lots of awkward folds.
The final shape I have achieved is very organic and curvey, which I am really pleased with. It is obviously very hard and strong too.
-
This is what I might have a go at, just love the look, so 70/80s. My old home station Kings Lynn, a nice single road shed with refuel, storage tanks and mess rooms.
http://www.rmweb.co.uk/community/uploads/gallery/album_2658/gallery_4412_2658_119863.jpg
Also, last photo on this post
http://www.rmweb.co.uk/community/index.php?/topic/79590-jeffps-photos-early-70s-and-80s/?p=1318428
I can't tell if it had a lot or not.
-
2
-
-
Great progress, really like the ballast and concrete weathering. The whole depot has a very nice look and feel, very much of the era. Sort of inspires me to think on mine and how I can create a similar look. I only have one track though. I love the inspection pit with the lights!
-
No progress on the layout to date, which is very frustrating, but what with half term holidays and a big garden project distraction, I have found little time to do any building work other than playing train sessions with the boys. But I guess that is fine, at the end of the day the boys are quite happy to play in trains, I just see a layout that is not finished!!
But I have to say the layout is calling rather loudly and so I need to do some modeling, perhaps a nice card kit will do?
-
5
-
-
Northallerton platform extension slowly getting there. Timber fence post and rail on steel frame, access steps and platform surface to the edge.

-
2
-
-
Great progress. You'll be running trains next!!
-
Great update!! And I know what you mean about family distractions, mine is a big wildlife pond!
I just love that inspection pit and the light is spot on and really effective. Got to get one of those on our layout.
Looking forward to the progress.
-
1
-
-
Sounds like you plan has some good good economical ideas, point control etc.
With regards to DC to DCC, do you intend to wire up the layout with DCC droppers or to do this at a later date?
Personally, I would just go down the DCC route from the start. My two boys (6 1/2 and 4) can operate the NCE Powercab without any problem; its just like a TV remote after all ;-) In fact I have found there are less harsh backwards/forwards movements of trains with them using DCC. They only need to know speed, direction, lights and sound. the rest of the buttons they just ignore - most of the time!
However, I did wire the layout to be both DC and DCC with a special double change over switch (the black box) http://www.rmweb.co.uk/community/index.php?/topic/106602-family-8x4-oo-layout-new-video-camera-truck/?p=2388341 . I, like you, have quite a lot of old locos so still need DC power; until I have converted all of them to DCC. Probably though DC with remain online as I can then test any second hand loco bought.
-
1
-
-
Not sure really as they came out of a box I bought from a model railway room clearance a while back. I bought the box because it was as it was that was full of lots of Kadee coupling parts and these bogies (trucks) just happens to be included.
I think they are US wagon wheel trucks, https://www.hobbylinc.com/cgi-bin/s8.cgi?cat_s=URI&tag0_i=956
They are similar to a Cambrian C90 ASF Bogies http://cambrianmodels.co.uk/4mmbogies.html#c90
Kadee also do similar ones https://kadee.com/html/truck_and_wheel.pdf
The key thing for CamTrack was they were very low profile as the wheels are only 9mm diameter.

I only use the one on the left (top photo) with the pivot hole. I used plastic wheels, as these are a lot quieter than the metal ones, so less track noise is picked up by the camera mic.
Hope this is of help. Are you thinking of making a truck?
-
Welcome to RMweb and also welcome to the 8x4 club
 There are quite a few recently started 8x4 layouts for "the family" here on RMweb. Looking forward to seeing the progress.
I assume this is OO as you mention Hornby train sets?
I like the plan good running and shunting capability.
A couple of questions,
1) how do you intend to get the height for the viaduct in relation to the main baseboard? Will it be a cut out section dropping down in level in relation to the track?
2) What do you mean by "I am doing this as an exercise in how close I can get a 'train set' to a 'model railway'"? I am assuming it is along the lines of how realistic can I get the scenery to look without having to worry about trainset track?
These might give you some inspiration http://www.rmweb.co.uk/community/index.php?/gallery/album/3800-leyburn-model-railway/
Keep the updates comming and good luck. Hope your son enjoys the build too.
-
1
-
-
Hard to tell, but more the powered I think. I did try adding some extra lead in my trials (thanks for the advise though) but no real change. My feeling this morning is that I am not happy with it and so I think it is going back :-(. It was the last one in the shop and was the ex-display model so I am sort of sceptical about it now.
The sound on plain line is fine and I am really happy with it then, but on the curves, it is just so loud and really distracts from the enjoyable running, no other loco has made this sound, so my view is it is not right.
-
Ok after so a long session of peering at my 31 with a magnifying headset on and trying to work out why it generates a sound going round curves I have come to a conclusion. It is wheel squeal.
With the body off and looking down it was it was clear than even on R4 curves the drive wheels are crabbing and the scraping sound is coming from the flange on the outer wheel round a curve scraping against the rail edge.
I have check the B2B with a OO gauge are they are OK. The flanges on the Railroad version appear to be very sharp compared to my old Lima model. I have a Railroad 37 and this is fine and much quieter.
The trouble is I have used Woodland Scenics inclines on all my curves and these sort of accentuate any running sound which reverberates in the cellular shape compared to rolling stock running on the MDF flat board.
So not sure what to do. I either taking it back, no exchange as it was the last one so just a refund. Accept it is a cheap loco at a cheap price? If I do take it back and get a refund to buy another from a different shop, I would not want now pay full price for it.
This was also a test of the Railroad parts I had planned to get for my older versions, this is sort of now in question.
-
Code 100. Most of the corners are formed from settrack either Hornby or Peco but I will have a close inspection to check if the wheels are riding the chairs. However, I have a lot of old stock including the Airfix/Lima 31s and not heard the sound that would relate to chair bumping.
I may try to record/video the noise, now that I have an account to upload videos to.
My only guess myself is that central wheel on the bogies is rattling as it tries to negotiate the corner; there is so much play in the wheel sets I onder if iot is not quite runnign true - sort of wheel squeel syndrome. I might take it out to see what happens.
-
Ooh, are you going to make it all filthy dirty?
Al.
Well that depends. I have zero skill at the moment on rolling stock weathering, so not too sure about making this as my first attempt. However, the key think for me is to get the face and look right as an example: https://www.flickr.com/photos/treflyn/6751376211/sizes/z/ The dirt collection around the lights, the 4 foot holes and the panel joints. Next would be black window rubbers seal, washer jet guards and appropriate transfers.
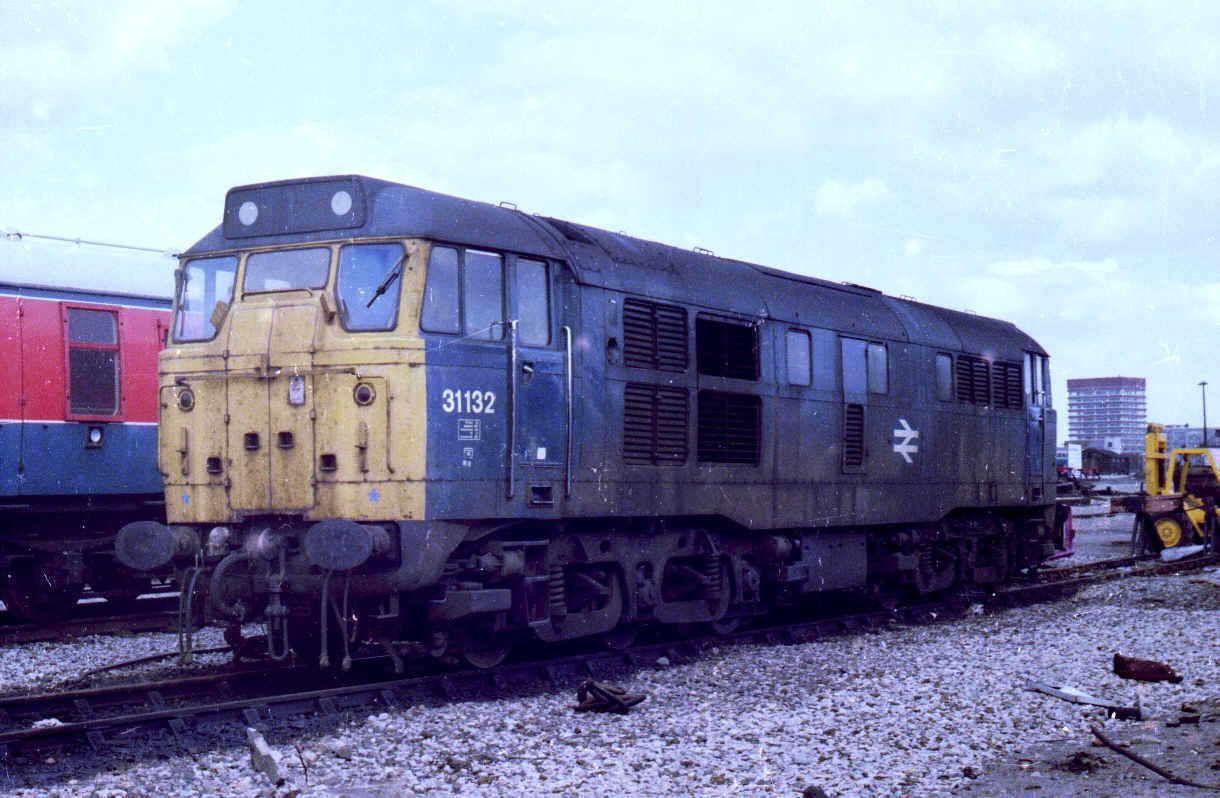
As for general weathering I like the look of these: https://www.flickr.com/photos/28178727@N08/4282393955/in/photostream/ or https://www.flickr.com/photos/28178727@N08/4282012629 as this is the condition I remember see them in when traveling from Kings Lynn when I was out spotting. This is a bit too extreme for me: http://www.class31.co.uk/picture/31132reading.jpg
The mods that I may also consider are wire handrails on the nose and plating over the side hand rails and roof ports and I will add lights and cab detail (possibly the spare parts from the super detailed Hornby version of the 31). As for other mods, I am not too purist on the exact look being right of the number carried. for me it about the general right feel for a Blue 31 from the 70/80s.
The only issue I have with the railroad model I have is that it runs very noisy when going round my any of my curves (r4,r3 and r2). It is nice and quiet on plain line but the wheels are really noisy on the curve, a sort of chatering sound, like the rails are really rough? Not sure why, will need to check the B2B.
-
I think they are only working Saturday nights at the moment, but yes progress seems somewhat slow now.
As for the droop, it certainly looks like it. But, there are lot of other things around it that not vertical/horizontal which may give the impression that the signal is leaning towards the track. The platform has a notable fall towards the back edge, some OLE masts are not vertical at Northallerton, for example this one has also caught my eye for not being vertical and having a notable lean away from the track https://en.wikipedia.org/wiki/Northallerton_railway_station#/media/File:Northallerton_railway_station_MMB_12_43XXX.jpg, So it is difficult to tell.
-
Recently found this one and it looks stunning. The buildup of grass tress and bushes is really effective!! Shall follow with great interest.
-
A BR Blue Class 31 has just come on shed today. Bagged myself the last £45 Railroad version from my local MR shop. Will show it off later once I have had a change to detail ti up a bit; will record my process to share.
-
1
-
-
Everything is very impressive. The layout design, the trackwork, the scenics and now the video. AND of course the family involvement too. Congratulations.
Just need more time to get on with it... but the kids love playing trains, which is the whole reason I started the layout. And to be honest neither of them have said "Daddy, why have you not finished the ballasting or grass etc", so I might have got away with the lack of progress ;-). The key thing is they can drive trains around and have great fun with lots of trucks and loads. But still the trains stop way too often in my view, same old excuse "The drive has gone for a cup of tea" or "Its run out of coal" !!
-
1
-
-
Great looking layout, shall follow with interest.
Thanks for the post on my layout thread, have you got any video from your Train Cam (GoPro) yet?
-
On 04/05/2017 at 07:52, acg_mr said:
Great video, really nice to see around your whole layout, and well done for keeping out of the way of the camera, I never do!
Al.
Cheers Al. Well I did end up having to follow the train round and the operate the points as I went by the lever frame. I guess I could have also hid myself under the layout with my Smartphone and watched it from there. But I was a bit worried in case I messed up my routing and derailed it crashing it to the floor!
On 04/05/2017 at 14:56, LongRail said:Camera looks good and video quality is excellent what is the height to the top of the camera from rail level on the wagon you have built?
The top for rail to the very top of the camera (the rocker switch on top ) is a total of 55mm. There is just 1mm clearance underneath the cradle to the rail.
Next time I built a layout I will have better clearances and so could use a normal wagon. For example the camera fits perfectly on a Wrenn Lowmac wagon with 63mm clearance.
One thing I do like about the camera is that the angle of view is such that the track stays pretty much in the middle of the frame even when going round corners. Some train cam videos I have seen online appear to have been shoot too far in the distance such that you see the lineside on the outside of the curve as you go round a corner rather then where you are actually going, if that makes sense?
-
1
-
-
Ok, so it was too obvious then!
I recently splashed on a Tomtom Bandit barrel video camera, ready for some family holidays, biking and general messing about on water etc.. But I also chose a barrel type camera as I wanted the boys to be able to video cab rides on the layout.
The cool feature of the camera is that you can use a Smartphone of Tablet to act as the viewfinder, so you can actually be the driver of the train in real time. The camera creates a mini WIFI network so you can control the camera from the phone and also stream direct to the phone in real time.
As the clearance on the layout under the flyover and in the tunnels was a bit tight I had to make a special cradle wagon. A normal low loader wagon would be ideal if you have a bit more clearance
So here is the finished item
A bit tight, but it was made to measure
And the final show off bit, the first cab ride video around the complete layout.
Sorry for the lineside clutter and dead animals, hopefully the next video will be better directed and will include other trains running.
-
8
-
-
Wow coming on really fast. Just adding legs make it look like a proper little layout!
-
Well I think you can tell Spring has arrived and the garden and family outings have overtaken any time for railway efforts!! However, one little project has been under progress and has finally been finished.
The boys have yet to see/play with it and I am not going to let on here just yet as to what it is for, but, here are a few sneaky peaks in to what is my first completely scratch built item of rolling stock. I just need to sort a few things out "behind the scenes" before I can show the final result, but least to say I am quite excited at the result and future possibility!! Guesses welcome :-)
The black 0-6-0 has just joined our shed. It was one of my Dads old locos and the one that I loved to play with as a youngster; it holds a lot of memories. After a quick search online, I found out it was made by Wrenn and was a Class R1 0-6-0. After just a bit a light oil, it still runs very well after 40 years! So I shall give it a further clean up and then chip it.
-
2
-


.JPG.f9be87af0d10c827381d3482dac2e209.JPG)

.JPG.b1828b1f36a1e3cc234f13de316f52b2.JPG)
.JPG.48be1233d73fd1514ff01662419f3ef0.JPG)
.JPG.3e85d01006eb6a3ab10404696142f346.JPG)


Family 8x4 OO layout - Trains running again.
in Layout topics
Posted
Ok might try some. Never really used any epoxy glue before, so do you mean the two part mix type?