


KNP
-
Posts
8,215 -
Joined
-
Last visited
-
Days Won
115
Content Type
Profiles
Forums
Blogs
Gallery
Events
Exhibition Layout Details
Store
Posts posted by KNP
-
-
Very nicely done KNP!!! really looks the part and blends in nicely.
Many thanks
Kevin
-
Been a while since I posted last but I have been building a 1:1 scale conservatory for my son. Job done so back to real work - the railway.
At last I have completed the Goods Shed at Little Muddle. It, like the track work and station, is loosely based on the one found at Shipton-on-Stour.
Basically mainly of grey card construction, plinth brick paper, windows L Cut adapted using the centre glazing bars set in a plastic section frame and mullions.(the odd one on the rear is because I ran out so used what ever I had left in the scrap box?)
The walls from plastic corrugated sheeting glued to card and lined internally with paper sheeting depicting the same.
The roof was whole different ball game and it ended up nearly in the waste bin and me taking up knitting!!!
Built over formers I constructed laminated layers of four thin sheets of card glued together which when dry gave a really strong, self supporting curved roof. The slow and fiddly bit was gluing strips of corrugated sheeting across and over it, starting at the ridge I glued each scale width of 6ft sections, let it dry and then bent each piece over the curve and left it to set. This what took the time and getting it line around the roof, I had already drawn a series on lines as guide but each section had a mind of its own and lining it all up would test anyone's patience.
I had to remind myself this was a hobby for enjoyment and not some form of endurance test!!!
I know there are gaps around the base but I did just plonk the building down last night to take some pictures. Once I'm happy that I have actually finished it, it will be bedded down.


-
 14
14
-
-
Yes, the brickpaper had been printed a while before I used it. I think I sprayed it after sticking it to the wood. So long ago now.
Also wondering if it was some reaction with the adhesive, a glue stick, and the wood, mdf, but why not all over.
What was the timeline?
-
Hi KNP the slates will be cut and laid individually might take a fair time to do though. I have started on the other half of it and will post pics soon. Can any body come with ideas for guttering? Downpipes are not a problem. I have looked at ratio's offering but I think they look a bit small,I have tried splitting tube but gave up cos I like my fingers as they are so any thoughts will be most welcome!!
Steve
You can buy half round plastic rod of various widths (its what I use sometimes) or I have seen brass channel used but it's not easy to work with as plastic so that is my preferred option.
I have found it is best to build the tiled roof on the work bench direct onto a sub base then move it to the model.
This how I did most of mine, if you are interested I can post some pictures of how I did it?
Looking at the pictures the platform curve is going to be interesting to cover, will this be tiled or do you plan another type of covering - lead with rolls, wriggly tin for example.
Kevin
-
Goods shed now has a roof. I an colouring a master sheet for the slates which will be scanned then printed on 200gsm card,cut and laid. Well that's the plan. I'm hoping to have it done by next week then I can start on the other half
Are they going to be laid as one sheet or cut to give the impression of overlapping tiles?
Kevin
-
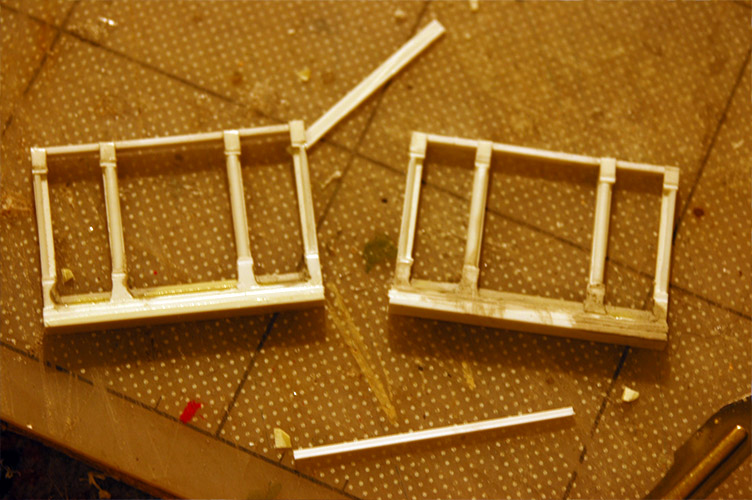
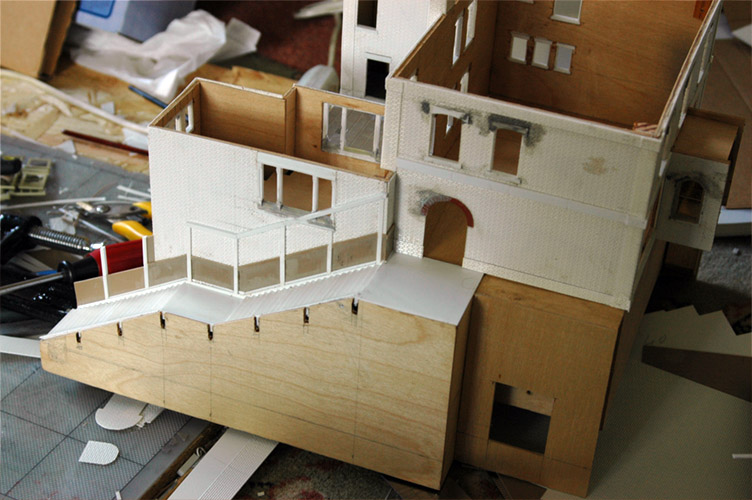
Sorry for not posting to this thread for a very long time, but I was distracted by detailing rolling stock, or doing kits and conversion kits. Back at last to building a building my main station building. I was waiting until it was finished, but at the rate I build things (work commitments mostly!). I thought that maybe I should post as is now, and post more later when it is finished.
It is loosely based on Finchley Road and Hendon stations from the Midland St. Pancras extension in the 1860's, but is for my fictional station Ellerby (not either of the Yorkshire villages of the same name, but named after my daughter's first names Ella B). The design is also skewed to match some available parts like the Wills arches which I am very fond of. Living near York I was fortunate to be able to request to see the original plans of the stations from the NRM archive and photograph them, which was a huge help given to lack of photos available of the stations. I can't post the photos as they are copyright the NRM. The archive staff there are so helpful and friendly to talk to, a huge 'thank you' to them in realising this build.
I build a thin plywood body which I glue plastic brick sheets on to, which makes a very strong laminate. Probably overkill, but they are really strong if somewhat slow to make.
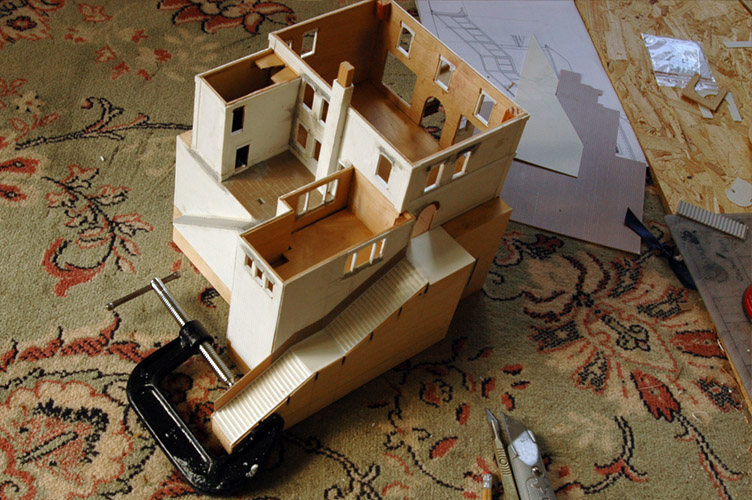
Scratch built windows from strips of Evergreen, pieces of plasticard and the lovely shaped sprue from Wills window parts, which makes great carved stone angles (seen at the bottom of the windows).
Long winded details of the making of this in my layout thread from post 329/330
The plans I made, which were slightly amended as the build went on, are in post 265
Here is the side view (which had to have a bigger drop to the platform level added and the stairs lengthened):
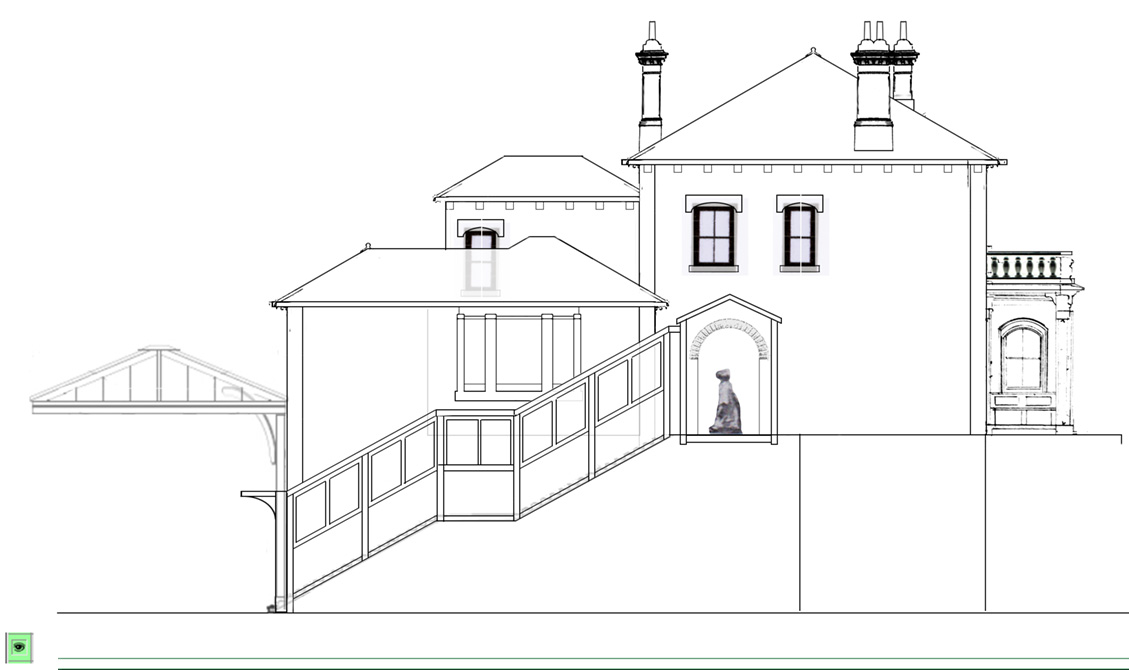
Hopefully at some point I can post finished images of the building, but don't hold your breath, the real thing was probably built quicker than the rate I go about things.
After this I will be a defector as I have some kit bashing planned, based on a Kibri corner house kit after discovering that was the source for some of the buildings on some of my favourite layouts, Wibdenshaw, Shenstone Road, and a few others.
Thanks to everyone for posting such inspiring work to this thread, from beginners through to those who post absolute masterpieces. Most of all, be inspired by everything here, and then just have a go, post your results, and let people give advice and accolades (or any other words that alliterate starting with 'a').
Jamie
Looking good even at this stage and can't wait to see the finished result.
I always feel a multi floored station building looks so much more complex and interesting than the standard platform ones.
Kevin
-
From what I can see Kevin the brickwork doesn't look all that faded but such a beautifully constructed building needs to be saved regardless of how much saving it takes. Certain varnishes however seem to be stained and will lightly darken whatever they're applied to especially those used on yachts and though normally glossy, a final coat of clear matt should result in a flat surface. You could check for stained yacht varnishes on Ebay
So, would this be worth trying on a very small section of the building, say around the base where it can be hidden behind weeds if at all it's not successful ?
Cheers.
Allan.
Well
I'll certainly look into these varnishes, in fact I have an old tin of International clear yacht varnish in the garage so I dig this out and have a ago.
The other option your comments has sparked is to put a selected paint colour (which one I'll experiment with) into the UV varnish and see if that will have the same result of darkening and bringing back some colour.
In fact the chimney stack seems the best place to work on as it's a lost cause anyway so I might have a play later to see if I can do anything.
If works, or even if it doesn't, I'll pass on the results to help others.
Anyway thanks for the thought and comments.
Luckily the building isn't fixed down so it'll be easy to work on.
Kevin
Allan
I had a go this evening to see what would happen if I added some acrylic brick paint to the UV varnish, as this was also acrylic I reasoned the two would mix OK (which they did) and apply to the faded chimney stack.
Well I was pleasantly surprised that painting it on as a wash, a couple of coats to build it up slowly I was able to make it look a bit redder and more brick like, I know the brick courses have discoloured as well but if you compare the two it definitely looks better.
Will leave to dry thoroughly overnight and see if I can further tweak it tomorrow.
Thanks for providing the comment that sparked the old brain box into gear.
I also painted over all the walls of the engine shed with the same brick varnish wash!!! and it brought the colour out so I would say the whole process was a success so I might have a go on the pub/shop row that has slightly faded as well.
Hope this will helps others suffering with the same problem or in fact just need to liven up some tried old card building but remember to only apply as a thin wash and build up coat be coat checking each time.
Kevin


-
11
-
-
I did spray the brickpaper after it was printed with a cheap hair lacquer but it didn't stop this happening.
Not sure of the cause, it was in a dry shed with no windows.
Another thought, had the brick paper been recently added and was it completely dry when you sprayed the hair lacquer as this looks like this could be some kind of reaction going on between the two.
Kevin
-
From what I can see Kevin the brickwork doesn't look all that faded but such a beautifully constructed building needs to be saved regardless of how much saving it takes. Certain varnishes however seem to be stained and will lightly darken whatever they're applied to especially those used on yachts and though normally glossy, a final coat of clear matt should result in a flat surface. You could check for stained yacht varnishes on Ebay
So, would this be worth trying on a very small section of the building, say around the base where it can be hidden behind weeds if at all it's not successful ?
Cheers.
Allan.
I'll certainly look into these varnishes, in fact I have an old tin of International clear yacht varnish in the garage so I dig this out and have a ago.
The other option your comments has sparked is to put a selected paint colour (which one I'll experiment with) into the UV varnish and see if that will have the same result of darkening and bringing back some colour.
In fact the chimney stack seems the best place to work on as it's a lost cause anyway so I might have a play later to see if I can do anything.
If works, or even if it doesn't, I'll pass on the results to help others.
Anyway thanks for the thought and comments.
Luckily the building isn't fixed down so it'll be easy to work on.
Kevin
-
And you haven't with jibes like the above, and about being hostile and ridiculous? It would appear that you didn't read my original thread that you have been over sensitive about. I said I have heard that, I didn't say that I agreed or supported it.
But I'm prepared to move on if you're not. So here is the start of my next scratch-build structure:

Can anyone tell what it is yet?
G.
A walkway roof, if I have read the writing correctly, to a building or underpass!
Kevin
-
Has anyone with a similar problem tried using artist's fixative spray?
I was wondering how to protect a 'printed slate roof'
Personally I would use the UV varnish shown in my earlier post.
Main reason is it's brush applied, the brushes can be cleaned with water, it dries very matt and is nigh on odourless.
The beauty of a brush is that it will go only where you put the brush, is primarily designed for artists/photographers to protect their works from UV and to date hasn't affected any of the models I have put it on.
That also includes my loco's and rolling stock if carefully applied..
It can also be used to give a paint effect as well and by that I mean I mixed a little Lifecolor track grime to it, applied to some roof windows on the creamery building and hey presto gave a dirty weathered effect with very little effort plus a protective coat to boot.

-
1
-
-
I would find a dark corner to have a tantrum in if I ruined a beautiful looking building like that Kevin and it's well known that sunlight can over time bleach a layout almost white.
Hope you get it sorted.
Allan.
A dark corner, with hindsight, would have been the best place for this model, though I must confess I rarely open the blinds to the room but then UV rays can still penetrate though most things and metal venetian blinds obviously offers little in the way of protection.
What to do, well I shall park it for now and then worry what to do with it later.
The only obvious main issue is that the single stack seems to have been effected the most (see picture) with the walls being only lighter when comparing front to back.
As I said earlier about 4 coats of the UV varnish was applied over Christmas and there seems to be little if any noticeable worsening of the colour fade.
I think I might just redo this stack in new brick paper and see what happens to the rest of the building over time.
Never gave it a thought when I built it, I know photographs can and do fade but it wasn't until I noticed some pictures taken of the canal at Lower Heyford fading in the conservatory that I looked further a field at items printed at the same time.
Since then, about 3 years ago, I have stuck faithfully to HP inks and quality paper regardless of the costs.
Kevin

-
1
-
-
Now for a cautionary note.
The attached picture is of the engine shed at Little Muddle which was the first card and brick paper building I had a go at which I would say was about 5 years ago.
At that time I was using an HP printer but with a compatable continuous ink system which said it was colour fast.
Well it isn't and if you look carefully the chimney stack has faded almost white and the main walls are definitely lighter when a current brick print is held up against it..
The same is happening to a row of shops and pub I built but I appear to have caught that early enough with the varnish to prevent further degradation.
The moral of this tale is only use manufacture ink designed for your printer plus some good quality print paper as well to help stop this happening.
One day I will have to bite the bullet and recover the walls, the rear of the building is fine it's just where it catches the light.
I have treated the walls with many coats of my favorite UV artists matt varnish from Windsor and Newton (see picture) and it seems to arrested the decline plus I keep the blinds closed as well.
Every building now gets numerous coats of this varnish as I don't want it happening again!!!
Hope this helps
Kevin


-
1
-
-
For a moment there I thought how did this picture get here........?
Thanks very much for the kind comments and one day the other half of the layout (the original part) will get posted - when it's updated to match the new half of the layout of course, whenever that is.
So here's me relaxing working out how I'm going to build that old barn I was on about

-
5
-
-
Since we now appear to be moving towards the dilapidated..............here is a little derelict farmhouse between Orford and Wickham Market. It still needs a few lingering tiles on the roof and others around it on the ground - but you get the idea.
The smaller building behind is just a cast resin example to complete the scene.
Looking good, have you thought about doing some smoke damage around say one the first floor window and roof area as if part of it has been subject to an arson action?
Just a thought.
I find building a derelict building more time consuming than a normal one but saying that I'm planning to start on the remains of an old barn in the near future.
Kevin
-
Have to agree with Allan ........... "Little Muddle" is a superb example of how it should be done - apart possibly from the fact that it has green engines with tapered boilers and brass kettles on the top - but nothing is perfect. (Wink).
Seriously good example of the model makers art, which should be studied by all.
- Don
Thanks
Well it is called Gods Wonderful Railway for a reason.......!!!!!!
Kevin
-
I'm probably repeating myself here but this is one magnificent layout in every respect.
A masterclass from Kevin and a lesson to us all in " How it should be done "
Cheers.
Allan.
Thanks Alan, comments much appreciated.
Though I refer to this as my 'new' layout I have been working on for over 5 years now and there is still with no end in sight as I keep on tweaking and altering it........
My real passion is scenery/buildings and I sometimes think the trains are just an excuse to allow me to indulge in this.
A typical fact that raises many an eyebrow and that was at last count I had made over 350 trees with more on the way, especially of the what I call the prime trees that take around 4 hours each to build.
Still it's a hobby and keeps us of the streets!
Kevin
-
1
-
-
Pictures of this layout are pure joy!
Brilliant effect with the hut.
Many thanks, I have more pictures in the Gallery section under the handle of Little Muddle......
-
Kevin,
Did you scratchbuild the trees, they look very good, light and airy unlike some model trees?
Alan.
Yes, some are just ordinary Seamoss spray painted and then coated with various shades of scatter.
My prime trees are sagebrush armatures obtained from the states (natural bush found in the desert areas) trimmed then Seamoss sprigs added individually and finished with scatter.
I have written an article on how to make them but it's on my other website which I am also a member of.
Attached is a picture showing how effective they can be.
Just so it stays within the confines of this topic behind the trees is the scratch built creamery!?!?!
Thanks
Kevin

-
5
-
-
Now for something completely different that I must say I have never seen modelled before.
Namely a building damaged by a falling branch from a tree in this case on old shed in the grounds of a derelict house.
Basically a shed built from plastic corrugated sheeting that I found is at a second hand stall at an exhibition.
Then, and this is the bit that took some working out, how to model the damage in such a way that it looked like something had fallen on it. Namely one side pushed in with the opposite side pushed out but the building still standing.
The shed was painted and then finished with an over coating of Scenic Rust which I can highly recommend, the only thing I will say is you have to be patient as it takes a while for the effect to happen, in this case I left it overnight.
The last two pictures shows it insitu with the branch (sagebrush armature) resting on the roof and finished with a few Seamoss branches with scatter added.
It took a while but I think it worked well.
Might change the door as it the pictures it looks rather thick or I could just paint the top edge black might be the simpler answer!!!
Kevin


-
7
-
-
I was going to post a couple of pictures up of a bridge that I built but after looking through this thread, I'm not going to bother. How you guys can build such great models is unbelievable and to make them look so realistic is just beyond my comprehension!
Remarkable!
I totally agree with the comments made, we all have to start somewhere and a little constructive advise can go a long way.
Look forward to seeing the posts.
Kevin
-
Thanks for the comments.
If you want to see more pictures I have posted some (and will continue to post more) in Galleries under the title of Little Muddle which incidentally happens to be the name of the layout!
Kevin
-
Here is a few more pictures of the store building showing that you can mix and match materials.
Main walls are grey card with brick paper from Model Railway Scenery there old Victorian brick wall range, roof Wills plain tiles, gutters from wills but downpipes from plastic rod with card brackets. Windows a mixture of what I had in the scrap box which ranged from Laser cut, plastic and no idea!!!, the timber planks are just plastic strip cut of various sizes, painted and fixed in place. Water butt Langley's range, timber battens on the roof are plastic strip painted with the excellent range from Lifecolor - weathered wood.
It is modelled as a view blocker so you have to peer around it to see what is behind hence why it is effectively cut off with the side painted black and in line with the profile board.
Kevin


-
6
-
-
Very nice. But I hope you washed that toilet paper before using it on your model. After all it does have a nice streaked and well weathered patina.
:-)
G.
Rest assured it was pristine and the weathering effect was indeed a paint treatment!!!!!!


Show us your scratchbuilt building
in Scenery, Structures & Transport
Posted
Thanks for the comments.
I have posted a lot of pictures in the galleries section under Little Muddle.
Kevin