Jump to content
 
  • entries
    172
  • comments
    1,473
  • views
    376,537

The Four Ages of Warships – Bachmann Types


Silver Sidelines

12,443 views

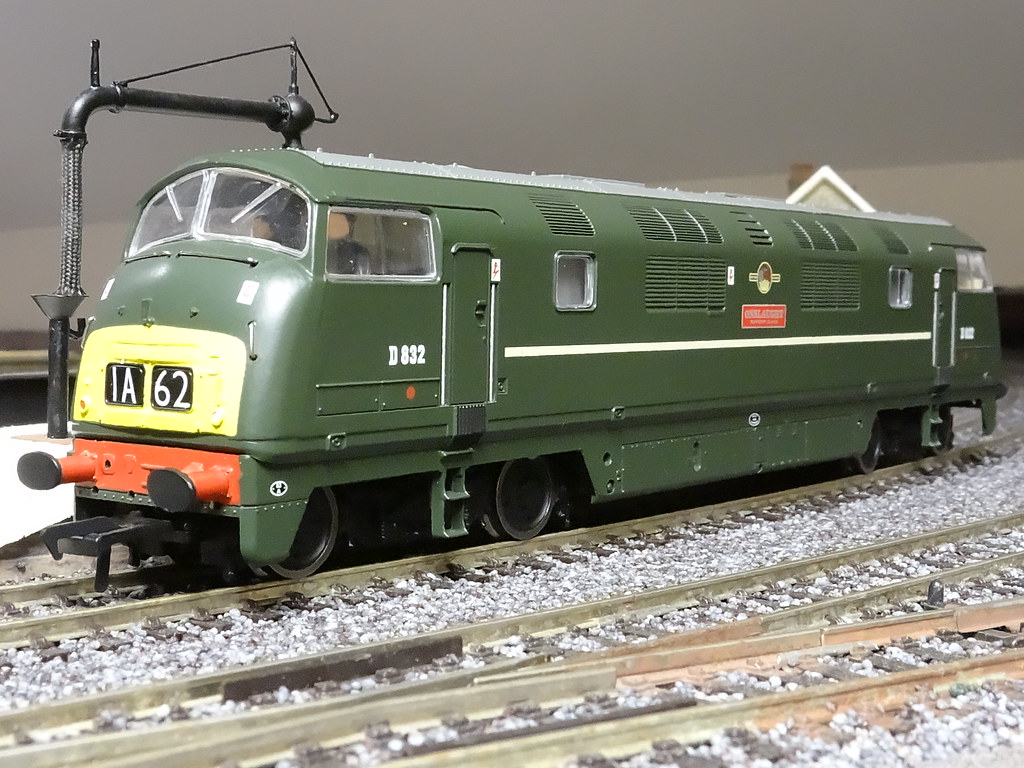
The arrival of Bachmann’s new Class 43 Warship Pegasus has encouraged me to revisit my fleet of Bachmann Warships. I have counted four distinct variants of the Bachmann Warship: the early 'low' version, the corrected version, the lighted version and now the latest Class 43. I don't count Kader’s early Mainline models as being Bachmann, although they have a place in this narrative.

22383572614_f3e650523c_b.jpg

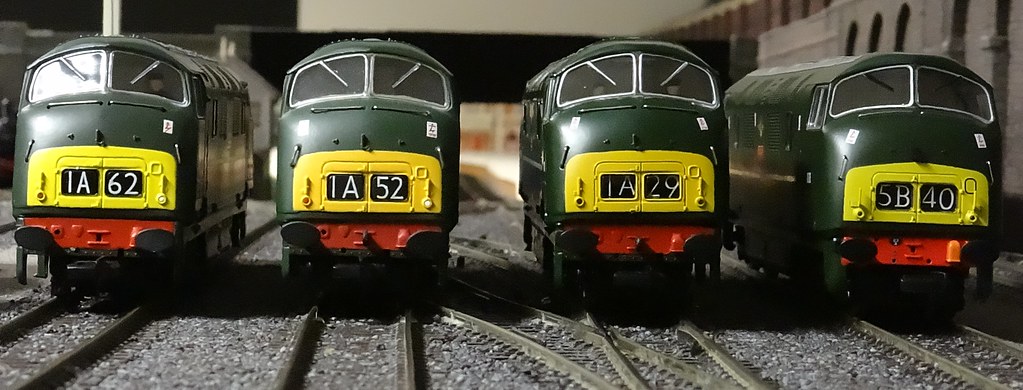
Four ages of Bachmann Warship, left to right, Onslaught, Glory, Zenith and Pegasus


First some history, Kader Industries introduced their first Warship under the Mainline label I think in the late 1970s. I certainly bought a couple in the early 1980s, now long since sold at auction. The Mainline models had a good shape and came with directional lighting. When Kader rebranded their UK models under the Bachmann label the body shell from the Mainline Warship was reused (with different fixings) right up until the introduction of the Bachmann Class 43 in 2015. The Mainline chassis had a ‘plastic’ mechanism and to counter the lack of weight rubber tyres were fitted to the wheels on the motor bogie. The plastic drive gears had a habit of cracking where they had been force fitted to the axles. Ultrascale still sell nice brass replacement gears. With brass gears and some additional weight the model was nearly very good as can be seen at the end of

.

20334967758_90418da86a_b.jpg

Mainline Warship chassis


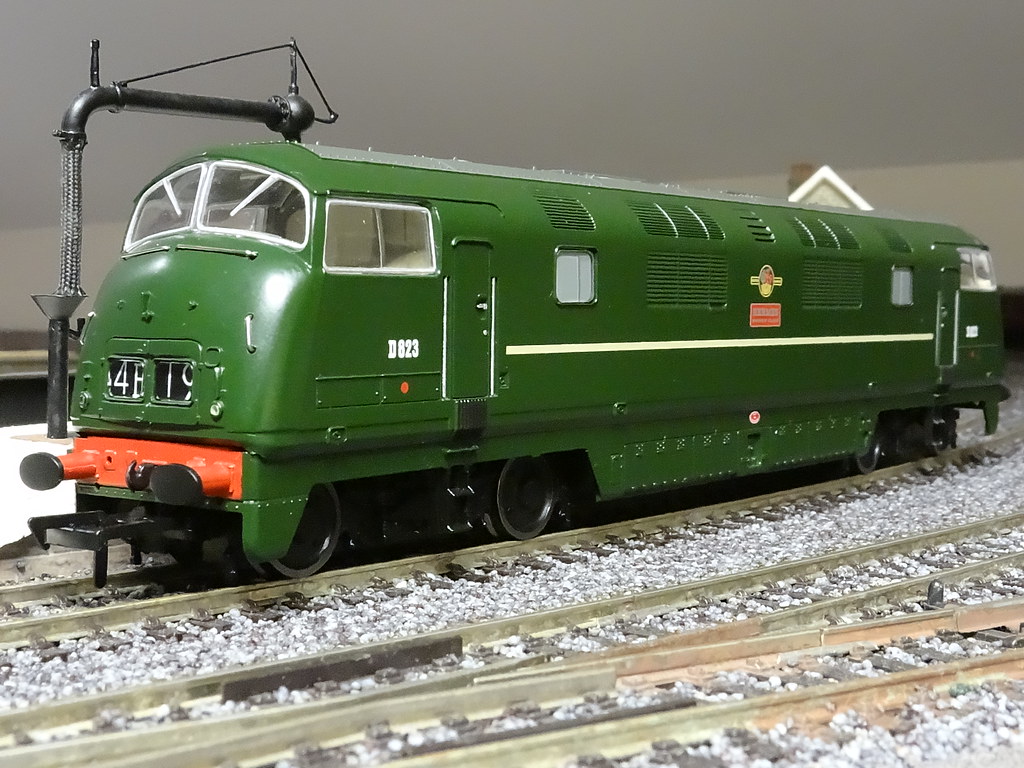
Bachmann reintroduced the Warship I would guess during the mid 1990s with a much improved chassis and motor, not forgetting the sprung buffers. It would be 2008 before directional lighting reappeared. Among the first Bachmann branded models were Foxhound, Onslaught and Eclipse (32-050, 051 and 052 respectively). The first production runs of these models were deemed to be too low. That is the body and buffers were some 1 to 2mm lower than they should have been. This is evident in the view below comparing the latest Bachmann model of Pegasus with Onslaught (as bought new).

22980302786_e1ef28e020_b.jpg

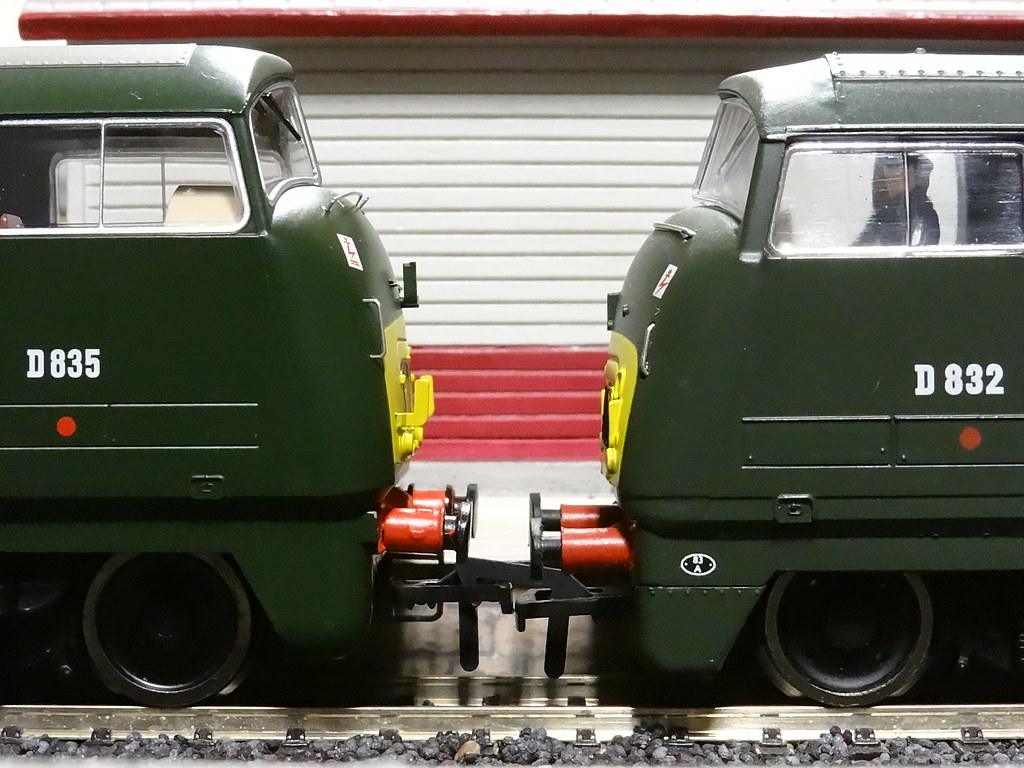
Bachmann Pegasus (left) Onslaught (right) as bought


A contemporary fix by Keith Norgrove shows how to grind away part of the chassis and insert some plastic spacers to correct the error.

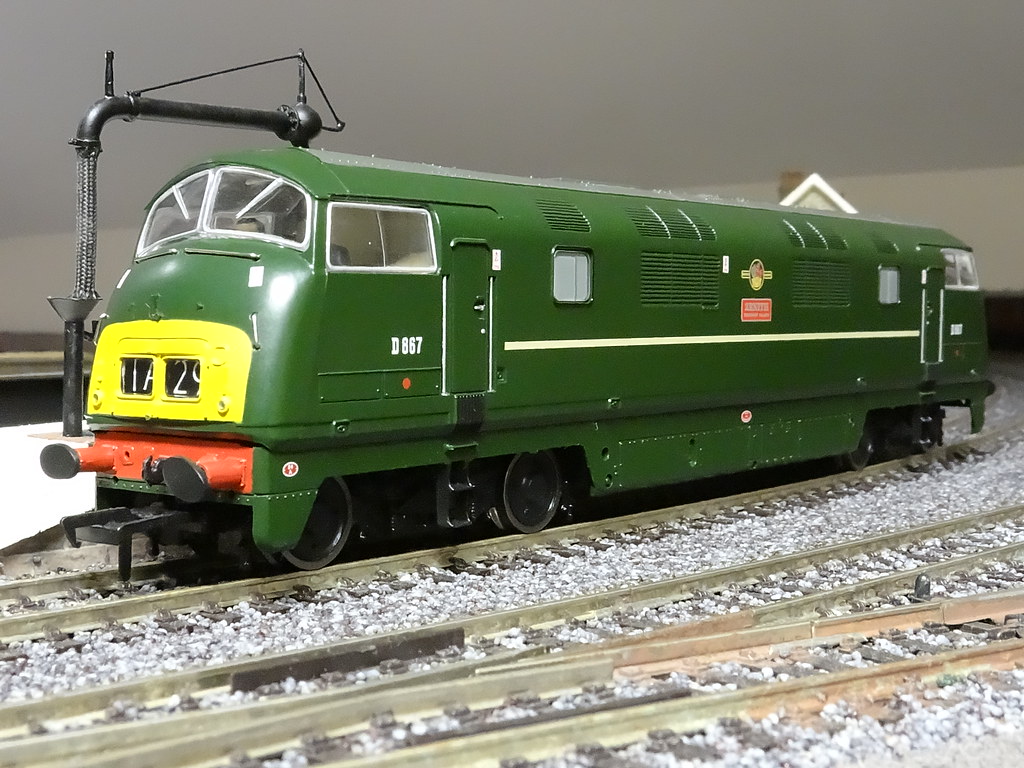
For their part Bachmann corrected the error in subsequent models such as Glory (32-059) by raising the height of the pivot point on the Bogie Towers. I don’t know how quickly these modified towers were introduced or whether any were fitted to later batches of the first models. Both Foxhound and Onslaught arrived on my layout too low. However I have a model of Eclipse (bought second hand) which was advertised and looks unused, which arrived with the correct height towers. Perhaps it was only the very first production batches that had the error and subsequent models were issued with corrected towers?

22587989727_c94eae7fb9_b.jpg

Bachmann Class 42 Towers - original right, later models left


Rather than grind away bits of chassis and manufacture plastic spacers I opted to source a couple of replacement towers for Onslaught.

22385129463_aa486198c6_b.jpg

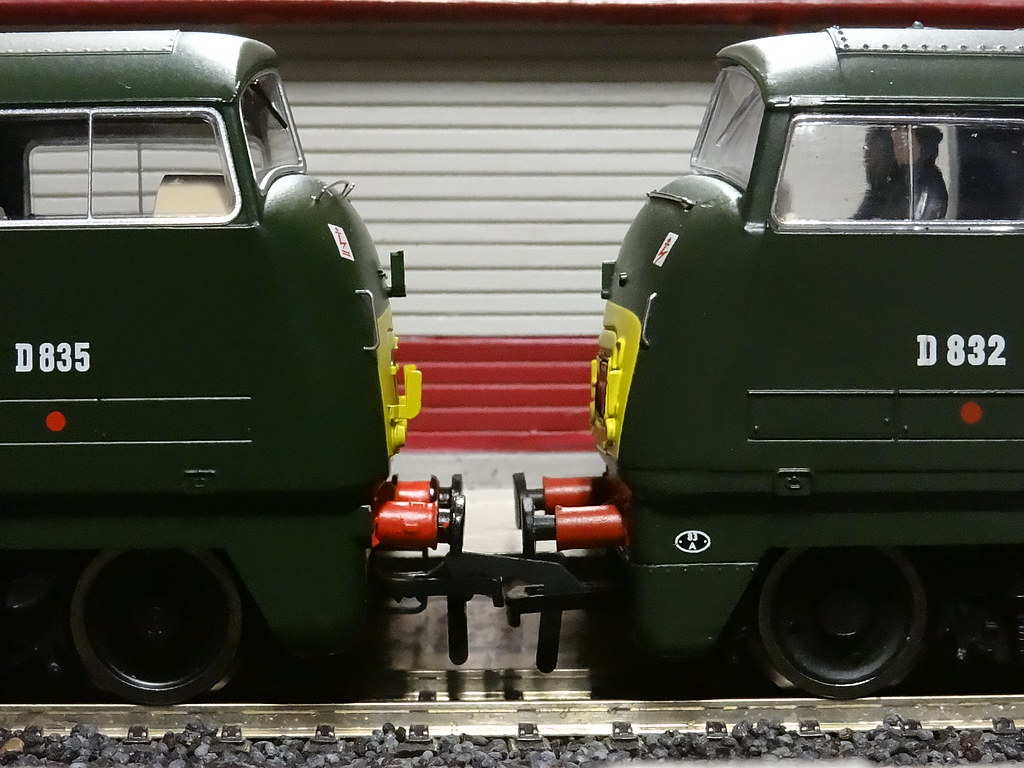
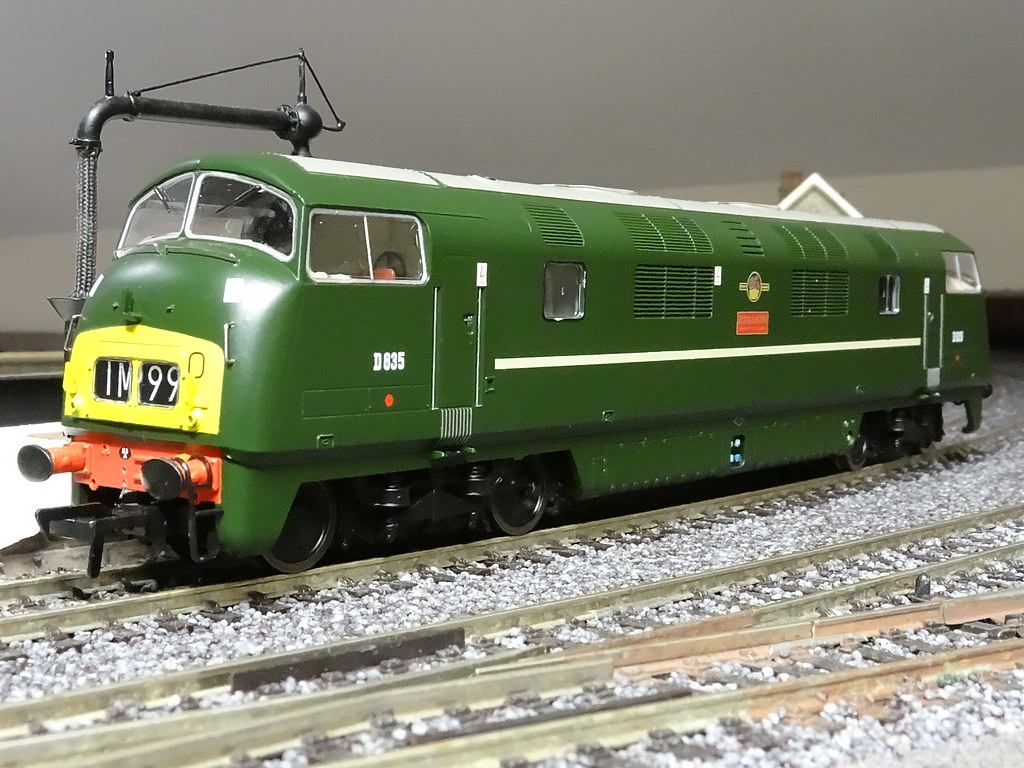
Bachmann Pegasus (left) Onslaught (right) with new bogie towers.


22588322708_35b663fa76_b.jpg

Bachmann Class 42 Onslaught, ride height corrected with replacement towers


When first introduced the Bachmann Warships were admired for their smooth running and super haulage capacity. They had a heavy metal chassis fitted with a big ‘can’ motor and they made a reassuring clunking noise as the heavy mechanism crossed rail joints.

22587978087_eede5495fc_b.jpg

Bachmann Class 42 Chassis (Foxhound/Eclipse/Onslaught/Glory)


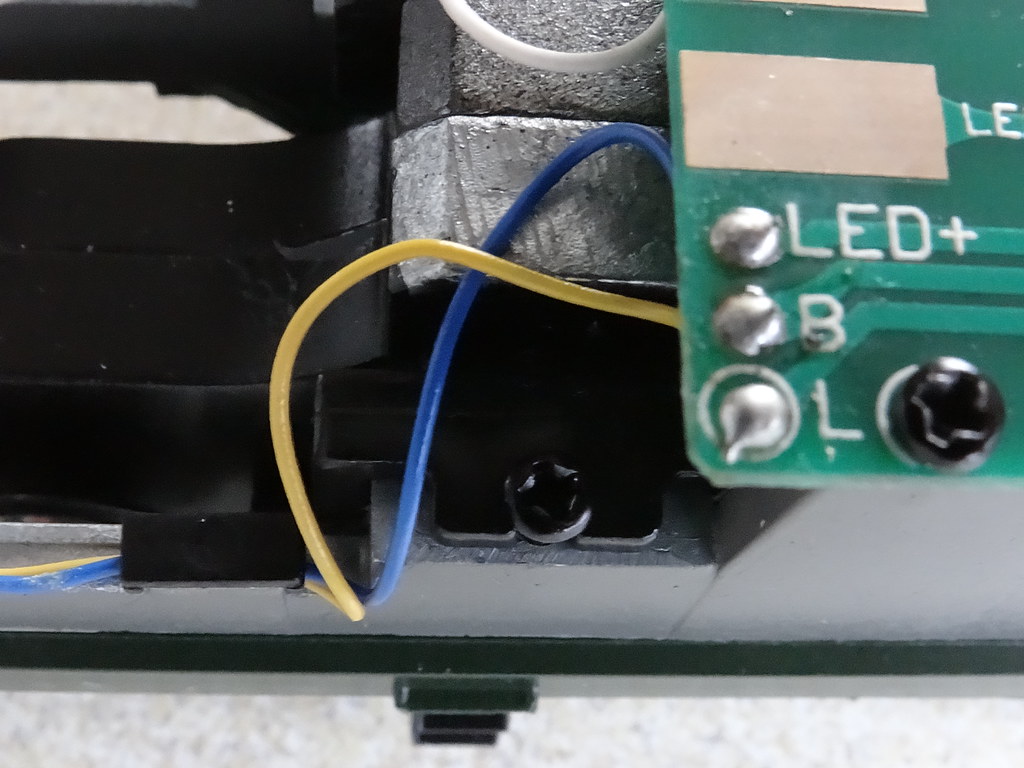
Around 2008 Bachmann upgraded the Class 42 Warship. The earlier model was reworked to include cab/indicator lights and a socket was provided to aid the installation of a Digital Chip.

22385459413_e0047b80e8_b.jpg

Bachmann Class 42 Zenith


The original and the reworked models share the same body shell. However if you compare the spacing of the top cab steps on ‘Zenith’ with the earlier picture here of ‘Onslaught’ it seems to me that the ride height of the reworked model is too high. I suspect that this is because of the spring contacts and circuit boards introduced as part of the lighting set up is preventing the body shell sitting tight on the underframe.

22980281516_0a9fd7230a_b.jpg

Bachmann Class 42 Chassis (Hermes/Zenith/Magpie)


The original and reworked models shared the same design of bogie / tower. However that is where the similarity ended. As shown below there were significant detail differences in the way that the towers were attached.

22587985688_4a10c1a2dc_b.jpg

Clip on Bogie Fixing Bachmann Class 42 (Eclipse/Onslaught/Glory)


23006323735_ee4af87a36_b.jpg

Screw on Bogie Fixing Bachmann Class 42 (Hermes/Zenith/Magpie)


Superficially the ‘can’ motors were the same. However there are detail differences between the two motors, notably at the opposite end to the brushes, such that when swapping motors between models it is necessary to also swap the black plastic motor cradle. From my own experience I would say that the motors on some of the reworked models were inferior in performance to those in the original models. I have had to replace two motors that I would say ran slow and overheated.


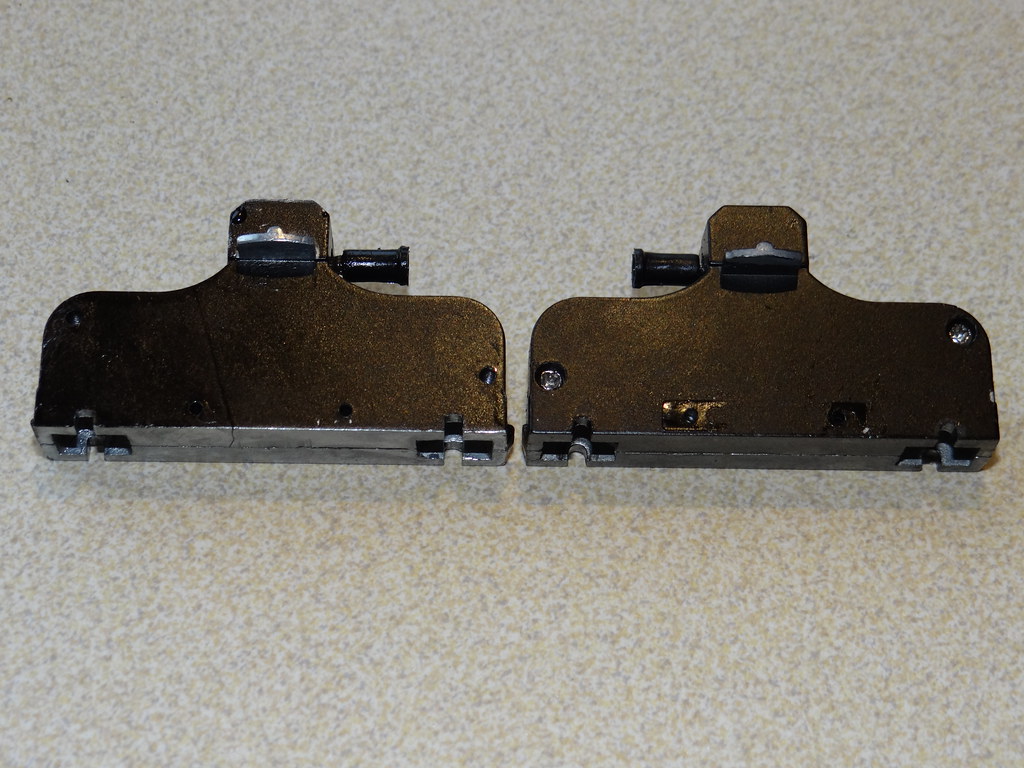
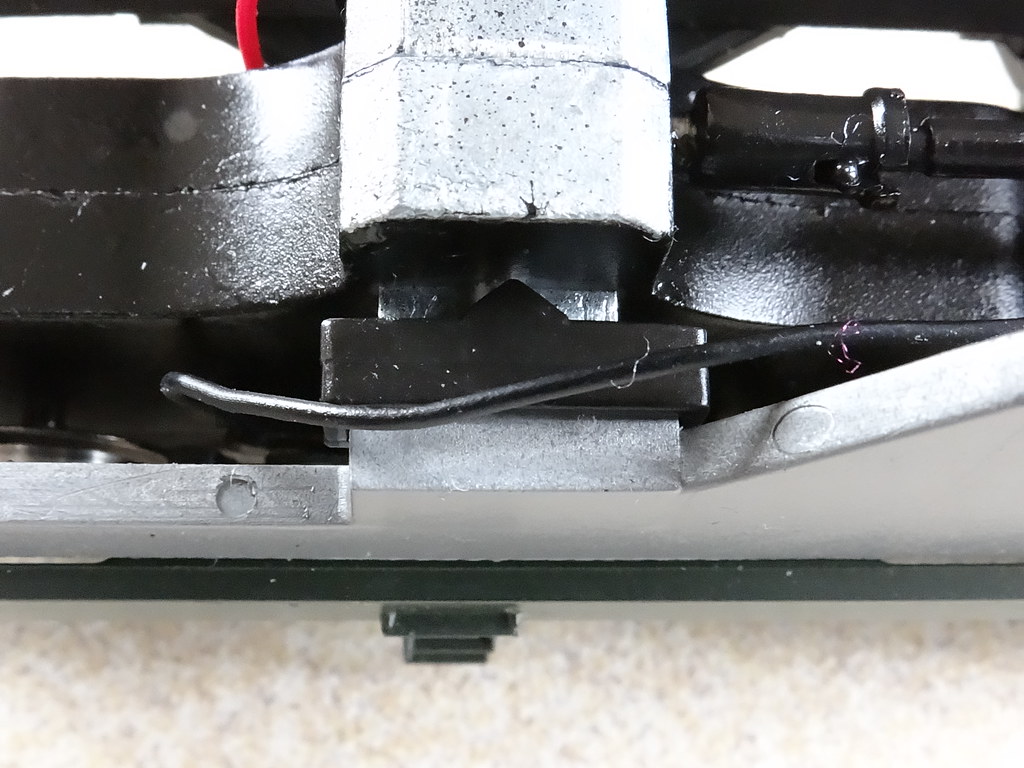
The overheating issue is interesting and has filled in many happy hours. The picture shown here above comparing the original (low) bogie tower with the modified bogie tower has differences in the shape of the axle holes. The original towers had an axle hole / bearing shaped to match the axle. Running was generally excellent. The modified bogie simply has machined slots for the axles. If these machined slots were made too deep the drive axle is no longer carried by the metal bogie side frames and instead the whole weight of the engine is carried by the nylon gearing. My observations suggest that carrying the weight on the gears increases the friction in the gearing leading to slow running and overheating, not to mention ‘wobbly’ running. (I do believe that Heljan ‘Lion’ has the same problem.) I did make a couple of spacers / bearings to clip to the metal side frames and pack the space between above the axle but it just seemed to slow the motor even more so it was abandoned.

22383556794_d0f89ac76e_b.jpg

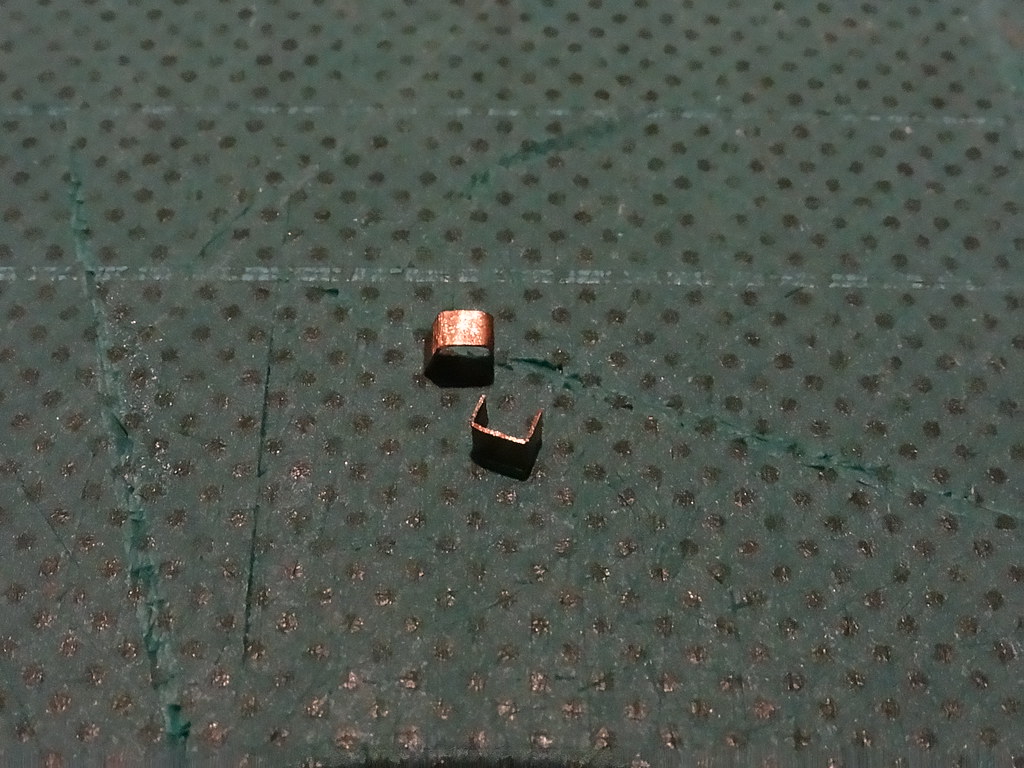
Axle spacers/bearings


I am not sure if there is a ‘fix’ and I resorted to swapping gears and wheel sets to obtain the optimum solution, coupled with many hours of ours of ‘running in’ using the ‘Loco Tester’. ‘Zenith’, bought second hand ran perfectly. ‘Hermes’, bought brand new was a problem, eventually only solved by fitting replacement towers and a different motor.

22385444723_f36eb2b041_b.jpg

Bachmann Class 42 Hermes


Because Bachmann’s Class 42 Warships have been around for some time I suspect the arrival of the Bachmann model of the Class 43 has not been given the prominence that other new releases have received. A pity I think, as it is a superb model which could teach a few other manufacturers a trick or two. Mine runs ever so quietly and is also rock steady. There are numerous clever touches, for example the casting of the engine/transmission visible through the side windows and the ‘yellow’ tint to the running lights.

23017755111_83a056cf3b_b.jpg

Bachmann Class 43 Pegasus


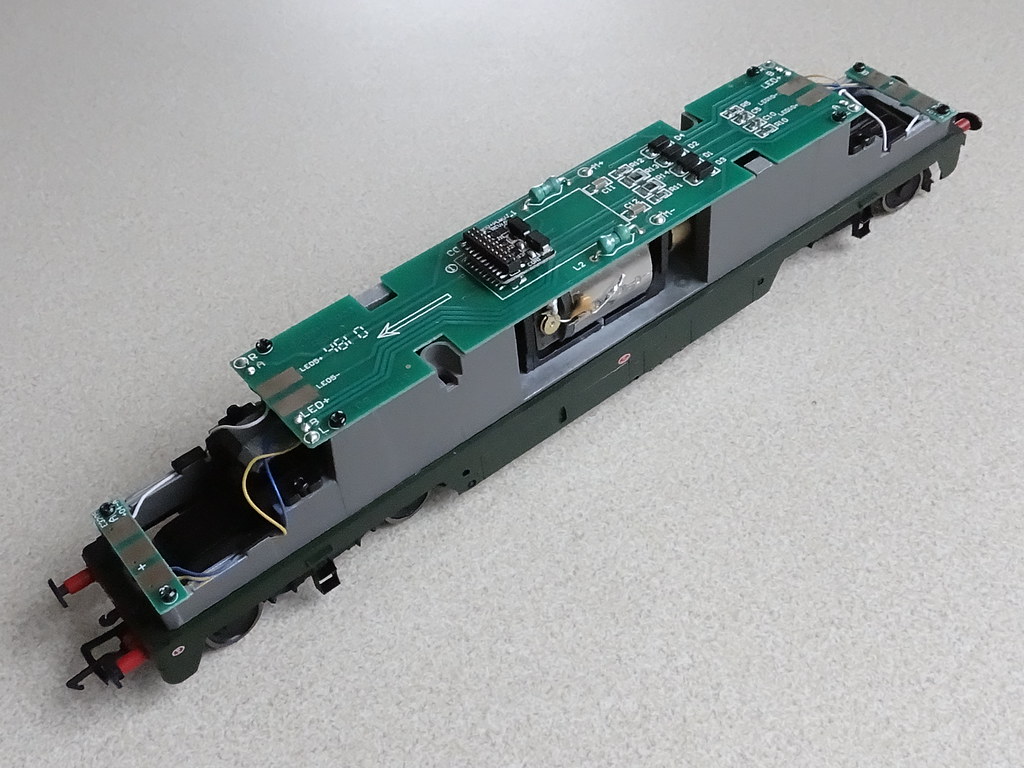
I have added a view of the chassis. This too has been re-engineered and is a work of art in itself. I have not investigated further but I can see very little that would be interchangeable with previous models. The space for scale cab interiors and a sound speaker does come at a price and the Class 43 weighs 70gm less than the Class 42. Time will tell as to whether this is important or whether it will be an excuse for double heading.

22385113743_6b400ddef1_b.jpg

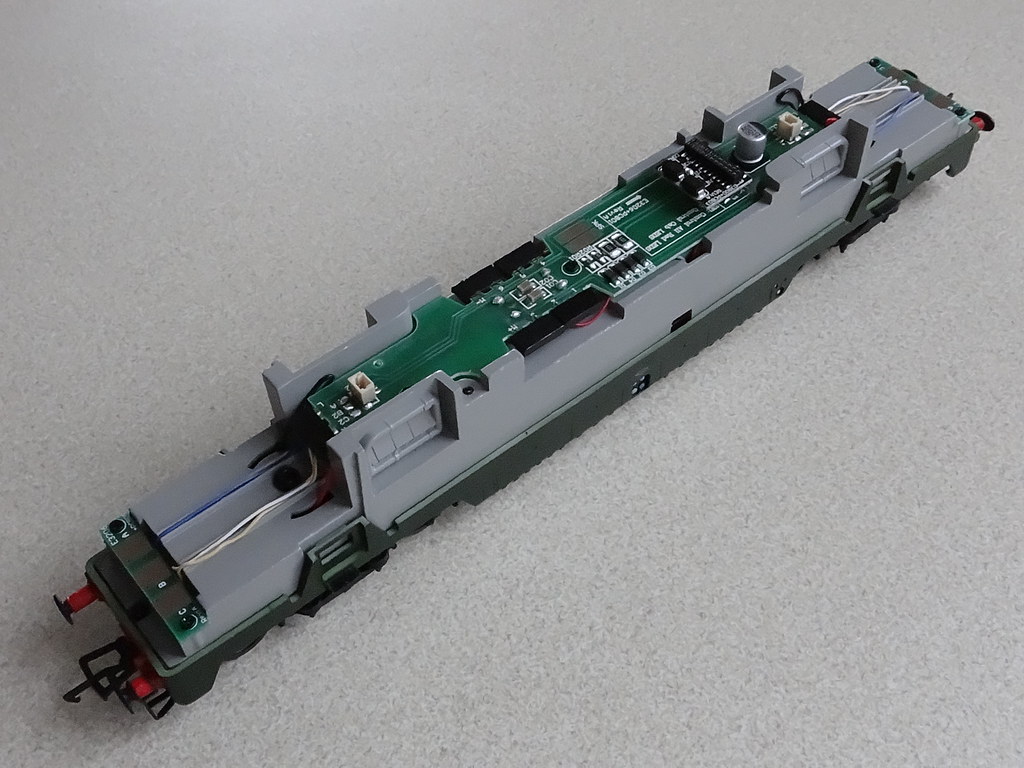
Bachmann Class 43 Chassis


The only question remaining is, "When will Bachmann introduce a new Class 42 based on the tooling for the Class 43?"

  • Informative/Useful 10

88 Comments


Recommended Comments


9 hours ago, Halvarras said:


Quite right, weathered blue 810 never appeared - I believe it was canned when the Class 43 was announced instead.

I wonder if weathered Class 43s will ever appear? (And if so will the awful gearing be amended?)

I don't know about the gearing but hopefully if they do a weathered one, they will model a specific loco with screen printed rust spots and marks particular to a time service rather than just mist with mud. Their more recent efforts have been a step change and a Warship would be an ideal candidate for the treatment.

Another thing that has struck me when looking at the Mainline and Bachmann class 42 production is that in the entire 32 year or so use of the tooling, blue livery was only ever correctly used for 827 Kelly, firstly (using the final variant of the blue livery application) on the original Mainline release and then much later on a 2010 Bachmann 21-pin release, using the slightly earlier pattern of blue livery with cab logos and serif numbers. Rather frustrating for us blue-era adherents with so many great subjects that could actually have been covered. 

Edited by andyman7
Link to comment
2 hours ago, andyman7 said:

I don't know about the gearing but hopefully if they do a weathered one, they will model a specific loco with screen printed rust spots and marks particular to a time service rather than just mist with mud. Their more recent efforts have been a step change and a Warship would be an ideal candidate for the treatment.

Another thing that has struck me when looking at the Mainline and Bachmann class 42 production is that in the entire 32 year or so use of the tooling, blue livery was only ever correctly used for 827 Kelly, firstly (using the final variant of the blue livery application) on the original Mainline release and then much later on a 2010 Bachmann 21-pin release, using the slightly earlier pattern of blue livery with cab logos and serif numbers. Rather frustrating for us blue-era adherents with so many great subjects that could actually have been covered. 


I'm not hopeful about the gearing either, especially since the effect can be overcome by DCC users, which I am not. This is causing me to rethink which of my Warships I will end up keeping for my BLT and planned diesel depot layout, which both require good slow running ability, but I need to choose a new controller and see how the '43s' perform with it first. I use etched EE Class 37/40/50 horn grilles as NBL exhaust ports on '42' to '43' conversions.


827 in its final guise was perhaps not the best choice by Mainline as it only ran in that condition from 23/4/71 until withdrawal 1/1/72 - just over 7 months. I agree, all of the other blue possibilities and 'Kelly' has been done twice! D813, D814, D819, D821, D822, D826 & D828 have never been produced in any livery so far, all bar D822 and D828 carried two versions of blue and all are correct for the tooling. In fact, after Mainline selected four correct subjects Bachmann seemed so intent on selecting wrong ones (D800/1/4/6/8/9/10*/12/67/70) that I had to wonder whether they were saving the right ones for an eventual full retool......


*810 not produced, as we know, but it was selected

  • Like 2
  • Thanks 1
Link to comment
  • RMweb Premium
On 03/06/2023 at 10:30, Eveannessant said:

Hi Patrick, good of you to commit to posting a circuit diagram, thanks.


Below is the PCB schematic.  The inputs are wired to the board, blue, green (aux1) and purple (aux2) on the left. The yellow and white are connected to the left of the DuPont connectors.  The DuPont connectors are as follows:

  • White/Orange, Yellow/Orange - Head Code Lights on chassis (LED)
  • Dark Blue - Adjustable White Running Lights - Body Shell
  • White/Yellow  - Body Shell
  • Red - Switched Adjustable Red Running Lights - Body Shell
  • Purple - Switched Adjustable Cab Light


MainlineWarshipCircuit.jpg.1a617bdabb653a2fb37f1dcaa17bb649.jpg


The trimmer are 50K, all resistors are 1K.  Light yellow is top of PCB with components and where the track cuts are.  Dark  yellow is underside (mirror) to show where the cuts actually are.


My latest design only has one trimmer to provide a differential between white running lights and marker lights if they are fitted, otherwise it is not required.  Speaker, track supply and part of stay alive circuit mounted on PCB as well.  Same PCB footprint, 9 x 12.. Screw terminals used instead of DuPont.  Some components not fitted if they are not used, likewise unused screw terminals. 

  • Like 1
  • Thanks 1
  • Round of applause 1
Link to comment
9 hours ago, NFWEM57 said:

Below is the PCB schematic.

Thanks Patrick, good of you to share.


Cheers,


Eve

  • Agree 1
Link to comment

Wow! Mint boxed it may be, but - no Class 43-matching lights/DCC socket/see-through etched fan grilles or other separately-fitted details (except nose-end handrails), slightly tired tooling and the most inaccurate version of them all (wrong boiler details and no Zulu-specific roof horns), in an unpopular livery:


https://www.hattons.co.uk/1337732/bachmann_branchline_32_057_po15_class_42_warship_d870_zulu_in_br_blue_pre_owned_fair_box/stockdetail


These old Class 42s are really holding their value compared to the Class 43s. Good job I bought my two 870s 'back in the day' when they could still be had for forty quid each brand new over the counter.......£226 would be a no-go 🙂

  • Like 1
Link to comment
  • RMweb Gold
1 hour ago, Halvarras said:

Wow! Mint boxed it may be, but - no Class 43-matching lights/DCC socket/see-through etched fan grilles or other separately-fitted details (except nose-end handrails), slightly tired tooling and the most inaccurate version of them all (wrong boiler details and no Zulu-specific roof horns), in an unpopular livery:


https://www.hattons.co.uk/1337732/bachmann_branchline_32_057_po15_class_42_warship_d870_zulu_in_br_blue_pre_owned_fair_box/stockdetail


These old Class 42s are really holding their value compared to the Class 43s. Good job I bought my two 870s 'back in the day' when they could still be had for forty quid each brand new over the counter.......£226 would be a no-go 🙂


Is it now £113? Still far too much…,

  • Agree 1
Link to comment

Bachmann Class 43 cab interior.  It can be improved by cutting the floor out, just leave the seats and the front frame, the chassis block needs thin card or good paper to cover the wire channels, then add seat bases level to the bottom of the frame. It clips back in fine and looks better and a lot better when cab lights are on.

IMG_0001.JPG

IMG_0030.JPG

IMG_0023.JPG

  • Like 1
  • Informative/Useful 1
  • Craftsmanship/clever 3
Link to comment
On 29/05/2023 at 13:55, Halvarras said:

I currently have a Mainline maroon D823 'Hermes' on the workbench into which I am attempting to fit the remnants of a D800 Mazak Rot victim which I foolishly added to a Hattons order on a whim cos it was cheap........and now wonder exactly what I've got myself into, as the chassis block is, er, somewhat shorter than it used to be and the motor is defunct, requiring replacement by a slightly rattly Class 25 unit I happen to have spare (phew!) The project has just reached the Point Of No Return as far as D823's body/underframe is concerned, if this works perhaps I'll post more - if it doesn't I won't mention it again 🤐!


Guess what - I've managed to nail it together so I'll mention it again! This purchased-on-a-whim Mazak Rot victim Bachmann Warship (D800) had a casting with broken ends, one broken bogie frame, wheels and frame missing at one end and a motor which seemed to have its own built-in variable speed control. I should have admitted defeat there and then but a challenge is a challenge, I had that spare Class 25 motor/flywheels and some Mainline Warship wheels and knew where I could get some cheap Bachmann Class 42 bogie frames, and once the imagination got to work on how to (possibly) rescue the situation imposed by my too-hasty purchase all of my other projects got sidetracked.......again.


Ladies and Gentlemen........or is it now "Hello Everyone!".........I present.......um.......this contraption:

D823-1.jpg.7c12affd6eea6025f5d620a228f312e5.jpg

This required some serious opening up of the Mainline underframe - I used the green D800 frame upside-down as a template. Spot the Triang-Hornby parts - the brass bosses are epoxied (is that a real word?) to the tops of the cast Bachmann gear towers, possible future weak spots but so far so good. The central casting seems to be sound enough, even if the remaining end extensions broke off with finger pressure, and so hard I gave up trying to drill holes in it (with a Bosch drill!) to take self-tapping screws through the underside, to secure the underframe. Instead I used a pair of T-H long brass bolts down through the diagonally opposite holes previously used by the Bachmann body securing screws in the opposite direction. The plasticard/Plastruct top assembly is self-evident. Although I strengthened this as much as internal clearances would allow it still bows slightly as the weight of the casting, motor, remaining flywheel and plastic underframe is supported on the T-H bogie pivots - the best I could do but next time I find a KS Metals stand I'll see if I can get some brass right-angle strip to bolster it. Because I didn't trust the casting not to fracture if I tried to force self-tappers into it I reused the two crosshead screws from the small circuit board at one end but had to find a close match from my screws box for the other two - and only had a pair of 'normals', so I marked which end takes which screw type - just being cautious. In retrospect the two plasticard rectangles at either end, drilled to take four body securing screws, were not necessary, but never mind.


D823-2.jpg.f243c9acd913cbb3f37abc868f935a72.jpg

The Class 25 motor was a straight fit into the Class 42 bracket but the flywheels were closer to the motor, so the remaining driveshaft had to be stretched by 4.5mm - after pondering where I could find a suitable tube to effect the extension (cotton buds having paper stems these days) I found the answer located about 9 inches from my right ear, which is where the pen shown was lurking on a shelf! A tight push-fit, no glue or pins required - perfick! The second flywheel was not essential and added to the weight, so was quickly removed with a slitting disc in the Dremel. At this point the motor ran quietly one way but even more rattly in the other - I reckoned if I could stop the shaft moving longitudinally I might improve it.........so I tried cutting a pair of Peco 1/16th" fibre washers (R-8) into 'clip-on' C-shapes and pushed them into place between motor bearing and flywheel with tweezers and small screwdriver - result!! Quiet in both directions. Well that worked out better than I'd dared hope for. The right-hand bogie has no gearing in it so, being two-axle drive now, I fitted Mainline traction-tyred wheels to opposite corners of the driven end.


D823-3.jpg.f96ebcee4d890b5bae3af30a4bcfa631.jpg

This side of the chassis shows how I had to glue a piece of brass tube into the broken corner of the casting to take the T-H brass screw into the underframe. The two Bachmann bogie frames obtained as spares (from ekmexhibitions.co.uk) should have simply clicked onto the Bachmann bogie castings, but no way - and no sign of the dreaded Rot expansion either (perhaps that's why they were only a quid each). Much filing of both parts (and cussing) later I was nearly there.......and broke the inner end vertical piece off one of the frames trying to get it off. Darn it! A-ha - no gears in the trailing end meant that I could drill and tap this to take a screw through the underside - problem solved. But I then had to be careful not to break the other one as well. More filing, and once it was on the driven bogie I decided this one would have to stay on, which is why a central body securing screw at each end wouldn't work, hence the four screws in the corners.

The inside of the body shows the drilled body securing 'ledge' supported by Miliput epoxy filler forced into the nose space, the more inset 'shelf' supporting the cab interior (control panel and seats) and upper part of the cab rear bulkhead glued to and ahead of the pins this would normally be located onto. This was the third attempt at getting the cab interiors in and the only way I could get the chassis to fit with sufficient clearance for bogie swing.


D823-4.jpg.5c4e349e465e9c9a92436b0296a56f3a.jpg

And the finished article, looking just like any other Mainline D823 but running considerably more quietly - just like a Bachmann one in fact. Externally I've fitted etched plates (name and works plates from Modelmaster - yes, yes, I know, but they did come through.......eventually - and cabside crests origin uncertain as they're not included in the Modelmaster pack, but I've had these for years, they just required some spots of blue paint), scribed the cab side glazing internally to emphasize the vertical central frame, painted the windscreen centre pillars maroon and the wipers black.


So, having described the work and being satisfied with the end result myself, would I recommend this to anyone with a Mazak Rot Warship sitting around in bits? Er...............no, I'm not convinced this amount of work and frequent exasperation was worth it, I certainly wouldn't bother again but I hope it at least made for an entertaining read!

  • Like 2
  • Craftsmanship/clever 5
Link to comment
37 minutes ago, Halvarras said:

So, having described the work and being satisfied with the end result myself, would I recommend this to anyone with a Mazak Rot Warship sitting around in bits? Er...............no, I'm not convinced this amount of work and frequent exasperation was worth it, I certainly wouldn't bother again but I hope it at least made for an entertaining read!

Wow!  That is really a labor of love.  Lets hope there isn't more rot in the remaining Mazak, or there is going to be more love involved! 

  • Agree 1
  • Round of applause 1
  • Funny 1
Link to comment

Ha ha ha, a thought just struck me; it would seem that two Maybach motors have been removed and have been replaced by a single Sulzer.........😂


Eveannessant

Edited by Eveannessant
  • Funny 2
Link to comment
On 18/06/2023 at 21:28, Halvarras said:


Ladies and Gentlemen........or is it now "Hello Everyone!".........I present.......um.......this contraption:


Well done Halvarras - definitely a labour of love.  I see you are not going to be taking orders.  I wonder what the next challenge is going to be?


Regards


Ray

Link to comment
On 19/06/2023 at 09:19, Eveannessant said:

Halvarras you must be the worlds most fanatical Warship fan ever........!


Well, I did see all of them in service between 1966 and the end in 1972, in Cornwall they were hard to avoid, but TBH I preferred the more modern appearance of the Westerns and Hymeks (and Brush Type 4s........sorry!) But I did miss them when they went and appreciate them all the more now, as the technical aspects - especially 2,200hp in less than 80 tons - was impressive. There are bigger Warship fanatics than me out there......😉!


4 hours ago, Silver Sidelines said:

 I wonder what the next challenge is going to be?


I wonder that too but I really must avoid any more time-consuming projects like this one (lesson learned) - I was working on a pair of Dapol Class 22s when this Warship intervened, they've had their side valances glued on but now I have to find a new way of attaching the bodies, to avoid a 'Lima Warship' situation (anyone who has tried to remove the body of one of these without damage will know what I mean!)


By the time I retired four years ago I had purchased a lot of models, most of which require some work, even if just renumbering to specific locos, but after a good start I got distracted onto so many other things, such as my blinged-up Tri-ang 'Nellie' and Dock Authority shunter plus two mates, that this 'grand plan' is now way behind where it should be (and RMweb prompted some of this side-tracking, but ultimately I didn't have to do these things - they just appealed, so I can only blame myself!)


But, hey, who knows......watch this space 😎!?

Edited by Halvarras
  • Like 2
Link to comment

Create an account or sign in to comment

You need to be a member in order to leave a comment

Create an account

Sign up for a new account in our community. It's easy!

Register a new account

Sign in

Already have an account? Sign in here.

Sign In Now
×
×
  • Create New...