


Phil Bullock
-
Posts
8,831 -
Joined
-
Last visited
Content Type
Profiles
Forums
Blogs
Gallery
Events
Exhibition Layout Details
Store
Blog Comments posted by Phil Bullock
-
-
9 hours ago, 46444 said:
Thanks Phil,
There's a shoal of Herrings awaiting building. Well three Cambrian kits at least!
I believe you and the good Captain of this parish has assembled a nice shoal of Herring between you.
Cheers
Yes indeed …. And my good friend @Downendian is guilty too….-
 1
1
-
-
Wot no herrings? 😀 Looking great ! @Liam some inspiration for your current project there?
-
 1
1
-
-
1 hour ago, Halvarras said:
Wow! Mint boxed it may be, but - no Class 43-matching lights/DCC socket/see-through etched fan grilles or other separately-fitted details (except nose-end handrails), slightly tired tooling and the most inaccurate version of them all (wrong boiler details and no Zulu-specific roof horns), in an unpopular livery:
These old Class 42s are really holding their value compared to the Class 43s. Good job I bought my two 870s 'back in the day' when they could still be had for forty quid each brand new over the counter.......£226 would be a no-go 🙂
Is it now £113? Still far too much…,-
 1
1
-
-
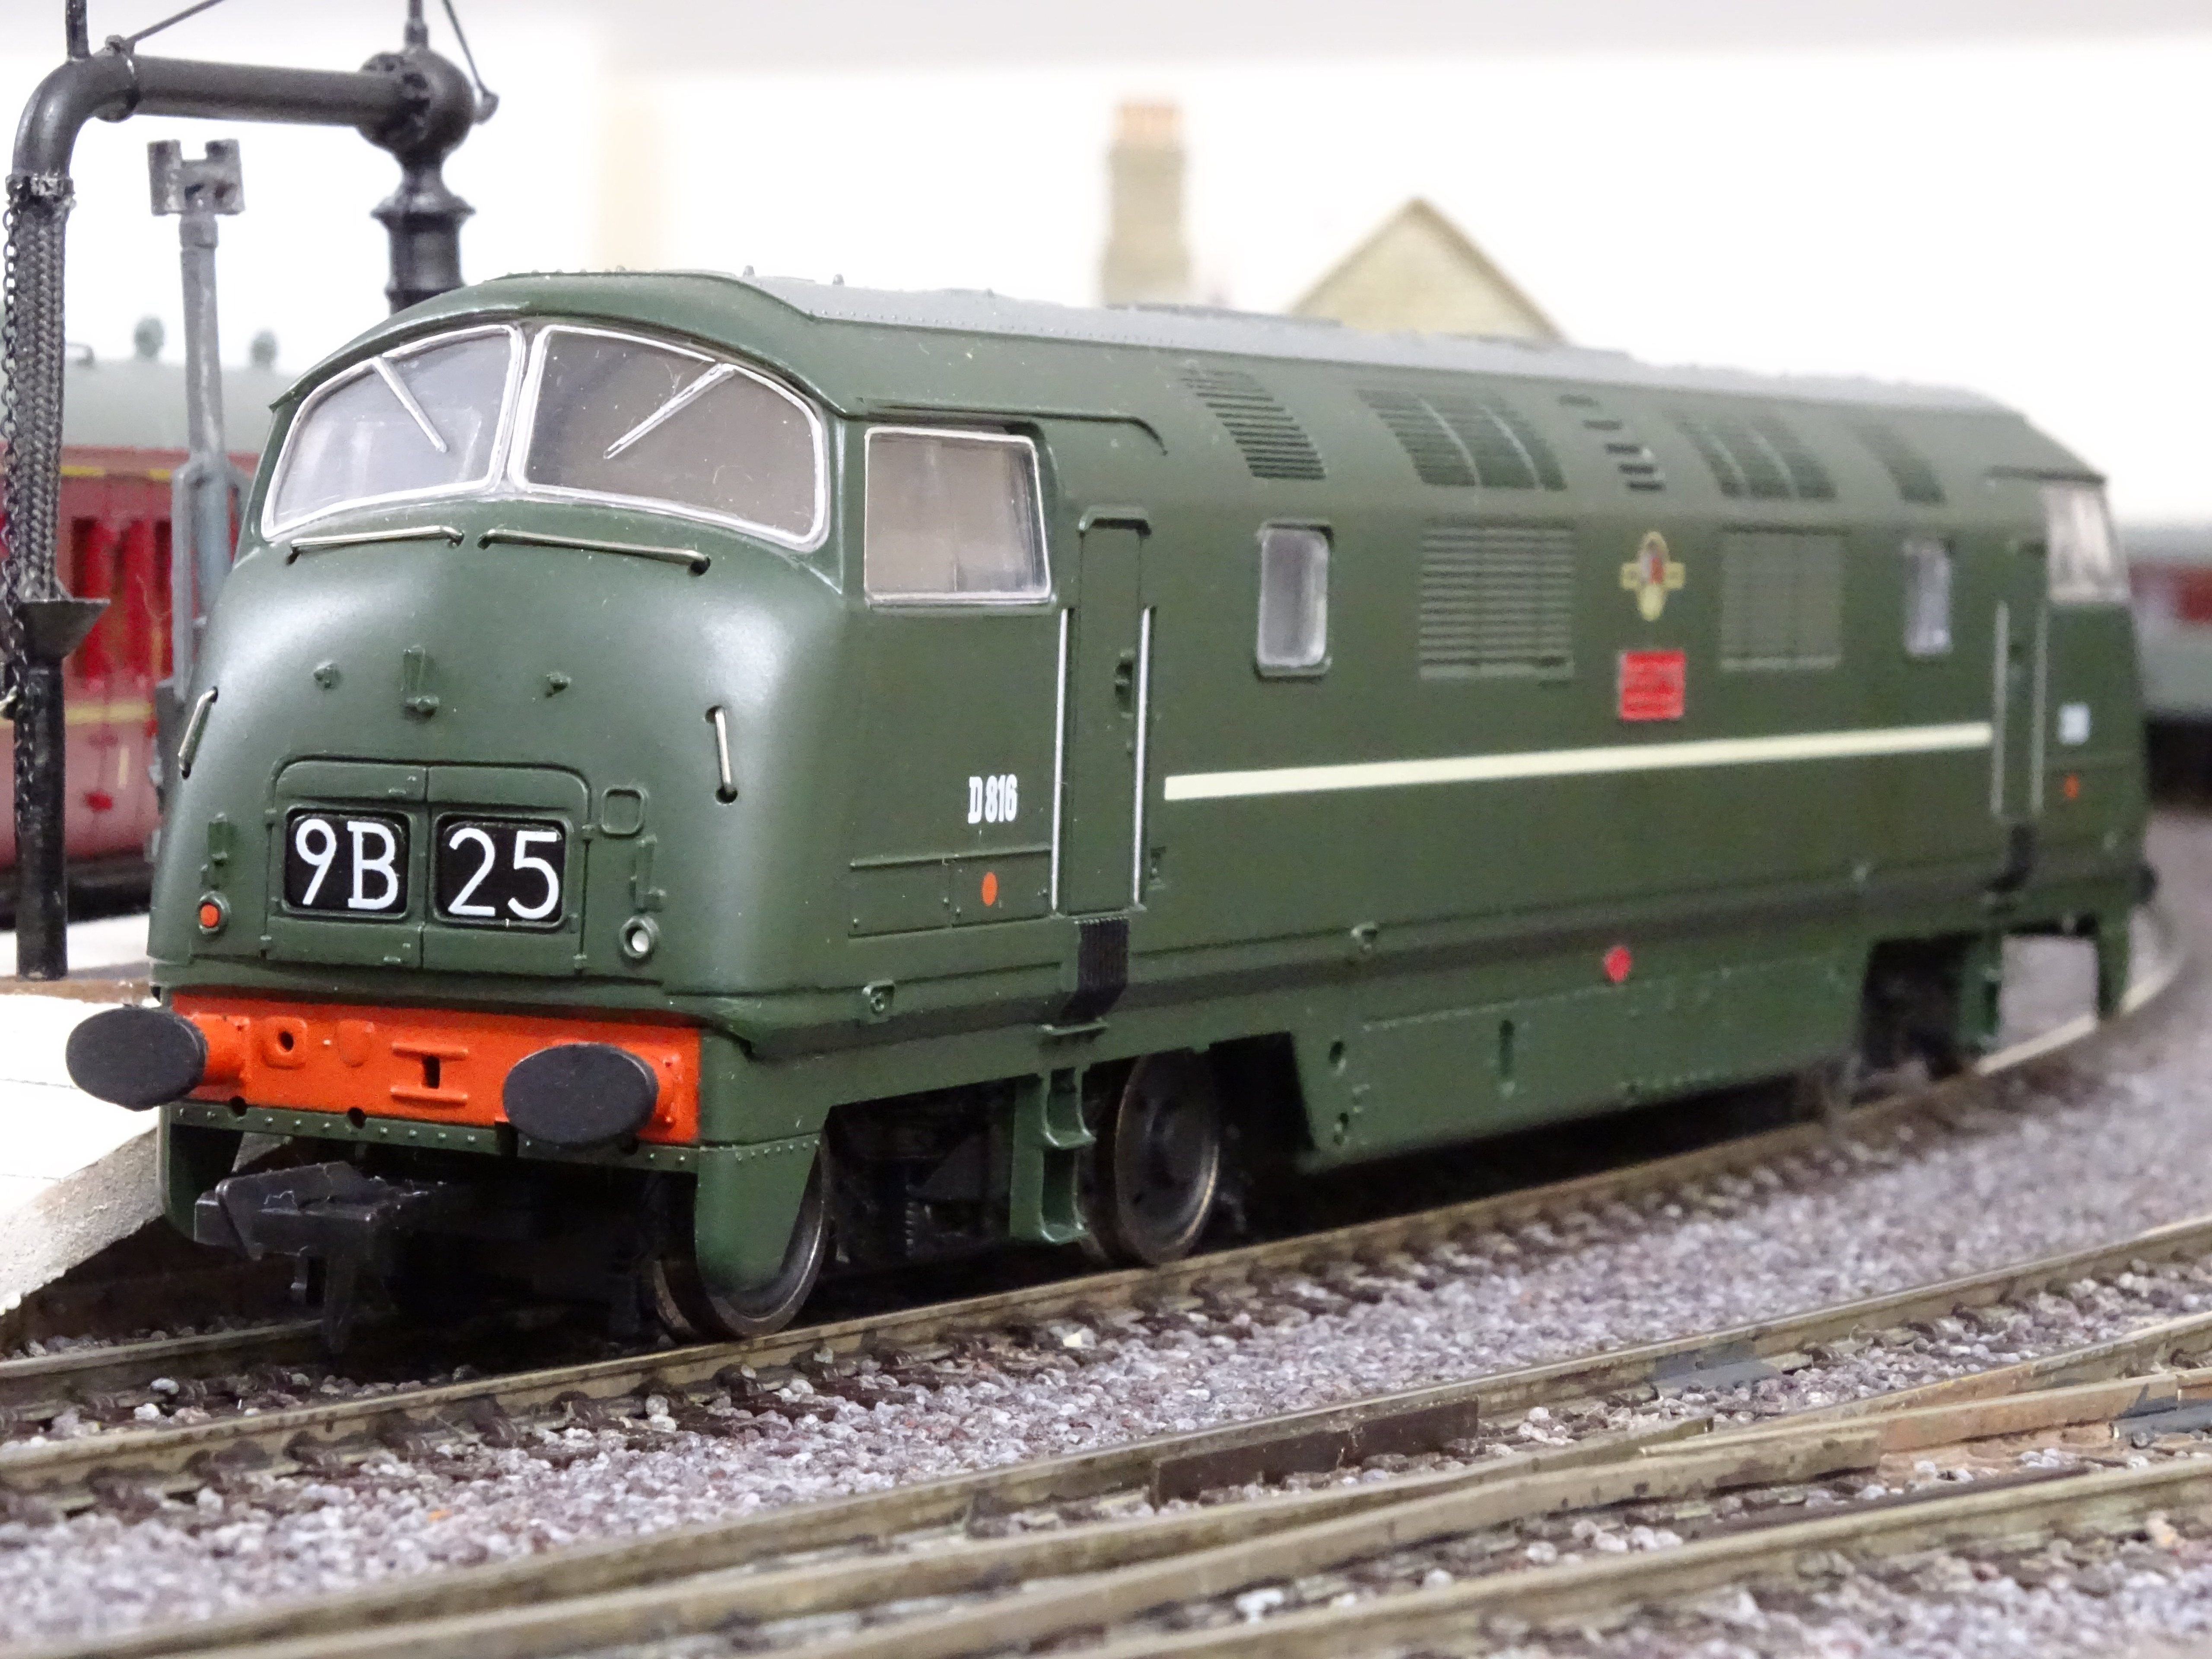
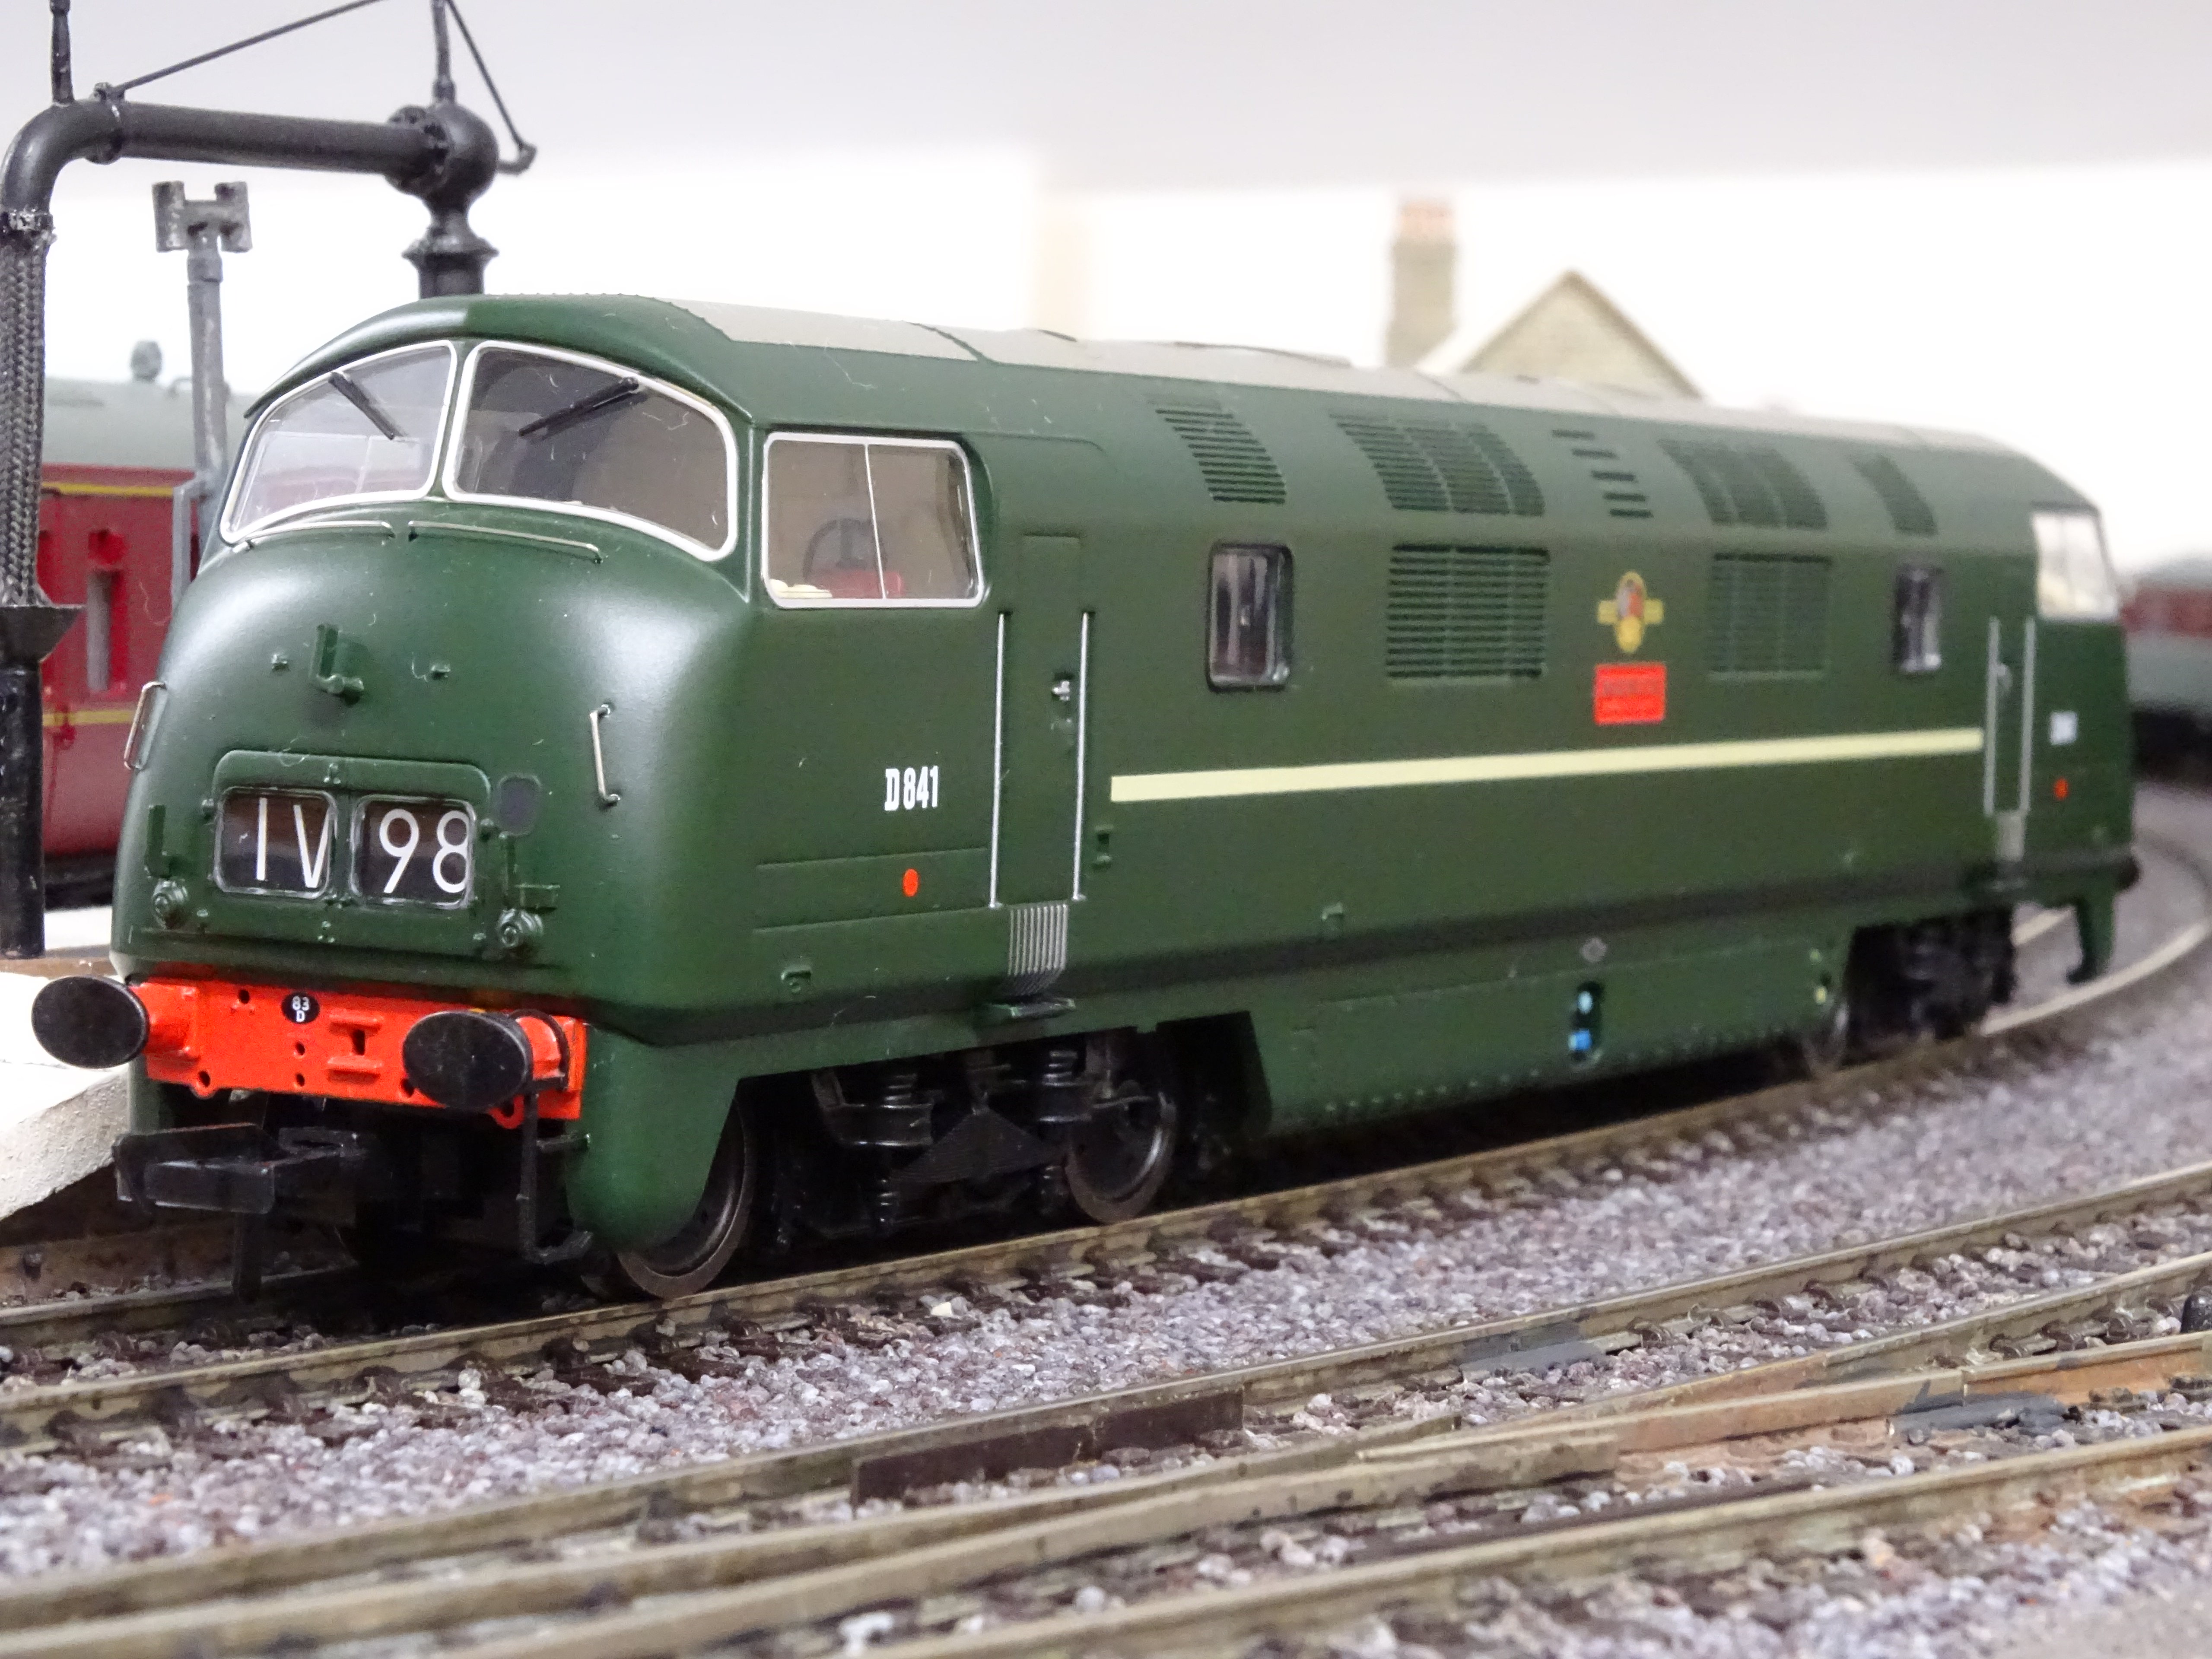
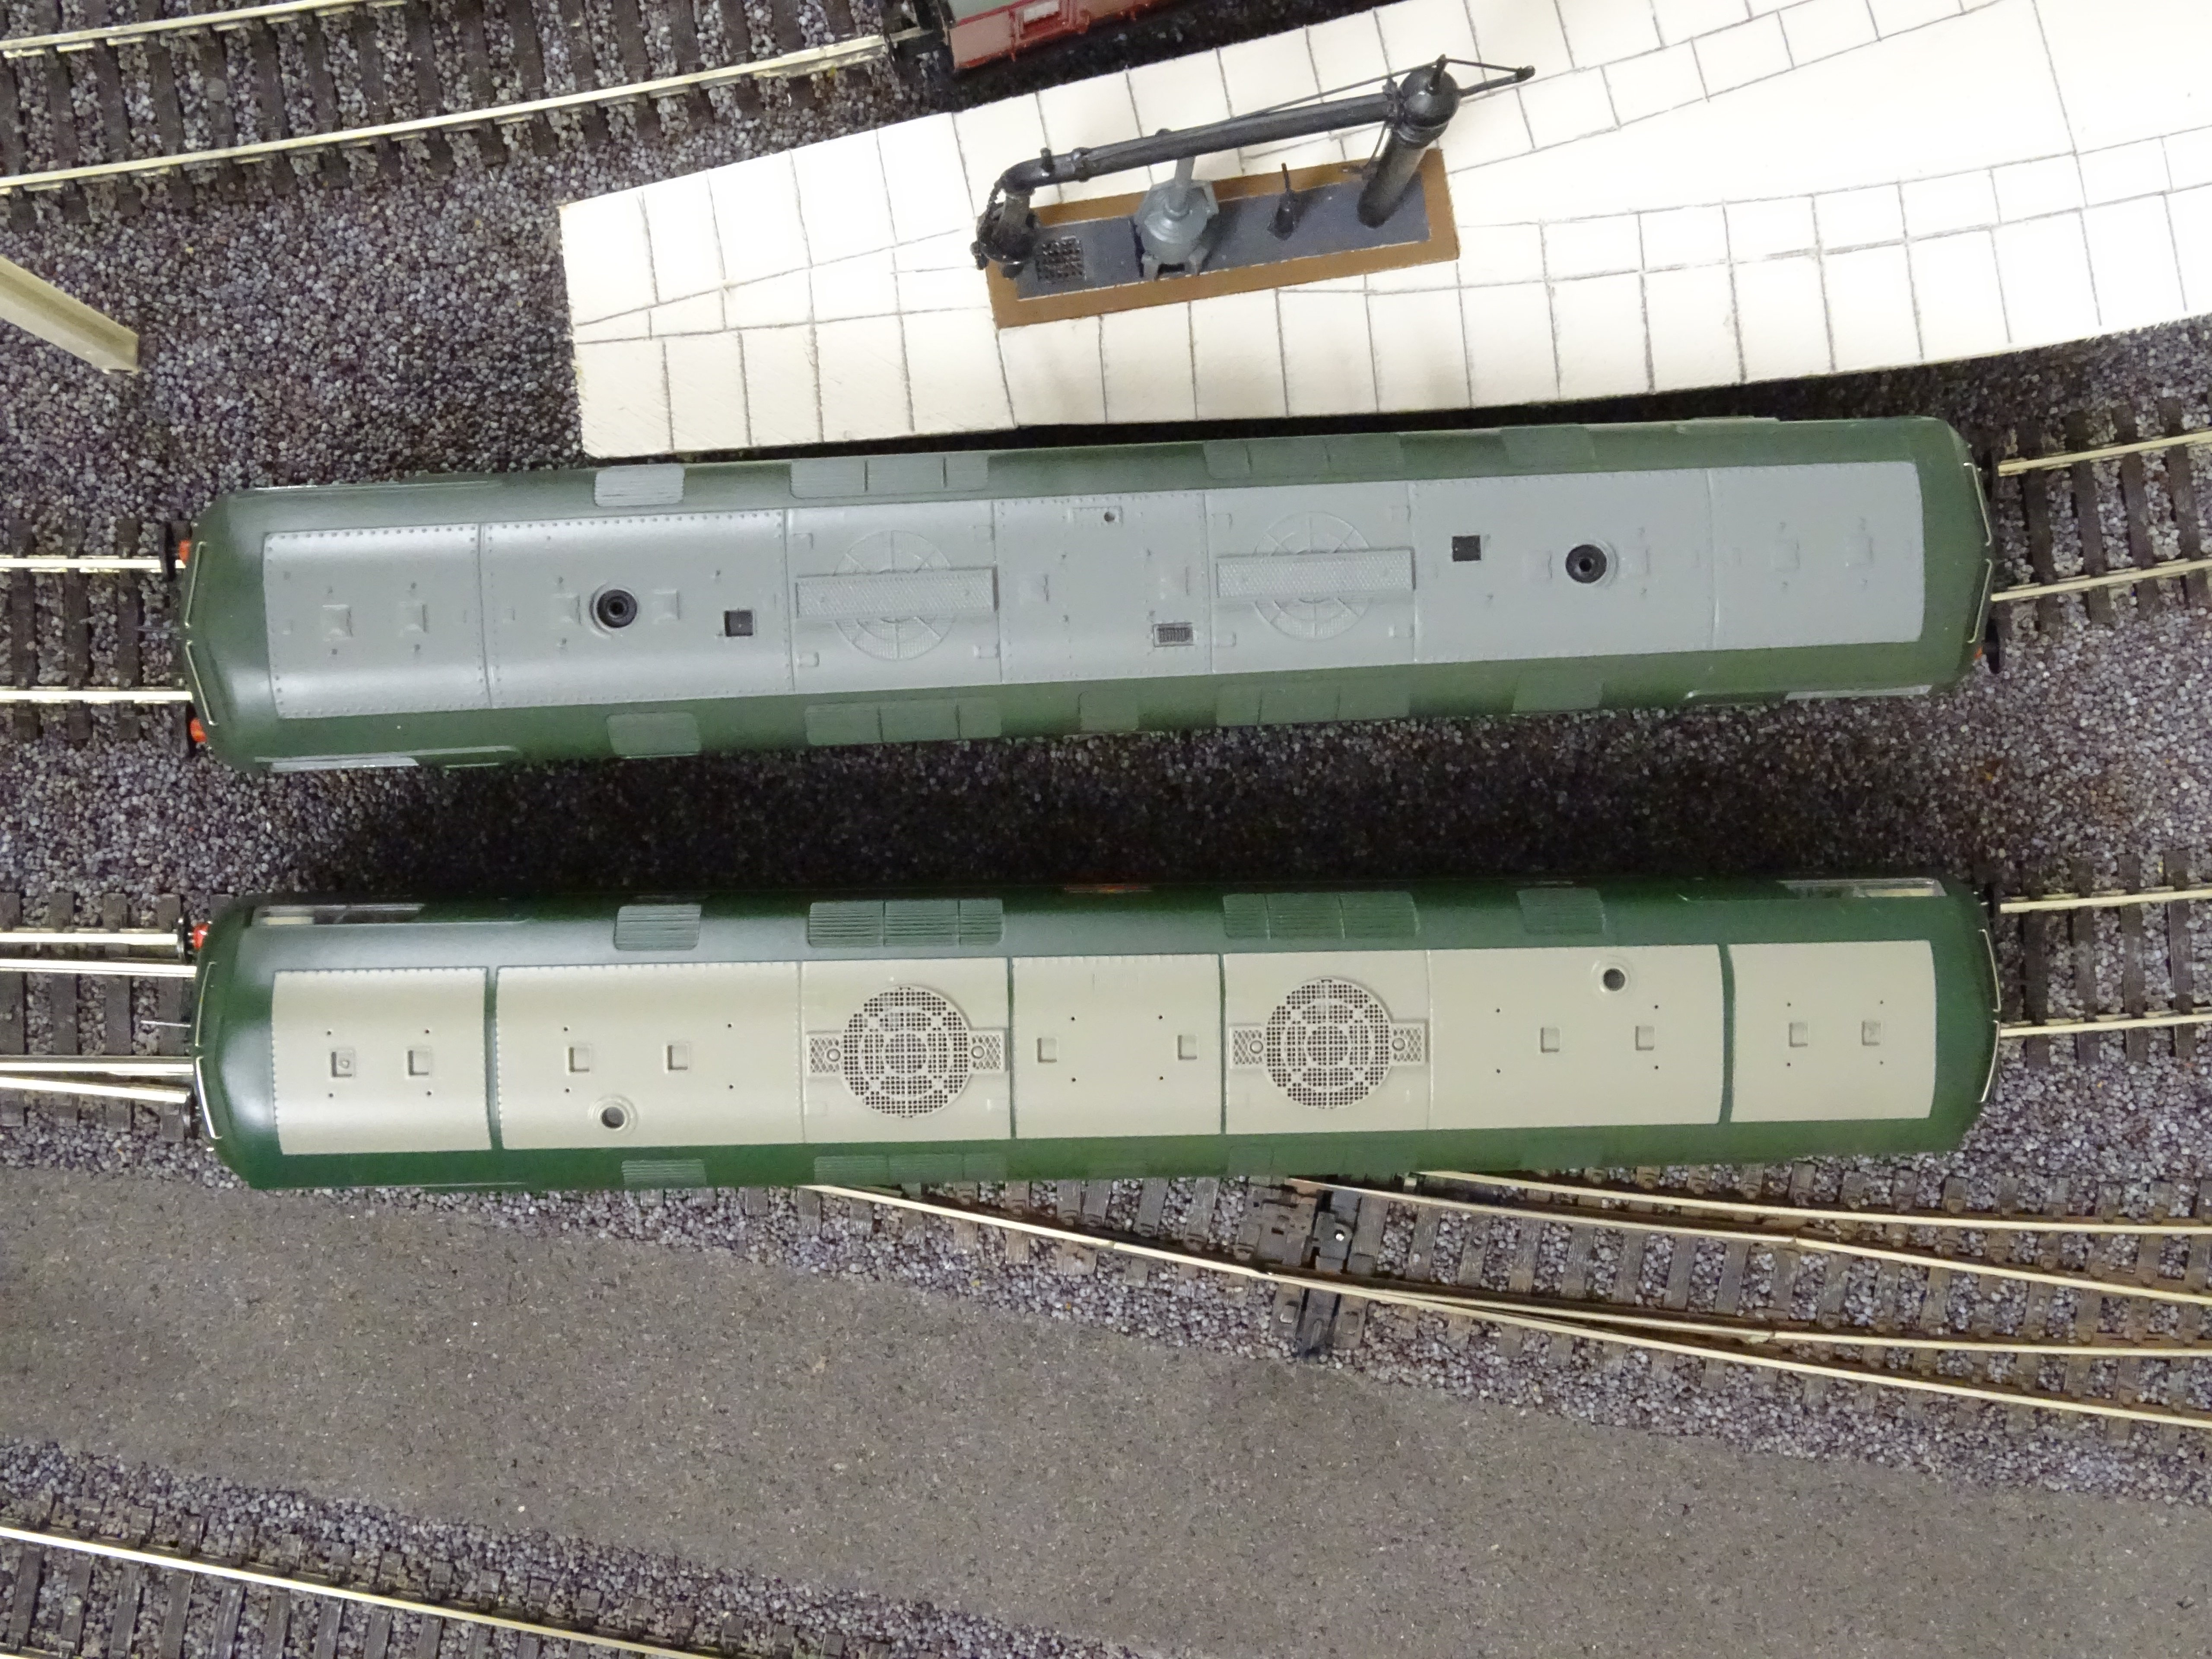
1 hour ago, Silver Sidelines said:
An update! Some pictues comparing a very early Bachmann Class 42 and a much later (2015) Class 43. I think that how you feel about them all depends on the viewing distance.

First D816 Eclipse a Bachmann Class 42 from the past.
Second D841 Roebuck Class 43 from 2015
Lastly a comparison showing the two roof details.
NBL wins hands down on roof detail…. But the 1990s Swindon version with the centre can motor was and still is a great model …. A better runner than the NBL which in my experience needs either wiper pick ups or a DCC stay alive to run well … and it takes off like a scalded cat on DC!-
 2
2
-
-
21 minutes ago, D 844 said:
When should we be expecting the new Class 42 Warship, it seems a long wait. The Class 43 shell does have minor mould seems near the roof so they are prepared for different roof details. Perhaps running quality needs a re-think, certainly the gearing and pickups. Interesting on Ebay recently, some trusty older Class 42s have been going for higher prices than Class 43s. The new Class 42 will have to be spot-on to be a winner for Bachmann and us.
I don’t think it’s anywhere in Bachmanns current programme. It was announced with the NBL IIRC but was then dropped. -

The old layout was at the Cheltenham show today …. Always a pleasure to see it
-
1
-
-

What a lovely 6 cylinder Sulzer burble, congratulations to Simon and the team,,,,
-
Hi Mark
Just a point of order…. The embellishments you mention are perhaps “Danny’s Bull” …. Danny Rowlands being the shed master at Aberystwyth who insisted on turning out resplendent engines from his depot for the Cambrian Coast Express when surrounded by filthy engines from other depots.
Certainly worth doing ….
Phil
-
1
-
 1
1
-
-
The long buffers represent extended buffers as used at the end of rakes when coupled to a loco or other non gangwayed stock. Bachmann buffers represent retracted buffers as used in vehicles within rakes when the gangway and buckeye couplings take buffering loads . Have added extended buffers to all my tail end coaches
-
Good grief Simon what a mess you must have been wondering what was coming next! If it’s any consolation I think the Derby/Darlington type 2s are just as bad if not worse, a number seem to be shunted in to a quiet siding and left to die so more power to your excellent work in keeping this super little loco alive. Can’t wait to hear that heathy Sulzer 6 cylinder splutter again...
-
1
-
-

Wonderful modelling! In the modern era the gulls would have a field day....
-
1
-
1
-
-
1 hour ago, Mick Bonwick said:
Sorry, Phil. I'd just been reading about HOP21s and my brain told my fingers to press the wrong key.
Confusion is no longer a stranger in my life.
it comes to us all Mick! But hang on.... perhaps your Brain is more active than you know and what you have just experienced is a deja vu......-
 1
1
-
-
HOP21s Mick? You got me excited there....

-
 1
1
-
-
Simon these are fascinating blogs! Please keep them coming....
-
1
-
7
-
-

I always find when I start a project I haven’t got the bits I need to finish! Fired off 4 orders to bits suppliers yesterday for coach components before I start some Mousa models MK1s to and avoid this problem....
-
1
-
-
2 hours ago, westernviscount said:
Thanks Phil. Clear your diary for the day and have a whiskey on standby!! I'm happy with the result but my goodness were they a pain! I think the main issue was gluing the container down first. A bit of wiggle room would have helped.
Auchentoshan on standby.....-
1
-
-
Those shackles are excellent. Just used chain on mine, need to revisit!
-
1
-
-
A fascinating insight Simon - many thanks for sharing!
-
3
-
-
Here’s the gen for converting a standard Dapol early headcode Class 22 to a late batch loco. Principles would be the same... with suitable adjustments ... for the retro fitted headcode box locos.
First - before doing anything else - get what you need - including pictures of your chosen loco.
.
Order
Class 40 split box etches from Extreme Etchings - EEDP40-18. Also wipers and flush glazing
Class 21/22/29 nose end detail pack .... A1 models on Ebay
0.31mm ns wire
Silver Tay lamp irons on EBay
Brass tube, sheet and plasticard sheet and strip.
Whilst you are waiting for those remove existing hand rails and lamp irons. It’s the headcode boxes that are the main work
Pilot drill a hole through the moulded circular top vents either side of the doors just below the driver/second man front windows. These together with the head/tail lamp holes will serve to give you location reference points later.
Then carefully carve away the head code box surrounds flush with the surface - and all other raised details on the nose end. Leave the outline of the headcode boxes visible. Take a small flat file - handily the most common size is exactly the width of the headcode box aperture - and extend the aperture down 1mm to the lower limits of the existing box you have just removed - the outline will still be visible.
Once you are happy with this then clean off all moulded nose end detail and fill existing hand rail and lamp iron holes with squadron putty. Rub down to a smooth surface - the nose doors are recessed, leave them visible as a template for the new doors you are going to make.
First job is to sort the headcode boxes. The etches are thin so need to be soldered on to brass sheet....0.5mm is about right. Drill centre of aperture and file out to open up box to internal edge of etching box. The frames are too heavy so file down width from outside too ensuring final results are square and consistent. Sweat on a length of 0.31mm ns wire along the top edge of the box to represent the hinge. Then mount boxes in place on model aligning Internal lower edge of box with internal edge of aperture. Superglue good for all brass and NS fittings but use gel not thin stuff. Ensure boxes are square and height is right relative to reference points and lateral orientation is correct relative to doors and edge of nose.
Next job are nose end doors. Thinnest plasticard cut and filed to shape and attached with plastic weld. I then prefer to prime before adding any more fine detail as any defects can be corrected before more detail is added.
Now for fine details. Use the reference point holes as drilled above to get the positions correct. Top air vents are brass tube drilled out to get thinner walls. Tube used to get protruding effect as per prototype. Duct in nose doors is a small brass washer recessed in to door, and tail lamp casings are brass signal cranks drilled and filed to shape. The only item used from the A1 models kit in the end were the horn grilles. Headcode box latches and small angled pad above doors are plasticard.
Handrails are 0.31 NS wire, as are door and headcode box hinges. Had to fabricate lamp irons by soldering up two irons off the Silver Tay thread...they are fine, made them handed although the prototype ones have central uprights. Could not get those robust!
Off the nose ends, two things to check.... drivers name card holder , no longer present on this loco....and any partial blanking of roof boiler port, use thin plasticard. Buffers .... Heljan Hymek are an improvement, fit them and buffer beam detail if required.
Assuming you are happy with all of that, it’s out with the paint. Jim used air brush to apply Precision primer, gloss rail blue and warning panel yellow. Then Fox transfers, and works plates if present. Precision Labels will custom print correct data panels. Check photos for missing valances, spray them and fit. Then Matt varnish and weathering to taste.
Final touches .... Precision Labels headcodes, then Shawplan flush glazing all over... and wipers from same source. Cab interior modified as lighting no longer lines up, crew are Bachmann 1950s loco crew, they look the part.
Just got sound chip and coupling loops to fit before she is good to go.
-
4
-
-
Fantastic work Simon - its an unfortunate reflection of the consequences of long term preservation, plainly many short term bodges done in the past. First Class 26 on the S&D then?
-
Nice work! DId it come with a train heating boiler port?
-

Ah you've a few to go yet Mick! Hee hee

-
4
-
-

Yes very woody names - not at all tinny!
Does look good....
-
 1
1
-
-

Don't forget the fisherman's specials too Liam!
Phil


.thumb.jpg.60c53fcbcaa34017b05b8919d1a9e6d2.jpg)


Part 2: Wagon Miscellany. Including BR/WR/GWR ballast wagons x 3.
in 46444's Blog
A blog by 46444 in RMweb Blogs
Posted
Dammit he has one more than me now!!! 😀