


simon br blue
-
Posts
386 -
Joined
-
Last visited
Content Type
Profiles
Forums
Blogs
Gallery
Events
Exhibition Layout Details
Store
Posts posted by simon br blue
-
-
Hi Al,
I can make the bogies available on Shapeways and I can print the parts and the transfers. I'll work out the costs and send you a message.
A small update, another wagon I've been working on finishing is the PRA china clay wagon, this model was made with a with Balco printed body and top sheet, Versatile plastic chassis, PA12 end walkways (mesh walkway not fitted yet) and Form 2 resin top cover wheel. Elastic hood straps made from fine elastic, glued at top before being tensioned and gluing at bottom.
 7mm PRA wagon body by simon br blue, on Flickr
7mm PRA wagon by simon br blue, on Flickr
7mm PRA wagon body by simon br blue, on Flickr
7mm PRA wagon by simon br blue, on Flickr
-
 1
1
-
-
Time for another update, first up I've applied homemade transfers to the UKF and VAA vans. The UKF transfers are printed on clear decal paper and the VAA was printed on white decal paper with a red border to the Railfreight logo and grey inner for the TOPS panel. I added the door locking mechanisms from plastic rod after applying the transfers.
7mm UKF PWA by simon br blue, on Flickr
7mm UKF PWA by simon br blue, on Flickr
1:32 VAA by simon br blue, on Flickr
I finally got around to weathering and adding transfers to one of the BAA (from Railtec) and at the same time added some black bands to some PLA printed steel coils.
7mm BAA by simon br blue, on Flickr
I've also been doing a bit of work on the Polybulks recently, still hopeful that I can get some transfer made up as I struggled make my own larger transfers especially printing light colours on green or blue backgrounds, the original drawings were done on MS paint. I though i would have a try at using vinyl and paper transfers printing a complete overlay for the bodyside with a possible bonus of smoothing out any inperfections on the sides. First attempt was using white Vinyl sheet for the Malt Distillers Polybulk in 7mm and then tried a 4mm version.
7mm Malt Distillers Polybulk by simon br blue, on Flickr
4mm and 7mm Malt Distillers Polybulk by simon br blue, on Flickr
4mm and 7mm Malt Distillers Polybulk by simon br blue, on Flickr
Next I tried the Traffic Services Livery but I struggled to get the large areas of green to fix to the paper when printing so I tried some sticky back paper and this worked well, this overlay was added to a grey bodyshell, I then printed a side for the Grainflow wagon, this was the harder of sides to draw it was hard to find a good photo of the Grainflow logo. Most of the text on all the wagons was found by looking online on one of the font finding sites, the Malt Distillers lettering was a bit a bit homemade.
7mm Swingtop Polybulk by simon br blue, on Flickr
7mm Grainflow Polybulk by simon br blue, on Flickr
Finally a line up of all 4 polybulks in 4mm and 7mm.
4 versions of the 4mm Polybulk wagons 3 bodies printed on Balco printer with Form 2 resin printed details, handrails made from handrail wire home printed transfer overlays on Malt Distiller wagon with Railtec transfers on the slab sided Polybulk and Fox transfers on the Grainflow wagon. Swingtop Polybulk is the Bachmann version.
4mm Polybulk lineup by simon br blue, on Flickr
4 versions of the 7mm Polybulk wagons with bodies printed on Balco printer with Shapeways printed details, home printed transfer overlays on 3 wagons with Railtec transfers on the slab sided Polybulk.
7mm Polybulk lineup by simon br blue, on Flickr
-
 5
5
-
6
-
-
Hi G,
I've not made these available yet in 7mm but i'll work through them and check that they are printable.
Some wagons I've been working on recently in different scales.
Line up of wagons by simon br blue, on Flickr
First wagon a 1:32 VAA van, body made in 7 parts from PLA printed on my Balco printer, Shapeways versatile plastic chassis. Slaters wheels with Balco PLA printed brake discs. Door locks printed in grey resin on Form 2.
1:32 VAA van by simon br blue, on Flickr
Next up a 7mm UKF PWA fertiliser wagon. Body printed in PLA in 14 parts with Shapeways Versatile plastic bogies. The door locking bars will be added from evergreen plastic strip after homemade transfers are applied.
7mm UKF PWA by simon br blue, on Flickr
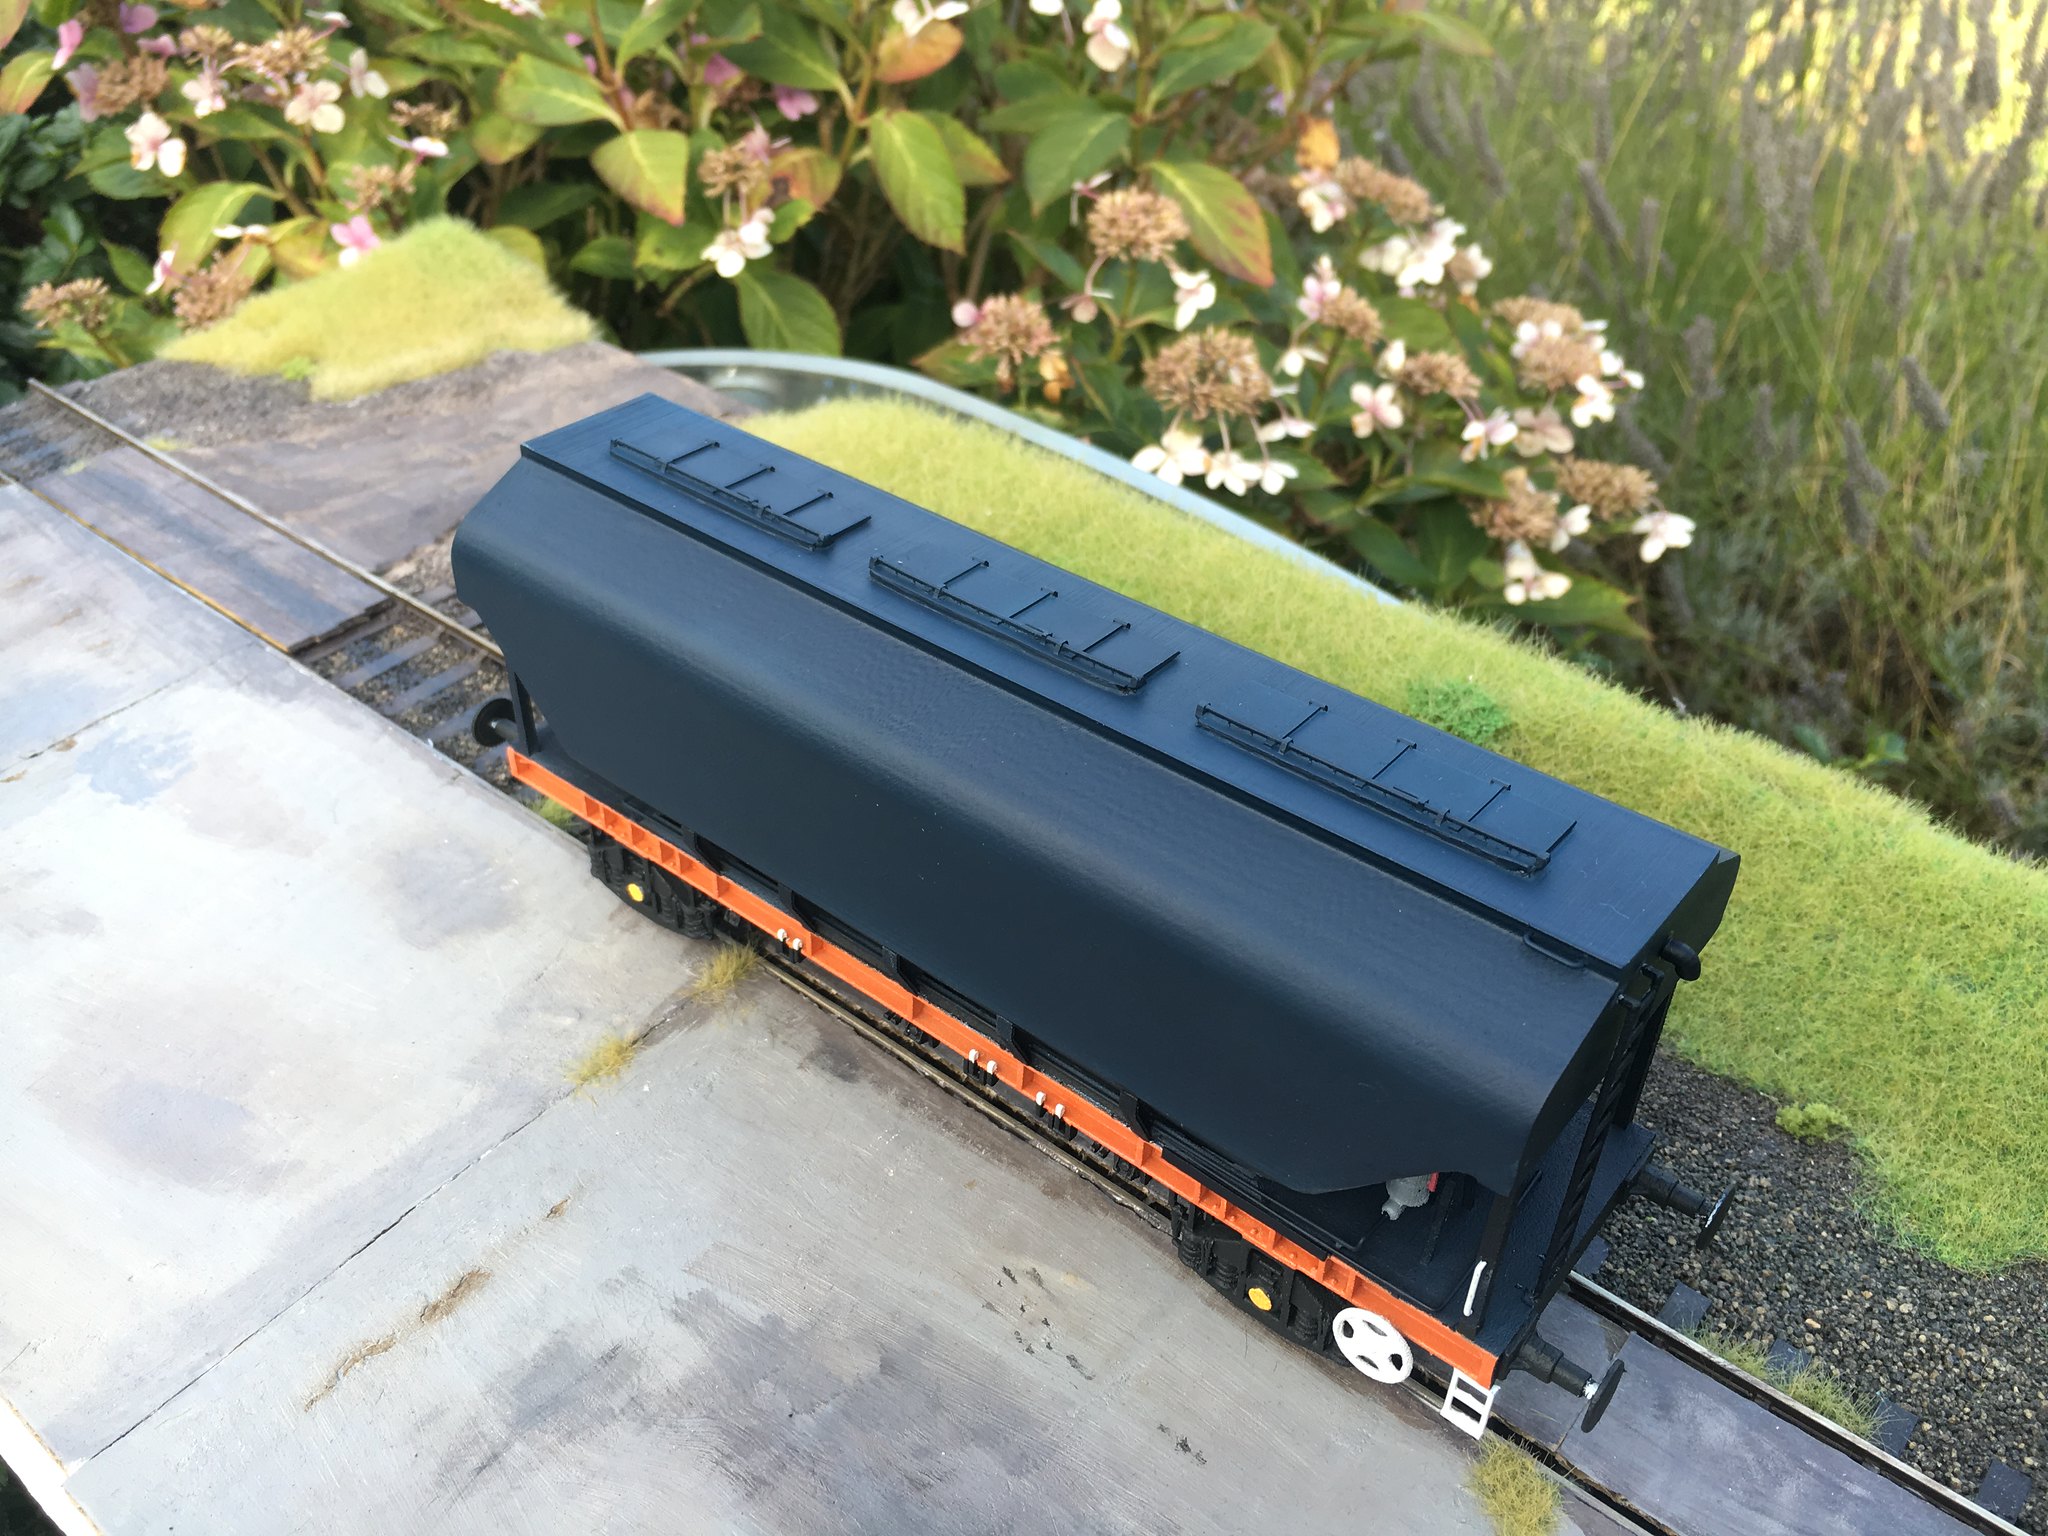
3rd wagon is a 2mm PHA hopper wagon for a Redland Self Discharge train. PA12 chassis with Form 2 grey resin hopper body.
2mm PHA hopper wagon by simon br blue, on Flickr
-
1
-
 1
1
-
2
-
-
Recent posts about Wisbech and Upwell no.16 and PA12 led me to dig out some of the Wisbech and Upwell models I have. I've taken some photos of the models in various scales and materials to show what the prints look like, bear in mind that some of the close ups will display the models larger than real life.
First photo's are of a 4mm Y6 Tram printed in PA12, with basic livery applied after a coat of primer.
4mm Y6 tram by simon br blue, on Flickr
4mm Y6 tram interior by simon br blue, on Flickr
Basically the same model in 3 different scales, 7mm, 4mm and 2mm trams. 7mm J70 printed in Natural White Versatile Plastic (WSF), 4mm Y6 in PA 12 and 2mm Y6 in Grey resin printed on my Form 2.
7mm, 4mm and 2mm trams by simon br blue, on Flickr
3 4mm models in different materials Drewry class 04 freshly printed in colour resin on my Form 2. J70 printed in Shapeways Fine Detail Plastic and Y6 printed in Shapeways PA12.
4mm Wisbech And Upwell trams by simon br blue, on Flickr
4mm J70 Tram printed in Shapeways Fine Detail Plastic, this was printed before the Model Rail J70 was announced. Model has the common partly removed side skirts layout exposing the cylinders.
4mm J70 tram by simon br blue, on Flickr
4mm Drewry 04 rear tram printed in Colour Resin on my Form 2, this shows the support material requiring removal from resin prints which is required to support the print any overhangs.
4mm Drewry 04 tram rear by simon br blue, on Flickr
7mm, 4mm and 2mm Wisbech and Upwell coaches. 7mm and 2mm printed in Shapeways PA12, 4mm printed in PA12 Black material. As can be seen detail is affected by the material in the smaller scales. Also note that the finer details such as the end railing need to be thickened up in the smaller scale to enable it to be printed.
7mm, 4mm and 2mm Wisbech and Upwell coaches by simon br blue, on Flickr
7mm Wisbech and Upwell bogie coach veranda printed in PA12 showing the railings
7mm Wisbech and Upwell bogie coach veranda by simon br blue, on Flickr
4mm Wisbech and Upwell coach veranda printed in PA12 Black showing the railings - this was an early PA 12 black model and some of the initial models had these small holes or gaps in the material.
4mm Wisbech and Upwell coach veranda by simon br blue, on Flickr
2mm Wisbech and Upwell coach veranda printed in PA12 Black showing the railings, noticeable how thick the railings are - a reason why I haven't as yet made this available in 2mm.
2mm Wisbech and Upwell coach veranda by simon br blue, on Flickr
4mm Wisbech and Upwell bogie coach veranda printed in Shapeways HDA Black resin (no longer available from Shapeways) showing the railings
4mm Wisbech and Upwell bogie coach veranda by simon br blue, on Flickr
4mm GER luggage van printed in Polished White Natural Versatile Plastic.
4mm GER luggage van by simon br blue, on Flickr
Bogie coach printed in Shapeways HDA Black resin (no longer available from shapeways), short coach printed in PA12 Black and GER luggage van printed in Polished White Natural Versatile Plastic
4mm Wisbech and Upwell coaching stock by simon br blue, on Flickr
Finally for this update, 7mm Wisbech and Upwell van no.16 printed in 2 parts (body and chassis) on my Balco printer.
7mm Wisbech and Upwell van no.16 by simon br blue, on Flickr
Hope this helps.
-
3
-
 2
2
-
-
Hi,
Just a quick question about the UKF wagon - what colour brown was the lower bodyside?
-
I realize you are disappointed with the model, I think the current price is £38 for the model but would I pay that for a similar print in PA12, yes I would and I currently have some 4mm models on order with Shapeways but I realize that PA12 that is a compromise between design limitations, surface finish and minimum thicknesses. Hopefully 3D printing will continue to improve where prints like the HDA model in my last post can be produced without the need for support like the current SLA models, without support residue marks like the Fine Detail Plastic on Shapeways and without the layering or lower resolution seen on FDM printer.
-
4 hours ago, Edwardian said:
It's a nice model, badly let down by the material. It's certainly worth tweaking to bring it in line with the prototype, if you are interested.
Then, perhaps, you might consider selling the right to print, because a much better print could no doubt be obtained on a home Photon or via a hub?
When out of lock-down, the factory that does the Rails SE&CR van offers an SLA service; it would be very interesting to know the cost of printing this coach would be.
They could print them for you for sale. Yes, you have to do post and packaging, but I would suggest a better quality than Shapeways and at less cost.
Hi, like most people on here I don't sell or give away my stl files. I have a Form 2 SLA printer but it would struggle to print the coach and to remove the support material easily. I models in this thread are made for myself as a hobby, I make them available for others if requested.
A more modern item of stock that i was able to take plenty of reference photos of is a 156 DMU. I wasn't able to find any detailed drawings but using the drawings and some side and front on photos I've made some drawings although there are some more detail to finish like the interior and sorting out a way of making the window frames - I'm thinking possibly laser cut frames or an etch. I did test print of the basic shell printed in 2 parts with the main body and a cab end with gangway printed as one part. I then printed a test of the snowplow and coupling on the Form 2 and a bogie on my Balco printer. I think the best way to print this would be as a one piece shell on Shapeways with separate details bogies and under frame.
156 cab render by simon br blue, on Flickr
156 bogie render by simon br blue, on Flickr
156 Underframe render by simon br blue, on Flickr
7mm 156 DMU test print by simon br blue, on Flickr
7mm 156 DMU test print by simon br blue, on Flickr
-
3
-
-
Hi,
Thanks for the comments, always good to get feedback.
just to reply to the comments above-
These models were originally resigned for the Shapeways black resin which they stopped using a couple of years ago. I only made the models available recently as the cost for PA12 was significantly reduced recently meaning that some may want to order one. Shapeways SLA resin material would cost about £75 and the Fine Detail plastic (previously FUD) would cost over £60, I can make these available if anyone wants them but would have to check if they meet the design guidelines. Below is a text print that was printed by Shapeways in their HDA resin before they pulled the material.
Now that they have been pointed out I can see the issues with the bodyside and think some of these carry over from elements copied from previous Wisbech and Upwell coaches and looking at some other vintage coaches and as mentioned I could't find a photo of the non break end with the door. I think the chassis issue was because I struggled to find decent photos and used the photos available of the brake on the Mid Suffolk Railway which doesn't have the original underframe.
All the models available on Shapeways can be viewed in their 3D viewer which may show up any detail issues on other models and as mentioned most details can be easily modified when noticed.
-
 1
1
-
-
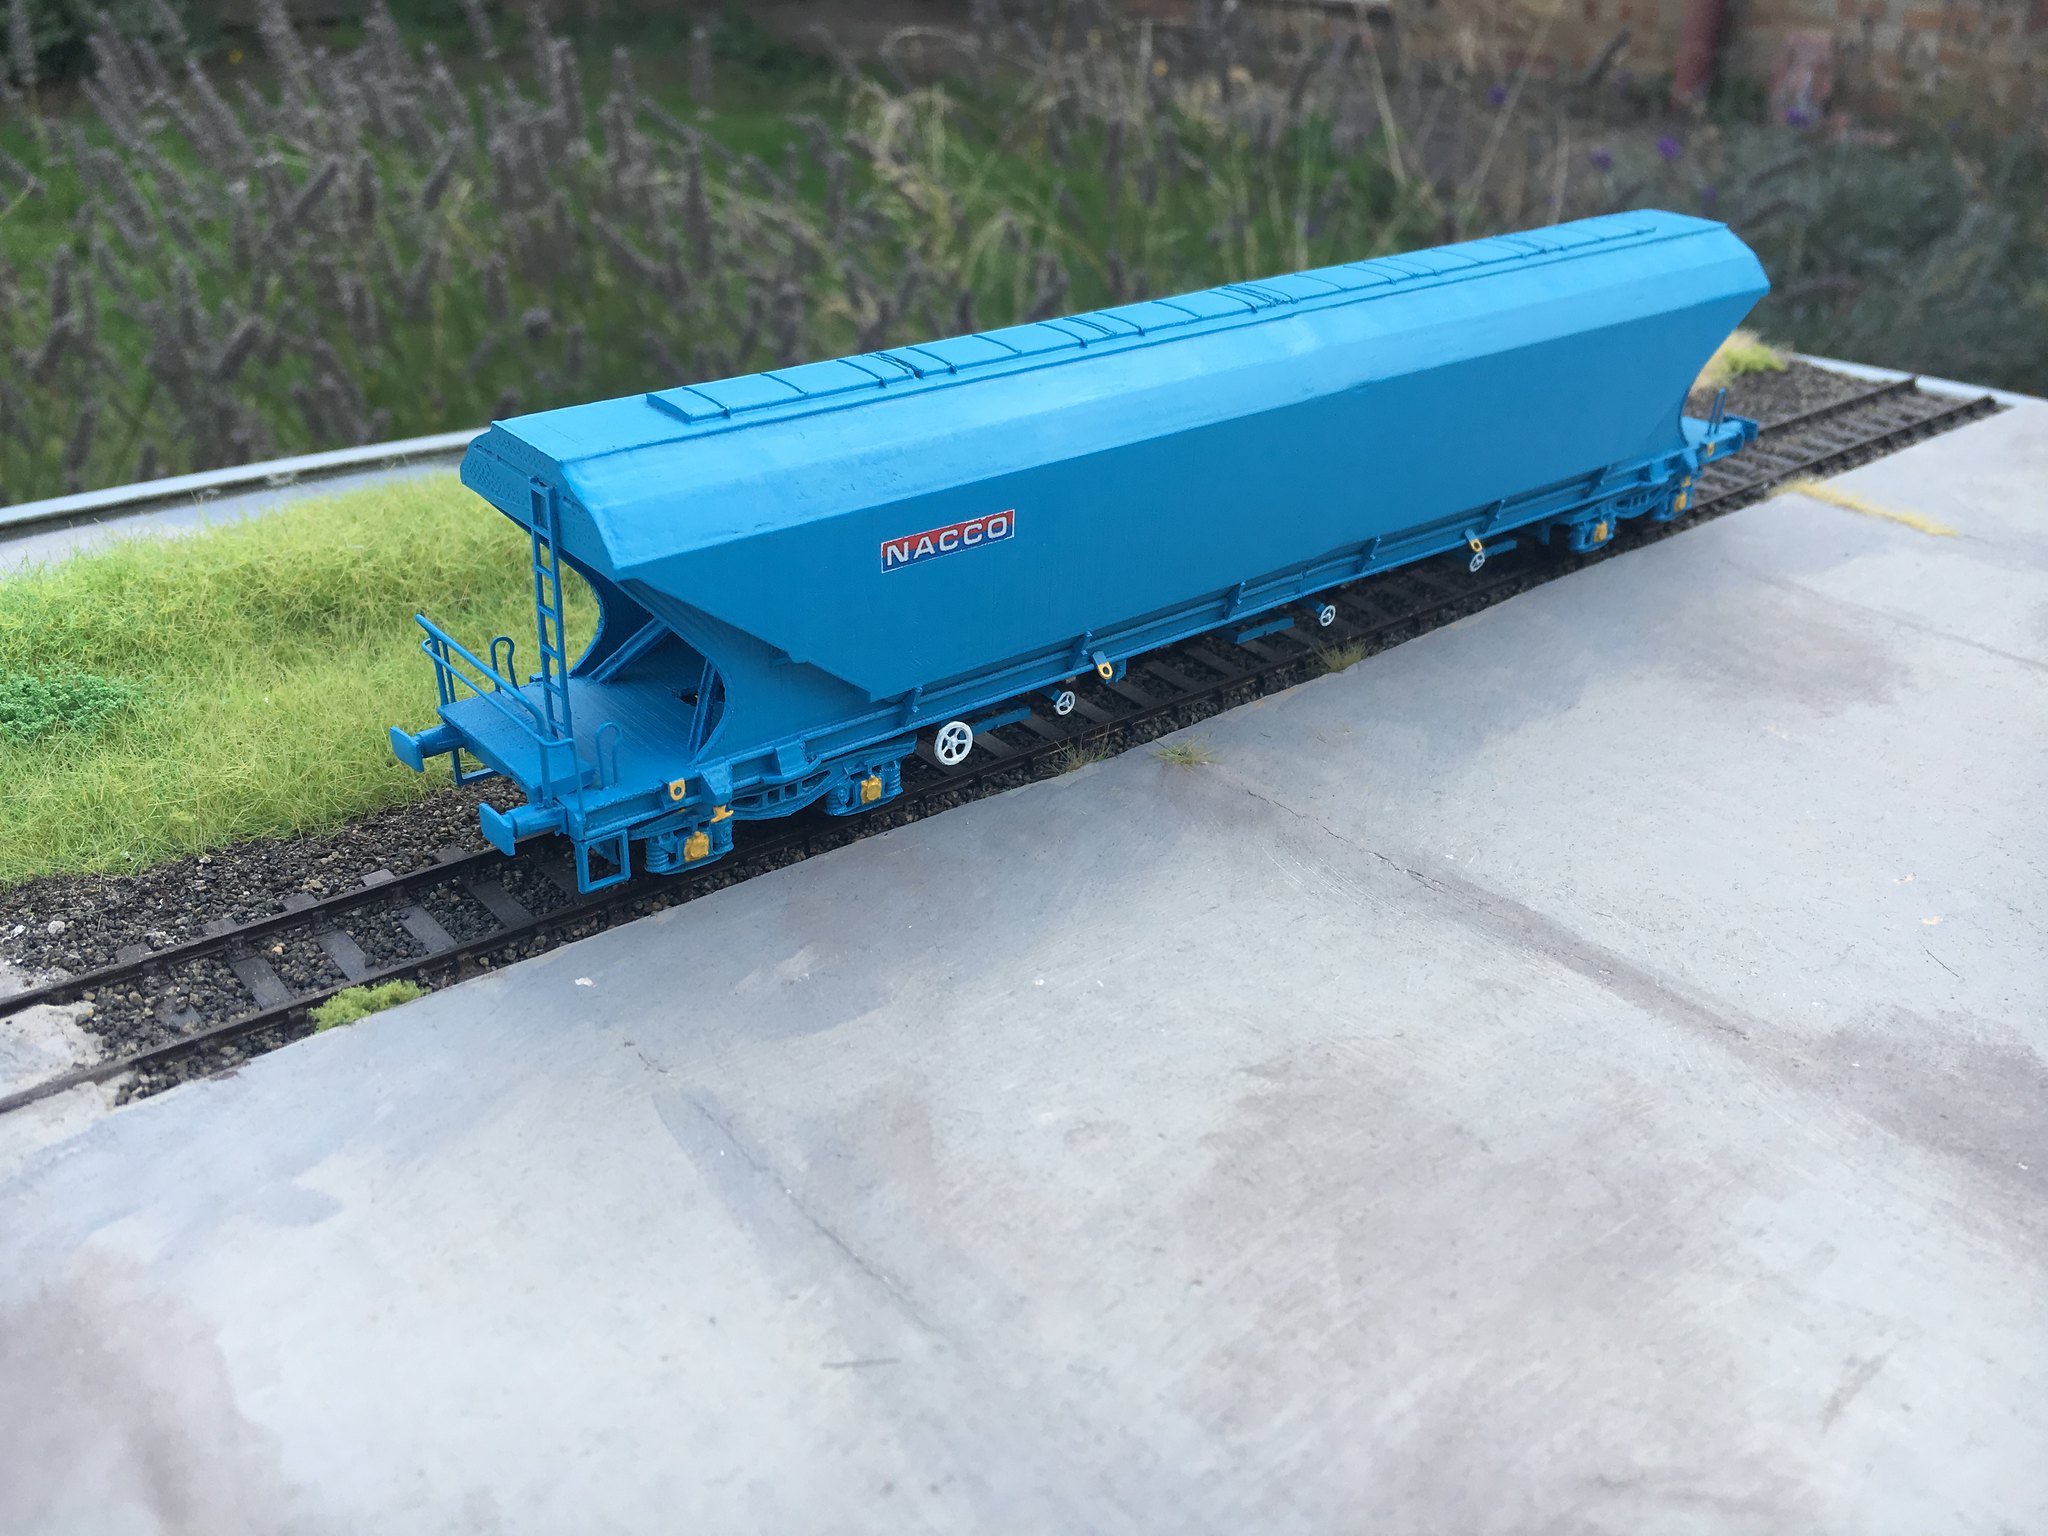
A couple of pictures of two 4mm Slab sided Polybulks I've been working on , one in the original livery and the second in the later Nacco blue livery, both use the Railtec 4mm decals with the Nacco version using the alternate numbers supplied with the main Polybulk pack.
4mm Polybulk by simon br blue, on Flickr
4mm Nacco Polybulk by simon br blue, on Flickr
-
3
-
5
-
 1
1
-
-
Another update,
Been doing some transfer application recently in 4mm and 7mm.
First was the 7mm TTA Caustic soda tank with transfers from Precision Labels. This is the first of the TTA that I made and is painted in a darker colour to the most recent wagon.
TTA Caustic soda tank by simon br blue, on Flickr
TTA Caustic soda tank by simon br blue, on Flickr
The next wagon is one of the 4mm Grainflow wagons, this wagon has the Fox transfers Grainflow decals although I've not finished all the smaller elements but took a couple of photos when I'd finished the other wagons.
4mm Grainflow wagon by simon br blue, on Flickr
4mm Grainflow wagon by simon br blue, on Flickr
The next two wagons are both 4mm Slab sided Polybulks, one in the original livery and the second in the later Nacco blue livery, both use the Railtec 4mm decals with the Nacco version using the alternate numbers supplied with the Polybulk pack.
4mm Polybulk wagon by simon br blue, on Flickr
4mm Nacco Polybulk by simon br blue, on Flickr
-
1
-
2
-
-
Just a quick update to mention that with the recent Shapeways price reduction on their PA12 material it has made a number of the 4mm models worth making available for sale including some of the Wisbech and Upwell items and a couple of vehicles.
Link below to the shop.
https://www.shapeways.com/shops/brbluemodels
A model that I've been working on recently is the 1/32 class 25 with most progress posted on the 1:32 section of the Western Thunder forum.
1:32 Class 25/1 bodyshell Printed by Shapeways in WSF, Primed with Halfords primer/filler and then a second coat of grey primer after a quick sand.
1:32 Class 25/1 bodyshell by simon br blue, on Flickr
25/1 radiator end roof detail with WSF roof grill and cab join made from tape and water slide rivets.
1:32 class 25/1 roof deatils by simon br blue, on Flickr
25/1 Air braked version with outwards hinge grills and additional access hatch fitted with water slide rivets.
1:32 class 25/1 grills by simon br blue, on Flickr
1:32 buffer for class 25, printed on Form 2 with homemade piano wire springs and brass shaft.
1:32 OLEO class 25 buffer by simon br blue, on Flickr
Class 25/1 cab interior with PLA bulkhead and control desks, Form 2 resin controls, fire extinguisher and handbrake wheel.
1:32 class 25/1 cab interior by simon br blue, on Flickr
Pre shading of grills and panel lines on 25/1 with a mixture of model air colours.
25/1 pre shading of grills by simon br blue, on Flickr
Progress with the Class 25/1 with bufferbeam added.
1:32 Class 25/1 by simon br blue, on Flickr
Progress with the Class 25/1 with bufferbeam added. Multi working sockets printed on Form 2 with elastic cables. WSF vac and steam pipes. Air pipe fitting printed on Form 2 with elastic hoses. Coupling from Dingler
1:32 Class 25/1 by simon br blue, on Flickr
-
4
-
9
-
-
Time for another update,
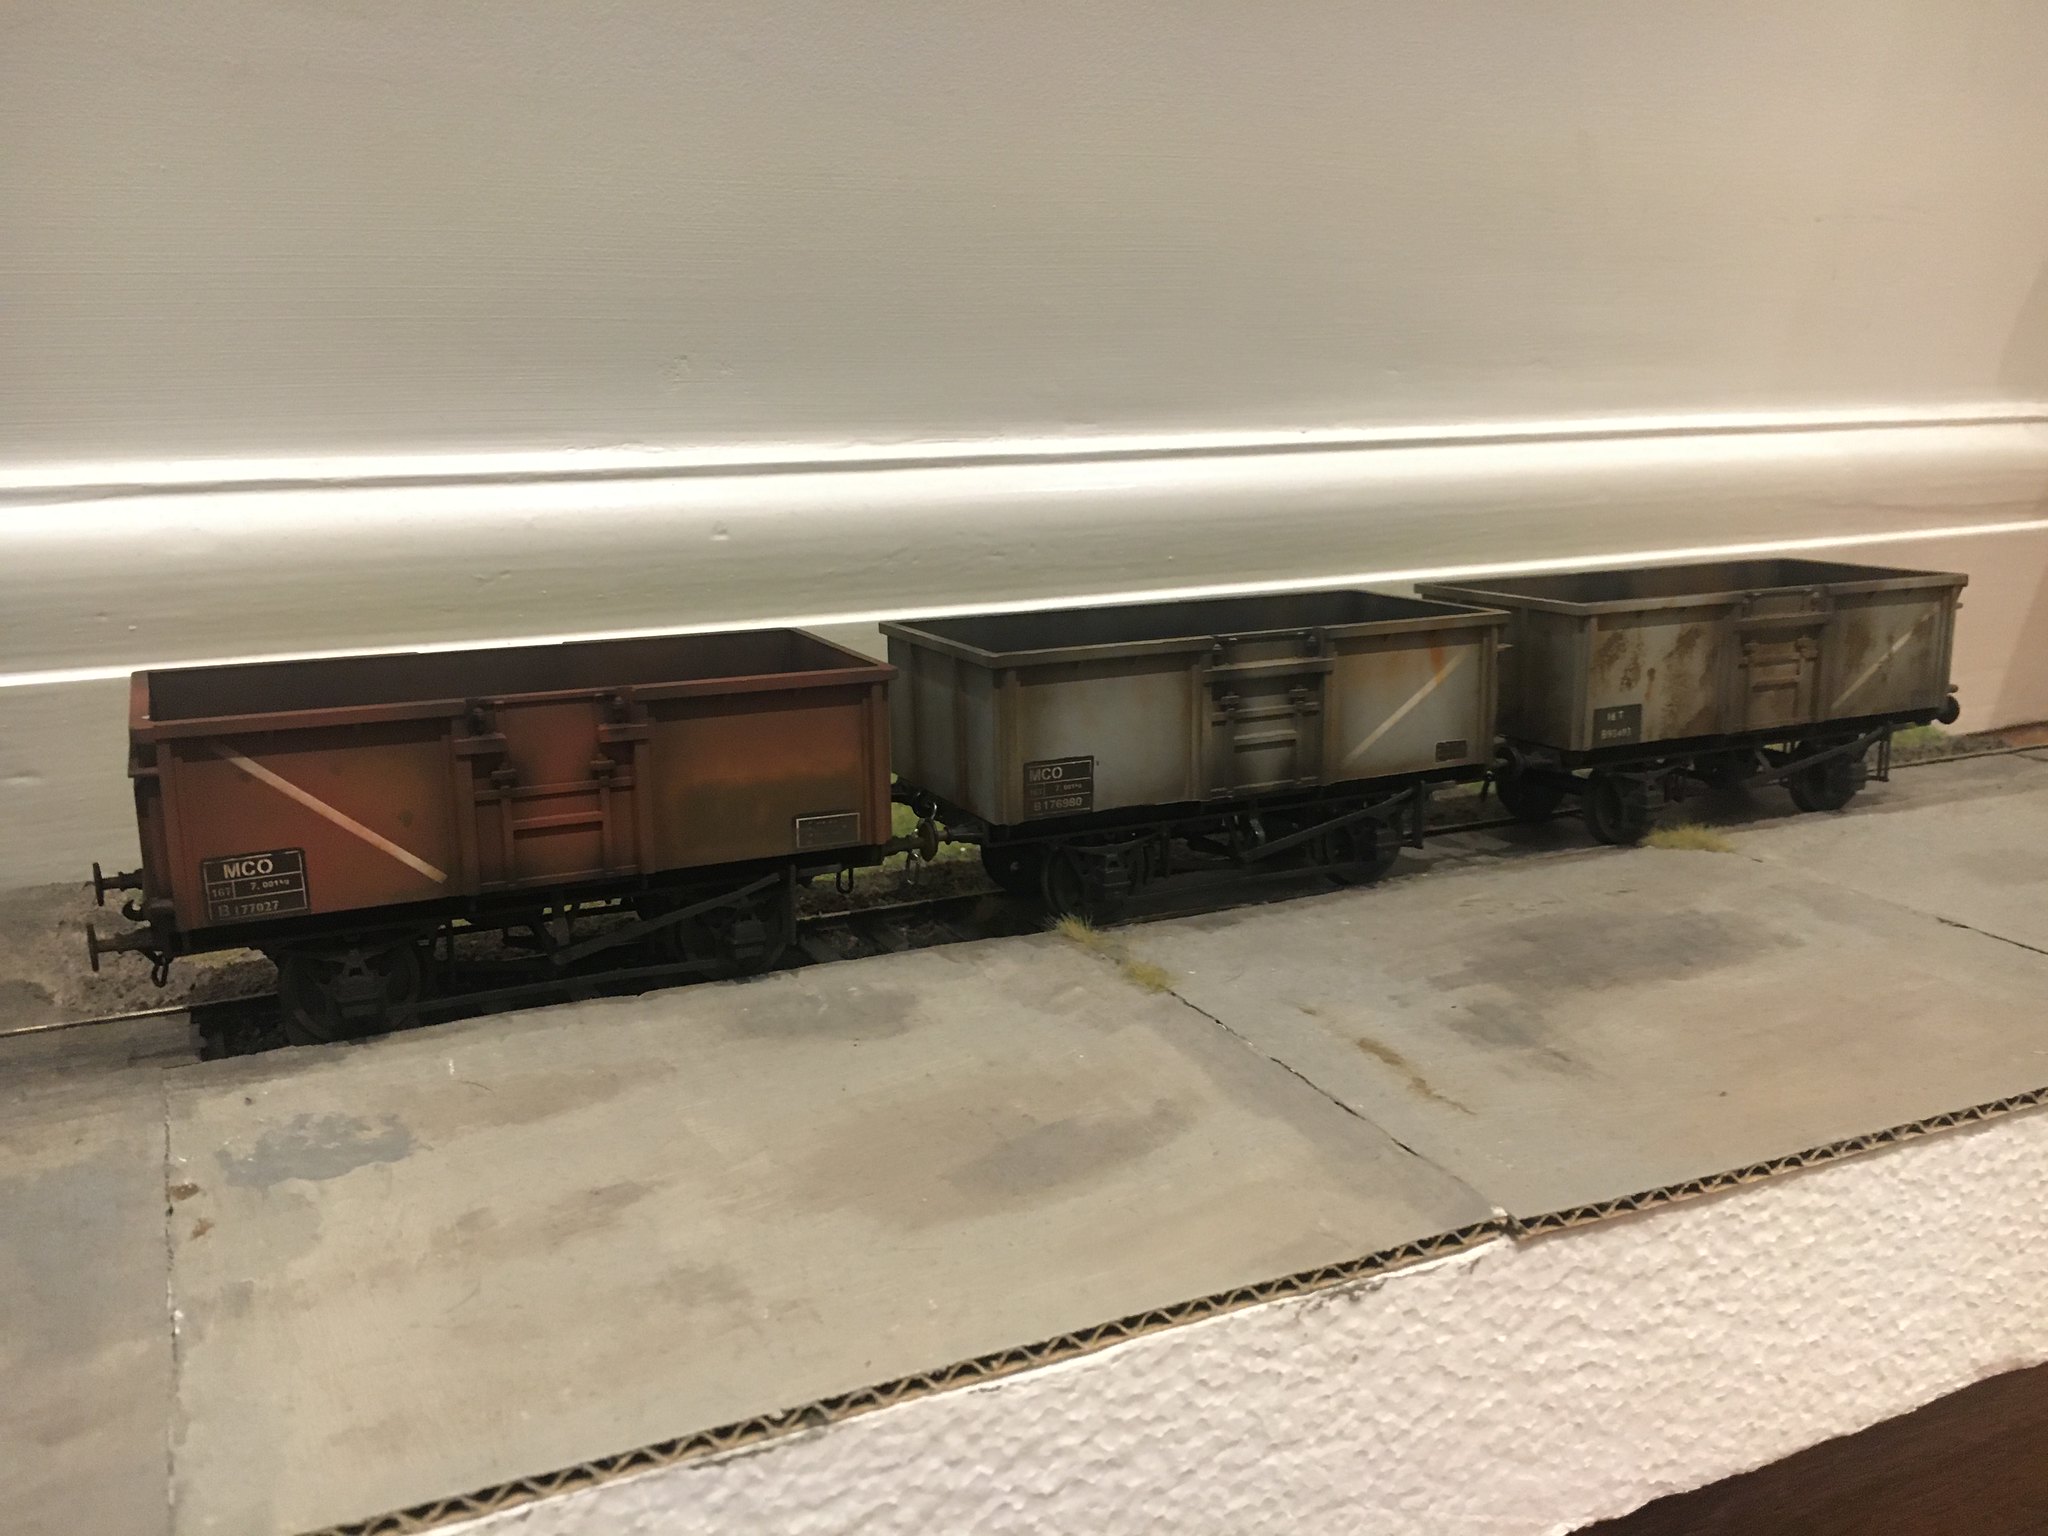
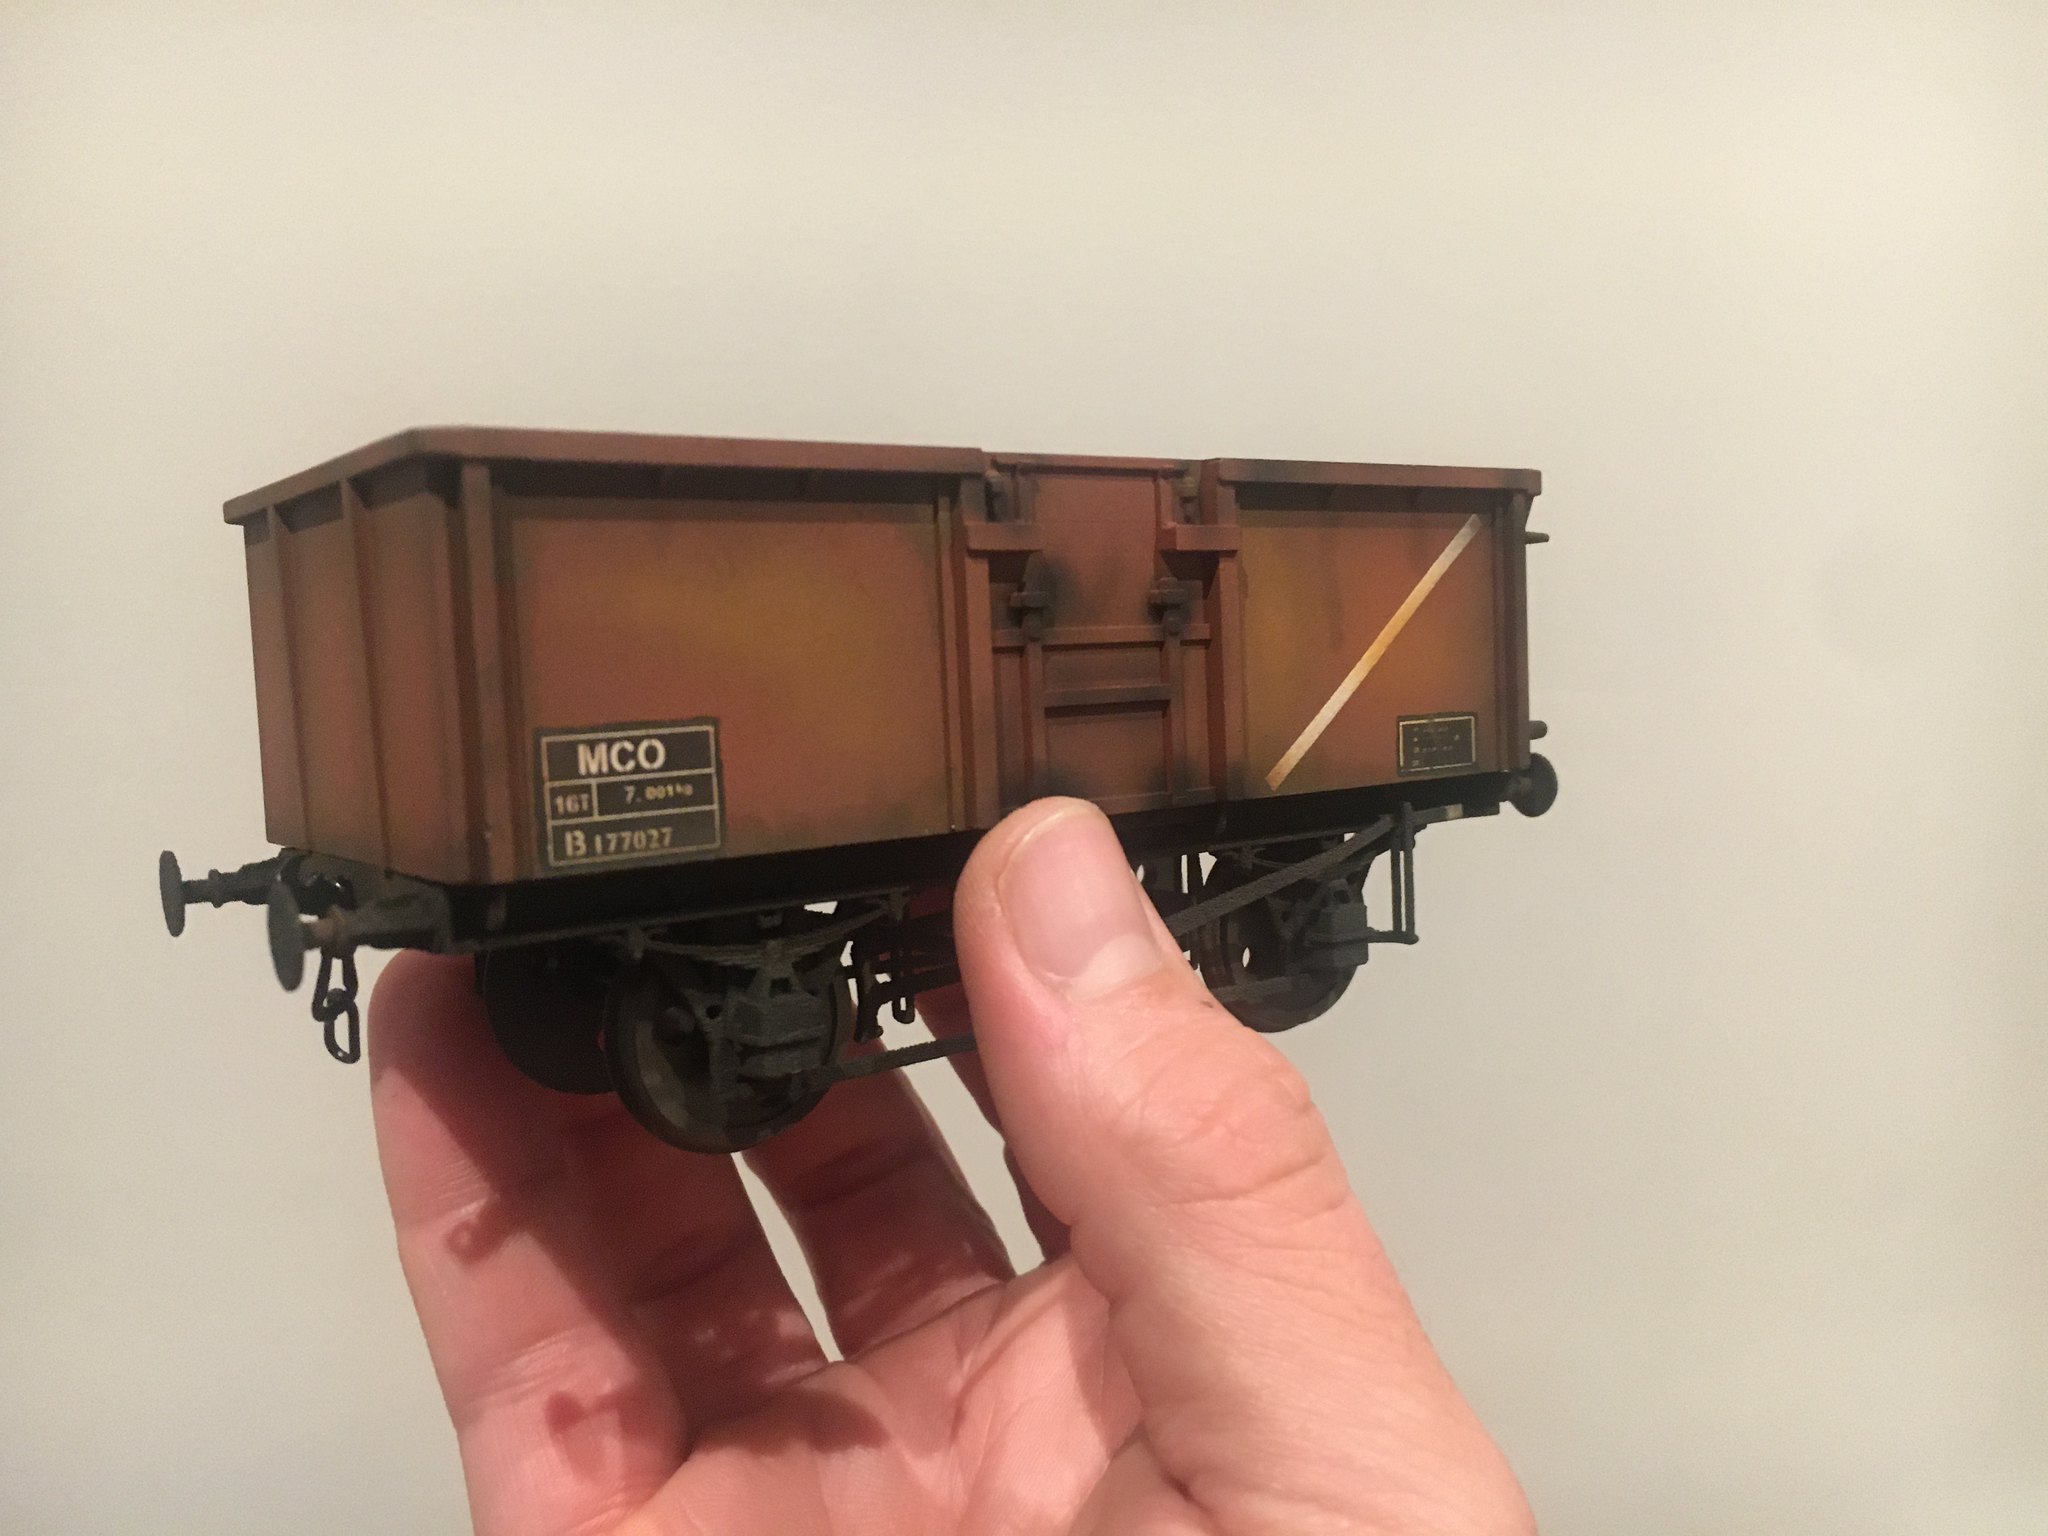
Firstly some wagon progress, the 7mm Redland PGA hopper now has most of the transfers applied, Fox transfers for most of the details with homemade Redland decals. Additional underframe details added after looking at the Cavalex models version.
7mm Redland PGA by simon br blue, on Flickr
7mm Redland PGA by simon br blue, on Flickr
Next up a 7mm Polybulk in the original POLYBULK livery, this is the Shapeways version printed in versatile plastic with plasticard sides added. The transfers are mostly Railtec (using the E442 pack) with the rest homemade.
7mm Polybulk by simon br blue, on Flickr
7mm Polybulk by simon br blue, on Flickr
Next wagon is an Albright and Wilson TUB Phosphoric Acid tank. This was printed several years ago but only put together near the end of last year. just requiring transfers which is the holdup now as I don't have a way of printing the white lettering.
7mm TUB Phosphoric acid tank by simon br blue, on Flickr
7mm TUB Phosphoric acid tank by simon br blue, on Flickr
7mm TUB Phosphoric acid tank by simon br blue, on Flickr
Another tank wagon nearly finished is a TTA ICI Caustic Soda tank. This is a updated model from the original Soda tank with a simplified chassis with separate underframe fittings to reduce the cost when printing through Shapeways. This tank also requires transfers and then some weathering as the colour looks too bright.
7mm Caustic Soda tank by simon br blue, on Flickr
7mm Caustic Soda tank by simon br blue, on Flickr
7mm Caustic Soda tank by simon br blue, on Flickr
-
3
-
-
Hi Stewart,
The Wisbech & Upwell project stalled when Shapeways withdrew the material the models were designed to be printed in. I will look again to see that can be made available in other materials.
-
I have a Balco printer and recently purchased another in the Black Friday sale. I've used it for a lot of items in 4mm, 7mm and 1/32. they seem to work well and are easy to strip down and fix. The original memory card on mine also failed and only other issues have been worn/ damaged nozzle (when using 3rd party PLA) and heated bed not sticking anymore (replacement pads included with the printer).
The main parts printed have been 4mm and 7mm wagon bodies, there is layering visible and parts need finishing/ filling/sanding before painting. A couple of examples below. Larger parts need to be printed in parts and joined together and there are limitations to what can be printed the same as with other PLA printers.
7mm Polybulk being printed-
 E443 Polybulk test print by simon br blue, on Flickr
7mm Polybulk finished.
 E443 Polybulk wagon 7mm by simon br blue, on Flickr
4mm Polybulk painted.
 4mm Slab sided Polybulk by simon br blue, on Flickr
4mm Polybulk before painting.
 Grainflow wagon 4mm by simon br blue, on Flickr
4mm, 7mm and 1/32 Grinflow polybulk wagons all bodies printed on Balco printer.
 Grainflow Polybulks by simon br blue, on Flickr
A 7mm ICI PAA hopper with PLA printed hopper, before and after painting. The hopper was printed at an angle as can be seen on the as printed hopper.
 7mm PAA urea hopper by simon br blue, on Flickr
 7mm PAA ICI Urea hopper by simon br blue, on Flickr
An example below of a test print of a 7mm GER coach with both the body and chassis printed in PLA, it worked out OK but required a lot of cleaning up where as a Shapeways versatile plastic (WSF) printed chassis would be more suitable.
 7mm GER no.16 van by simon br blue, on Flickr
-
4
-
1
-
3
-
-
On 13/12/2019 at 18:37, rka said:
Will you be making some of your wagons available in 4mm scale?
Hi, yes I can make models available in 4mm, let me know what you're interested in, the only issue is that the models wont work out particularly cheaply as to get reasonable detail the more expensive materials will be required.
Below are a couple of more wagons suitable for Kings lynn, another 7mm Polybulk in the original POLYBULK livery. This is one of the original Shapeways printed models with platicard sides added, I did get a couple of these but with the price increases at Shapeways it made sense to develop the PLA printed version. The transfers are Railtec (E442 Polybulk transfers) for most of the wagon with homemade decals to finish off.
 7mm Polybulk by simon br blue, on Flickr
Next wagon is a 7mm Ferry tank wagon used for chemical traffic to DOW Chemicals a Kings Lynn. This was actually printed a couple of years ago but only finished recently, the chassis and ends were printed by Shapeways in versatile plastic, Shapeways Fine detail tank hatches, PLA printed top cover and plastic pipe for the tank barrel. Finshed with homemade transfers.
 7mm Ferry tank by simon br blue, on Flickr
 7mm Ferry tank by simon br blue, on Flickr
I have also recently been painting a couple more 7mm mineral wagons, 7mm HTV hopper with PLA body and Form 2 black resin test chassis (ZDV) and shapeways chassis (HTV's), homemade transfers, weathered with MIG and model air acrylics, the only parts not fitted yet are the handrails. The ZDV was weathered using MIG and model air acrylics and MIG streaking rust affect.
 7mm HTV hoppers by simon br blue, on Flickr
 7mm hopper by simon br blue, on Flickr
The 7mm 16t mineral wagons are Lima body with Shapeways chassis, various weathering effects used to experiment with finishes, again weathered using MIG and model air acrylics and MIG streaking rust affect
 7mm 16t minerals by simon br blue, on Flickr
 7mm 16t mineral by simon br blue, on Flickr
-
1
-
1
-
-
Yes, that's one of the photos I used as a guide when drawing the conveyor. Paul Bartlett has a photo of the same process taking place at Lynn station and also a nice photo of a similar item North Elmham linked below from the Rail Scotland site-
https://www.railscot.co.uk/img/23/750/
-
A couple of pictures of some 3D printed items I've finished but not posted on here yet.
A 4mm JCB Loadall, Massey shunting tractor and conveyor loading a Polybulk.
 4mm Wagon loading by simon br blue, on Flickr
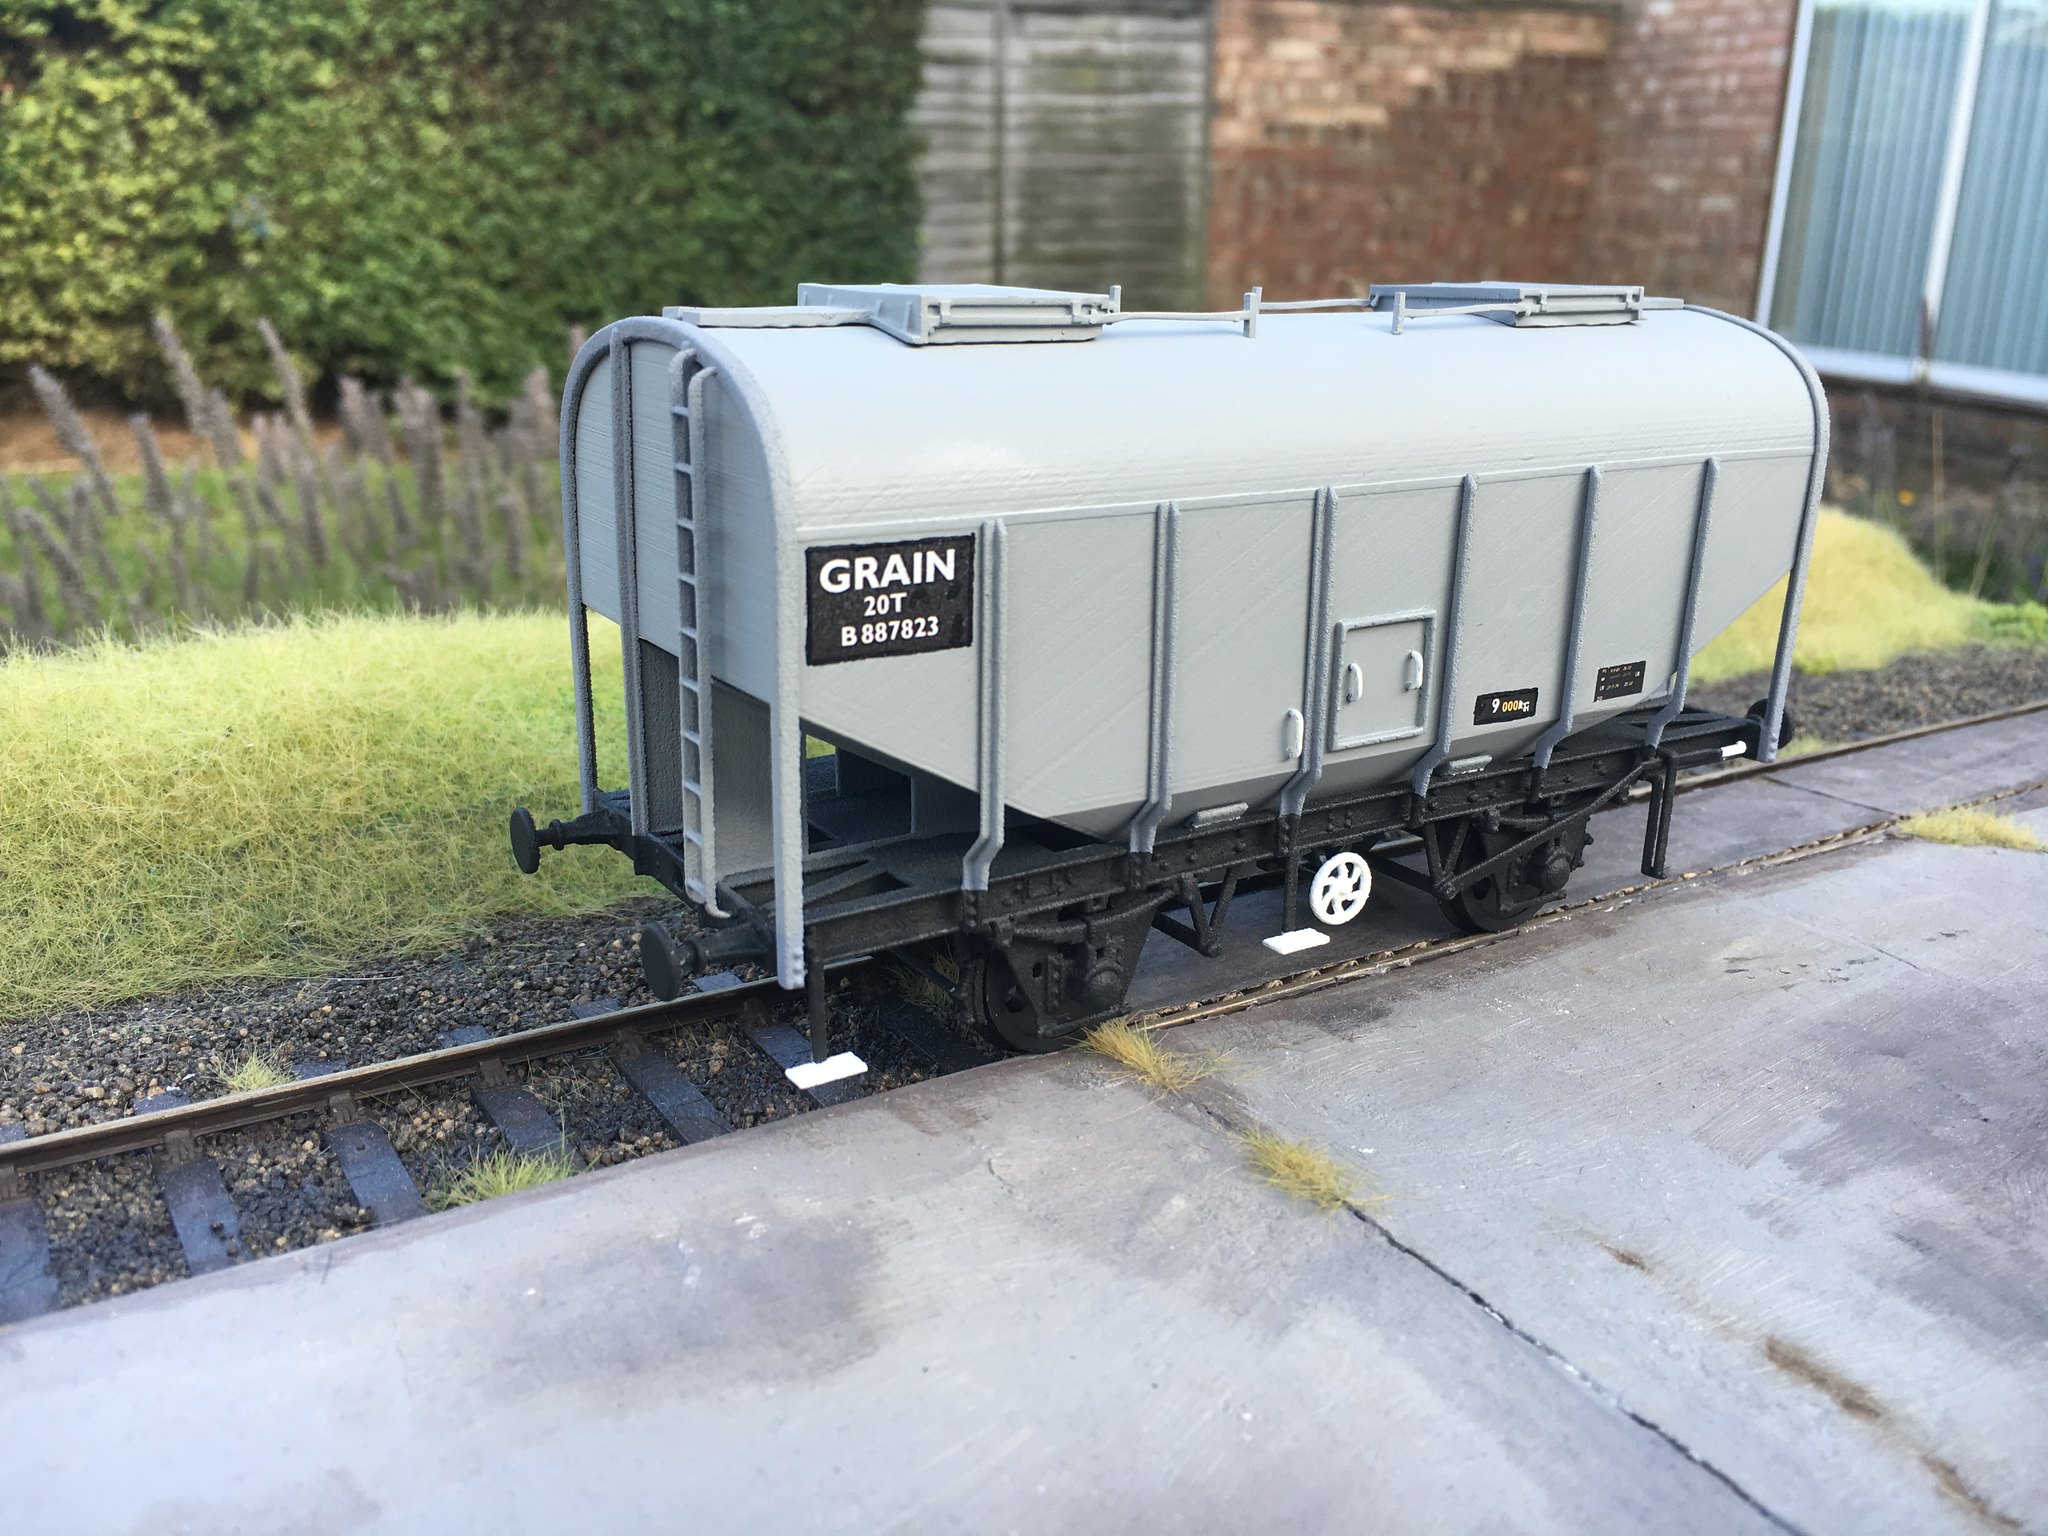
A 7mm Massey shunting tractor and a grain loading elevator printed in versatile plastic loading a 20T grain wagon.
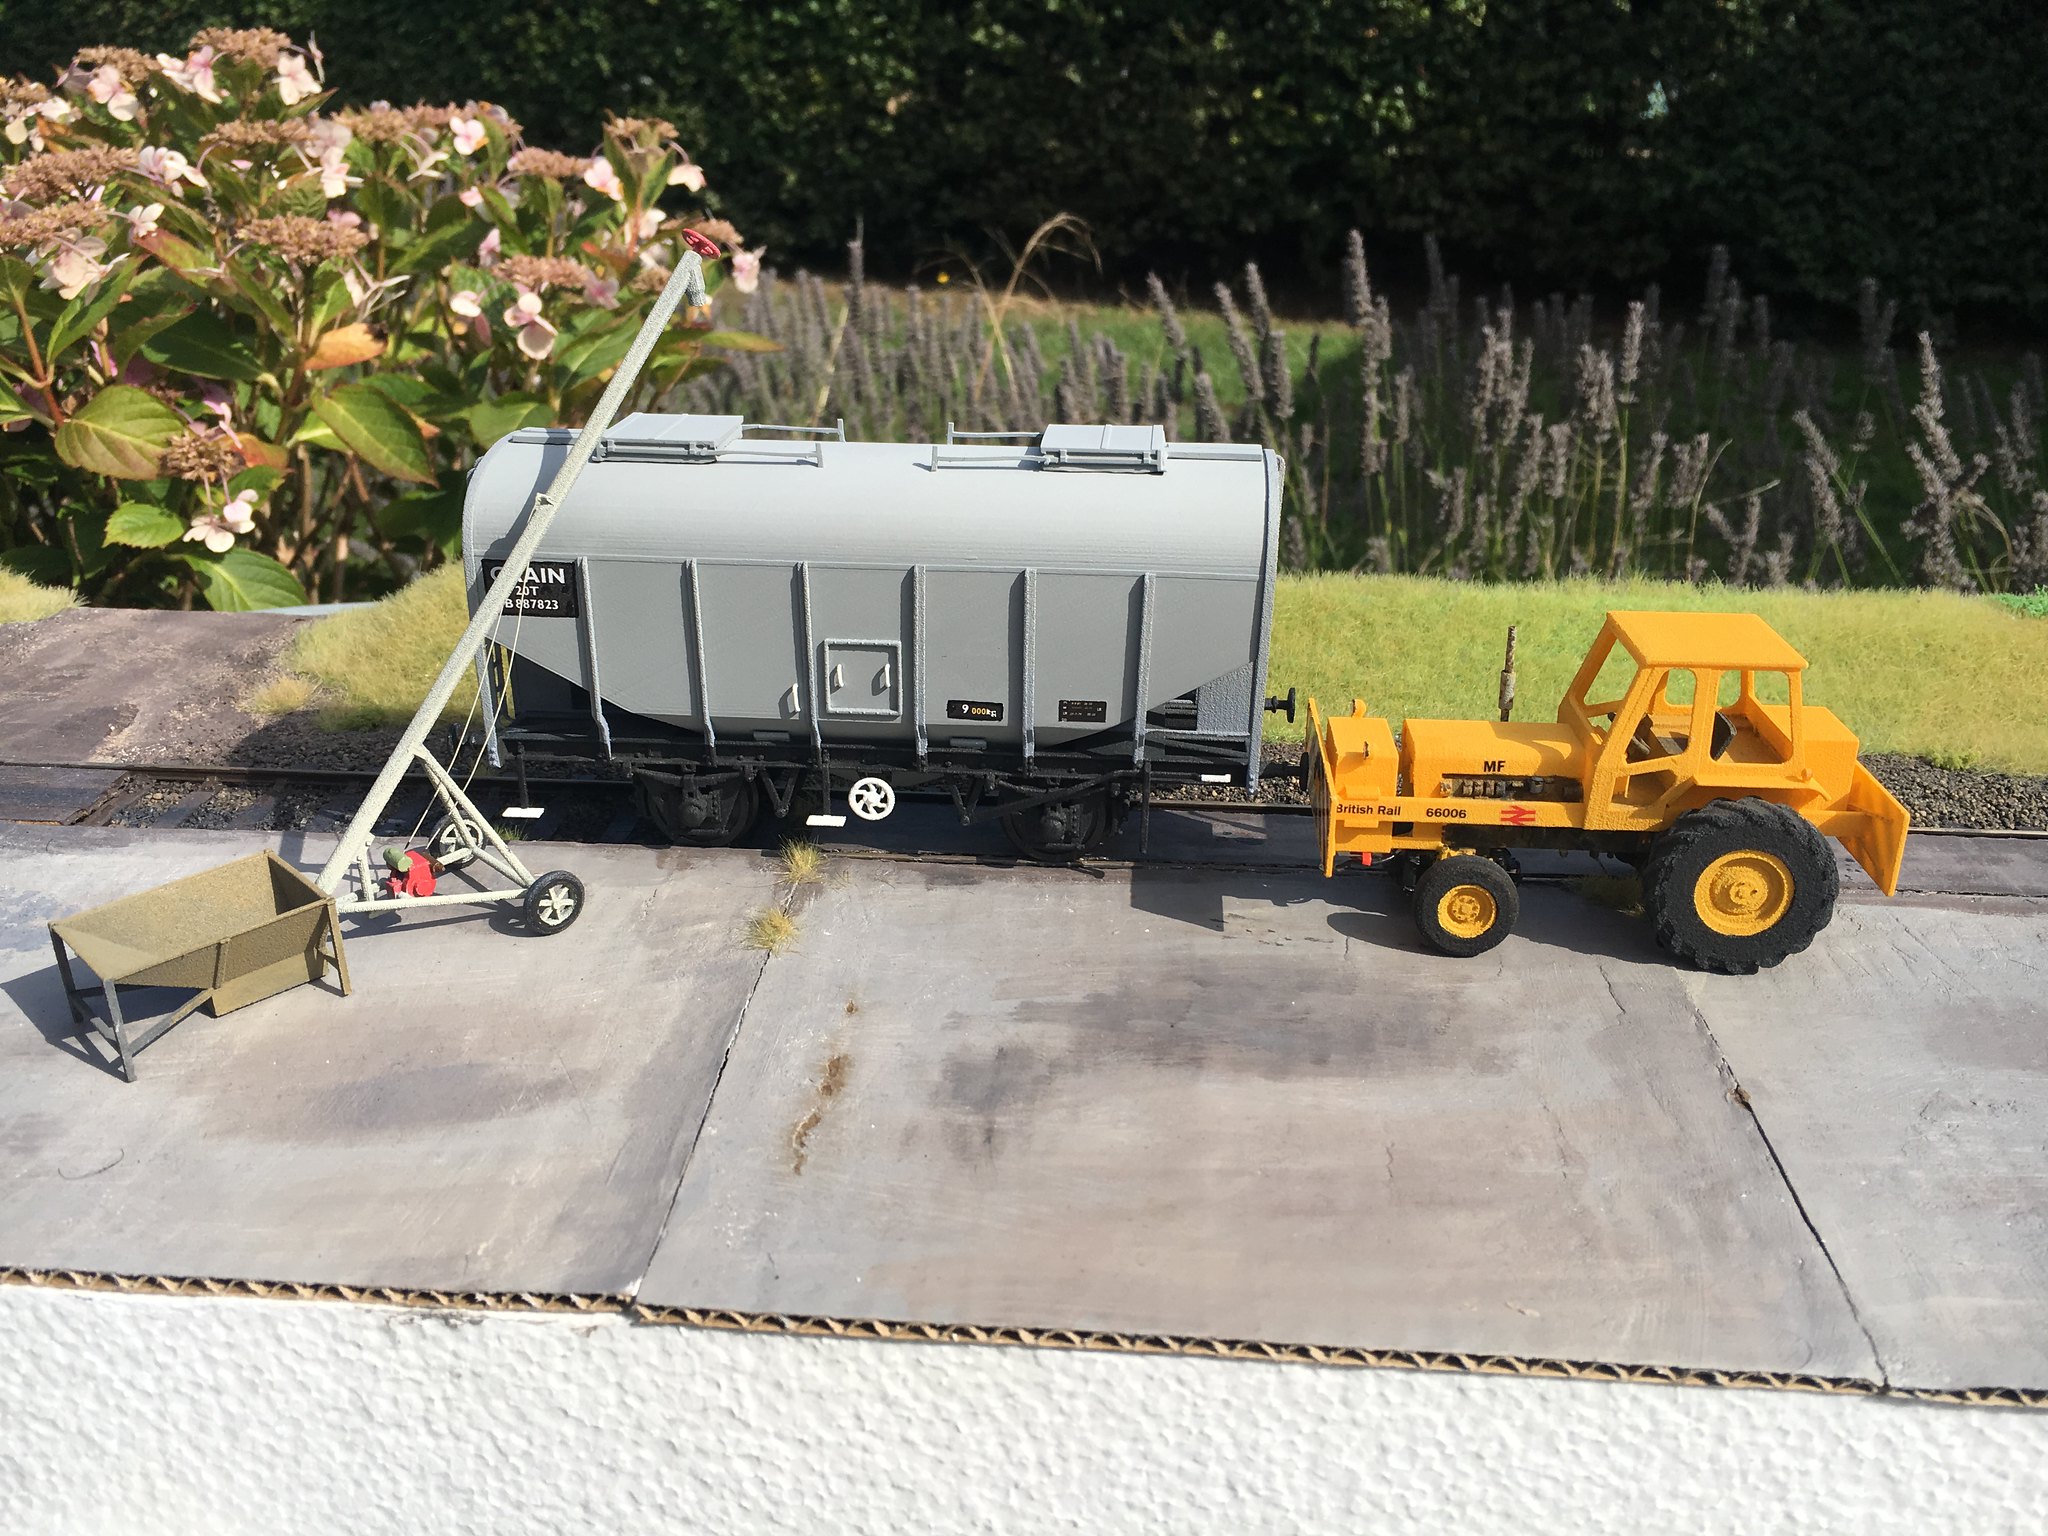 7mm grain loading by simon br blue, on Flickr
A 7mm Produce elevator, one piece printed in versatile plastic.
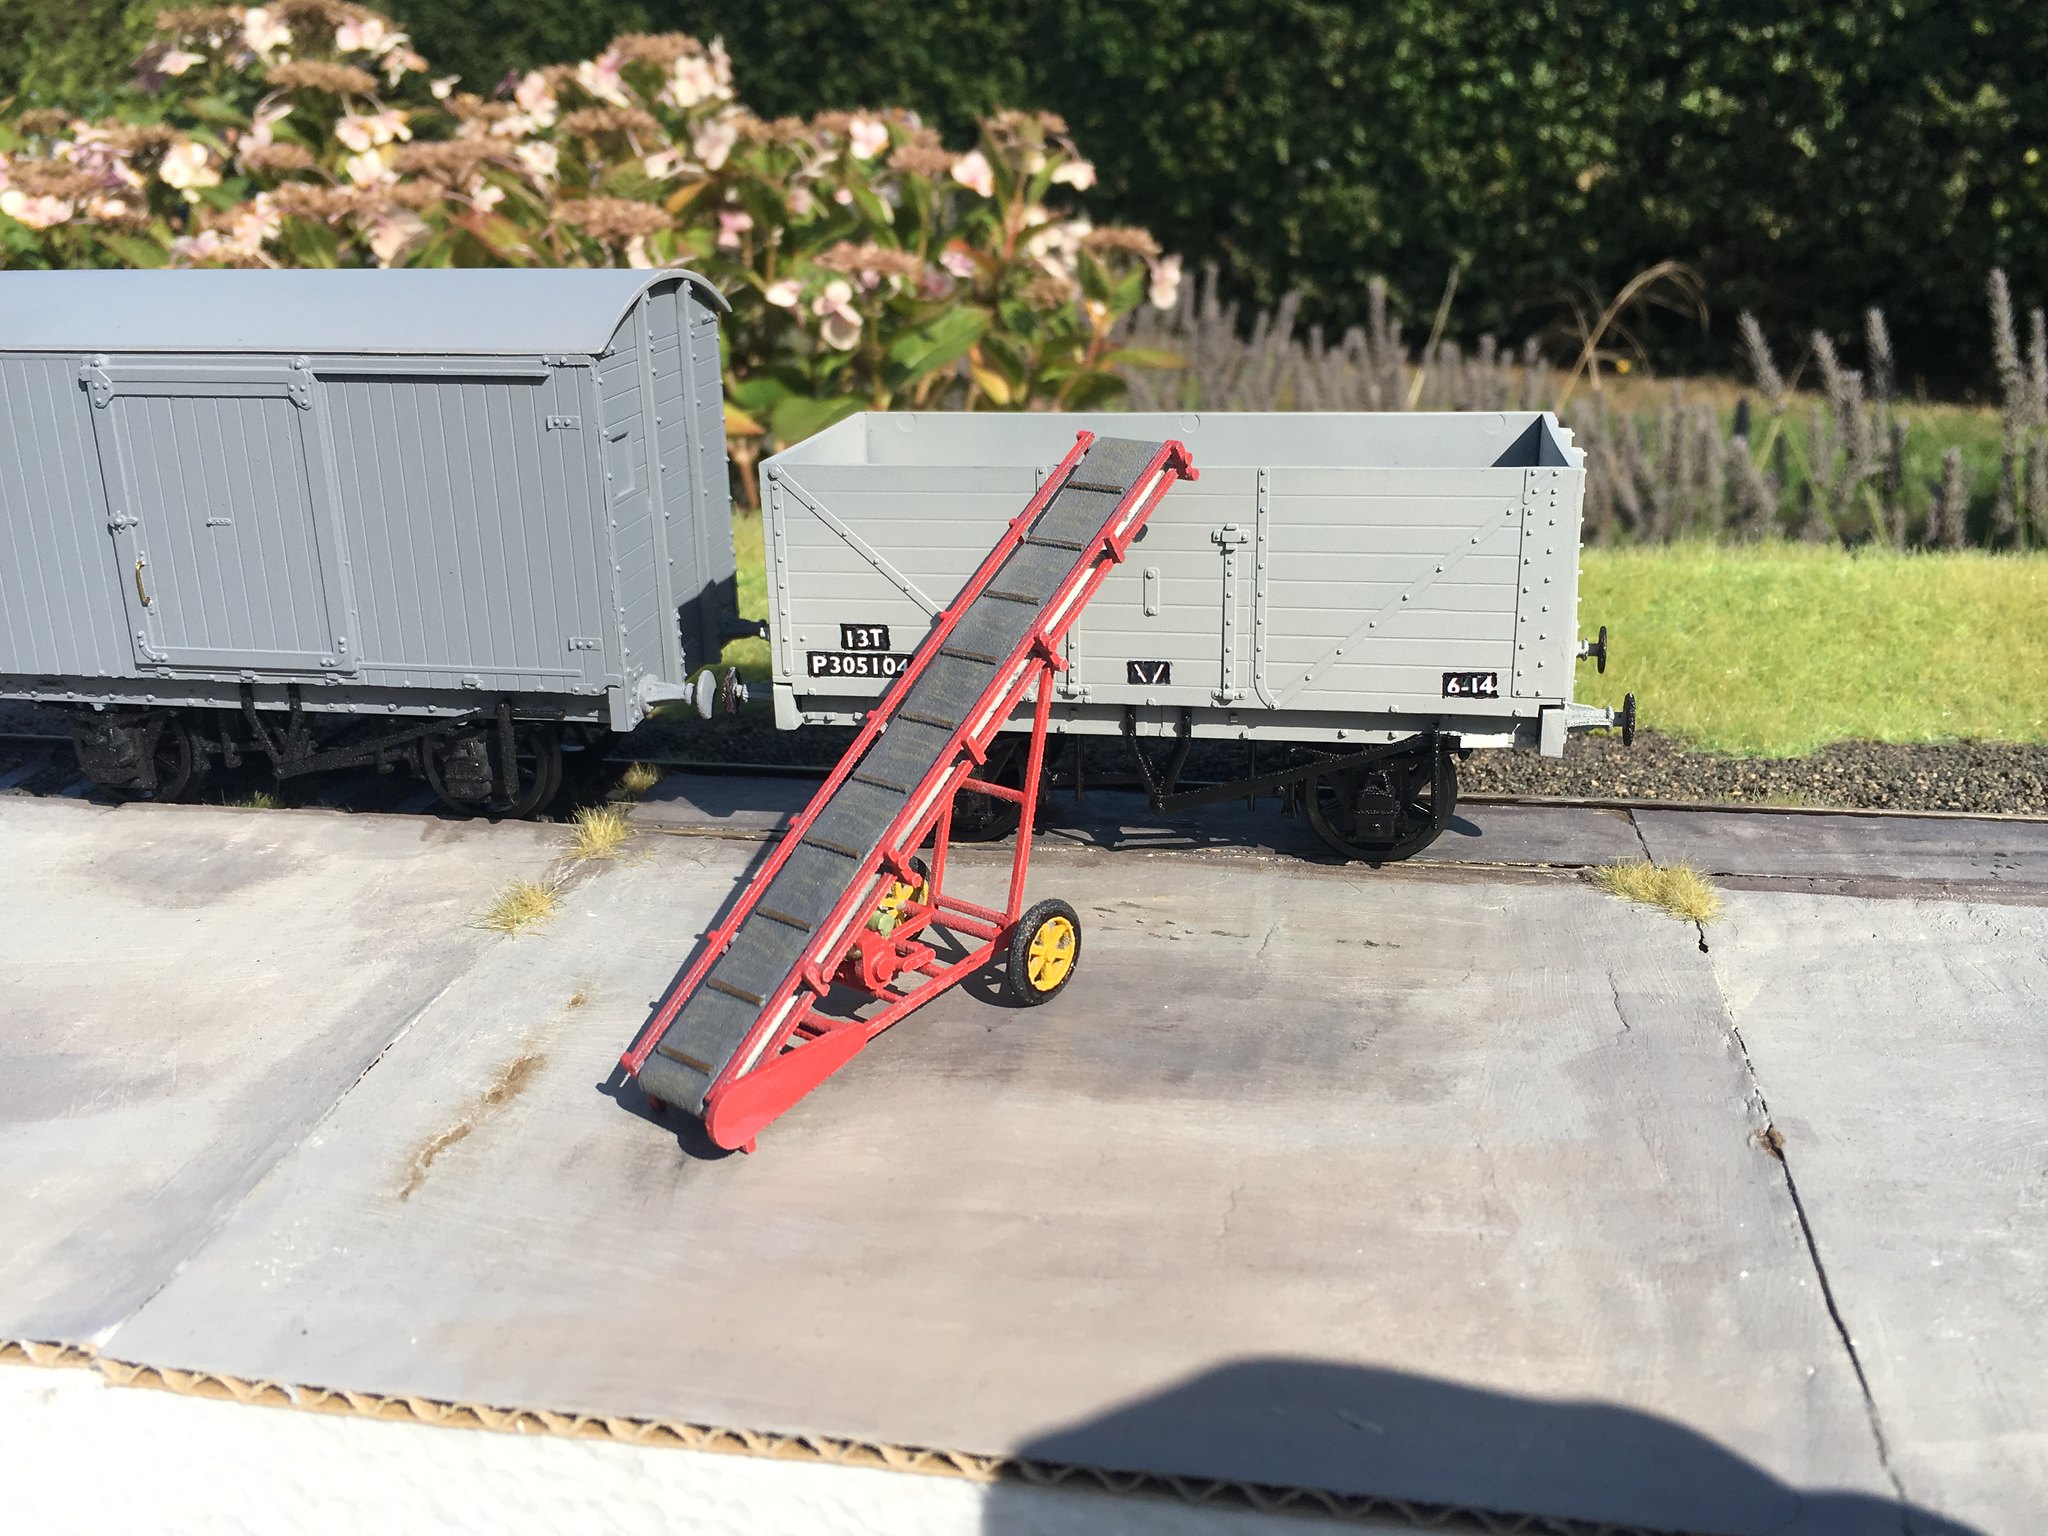 7mm Conveyor by simon br blue, on Flickr
-
3
-
1
-
4
-
-
If anyone’s looking for a printer the Balco printer is currently £150 from £250 in The Aldi Black Friday sale.
-
1
-
-
I’ve not seen any mention of an offer for Black Friday or cyber Monday unless I’ve missed it. Anyone seen any deals about?
-
Cheers Steve, hopefully get some of these at Warley.
Pictures of a couple of more wagons below.
First up is the 7mm PAA ICI Urea hopper with White Natural Versatile Plastic chassis with PLA hopper, Form2 Grey resin hopper top doors and wire pipe runs. I struggled to find a good colour match and ended up mixing up a similar colour.
7mm PAA ICI Urea hopper by simon br blue, on Flickr
 7mm PAA ICI Urea hopper by simon br blue, on Flickr
 7mm PAA ICI Urea hopper roof detail by simon br blue, on Flickr
Next wagon is a 7mm TUA Carless tank wagon, White Natural Versatile Plastic chassis, tank ends, ladders and walkway. 63mm plastic pipe for barrel with masking tape used for tank joins and homemade transfers. This is the shorter tank, I now have a longer wheelbase version to build.
 7mm TUA tank wagon by simon br blue, on Flickr
 7mm TUA tank wagon by simon br blue, on Flickr
 7mm TUA tank wagon top detail by simon br blue, on Flickr
Another new wagon thats nearly finished is a 7mm KFA Warflat wagon fitted with GPS bogies. Body printed in 2 parts in grey PLA printed on Balco printer. GPS bogies and bufferbeam printed in versatile plastic from Shapeways. Air brake fittings and vehicle chocks printed in clear resin on Form 2. Handbrake wheels and securing eyes not fitted yet. Its been identified that the bogies are too narrow and I've now drawn some wider ones.
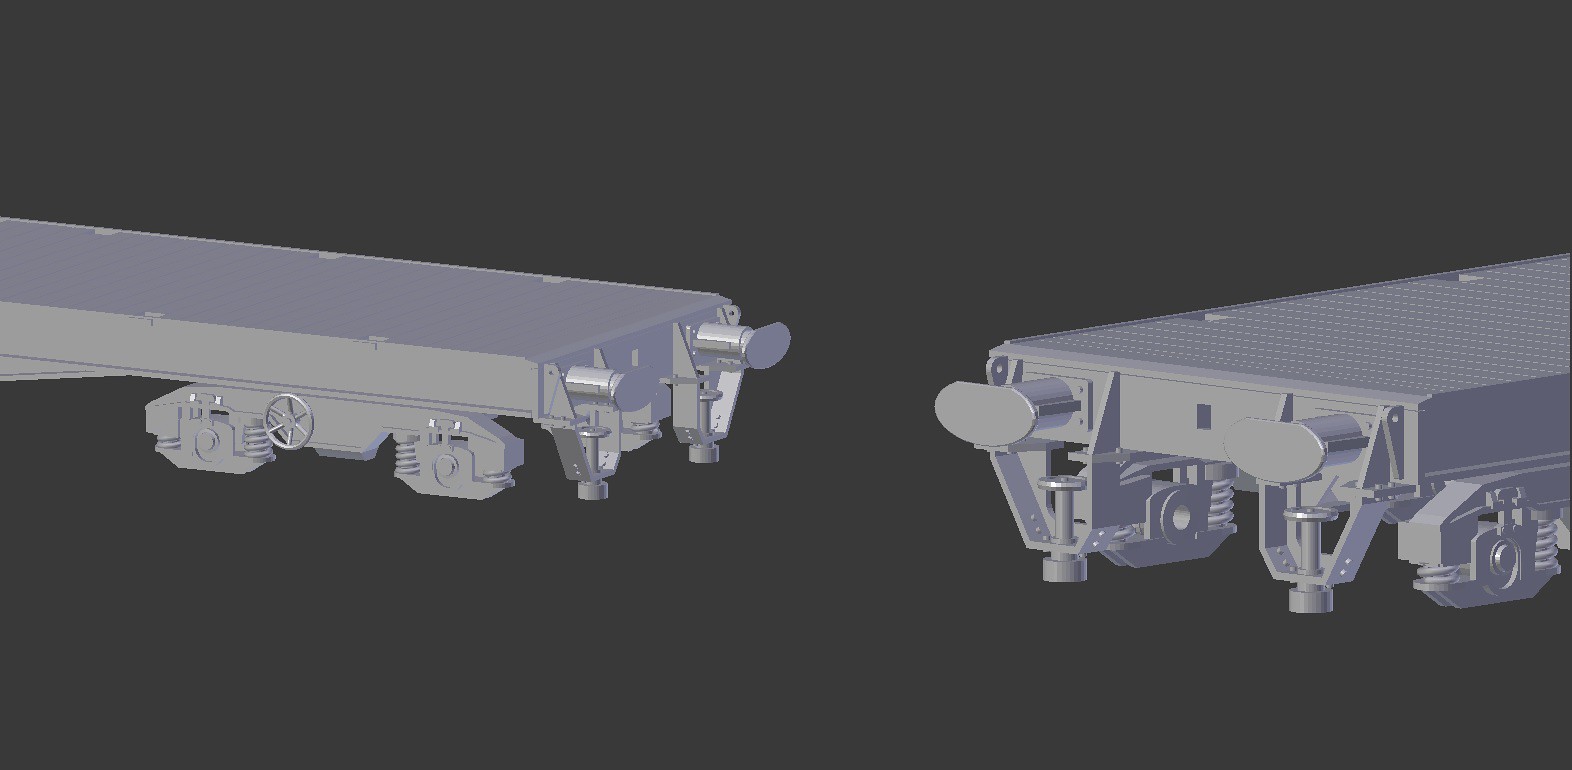 7mm Warflat wagon by simon br blue, on Flickr
 7mm Warflat wagon by simon br blue, on Flickr
 7mm KFA Warflat by simon br blue, on Flickr
 7mm KFA Warflat by simon br blue, on Flickr
 7mm KFA Warflat by simon br blue, on Flickr
-
3
-
-
Steve from Railtec has mentioned producing these previously. Hopefully he can produce these and the Grainflow decals.
-
They look good, what did you use to make the joins in the tank lagging?
-
They are home printed transfers, the only issue I has is as the text on the sides is white I had to match the colour of the hopper body to a colour in ms paint and print them on white transfer paper.
-
Good to see some models being built. Regarding the surface roughness in the Campbell's wagon i Think you've made a great job of smoothing the ends, I did look at making the chassis available in the smoother detail plastic but that would now cost over £80. The CO2 tank looks ready for the paint shop, when I painted mine I painted the white and then the orange band over top. I also did an experiment where I painted the Orange over a grey primer, masked it and then sprayed the white on top, this is easier to mask and gives the orange a darker colour and suits the sun weathered look.
A couple of wagon updates, a couple of hoppers nearly finished, the unbraked grain hopper has had home made transfers added along with the side hatch detail and the upper band which was added using a strip of masking tape.
 7mm 20t Grain hopper by simon br blue, on Flickr
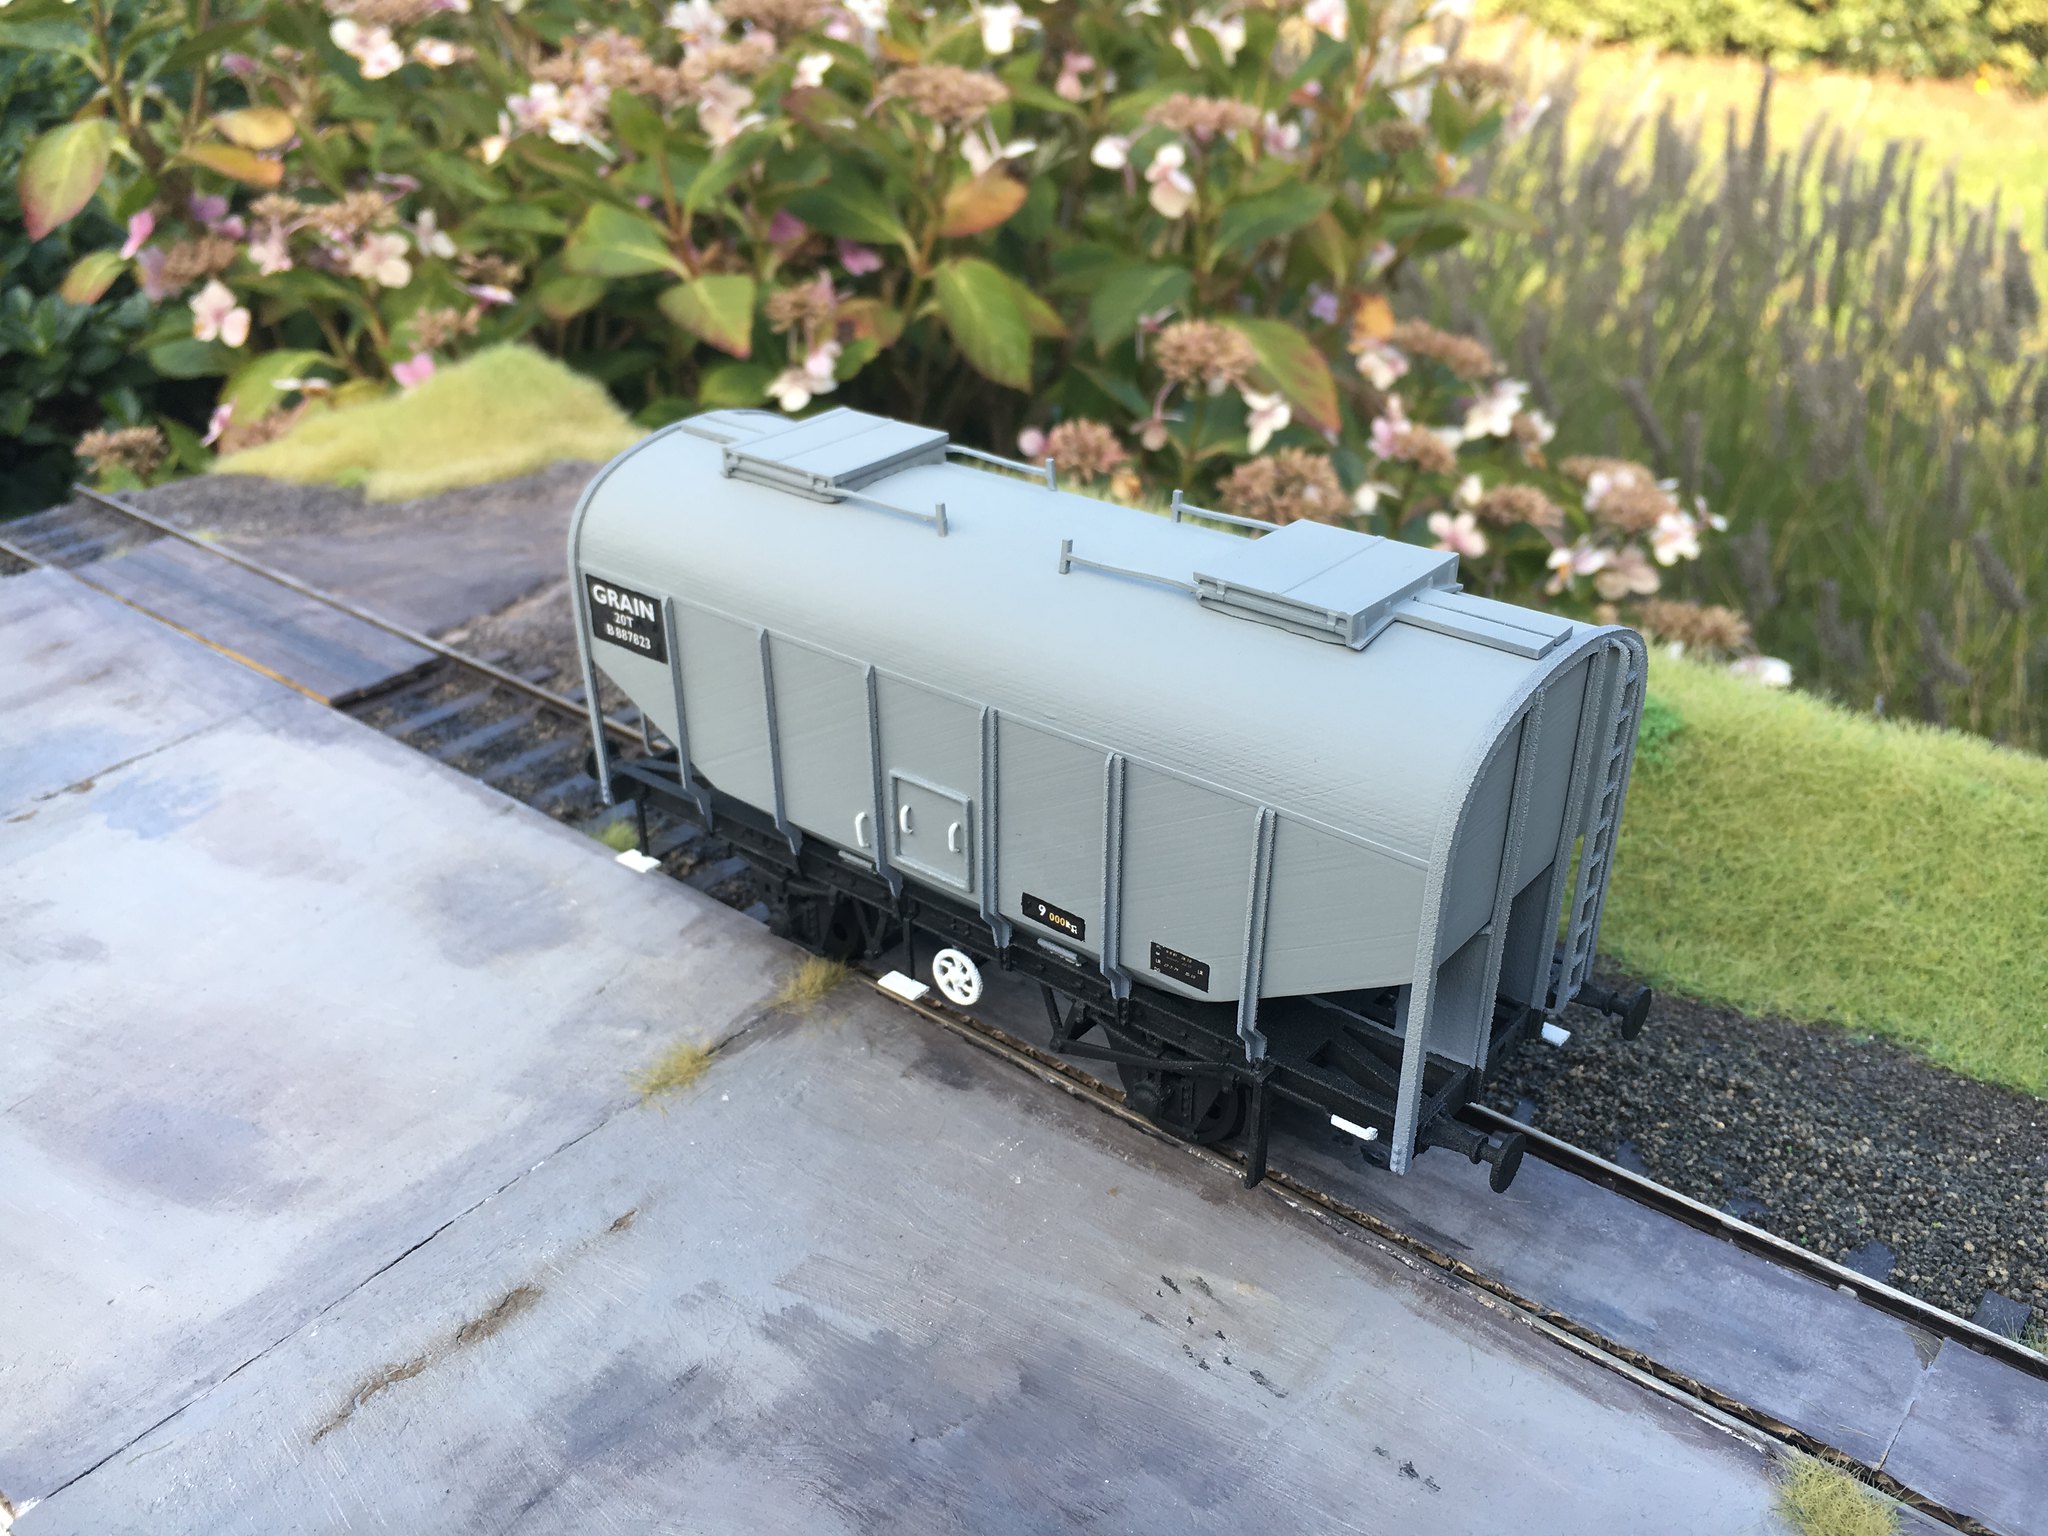 7mm 20t Grain hopper by simon br blue, on Flickr
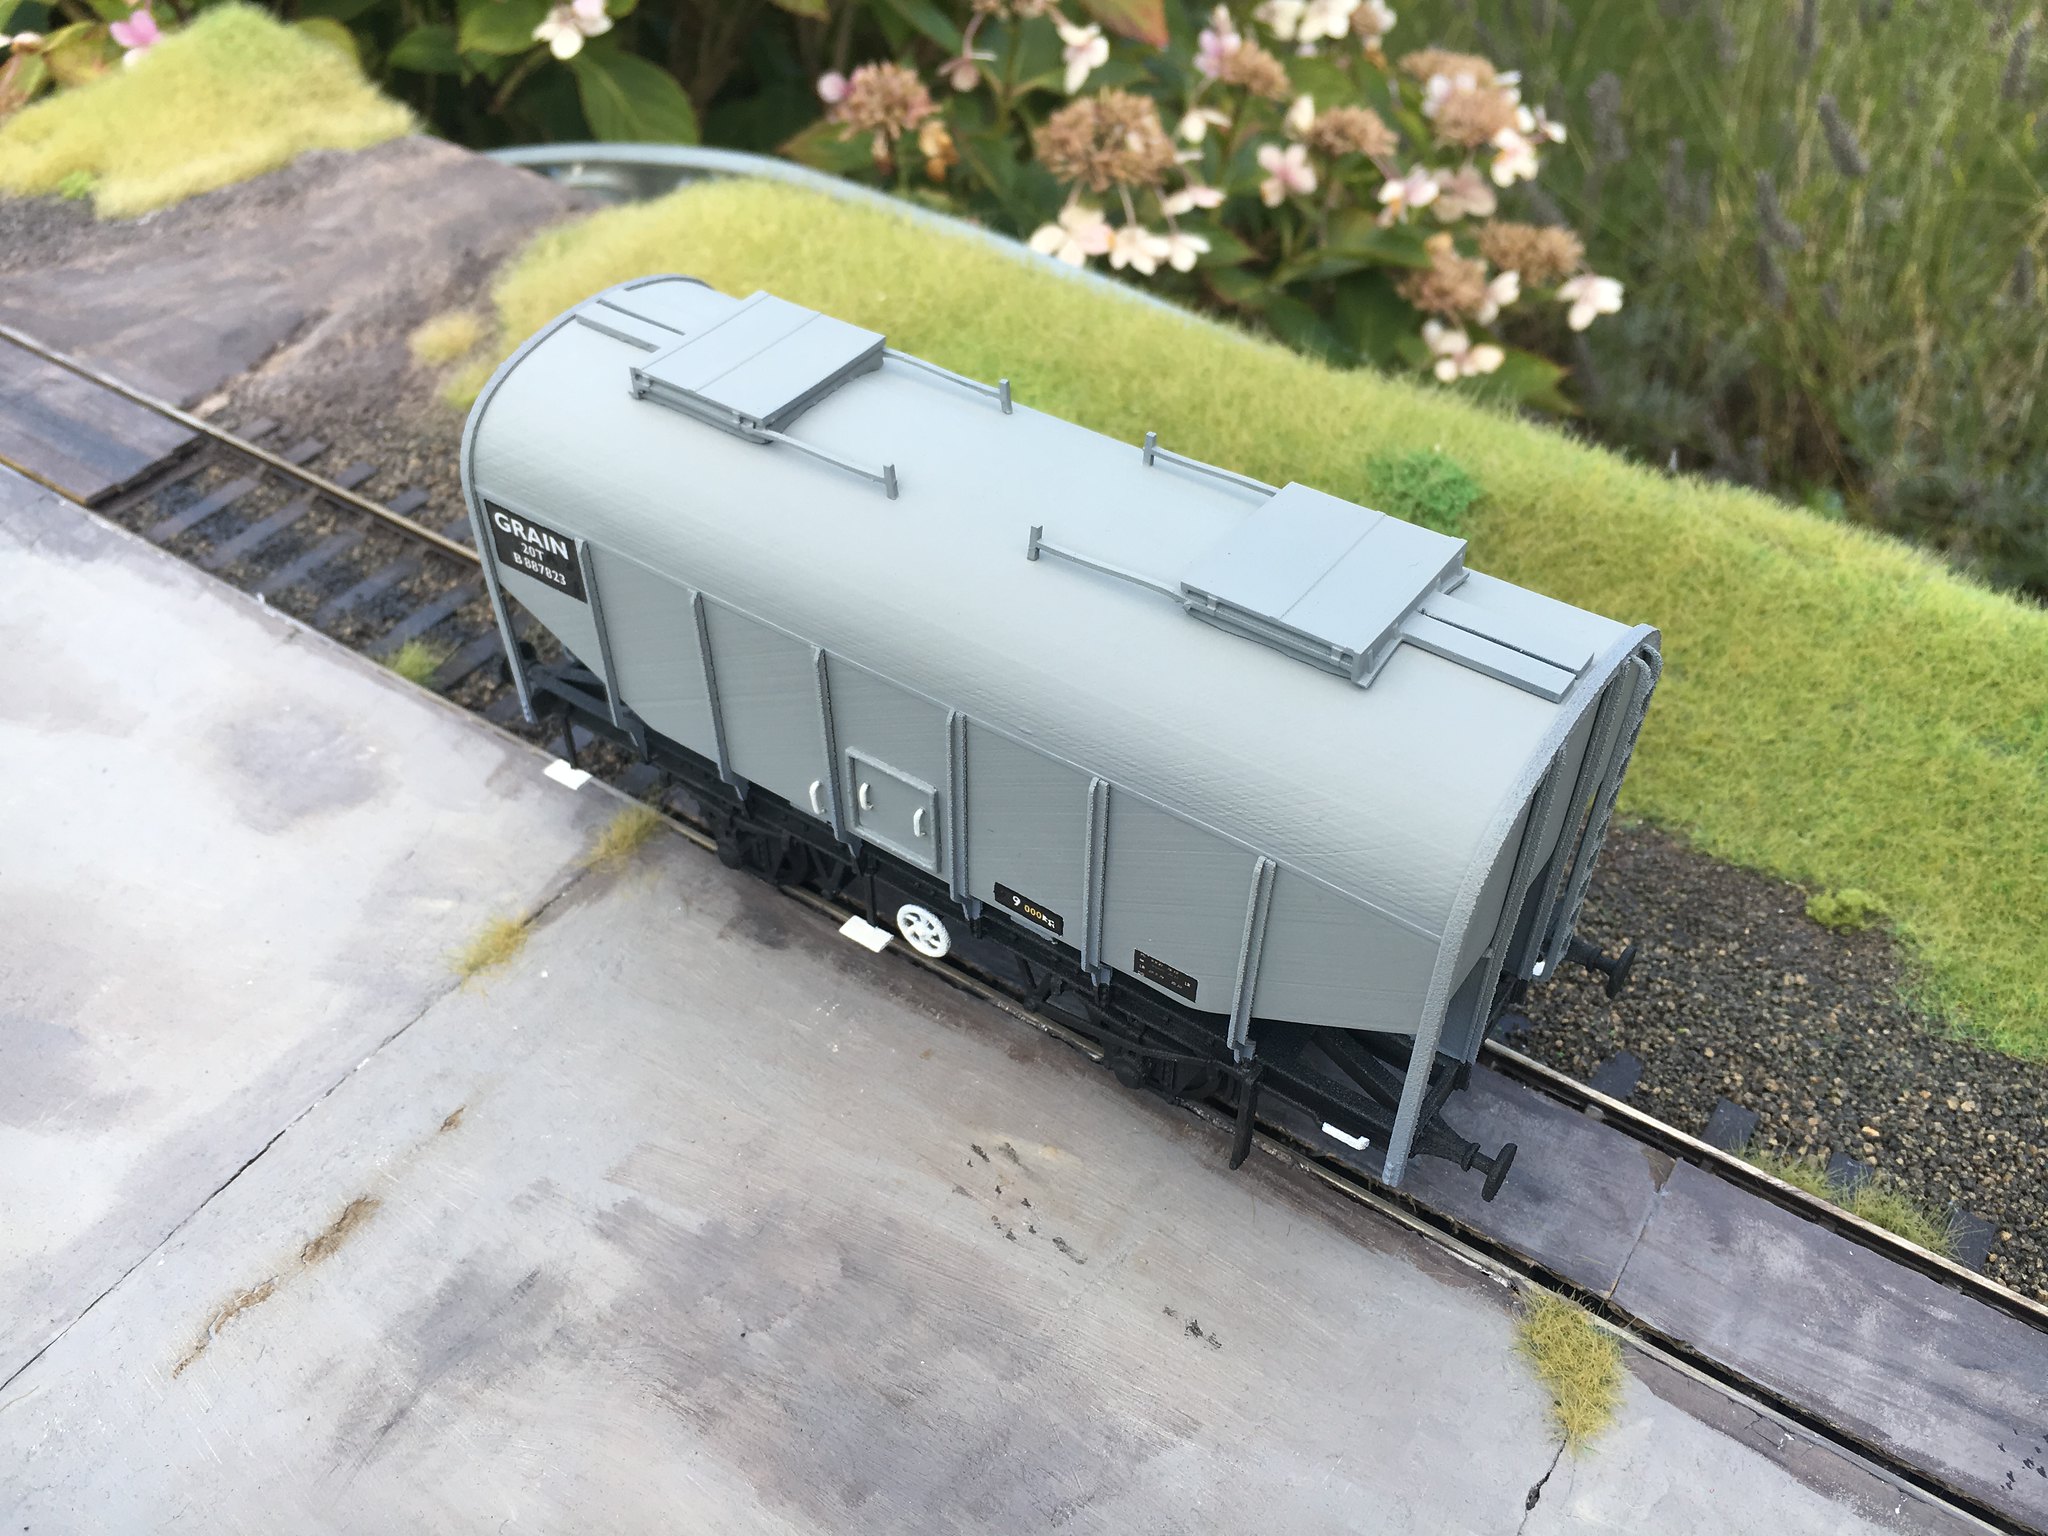 7mm 20t Grain hopper roof detail by simon br blue, on Flickr
The second wagon is the PAA Tullis Russell China clay hopper, this has been finished off with the addition of chains made from twisted wire and some weathering, just needs some greyish weathering to represent the china clay.
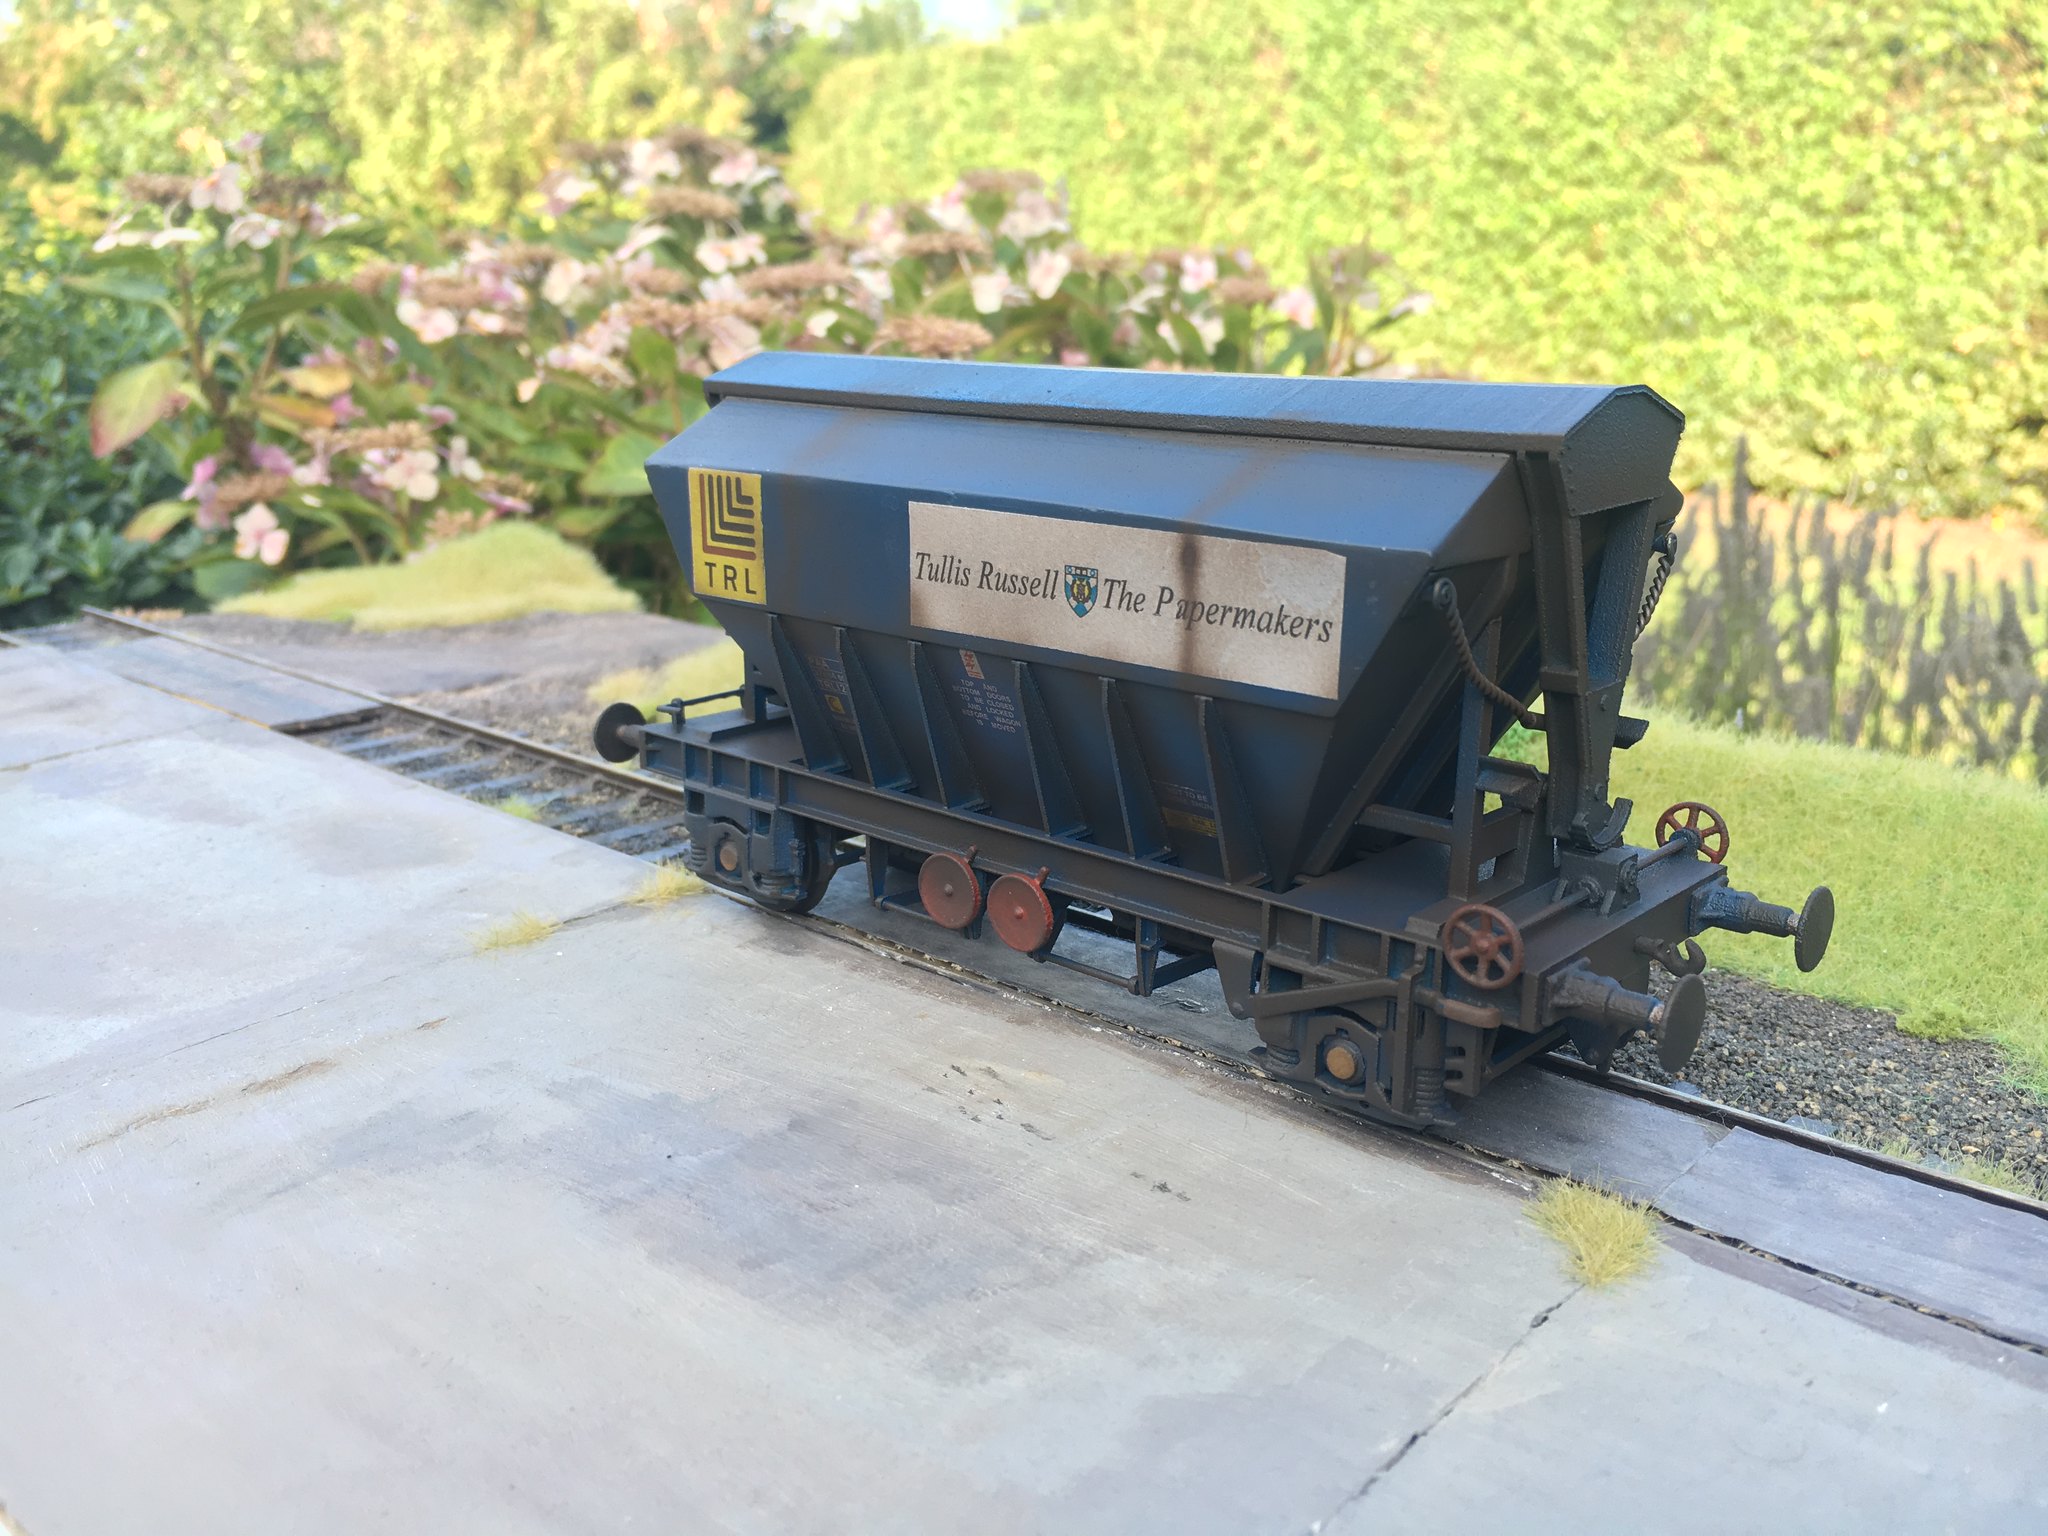 7mm PAA Tullis Russell hopper by simon br blue, on Flickr
 7mm PAA Tullis Russell hopper by simon br blue, on Flickr
-
2
-
2
-


3D printing class 25 parts .... Also class 20,37, 2mm and 7mm wagons and 1/32 bogies
in 3D Printing, Laser Cutting, CAD & CNC
Posted
Yes, as pointed out they are slightly different bogies, Photo below of some of the various 7mm bogies I've made with an unpainted PWA Gloucester bogie in the middle.
Had time to fit mesh for the walkway and apply the Precision Labels transfers to PRA wagon at the weekend.