


michl080
-
Posts
231 -
Joined
-
Last visited
Content Type
Profiles
Forums
Blogs
Gallery
Events
Exhibition Layout Details
Store
Posts posted by michl080
-
-
You don't write if you prefer Acrylic or solvent based paint, but here are some sources for RAL 8012:
Acrylic
https://acrylicosvallejo.com/en/producto/hobby/model-air-en/ral8012-german-red-brown-71271/
and solvent based
https://shop.elita.de/RAL-8012-Rotbraun-seidenmatt-15ml
Michael
-
 2
2
-
-
looks like all suppliers above start at about 2mm. If you need something smaller, you may want to look HERE. They start at M0.6 ! I guess the german language site is no problem if it is about nuts and bolts.
Michael
-
16 hours ago, Ian Morgan said:
That double slip is a curious looking beast. Not seen one like that before.
These double slips were common in Germany. Tillig Elite has them both availbable. This one is the "strange" one, That one is the more common one. In German, they are distinguished as "Innenliegende Zungen" or "aussenliegende Zungen". Someting alomg the line of "inside switch blades" or "outside switch blades". German modellers are always jealous about the creative UK track plans. This double slip is the only strange component used in Germany.
Michael
-
17 hours ago, woko said:
Also I have no idea what would be a reasonable price point for these models, they aren't hugely expensive in 3d material, just time to print them, so making a master version and learning to cast maybe the way forward with this to keep the cost down!
Rob,
there is a manufacturer of resin kits in Germany that may be roughly comparable with what you do.
HERE is a link to the website. Their prices are for the unpainted and unassembled resin casted kit. I think their prices are way too low, but this might give you an idea. They are quite successfull in Germany with their products.
Michael
-
1
-
-
Morning folks,
the body is clearly a west german DB V60, but the chassis is much improved. Obviously, the chinese designer thought that 0-8-0 must sell better than 0-6-0...
 .
.
I know the V60, I had a ride as a ten year old boy. I'll never forget.
Michael
-
Ray,
medium thread lock with very small threads is like soldering the thread. You might want to try first of you get the thread separated with this kind of thread lock before you use it at the ral thing.
I am only using Loctite 221 and even this one is defined as "for small threads up to M12"

-
Steve,
I had the same problems when I started using an Airbrush. A cheap 20£ ultrasonic bath solved any cleaning problem I had.
-- After use, I am filling the reservoir with cleaner and wipe all surfaces with a cotton bud.
-- I use the bud to poke into the bottom of the reservoir to loosen as much paint as possible.
-- Next step is to flush the remaining cleaner through the airbrush.
-- CAREFULLY push a wetted cotton bud into the nozzle and turn it so that sticking paint is removed from this zone. Make sure you make no radial movement or the needle might be bent.
-- I remove the needle cap, the nozzle cap and the nozzle and drop them into a small container filled with cleaner. Depending on the design of your airbrush, there might be more or less parts to remove.
-- Pull the needle from the airbrush, if possible to the front to make sure that gunk is not smeared onto the internal sealings.
-- drop the needle, the closed container and the whole pistol into the ulrasonic cleaner filled with hot water and sonicate it for 5 minutes.
-- Reassemble the whole unit and spray until all l water is removed. At reassembly, push the needle from the backside into the airbrush.
Done.
I have had never any problem since I use this procedure.
Michael
-
 1
1
-
-
12 hours ago, Nicktoix said:
Mr Parkin's kits with some patience make excellent models
correct. I think there can't be much improvement. MMP-kits are excellent. But it needs its time.
HERE is my example.
Michael
-
 1
1
-
-
good morning,
The propellant gas in the rattle cans is partly dissolved in the paint/solvent mixture. As you spray, the propellant gas evaporates. This cools down the content of the can. As the paint cools down, it increases its viscosity. This causes coarser atomization at the spray nozzle and this causes an inferior result.
Simple physics
Michael
-
5
-
-
I browsed through many books and checked probably a hundred 7F pictures. In some of them, the handbrake handle can be actually seen on the starboard side of the tender. The only example where I could see the handle on the left side was 53809
Please see this picture that shows the front side of an early 3500G Fowler tender and also some description of the brake position.
I guess, I will put the standard to the right side. Thanks for all the feedback.
Michael
-
I don't have that magazine, so I don't know if I am barking up the wrong tree.
I am currently browsing through some books and found that there are quite a few occasions where the tenders don't seem to be in line with the loco.
As I don't have the magazine you mention, I can't see if it is a similar situation, but there are pictures where the backside of the tender is much higher than the front side. I can imagine that a low water level comined with a large supply of coal might be the cause.
Or I am totally wrong...
Michael
-
thanks John-Miles and Blandford1969,
I did some more investigation and it looks like you are right. The current tender has flush rivets, it has coal doors and it carries the numberplate "4302". If I take a very close look at the pictures in Ivo Peters "The Somerset & Dorest in the fifites", and read carefully John Jennisons article "LMS tenders Part 1 - The 'old standard' 2500 Gallon Tenders" in the LMS Review magazine, it appears that the current tender carries that number but has a different identity. It appears that 53809 was initially paired with a tender 4302 which had the old coal chute style without doors. There are some pictures in the above mentioned books from the early fifties that show the air vents in the coal space and some later photos that show no air vents at all
 . I have no idea how the tank was ventilated after removing them from the coal space.
All pictures I could find show no lifting holes in the coal plates, so I assume that they must have lifting lugs.
The currently used tender has its brake standard on the right hand side. I will model it that way assuming that the fireman would be operating the engine brake.
I love this investigation in preparation of kit building and I am sure I will have a lot more questions soon.
thanks again,
Michael
-
Good evening,
I am starting to build a David Andrews 7F kit and there are already quite a few detail questions I cannot figure out...
Starting with the tender, my first question will be regarding tender details, but I am sure there are a lot more to come.
I am planning to model 53809, that is nicely restored, however I want to build it as it ran in the 1960s.
-- Is 53809 running with its original 1960s tender? I found some pictures that show the air vents in the position behind the rear coal plate. Todays pictures show no air vents at that position.
-- Considering that the tender is not original, did the 1960 tender have lifting holes in the coal plates or lifting lugs?
-- I found out that all S&DJR 7F had the water scoop removed or eventually never mounted. So far, so good, but I couldn't find any picture of the tender front showing how the scoop was operated. From some other description, it appears as if one of the standards were for the hand brake and one for the water scoop. I assume that 53809 did only have one hand brake standard at the right hand side of the engine (fireman side)
any expert around?
Michael
-
18 hours ago, george stein said:
Ideally, suggestions for Vallejo paints as these are available in the USA.
George,
Vallejo has quite a few shades of black. I am using 71055 black grey, 71123 Dark grey, 71052 anthracit grey, 71251 nato black, 71056 panzer dark grey. All of these are actually quite neutral. Furthermore, I use some greens like 71013 yellow olive and 71015 olive green and some browns like 71042 black brown or 70872 chocolate brown.
A great base is 71306 dark rubber. Mostly, I start from there.
hope this helps,
Michael
-
14 hours ago, hmrspaul said:
Thanks Paul, I couldn't figure out how to link your picture directly

Michael
-
1 hour ago, Fat Controller said:
That's a cracking bit of work; those are all model photos, aren't they?
If they look like the prototype then because the kit is extraordinary. Take a look at David J. Parkins site
Honor is due to him.
Michael
-
39 minutes ago, lightengine said:
I achieved a very similar look a couple of weeks ago using rust colours, chipping medium and Humbrol 63 over the top and then rubbed back.
I need to work on my underframe and over all technique though.
Let's see! Preferably with some description...
Michael
-
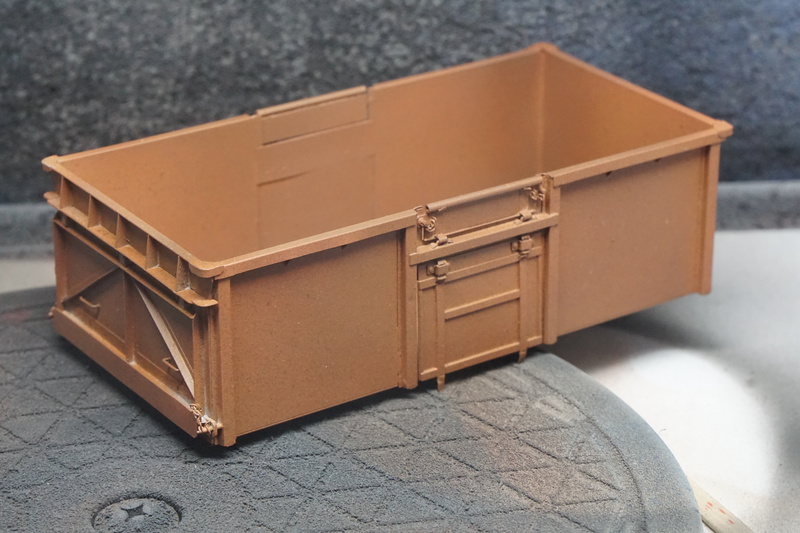
OK,
I took a couple of pictures while I weathered the wagon, so I may give some ideas about how I did it...
I took some of Paul Bartletts pictures. Search for B221316 and you will find an example that I liked a lot. I will not insert a picture to comply with Pauls copyright rules.
This is where it starts. The kit has a grey basecoat with etch primer.
I have about 15 different shades of Vallejo red, brown orange, tan etc. that are all somehow looking like rust. I put a little drop in my airbrush and spray some dots onto the primer. As soon as the paint is empty, I take another drop from another bottle and continue, etc. The paint should not be covering the surface. My idea is that the paint is slowly building up in many shades. The more shades we get, the better the result. Don't be afraid of some very bright orange spots and some very dark browns, it should all equal out to a general tone.
This is the result.
From here, I used the "salt and hairspray" method to create the worn painting of the wagon.
Take your girls hairspray, collect a little bit in a small beaker and apply the hairspray on the surface, but only where the rust should appear later. Take coarse salt and let it trickle onto the wet hairspray. Make sure that you apply enough salt to prevent the later appied grey paint to reach the rusty surface. Let it dry.
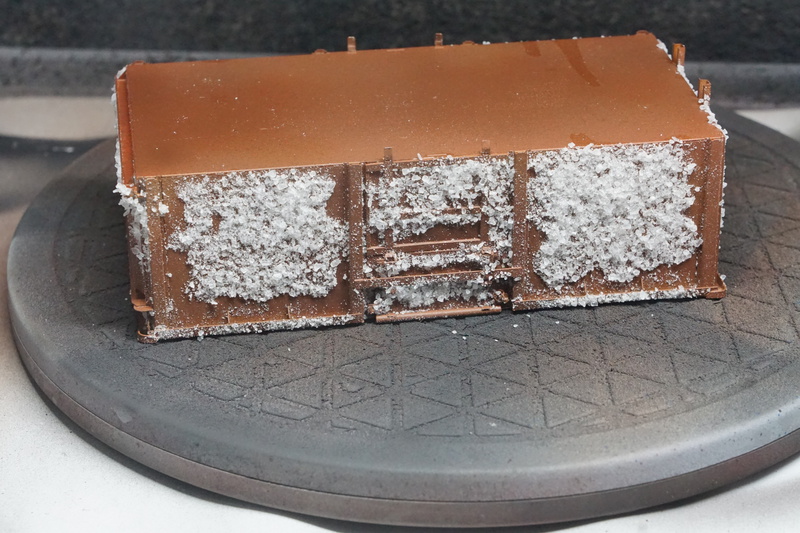
That's the result. Apply grey paint, but make sure that the airbrush won't blow the salt away.
Sorry no picture of that stage. After the grey paint if dry, but not thoroughtly cured, take a soft brush and wash away the salt and the hairspray with warm water. Don't overdo, or all grey paint will be gone quite quickly.
That is what we get.

If you take a close look, you may see that the paint is loose at some edges which looks like peeling paint.
I didn't take much more pictures from here on, so I try to explain what I did and try to show some effects at the finished kit.
I masked the position of the white stripes and painted some spots of white onto the rust layer. This can be done easily with a very small brush and only a little amount of paint. Try to get a result as on one of Pauls pictures.
Next step is to apply a glossy varnish and then apply the water slides.
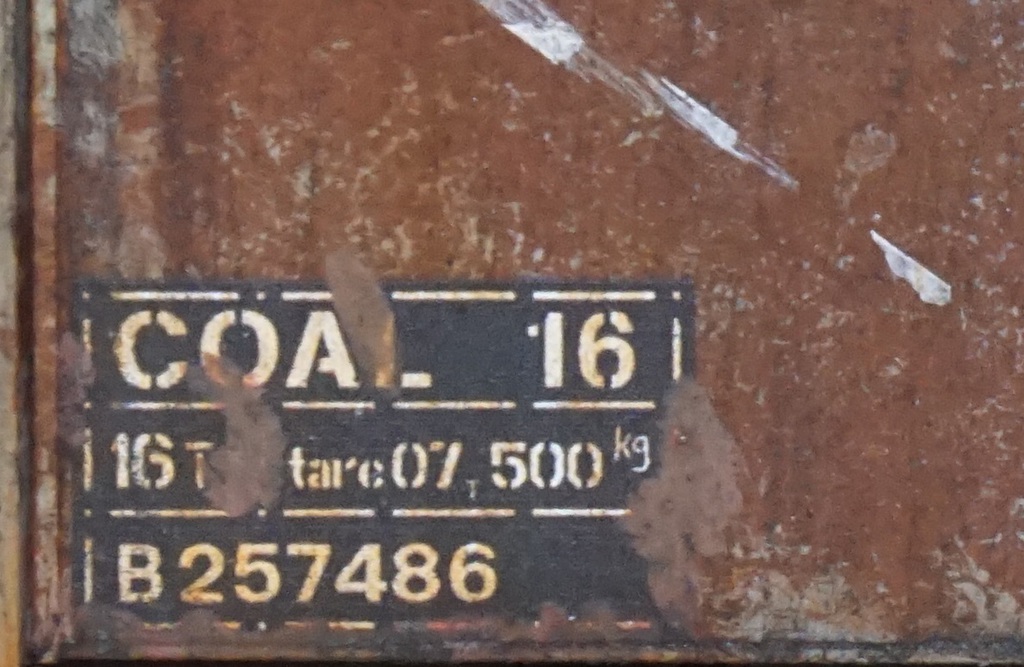
I tried to simulate the rust effect on the decals, but you can see that the colour doesn't match very good. Also see the effect of the white band.
I think that the wagons were loaded in a very dirty environment full of coal dust, so the whole wagon was evenly covered. However, assuming the the wind and the rain removed the dirt wherever it had access, I think that most of the plain panels were rusty, but not dusty. The dust collects in the corners where rain and wind have no access.
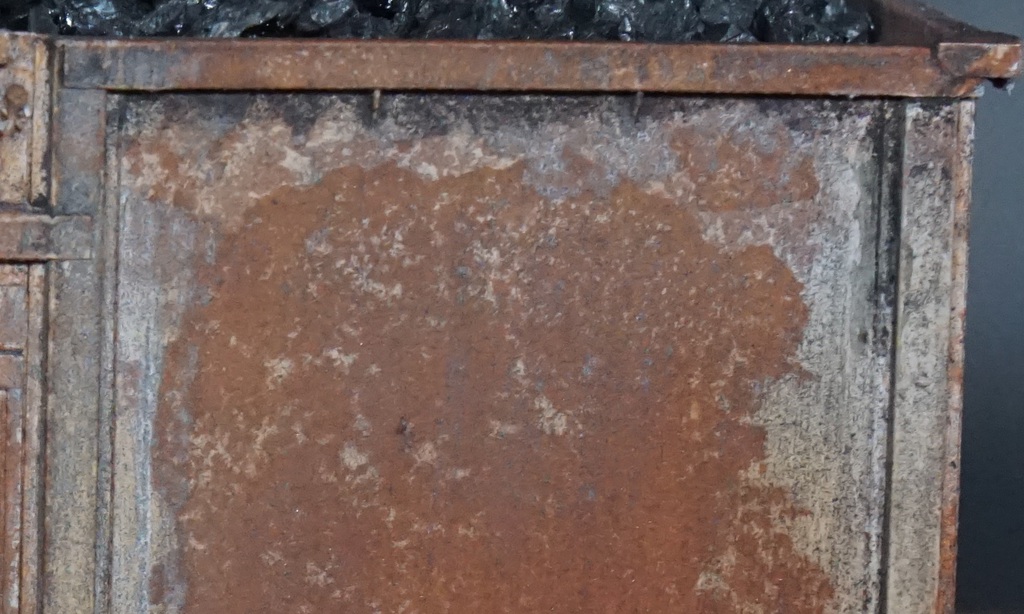
See the grime at the upper profile where the rain has no access.
I am using powder pigments in dark brown and black to simulate the coal dust. I am using a very weak binder that barely holds the pigments in place. The brush is dipped into the binder and then into the pigment. Apply the wet mixture with a lot af pigment. Clean the brush in the binder and wipe the pigments vertically upwards to simulalte the rain streaks. I don't know if this kind of pigment binder is available in the UK, I think water will do as well. If the mixture is dry, take a wide hard brush and wipe off most of the pigments, not so much in the corners, but take away most on the plain surface. Always wipe in direction of the rain streaks. This can be repeated as often as necessary. If there are any recesses, fill them generously with pigment/binder and let dry. Take the hard brush to remove the mixture after it is dry. The pigments will stick in the corners where we want them.
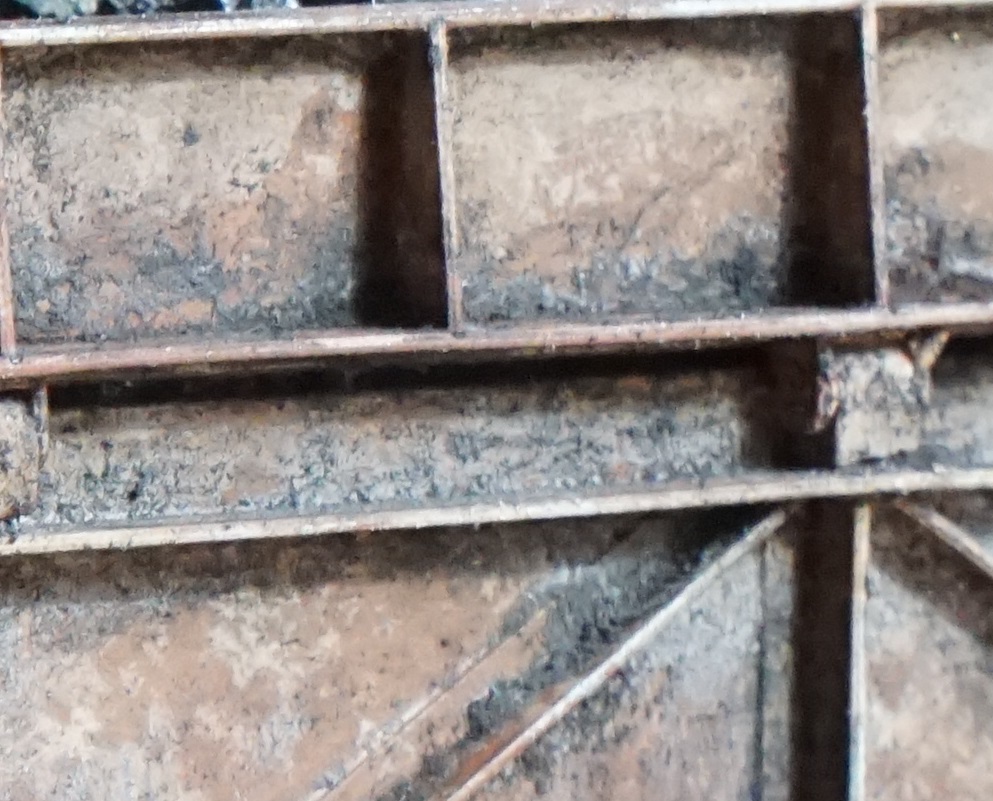
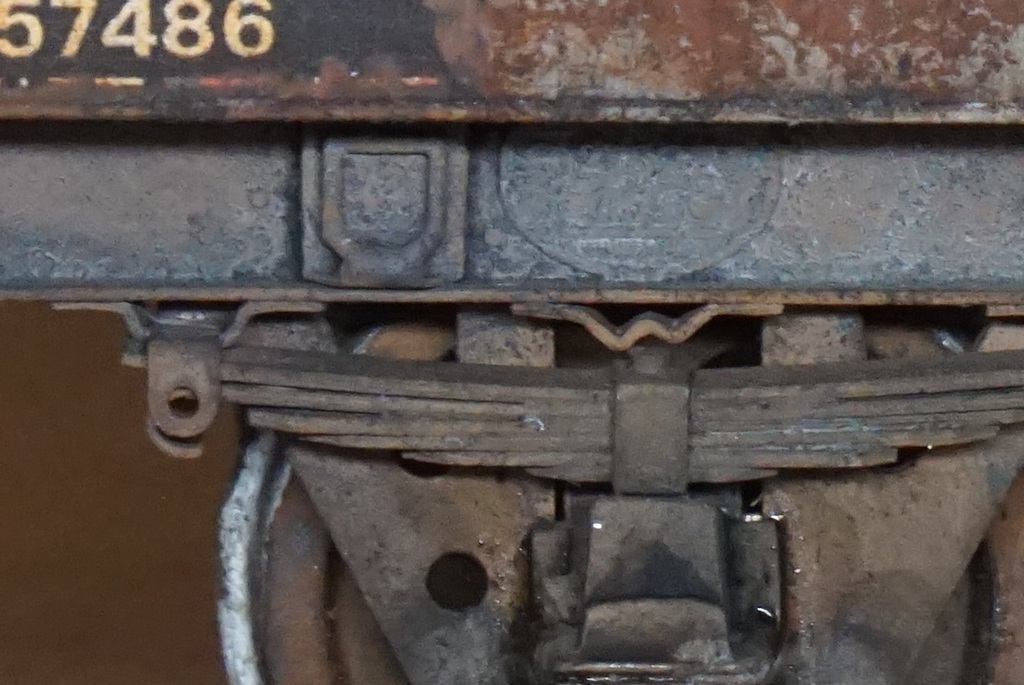
The underframe of the wagon is also very dusty with coal, but there is also a lot of ferrous dirt that is more like orange and red. I appy that with my pigment/binder sauce and remove most of it as with the coal. The framework can be very dirty, but as these wagons had only hand brakes, the brake dust was probably not as extreme as today.
The pigments will sit very loosly, so take care that you don't touch it too much or the work will be transferred to your fingers

As a next step I apply a VERY matt vlear varnish. I am using AK interactive Ultra Matte Varnish AK-183. This gives an almost mineral like surface.
It may happen (and happened in my case) that the varnish will brighten up the pigments, so that it looks more like limescale rather than coal. In that case, you can apply a very diluted black-brown wash in the white spots o tone them down.
After the final varnish, I apply some Vallejo Engine oil stains at the axle boxes. This will give a shiny appearance as if the oil would be leaking form the boxes. A small touch of black oil paint to simulate the buffer grease and that is all.
I hope you like it.
I have no connection with the manufacturers I mention, but I like their products.
Have fun,
Michael
-
3
-
1
-
1
-
 11
11
-
-
There is always a risk that you will see the glue at the edges of the nameplate.
For this reason, I am using paint in the same colour as the subjacent surface. Any surplus paint will be invisible.
Michael
-
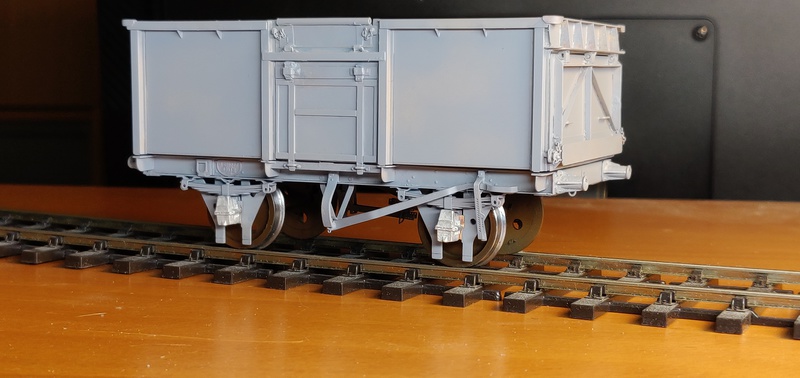
Just finished a MMP kit of an plain 16 ton mineral wagon.
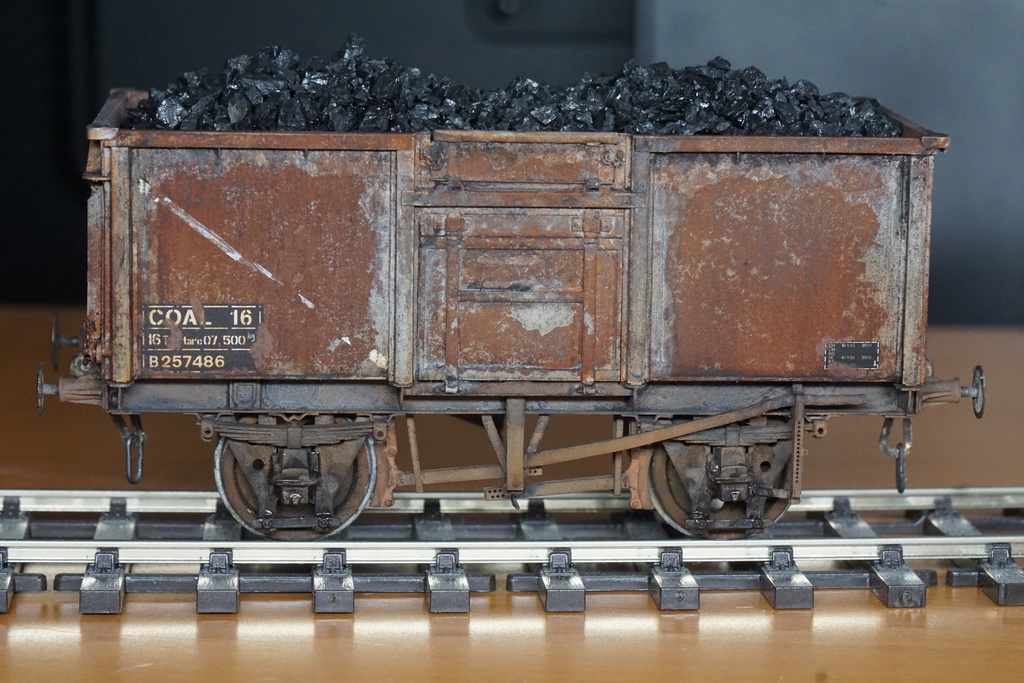
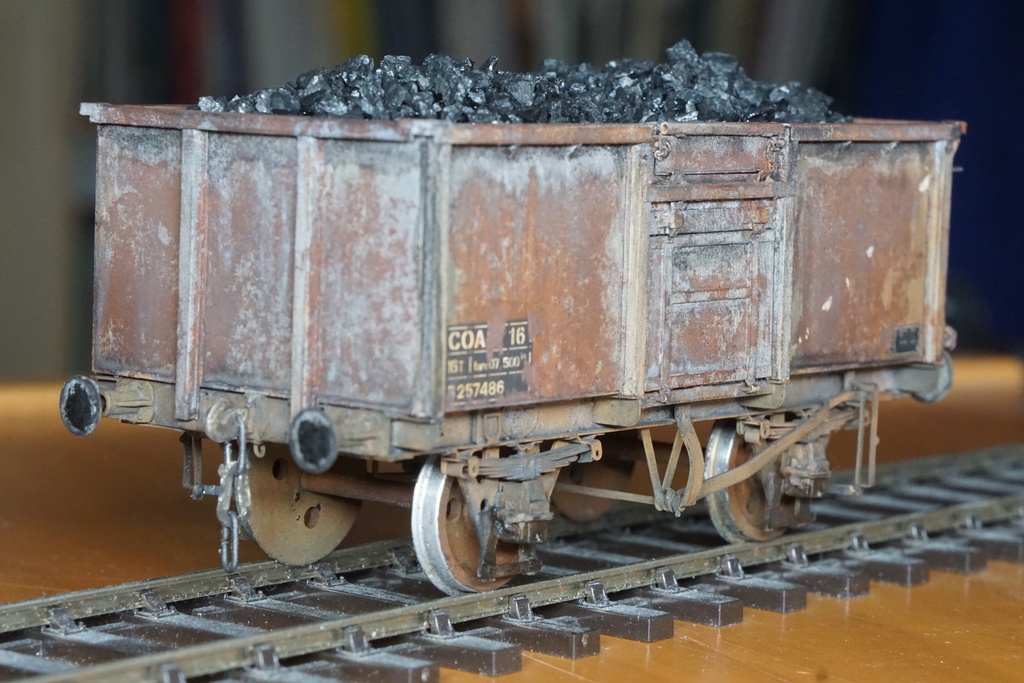
hope you like it...
Michael
-
10
-
 1
1
-
6
-
-
That's how I solved the problem:
30 cm pieces of square aluminum tube in 15x15mm and 20x20mm.
A peg at the backside keeps the wires where they belong.

You can call that overengineered, but what can you expect from an engineer

btw., all proposals so far have a common problem: you can't get hold of short pieces that disappear in the tube.
Michael.
-
3
-
-
14 hours ago, MikeTrice said:
No it is generally always +0.2 so 10mm prints at 10.2mm and 40mm prints at 40.2mm based on experiments to date.
Mike,
I can confirm this 0.2mm deviation with my Formlabs Form2.
Michael
-
3 hours ago, Mick Bonwick said:
There must be many others, and I'm sure that somebody will be along soon with their favourite.
here we go. I am using this one.
This one has a A2P3 filter which is quite amazing. You do not smell any solvent under the mask.
Michael
-
1
-
-
I am using a simple, cheap ultrasonic bath for that purpose. Just drop the plastic container with the ink into the bath filled with cold water. Sonicate it for 10 minutes and all agglomerates should be gone.
I cleaned my 30 year old Rotring pens recently in the ultrasonic bath. They look like new. All sticky residues inside the pens were coming out easily. I cleaned them with hot water without any additive. You wouldn't believe how long black clouds were emerging from the pens.
I am also using it to prepare paint before spraying it in my airbrush. In this case, I am aslo using hot water to warm up the paint. I think the surface will be smoother then.
I am just using a cheap 30€ ultrasonic bath.
Michael
-
3
-

 .
.


 . I have no idea how the tank was ventilated after removing them from the coal space.


Screw pitch help - not M3.5 not 4BA
in Kitbuilding & Scratchbuilding
Posted
Morning Gentlemen,
I find THIS table very useful and complete. I guess the strange language is no problem.
Michael