


saxokid
-
Posts
3,281 -
Joined
-
Last visited
Content Type
Profiles
Forums
Blogs
Gallery
Events
Exhibition Layout Details
Store
Posts posted by saxokid
-
-
2 hours ago, classy52 said:
Hey Danny if you're going to do a TMD with concrete hard standing check out this video on YT, really interesting way of creating a concrete base using real concrete instead of fake materials.
You can make good concrete hard standing using plastic card and make it look as real as you can,its how many hours of time and research you put in helps...
-
 1
1
-
-
Ive been cutting lines into the plastic card then filling in with mixs of track grime with hint rust effects.

-
 12
12
-
-
Ive made few of these in different forms over the years ...
plastic card and polly filler ect..
Ile be posting up my latest hard standing ive built for my New build depot (Colmore TMD)
Using A4 thin plastic sheets ...
cut with knife blade,
scotted for rough look.
weathering by both airbrush & dry brush...
-
4
-
 1
1
-
-
Ive just got hold of old Airfix plastic kit footbridge,
which ile be building to my own specor idea with pipe & cables running down one side ect...
-
1
-
-
On 27/06/2019 at 17:04, mudmagnet said:
A small diversion from 00 modelling - a couple of 0 gauge wagons.

Some very nice modelling work here!!

thanks neil..
-
1
-
-
Been doing few modds to this old style Hornby crane along with lifting gear...
more to follow on this this week,when im tempting to use two of them to lift Lima class 31

-
3
-
-
On 21/02/2020 at 13:00, quicksilvercoaches said:
These are OO rather than N, but as 3D printed road vehicles I guess this is best place to put them. Vauxhall Novas from an ebay seller (who also does a 'breadvan' VW Polo), but as my first examples of solid models what is the best way to represent the window glass on these opaque bodies?
The intention is to replicate the one my parents had, but that was a 5-door so some modification will be needed. Being solid at least makes that easier as I don't have to cut out and reposition the window pillars.
These look rather good..
-
Ive been respraying,weathering and detailing up locos for many years.
Mostly my own stock,but sometimes few little commission workbench jobs too.
This post wil have most of my up todate weather and loco renumbering projects...
Others can stil be seen under my old user name class66..
-
5
-
-
8 minutes ago, Nelson Jackson said:
This is how I have achieved brickwork on my models. Indeed there is no correct way, but this is how I have done mine,
1) Spray whole model with red primer
2) Whitewash the whole model for mortar
3) Dry brush your selected colour onto the model in a diagonal fashion (I prefer enamels as they dry slower and tend to dry flat without any sheen from the dry brushing)
4) Usually at this point weathering takes place, I first of all use a weak brown wash for the mortar and use various browns and oranges for picking out the different bricks (via the dry brushing again).
Hope hope this helps!
Nelson.
Very nice work here Nelson..
-
 2
2
-
1
-
 1
1
-
-
Any new updates on your layout build Danny??
cant wait to see some scenery builds...
-
 1
1
-
-
On 22/02/2020 at 01:47, DRS Crewe On A Mission said:
Hi Steve,
Many thanks for the follow and interest in this thread. I am posting my regularly to it now than what I have done previously and I have got another update to share soon. DRS is excellent for variety of traction because you can model anything from around 50 years old to nearly new which gives so much potential for a layout. Their are some really exciting things in the pipeline for the layout with regards to locos and stock and not just DRS, because I have been expanding the collection in many aspects including freight and passenger operations. With more stock arriving this year, it will compliment some of the stock I have already bought but not yet introduced to the layout very nicely and I am hoping as we get further into 2020 the layout in terms of stock will become bigger, more diverse and will serve a greater purpose than ever before. It's certainly a great time for the layout because we have been deprived of so many modern image items until recently.
I bought the DRS magazine, by the way. Thank you very much for telling me about it because I rarely check the Key Publishing site and I would have missed out. It's a great read spanning the full 25 years of DRS and it even gets status changes to each loco fleet etc, which I always like to see, because I do like following fleet changes.
Have you bought any new stock recently?
Thanks for the support.
Kind Regards,
Danny.
Looking good my mate...
-
1
-
-
On 14/03/2020 at 22:50, JonKing said:
Not much progress on DR98008 recently, I am trying to source a set of custom transfers to finish it off. In the meantime a handful of locos have rolled off the workbench. First up is 47315 in battered dutch livery. I remember visiting Bescot in the late 90s and 47315 was stabled outside of the TMD building, being a Devon boy dutch liveried 47s were a rare "spot" for me especially given there would only have been 3 or 4 left in traffic at the time.
47315 is a complete respray of a Bachmann 47, given I am modelling the loco in battered late 90s condition base colors were sprayed using faded tones. Varnish and transfers were applied as normal and then body streaking added by painting on thinned dark grey / dirty black paint which was then removed in a vertical motion with cotton buds soaked in thinners to soften the edges of the streaking. Roof grilles and panel lines were then given washes of the same dark grey / dirty black to build up an accumulation of dirt in the grilles & recesses. On the prototype the fibre glass roof domes had been chipped in places revealing BR blue underneath, chipped areas were added with a small brush as were nameplate scars where the nameplates had been removed. The roof was then sprayed with a light coating of dk grey / dirty black withe a second coat of dirty black / dk blue around the exhaust area. Lower bodysides were sprayed with frame dirt and brake dust. Correct pattern underframe tanks were added (retaining steam heat water tanks) and the under frame was sprayed with frame dirt.
Next up is 20118. A complete respray from a Bachmann 20 previously resprayed & weathered (badly!) by me around 10 years ago. Respray and weathering techniques on this one are fairly standard however I have modeled the loco in 1995 condition when the engine room doors had been repainted a lighter grey on one side (following these doors being replaced with doors from a BR blue loco at Tinsley in the early 90s). Eagle eyed will notice I have used the incorrect OHLE warning stickers - I have used the post 1998 versions (yellow triangle) rather than the pre 1998 versions (red symbol), I have done this on the purely fictitious premise that 20118 was reinstated by DRS as a short term measure to work with its original batch of 20/9s. Not too far fetched given 20118 was only withdrawn in 1995 due to a broken windscreen,
Great work Jon here...
-
1
-
-
1 hour ago, chuffinghell said:
I’ve spent a bit of time carefully notching out a small piece of platform to sit at 90 degrees.....
.....to later realise I didn’t really need to take as much care for something you’ll never see

Good work here Chris...
-
3
-
1
-
-
1 hour ago, Southwich said:
Thanks Neil good to have you on board.This evening I’ve finished all the track work with check rails and cosmetic chairs ready to be sprayed tomorrow weather permitting (it’s supposed to be nice!). I’ve take a few photos of the point work and placed a van on the three way to show scale - it’s a pretty long point!
Normal 1:7 point:
Three way point:
Hopefully by the end of the weekend I’ll have managed to get all of the initial track colours sprayed. Happy modelling everyone and stay safe!
Kind regards,Will
More top work here Will,im following this
Looking forward to another update now...
-
1
-
-
On 12/03/2020 at 21:42, flex2wees said:
Finally amost finished the hardstanding! Wasn't too happy with the finish again so I've sanded even more and now added a coat of dulux paint and then some MIG Acryllic concrete paste. This has gone down really well and creates a great texture for roughed up concrete although the surface is a little coarse and I'm now going through the process of sanding the concrete paste to scale it down suitably.
Now for a but of fun! I've also modelled my now old car in 1:76th by using some touch up paint and clear. With a few transfers i'll be pretty happy with the result!
Any new updates on your build??
-
7 minutes ago, jukebox said:
Cracked it.

Took the test sheet and brushed away the turf... to be greeted with this:
Lovely, lovely, lovely.
It's one of those times where scaling down 1/76 exactly doesn't work - the eye needs to see some texture to believe it's looking at grass. And the very small grains of the "fine turf" work just right (for me, anyway!). I did have a perverse thought that if this didn't work I could try painting over the top of it, leaving a coloured textured surface. Someone else can try that!
As Jonathan correctly observed, I'll repaint the plasticard a solid olive, just to provide an under-colour for safety, but am now comfortable if I have to flock in two passes.
The one thing I will do differently to the sample sheet is make all three tones from a blend of colours. The photo doesn't really show it well, but the squares that used blended shades have a more realistic feel than those using the native Woodland Scenics tones - I guess because in real life, grass isn't a single shade either.
37C here in Perth today (where it's 8:30am on Thursday), so I'd imagine I will have this done by the time many of you wake up today.
")
Cheers
Scott
Some very nice work here Scott.
cheers neil
-
1
-
1
-
-
On 07/05/2019 at 09:49, Andrew liszka said:
Hi Neil the brush looks ace mate looks proper work stained
Hows things going my mate,any new layout updates on yours??
-
Few more pictures of the high level box....
-
2
-
-
On 22/03/2020 at 14:35, scoobyra said:
With the whole Country approaching lockdown, and every show except RailEx NE cancelled, it’s safe to assume that I won’t be working on the layout for a while. I’ve managed to get the electrics finished all bar a couple of frog wires, and the signal decoders but it’s all connected up to iTrain. It’s been a massive learning curve and one which I wouldn’t have managed without James Hudson at DCC Train Automation, and he deserves a medal for his patience! There’s still a fair amount to do in terms of inputting locos and rolling stock but that’s par for the course.
I’m going to spend a while getting the station buildings up-together now and finish off the 166, along with sorting out the rest of the stock.
stay safe people and see you all on the other side.
Looking forward to when you get back on with your layout build Mike..
cheers neil..
-
1
-
-
Been busy adding some bit n bobs to the insides of my x3 signal boxes starting with this high level box...
-
2
-
-
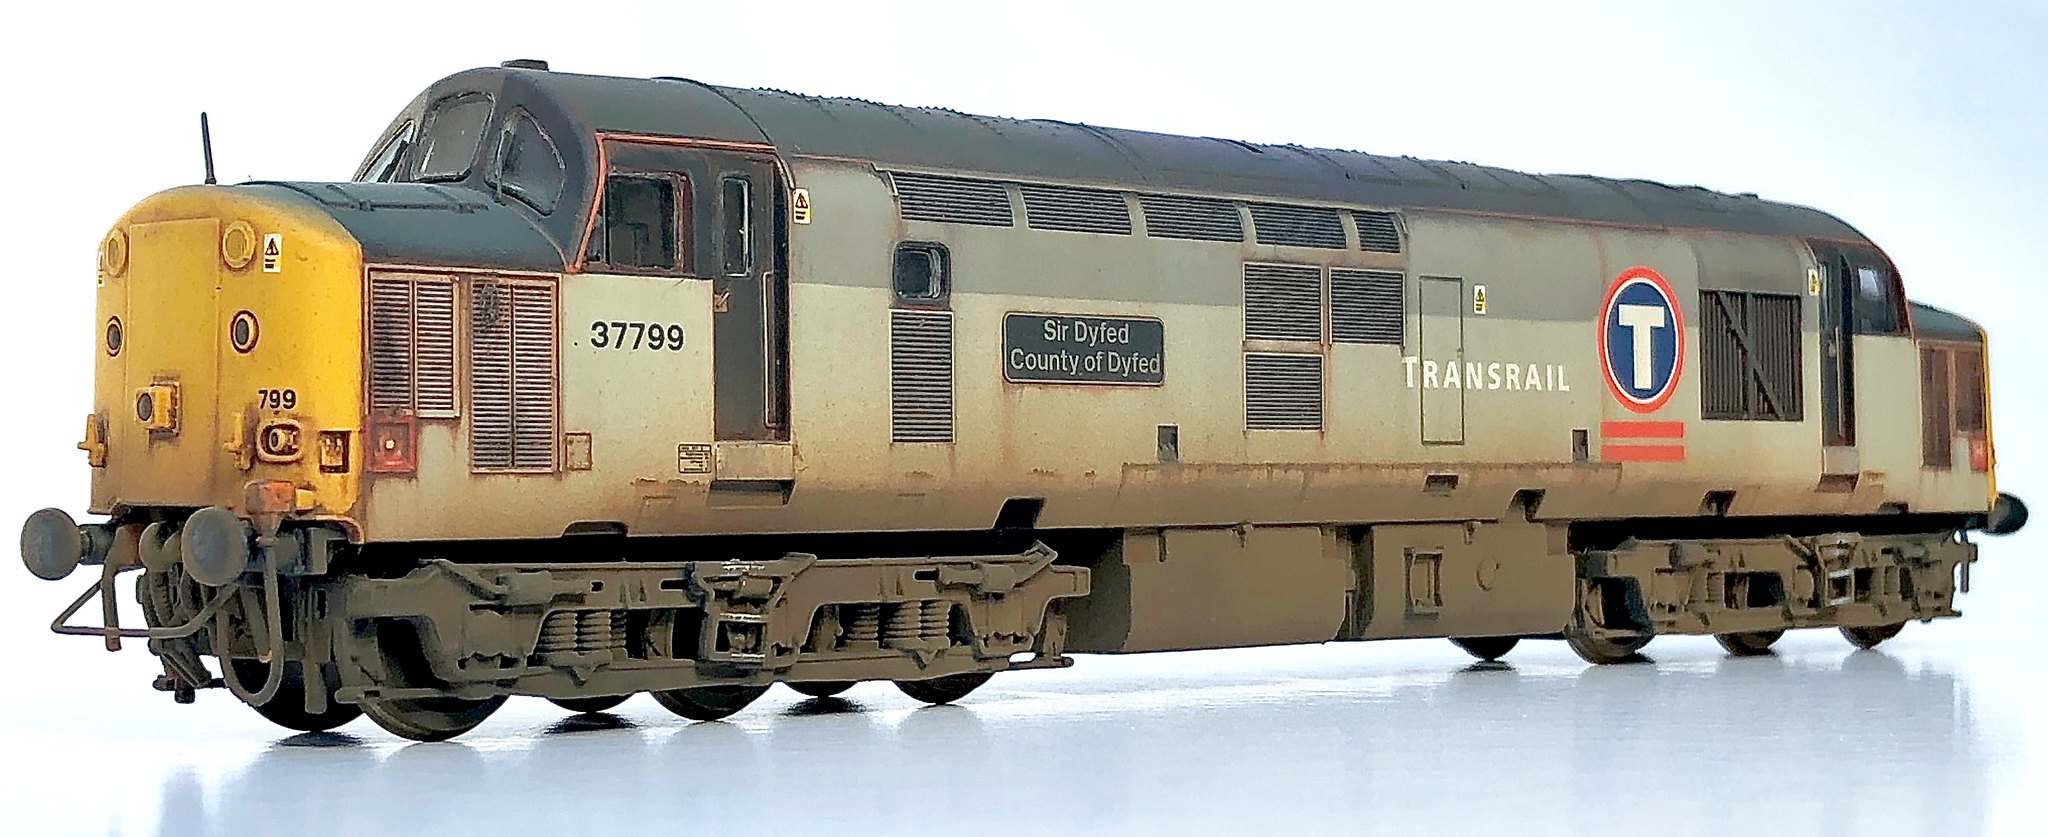
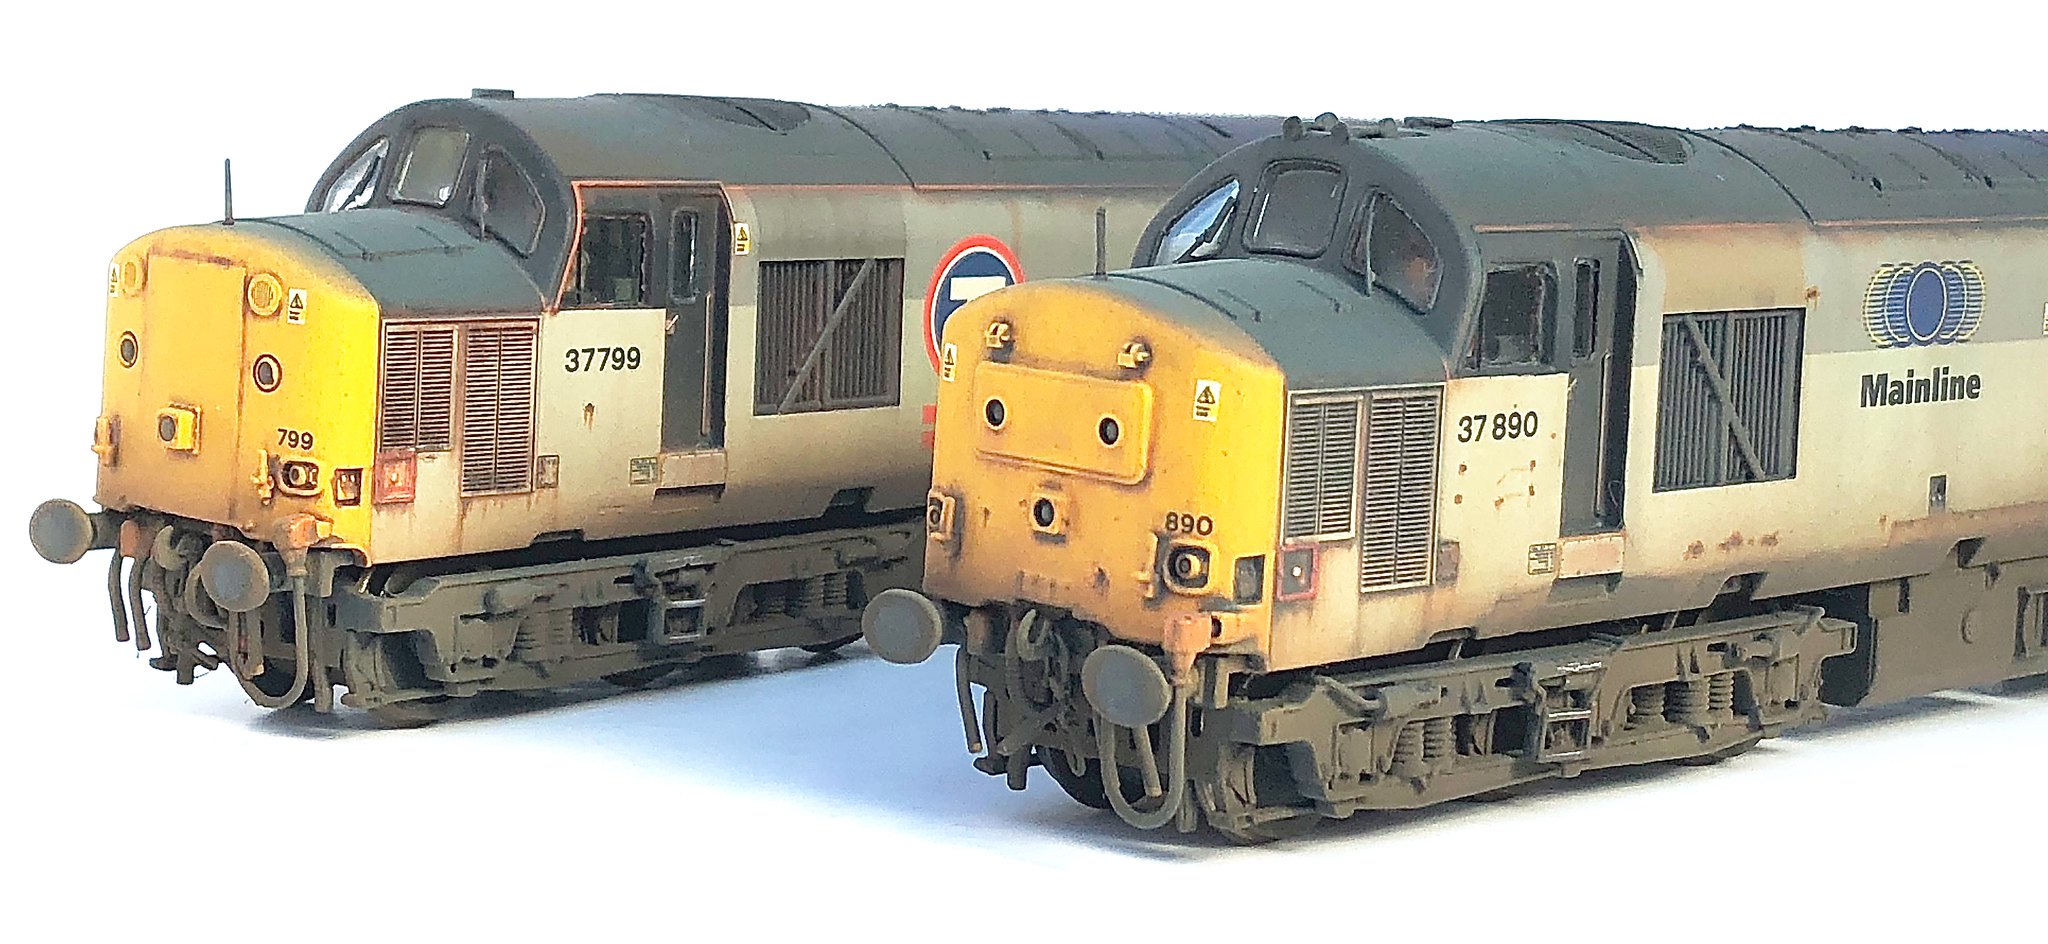
On 29/12/2019 at 22:40, James Makin said:
Last, but hopefully not least in the Class 37 run is a pair of 'Heavyweights'!
37799 and 37890 by James Makin by James Makin - Account 2, on Flickr
37799 and 37890 join the fleet in Transrail and Mainline liveries respectively, not especially glamorous but no-nonsense workhorses captured in their final glory days before being usurped by more modern traction.
The starting point in both cases was the Bachmann 'Conidae' release in Petroleum...
37799 and 37890 by James Makin by James Makin - Account 2, on Flickr
Most notably for me, these were among the first Bachmann 37s I bought new that were breaking the magic £100 barrier - chunky money, but cheap in comparison now!
The branding was stripped off, and satisfyingly the newer Bachmann printing literally peels away with a splash of enamel thinners, a real treat to watch!
37799 and 37890 by James Makin by James Makin - Account 2, on Flickr
Next, the locos were modified and detail changes made where needed - 37890 needed new ends, new roof and roof horns installed, while 37799 was a simple renumber...
37799 and 37890 by James Makin by James Makin - Account 2, on Flickr
Both locos were painted up and then gloss varnished, ready for transfer application.
37799 and 37890 by James Makin by James Makin - Account 2, on Flickr
Classic Alphabeat is very much the recommended go-to soundtrack for Heavyweight 37s.
After transfer application, the bodies were given a coat of Railmatch matt varnish and left to harden for a month before weathering began. This included my usual trick of paint-on/wipe-off coatings of various light browns and darker greys, matching to prototype photos of the late 1990s.
37799 and 37890 by James Makin by James Makin - Account 2, on Flickr
After this, the fun could be had then in starting to pick out the tiny rust patches and bolt-hole marks from previous depot plaques for example.
37799 and 37890 by James Makin by James Makin - Account 2, on Flickr
Finally, the models were reassembled and subjected to an airbrush weathering, Phoenix Paint's track dirt, brake dust, roof dirt, dirty black and lastly a coating of my dark navy blue for the roof exhaust weathering.
37799 by James Makin by James Makin - Account 2, on Flickr
37799 Sir Dyfed / County of Dyfed has long been a favourite - it starred in a number of RAIL Magazine pictures in the late 90s and so then finally seeing the loco sealed the deal, and it's place in the collection at long last!
37799 by James Makin by James Makin - Account 2, on Flickr
37799 by James Makin by James Makin - Account 2, on Flickr
There's something that just looks very 'right' about the splitbox refurbished ends, really appealing, to me at least!
37799 by James Makin by James Makin - Account 2, on Flickr
37799 by James Makin by James Makin - Account 2, on Flickr
And along comes 37890!
37799 and 37890 by James Makin by James Makin - Account 2, on Flickr
37890 The Railway Observer was among several other Heavyweights that are among my 'to-model' listing, looking a little worse for wear than 37799, with a number of bodyside rust patches and about to lose its RCTS plaques that accompanied the Railway Observer nameplate.
37890 by James Makin by James Makin - Account 2, on Flickr
I bought the nameplates from Fox Transfers, but they don't supply the RCTS plaques with it, so I ended up making them from the spare plaques that came unwanted with previous loco 47348 (St. Christopher's Railway Home) and repainting a few letters to replicate 37890's plaques...the golden rule being never to throw something away!
37890 by James Makin by James Makin - Account 2, on Flickr
I love modelling the weathering marks left behind after the depot plaques are removed..!
37799 and 37890 by James Makin by James Makin - Account 2, on Flickr
As always, it's great to bring back some past loves that are now gone...37890 eeked out a good career as part of EWS' Sandite fleet into the 2000s, before finally meeting it's maker in 2010. 37799, meanwhile, lead an even more interesting life after EWS usage, being shipped out to Spain as part of the GIF contract and gaining a bright blue livery for it's holiday in the sun. However like all good holidays, they soon come to an end...sadly 37799 was never to return to the UK and was scrapped in Spain in 2011.
37799 and 37890 by James Makin by James Makin - Account 2, on Flickr
It's been huge fun modelling all these Class 37s, and there are plenty more on the workbench right now to follow later in 2020 - watch this space!
Cheers,
James
These are just perfect James!!!
-
2
-
2
-
1
-
1
-
-
49 minutes ago, Dagworth said:
I think she'd divorce me!
How much??
Andi
I always have to buy trains and sneak them in at night
-
 1
1
-
-
6 minutes ago, Gloucester Road said:
Northern 156 pulls into Crossland station.
Nice updates here!! had good catch up...
-
1
-
-
Been at it again!!
making another burnt out brake van,
this one wil go on the sidings on Colmore TMD...
-
3
-


")


Embankment Road TMD
in Layout topics
Posted
Same as me Rob..
im going renumber my 47315..