Jump to content
 

Scratchbuilt GWR one-plank wagon (2)


Mikkel

4,939 views

blog-0646490001379533346.jpg.4d2532206d6697ceb2a490440084096f.jpg


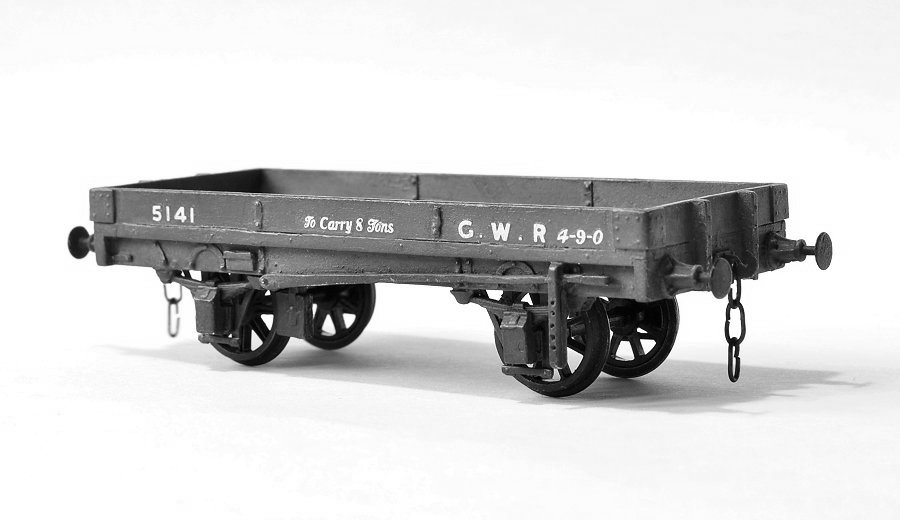
I've managed to finish my early GWR one-planker, built mostly from styrene. Just to recap, the prototype is one of the 18ft types with wooden solebars, originally built in the 1870s. We don't hear much about GWR one-plankers, but there were more than 2300 in service in the early 20th century. They appear to be a bit of minefield with a variety of dimensions, so mine is based on the drawing in "GWR Goods Wagons" by Atkins et al. Details are based on no. 5141, of which a couple of photos exist.


Img_1802.jpg


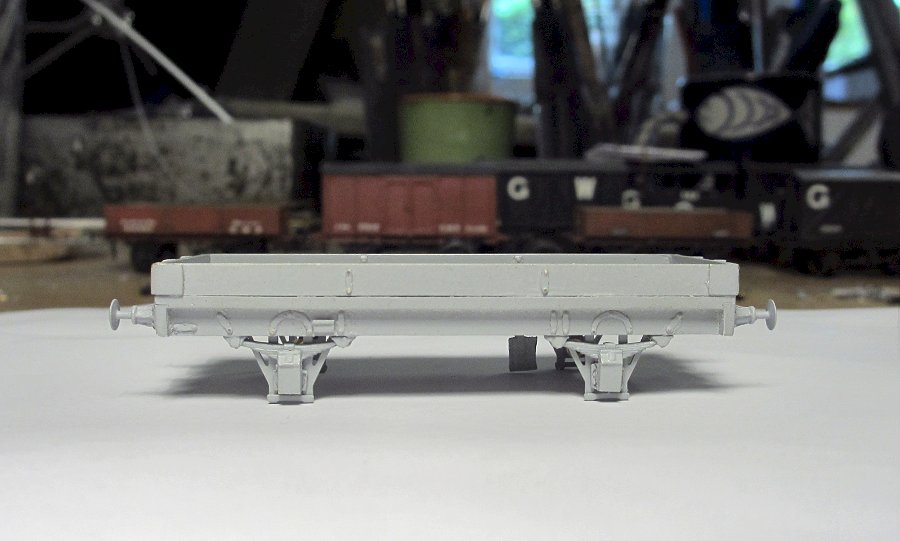
Here she is with a light dusting of grey primer, in preparation for the rivet transfers. It seemed a shame to cover all those nice brass detailing bits, but sooner or later we all loose our shine!


Img_1772.jpg


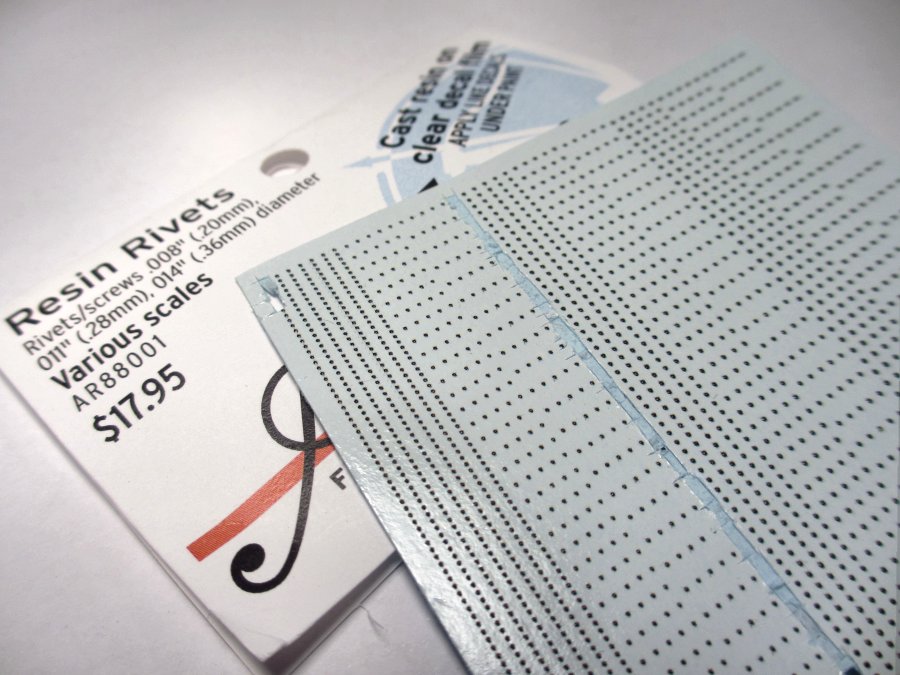
For the rivets I used Archer's resin transfers, as discussed in this thread (thanks gents!). I bought the mixed-size sheet as it is a bit difficult to assess beforehand what size you need. There doesn't seem to be many UK stockists, but DCC supplies have them. They are not cheap, but there should be enough here for several jobs.


Img_1759.jpg


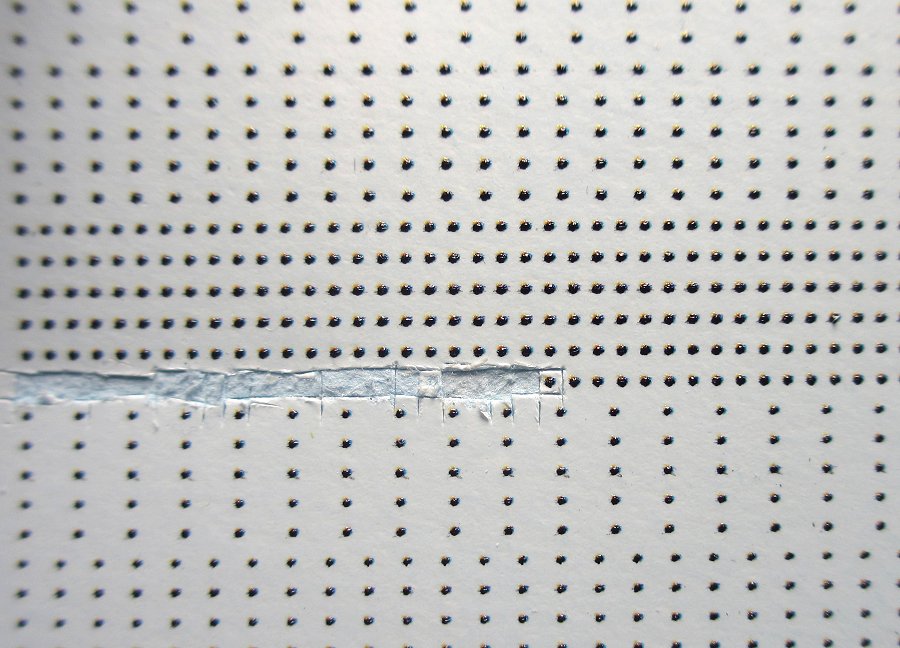
Pacman? No, rivet transfers. The clever bit is that you can cut out strips of rivets and therefore don't have to add each one individually. But it depends on the prototype of course. In my case I did have to add a lot of them individually to get the right spacing.


Img_1730.jpg


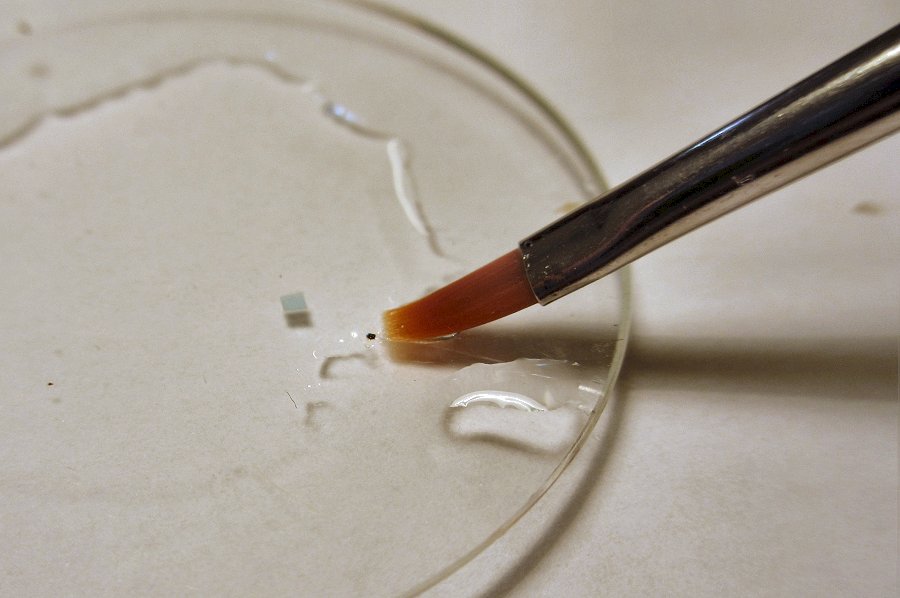
The transfers need to be soaked in warm water prior to application. The instructions suggest retaining the backing paper until the rivets are in place, and then sliding it out from under them. I personally found it easier to tease off the backing paper with a brush while in the water, and then simply add the transfer directly to the wagon.


Img_1804.jpg


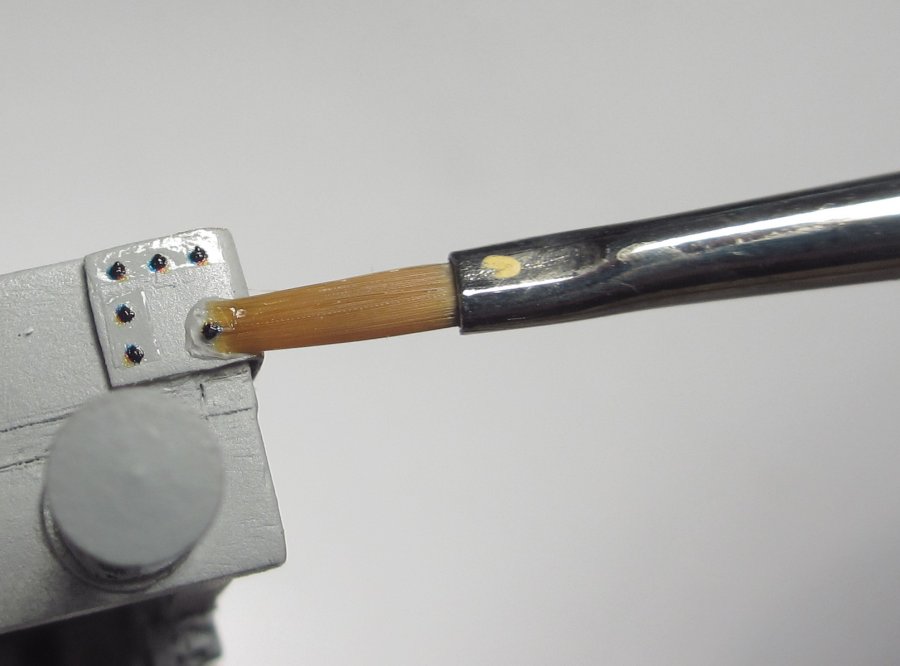
As long as they're wet, the transfers can be gently nudged in place and repositioned as required. Once they dry up they start to harden. As RMwebber Sasquatch advised me, the transfers really do need a coat of primer to stick to if you want good adhesion. As you can see, the transfer film is fairly obvious...


Img_1803.jpg


... so as recommended in the instructions I used Microsol on top of the transfers, which interacts with the primer and transfer film so that the latter essentially dissolves.


Img_1814.jpg


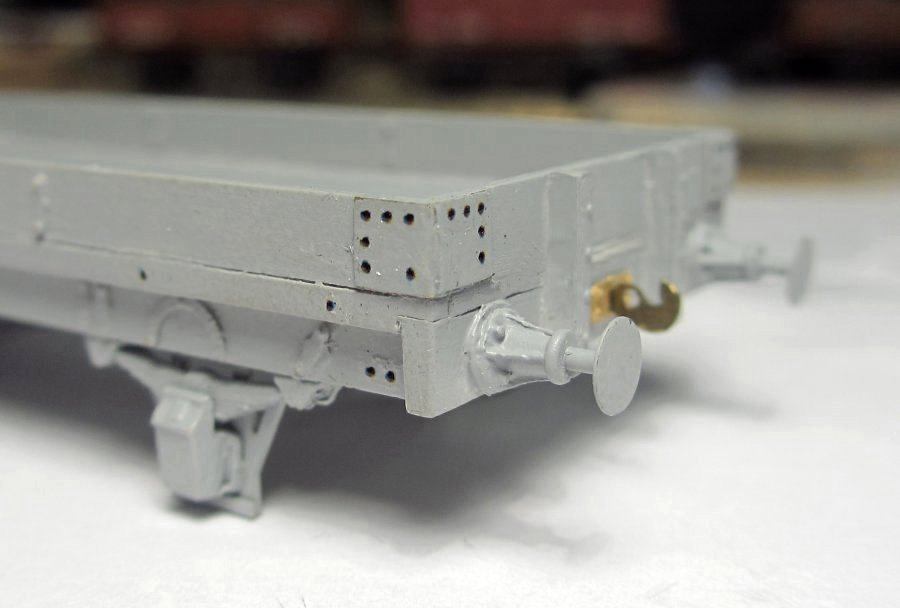
Train spotting. The transfer film is gone and the rivets are stuck in place. One of the fun things about scratch-building is that you can replicate the idio-synchrasies of a particular wagon. The real no. 5141 also had a rivet head missing on one corner plate, and lacked rivet plates on one end of the solebar. The ribbed buffers are from MJT and this close-up is a little unfair to them.


Img_1877.jpg


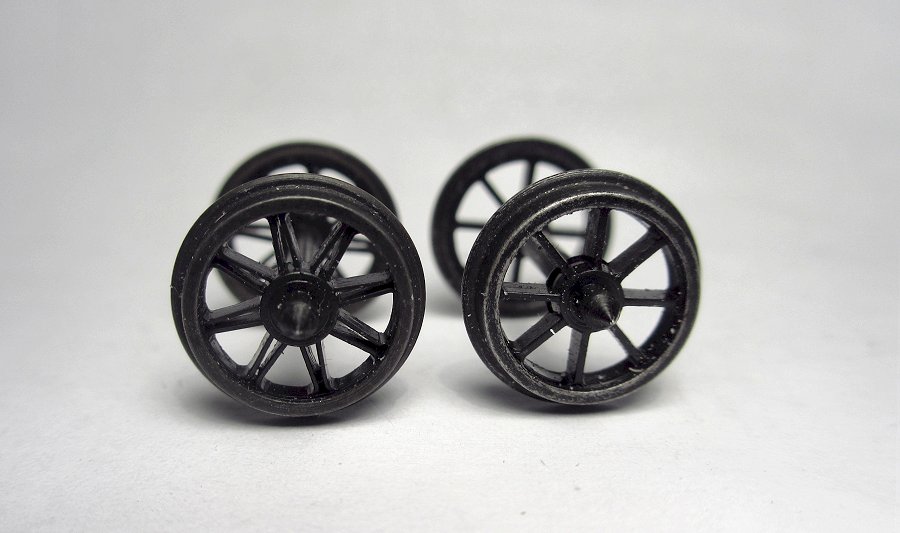
Another of those little imperfections that I rather like, and that noone else will ever notice! Photos of no. 5141 show the wagon with two different wheel types, one axle with split spokes and the other with solid spokes. I'm sure it wasn't built like that, but something happened along the way. We all know the feeling!


Img_1876.jpg


Here she is again after another coat of primer to cover the rivets. The brake is a bit of an enigma. We know that these wagons had a single large wooden brake block, but the details of the arrangement are not clear. The two photos that exist of no. 5141 are from the unbraked side, and the brake is only seen as a ghostly shadow. Photos of other wagons with single brake blocks suggest that there were several different types, so that is not much help. The arrangement seen here is therefore my guesstimate, based on consultations with knowledgeable RMwebbers (any mistakes are entirely my own!).


Img_1889.jpg


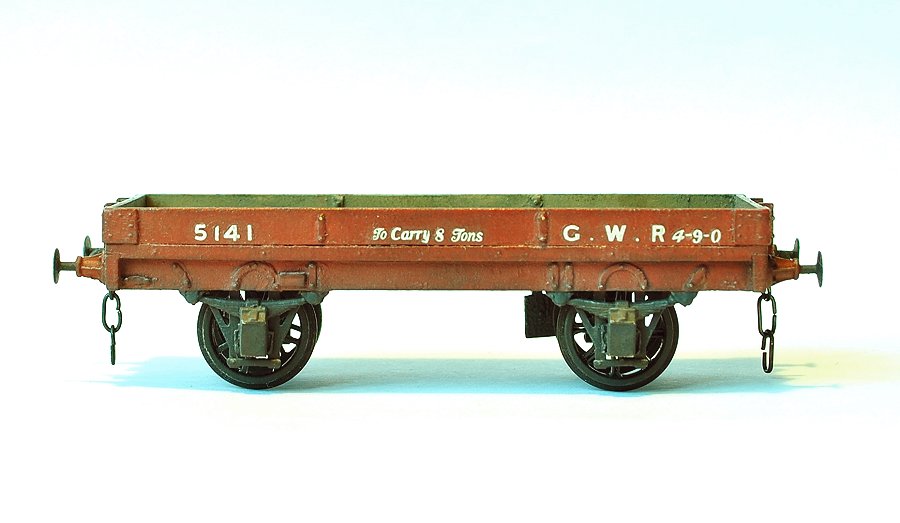
Then came the question of livery. As discussed elsewhere, my working assumption is that wagon bodies were red right up to 1904. But what about the bits below the solebar - the axleguards etc? Were they red or grey? I tend to think grey, but looking at photos of the real 5141 it does look as if it's the same colour all over. I can't show the prototype photos, so above is a shot of my model instead, taken with the "monchrome" setting on my compact camera. As you can see the wagon is clearly the same colour all over....


Img_1888.jpg


...except that it isn't :blum:. This photo was taken immediately after the one above, and to me it indicates just how difficult it can be to tell colours apart in monochrome, even with today's technology. Admittedly, these shots aren't of a very good quality (they were taken with the macro-focus on), and I realize that it is problematic to compare modern photos with those of the 1900s.


Dsc_1756b.jpg


No doubt it also depends a lot on the colour shade and lighting: This photo was taken indoors with artificial lighting, after I had given the wagon a second coat in a different shade, and treated it with weathering and varnish. Here you can actually see a colour difference between the axleguards and the body. This may explain why the evidence from prototype photos is so ambigious. In any case, for the time being I'll stick with "red on top, grey underneath" (to paraphrase the old Kerryman joke).


Dsc_1756.jpg


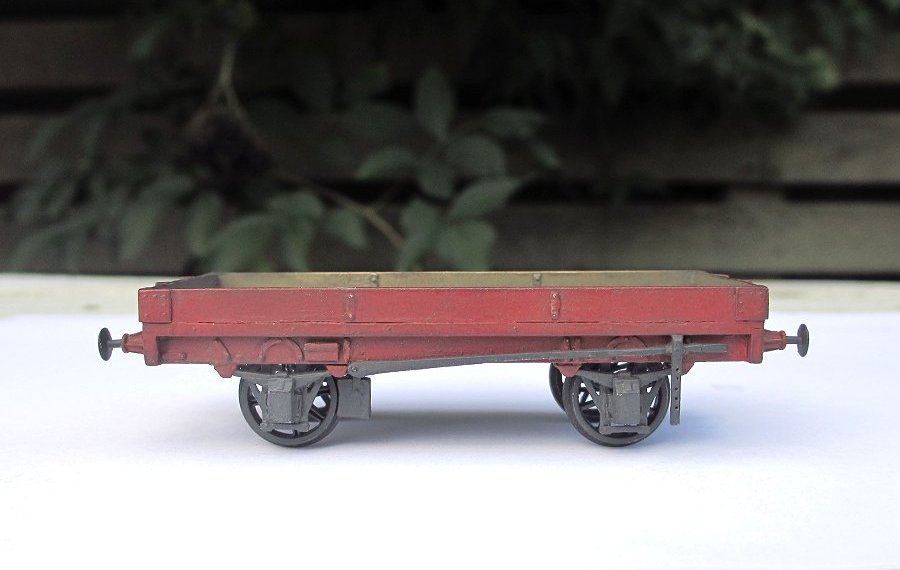
So here she is in more or less finished condition. I say more or less because the prototype photos of no. 5141 show her with broad gauge-style incised lettering on the solebars, and a variety of chalk markings on the sides. I must admit I am at a loss on how to reproduce these, especially the incised letters, so I might have to compromise and leave it off. As for the shade of the red colour, I wanted to try out something a little more worn and toned down that on my other wagons. Experimenting is half the fun of modelling, I think.


Dsc_1755b.jpg

Lady in red. Not much to look at really, and quite labour intensive. But she's all mine!


Edit August 2015: I recently came across a photo on the web which I think may show one of these wagons. There aren't a lot of photos of them around and I have never seen this photo mentioned before in the literature. Note especially the enlargement available in the r/h column: http://www.dudleymal...ak/roundoak.htm

  • Like 23
  • Craftsmanship/clever 1

26 Comments


Recommended Comments


  • RMweb Gold

Fantastic work as usual Mikkel.It might seem a stupid question but what kind of load would these wagons have carried back in the early 1900s.

Link to comment

I want one!


Lovely work again Mikkel, I shall have to get out the plastic and knives in the future and have a go.


Your work is so inspirational.


Thanks for sharing.


Jim

Link to comment
  • RMweb Gold

Fantastic work as usual Mikkel.It might seem a stupid question but what kind of load would these wagons have carried back in the early 1900s.


Hi Rob, thanks, well the photos in the Atkins tome shows it with sacks of some sort - and they are loaded very high too! No wonder the GWR caught upon the idea of adding more planks :-)

Link to comment
  • RMweb Gold

I want one!


Lovely work again Mikkel, I shall have to get out the plastic and knives in the future and have a go.


Thanks Jim. It would be great to see you build one, no doubt it would be superb. I was a bit surprised at how many hours I had to put into this, I could've finished my goods depot in that time! But then I'm slow, I think people with more experience in scracthbuilding could do it much faster.

Link to comment

Makes me want a 4mm shunting plank just so I can have a go........ one for the list of projects!


Thank you for the in depth coverage!

Link to comment

"The real no. 5141 also had a rivet head missing on one corner plate"


I have often read about 'rivet counters' but now it seems we have to count missing rivets too :)


Seriously, a very nice model and,as you point out, scratch-building allows you to follow the construction details of the real thing.


Mike

Link to comment

Hi Mikkel,


Excellent stuff! I've been sat here with the prototype photos alongside yours on the screen for a while and it really does capture the sense of the original very well. The only problem is your monochrome photos aren't grainy enough :O


I particularly like the label box on the solebar, so much better than that flat rectangle on Cooper Craft solebars that is neither early box nor later clip. I reckon the brake is about as close as you'll get without a shot of the other side.


Apart from the incised GWR and number on the solebars, the only things missing are the minute rope loops which are probably too small to represent well at this scale, and the horse hook loops.


Nick


ps. I'm still not convinced about why the blacksmiths' shop adopted grey livery before the carpenters :scratchhead:

Link to comment

It's all been said above - but nice one Mikkel.  How long did they last in service??  I might build a couple for 'Ambridge one day...


Regs

Ian

Link to comment
  • RMweb Gold

Great to see this finished Mikkel.


You've made a beautiful job of this wagon from the build up to its finished state.


Nicely described as ever and lovely photographs.


Cheers,


Mark

Link to comment
  • RMweb Gold

Hi Mikkel,


Now this IS nice! Super job!


All the best,


Castle


Thanks Castle, it was helpful to have your post on the rivet transfers to steer by. The Microsol makes a big difference, without that they wouldn't work nearly as well, I think.


"The real no. 5141 also had a rivet head missing on one corner plate"


I have often read about 'rivet counters' but now it seems we have to count missing rivets too :)


Hi Mike, yes it's good fun I think. In a way it's a bit silly because there are other minute details that I have left off the wagon, so I'm not being entirely consistent here. On the other hand it seemed odd to model a rivet that wasn't there in reality!


Hi Mikkel,


Excellent stuff! I've been sat here with the prototype photos alongside yours on the screen for a while and it really does capture the sense of the original very well. The only problem is your monochrome photos aren't grainy enough :O


I particularly like the label box on the solebar, so much better than that flat rectangle on Cooper Craft solebars that is neither early box nor later clip. I reckon the brake is about as close as you'll get without a shot of the other side.


Apart from the incised GWR and number on the solebars, the only things missing are the minute rope loops which are probably too small to represent well at this scale, and the horse hook loops.


Nick


ps. I'm still not convinced about why the blacksmiths' shop adopted grey livery before the carpenters :scratchhead:


Thanks for that, Nick. Yes I'm fairly happy with how it captures the feel of the real thing. One unexpected problem was that initially the styrene parts fitted together too neatly, so it didn't have that rounded and slightly worn feel of real wood. So I distressed it a bit here and there. That and the unplanned rebuild (including glue in the wrong places and things not fitting quite so neatly the second time!) has helped give it a bit more character.


Mind you I'm fully aware of the shortcomings and missing bits here and there. I also belatedly discovered that the wagon strapping I used has rounded ends, whereas if you look very closely the prototype strapping has straight ends. It is so hard to see, though, that it doesn't bother me too much.  


It's all been said above - but nice one Mikkel.  How long did they last in service??  I might build a couple for 'Ambridge one day...


Regs

Ian


Hi Ian, I don't actually know how long they lasted in service! I am not sure if anyone has ever researched it. The Atkins tome is actually a little confusing/unclear in its description of these wagons, but if I read it correctly it states that round about 1917 there were still 2300 one-plankers on the system. This included the shorter wheelbase ones. So surely there must have been a good number left in the decades that followed?   


That's me sorted for a new chapter of GWW, err, I mean a coupla new pics for GWR Modelling...


Hi Miss P, well who knows how it all really looked, and I'm certainly not sure of anything myself. But please do help yourself to any pics you like and let me know if I can help with anything.


Again a wonderful goods wagon from the Farthing wagon works.

As a goods wagon fan I like your models very much.


Job


Hi Job, thanks, and yes there is something about goods wagons that is very appealing for me also. For me I think perhaps it is that they have a very human face. And in modelling terms they don't require the precision engineering skills that a loco does :-) 

Link to comment
  • RMweb Gold

A lovely bit of modelling as usual Mikkel and not a trace of lipstick in sight! lol I particularly like the way you've done the faded red livery along with the distressed wood effect.


Best wishes


Dave

Link to comment
  • RMweb Gold
Great to see this finished Mikkel.


Hi Mark, I'm glad it's finished too. I'm sure we all know that feeling: Is this really worth all that effort? But it usually is, isn't it?

Link to comment
  • RMweb Gold
A lovely bit of modelling as usual Mikkel and not a trace of lipstick in sight!


Hi Dave, no lipstick? How do you think I did the red livery then ? :-)

Link to comment
  • RMweb Premium

Beautiful model.  Love the patience with the rivet detail - so accurate. Sure you haven't got a miniaturization machine so you can shrink down to put them rivets on in a perfect line?!


Mike

Link to comment
  • RMweb Gold

Thanks Mike :-)


 Sure you haven't got a miniaturization machine so you can shrink down to put them rivets on in a perfect line?!


Argh, my secret is out! It's kind of a useful machine though. Do you reckon I could earn a penny or two if I sold the patent?

Link to comment
  • RMweb Gold

You've made an excellent job of that Mikkel! You've captured the character of that wagon really well. :)


I have often read about 'rivet counters' but now it seems we have to count missing rivets too :)


Well, technically, Mikkel is actually a "nut counter", as these are actually the nuts on the ends of the bolts that are used in the wagon construction ;). In the prototype photo you can actually see they are square, not round.


I took the opportunity to run one of Mikkel's colour pics through my "ye olde" Photoshop filter with added grain for Rob but unfortunately I've just found another blog short-coming; I can't directly attach a pic to this post without uploading it somewhere else first. :(

Link to comment
  • RMweb Gold

Thanks 57xx, that's a nice "olde" version of the photo. And now this one too looks like one colour all over! Maybe all GWR wagons were really pink and black and we've all just been fooled by light and shade for all these years ;-)


I thought "rivets" was a broader more generic term, thanks for putting that straight.

Link to comment

Mikkel said:

"One unexpected problem was that initially the styrene parts fitted together too neatly, so it didn't have that rounded and slightly worn feel of real wood. So I distressed it a bit here and there. "


There was an interesting series in Scalefour News back in 2003/2004 describing building timber framed wagons in the 1930s at Stevens Wagon Works in Doncaster by someone who was an apprentice there at that time. Amongst other things he says apropos siderails:


"Now we will be thinking about the siderails. These run the whole length of the wagon and are machined from five- inch square timber. They are bolted to the top outer edge of the solebar and form a base on which the sides of the wagon wil be built. To prepare them each end has to be haunched to fit over the top of the headstock, then a chamfer is cut along the top outside edge. The chamfer is cut with a drawknife  and is stopped short at both ends and also where the cross rods will be. Then an arris is planed off the front bottom edge"


 A final comment on the side rails:

"Care has to be taken that no hammer marks show on the face of the side rail ................................. I should add that   all the nuts must always be left vertical - it looks better like that."


So it would seem that Mikkel is correct in thinking his styrene framing was too square, 


The article was included in S4-135 to S4-138 and I suspect it describes the way wagons were built way before the 1930s. I have omitted lots of detail about bolt sizes and the like but for the benefit of 'rivet/bolt counters' it is all there ;-)


jayell

Link to comment
  • RMweb Gold

Hello John, good to see you here on RMweb, I didn't know you frequented these parts.


Many thanks for this interesting info. Looking at the photos of the one-planker on p. 270 of Atkins, Beard & Tourret (1998 edition) I think i can see the arris (had to look that up!) along the lower front bottom edge, though I can't really see the chamfer along the top.


Page 41 of the same book has a drawing of the arrangement of sidebars on a single plank open, which I used to steer by when building this wagon, but that would appear to be incorrect then as it does not show the chamfer or arris. If indeed we can assume that the GWR did it like this?


BTW, I've just had a look at your battery-powered 850 that you mention in another post on here, what a gem that will be!

Link to comment

Hello Mikkel


I agree that the GWR may not have done things like that, not that I am any sort of expert, but from what I have read they tended to go their own way in most things. That does tend to make life 'interesting' for us GWR modellers, especialy if our interests are around the 1895-1912 era when much was changing.


I do keep an eye on several threads on RMWeb and your Farthings blogs are among those threads. My particular interest is the Bridport Railway and Toller Porcorum in particular. I am using the Timber Tracks P4 panels for the straight track, in fact there are no curves as such, the turnouts at each end of the siding will be built on Templot templates using timbers from Timber Tracks and plastic chairs from C&L.


I found the straight track easy enough to do, remembering to reverse the chair direction for the last chair, but maybe should have alternated all the chairs as the track is bi-directional. I am a bit scared tho' when it comes to turnouts and keep putting off making a start!!


I quite like the idea of having the siding as baulk road though, possibly using some of that nice rail from the BGS but finding photos of track from that in-between era is proving a bit difficult. It is bad enough finding photos of GWR turnouts witth round stretcher bars, but there are two photos of Bridport station circa 1910 one of which clearly shows balk road with early type rail still in use.


I am looking forward to getting my 850 back from the other side of the world, strictly speaking it isn't correct for the Bridport branch as it should really be a 2021 which although looking much like the 850 had the rear wheels spaced further   apart so altering the appearance of the whole rear end a bit.


There is a new thread on ScaleForum entitled Dartmouth which is to be about a mixed broad/narrow gauge layout and a few days ago Paul Townsend posted a picture showing what he is doing regarding wiring the layout. He says

"The CBus electronics is derived from MERG kits and will simplify wiring, allow computer control etc."

Now if that is simple wiring I am glad I decided to go battery powered/RC controlled, but that is quite enough from me.


jayell

Link to comment

Create an account or sign in to comment

You need to be a member in order to leave a comment

Create an account

Sign up for a new account in our community. It's easy!

Register a new account

Sign in

Already have an account? Sign in here.

Sign In Now

×
×
  • Create New...