Jump to content
 

SDJR Road Van


Mikkel

4,522 views

Last year we had a discussion about SDJR Road Vans here on RMweb, which revealed that – contrary to what one might think – these vehicles travelled well beyond the SDJR on a regular basis, including foreign destinations right up to London. For details, please see Buckjumper’s notes in the thread.


I thought I might justify one of these vans making an occasional appearance at Farthing, perhaps carrying small consignments of cheddar, cider and other Somerset delicacies to satisfy the palets of Wiltshire’s gentry.


IMG_1237.jpg


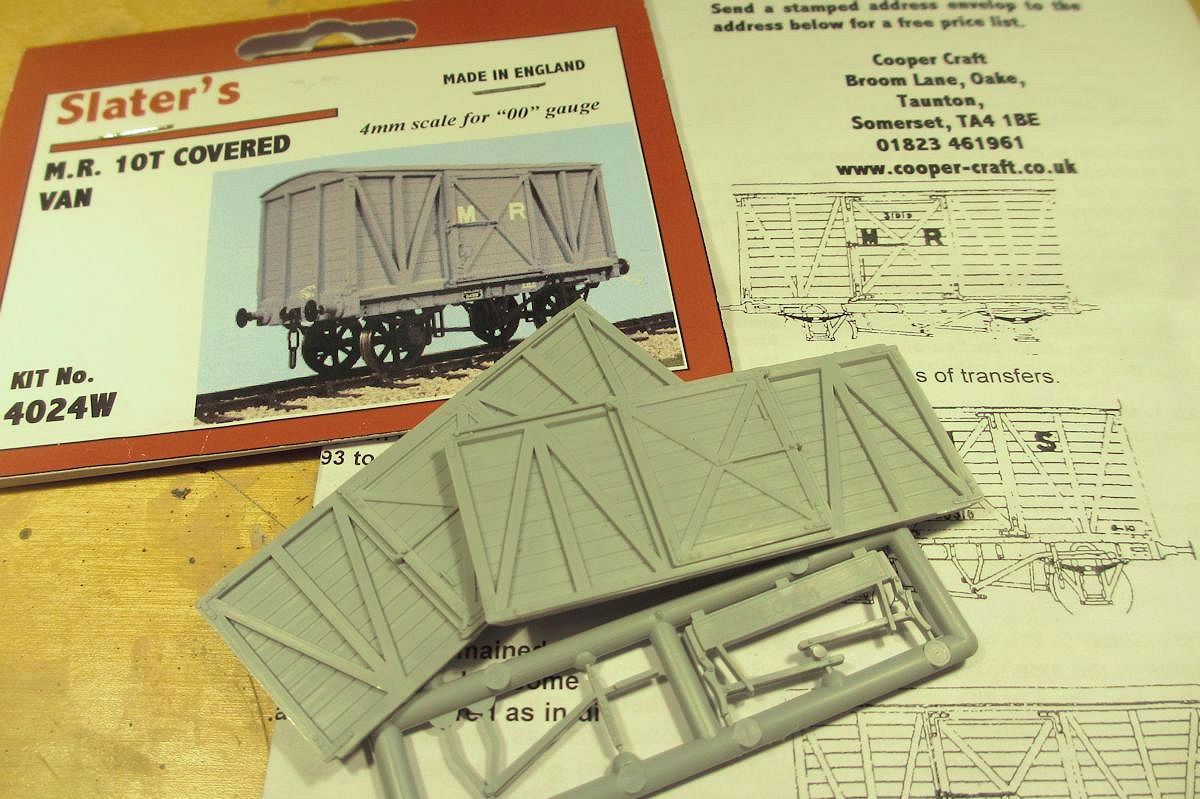
The SDJR had at least two designs of road van, one of which was based on the Midland Railway diagram D363 vans. Slater’s do a kit for the latter MR van, so I thought this would be a good basis for a kit bash. As it transpired, the project came to involve a lot more scratch building than kit building!


Image3.jpg


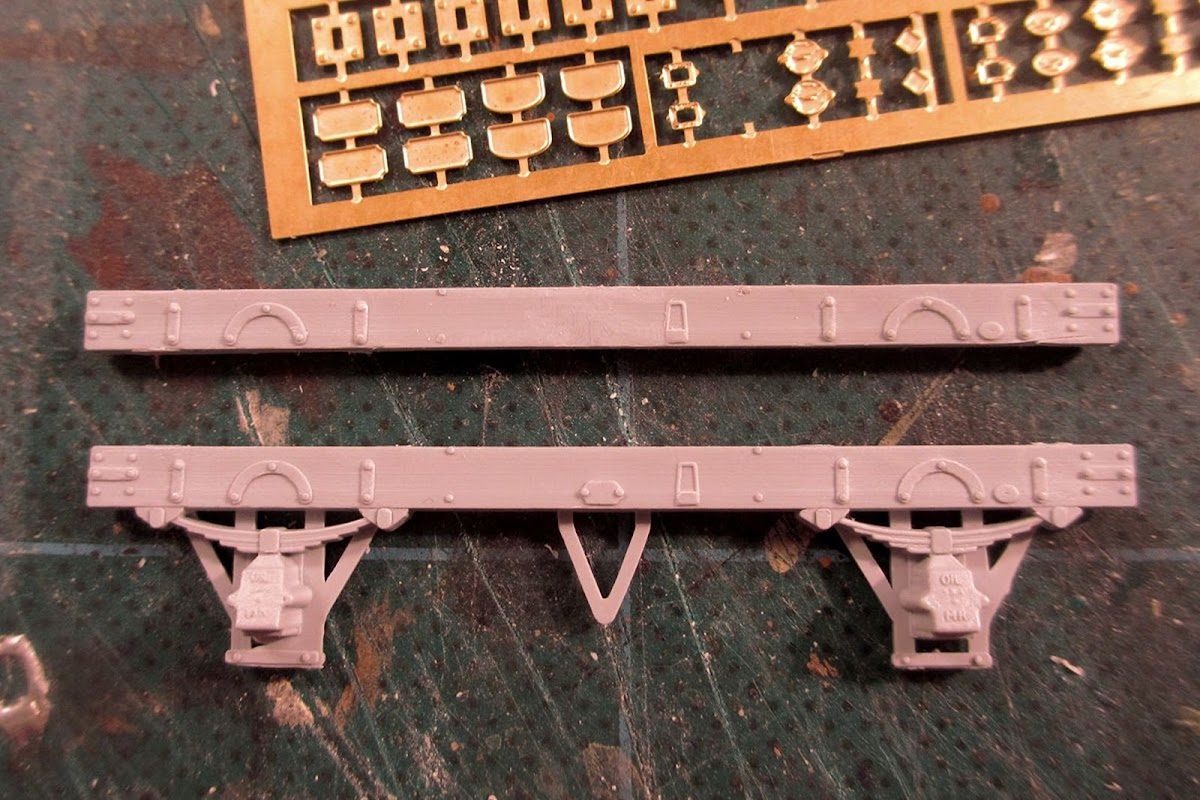
I began with the chassis. As can be seen here, the kit comes with oil axleboxes but my photos of the SDJR vans show Ellis grease axle boxes. So I removed the axleboxes and W irons, and also filed off some of the solebar fittings, to be replaced later.


Image4.jpg


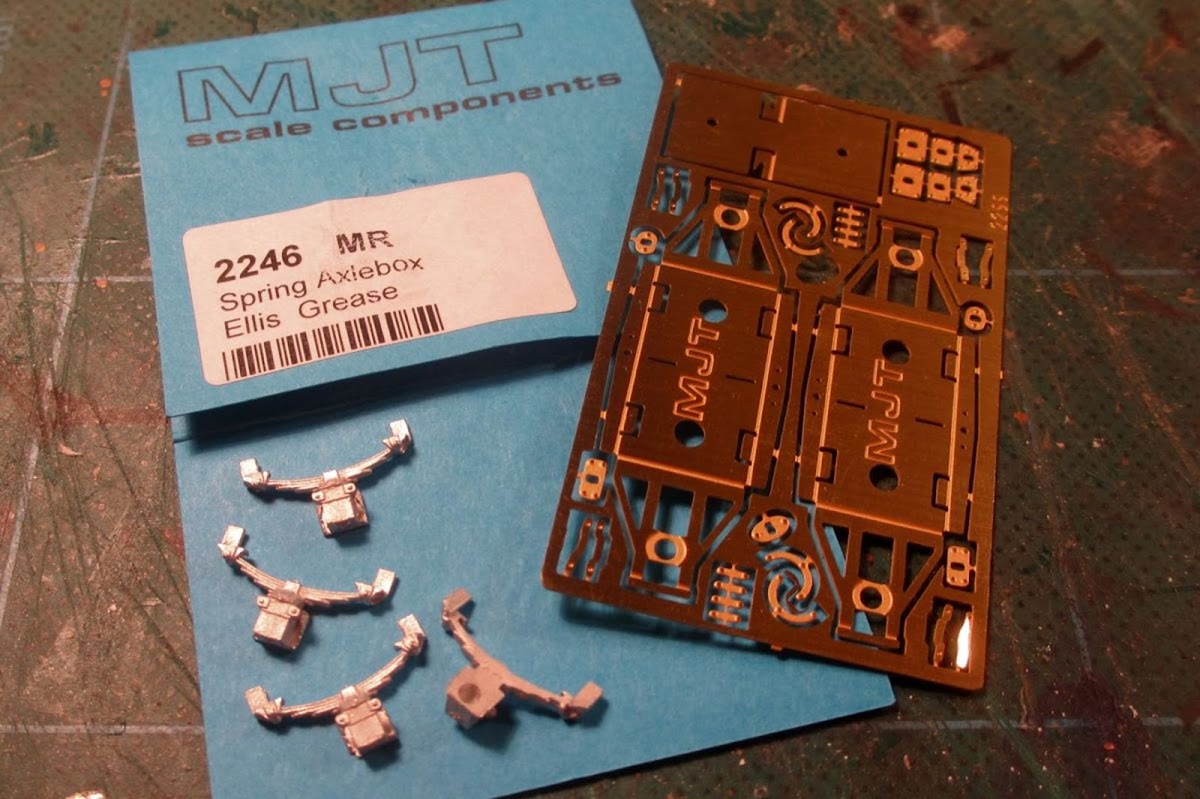
I bought in some MJT compensation units and and Ellis grease axleboxes from Dart castings.


Image5.jpg


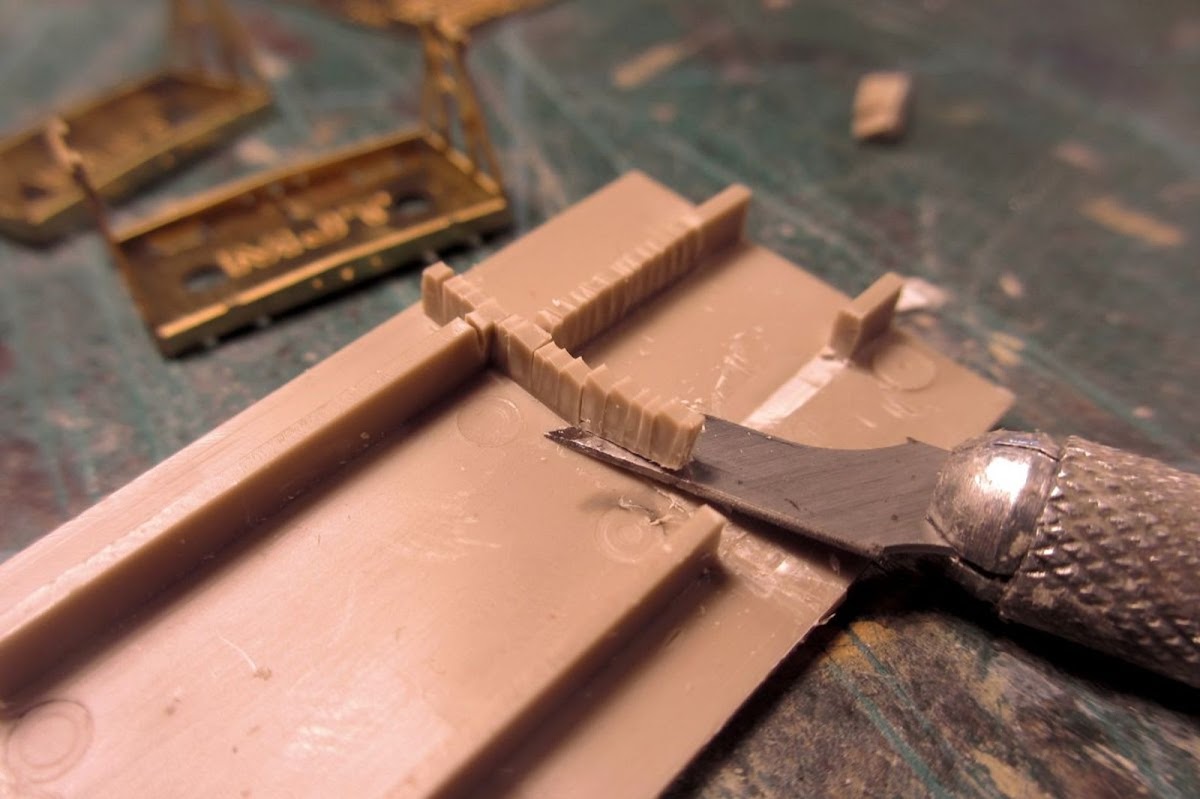
To make space for the MJT units, parts of the underframe from the kit was cut away, using what I call the “salami method”.


Image6.jpg


Plastikard packing under the MJT units to get the right ride height.


IMG_1116.jpg


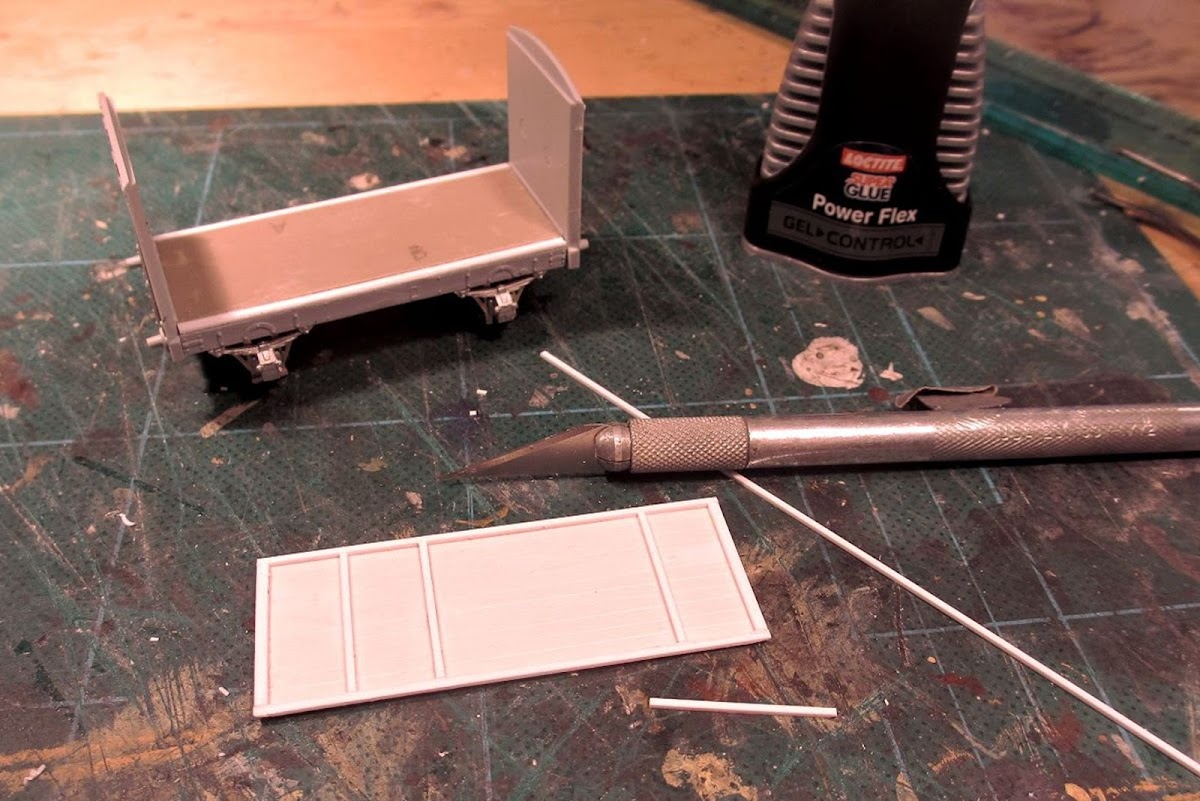
Then came the time-consuming part. As can be seen above, the Slaters kit has a sliding door type which is wrong for the SDJR vans. To make matters worse, the door is off-set to one side, meaning the Vs of the framing aren’t actually symmetrical. So I decided to scratch build new sides.


Image7.jpg


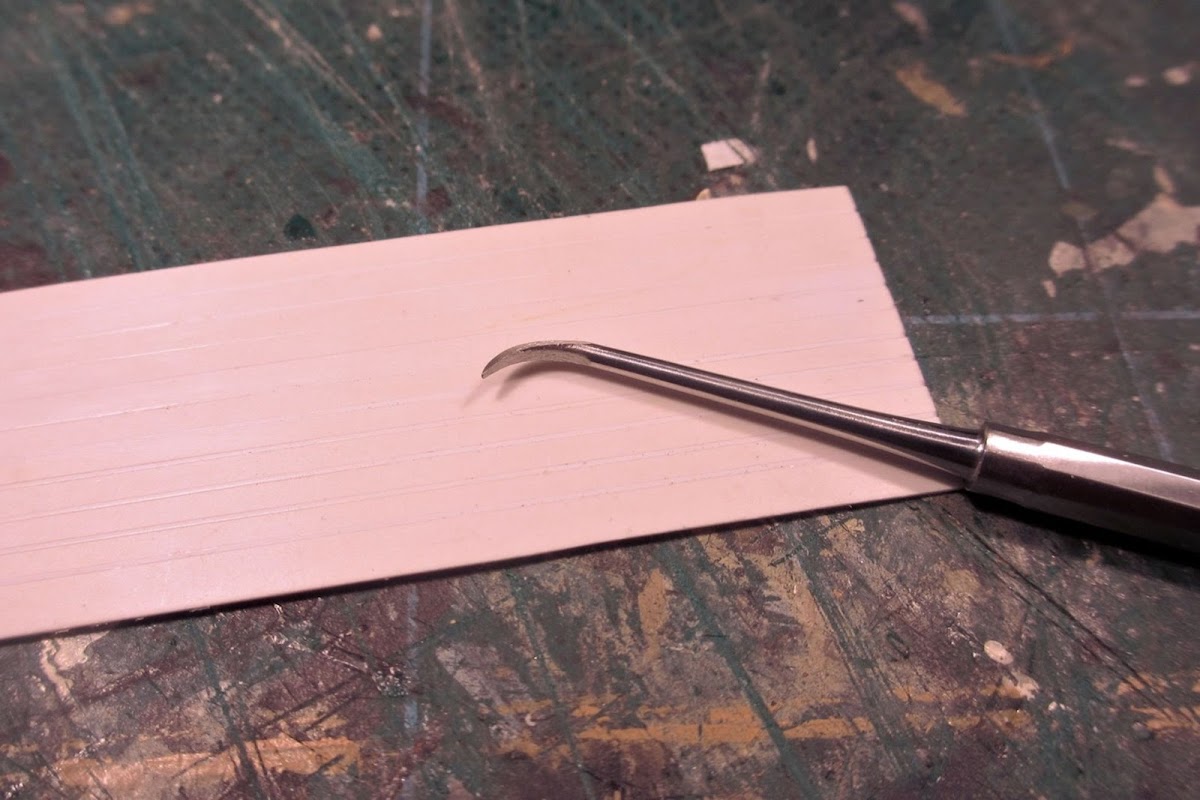
For the new sides I used plain Evergreen 0.5 styrene, and did the planking with my new scribing tool. This makes a neat V-groove, whereas other methods – eg the back of a scalpel blade – tends to make an unsightly ridge along the groove.


Image8.jpg


The framing was a bit tricky. The joins with the van ends are mitred, and the bottom framing is sloping in order to let rainwater run off. It helped to fit the ends to the chassis, so that I could offer up the sides to the van and check that everything fitted as I went along. I trust my fettling more than my measuring!


Image9.jpg


The framing all done.


Image10.jpg


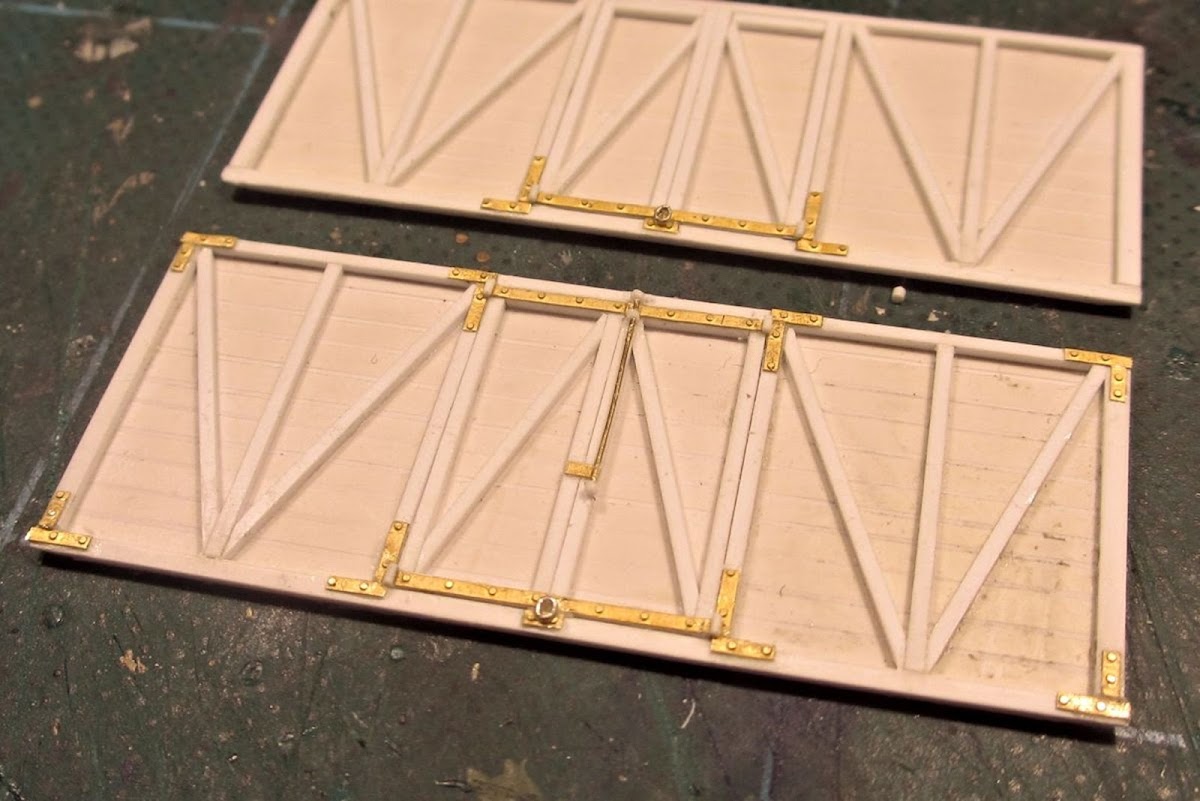
For the strapping I used a general etch from Mainly Trains. Having done a full side, I realized that the strapping should have rounded ends. I decided to leave it, but next time I’ll use plastic strip instead as this can be fashioned as required. Door hinges and locking mechanism were made from plastic rod, wire and chain.


IMG_1134.jpg


Bolt heads were added using rivet transfers. The lower framing “dips” where each bolt is mounted. This was replicated with plastic putty filed to shape.


IMG_1110.jpg


Sides checked against drawing. The perspective makes the side look a little too long here, but it fits in reality (honest, guv!).


IMG_1137.jpg


My glorious reward for scratchbuilding the sides was that the ends now looked a bit coarse by comparison! I decided to leave them as they were, except for a bit of modification to the strapping (lower left is as it comes, lower right is modified as per the prototype photo).


IMG_1236.jpg


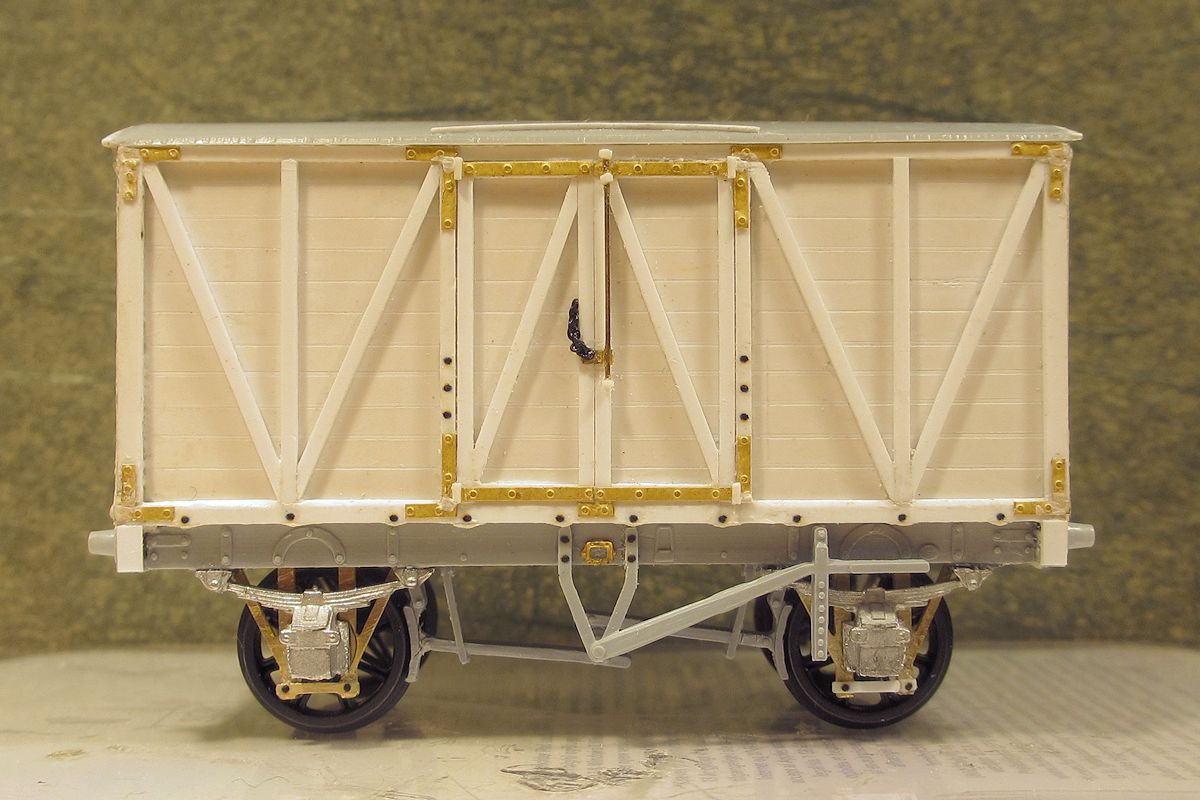
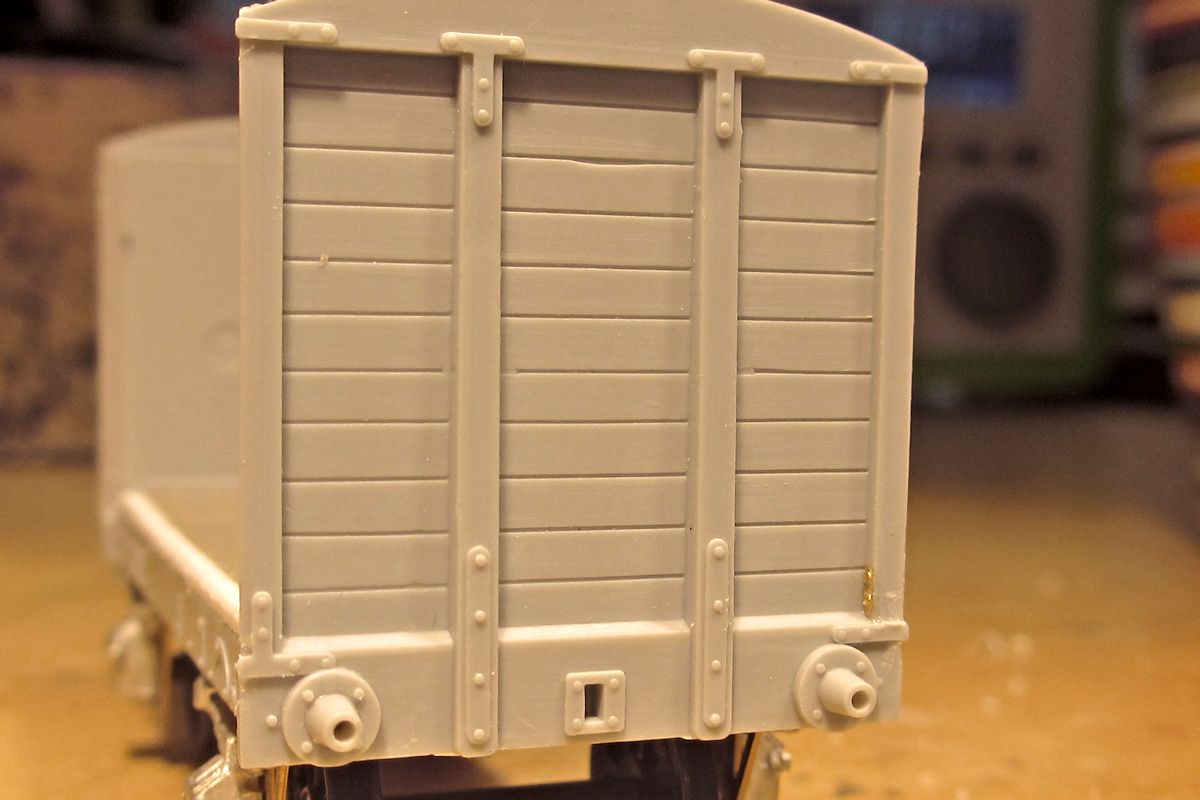
Ready for primer with brakes and various other fittings now added. The headstocks were extended a little to be flush with the lower framing, as per the photo in Southern Goods Wagons. The roof seemed a little short to me – even for the original kit – so I extended it by 0.5 mm at each end.


IMG_1374ok3.jpg


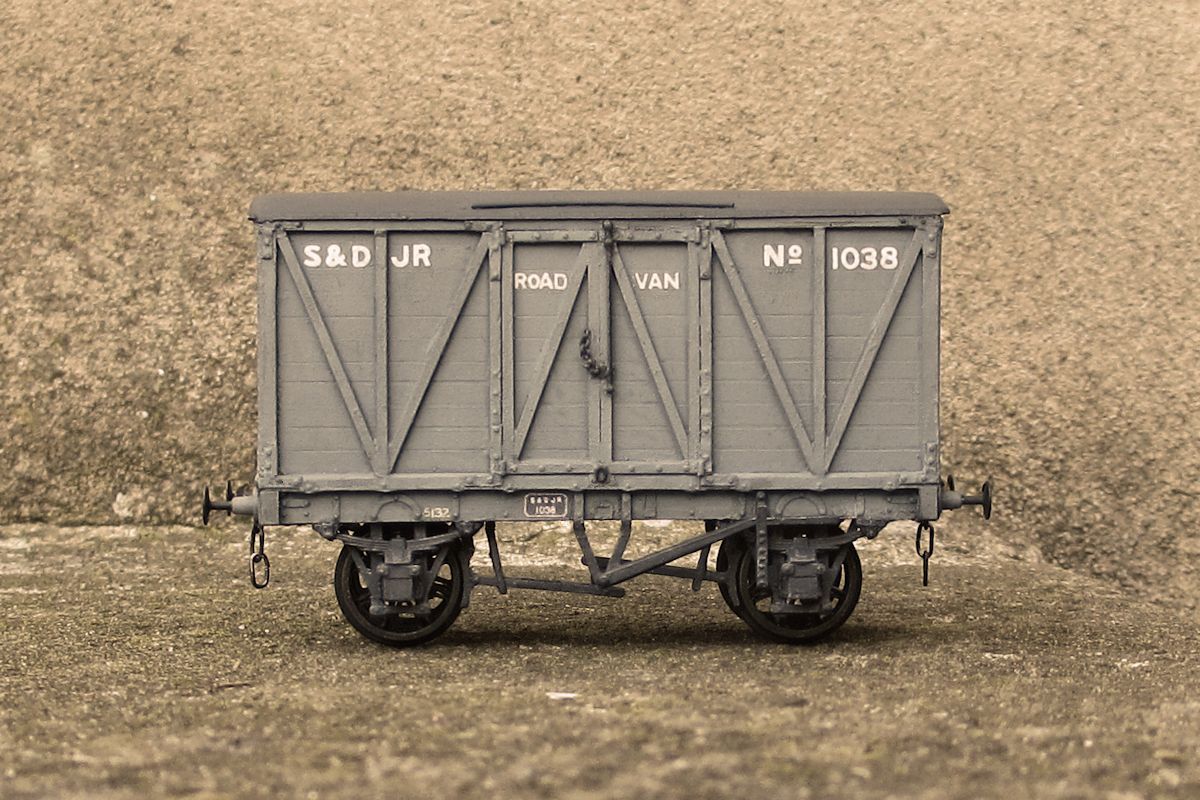
The paint job did not go well. Unfamiliar with the livery, I first sprayed on a light grey, then tried a darker one, then the light one again, etc. As a result, the grooves in the sides started filling in and revealed that I hadn’t cut them all to equal depth. Lesson learnt, the hard way! I couldn’t find any available SDJR lettering, so used individual letters from various HMRS sheets (the SR pre-grouping sheet is particularly useful). Number plates are a print from the original photo, with the perspective changed in Paintshop. The split spoke wagon wheels are temporary till I get some new plain ones.


IMG_1406e.jpg


Thankfully, the slightly heavy paintjob is not really noticeable in a layout context. One thing puzzles me though: Most SDJR wagons seem to have had distinctive black ironwork, but the 1896 photo I was working from shows no. 1038 in all-over grey, with only the number/works plates picked out in black. It’s an official photo taken at Derby works, so perhaps not to be trusted? For the time being I’ve left the strapping in plain grey but if anyone has further info I’d be interested.


Thanks to all involved for helping out with the info used in this build, very much appreciated!

  • Like 23
  • Craftsmanship/clever 2

35 Comments


Recommended Comments


Wonderfully researched / observed / detailed / finished Mikkel. Another little beauty from Farthings for us to behold.


And as always, your updates seem less about instruction or display, but more akin to a delightful journey (even if there is an occasional bump on the way). A most enjoyable read.


One question if I may - what tool(s) do you use for scribing styrene?


Thanks,


Mark

Link to comment
  • RMweb Gold

That's turned out very nice Mikkel - Must be very satisfying to have built and detailed your own sides and although you mention the paint job I think the overall result is very compelling - another enjoyable visual read :good:

  • Like 1
Link to comment

Mikkel,

What a lovely little van.  It looks quite at home at Farthing.  Reading this entry makes me feel like I ought to get out the plasticard and make the 1, 2, and 3 plankers that I intend to build for Modbury, however I really must resist that temptation for a few months until I get the track work completed and the wiring sorted (I want to utilise the signalling to provide power to only the sections that have been granted access to by the clearing of the relevant signals - a task that is sometimes making me wish that I was modelling a halt) :-)


Ian

Link to comment

On the original, the 'dips' in the lower horizontal frame was produced by chamfering the edge of the timber between the bolt heads. All the uprights and diagonals were also chamfered for most of their length.

Link to comment

Nice bit of modelling there Mikkel and a nice addition to Farthing Layouts.


Snitzl

Link to comment

As ever, wonderful. You make creativity look ridiculously easy.

Can you provide a vegetarian-friendly alternative to salami? Otherwise, I can't use your technique :)
 

Cheers


Jan

Link to comment
  • RMweb Gold

Lovely piece of modelling Mikkel.


Hope you're stocking up on Mainly Trains detail etches with their winding down of the business?


Cheers,


Mark

Link to comment

Despite your reluctance to admit to scratch-building - this is an excellent example, only loosely connected to the kit!  I had missed the thread about 'road vans', so have now read it with interest. 


I like the outside framing, while the 'Mainly Trains' detailing parts really bring it all to 'life', as a very characterful model.  Let's hope someone else takes  them up when the original business is wound up.


There is so much that was different about 19th-cenutry operations. It seems that closed vans appeared quite late on many lines, with almost all goods carried in open wagons or at best under tarpaulins.  This one makes an excellent counter-point to the GWR Iron Mink.


Mike


ps thanks also for the salami/carrot slicing tip :)

Link to comment
  • RMweb Gold

Very nice Mikkel! A really characterful addition to your wagon fleet and a nice contrast to the GWR stock. That "v" shaped scraper looks like it will be a very handy instrument for scribing planking. I have to agree with Mike, this is a fine example of scratch building!


Best wishes


Dave

  • Agree 1
Link to comment
  • RMweb Gold

Execellent work Mikkel.

The painting of the ironwork is a thorny problem. I have an idea which could explain why photos show both styles. I wonder if the Wagons were shopped out from new with the iron work black but when due for a repaint the local shop just simply painted everything down to the bottom of the solebar body colour and everything below that black. No evidence at all to back this up but I cannot believe they painted the ironwork just for a photo then put it back in the shop for a repaint.

Don

Link to comment
  • RMweb Gold

Brilliant I wish I could turn stock out to this level or detail, truly brilliant


Hi Paul, many thanks. Well it's a lot easier in 4mm than in your scale. But if you fancy a challenge, Steve Sykes has done one of these vans in 2mm: http://www.rmweb.co.uk/community/index.php?/topic/65499-whats-on-your-2mm-work-bench/?p=1044691


Wonderfully researched / observed / detailed / finished Mikkel. Another little beauty from Farthings for us to behold.


And as always, your updates seem less about instruction or display, but more akin to a delightful journey (even if there is an occasional bump on the way). A most enjoyable read.


One question if I may - what tool(s) do you use for scribing styrene?


Thanks,


Mark


Thanks Mark, and yes good point, I think modelling is a lot about the journey (though shortcuts can be nice, eh?).


I used to scribe styrene with the back of an X-acto no. 11 blade. I had quite got the hang of this, but the problem is it requires cleaning up/sanding of the ridges along the grooves. So I recently bought a Squadron scribing tool. These seem to be scant in Europe but you can get them here. Be warned though that it seems to require more practice than I thought - as you can see above I hadn't got all the grooves equally deep. I've also heard that each of them is actually slightly different in the point, so one may give a broader groove than another! I'll practice some more with mine, but I believe there are also other labels available which may be worth exploring.


That's turned out very nice Mikkel - Must be very satisfying to have built and detailed your own sides and although you mention the paint job I think the overall result is very compelling - another enjoyable visual read :good:


Hi Pete, glad you like it. Well it's one of those situations where I almost wished I hadn't painted it, it looked so nice and sparkling before my clumsy paintjob. Oh well!


This is again a wonderful wagon.

Like to see your wagon park growing this way.

Looking forward to your next one.


Thanks Job, I really like the pre-grouping wagons and their liveries. Problem is I'm going to need a bigger layout soon as my goods trains are getting longer and longer! :-)

Link to comment
  • RMweb Gold

Mikkel,

What a lovely little van.  It looks quite at home at Farthing.  Reading this entry makes me feel like I ought to get out the plasticard and make the 1, 2, and 3 plankers that I intend to build for Modbury, however I really must resist that temptation for a few months until I get the track work completed and the wiring sorted (I want to utilise the signalling to provide power to only the sections that have been granted access to by the clearing of the relevant signals - a task that is sometimes making me wish that I was modelling a halt) :-)


Ian


Hi Ian, your discipline is impressive! I like the sound of those "low-plankers". I have a thing for 1-plankers in particular, am building an LSWR one currently for which I have no real use, but it looks so nice :-)  Good luck with the wiring challenge, I'm sure it will give a more "real" operating experience once it's done.


On the original, the 'dips' in the lower horizontal frame was produced by chamfering the edge of the timber between the bolt heads. All the uprights and diagonals were also chamfered for most of their length.


Thanks for clarifying that Bill, I was wondering how the effect was achieved and what the point was. Looking at the prototype photo of 1038 it is clear now. I should have chamfered the lower frame. Will take note of that for next time.


Nice bit of modelling there Mikkel and a nice addition to Farthing Layouts.


Snitzl


Thanks Snitzl, I came across your scratchbuilt SDJR van with the X framing in the galleries. Perhaps we'll see some more SDJR stock as part of your "new generation" of rolling stock builds?


As ever, wonderful. You make creativity look ridiculously easy.

Can you provide a vegetarian-friendly alternative to salami? Otherwise, I can't use your technique :)


Cheers


Jan


Hi Jan, thanks very much. The idea of modifying the Slater's kit came from Simon over on Western Thunder who did a conversion of the G1 kit. His option of re-using the kit sides and only scratchbuilding the doors is definetely worth considering. As mentioned above the "Vs" will not be fully symmetrical, but it's not that noticeable and does make the project less time consuming.


Instead of salami, how about cucumber? :-)

Link to comment
  • RMweb Gold

What a cracking job, and explained so well. all the best Adrian


Thanks Adrian, I'm never sure how lenghty these build descriptions should be, or if anyone actually reads it all. But I use it for my own future reference too - it's frightening how quickly I forget how I did something!


Lovely piece of modelling Mikkel.


Hope you're stocking up on Mainly Trains detail etches with their winding down of the business?


Cheers,


Mark


Hi Mark, good point, I should probably get some more etches. I wonder what will happen to MT's own etches once the business closes completely? I hope someone picks them up, eg 51L.


Despite your reluctance to admit to scratch-building - this is an excellent example, only loosely connected to the kit!  I had missed the thread about 'road vans', so have now read it with interest. 


I like the outside framing, while the 'Mainly Trains' detailing parts really bring it all to 'life', as a very characterful model.  Let's hope someone else takes  them up when the original business is wound up.


There is so much that was different about 19th-cenutry operations. It seems that closed vans appeared quite late on many lines, with almost all goods carried in open wagons or at best under tarpaulins.  This one makes an excellent counter-point to the GWR Iron Mink.


Mike


ps thanks also for the salami/carrot slicing tip :)


Hi Mike, yes it did feel like a scratchbuilding project, and took rather more time than I had planned for (surprise!). The info that Buckjumper obtained from one of his friends on the SDJR Road Van workings was quite fascinating. I'm not quite sure one of them would have ended up actually inside a foreign goods depot, but I'm willing to stretch reality on that one.


You're right about the open wagons being totally dominant in pregrouping times, I must resist the temptation to build too many of them! There are plenty of nice opens though.... :-)


Very nice Mikkel! A really characterful addition to your wagon fleet and a nice contrast to the GWR stock. That "v" shaped scraper looks like it will be a very handy instrument for scribing planking. I have to agree with Mike, this is a fine example of scratch building!


Best wishes


Dave


Thanks Dave, yes the SDJR van does actually contrast the GWR stock quite a lot, being bigger and more "modern" in appearance than my Iron Minks and outside framed GWR goods vans. As for the V scraper, see my comment to Southernboy above, given the results on this project I can't vouch 100% for it yet, needs more practice/experience I think.

Link to comment
  • RMweb Gold

Execellent work Mikkel.

The painting of the ironwork is a thorny problem. I have an idea which could explain why photos show both styles. I wonder if the Wagons were shopped out from new with the iron work black but when due for a repaint the local shop just simply painted everything down to the bottom of the solebar body colour and everything below that black. No evidence at all to back this up but I cannot believe they painted the ironwork just for a photo then put it back in the shop for a repaint.

Don


Hi Don, that certainly sounds like a plausible explanation. On the other hand, the caption in "An illustrated history of Southern Wagons" says  the photo was taken in April 1896 when the van was built - but that may be incorrect of course.


Normally I don't trust works photos for livery as they are usually made up to look extra nice for official photos, but oddly in this case the opposite is the case - the official photo has the van looking more drab than it would with the black ironwork that seems to have been a normal in-service livery for other SDJR rolling stock.

Link to comment

A lovely looking wagon, Mikkel. If this is one of the wagons you hinted to be struggling with then you have made a wonderful job despite the little hic-ups along the way. You must be feeling very satisfied.


Scott

Link to comment
  • RMweb Gold

I don't think you need a bigger layout.

Just have a look at working with wagon cards.

Your goods train has a maximum size and using the cards the composition of your train looks different every time.

Have for instance a look here: http://www.fremo-net.eu/320.html?&L=6 


Thanks for the link, Job, I like the Fremo cards. I agree there are plentu of shunting puzzles to do on small layouts. The problem is that I like the look of all my wagons coupled together in a long rake :-) But so far it's just an idea at the back of my mind.

Link to comment
  • RMweb Gold

A lovely looking wagon, Mikkel. If this is one of the wagons you hinted to be struggling with then you have made a wonderful job despite the little hic-ups along the way. You must be feeling very satisfied.


Scott


Hi Scott, it is indeed one of those wagons! There are a couple of LSWR ones on the way too, though those are kits (well, more or less!). I'm glad you like this one, your standards are an inspiration to work towards I think.

Link to comment
  • RMweb Gold

Basically what the others have said. A lovely bit of modelling of what you'll not be surprised to hear is a favourite prototype of mine.


Jerry

Link to comment
  • RMweb Gold

That's properly impressive. Exquisite modelling, beautifully applied to a charming prototype.

Link to comment
  • RMweb Gold

Basically what the others have said. A lovely bit of modelling of what you'll not be surprised to hear is a favourite prototype of mine. Jerry


Thanks Jerry, yes I'm not surprised you like this prototype :)  I do like the S&DJR freight stock, I was thinking of doing one of the round-ended opens with the wooden sheet rail at some point. But I had better get on with other things first - I could build wagons all day long but need something to run them on too...

Link to comment
  • RMweb Gold

That's properly impressive. Exquisite modelling, beautifully applied to a charming prototype.


Thanks Al, well I'm not sure about exquisite what with that paint job, but anyway I learnt a lot about scratchbuilding vans from this project.


I suppose it's debatable whether such a project might better have been a full scratchbuild rather than spending money on the kit parts, but I sometimes find that having a kit as an outset helps to give the confidence and impetus to get a project going.

Link to comment

Create an account or sign in to comment

You need to be a member in order to leave a comment

Create an account

Sign up for a new account in our community. It's easy!

Register a new account

Sign in

Already have an account? Sign in here.

Sign In Now

×
×
  • Create New...