Jump to content
 

Backdating the Oxford Rail Dean Goods (1)


Mikkel

4,375 views

38002287972_d2442cd636_o.jpg


Here’s a summary of the work so far on my attempt to backdate the Oxford Rail Dean Goods to 1900s condition. Thanks to everyone who has helped with advice and information.


26281236329_ed0bf3907e_o.jpg


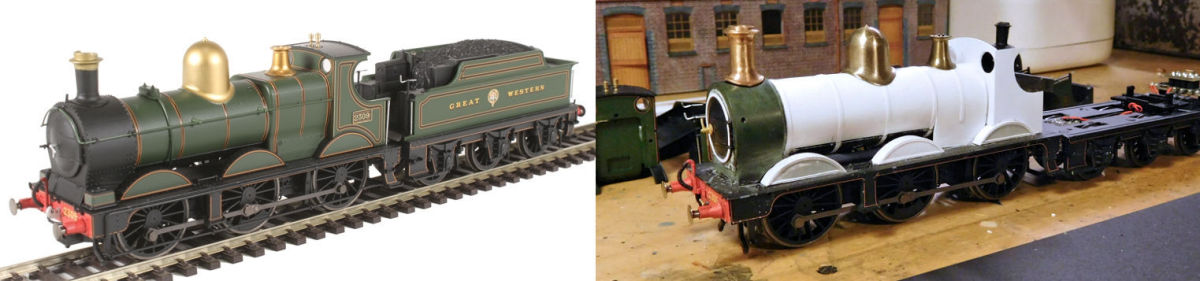
My model is based on a 1903 photo of No. 2487, sporting the S4 roundtopped boiler and wide footplate. Various features such as a short smokebox, large cab spectacles and "piano lid" cylinder cover will make it a bit different from the superb Finney kit models out there - no other comparison intended!


35531813432_7423be5276_o.jpg


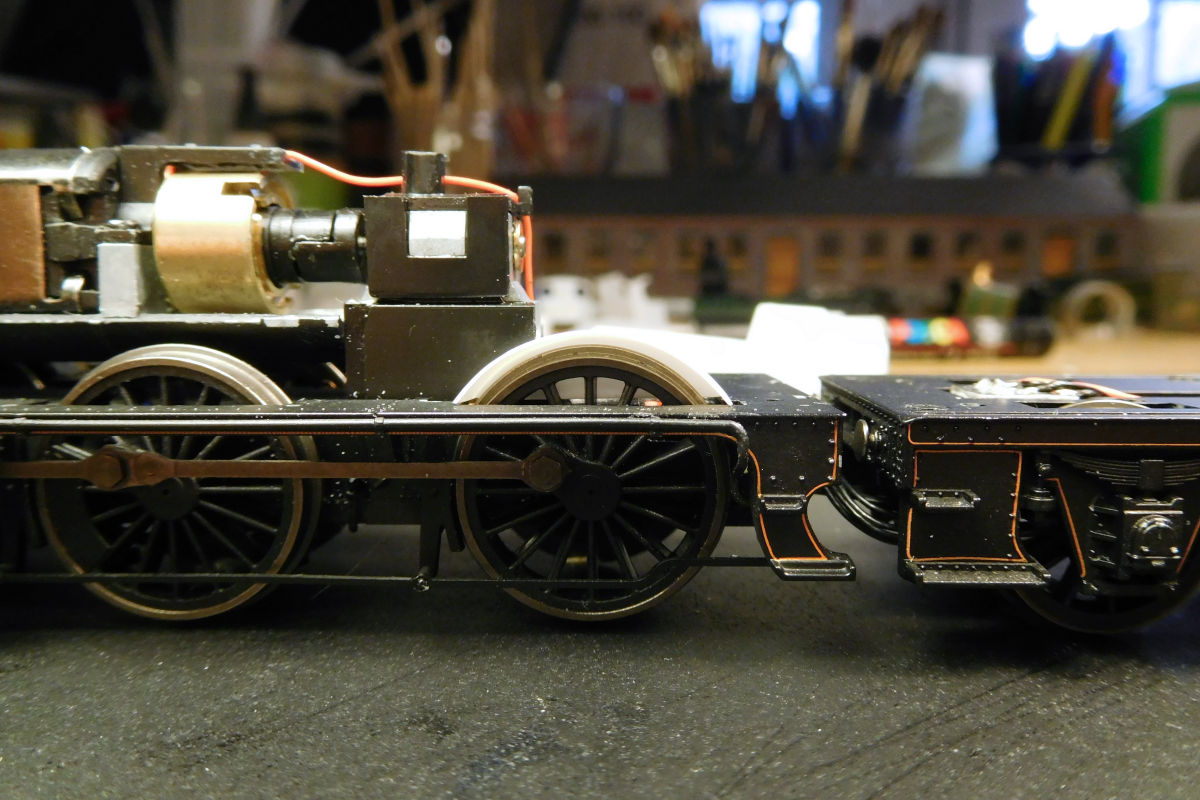
The chassis is a good silent runner. The model comes with plain con rods and wide footplate. This particular combination was found on Lot 99 and 100 (nos 2451-2490), so is appropriate for my loco. Incidentally, some locos built with fluted rods later acquired plain ones, meaning that selected locos in the 2491-2580 wide footplate series could also be made.


35002134773_f751408700_o.jpg


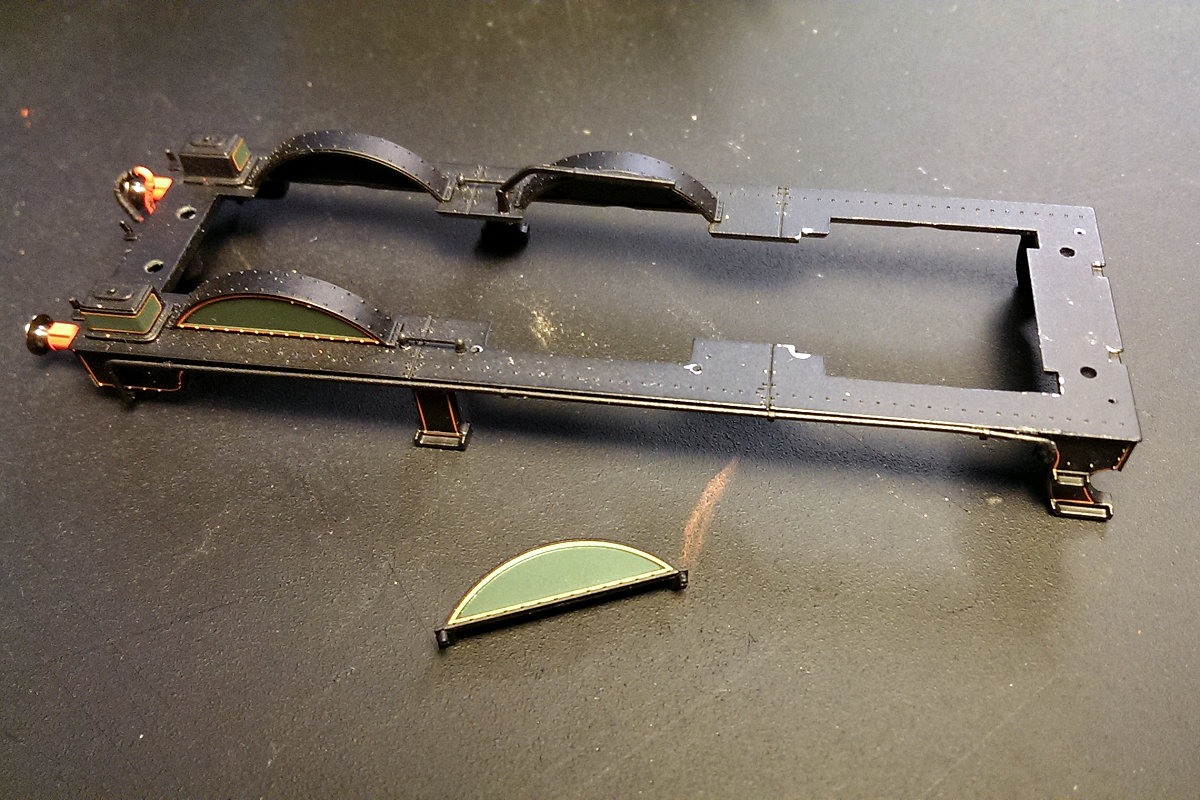
The cast footplate is also good in my view, so was retained. However the splashers and cab were discarded. The splashers are rather thin and high, and the cab is too tall for a roundtopped version. I might have accepted this on other occasions, but I wanted to see what I could do with styrene and a Silhouette cutter.


35531813892_ce16d4b810_o.jpg


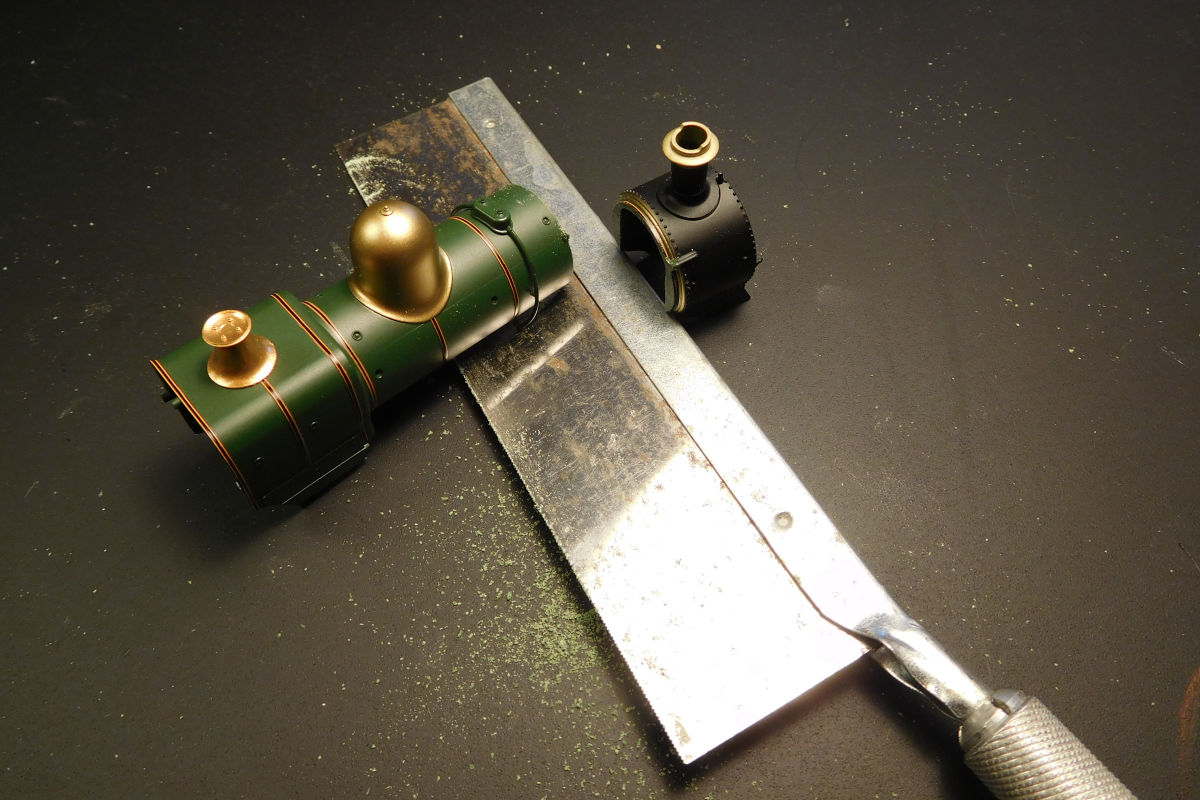
The Belpaire firebox also had to go, and as the boiler then becomes too short for a roundtopped version, I discarded that too. The smokebox was sawn off and put aside for later modification.


35763242876_2fd35c3415_o.jpg


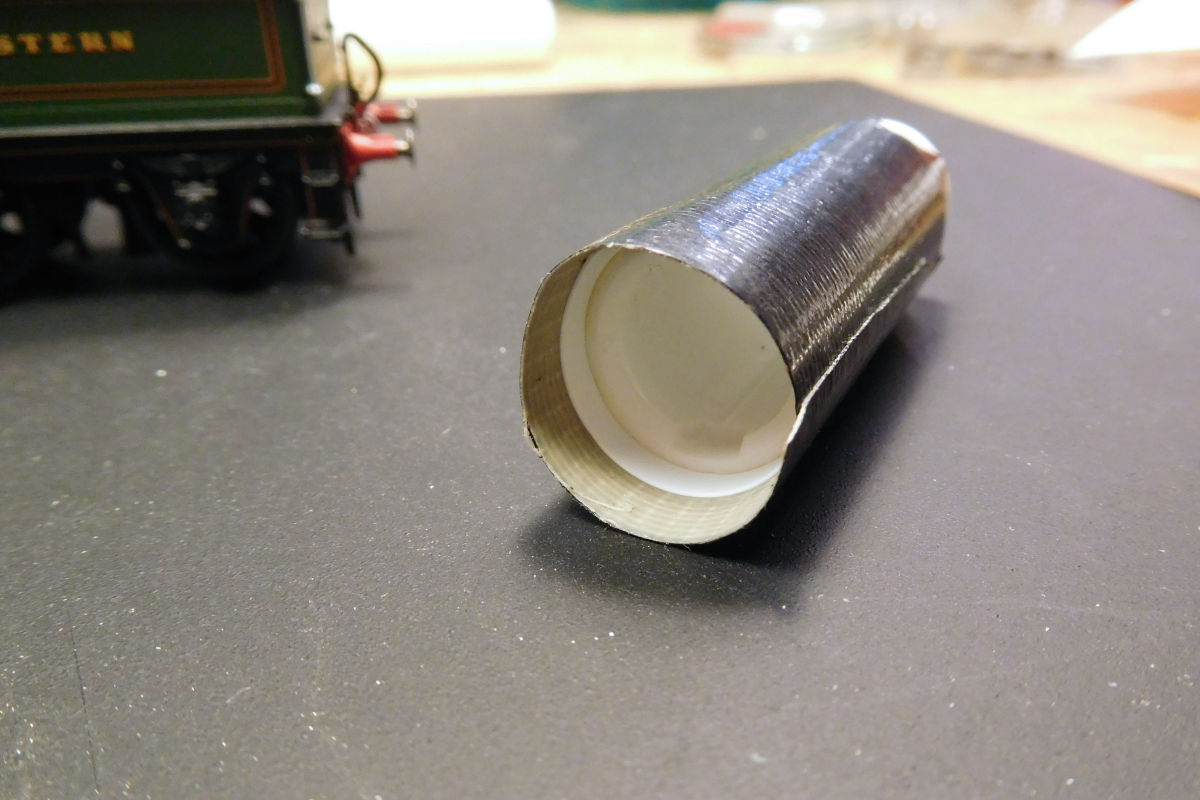
I made a new boiler from laminated layers of 5 thou styrene. Each layer was shaped by wrapping it around a former, taping it with duct tape, and dunking it in boiled water. I used a Lypsyl lip balm container as former, and stuck the duct tape to the workbench a couple of tiems to reduce strength. Next time I will probably use a single thicker sheet for the boiler, as I’m a little worried about possible expansion over time. So far however it has proven stable.


35763588866_88c0d53c81_o.jpg


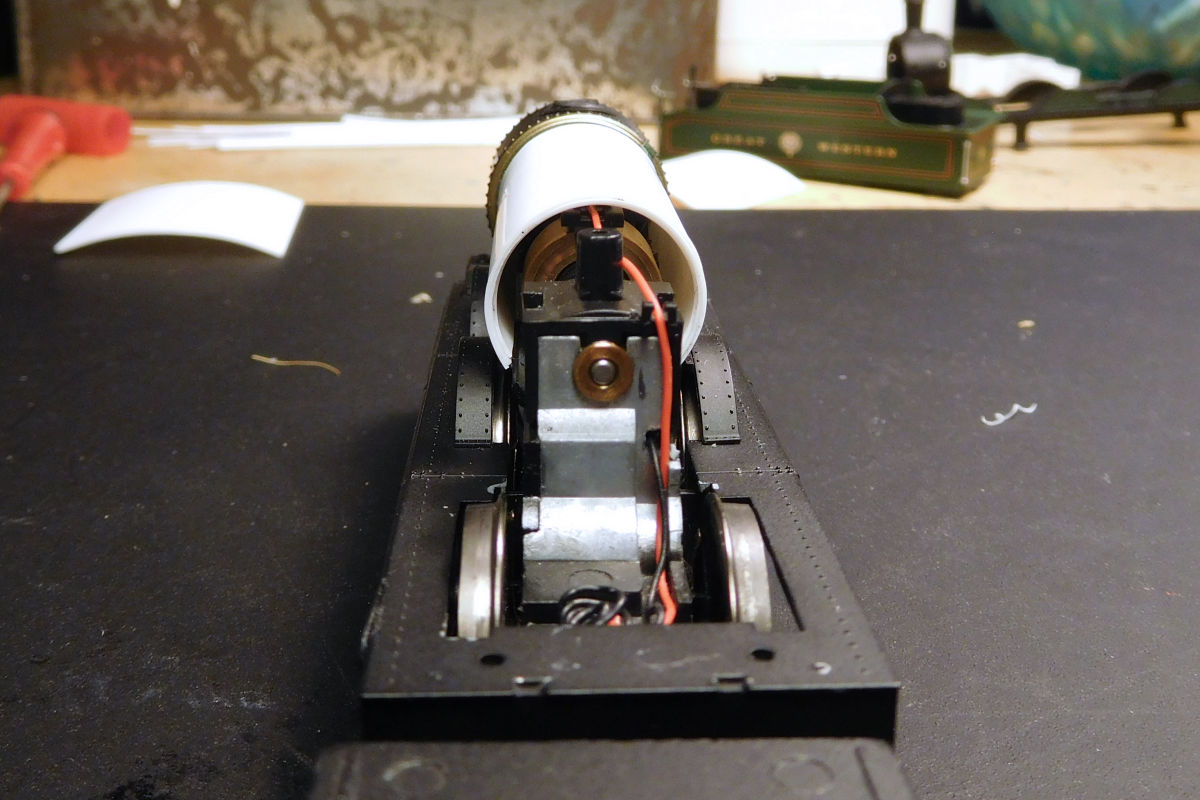
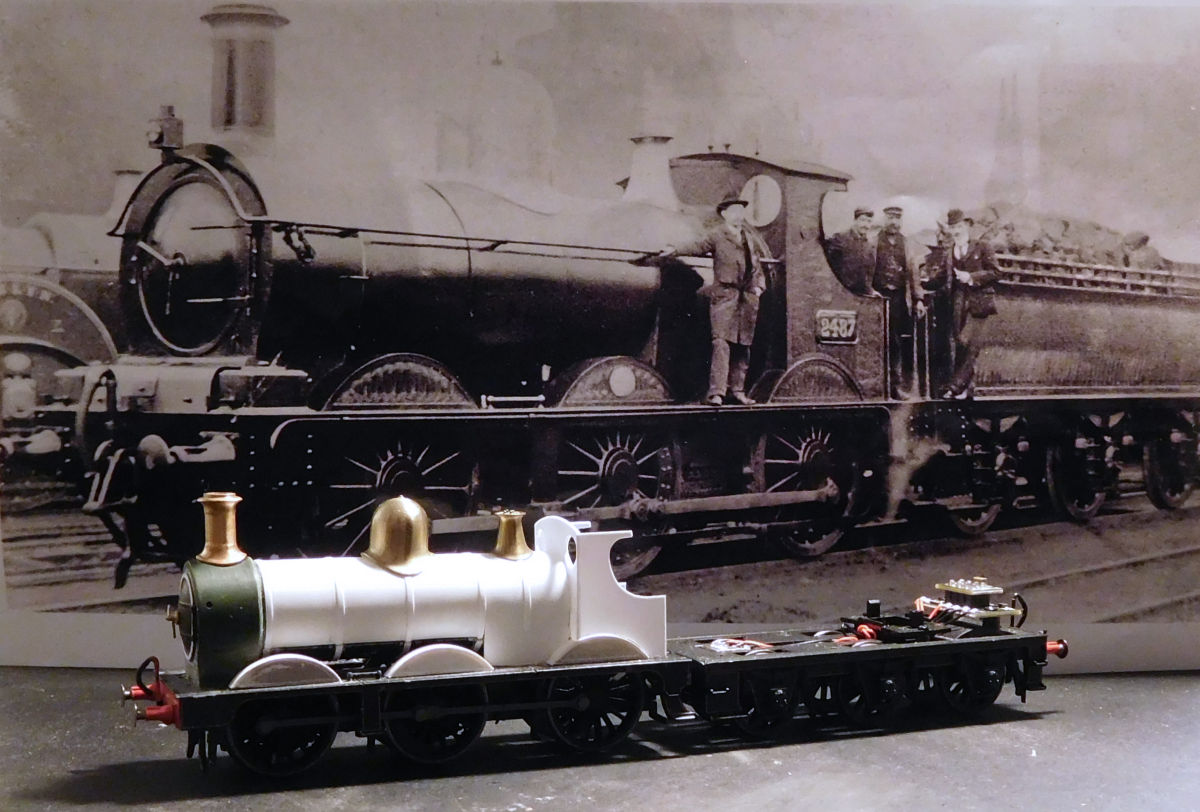
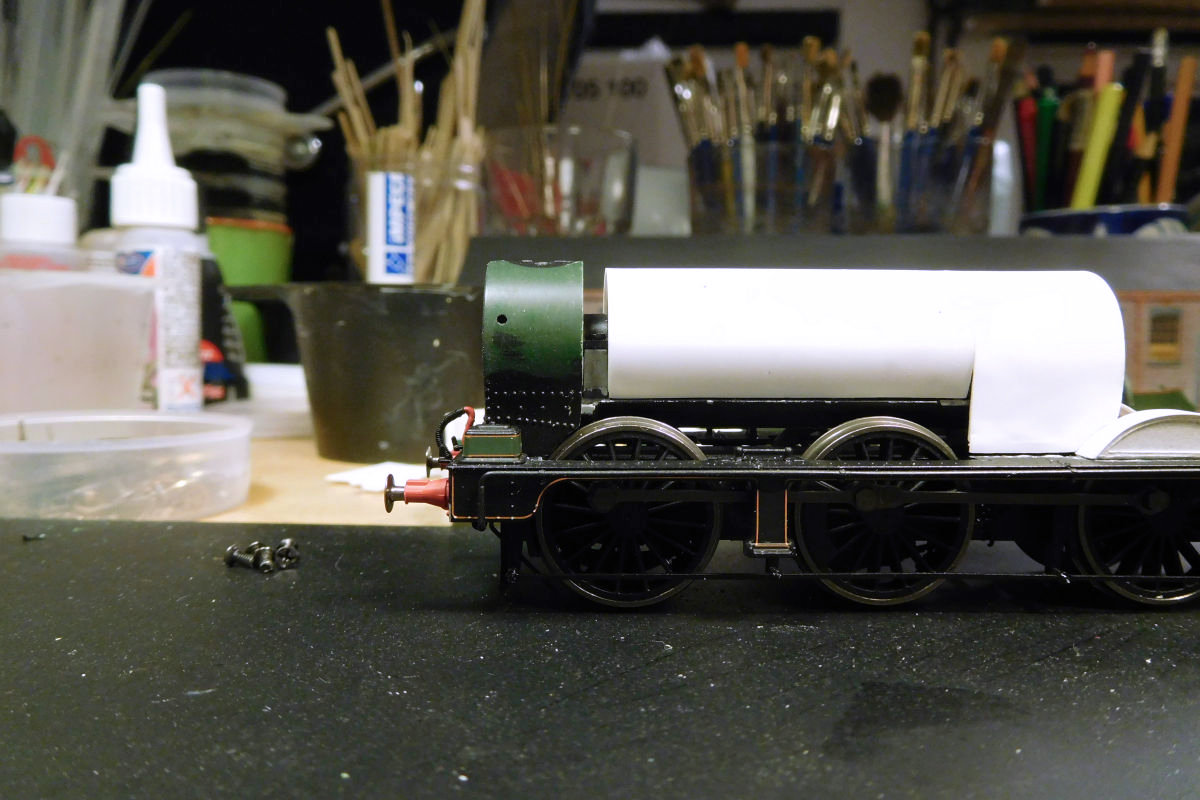
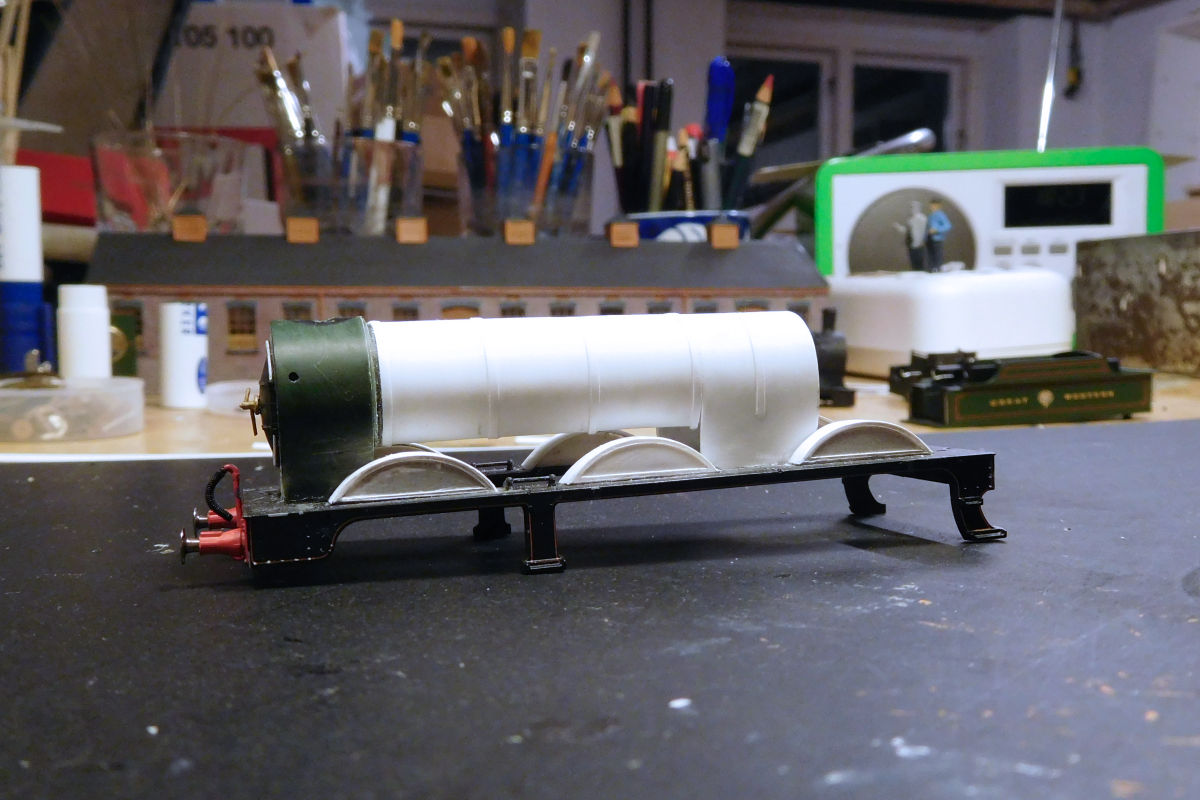
This is the boiler test-fitted on the Oxford footplate and chassis. The Oxford chassis has a cast section representing the underside of the boiler. My boiler had to fit this, while still allowing the body to be detached if necessary. This is the most problematic part of the project. To make things easier, I built the boiler separately from the firebox.


37264449754_376582a458_o.jpg


The cast underside of the boiler can be seen here. The join looks poor in this shot, as the boiler and firebox were still loose. The firebox was shaped as per the boiler, with a wood former for the sides. The smokebox is seen with the chimney cut off, rivets and other bits filed away, and the length shortened with a saw. For reasons I have now forgotten (must be all those designer drugs), I chose to shorten the smokebox from the rear.


37920667656_688190c791_o.jpg


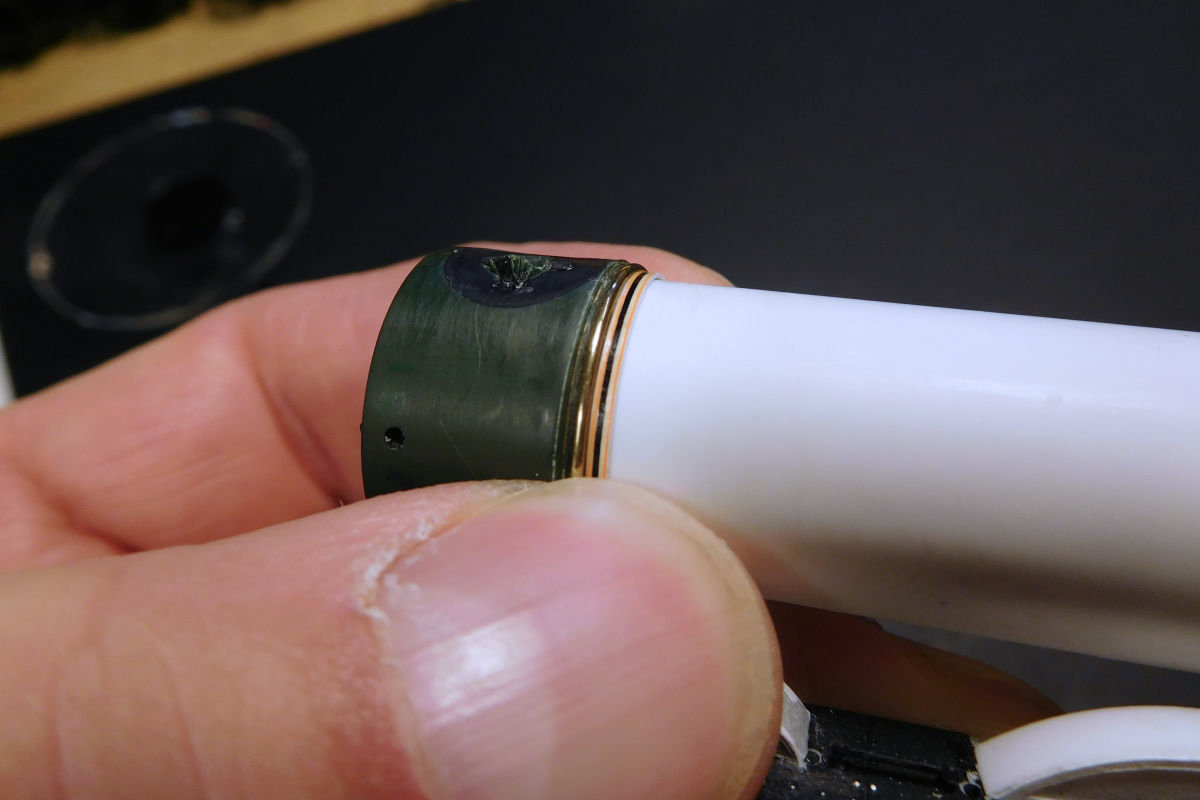
The smokebox pushed back to meet the boiler. The elegant transition between smokebox and boiler on the prototypes was not easy to get right. I did my best using a slice of the original Oxford smokebox, and a ring of brass wire. The leading boiler band (overlaid here with lining) helps too.


24123070408_40f1dfb41a_o.jpg


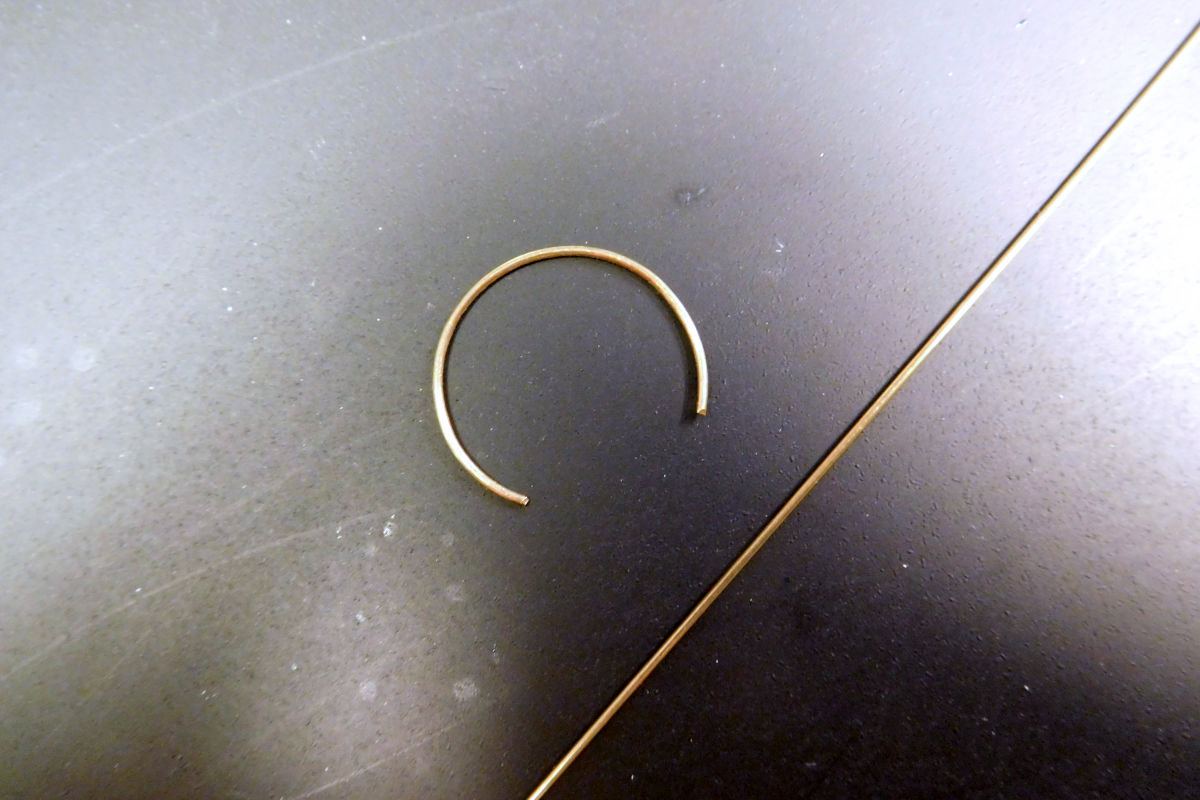
The brass ring imitates the, um, brassy ring that can be seen on prototypes in the 1900s. It is a snap-fit, and won’t be finally stuck down until after the body has been painted.


37920667526_7317ceb790_o.jpg


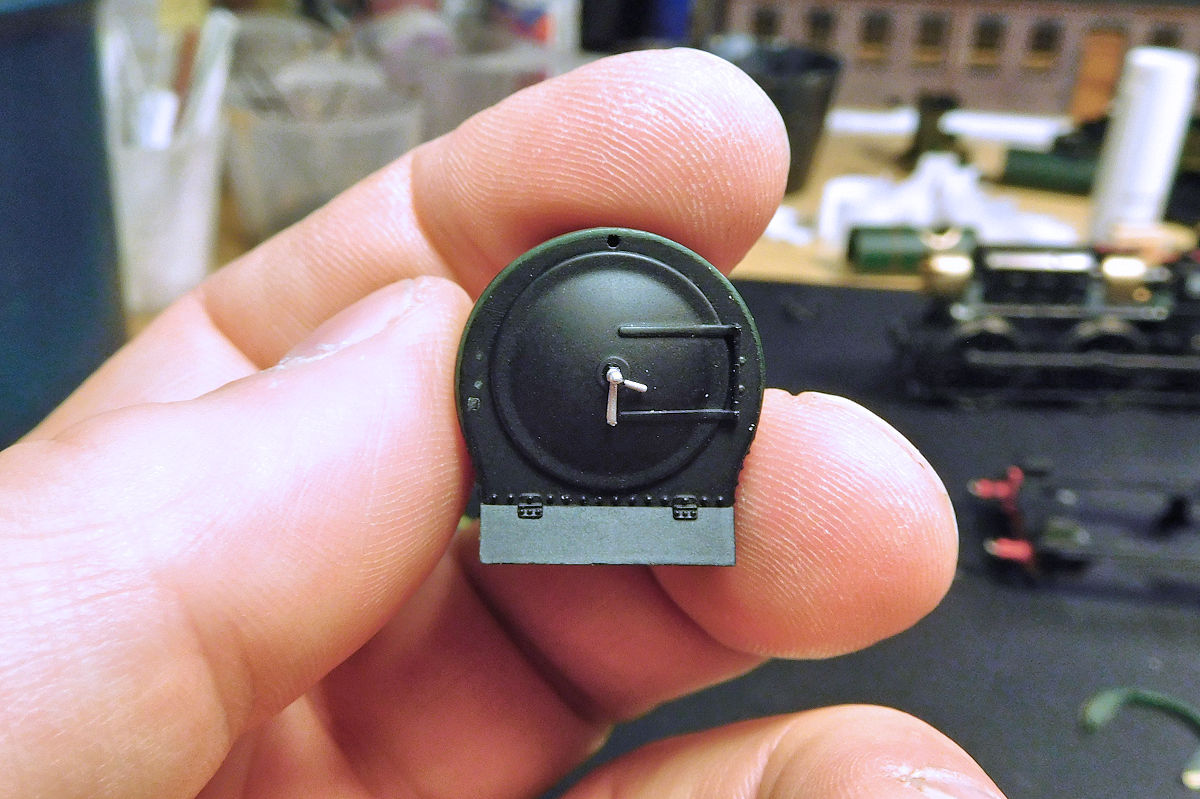
The smokebox door also needed work. Here’s how it originally looked.


37264449654_8cd6764452_o.jpg


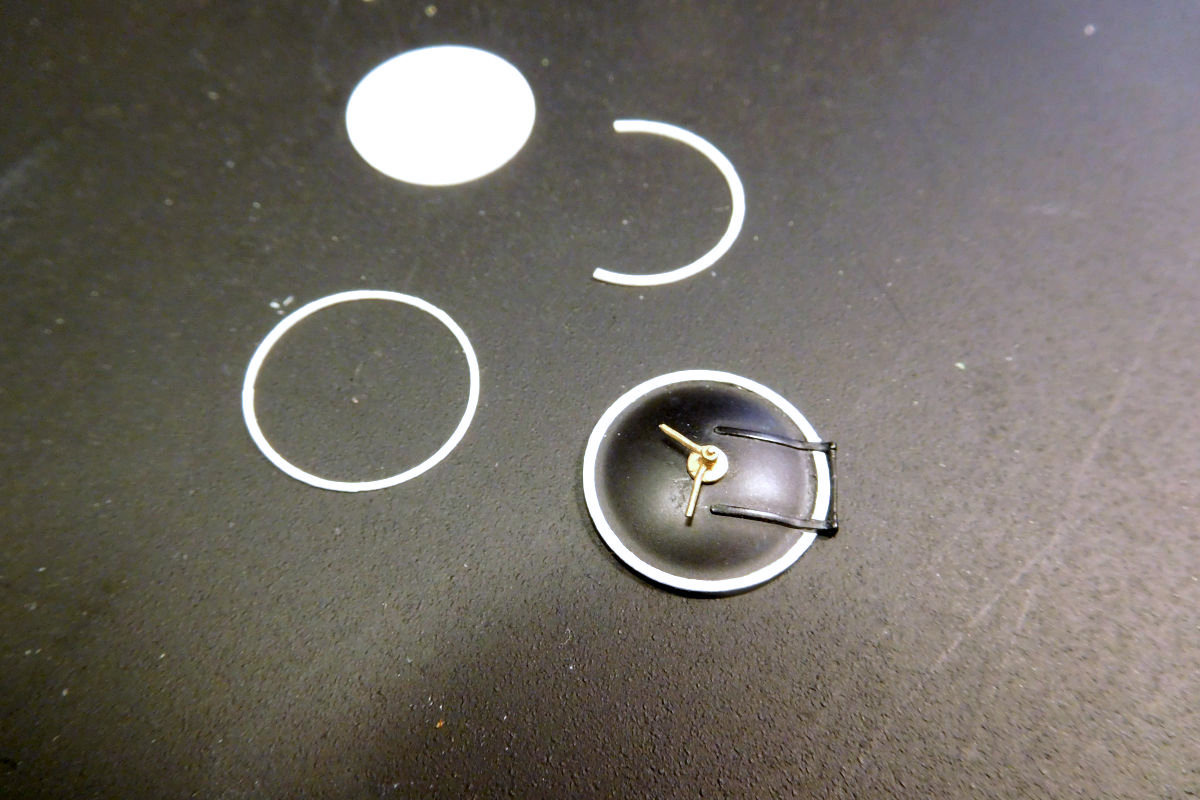
I added an outer ring to the smokebox door, and a new door dart. The ring was cut on my Silhouette cutter.


24123091918_d7eb649581_o.jpg


The door was then lowered to appropriate height by carving out the lower part of the smokebox, and filling out the space above with plastic putty. The cylinder cover was filed back and will be replaced with a “piano lid” type cover later.


36240477025_2b34309116_o.jpg


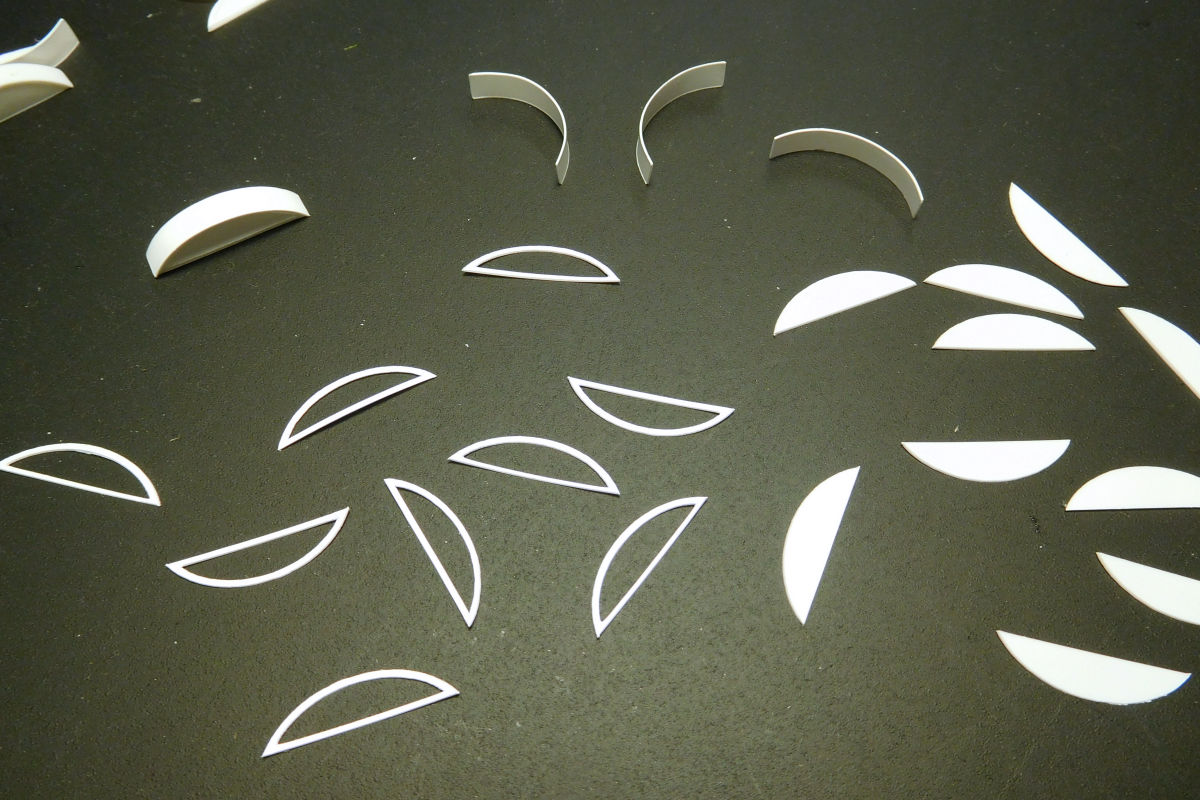
The replacement splashers were made from 5 and 10 thou styrene, cut on my Silhouette, and reinforced on the inside with additional layers. I initially attempted to replicate the slight overhang of the splasher tops that can just be made out on the prototype. However it became too prominent in styrene, and was easily damaged, so I left it off.


36201871296_505e7b0c21_o.jpg


I made the splashers 20 x 5 x 4 mms, which is overscale compared to the prototype, but about 1mm smaller in all dimensions than the Oxford originals. As this (reversed) test fit shows, there is the ample clearance over the wheel flanges and I could probably have made them smaller, but wanted to be on the safe side.


37920679666_f8f40f675b_o.jpg


The boiler bands are a compromise, and possibly a mistake. I made them from 5 thou styrene strips, and deliberately made them too wide in order to fit the HMRS lining transfers. They do look rather too prominent at the moment though, and need some work.


24123114808_ccf11f7036_o.jpg


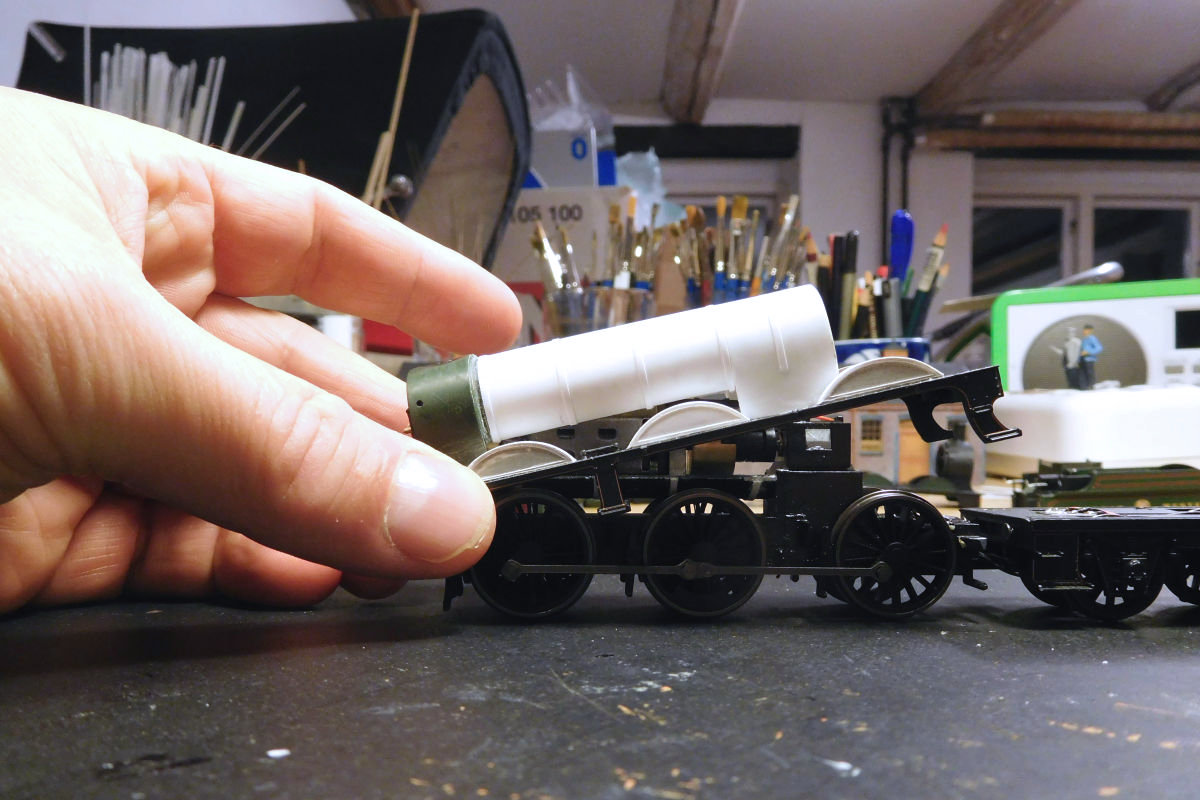
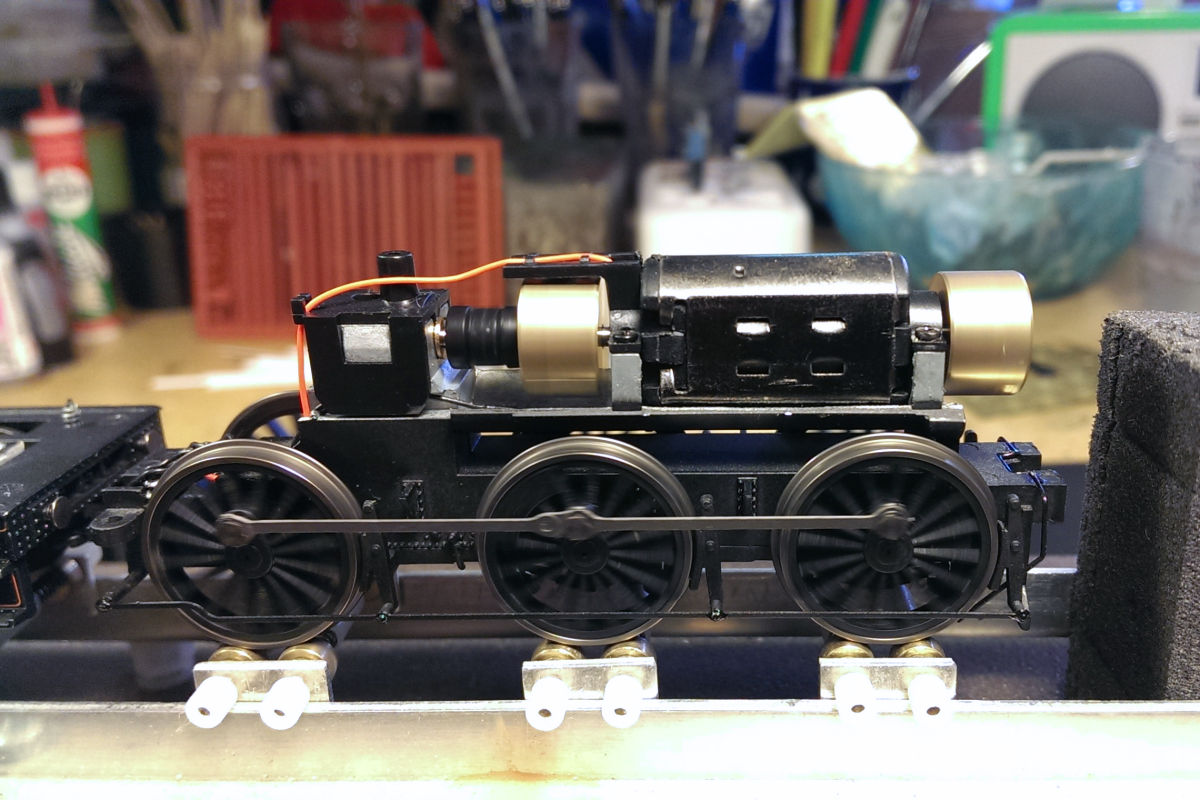
The body fits snugly over the chassis. So far I have made virtually no modifications to the chassis, as I want to be able to replace it without too much trouble in case of a motor failure.


35221896963_2158c7bc62_o.jpg


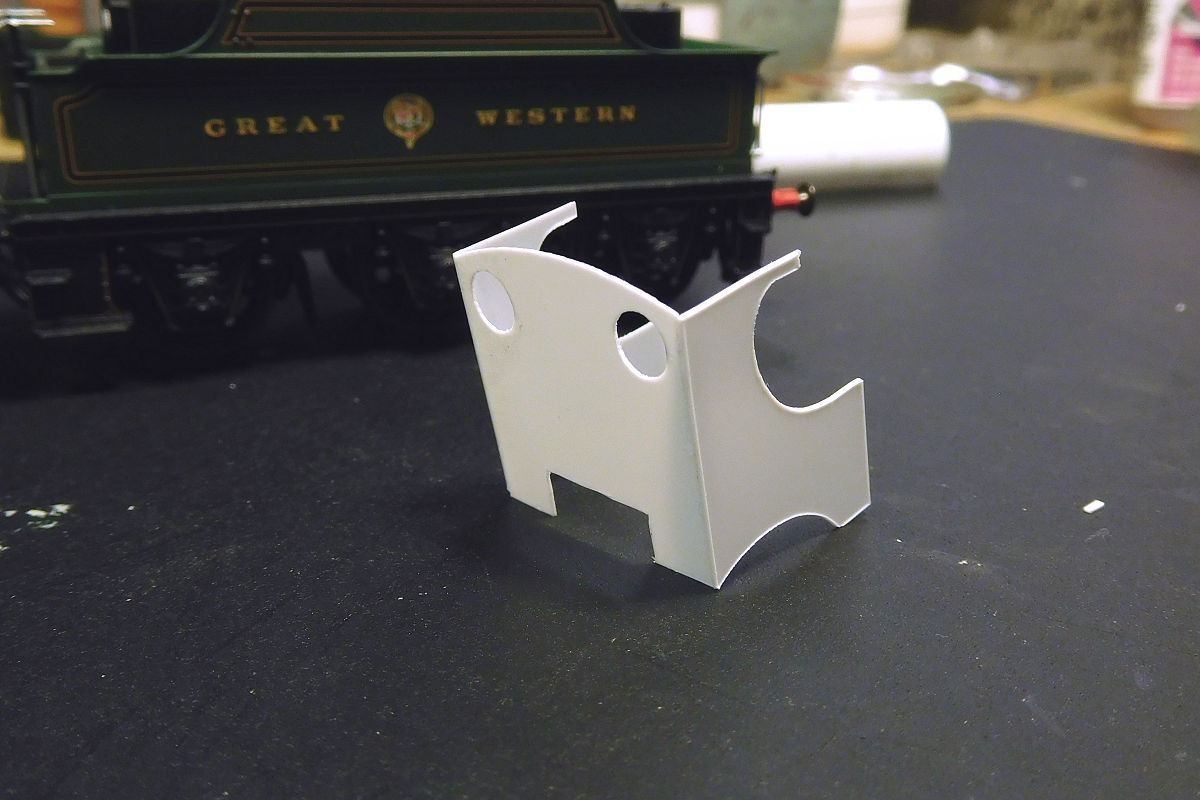
Work has now started on the cab. The sides and front were printed on my Silhouette.


37943758092_5aa0d4ea21_o.jpg


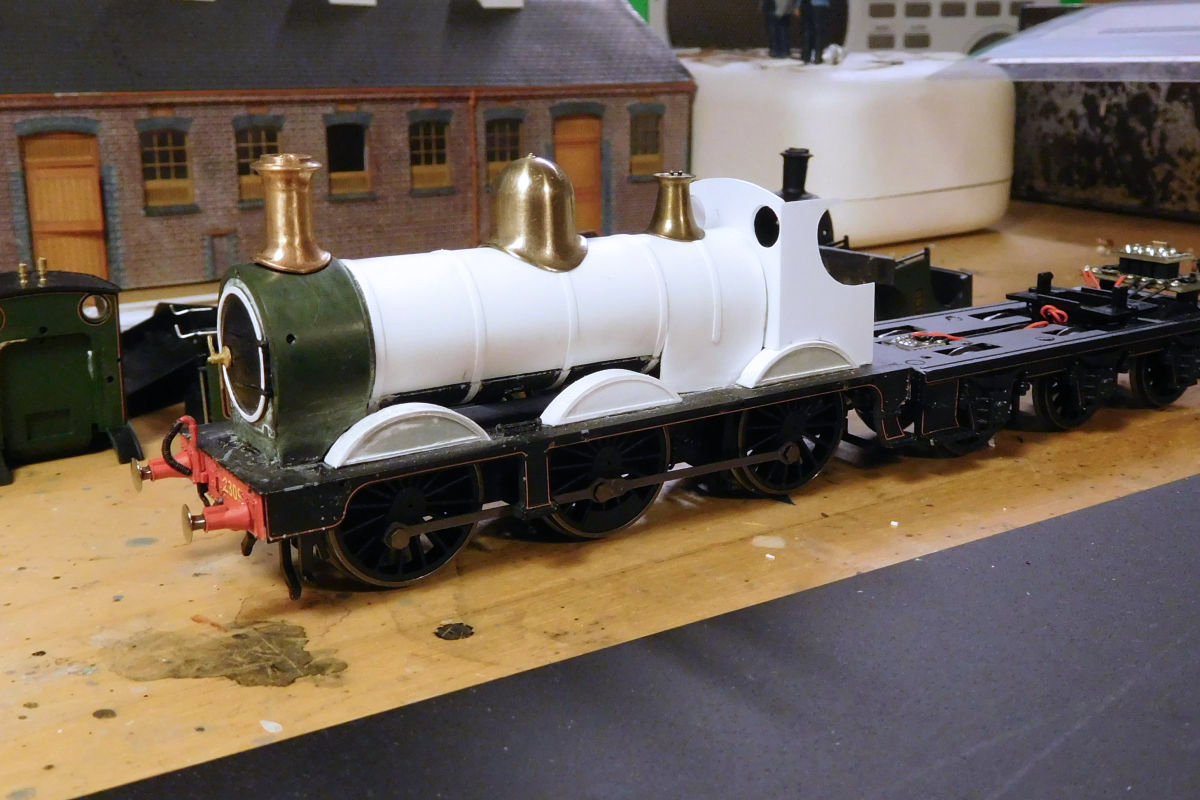
So that brings us more or less up to date. Above is the current state of play....


Lastly,  a short video showing a running test I did the other day:


  • Like 18
  • Craftsmanship/clever 4

30 Comments


Recommended Comments


Red wagons and a white loco - suitably scary for Halloween!


Seriously though, it made me wonder about speed limits for shunting into goods sheds.

Link to comment
  • RMweb Premium

Nice conversion. 


Glad to see you are having fun with the silhouette Mikkel. 

Link to comment

I was suffering severe withdrawal symptoms, from seeing no post on this thread since February.  A 'fix' before the end of the year was needed very badly - thank you :)  The 'fireless' locomotive shunting at Farthing was a bit of a shock, however.


It's good to see you making use of your Silhouette cutter.  I especially like the smokebox ring, which is an easier method than trying to paint in a polished ring.  I also think you are very brave to roll a boiler in styrene - it's much easier in brass!  Fitting it to the existing cast section must have been quite a challenge.


I'll look forward to seeing the finished locomotive - before the end of the year?


Mike

  • Like 1
Link to comment
  • RMweb Gold

Red wagons and a white loco - suitably scary for Halloween!


Seriously though, it made me wonder about speed limits for shunting into goods sheds.


Quite right, it does look a little dangerous in the video! The camera was closer than I was, so it's one for the "scale speed" discussion I suppose. Must remember to go slower next time.


Nice conversion. 


Glad to see you are having fun with the silhouette Mikkel. 


Thanks Dave, yes this project has sort of become a test for me, to see if styrene and the Silhouette can help me build the locos I want. I'm not 100% convinced yet, especially about the boiler.


That looks very nice indeed.


Thanks Andrew, personally I think the Dean Goods looked particularly good around 1900, they had a bit of that Victorian elegance and well-balanced proportions seen on Dean's passenger classes.

  • Like 1
Link to comment
  • RMweb Gold

Lovely work sir as always.


Kind regards,


Nick.


Thank you Sir :-) It's become a rather drawn-out project and you could argue a kit build would have made more sense. Still, a kit would also have required modifications to portray this particular period.


Nice resume Mikkel, and pleased to see it in video form. Well done so far.


Thanks Grahame. I've been doing regular running tests but needed to do a video to get some sense of progress!


proper modeling well done it looks superb 


Thanks Steve, I have learnt a lot from following your thread and builds. The Dean Goods is really quite a boring loco compared to your Conner 2-2-0 and 2-4-0 projects!

Link to comment
  • RMweb Gold

I was suffering severe withdrawal symptoms, from seeing no post on this thread since February.  A 'fix' before the end of the year was needed very badly - thank you :)  The 'fireless' locomotive shunting at Farthing was a bit of a shock, however.


It's good to see you making use of your Silhouette cutter.  I especially like the smokebox ring, which is an easier method than trying to paint in a polished ring.  I also think you are very brave to roll a boiler in styrene - it's much easier in brass!  Fitting it to the existing cast section must have been quite a challenge.


I'll look forward to seeing the finished locomotive - before the end of the year?


Mike


Hi Mike, not sure about the end of the year, it needs painting too!


The crew have since complained at the lack of a cab. The lack of a chimney was also rather inconvenient! :-)


Yes, the Silhouette has been invaluable for some of the details that might otherwise have kept me from embarking on the project. Of course you discovered that long before I did, and seeing your coaches was one reason I put the Silhouette on the wish list!


A nice entry with the step by step explanation how you created your loco. Looks very good.

Looking forward to the finished model.


Thanks Job. I struggled a bit to put together the step-by-step explanation. Looking through my own workbench thread it was all a bit confusing! But that's one of the benefits of the blog, it helps us get an overview of things and - as MIke has said - helps us remember what we did!

  • Like 1
Link to comment
  • RMweb Gold

Looks very promising Mikkel and definitely captures the look of an early Dean Goods!  We are going to have to get you using brass for your creations, as Mike said the boiler would have been much easier if rolled in metal!  Having said that I think using plastic card laminations should give a good stable boiler.


Looking forward to seeing it painted! :-)


Best wishes


Dave

Link to comment
  • RMweb Gold

Hi Dave, many thanks, hearing it from the man who built 2467 is encouraging! It's all very pragmatic of course, but if it captures the look I'm happy. 


Brass? There is such as thing as brass? ;-) 

  • Like 1
Link to comment

Brass? There is such as thing as brass? ;-) 


'Appen it comes from "Up North" young 'un !


Joking apart you wouldn't go far wrong in giving it a try mate, but then like me you've discovered the magical properties of the Cameo !

Link to comment
  • RMweb Gold

Brass? There is such as thing as brass? ;-) 


'Appen it comes from "Up North" young 'un !


Joking apart you wouldn't go far wrong in giving it a try mate, but then like me you've discovered the magical properties of the Cameo !


Oh allright then, I'll try brass for my next boiler - just to get you and Mike off my back  :jester:

Link to comment
  • RMweb Gold

Good to see you've not given up on this - it's starting to look like a proper engine now!


Glad you think so Stephen, the bought-in boiler fittings do add a lot in themselves, I think. Get the brass right on a Great Western loco and you're halfway there.

  • Like 1
Link to comment
  • RMweb Premium

... yes indeed. I'm afraid what I meant was, none of this superheater/Belpaire 20th century disfigurement!

  • Like 1
Link to comment

"I made a new boiler from laminated layers of 5mm styrene"


I presume you don't mean five whole millimetres thick? I've had no luck at all trying to create barrels from styreme, but I tried rolling a long piece into several layers. You did it in separate layers did you?

Link to comment
  • RMweb Gold

"I made a new boiler from laminated layers of 5mm styrene"


I presume you don't mean five whole millimetres thick? I've had no luck at all trying to create barrels from styreme, but I tried rolling a long piece into several layers. You did it in separate layers did you?


Sorry, I meant 5 thou (Evergreen sheet).


Yes, I made it from 3 layers, each one formed separately in hot water, and then laminated together. There's a more detailed description here: http://www.rmweb.co.uk/community/index.php?/topic/97672-pragmatic-pre-grouping-mikkels-workbench/?p=2778847

Link to comment
  • RMweb Gold

Hi Paul, thanks very much. I would make a mess of N gauge! I admire those who - like yourself - can modify locos in that scale. 

Link to comment
  • RMweb Gold

Damn - had missed this :rolleyes:


Lovely work Mikkel - one of my fave locos and had one in N gauge 35 years ago before my kettle phase gave in to BR Blue ;)


Nice vid to finish off too...

Link to comment
  • RMweb Gold

Thanks Pete, well we all have to progress. I'm still in the kettle phase though  :jester:

Link to comment

Hi Mikkel,


Only just started looking at the blogs following a frustrating time grappling with 4 wheel coaches.


I agree that the period you are modelling shows the GWR at it's most elegant. I don't keep up with the proprietary scene as I should but the standard (and price) seems to be getting ever higher. I'm always impressed with the finish of proprietary models these days; the painting and lining is superb and you have to consider that these are churned out in their thousands. It therefore takes a special kind of confidence to take a hacksaw to an expensive model!


The photo of the prototype accompanying your blog is interesting as it shows the peculiar swirls on the paintwork that appear in photos of many other locomotives of this period. In the photo  this is particularly prominent on the splashers and tender. I believe this was caused by the materials used to clean the locomotives at that time but I've yet to see any models showing this feature.


I like your step by step guide which has obviously taken you some time to do. It's much appreciated.

Link to comment

Create an account or sign in to comment

You need to be a member in order to leave a comment

Create an account

Sign up for a new account in our community. It's easy!

Register a new account

Sign in

Already have an account? Sign in here.

Sign In Now

×
×
  • Create New...