


kirtleypete
-
Posts
1,394 -
Joined
-
Last visited
Content Type
Profiles
Forums
Blogs
Gallery
Events
Exhibition Layout Details
Store
Posts posted by kirtleypete
-
-
The brakes didn't take as long as I'd expected and being plastic at least they won't cause any shorts. I had to make six - the trailing wheels had brakes too!
The Westinghouse pump has been painted now too....I really must get that cab roof fixed in place!
Now she needs a Zimo sound decoder with a Terrier sound on it, that's about the closest I'm going to get,
Peter
-
 7
7
-
-
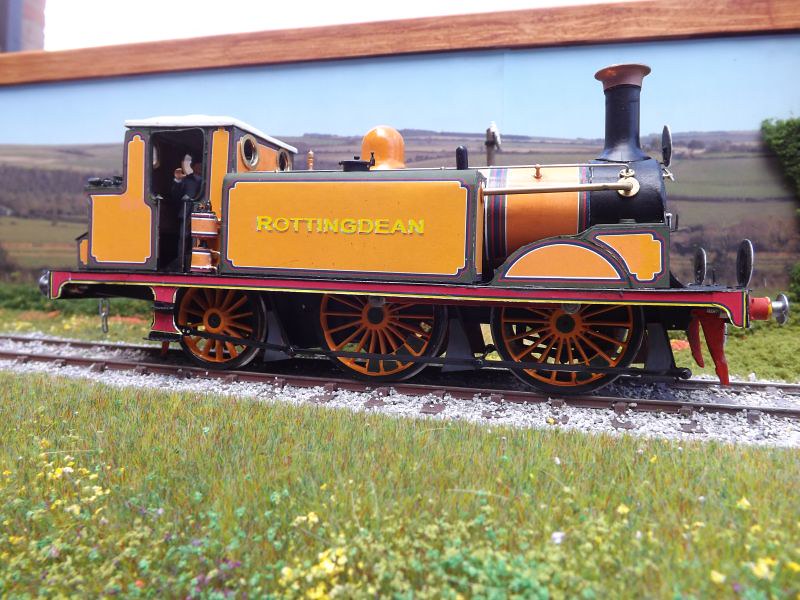
She's nearly there, just a few bits and pieces to add.
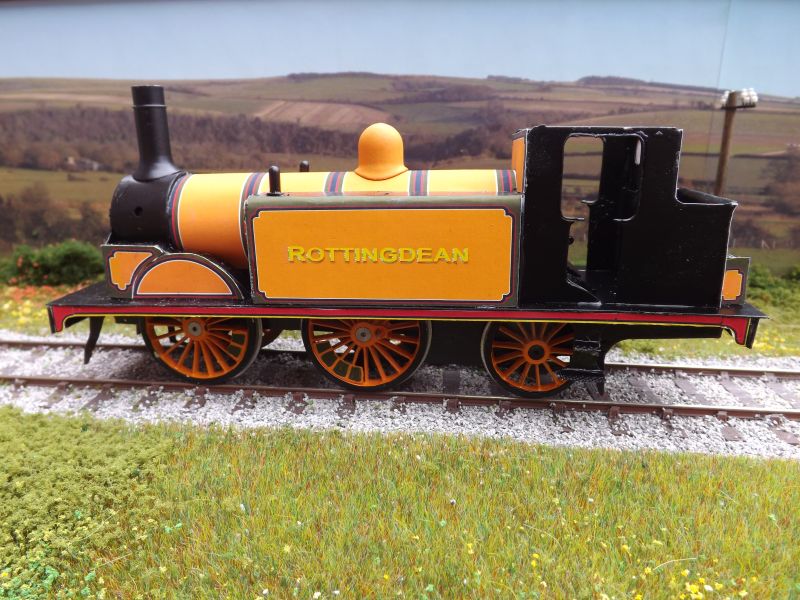
The Salter safely valves weren't in the box so a set are being sent in the post. There are no brakes yet because the kit gives you one etching for a wooden brake block with the helpful instruction 'use as a template'! At least I only need four. I need to line the Westinghouse pump, and there is tidying up still to be done as always. I think, though, that I've ben alble to show that the technique works - the only yellow paint on the engine is on the dome, wheels and Westinghouse pump, everything else is printed on paper and stuck in place.
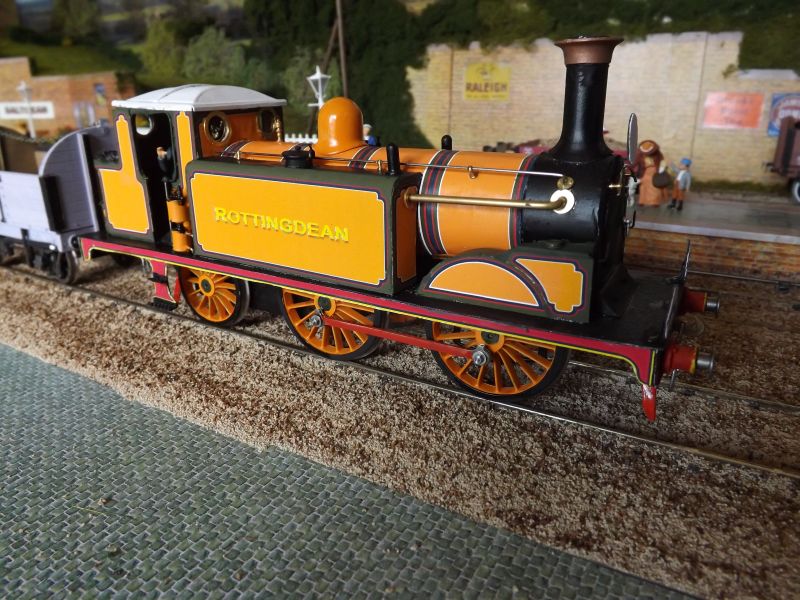
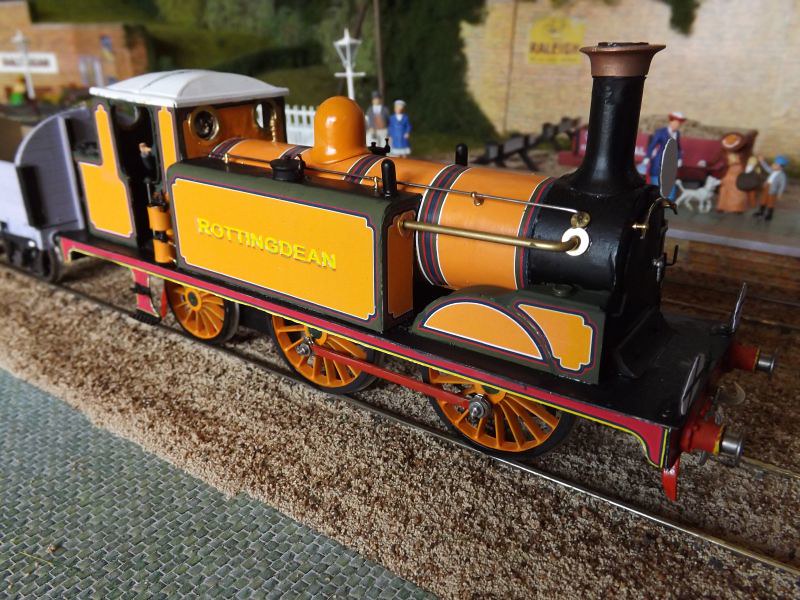
Interestingly in view of all the discussion about Improved Engine Green, she looks far more yellow in the pictures than she actually is - they were taken in bright sunlight. The sample paper panels earlier in the thread are the actual colour. The dome looks the right shade, but the side tanks reflect the light.
The ends of the handrails alongside the smokebox are wrong, just a lash up until I can get some fine tube to do them correctly.
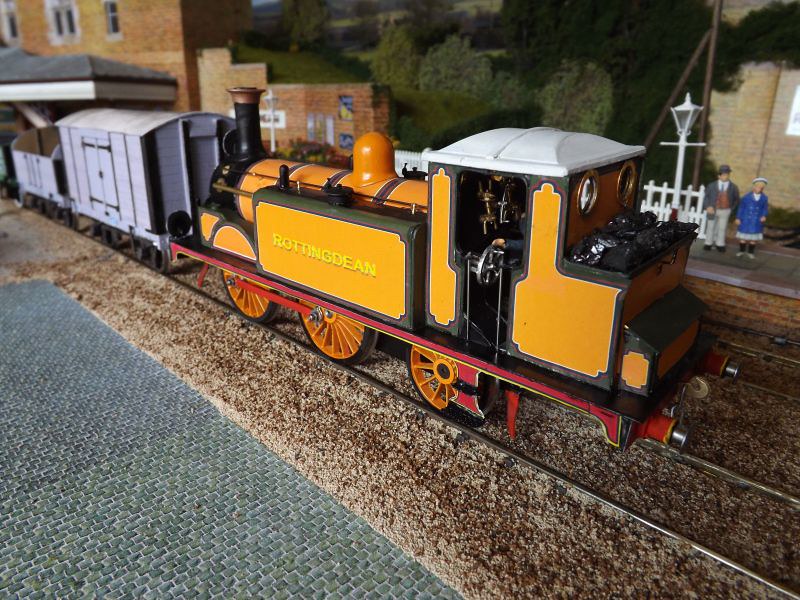
She needs works and number plates which have been ordered from Severn Mill.

The next loco will be a 2-2-2 tender engine 'Dieppe' which should be an interesting challenge; at lease now I know I'll be able to paint it, if that's the right word,
Peter
-
8
-
-
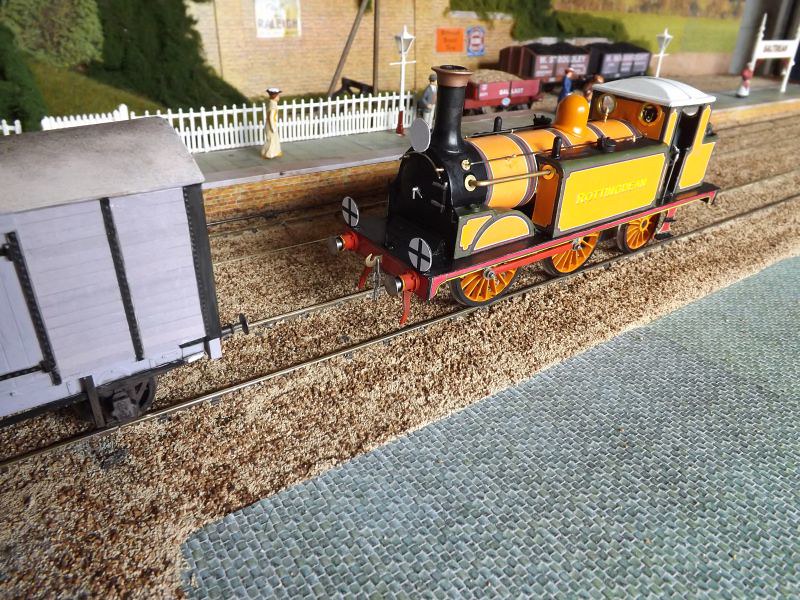
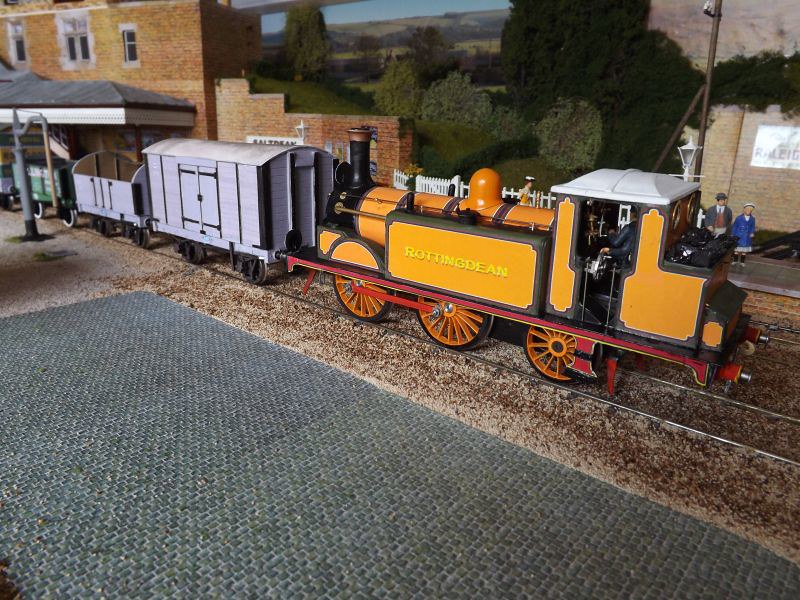
Saltdean finally has an engine, a D1 0-4-2T - details of building her are in the 'Pre Grouping' section. She's not quite finished but good enough to have her portrait taken! She looks far more yellow in the pictures than she actually is, which is interesting bearing in mind all the discussion of Improved Engine Green.
Peter
-
17
-
-
I pretty much use it for everything, it's the only glue I couldn't manage without.
Peter
-
Sorry - I missed that bit out. I use Evostick imapct from a tube, but ignore the instructions; just spread it over the paper and put it straight on, then you get a bit of adjustment time.
Peter
-
1
-
-
Right, here we go - this time it's for real! Whether this is going ot work I don't know yet....
The D1 kit is by Albion Models, sold through Roxey Mouldings. Although it's blown up from the 4mm kit, it's pretty good and went together well. The only thing lacking is the Salter safety valves, but I might just have been unlucky.
Here's the basic shell....
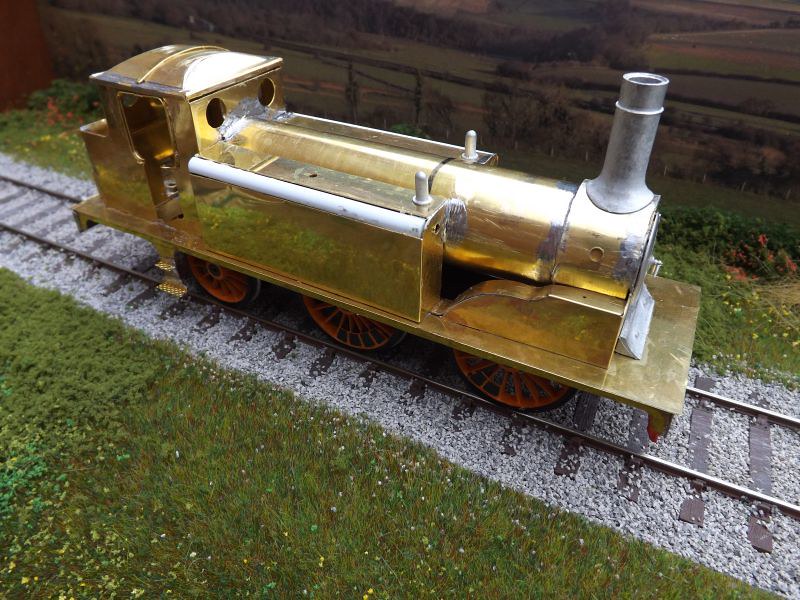
It shows up inadequacies as a loco builder, but never mind! The cab roof is loose, just resting in place so that gap won't be there. The top of the tank where it curves over is a length of Plastruct ....the kit tanks are full height and the instructions say 'form the curve along the top of the tank'. No clue as to how to actually do it, of course! I scored the brass and snapped off the piece that should curve and used the plastic instead, as if the curve isn't correct it's going to look awful.
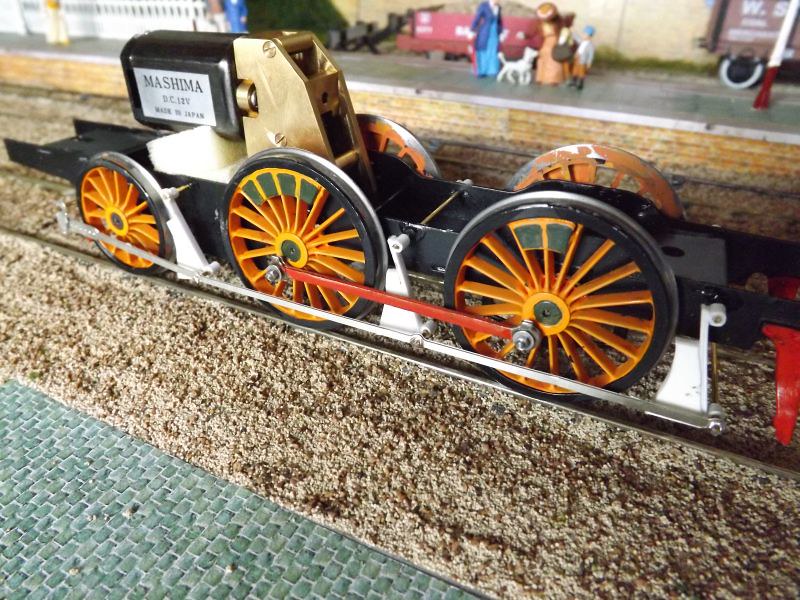
This is the chassis, very neat looking.
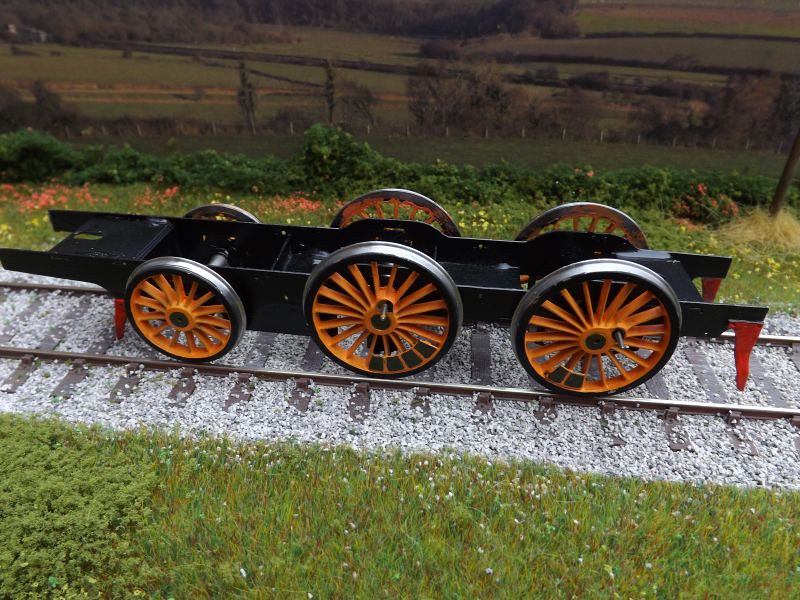
The wheels were brush painted using Tamiya acrylics. I matched the colour to my pictures of Gladstone and to the printed papers I will be using on the engine; it's much easier to do it this way round. The colour was a doddle - one brush of red into a new jar of yellow, job done. Some people won't like it, but it's my engine, so...............
The body had a spray with grey primer...
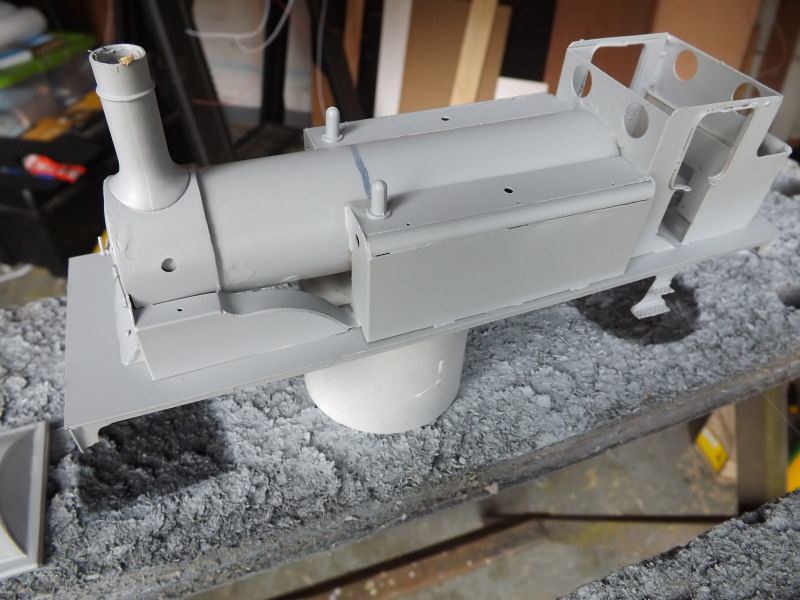
and then satin black.

You'll notice that all the detailing bits aren't there...that's because the paper panels will need to be fixed in place first.
While the paint was drying, I began the artwork. First I did a sheet of simple shapes for each panel, tweaking them until they were exactly the right size; doing it like this all I wasted was some paper and a little ink. Some parts such as the cab sides need a second sheet.
Then one panel at a time I did the proper artwork, simply filling in the outlined shapes:
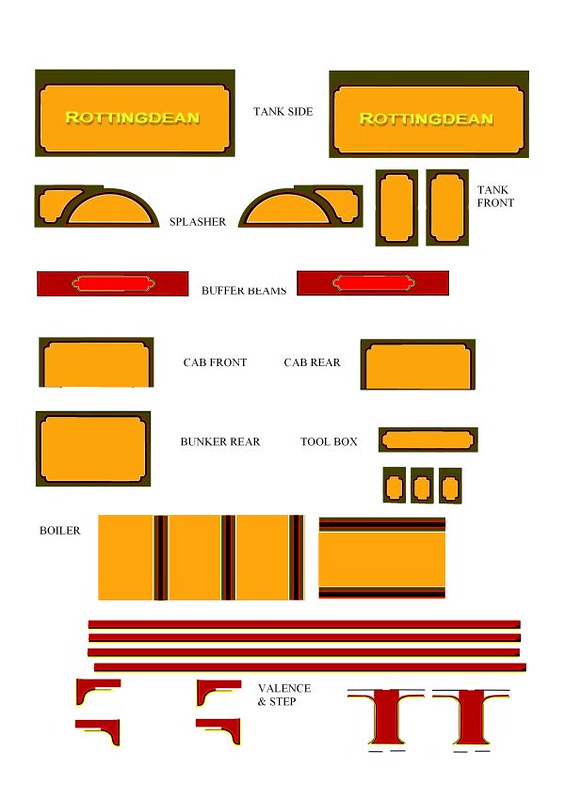
With the black paint dry and the sheet of panels printed off, I could see how well they would look on the engine. I printed the sheet with an Epson inkjet printer onto Epson matt photo paper, as I've found in the past that using gloss paper the ink stays on the surface and is prone to scraching. With matt paper it soaks in and that isn't a probelm.
I cut out the first panel and began to decorate the engine; I wasted more than I used, the artwork needed some ajustment, but none of that matters because it's so easy to do. This is how she is looking so far...
The dome isn't fixed; the colour of the paint matches pretty well.

I'm pretty encouraged; now i'm going to give the panels a coat of Microscale satin varnish to make sure they still look OK before I go any further.
The lack of cab windows, by the way, is becasue it's much easier to cut those out in situ, but not until the varnish has dried.
Peter
-
4
-
-
I always work like that Don; it keeps me interested and means I can put photo's on my website or more than just plywood!
Peter
-
1
-
-
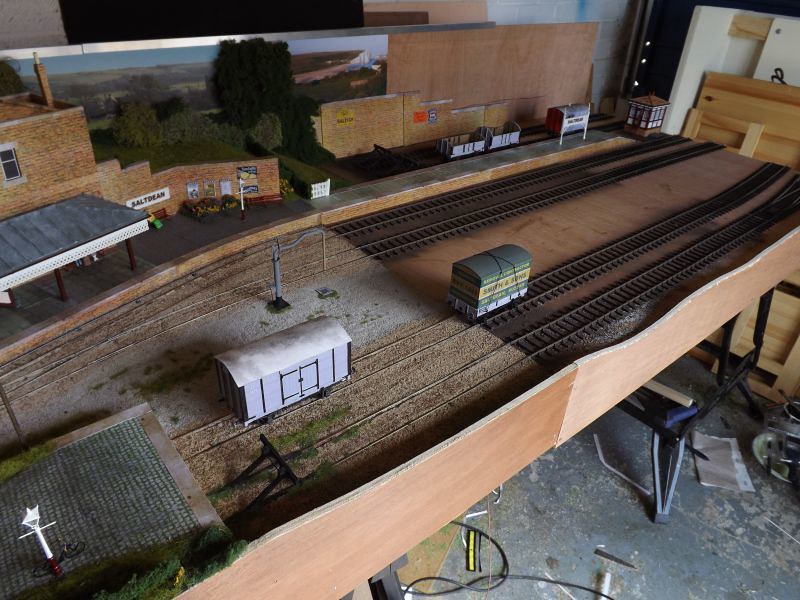
The second baseboard has moved on enough for me to post some more pictures; I won't begin work on the third until I've got some coaches and a couple of loco's built as now I've somewhere to photograph them.

The Gaugemaster backscene needs a spray with Dullcote.
I've removed the picture of the Seven Sisters, not because I didn't like it but because I want it to be bigger and more prominent on the next baseboard.
There will be a crane on the paved area in due course.
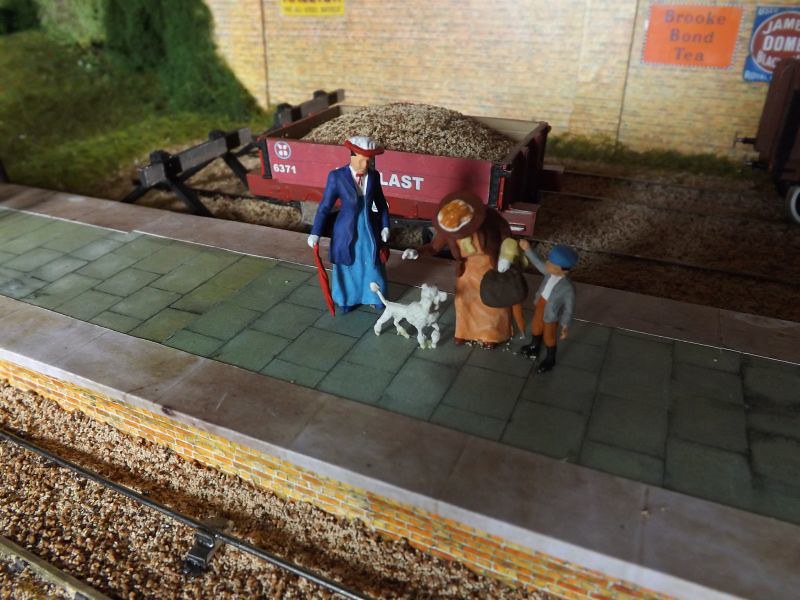
These lovely figures are by Presier; I'm not sure what to do with the Prussian policeman that came with them!
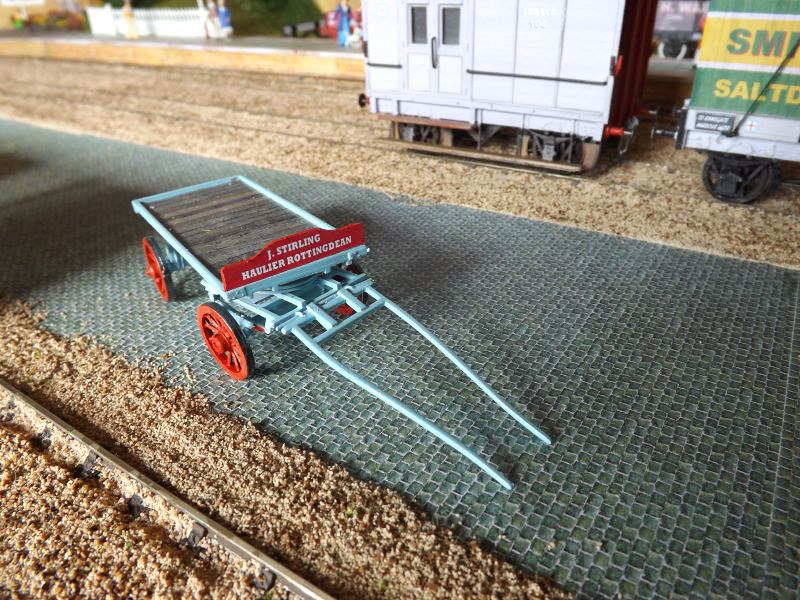
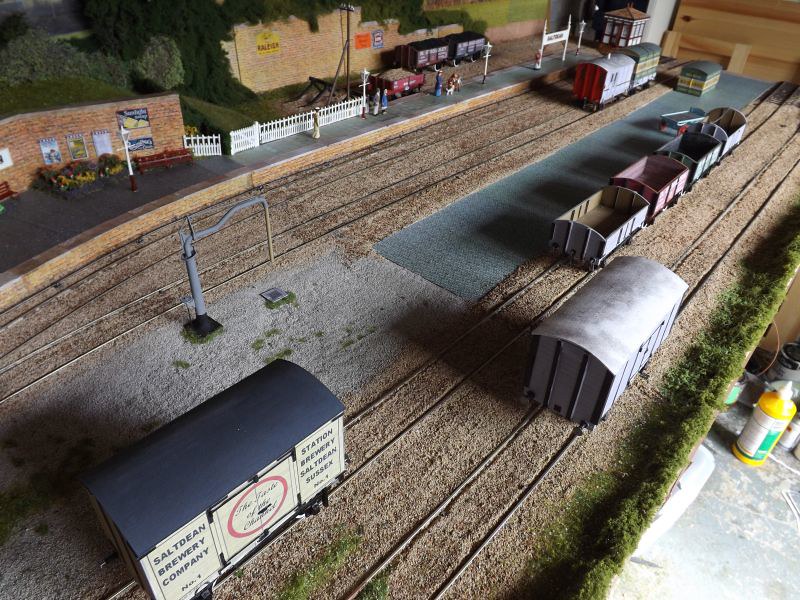
The granite setts are just printed paper. The dray is by S&D models.
Peter
-
13
-
-
All I've got is an inkjet so that's what I'll be using; at home I can mess about as much as I want, any waste is just paper and only the perfect pieces go on the loco. Hopefully this weekend I'll be in a position tro find out,
Peter
-
1
-
-
That's an interesting variation James,
Peter
-
I will cover all that when I start work on the model. The kit arrived today so I should make progress with it pretty quickly now all being well.
Peter
-
You're right Eddie - he built the loco first and then took so long building the tender he'd forgotten exactly how he'd mixed the paint!
A freind of mine went to the museum a couple of weeks ago and photographed it but it's in a glass case stuck in a dark corner so it's very difficult. However, the Brighton Circle have arranged for it to be taken outside on a sunny day to be photographed properly, which will be very interesting.
Peter
-
2
-
-
My understanding is that Gladstone is original, and that when Boxhill was painted at Eastleigh in 1960 they basically copied Gladstone. I'm no expert, though, so that could be wrong.
You can understand why black engines are so popular....!
Peter
-
1
-
-
Speaking as someone who runs a stand but also likes shopping (!) you do have to be a bit carful, Kenton....some people are put off if the trader is too pushy. Most modellers know what they are looking at and if they want to know about it they'll ask. I certainly feel like that when i'm looking at a stand. Usually when I'm trading it's possible to tell if the person needs help or not or just wants leaving alone.
Peter KIRTLEY MODEL BUILDINGS
-
Excellent, that's exactly the sort of thing I've been doing. It looks more than OK to me,
Peter
-
I'm going to try the boiler James, just to see what happens; fortunately a Stroudley boiler was nice and simple. Fingers crossed!
Peter -
I've begun a thread in the 'pre grouping' section of the forum about loco painting which is related to Saltdean, but it seemed sensible to keep the two of them separate. When the first loco, a D1, is ready naturally pictures will appear on here.
Peter
-
One thing I forgot to mention; something I thought about to begin with was using an actual photo such as the spalsher from Gladstone. It doesn't really work, though; you get refections in the image and it wouldn't be possible to do something such as the cab froint like that. It's better to do all the panels from scratch, then they will all match.
Peter
-
As we all know, one of the great attractions of the pre grouping period is the wondeful colour schemes carried by locomotives....however that attraction can wane somewhat when actually faced with reproducing it on a model! I am building an LBSCR layout in 0 gauge, set in the 1890's, which means Stroudley livery on all the engines. That gives me a problem, because I can't paint and line well enough to do it myself, and I can't afford to pay someone to do it for me. Catch 22!
Fortunately, there may be a third way, which is why I am beginning this thread.....over the next few weeks I will be building a kit for a D1 0-4-2T and that is going to be the test bed to see if what I am planning will work in practice. I am going to print the livery on paper.
This was the loco that made me think it might be possible, an old Vulcan Terrier that I recently painted in Newhaven Harbour colours as carried in the 1920's.......
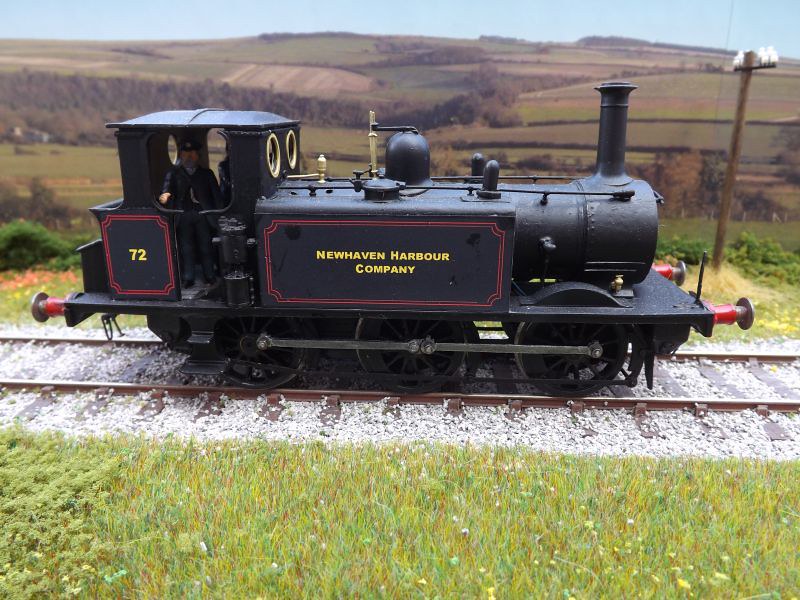
She's no use on the layout, of course, but it was a good way of testing the technique. The tank and bunker sides are simply printed paper, with artwork done on the computer, printed off, cut out and glued in place. The advantages are obvious - no problems applying transfers, getting the spacing of all those letters right, and so on. The downside is that the black isn't really black, so the patches where I've added some paint show up. That was my fault - if I'd varnished the panels as soon as I added them to the loco they wouldn't have scratched.
You may well be thinking "why didn't you use ink jet water slide paper"? Well, I've used it a lot but I really don't get on with it, in the main because the transfers stretch when being slid off the backing paper if they are on the large side like a tank side. I've also had trouble with the edges lifting. I wanted to see if there was an alternative.
It's not perfect by any means, but it worked well enough to encourage me to try something more complicated.
The next problem I had was deciding on the colour of Improved Engine Green, which people seem to interpret in many different ways. Just look at these four pictures of 'Boxhill'....
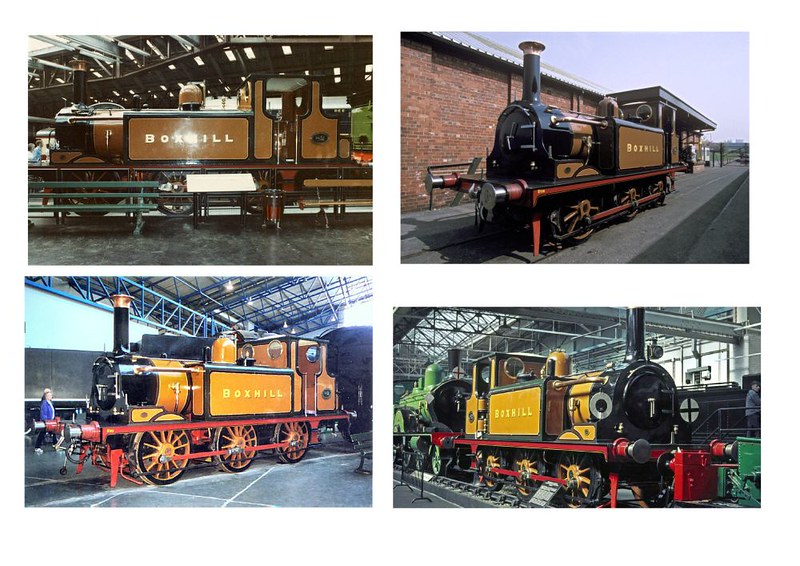
It was painted at Eastleigh in 1960 and hasn't been touched since, but you wouldn't think they showed the same engine. The only difference is the camera, maybe the film, and the weather but the colour changes from yellow to brown. No wonder so many models vary. Then there was the varnish, which browned as it aged, especially in the sulphurous atmosphere of a Victorian engine shed, so that a newly outshopped loco might well look nearly yellow but one nearing overhaul certainly wouldn't.
In the end I did the obvious thing, I went ot the NRM and looked at Gladstone. The pictures I took will be the colour match I use on my models. (On my visit Boxhill wasn't on public display, sadly).
So, I thought it should be possible to produce a panel of LBSCR livery which could be printed off and used on a model loco. Here's my first attempt, with a picture of Gladstone used for colour matching:
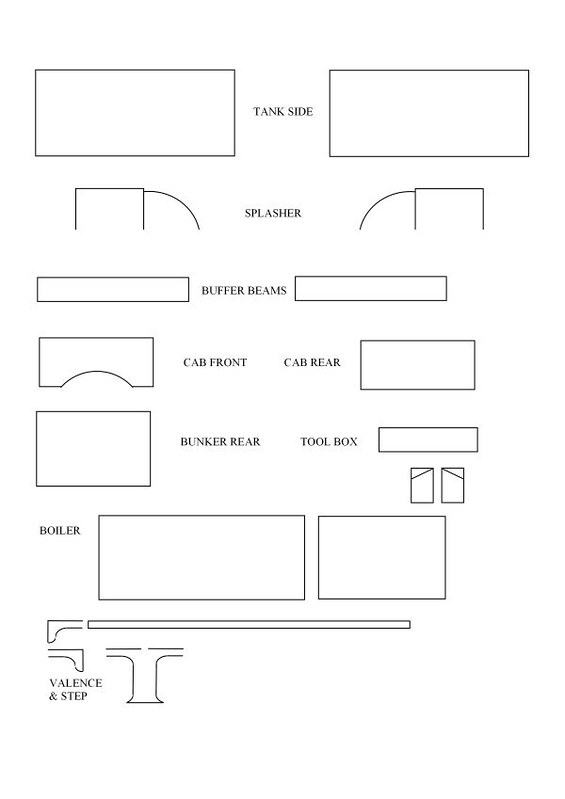
I was encouraged enough to keep going; the next question was how to make sure the panels were the right size. This is best done by scanning a drawing of your loco, rescaling it on the computer to the correct size, and then overlaying your panel onto the drawing like this....it's easier than using trial and error on the actual model.
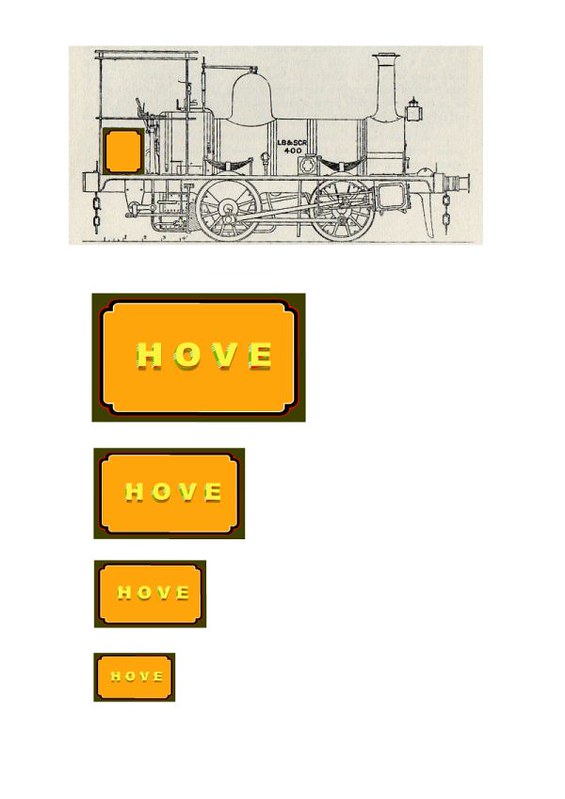
It's much better to work on the artwork nice and big and then reduce it to size once it's finished.
Here's how I built up my panel..... I use Serif Pageplus software which is easy to use and more than adequate for jobs like this.
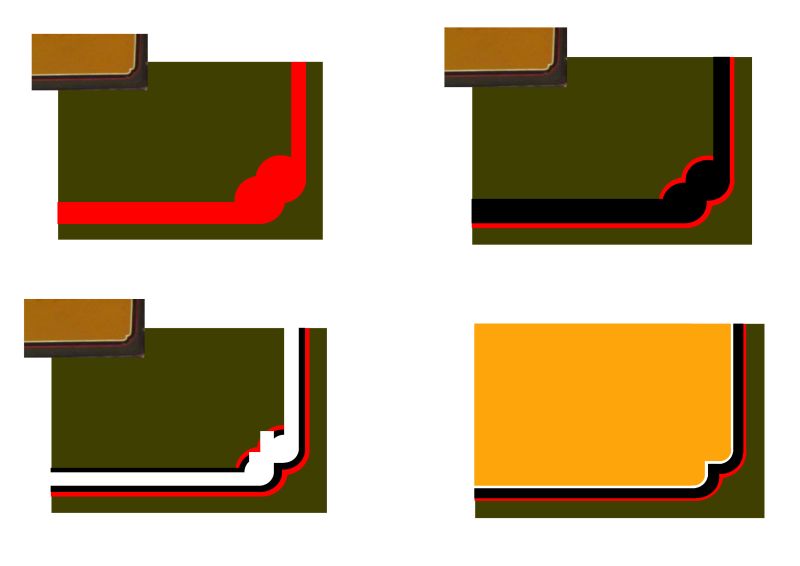
Top left is the first stage; I began with the olive green and worked inwards one colour at a time, building up the scalloped corners using circles. Each new colour overlays the last one, leaving a thin line showing, with the Stroudley yellow coming last. The small picture is a panel from the tender of Gladstone as a reference which was deleted when my artwork was done.
When one panel with a single corner is finished, this is the next stage....
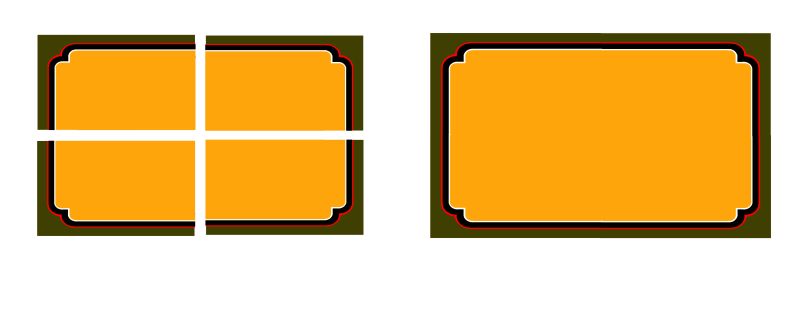
By copying and pasting the image, then flipping the new panels vertically and horizontally, four can be arranged like this, then brought together to form one panel with four perfect corners. Because the new three are copies of the first, the lining lines up perfectly.
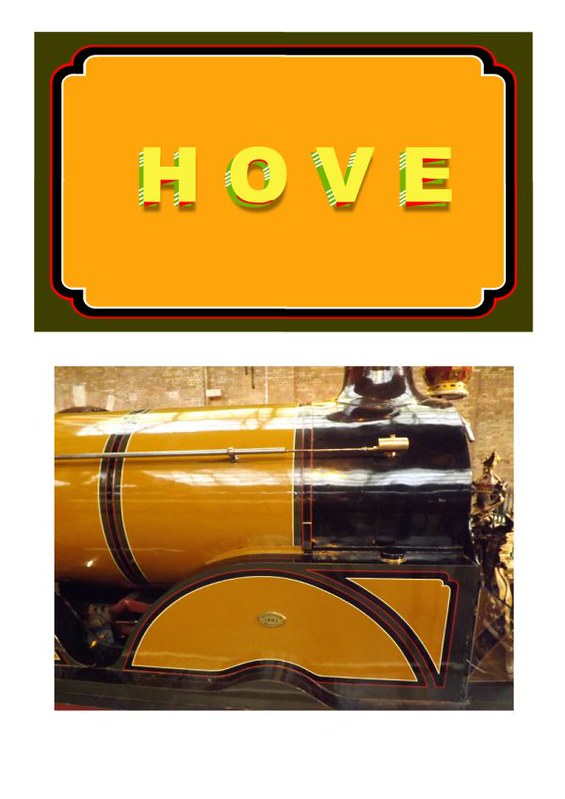
On a Brighton engine there is another stage to be considered - the name was painted into the side tank. My engines are all going to have the shortest names I can find!
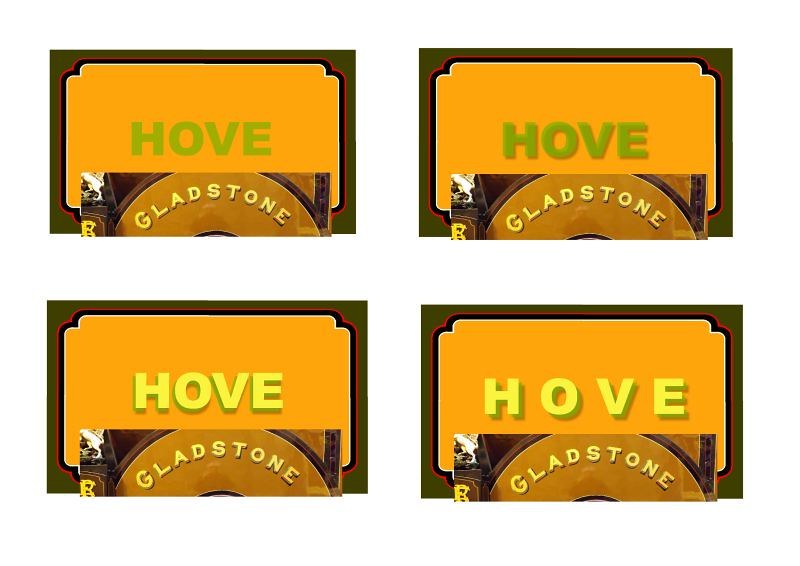
I began with the light green, added the shadowing then overlayed the lettering in yellow to create the shading; it should be gold, but that is one shortcoming of using this method. On the fourth panel the lettering has been spaced out more to give the right look. The picture of Gladstone is again for reference and will be deleted at the end.
Obviously any name can be created, but the long part is adding all the fancy shading the LBSC used which has to be done one bit at a time.
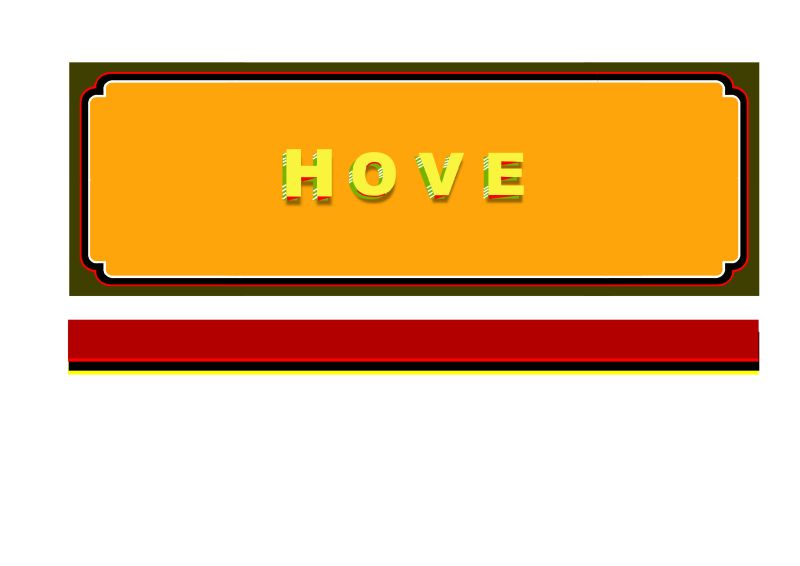
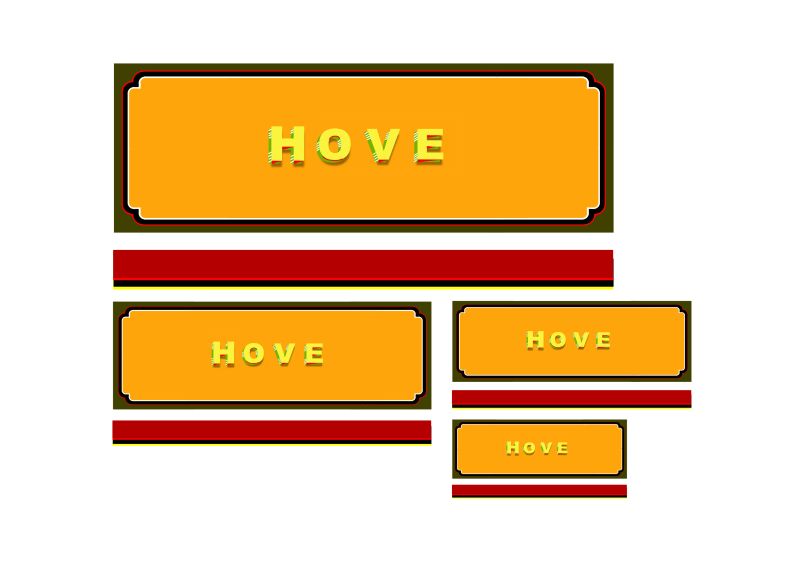
This is the finished panel, with a strip of the claret colour used below the footplate. The first letter of the name is slighly larger than the others. My hope is that I can carefully add a little gold paint once the panel is on the model to give the correct look to the letters.
Of course, once you have finished your artwork it can be reproduced in any size for use in any scale, and the name can be altered as many times as you want. The colour could be changed to suggest an older loco, or a dirty one, there are a lot of possibilities.
I have no idea what sort of loco Hove was, by the way, it was just a convenient name to practice with.
The next stage is to try it on my D1, and I'll post here as it progresses. If it works, the only yellow paint I should need will be on the dome and the wheels...if it doesn't, it's back to the drawing board!
The technique can be used for any livery, of course, and for later loco's with lots of rivets these could be added afterwards using Archers transfers.
Peter
-
10
-
-
You have to trim your range according to what people want; until recently I had over 150 different sheets of building papers, most of which no one but me wanted to use! Now I've reduced it to twenty five, just the popular stuff like red brick and slate roofing. To date no one has complained so clearly it was the right thing to do. I've also stopped doing some kits and accessories with the same reaction - the bottom line is to concentrate on what people are interested in.
Peter KIRTLEY MODEL BUILDINGS-
1
-
-
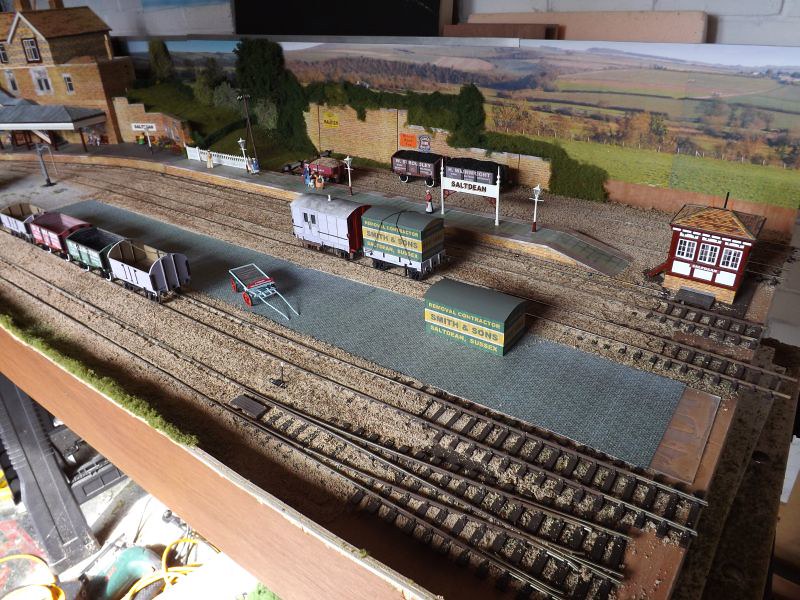
The second board is coming along now, it's about ready for ballasting.
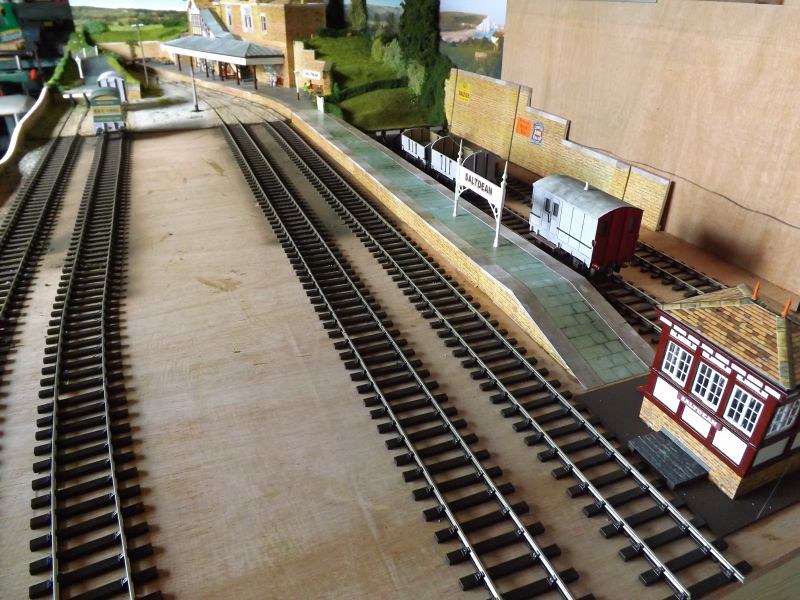
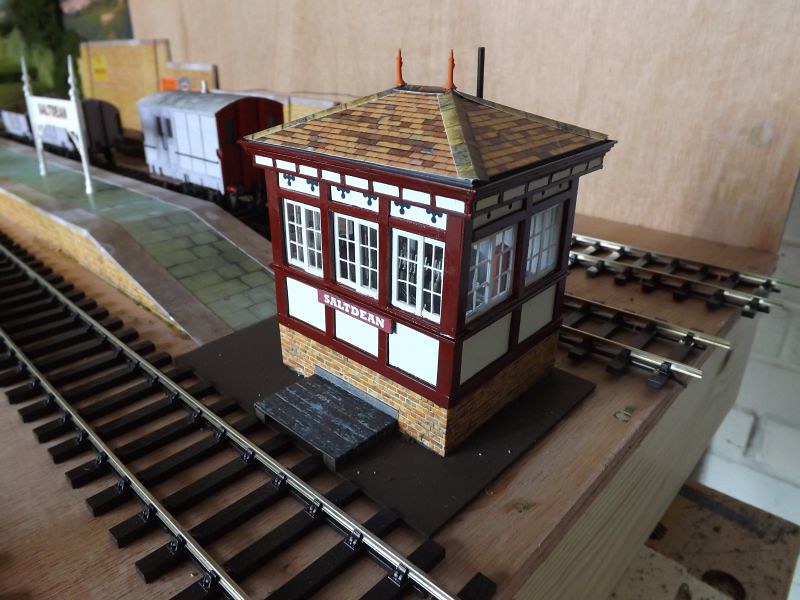
The platform is in and the signal box is in the right position.
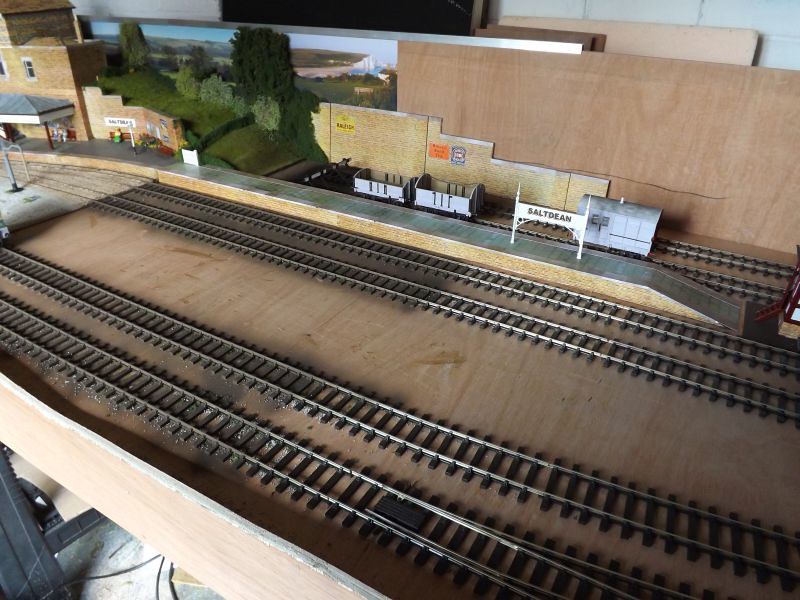
The two wine bottles on the roof have been replaced! The interior is finished now though it's almost impossible to see it through the small windows.
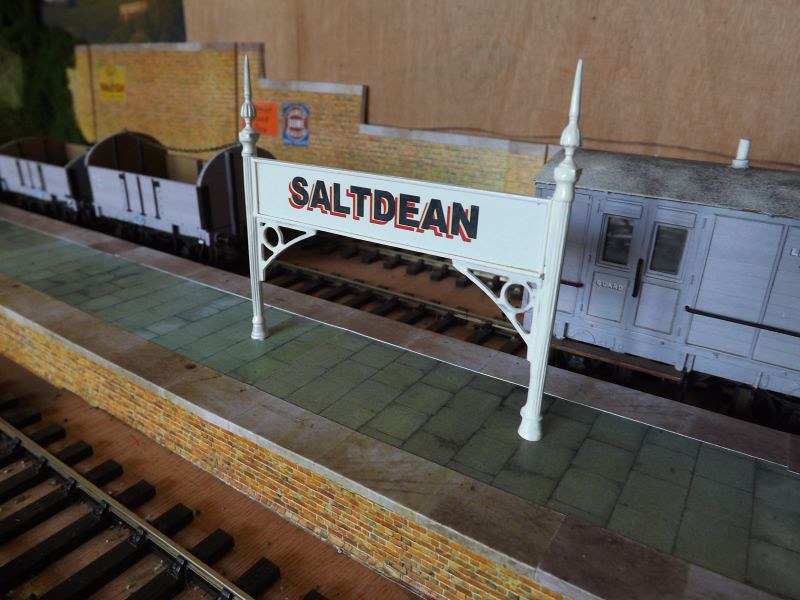
The LBSC had some glorious nameboards in the early days; this isn't finished, it needs another coat of paint and the brackets need to be red. The posts should be square section wood but I hadn't got anything suitable; perhaps the one at Saltdean was an experiment that wasn't developed? The lettering was done in Serif Pageplus on the computer.
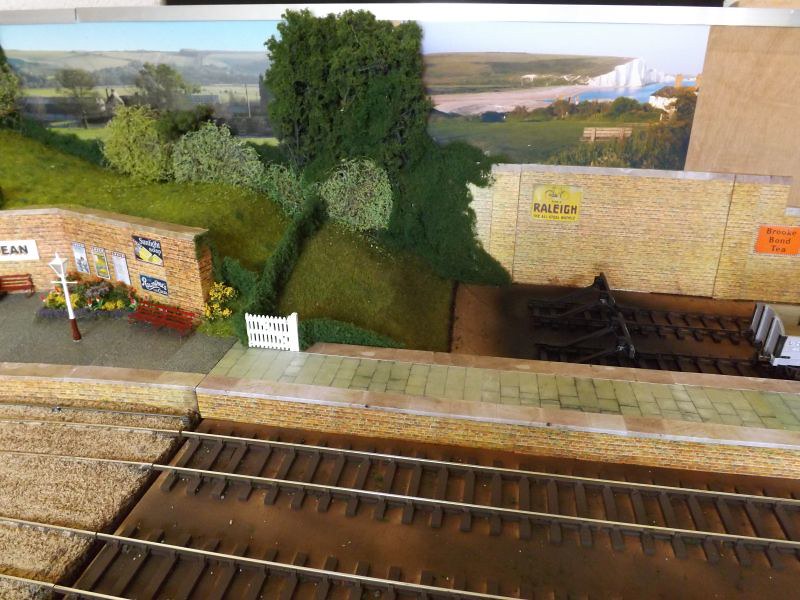
The picture of the white cliffs at Seven Sisters helps place the station on the Sussex coast; there will be more trees to hide the right hand edge. The platform needs a spray with Dullcote.
Peter
-
16
-
-
They seem to be a general design that could be used anywhere Don, it was the farm carts that were more regional.
I've quite a few pictures of Dolgelly station - would they be of use to you? If so e-mail me at peter.smith5547@gmail.com and I'll scan them for you.
Peter-
1
-
-
Thanks Al - I'm pleased you liked it.
Peter
-
I ignore what it says on the box Bill - if it looks right, I'll use it.
We use Andy's seagulls on 'Mers les Bains' and that's 1/32nd...they look just right. If they were on an 0 gauge layout you'd be very careful not to stand underneath one!
Peter

Painting locomotives without (much) paint.
in Pre-Grouping - Modelling & Prototype
Posted
It's a Slater's unit Ian, I only used it because I'd got it here and it saved buying a new one. It's too big really, I had to remove some of the backhead in the cab though fortunately it doesn't show. They do run very well, I've used them before. If I was building it again I'd use a smaller gearbox.
Peter