


LCUT_creative
-
Posts
184 -
Joined
-
Last visited
Content Type
Profiles
Forums
Blogs
Gallery
Events
Exhibition Layout Details
Store
Posts posted by LCUT_creative
-
-
Impressive range so far. The bridge items might prove useful at a later date.
The engine shed could also be adaptable to what I'm after, though finding decent photos online to illustrate what I mean is proving difficult atm (I'm referring to the Lillie Bridge Depot LT steam shed).

Thats about the best photo of the front i've been able to find online, there are better photos around in books etc however.
Further adding to this this sparked our intrest:
Do you know what window type is on the sides? Is it something similar to our standard LCC 04-49?
-
Impressive range so far. The bridge items might prove useful at a later date.
The engine shed could also be adaptable to what I'm after, though finding decent photos online to illustrate what I mean is proving difficult atm (I'm referring to the Lillie Bridge Depot LT steam shed).
Thats about the best photo of the front i've been able to find online, there are better photos around in books etc however.
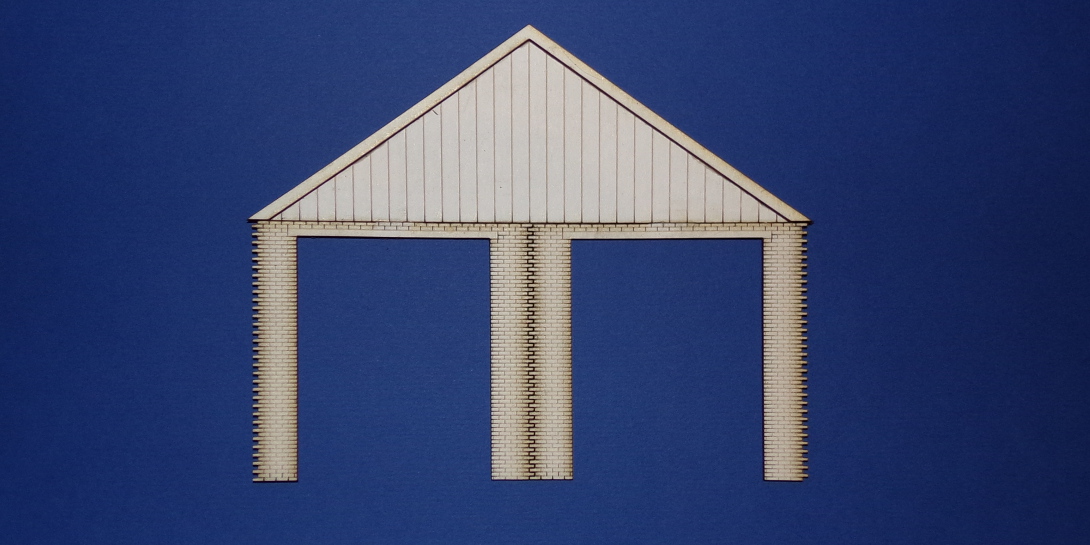
It could certainly be adapted! You would need some gables and roof struts but it shouldn't be too difficult.
-
 1
1
-
-
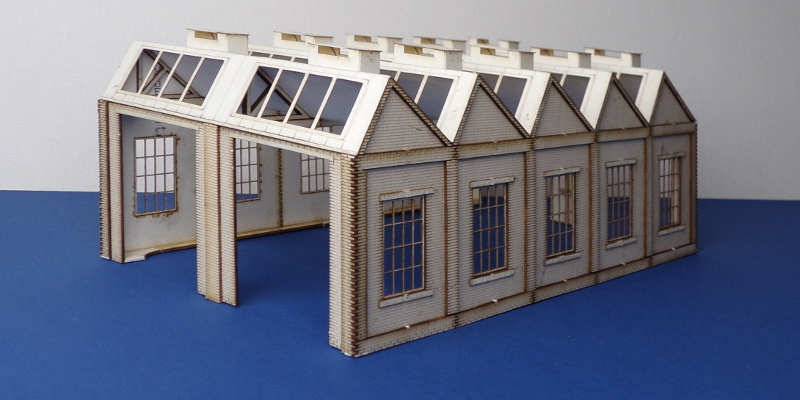
Introducing north light style engine shed
Designed for more modern image railways. Currently available in 4mm scale but 7mm scale version is coming soon!
http://lcut.co.uk/index.php?product=B%2000-29&title=B%2000-29
-
1
-
-
Hi Jakub,
What I'm suggesting is as per the attached modified photo of your door panel. The black bit at the bottom could be left in the door frame and marked "Remove after Assembly".
The problem I'm addressing is that I feel it is essential to get the brick Bond to mesh correctly and fully to ensure the join is as invisible as possible and with my level of dexterity it is proving to be more challenging to do the door section which is less stable than the similar sized windows, for example. It is also possible to over stress the junction between the side and the top of the panel and this would also be helped by the stiffener.
I don't think your instructions are all that bad. Perhaps more emphasis on The Manual & Guide would be useful as I suspect that most people will be modifying your designs to suit their individual needs.
Regards
Thank you for the clarification! It makes perfect sense now! I didn't understand what you meant because I always glue the door panel first and then join it to other wall elements. I never came across this problem because of that. I will see what we can do in that department.
Regarding the manuals. Elements from the main guide I made years ago are now being incorporated into the individual manuals. Which is also what I think you are referring to. I am also incorporating a lot more written hints and tips in them.
-
Hi Jakub,
Another minor issue, now that I am assembling some of your components. I am having difficulty keeping the sides of the doors parallel (in LC-OO-06 for example). Could the design be modified to include a bar or spacer at the bottom which could be cut out after construction? Once everything is glued together the extra rigidity will mean the door sides will remain parallel. I realise it's probably a big change for you to change the masters and update the instructions. Possibly one to bear in mind for the future?
Regards
Ian
Hi Again Ian,
I am not 100% sure what you are referring to (LCC 02-06 station door panel?). We already supply a set of corner and wall supports with the bundles which are supposed to mitigate this problem. The instructions could do with updating and we are slowly working our way through them to bring them to a better standard.
-
Hi Ian,
Thank you for your comments! We already have quins and they are used on one of the buildings (http://lcut.co.uk/index.php?product=B%2000-02&title=B%2000-02). The issue with interlocking and different brick bonds is not only corners but also the elements in the middle of the wall. In our testing we have found out that often the bricks would dislodge themselves when you push the parts in.
That is not a bad idea regarding the window sills. We could do that in future. No idea when it would happen because we would need to modify the window blisters. Thank you for giving use the idea!
Best regards
Jakub
-
1
-
-
The arch as shown in 148?
Perfect!
A short (hopefully) bout of saving-up will be followed by an order for canopy and arch components.
A many thanks!
Kevin
Just for posterity here is a picture of the prototype:
-
1
-
-
The arch as shown in 148?
Perfect!
A short (hopefully) bout of saving-up will be followed by an order for canopy and arch components.
A many thanks!
Kevin
If I understand you right yes this is the 7mm arch. You would need 15 arch units (the arch with embankments is 237mm and without which is what interests you is 216mm). If you are ordering them just put a note through PayPal that you need the modified ones and we will change the arch faces in the packs.
-
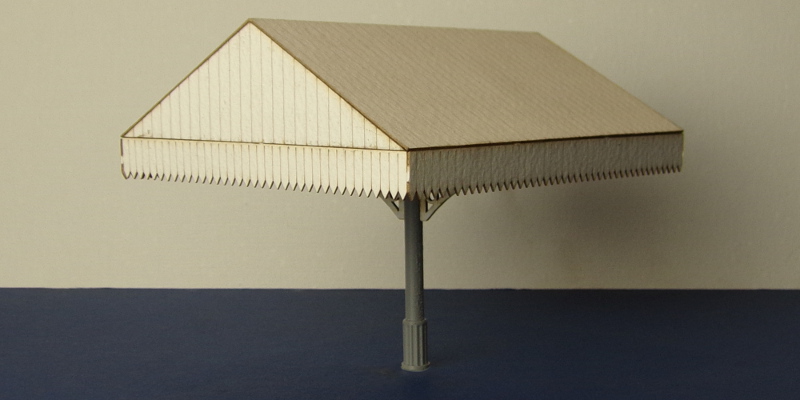
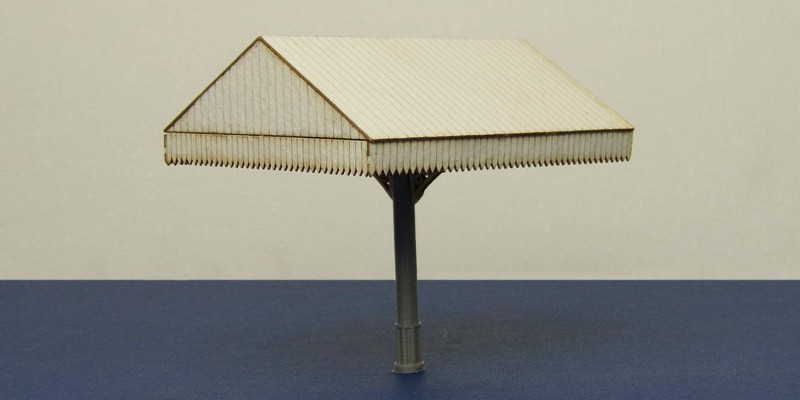
Introducing canopy modules in O gauge:
In keeping with the commitment to provide same range in both 4mm and 7mm scale we have now introduced the 7mm version of canopies:
Middle module:
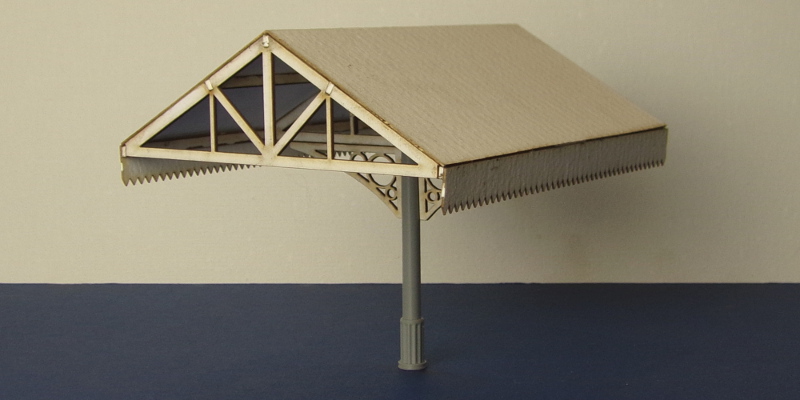
End module:
-
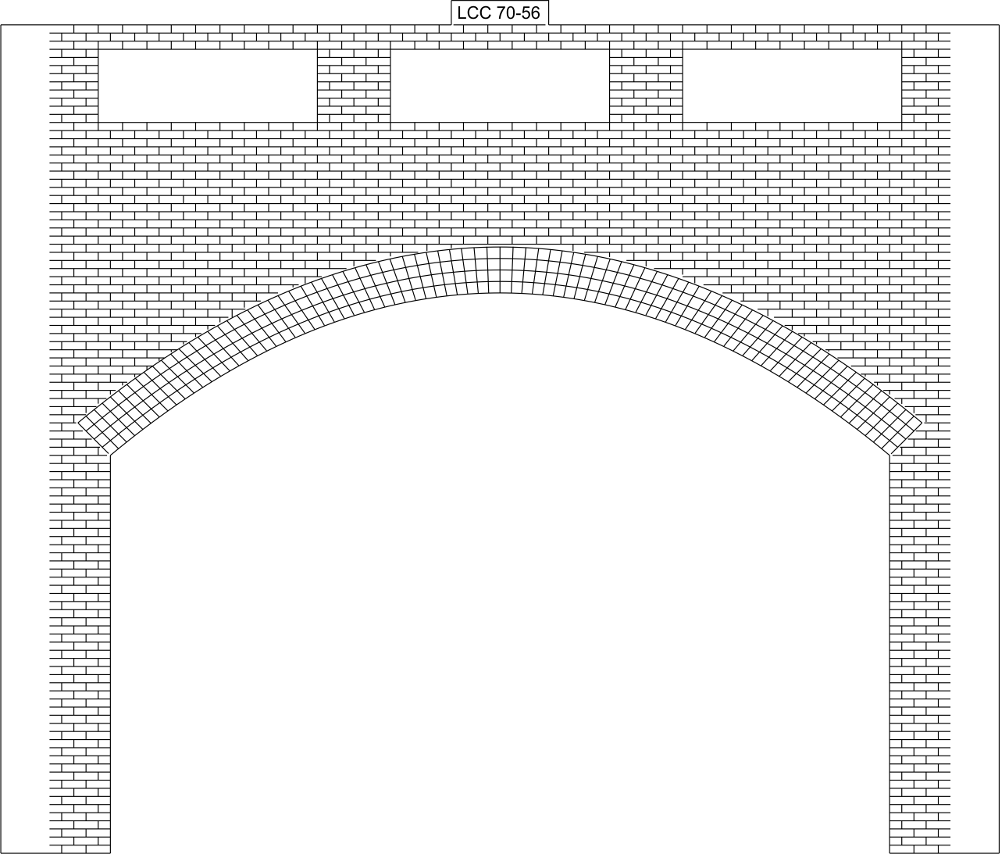
Similar, yes, but above the broader span of the 7mm one, I was looking to see two, three or four panels.
I can't find a picture of exactly what I mean, but here is an extremely wide arch, with lots of panels in the parapet:
Regards, Kevin
Hi Kevin,
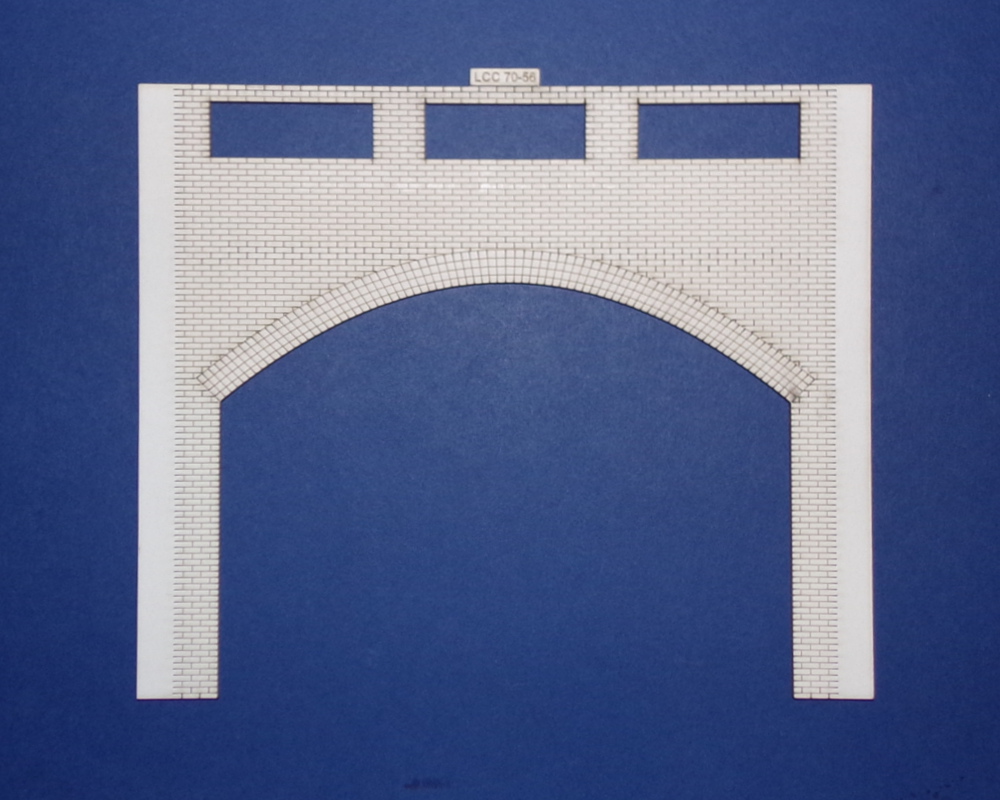
Something like this? With LCC 70-59 at the back (http://lcut.co.uk/index.php?product=LCC%2070-59&title=LCC%2070-59)
-
1
-
-
Hello again, and apologies for using the forum for personal order enquiries, but my email has suddenly decided that it won't accept attachments .......
As well as canopies, it looks as if I will need about 10ft-length-worth of blind arches, in 0 scale, for my new small layout project.
Ideally, to get the look I'm after, the balustrades/parapets would have "blind reveal panels" (if that is anything like the right terminology!) in them.
I could cut all these out, bit doing so would be deeply tedious, and I wonder whether it might be possible to programme a variant version of the arches, with this feature. The sketch attached should, hopefully,explain what I mean.
Thanks in advance, Kevin
Hi again Kevin,
Do you mean something along the lines of the parapets on our 4mm retaining wall?
The retaining wall in question: http://lcut.co.uk/index.php?product=B%2000-25&title=B%2000-25
-
Hello,
Any news on the platform canopies in 7mm?
The way my current plan is working out, I will be in need of c3ft of island platform canopy, and these look potentially very interesting.
Width is also a question. I'm going very minimal with my island platform, c100mm.
Kevin
Hi Kevin, They will be ready in few days. We just need to iron out few last issues and prepare the paperwork for them.
-
Thank you Barnaby! In the case of the small goods shed the floor acts as the structural element. It will ensure the walls all come in at the correct angle and that at the end the main building body will be sturdy and rigid. In the case of other kits such as the single road engine shed you have 2x LCC 70-00 corner support kits and 4x LCC 70-01 wall support kits. Kits with larger roofs are supplied with roof braces, again in the case of the engine shed you receive 2x LCC 74-17.
-
You did that too late! I had to work out what the parts were the hard way, before placing my order at lunchtime! I've just ordered three kits plus an extra support, to make a big canopy for the front of the Scalescenes Low Relief Factory, that will cover the track as well as the platform. I'm aiming to put the pillars along one side, and support the other side on the wall of the building.
Thank you for your order! I do apologise for forgetting to update it, I didn't realise I forgot until you asked about the parts.
-
Hello Lcut I wonder if it is possible for you to produce some of your existing 7mm kits/models but in 1/8 or 3/16 or their metric equivalent but out of MDF?
If so what price impact would that have on the overall cost?
I am needing to create a back scene which will need to be handled quite a bit and it concerns me that the card kits might start to de-laminate.
Best
Unfortunately we are not able to cut MDF that thick on our machines. We have experimented with MDF some time ago and anything above 2mm or 5/64 requires multiple passes to cut through.
-
Do you sell the canopy supports in 4mm as a separate item. I should be rebuilding the canopy for my Padstow station. It may turn out the roof pitch is too great for my purposes. I have to include a skylight running on one side of the roof as well.
All of the parts are available separately. I have forgotten to add the links to the product page but it is now rectified. If you go to the canopy product pages it will list all the parts that are in the kit, just click on the one you are interested and it will take you to that part's page.
For referance:
http://lcut.co.uk/index.php?product=B%2000-28M&title=B%2000-28M
http://lcut.co.uk/index.php?product=B%2000-28E&title=B%2000-28E
-
Will you be doing these in 7mm scale? I might have a use for a couple.
Hi,
Yes we will. We are expecting to be ready with it around February 2016.
-
Introducing canopy modules
With the aid of 3D printing we have been able to develop canopy modules. Staying true to our philosophy the model is modular and infinitely extendible. The canopy comes in two different modules:
Middle module:
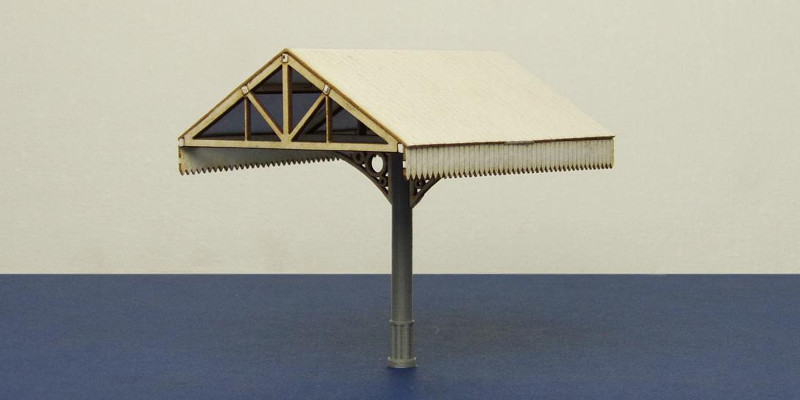
End module:
-
4
-
-
Although the pictures do not do the windows justice, here is a picture of The Duchess Pub I scratchbuilt which "L Cut Creative" custom made the windows for last year. They have opening apertures which were loose parts just requiring glue to fix them in the correct position. I was very impressed with their customer service, willingness to do something special and quick turn around! They made them from a word doc I sent them with a simple table design showing measurements! Exactly the correct dimensions! Thank you L Cut!
Ian Lancaster
Layout Thread "Jencaster"
Hi Ian,
Thank you very much for posting this picture! Its lovely to see the windows now installed and painted. It was a pleasure working on them!
-
Many thanks for the two engine sheds. Very impressed with the speed of delivery.
Next step for me will be painting and plantng in to the layout.
Glad we could help! It looks great!
-
I've used Lcut on the last couple of layouts I have done, and cannot recommend them enough.
I have just had some retaining walls land which Im looking forward to making immensely.
The kits are good quality they go together really well and they take paint brilliantly.
Thanks to Jacub and Co.
Hi big T,
Thank you very much! We are glad that you like our products. As always let us know if there is anything else we can do for you!
-
Introducing station platform with building extension
In continued effort to improve our range we have developed an extension to the already existing platform. The platform with the extension is an easy to customise kit as our philosophy dictates. Also following feedback we are now clearer on the dimensions of the kit in the manual and in our online catalogue.
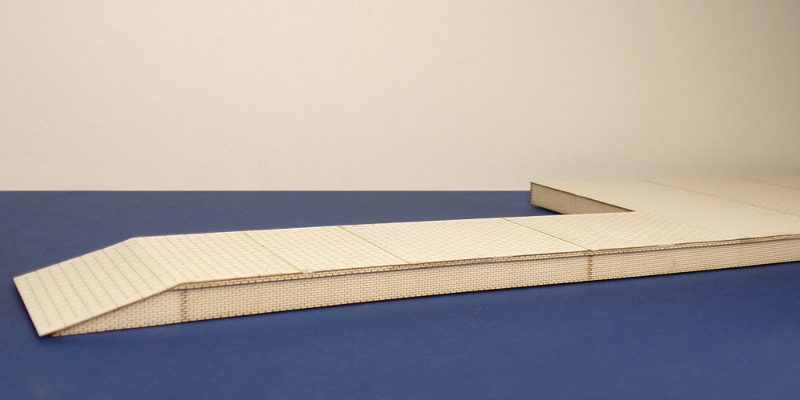
http://lcut.co.uk/index.php?product=B%2000-07A&title=B%2000-07A
-
0. Gauge, Signal Box interior.
This morning, Raymond sent me his photos, of his interior build of the above.
 Lofty 0 gauge box interior build 07 19 15.jpgLofty 0 gauge box(1) interior build 07 19 15.jpgLofty 0 gauge box( 2) interior build 07 19 15.jpg
Thank you David! As always we really appreciate what you do for us!
-
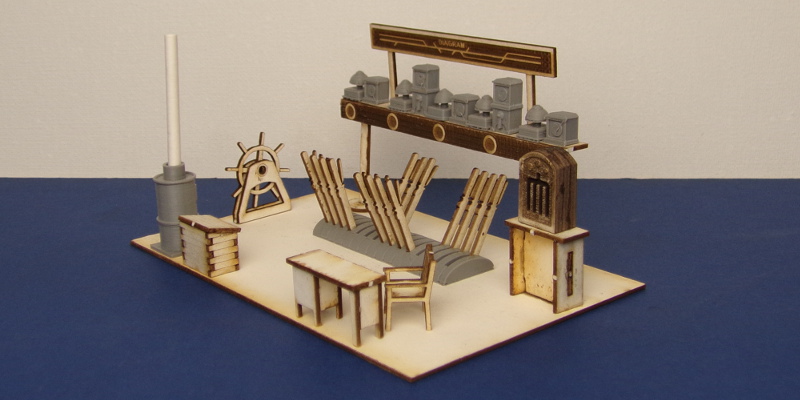
Introducing O gauge signal box interiors
The O gauge mediums signal box interior is now available and it was improved upon the OO gauge interior thanks to the bigger scale. Furniture such as desk and chair are now made with laser cut parts which makes them more lifelike. Lever frames also had an overhaul and are closer to original. Finally, instrument shelf now has more variety with different types of indicators and bells.
-
2
-

LCUT creative
in Smaller Suppliers
Posted
I am sorry but I can't see it on any of the photos. The 16th doesn't show the building at all. The roof angle can always be changed.