
Entry posted by SouthernRegionSteam in Research
595 views
QuoteThis blog entry solely deals with WWII events that happened around the time that Bramble's Boatyard will be set, yet I will only talk about the layout itself in the first two paragraphs below - thus, this post is mostly for my reference, but I thought it might be interesting for others nonetheless; so I have written it in full rather than shorthand bullet points!
Research is absorbing, and despite trawling through unnecessary information and photos that are of little use in terms of creating a model railway, in the case of D-Day, I felt it was important to understand the challenges faced, the enormity of the preparations, and the speed, yet precision, in which everything had to come together. Take, for example, the artificial 'Mulberry' harbours constructed in Normandy. I don't really need to see photos of what it looked like in use, I'll only be modelling some 'small' components, and I definitely could've spared myself from looking at photos of dead soldiers lying on the beach. However, I figured that spending a lot of time researching things would increase the chances that I'd become a better modeller by the end of it; not just because I'll have based my model on actual research rather than guesswork, but also because I'll be more invested in the prototype, and thus have a greater understanding of what needs to be included and the atmosphere that needs to be portrayed.
Perhaps more importantly, I could teach other people the background behind it and open their eyes to what I've modelled, why I've modelled it, and the importance of it. I can also potentially use the research as inspiration for the way in which I present the layout. Whilst I've always modelled my layouts as if they're set on a hot summers day, hearing the horror stories of war makes me think that setting the layout on a rainy, overcast day with dimly lit scenes would make for a unique and relevant proposition. As you'll read later, multiple operations during WWII were beset by weather delays. Setting the tone of the layout using 'weather' seems apt, although it may be that I end up trying various lighting set-ups.
Anyway, this post is all about the research I've carried out, so let's crack on! (Click/tap on any photo to see it on the IWM website)
QuoteThe New Forest coast was positioned in a prime spot to help with Operation Overlord - the codename given to the allied invasion of Normandy during WWII; an event that ultimately turned the tide of war into the allies favour. This was, however, far from plain sailing - to get there, they first had very valuable lessons to learn...
...Disaster at Dieppe
In 1942, Allied governments met to agree and commit to opening up a 'Second Front' to force the German regime to spread its' forces thin and fight on two Fronts instead of one (the original with Russia to the east, and now a second, to the west). To do this, they would need to invade mainland Europe, so an attempt was made to capture the port of Dieppe and use it as a launchpad to spring the offensive from. Unfortunately, it all went horribly wrong...
A false start
This 'experimental' raid had previously been delayed due to bad weather, and in the meantime, two vessels had been lost due to bombing runs; spooking the British into fearing the Germans had found out about the planned attack - after all, 10 000 Allied troops now knew about the offensive, so there was every possibility news had leaked. Indeed, as it turned out, French double agents had warned the Germans that Britain was showing 'great interest' in Dieppe. On hearing this, the Germans went on high alert; increased survellainace patrols spotted larger numbers of landing craft gathering on the south coast of England, as well as increased radio chatter. The Germans were soon bolstering their defences, deploying thousands of soldiers in Dieppe, and adding heavy artillery on the main approach (including in hard-to-spot cliff caves).
Back in Britain, despite great reservations by others about the planned raid, Louis Mountbatten (once captain of HMS Illustrious, and now thrust into the role of Chief of Combined Operations - lieutenant general, air marshal, and vice-admiral), proposed to relaunch the attack 6 weeks later at the same intended location; Dieppe.
Quote"The very last thing they'd ever imagine is that we would be so stupid as to lay on the same operation again." - Louis Mountbatten (Chief of Combined Operations)
Mountbatten was rather inexperienced tactically, and had multiple recent failures on his books. Perhaps unsurprisingly, given that remark!
The approach to Dieppe
Despite objections, the raid went ahead, with the Allied fleet leaving the south coast - minesweepers leading the way. Meanwhile, initial night patrols were carried out by RAF Coastal Command vessels, and, once day broke, by fighter planes. By 4.50am, on the 19th August, the initial landings began. The flotilla was split into 6 separate groups on 6 different beaches; each codenamed with a colour, and further split into two separate sites. Miscommunication meant that Allied destroyers, who saw an early engagement between German vessels and Allied landing craft en-route, failed to come to their aid - they had assumed that they were under fire from the shore batteries.

Above: Dieppe shoreline viewed from a landing craft as it approached; fires are burning visibly in the hinterland as a result of the naval and aerial bombardment. Photo courtesy of the Imperial War Museums: © IWM (H 22612)
Distractions and communication breakdowns at 'Yellow' beach
Further breakdowns in communication occured when one of the 6 groups, No.3 Commando - set to silence one of the coastal batteries on 'Yellow Beach' - were not warned of an approaching German convoy; despite the fact that it was picked up on by radar stations. Some of the landing craft were torpedoed, whilst others were able to disperse the German convoy. This group were set to land on 2 beaches; 6 craft on one of the beaches could not advance, but were also unable to retreat; so surrendered to the Germans. The other group made it to the battery, and although unable to destroy it, managed to distract it long enough to prevent it focussing on the rest of the invading flotilla. However, this group eventually had to retreat due to the superior enemy force.
No smoke, all fire at 'Blue' beach
No.3 Commando were also split into to groups/locations, with a similar objective, this time on 'Blue Beach'. Due to delays, smoke screens planned to hide their assault had already lifted by the time they landed. Already well prepared in advance - with a bunker along the sea wall, the Germans pinned the Canadians against it. Out of 556 men, 200 were killed, and 264 were captured.
Success at 'Orange' beach
No.4 Commando were in charge of another battery, and landed on 'Orange Beach'. This was the only fully successful raid - they achieved their objective; destroying all six 150mm guns. Most of the commando withdrew successfully and safely returned to England.
Off course at 'Green' beach
Elsewhere, the 1st Battalion, another of the 4 groups, beached on Pourville ('Green Beach') undetected. Unfortunately, most landed west of the River Scie rather than east of it! With only one bridge, the Germans were in a superior position; and decimated a large number of the battalion. Some, however, were able to make it across, and made it further inland than any other unit; however, German reinforcements soon beat them back, with the Battalion suffering heavy losses - only 341 made it back to the craft on the beach.

Above: A British Destroyer rescuing soldiers from a landing craft sunk during the raid on Dieppe. Photo courtesy of the Imperial War Museums: © IWM (A 11240)
Radar removal
There was however one hugely successful aspect. Accompanied by a unit of only 11 men, a radar specialist, RAF Flight Sargeant Jack Nissenthall, was tasked with determining the importance of a German radar station on the cliff-top. Due to Nissenthall's specialist knowledge, orders were given that, should he be captured, he would either be shot by his own unit, or take a cyanide pill! Thankfully, Nissenthall, whilst unable to enter the station, crawled (whilst under gunfire), to the rear of the building and cut all telephone cables. As a result, the Germans inside had to use radios; which were able to be intercepted by listening posts in the UK. This gave a fantastic insight into German radar operations - cementing the importance of developing radar jamming technology. An even more remarkable fact is that only Nissenthall and one remaining soldier in that unit made it back to England!
The main assault
The main landings (on beaches 'White' and 'Red') were given support by the four destroyers; who bombarded the coast as they approached. 2 hours later, they were joined by 5 RAF Hurricane squadrons, who not only bombarded the coastal defences, but also set a smokescreen to protect the ground troops. The infantry's armoured support, 29 Churchill tanks, not only arrived 20 minutes late, but 2 of them sank, and 12 became stuck in the shingle. Tank obstacles prevented them advancing further than the seawall, so were instead delegated to lend covering fire for the now-retreating infantry, who were being gunned down at an alarming rate by machine fire from emplacements in the cliffs. None of the tanks made it back to England, and all tank crew were either killed or captured.
The smoke screen meant it was hard for the Major General to see what was going on. Two reserve units were sent in. The first of these were the Fusiliers, and were mainly gunned down or blown up with grenades and mortars. The few that made it to town were pinned against the cliffs, so the second reserve unit, the Marines, were also deployed. These suffered an almost direct demise; their landing craft heavily engaged on the way in. The few that even made it to the beach were killed or captured; with their commanding officer shot moments after signalling to retreat.

Above: A smoke screen is deployed in an attempt to mask the arrival of landing craft, and thus protect them as they landed on the beaches. LCP landing craft can be seen behind as they approach the beaches of Dieppe. Photo courtesy of the Imperial War Museums: © IWM (A 11231)
Counting the cost
All in all;
- 3367 out of 5000 Canadians were killed, injured, or taken prisoner.
- 247 out of 1000 British Commandos were killed.
- 550 men from the Royal Navy were either killed or injured, and the destroyer Berkeley and 33 landing craft were lost.
- The RAF lost 106 aircraft; including some due to friendly fire, and structural design flaws.
- 6 out of 50 American Rangers were killed, with 7 injured and 4 captured.
- The Germans themselves lost a more modest 322 men, 1 submarine, and 48 aircraft.

Above: HMS BERKELEY settling down in the water after being bombed during the Combined Operations daylight raid on Dieppe. It was later torpedoed by the Navy to sink it. Photo courtesy of the Imperial War Museums: © IWM (A 11242)
Recon failure & warship woes
It certainly didn't help that a planned operation ('Operation Rutter'), which was intended to be both a recon on Dieppe and a morale booster for the British public by engaging with German forces, failed to happen. With inclement weather forcing a delay (a common theme throughout the war), the Canadian forces chosen for this operation were spotted by German aircraft whilst awaiting their approach, who then bombed the flotilla. The whole operation was called off before much in the way of valuable intel could be gathered.
A further cause of the failure in Dieppe was the lack of naval support - the Royal Navy refused to send their most prized warships on a mission that was clearly at risk of enemy fire from the air; especially after two of their warships had previously been lost to Japanese aircraft in 1941.
Lessons from Dieppe - the D-Day preparations
With that absolutely disastrous raid in August of 1942 on Dieppe, it became all too obvious that the French ports were heavily defended by the Germans. If the allies were to have any hope of a successful invasion, it was clear they would have to land on remote beaches, build their own port, and use the element of surprise. This posed a significant problem because the beaches in the target area had very shallow gradients; it was approximately 1.5 miles from the beach until you reached water deep enough for large ships to traverse. To successfully land heavy machinery, a floating roadway would need to be designed, built, towed across the Channel, and then assembled - no mean feat; especially given the short timeframe of 6 months to build all the necessary components!
Meanwhile, various other raids began in other countries like Africa and Italy, whilst preparations were underway for the mammoth undertaking that would be the D-Day landings. In February 1944, having suffered bombing runs on various UK cities, the 'favour was returned' by RAF and US Air Force bombers on German cities. Whilst heavy losses occurred on both sides, the Germans were unable to rebuild their supply of pilots and planes as quickly as the Allies - meaning any losses the Germans had now would benefit the Allies when it came to the D-Day landings; as they would not have the airpower to overwhelm the Allies.
In early May 1944, the month prior to D-Day, 'Exercise Fabius' was carried out along the south coast. Over the course of 6 days, 25,000 troops landed at various beaches to prepare them for what was to come. On the 31st of May, the troops, some of who had been waiting in camps for a long time, finally began the embarkation process. Due to the number of troops and supplies involved, this was, just like 'Exercise Fabius', spread out over 6 days.
The 1st of June sees a message (in the form of a French poem) played by the BBC, warning the French resistance to forge ahead with plans to sabotage their railway ahead of the incoming invasion. German military intelligence did however intercept these messages, and realises its significance.
The Artificial Harbours
Mulberry Harbour
Before any of the details of the floating roadways and platforms could be worked out, the overarcing problem was the necessity to create an area of water calm enough to utilise the landing craft and masses of smaller boats in a safe manner, and also to ensure the roadways didn't bounce around too much with every wave. An entire set of breakwaters would somehow need to be made to reduce the height of the waves, and provide a safe refuge. This, as you can imagine, is a colossal challenge; especially when you have to bring all the components across a 100 mile wide stretch of open water, and in a covert and well-orchestrated way!
Various solutions were tested; from scuttling ships, to concrete caissons:
Pneumatic breakwaters were perforated pipes that force compressed air from the seabed up to the surface to dissipate wave energy. It was found that a variation on this using short pipes suspended from a float (rather than fixed to the seabed) was more effective, but despite promising results, this entire solution was abandoned at the end of 1943 after tests revealed that the amount of power needed to generate the volume of air required would be too great.
Blockships (scuttled/sunk ships) codenamed 'Corncob' or 'Gooseberries'(!). These were obsolete ships; both merchant and naval; scuttled to act as a breakwater. These would require a tug for precise final placement, and although they had the benefit of being self-propelled, were no more effective than concrete caissons, and were unpredictable during the scuttling process.

Above: The first blockship to be scuttled, the SS Alynbank. Photo courtesy of the Imperial War Museums: © IWM (A 24167)
Inflatable breakwaters (codenamed 'Lilo') proved to be a viable solution if suitable concrete anchors were used, but were deemed too at risk of damage by gunfire or simply by accidents during use or installation.
Floating cruciforms (codenamed 'Bombardon') were solid versions of the inflatable 'Lilo' breakwaters, each being 200ft x 25ft. These were made of fabricated steel, and were partially submerged and anchored to both the seabed, and also to each other (with a distance of 50ft apart). The resulting breakwater was 1 mile long, and was capable of halving the incoming wave height. Here's a diagram.

Above: Mulberry 'Bombardons' being built in a dry dock. Location is supposed to be Marchwood, but I don't think Marchwood had a dry dock (unless it was a floating one - which, judging by the curved end wall, this isn't!). It looks to me like the same wall design of the King George V graving dock in Southampton. Anyway, the Bombardons are of steel construction, with hollow chambers for bouyancy. Photo courtesy of the Imperial War Museums: © IWM (A 25811)
Concrete caissons (codenamed 'Phoenix'). After a number of revisions, these hollow structures (designed to be towed empty, and then flooded and sunk into position) were built at a few dedicated worksites, with a second row built with a cover after some of the earlier ones were destroyed by overtopping waves. These were jointly designed by the UK and USA, and being 200ft x 50ft (with the tallest being 58ft high), displaced up to 6000 tons of water. There were multiple variations in height to account for the differing depths of water. Material shortages and time restraints meant that walls were often thinner than they should be, and reinforcement lacking; but considering these were temporary structures that had to be available at relatively short notice and in large numbers... compromises were inevitable. Some were also fitted with crew quarters, anti-aircraft guns, and barrage balloons.
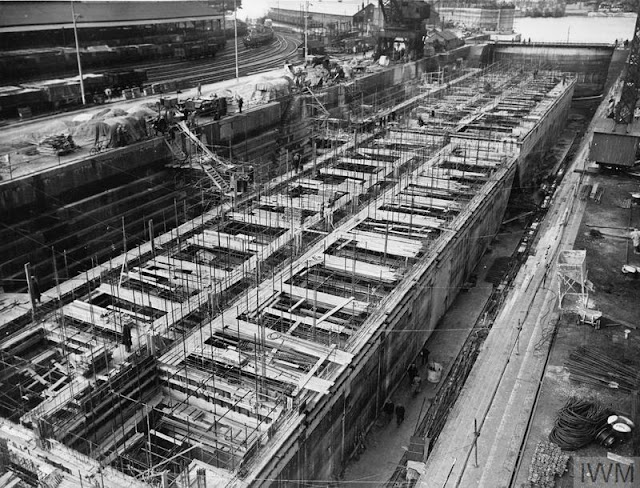
Above: Mulberry 'Phoenix' caissons being built in a dry dock in Southampton, April 1944. Photo courtesy of the Imperial War Museums: © IWM (A 25792) These are shown in the George V Graving Dock, although other sources state that only Bombardons (+ shaped concrete structures) were built here. Note the busy railway sidings in the left background.
An internal struggle between the Admiralty and Tn5 (Transportation 5 - a team of civil engineers set up by the British Army to find solutions for port repairs) came to a head - with the Admiralty saying the floating concrete caissons would be unwieldly and liable to damage when being towed, whilst Tn5 said blockships and other methods were either too unpredictable, or would require too much steel in their construction.
The final set-up
In the end, three of the solutions were used; 147 'Phoenix' caissons (plus the extra reinforcing line), 93 'Bombardons' (using 20 000 tons of steel), and finally the scuttling of ships. However, by digging their heels in and forging ahead with the building of the Bombardons in the dry docks, the Admiralty prevented most of those in Southampton from being used to build the large caissons; resulting in less-than-ideal construction areas being hastily erected in awkward sites. The photo above, however, shows what I believe to be at least 2 of the caissons being built in one of the dry docks.
'Phoenix' caissons
Two sets of Mulberry Harbours were built; Mulberry A by and for US soldiers, and Mulberry B for the Britons and Canadians. However, disaster soon struck as a huge storm on the 18th and 19th of June destroyed much of Mulberry A, though thankfully Mulberry B fared much better. Any salvageable components from A were then used to repair Mulberry B; allowing it to remain in use until it's decommisioning in October 1944.
Here's a fascinating short film showing various components being towed into place.

Above: Mulberry Harbour, Arromanches. A completed concrete caisson weighing 7,000 tons being towed into position in the main breakwater off the coast. Note the mounted gun on top. Photo courtesy of the Imperial War Museums: © IWM (A 24084)
One such site was at Stanswood, near Lepe. Codenamed Q2, construction work began in July 1942, and was finished by October; though initially, like many new hards built in the area, was solely supposed to be used to transport troops and vehicles onto landing craft for the invasion. However, in addition to that role, it now also had to become a worksite for the construction of 6 'B2' type Phoenix caissons. Built by over 700 men, once complete (some 3 months later), they would be launched sideways into the water, and towed to Southampton for fitting out. The remains of the slipways, mooring dolphins, and the majority of the construction area can still be seen today at Stanswood.

Above: Believed to be a photo of caissons under construction at Stokes Bay, Gosport. Visually, it is almost identical to the remote site at Stanswood, however, the slipway (which the completed caisson appears to have fallen off!) is towards the middle of the construction site, rather than the end as at Stanswood. Photo courtesy of the Imperial War Museums: © IWM (H 35554)
Concrete hards
As mentioned, in order to load troops and supplies, new hards (concrete aprons and slipways) had to be built in variations locations across the south coast, including at Stanswood. The photo above also shows dolphins (mooring points just off the coast) for boats; so such a slipway would've been built next to it. The photo below shows one of them:

Above: One of the many concrete hards, this example being in Southampton, being repaired with new sections. These were anchored to each other and the ground below with hooks and wire, with a textured chocolate bar appearance - presumably to allow water to drain easier and provide more grip; allowing the slipway to be used at all tide points for loading both men and machine. Photo courtesy of the Imperial War Museums: © IWM (A 24151)
Floating roadways
'Spuds' and docking platforms
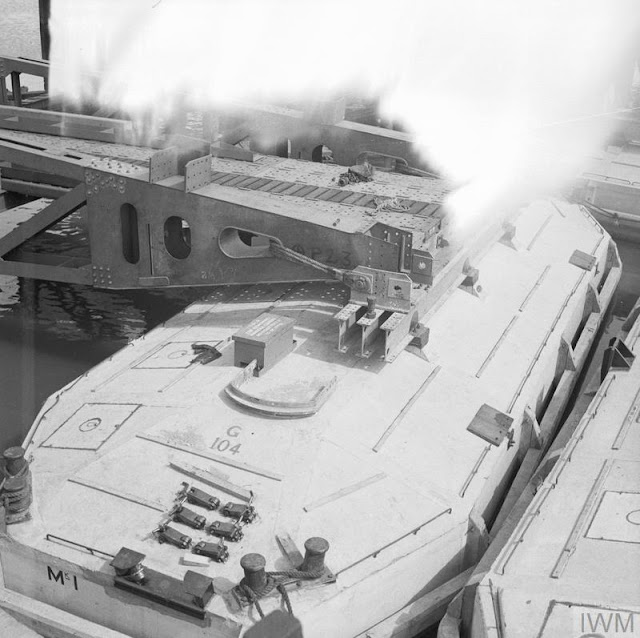
Meanwhile, a mooring and offloading point for ships was clearly needed as well as the roadway. Eventually, a system was devised using 90ft long motorised 'spud' legs that sat on the seabed, together with a floating roadway/pier; each of the latter essentially being 200 x 60ft barges. This design meant that the whole system could be adjusted to deal with changes in wave height and seabed shape. The usual working was actually to partially submerge the platform/barges to provide even more stability, and reduce load on the 'spud' legs.

Above: Mulberry 'Spud' pierhead awaiting towing to Normandy. Selsey, Sussex, June 1944. Photo courtesy of the Imperial War Museums: © IWM (H 39297). Note the telescopic roadway attached to it, which is explained in the next section...
Roadways
The big challenge now was how to build a roadway to link these to the beach itself, whilst allowing it to be flexible enough to rise and fall with the tide. Multiple prototypes were tested; one such using flexible roadways made of timber and canvas and strung together with cable. It was clear that, although the principle of this particular design was sound, more substantial materials would need to be used to support anything heavier than a small truck. Another design using concrete caissons that sat on the seabed, with metal roadways anchored to them was less of a success due to instability issues resulting in distorted roadways, but it was all useful testing.
The solution was to build floating concrete pontoons that supported metal bridge spans, with the span that was attached to the earlier spud construction being telescopic to allow for the necessary adjustment. This is much more complex than it sounds due to the lack of materials in time of war, the rotational and vertical forces applied on the structures by the waves, and having to ensure that the heaviest components were suitable for towing across the Channel!
Above: A Mulberry 'Beetle' - a concrete floating pontoon used to support the 'Whale' roadways (the lattice structure on top of it). Photo courtesy of the Imperial War Museums: © IWM (H 39106) Some of which were constructed along the New Forest Coast; both types at Marchwood, and the 'Beetles' along the Beaulieu River at both Clobb's Close and Buckler's Hard.
Details right down to the type of tread pattern on the bridge decks were subject to intense testing, with all components having to meet load weights of up to 56 tons each - including a full 25 ton single load at any one point (i.e. a tank). After many revisions, the eventual design, tested in Scotland, culminated with concrete pontoons called 'Beetles', and bridge decks called 'Whales'. Other components were also designed, built, and tested; such as hinged pontoons to enable landing craft ships with ramps to offload easily, and intermediate pontoons so that multiple pier heads (those with the 'spud' legs) could be connected together.
On top of all that, a shortage of steel due to the war meant that most were built using Ferroconcrete (steel reinforced concrete panels), with the steel-only variants often adapted with their own 'spud' legs, and reserved for rocky areas.
Here's a great website showing diagrams of the floating roadway and spud pierheads.
Anchors
All 'Beetles' were connected using a brand new lightweight anchor; designed by Allan H Beckett. These, called 'Kite anchors', had strength-to-weight values unheard of up until this point, and were connected to the 'Beetles' using steel cables. The design of the anchor meant that instead of dragging along the seabed in times of overload, they would dig themselves deeper into it. They were so effective that most remain where they were first used to this day!
The lightweight design of these anchors meant that small boats (SLUGs - Surf Landing Under Girders - so named because they towed small barges under the floating bridges) could be used to carry, position, and offload the anchors and cables in the tight locations where they were needed. Some of these boats might have been built in Husbands Shipyard, which I had previously talked about in other entries - although due to direct hits in an air raids in 1941, I can't be sure as most records were destroyed. I do know that wooden minesweepers were built there for the war effort, and that Camper & Nicholsons, a luxury yacht builder, built some SLUGs at their premises in Gosport.
All in all...
- By the time the Mulberry Harbours had officially been closed in October 1944, over 39,000 vehicles and 220,000 men had been landed.
- Approximately 40% of all towed Mulberry Harbour components were lost en-route - due to either weather, mines, or U-boat attacks.
- On Mulberry A, the storm of 19th - 22nd June destroyed their piers, 20 Phoenixes, 7 blockships, and 100 small craft. This high damage number was due to the site being more exposed, the blockships not being sunk in the correct places, and the failure to take precautions against the storm. The British Mulberry fared better:
- On Mulberry B, the storm of 19th - 22nd June destroyed many Bombardons, 5 Phoenixes, a few damaged piers, and it sunk 250 small craft.
- Mulberry B had unloaded 40% of all British stores by the end of August, although this decreased to 25% by October.
For a better, more comprehensive look at D-Day, this is a great guide to digest.

Above: Mulberry 'B' harbour at Arromanches. Note the long lines of 'Whale' roadways, located on top of 'Beetle' floats. The 'Spud' pierheads can also clearly be seen, as well as an armada of various vessels. On the right of the image we see a line of what looks to be block ships and 'Phoenix' caissons. Photo courtesy of the Imperial War Museums: © IWM (C 4626)
The D-Day landings and Mulberry Harbours ultimately paved the way for a fairly reliable and much needed supply route for the allied American, Canadian, and British forces. With the two Mulberry Harbours (at least until the devasating 3-day storm), the allies could attack on two fronts - when the British became bogged down in Caen in the following weeks, the Americans could push forward and encircle the Germans.
This colossal undertaking and impressive achievement would not have been possible without the requisition of boat yards in the run up to, and during the war. The New Forest coast and Southampton areas in particular were crucial to the construction of the Mulberrys, the embarkation of troops, supplies, and machinery, and ultimately the success of Operation Overlord as a whole.
QuoteI hope you found this blog entry informative, even if the modelling side of things is severely lacking! It hopefully goes to show why I was so keen to properly research the run up to D-Day, and thus understand the effect it had on the area to be modelled. Next time, I plan to focus on the New Forest coast specifically, as there is more to be learnt and understood with regards to the specific role it played, and again I'll be sharing more photos from the IWM collection; particularly of Marchwood Military Port - which will be crucial to actually modelling the D-Day preparations in 'my' fictional boatyard.
Edited by SouthernRegionSteam
Added links, fixed some typos.
-
 4
4
-
 4
4
-
 2
2


4 Comments
Recommended Comments
Create an account or sign in to comment
You need to be a member in order to leave a comment
Create an account
Sign up for a new account in our community. It's easy!
Register a new accountSign in
Already have an account? Sign in here.
Sign In Now