

londonbus
-
Posts
143 -
Joined
-
Last visited
Content Type
Profiles
Forums
Blogs
Gallery
Events
Exhibition Layout Details
Store
Blog Comments posted by londonbus
-
-

Time travel is a good explanation. I can track from 10am to 3am the following morning in the state you describe in very short order. However I am unable to travel back. Table has been set and cleared up in my absence.
-
 1
1
-
-
Very nice. I used to use the Decalfix and powders routine and liked the resulting rough finish (as supposed to smooth!) But stopped doing it recently. Time for a review. Thanks for posting. Great result. T
-
1
-
-
Thanks - Vallejo is my preferred medium and was looking for this information! Much appreciated.
-
 1
1
-
-
...If you’re using electromagnets, which are operationally preferable, you’ll certainly be doing a bit more hacking about under the tracks!
Thanks for the positive comments Chamby... The uncouplers were certainly an afterthought and there has been so much to think. The Kadee magnets are unsightly, but I suppose could to some degree be partially disguised with weathering. Not ideal though. I’ve bought some 3mm x 3mm neodymium magnets, but haven’t had time to experiment. Off to Warley next weekend so will no doubt purchase one of the Kadee electromagnets for a trial before I settle on the final solution. Current thinking - normal Kadee magnets (or the neodymium) for the storage sidings where the cosmetics don’t matter, and electromagnets for the station area. I’ll need at least 10!
-
Thanks Corbs, on couplings the stock is mainly with the NEM pockets, however a reasonable amount of early stuff, already ordered 2 x bulk packs of standard whisker couplers and the corresponding draft gear boxes. Yet to be fitted. Have tried the NEM Kadees #17, #18, #19 and #20, the closest coupling I can get (and without buffer lock on the non-scenic 3rd radius curve) is a combination of 1 x #17 connected to 1x #18. I will experiment with 3 link coupling, Sprat & Winkle, some 3D printed NEM 3 link ones, all the proprietary ones and will knock up some hook and loop ones - all in due course, trying to focus on getting the track down, wired up and tested, i’m far too easily distracted!
On turntables, there are two on the layout, one in the station area and one in the storage area. I have a Heljan already which will be used in the storage area. It’s still boxed but thanks for the comments, it’s a bit too “continental” looking for use in the main scenic section which is why (cough) i’ve Just ordered the ADM turntables version with detailing which is a very close match to the actual TT at Leicester C. This is expensive, but the reviews are exceptional and it really looks spot on. By far the most expensive single item on the entire layout.
Mojo is currently high to get more work done, it always is when i’m travelling and not at home.
-

I just found your “blog” here, but have been following your Flickr stream for quite some time. Nice subtle work and a reminder that less is more with weathering.
-
Hi Tremayne.
This is looking good. I especially like the way you've been able to angle the boards to fit in the loco servicing area.
Don't forget to leave enough space on the baseboard edge for the Passenger South Signal Box!
Hi Chamby, thanks for your comment! it's taken quite a few hours (understatement) to get this track plan as close to the original using proprietry pointwork. The elevated trackbed is in place but the area in front of the station will also be modelled taking in Bath Road etc. So the South signal box will be modeled - found a great colour photo on " The Jeyes' " Great Central Flickr Photostream from the road side and it shows the detail of the signal box supports:
https://www.flickr.com/photos/108977492@N02/38011168364/in/album-72157687941513193/
-
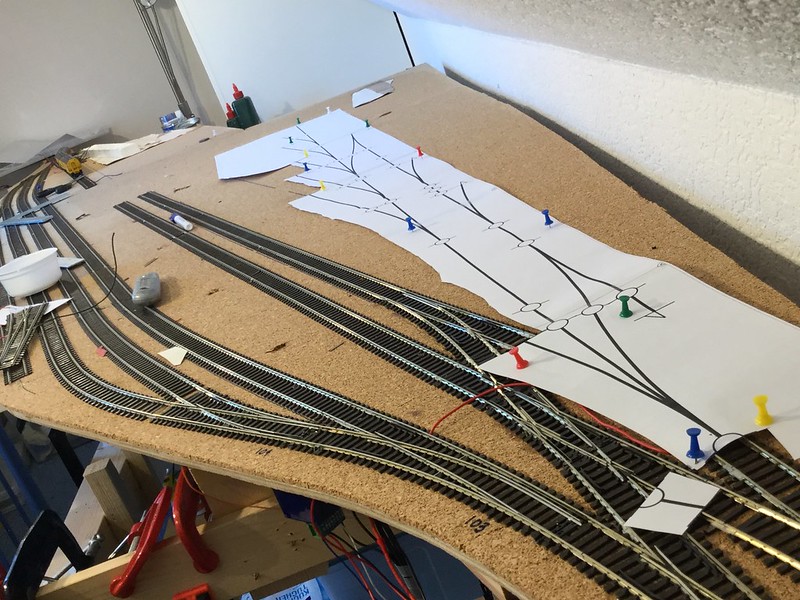
Had enough for the day, I had to spend an hour or so on Anyrail as I had reduced the track centre to centre measurement to 4.5cm on the down lines. But I hadn't changed it on the software. The up lines were still set at 5cm centre to centre. So having had a problem with the allignment of the curve on the down, I decided to do it right so I could print the pointwork off. The result of this was in fact that the distance from the 3-way point until the point for the up fast and up slow lines increased by 25cm. I can fit a 9 coach train in the down main platform but only an 8 coach on the up. However the width of the platforms had to be the same.
The perspective is a bit misleading, I can get 4 coaches and an engine in the south bays. And a 3 car DMU in the northern bays. But the area for station buildings sandwiched in the middle is much smaller as just the platforms if built to scale would be 5 meters or nearly 17 feet long.
Packing up for the day.
-
Nice to see how this is progressing, my own DC version of the GC at Leicester is also progressing slowly, most of my track is in place and I am building the station canopy and buildings/platforms, I am yet to add the turntable/parcels office area.http://www.rmweb.co.uk/community/index.php?/topic/124304-the-great-central-in-and-around-leicester-195565/page-1
I'm now following you and well considering this project has been on the cards for about 10 years you're significantly ahead of me!
-
Just a quick update not warranting a new post. Some more progress on the southern end. Track laid but still need to drill the droppers through and wire up a new Bus wire from the PM42 as the up lines are on a different zone to the down lines. This means that if there's a short on the down lines it will not affect the running on the up lines and v.v. The storage sidings will also be likewise wired and the loco storage and turntable will be the 4th zone.
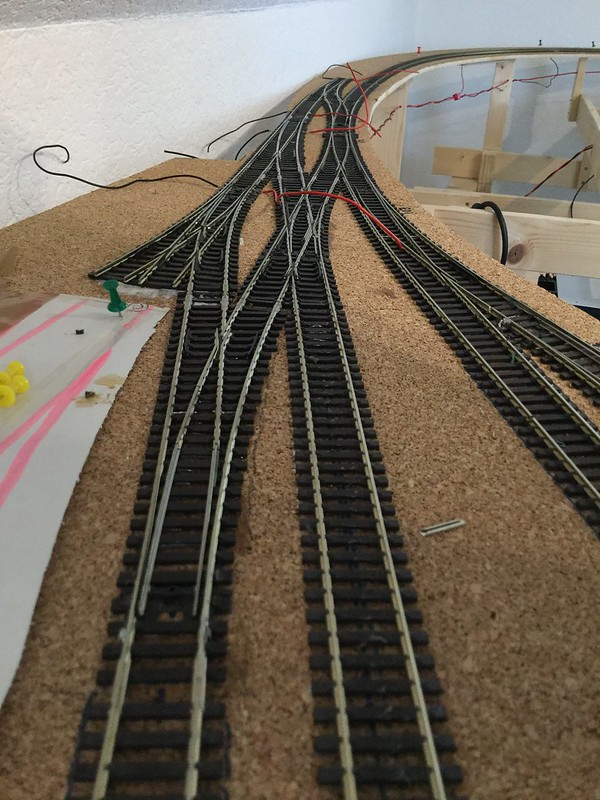
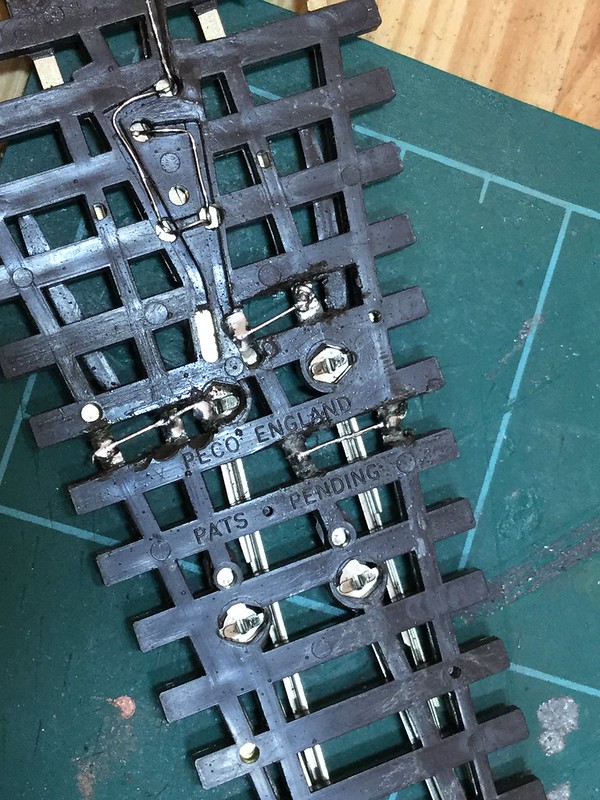
A little bit of reading up on the Peco Insulfrog 3 way point resulted in a little belt and braces approach. I cut out some webbing to ensure contact between the + and - rails. It seems these were reliant on the blades making contact which doesn't seem very rugged to me. So I soldered them together. 1st try with a 3 way so we'll see. Lower one is new and the top one has the webbing cut away.
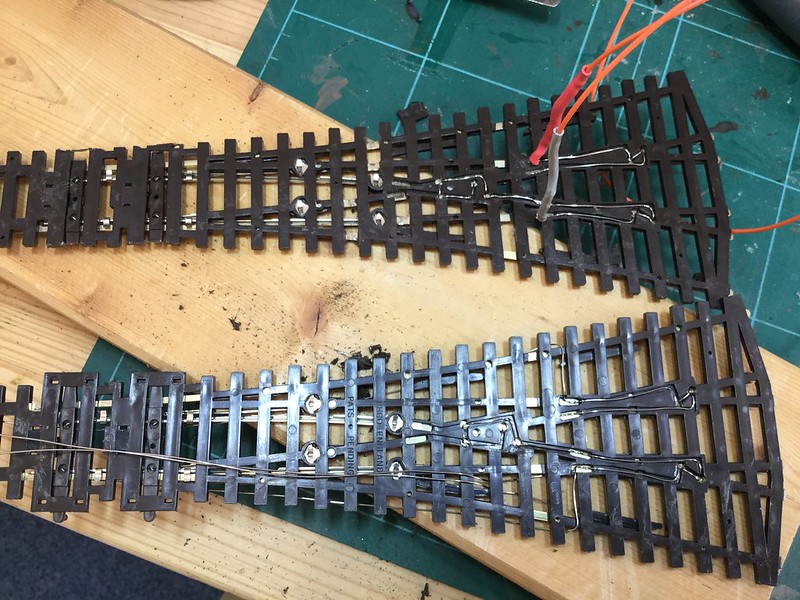
And this is after i've soldered a wire connecting the + rails and independently the - rails (obviously not the + to the -!) The 2 x frog polarities will be changed over from the 2 x Cobalts.
-
Hello Tremayne,
good to see some progress on your layout.
I wish you and your wife a happy easter.
Markus
Thanks Markus, it's slow work but getting quicker (it's all relative). Best wishes for Easter!
-
Hi Markus, seems far away from your Scottish layout! Nice pictures.
-
!!! No earthquakes yet, although 3 inch screws now secure everything well into the concrete, supported below as well. Could've been a really expensive and frustrating error.
Markus, thanks for the comment, making some progress, APT-E is still boxed up though, work, family and usual stuff all still keeps getting in the way as ever. But once the electronics boards are up I hope to complete the track laying by the end of Summer. You must let me know if you're ever near Frankfurt.
-
Hi Iain,
In the end I went with cork. I did find the Depron quite soft and actually the different in noise was not noticeable. I also found a very cheap bulk source and have a very long roll which has covered the entire baseboard. I was at a large layout recently with cork as the base and it was tacked down, not glued and the noise was noticably lower. I think the key is the noise being transferred through the ballast and glue so i'm using Copydex. It stinks, but is more rubbery so doesn't conduct noise quite as much.
-
Looks like a good trip despite the weather. I went up to the HSB in Feb I think, lots of snow and spent 2 days travelling about two thirds of the HSB route but not Nordhausen. So need to organise another trip! Nice video. Thanks for posting. T
-

This sparked off a memory from the 1970's of a similar steam loco somewhere in a park in Chelmsford! Even the colour seems right. But I could be very wrong.
-
Hi Markus, not yet it's still in the box - but I'll post a video when it can do a lap of honour.
-

Just found your thread and enjoyed reading through it. Looking forward to seeing continued progress and more pictures of the shed "in use" with the various paraphernalia.
-
Hello Farren, It was also (just) before I was born, and I used to walk the trackbed in the 1970's south of Woodford Halse - Helmdon. Like many of us fascinated by this railway I have browsed the books many times, however as a belated Xmas present just bought George Dow's "Great Central" - well one of the volumes at least. Keeping an eye out for the other two! I too hope to see trains running soon. Now I'm happy with baseboards I'm focussing on getting track down and organising the Power districts, detection zones, point motors etc.
-

Great photos Dom, coincidentally without knowing the content of your entry, I have just got off an ICE train heading to Leipzig but am in Magdeburg. The tram on the far left on the Museum photo is similar to the trams in Yevpatoria in Crimea. I travelled there frequently, and only after a few years did I notice that there was a small sign that had been revealed under peeling paintwork that mentioned Zwickau.
-

Just read the whole thread, drawn in by spotting this backdrop over my first coffee of the day. Overall standard is very high, really set off by this backscene. Shouldn't there be some sheep?
-

Very timely, i've just unpacked about 50 of the old Hornby MGR wagons from storage today ready to bring back home with me. Improving them is a job on the ever longer to do list.
-

What a shame, here in Germany everything is not allowed unless specifically allowed, the government has banned Google Earth because the data is stored on a server in the USA and if there were Noch models of people sunbathing naked then it would probably get the go-ahead anyway. You could always go on strike.
-
Good job they haven't invented DCC smell. That pig pen looks ripe and the signalman is probably holding his breath. Very nice layout.


More Hopper Weathering. The Maskol & Hairspray Way.
in Leicester Central, DCC, OO
A blog by londonbus in RMweb Blogs
Posted
It took a bit of experimenting, but that shouldn’t put you off. The main challenge is getting the resolution high enough with the system i’m using:
Hope that helps.